MOS Pack Grande backpack review

REVIEW – A while back, I looked at the first iteration of the MOS pack. One of the things I thought needed improvement was the space allocated to each pocket. I think MOS is reading our posts, because they have just announced two new packs, the Grande and the BlackPack that each offer ways to get more room for your stuff, without compromising the other unique features they offer. I’ve been carrying both of these packs for a while (alternating, not at the same time!) Let’s look at the Grande first, comparing it with the original iteration, as well as the difference between these two.

Note: Photos may be tapped or clicked for a larger image.

What is it?

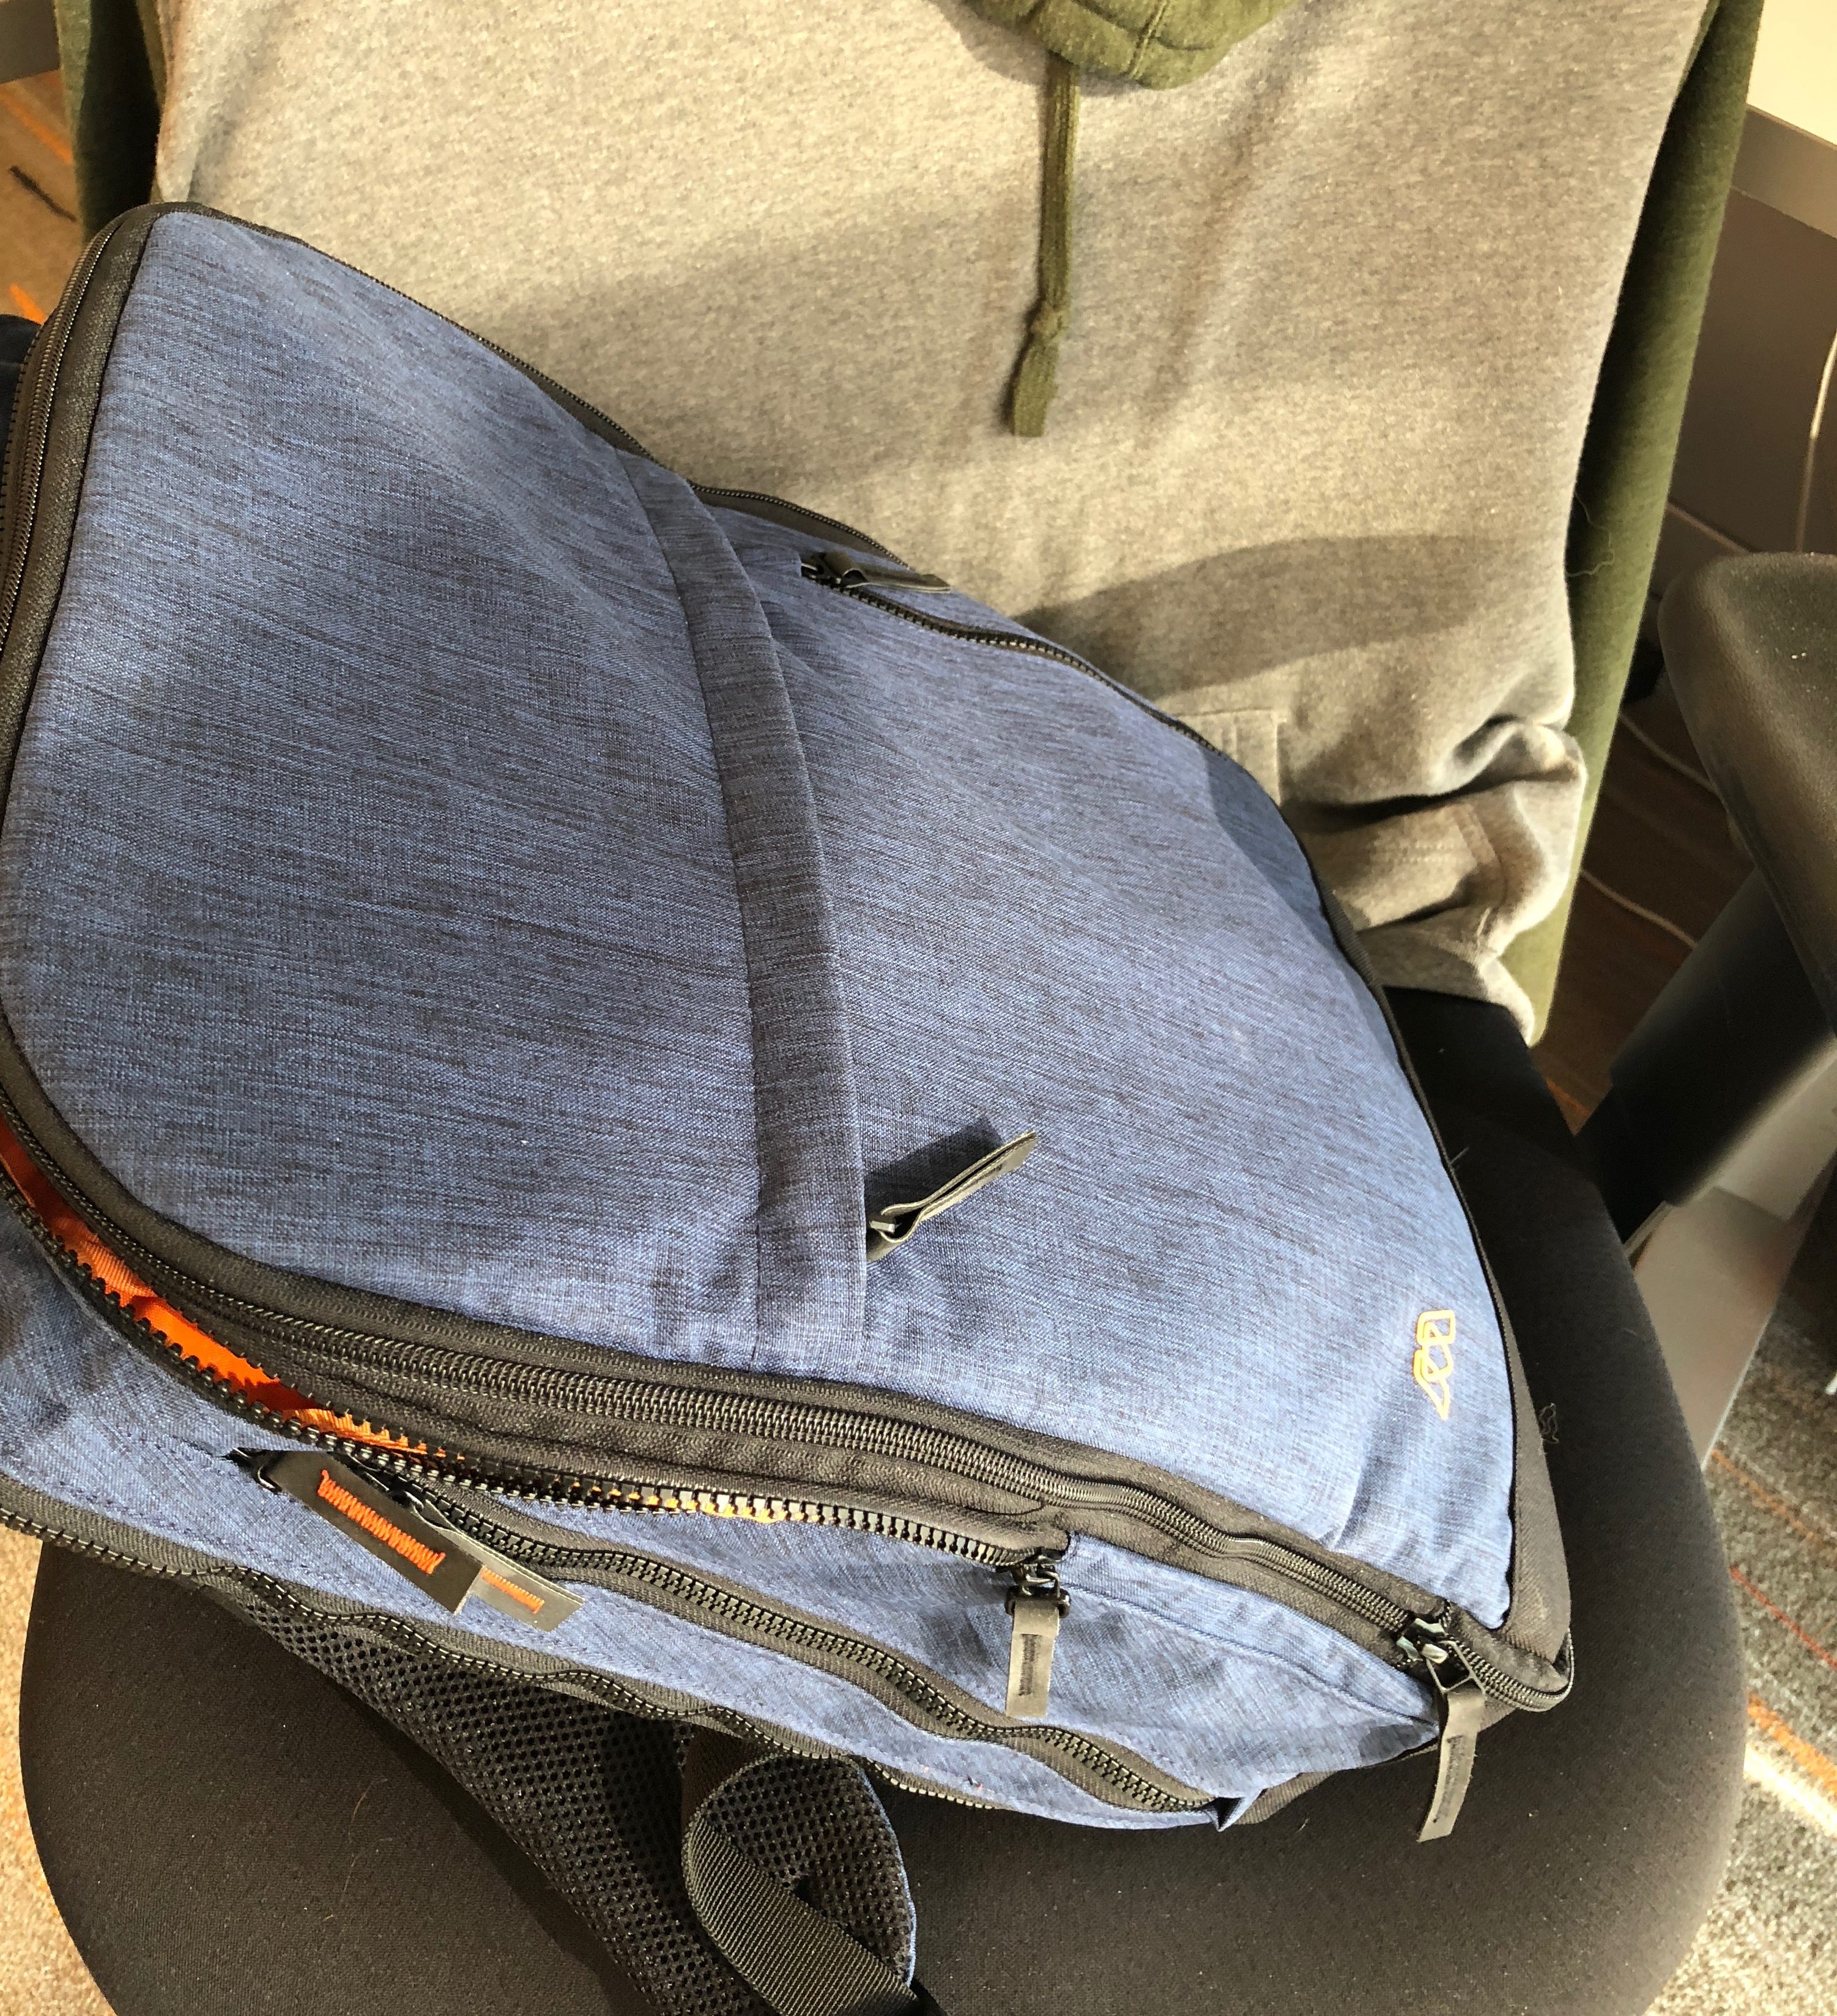
From the outside, the packs don’t appear to be changed, other than the Grande being larger until you start looking closely. The straps have been redesigned, and the outer pockets have been given a whole new interior. The side pockets and the top hard-shell pocket are pretty much the same, as is the haul loop/handle. The fabric of the Pack Grande is now available in several colors. I was sent a patterned cobalt blue-black, which I really like. The inside is where the huge changes have happened, though.

Hardware specs

(from the company website)

  • The laptop pocket is ~11.75” x 1.6“ x 16.25” to the top of the pocket or 17.25” to the top of pack at the corners
  • Water Bottle pocket can fit up to a 40 oz water bottle
  • Mounting for the REACH C and REACH+ power adapters
  • Large tablet pocket that will fit a 12″ MacBook
  • Water-resistant
  • Hard-shelled quick access pocket
  • Passport pocket
  • Cell phone pocket
  • Interior cable management
  • Breathable back panels
  • EVA foam straps
  • YKK Vislon zippers with Hypalon zipper pulls
  • 5-year warranty

What’s in the box?

  • Just the pack and info cards/tags

Design and features

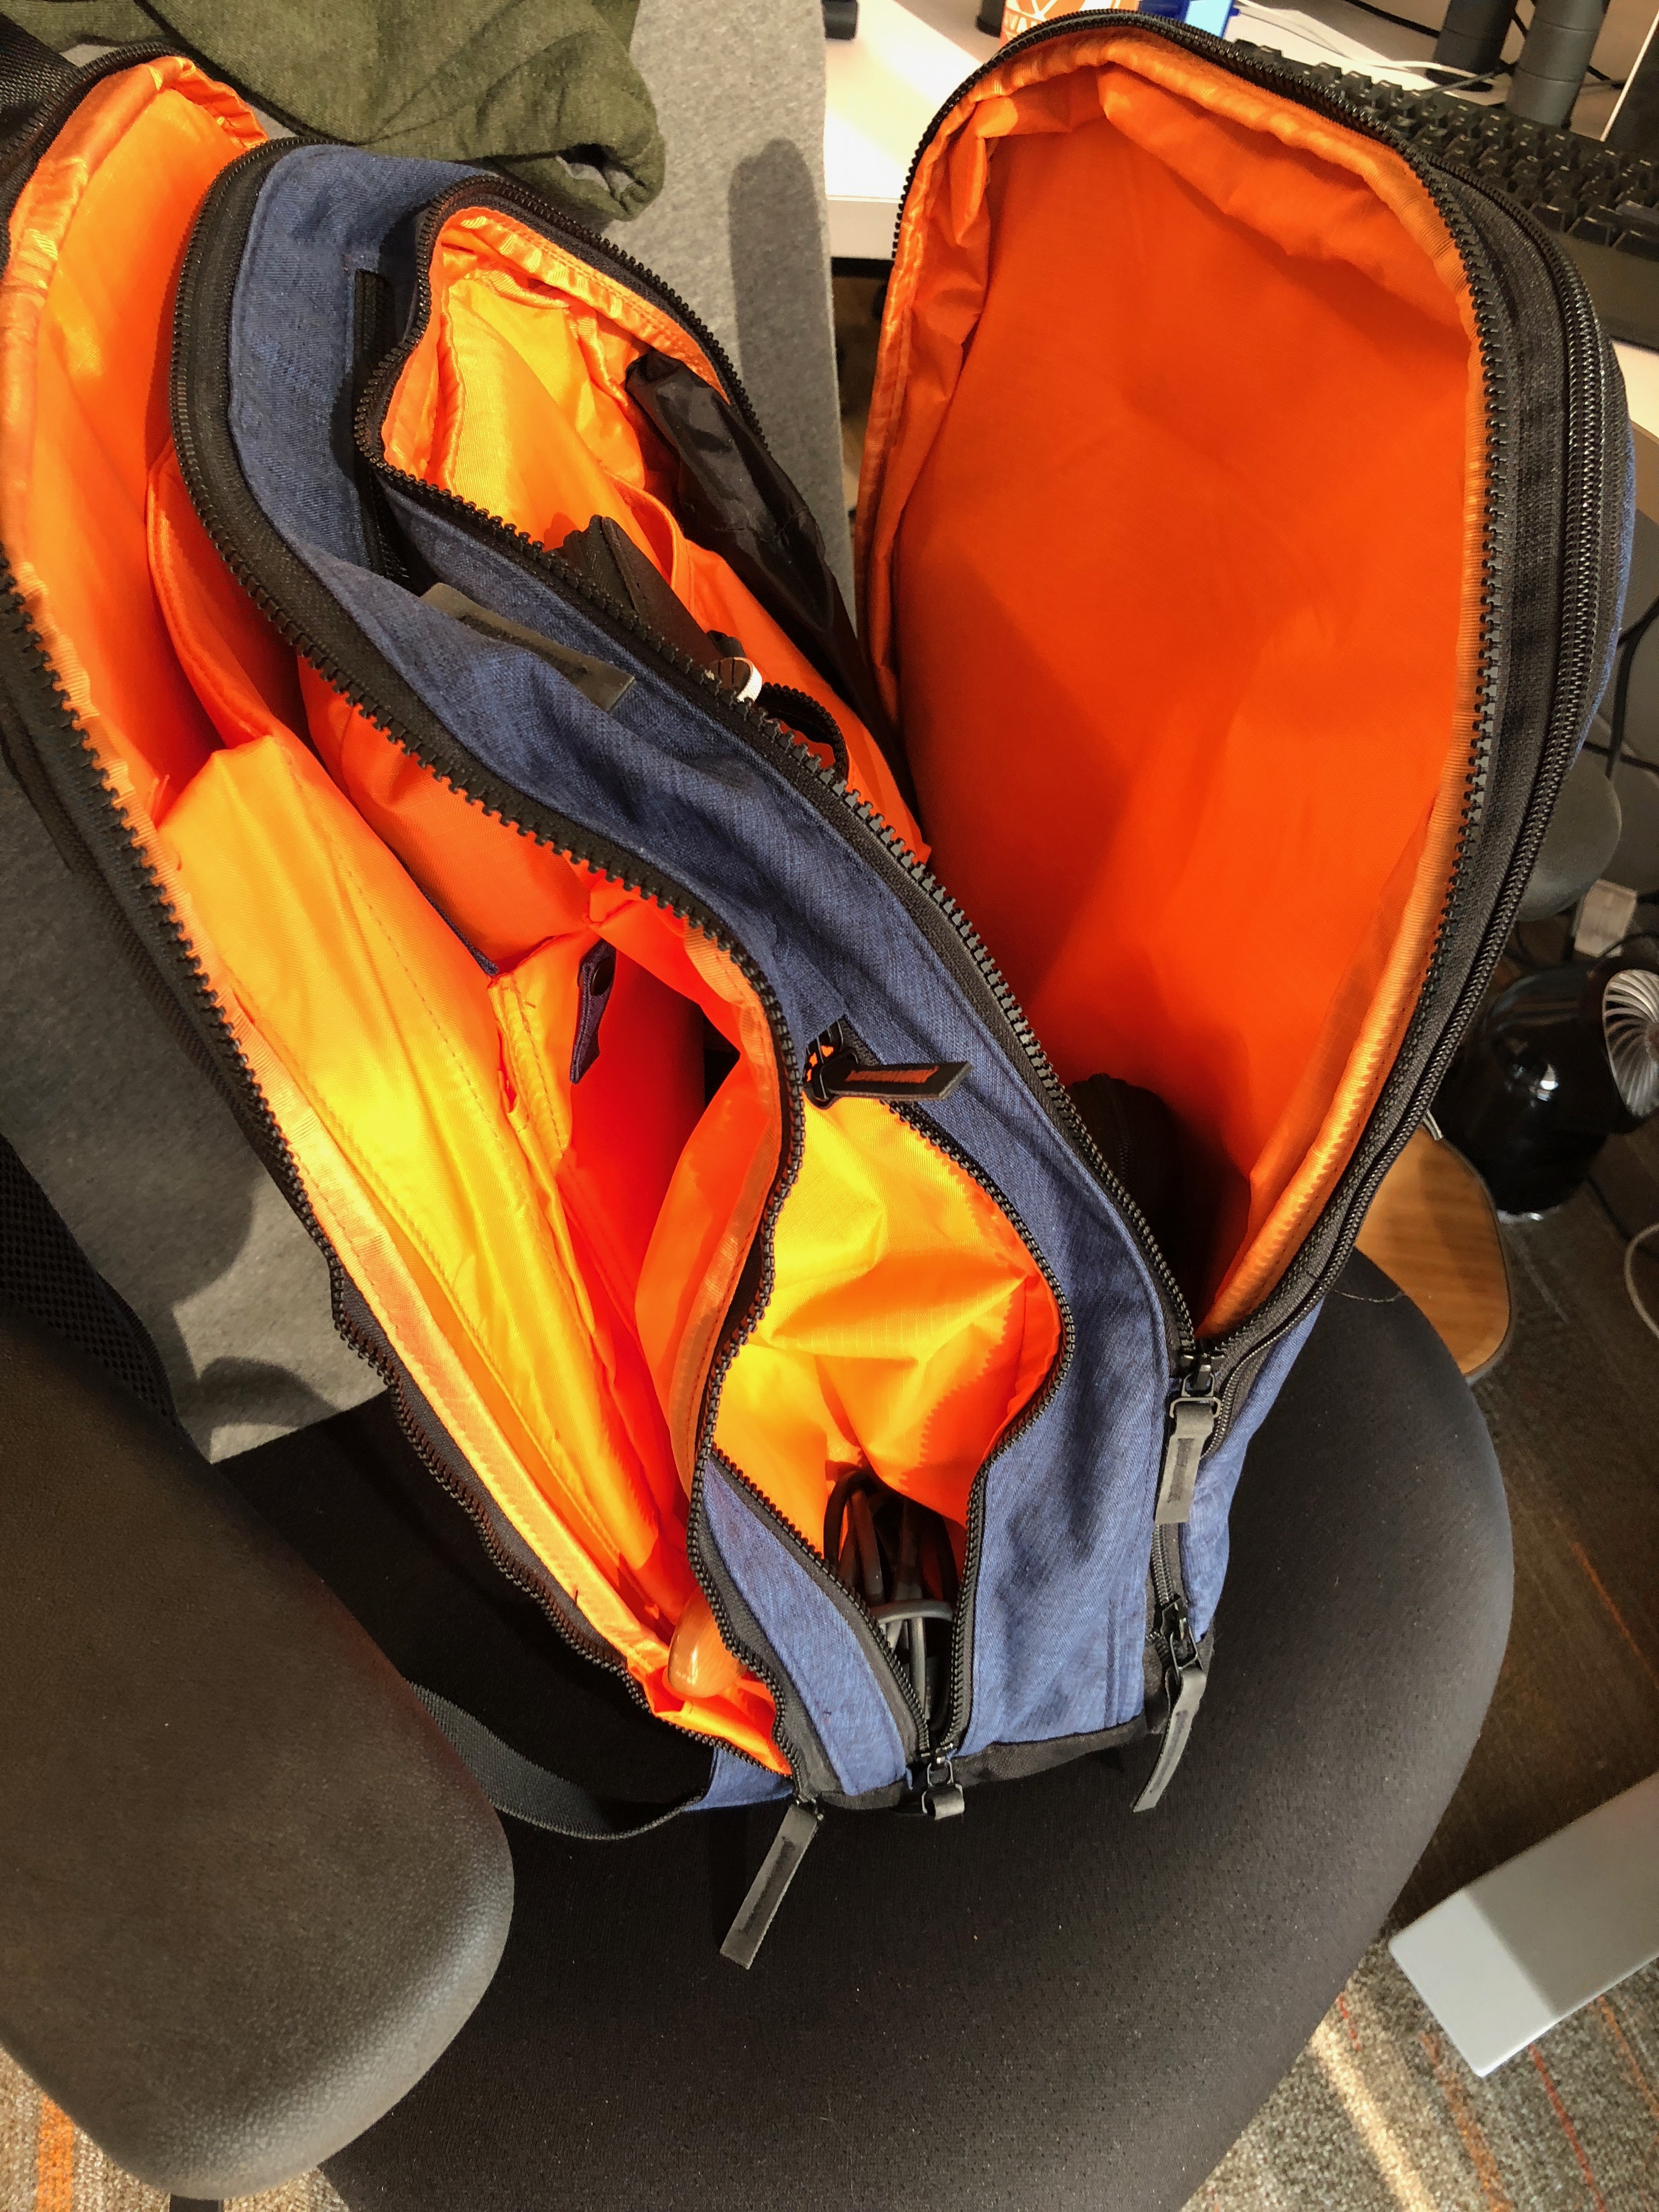
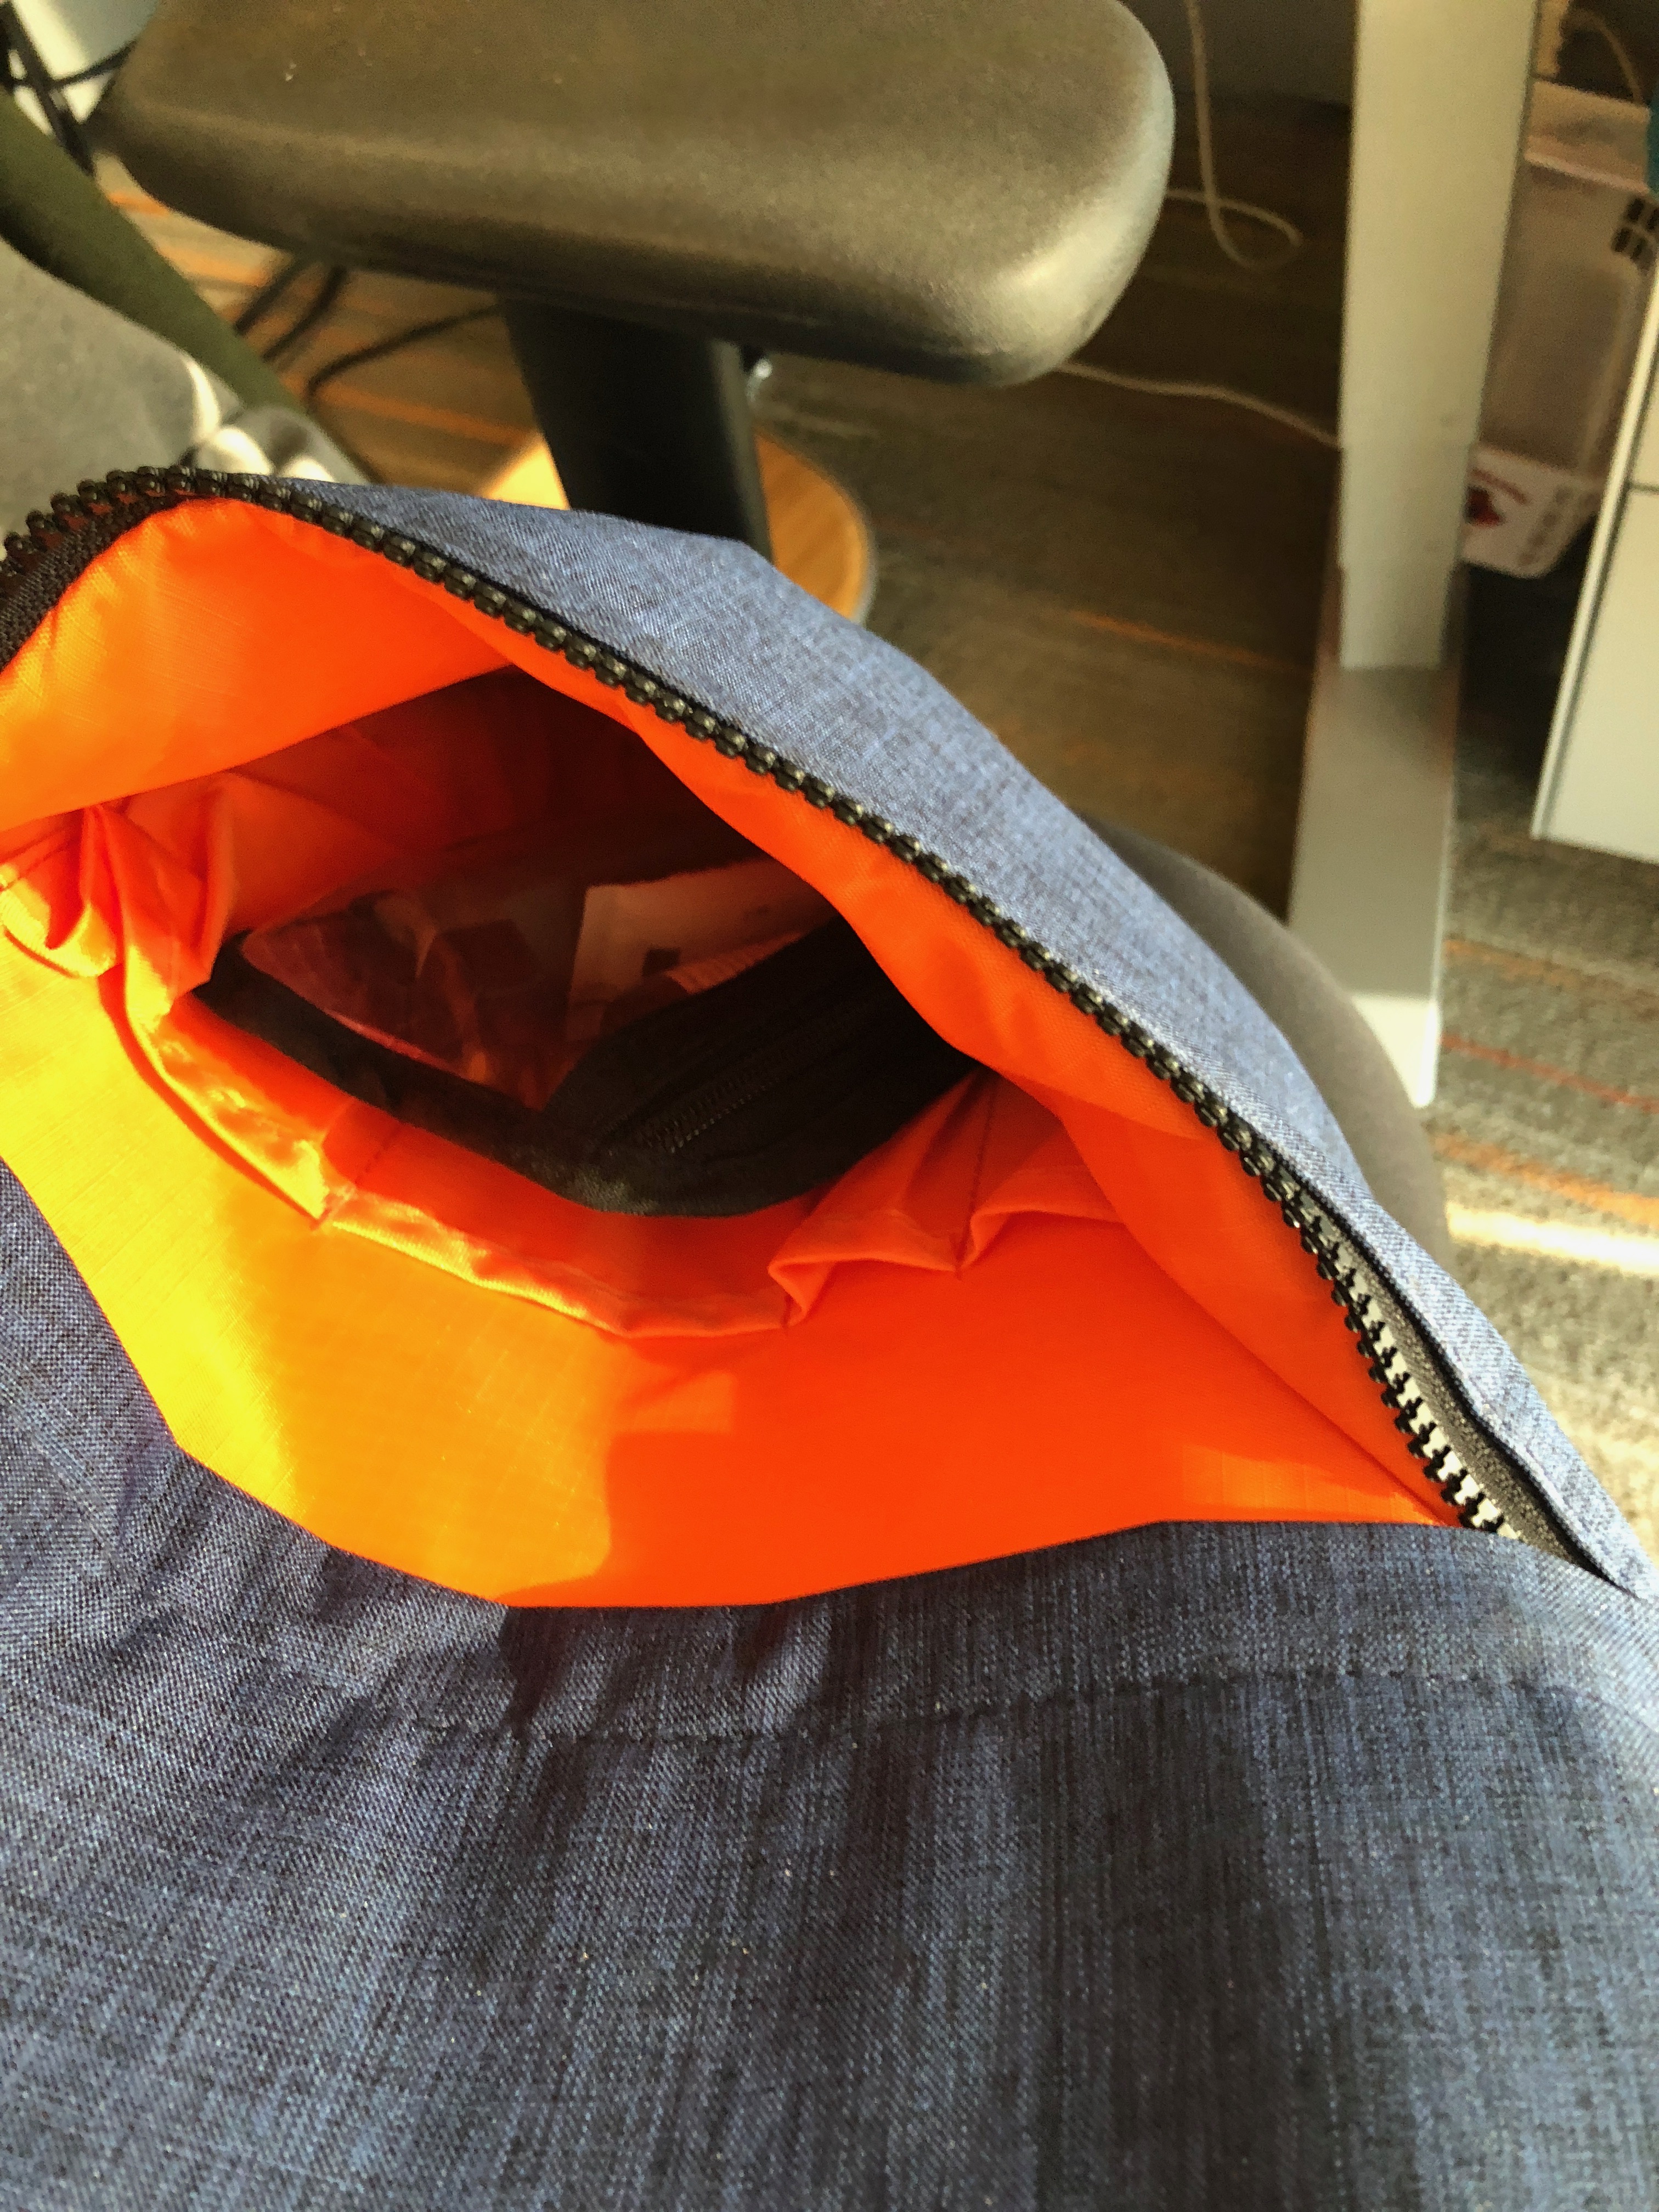
The first thing you’ll notice inside is that all the sewn-in pockets have more space. Rather than squeezing in a naked iPad or laptop, you can carry a large gaming unit (up to 17” – Do folks still really carry these around?) and an iPad with a case, or even a second, normal-sized laptop. Both will slide easily into the padded sleeves together. My 12” Lenovo work laptop gets lost in the cavernous main laptop pocket. That’s my 10.5″ iPad Pro peeking out from the bottom in the photo above. The microfiber cloth is in the tablet pocket mounted onto that.

The power management pass-through is still incorporated in the left (as you carry it) side pocket, but the space is less tight when coiling the cable to store. (More on this later, as we discuss the new Reach-C power cable.)

The MOS Pack Grande expands from 21 liters to 40 liters with a simple expansion zipper. This space is all added to the front compartment (which is already roomier than either of the others). This added space means not only can you get in something other than the Nest organizer and a few magazines or odd and ends, but you can slip in a change of clothes, gym shoes, or any other items you wish.

The front pocket has much more room, both inside and in the “Napoleon pocket” across the front. This pocket can hold items several inches thick – like your bike’s U-lock, or an iPad mini, or a travel paint set. The larger pocket beneath can hold a raincoat or heavy gloves or your 3-1-1 goodie bag.

Performance

The Grande performs like a pro. It can hold enough for a full weekend with room for clothes, shoes, and all the extras. If your needs dictate, you can haul around a wealth of tech, plus enough room in the front pocket for your lunch, a sweater, and extras like chargers.


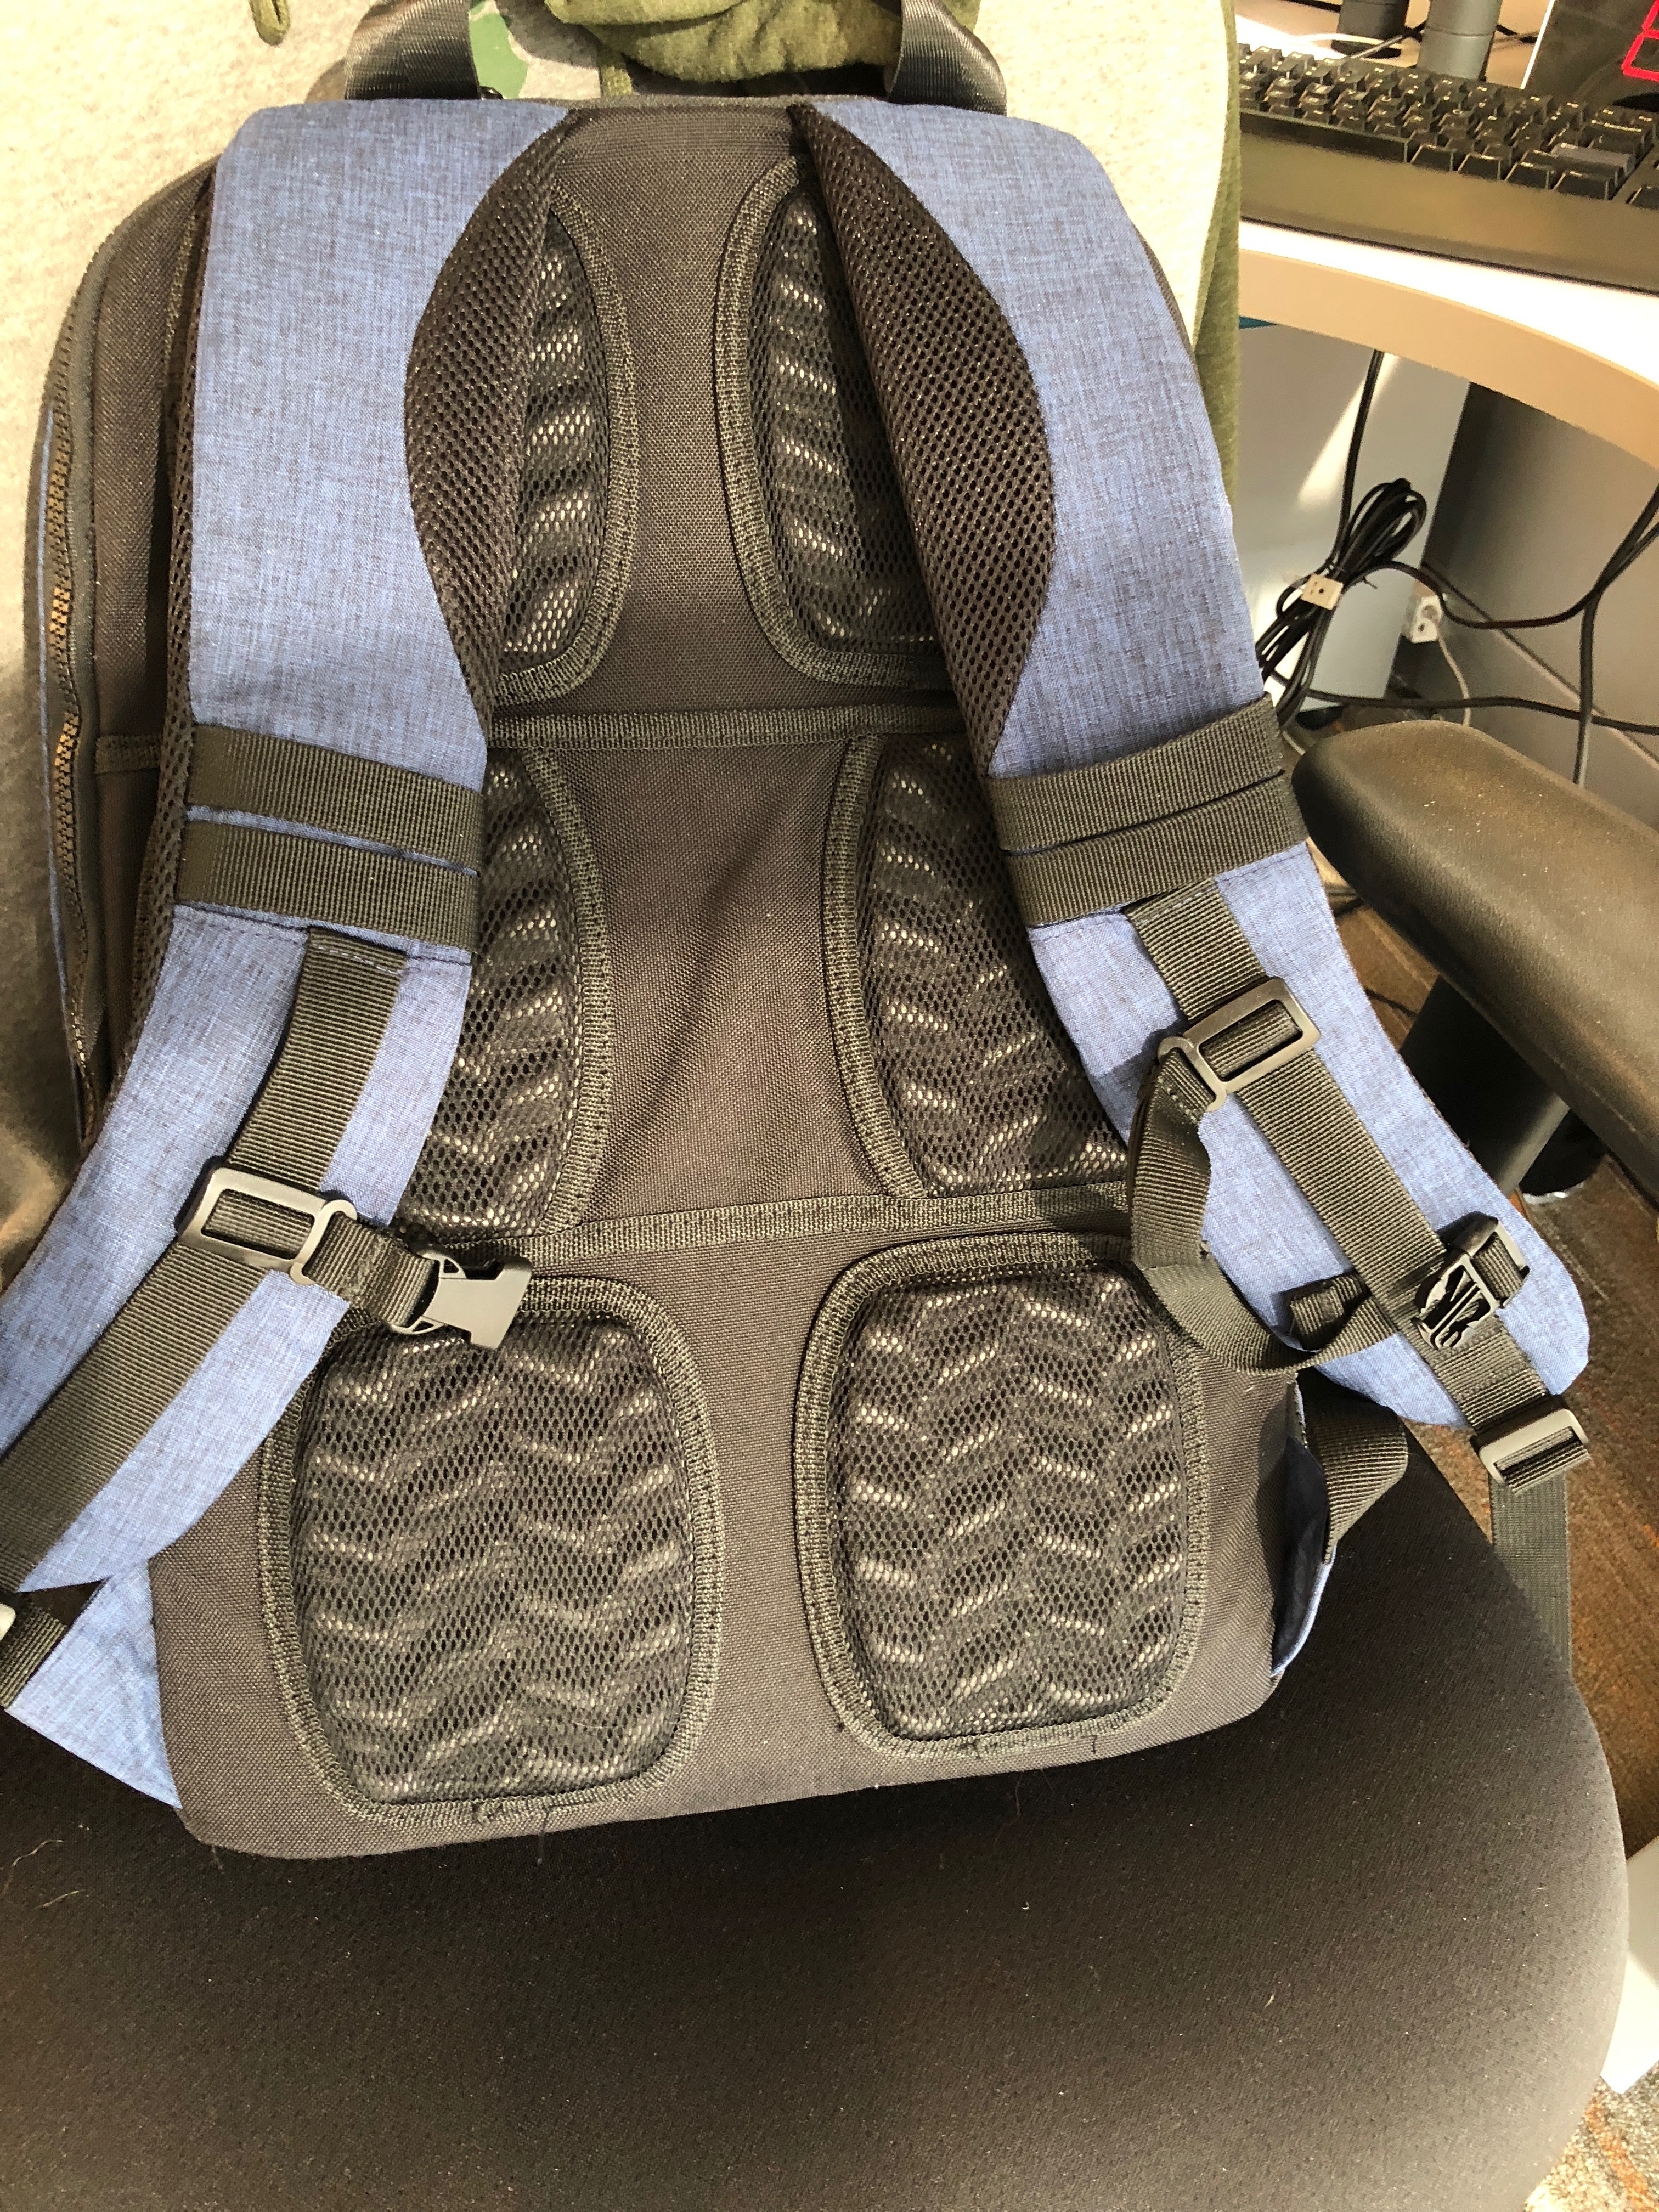
The straps have nicely cushioned areas where they hit the sides of your neck, which prevents them chaffing or cutting into you on long concourses. You can fit a 40 oz water bottle in the pocket, and it’s sealed from getting any liquid into the insides.
The charging features, while not included, are pretty awesome.

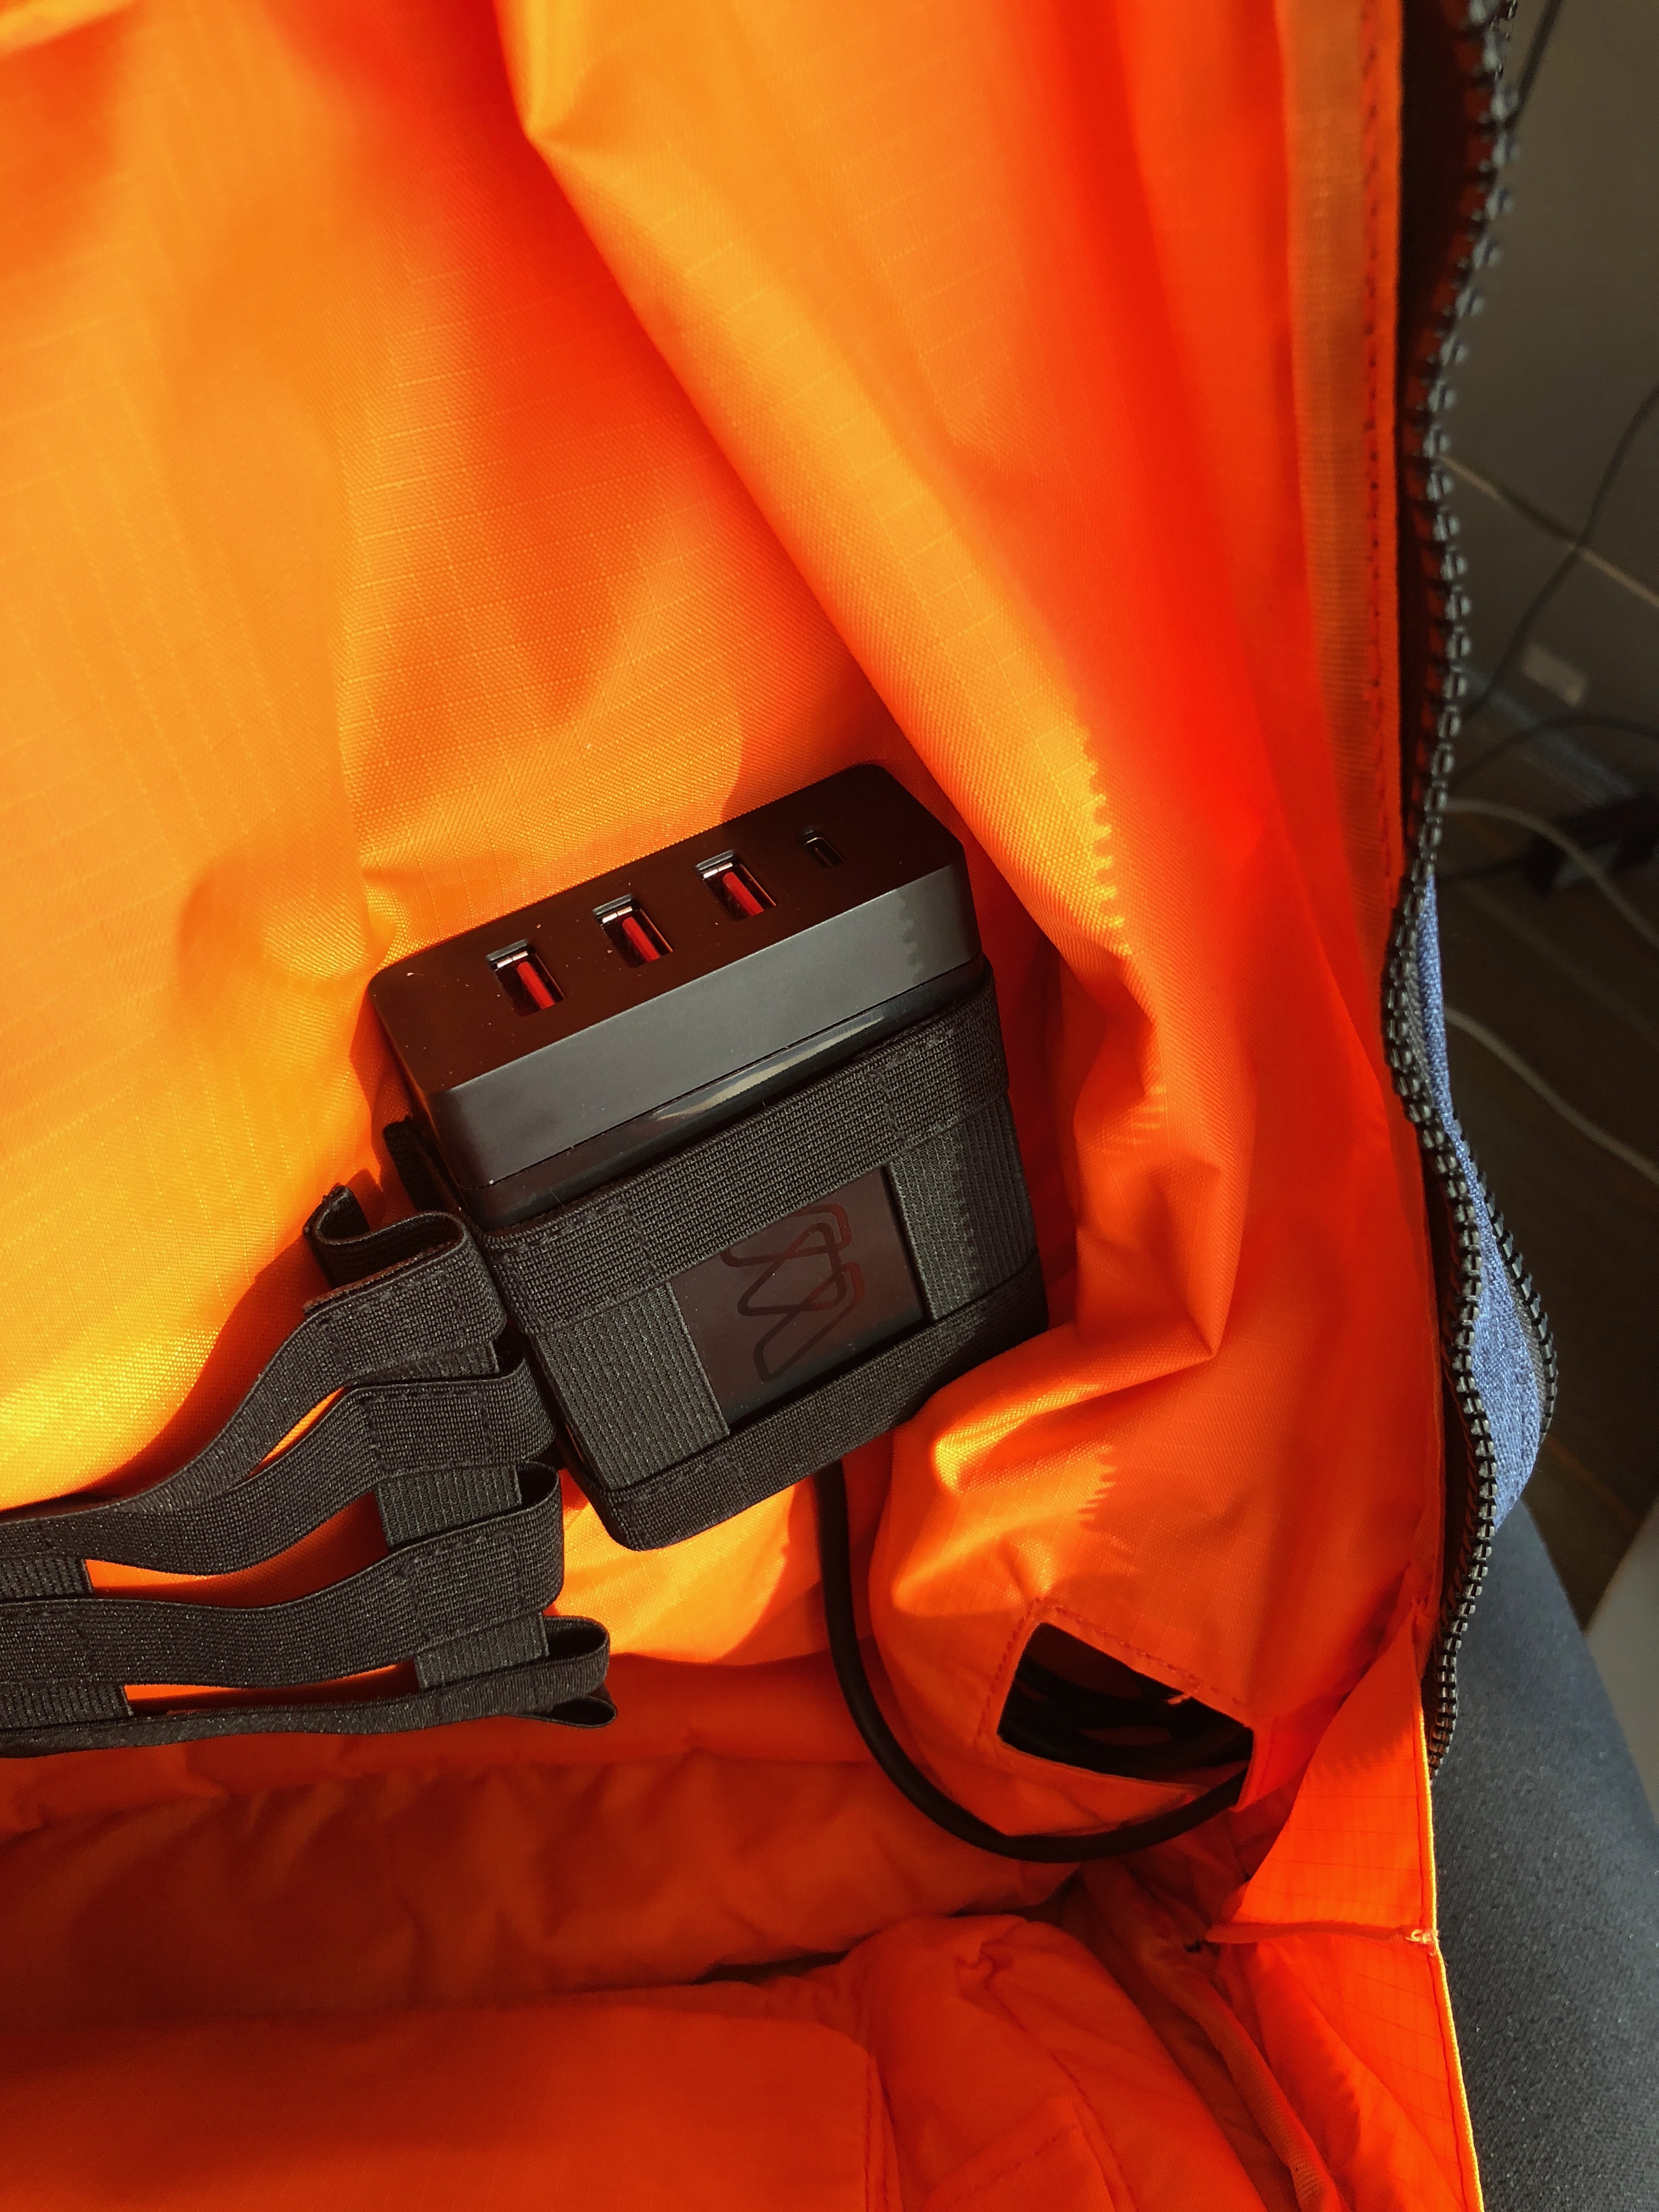
The new Reach-C has three USB-A charging ports and a USB-C port, as well as a removable power cord, so you don’t have to thread it through the side pocket. If you don’t (yet) need USB-C, the original Reach Plus, with only two USB and one AC 120 V port, or your third-party power bank can also fit in the straps. Actually, there’s room for several of these options! There’s room in the left side pocket for both plugs, if you need. The interior cable routing takes power cables from the elastic straps that hold these charging options in place to all corners and layers of the bag. It’s easy to have all your electronics connected to just one or two power plugs, and plug them in during a layover or your temporary workspace.

Extras

The Nest ($39.95, on sale for $29.95) is a smaller, internal sub-pack, and fits into the front pocket of the Grande. It’s relatively unchanged from the first iteration, but due to more space in the front pocket (and, with the expansion, a huge amount of extra space!), it’s much more usable. Still doesn’t fit a “normal” tablet, but your eReader or a novel from the airport bookshop will nestle in there along with your travel papers and snacks. It will then slip out and sit under your seat or in the seatback pocket in front of you, giving you more legroom while the rest of the bag stays in the rack.

Having an integrated charger really rocks on those long layovers when you’re trying to keep up with email, online documents, and all your Slack channels. There are now two versions of the Reach travel charging solution. The original Reach+ ($19.95) still has one 110V outlet and 2 USB charging outlets with a captive 3 foot cable.

The Reach C, however, gives you three USB-A charging ports as well as a USB-C charging port.  The Reach C also has a removable four-foot power cable, which means it’s easier to thread through the opening. And since there’s no AC, you don’t need the heavy-duty power cable. The Reach C is such a handy charger, it fits easily into other “charge-ready” bags, so look closely at bags you may have at hand and consider how it could fit in.

Reach C specs

  • USB-C Output: 5/9/12/15/20V, 3A
  • USB-C Power Delivery: PD 2.0
  • USB-A Output: 5V 2.4A
  • Cable Length: 4ft.

What I Like

  • Enormous inside!
  • Safety orange interior lets you see everything easily
  • Integrated power and cable management
  • An outside front pocket you can use
  • Hard-shell top pocket for fragile items
  • Expandable

What needs to be improved

  • Some of the interior straps are a bit fiddly
  • The Nest expansion still is tight, unless you have the expansion open.

Final thoughts

MOS has gone from a niche player in the tech accessory marketplace, to being a full-scale design shop. They still build innovative little items (like the Kick, a phone tripod attachment that fits in your coin pocket), but they also have several interesting options for power management, as well as their packs. All of their full-sized packs can fit both the Nest as well as either of the Reach power cords, making them fantastic for those who travel with technology – and isn’t that everyone nowadays?

Price: $139.00
Where to buy: MOS website and Amazon
Source: The sample of this product was provided by MOS.

Filed in categories: Reviews

Tagged:

MOS Pack Grande backpack review originally appeared on The Gadgeteer on September 29, 2018 at 8:00 am.

Note: If you are subscribed to this feed through FeedBurner, please switch to our native feed URL http://the-gadgeteer.com/feed/ in order to ensure continuous delivery.

Start a fire with your own personal flame thrower

NEWS – It’s not really a flame thrower, but you won’t need charcoal starter fluid for your grill or those little paraffin-soaked starter bundles for your fireplace anymore.  The Bison Airlighter is made of plastic and stainless steel.  It is CPSC compliant, and it has a child safety lock to prevent accidental ignition.  The lighter uses butane fuel, and it needs batteries to power an air blower.  A typical charcoal barbecue requires about 1 minute of fan time to be fully lighted or about 5 minutes before you are ready to cook.

There are two models available:

  • The Airlighter 420 has a built-in bottle opener and a storage hook.  It requires 3AA batteries.  It measures 16” x 2.2” x 3″ and weighs 1.3 pounds.  It’s $49.95.
  • The Airlighter 520 has in integrated flashlight and bottle opener.  It has USB-rechargeable batteries, and an adjustable folding handle with 3 different positions.  It measures 21″ x 3.5″ x 3″ and weighs 3 pounds.  It’s $79.95.

Both of these Bison Airlighters are available now at The Grommet.

Filed in categories: News

Tagged:

Start a fire with your own personal flame thrower originally appeared on The Gadgeteer on September 28, 2018 at 1:20 pm.

Note: If you are subscribed to this feed through FeedBurner, please switch to our native feed URL http://the-gadgeteer.com/feed/ in order to ensure continuous delivery.

Posted by / September 28, 2018 / Tagged with / Posted in News

Chamberlain Ultimate Security Bundle smart garage opener review


REVIEW – Did the box grab your attention? Hope so. Garage door openers are challenging to shoot for headline photos. Do you need a new garage door opener? You might given how much they’ve improved in the last few years.

What is it?

Chamberlain’s Ultimate Security Bundle is a garage door opener with app connectivity, safety sensors, a backup battery, an internal deadbolt, two car remotes, and an external keypad.

Hardware specs

What’s in the box?

  • Items covered in the next section

Design and features

Design of a garage door opener is all about functionality. It has to work. Chamberlain has clearly done that here, and when installed it looks pretty good too.

The key features here are…

  • Wifi connectivity with App control and status updates
  • Belt drive which makes it quite a bit quieter
  • Back up battery so you can operate the door without power
  • Remotes! – Wall mounted remote, two car remotes, external keypad, App control and Homelink compatibility
  • Safety sensors to avoid accidents
  • Deadbolt for extra security

Setup

The bulk of the review here is actually the install. It took me about 4 hours, with some self-imposed trouble. Here goes…

Installation starts by assembling the track that that will run along the ceiling by connecting the different sections.

Use a screwdriver to anchor the trolley (during assembly) that will eventually lift and lower your garage door.

Insert the mount for the opener into the end of the track.

Bolt the motor onto the mount with the two black bolts shown in the below photo.

Starting to come together.

Bend up this little tab to act as a physical stop for the trolley.

Attach one end of the belt to the trolley with a sideways insert with a 90º twist.

Feed the belt through the slot, then install the pulley.

Wrap the belt around the gear on the top of the motor.

Connect the other end of the belt to the threaded rod with the bicycle style chainlink.

Slide the threaded rod through the trolley and anchor by threading the spring nut on hand tight, then follow the instructions for snapping the ring nut against the trolley.

Install the gear cover with the provided screws.

At this point, it’s ready to install, so that means removing the current garage door opener. Incidentally, mine was also a Chamberlain although I’m unclear as to how old. It was starting to get quirky and would reverse direction about a foot before closing 3 out of 5 times. You can see from the photo below that my ceiling is unfinished dark wood. My garage door has a huge coil spring across the top of the door to assist in lifting and lowering which fortunately did not need to be messed with.

Here’s the old motor unit to be replaced. It had a front facing light which didn’t help visibility towards the back of the garage.

A lot of the hardware was similar or the same, but I reinstalled almost all of it. This anchor for the track I moved closer to centerline of the door to correct some of the issues I was having with the old one suddenly reversing. Mount the track to the anchor with the pin and lock ring. This step makes lifting the heavy motor end of the system much easier.

These mount joists are the previous ones, but I did move them up a bit to make sure everything was level. They mount to the side rails on the motor with anchor bolts.

Install the light bulb onto each side.

You now need the door in the up position after installing the lift bracket which has this bent shape to help make the turn. My garage is low enough that I later cut up a tennis ball to mount on that bend as I did manage to crack my head on it once during install.

The straight arm mounts to the trolley with a similar cotter pin at which point you both the two sides together.

Next you need to run the power lines for the door control. I used the lines that were already there. The mounted panel is shown here.

It’s mounted with a screw that you find by lifting the door actuator button.

On the back side are the two contact screws you need to connect the wires to.

The safety sensors are there to make sure the door doesn’t close on objects or people (or for you to kick a foot at as you realize that one thing you forgot to grab as you left). These can be mounted directly onto the garage door rails or onto the wall next to them. For this part of the install, I reran all the wires and decided to get crafty with my staple gun. I clearly went to fast and pierced the cable a few times and had to pull one of them completely down and replace with the old wire to finally get it working. What’s the saying? “Measure twice, cut once?”

Pair up the leads from the two sensors and twist them into the corresponding pairs before inserting into the proper terminal on the opener.

Here you can see those wires in the right two positions next to the ones previously run for the door opener. You can also see the controls you’ll use to set the final open and closed positions of the door.

On the other side of the opener, install the large backup battery and connect those terminals. You’ll run a quick test to verify that the opener can now run on auxiliary battery power.

Back on the door opener you’ll connect to wifi and complete the connectivity setup.

Once that’s done you can use the same menu to set up the pairing for the keypad remote shown here. The two car remotes are already paired and ready to go.

The system also comes with a deadbolt which I haven’t seen on a garage door before. It wires up similarly and mounts to one of the rails to basically deadbolt your door from lifting. Only a quick 3/4″ hole to drill. There was a pretty big disclaimer in the instructions that you must have an entry door to use this feature. My garage does not, so I didn’t feel comfortable testing this out. I actually have an externally mounted quick release key from Chamberlain installed from getting locked out before when we lost the only visor remote shortly after moving in. It’s basically a removable key core that yanks a cable connected to the manual release on the trolley. Pretty handy unless you lose that key.

Okay. The App is as simple as downloading and creating a login. I’ll show some screenshots in the next section. Let’s move on to how it works.

Performance

In short. Huge improvement over the old Chamberlain model I replaced. That one was definitely installed a bit crooked, but I wouldn’t have figured that out without installing a new one. My old model was a chain drive. This belt drive model is significantly quieter, and smoother. It closes completely and in the fully open position, it’s completely out of the doorway. The dual lights are brighter than what I had before which is a huge help in my dark garage.

As for reliability, garage doors are something you don’t really think about until they aren’t working properly or break entirely. I’ve been using this for a full month and it’s doing exactly what it’s supposed to do and then some. The wall mounted opener has the time and the temperature which while not necessary is actually pretty handy.

The App allows me to check if I closed the door, and then actually do it without needing to trudge out to the garage. Here’s what the app looks like, and yes I named my garage Sesame.

Chamberlain partners with Nest, Wink, Xfinity Home, Google Assistant, IFTTT, Alpine, Clare Controls and Eve Connect for Tesla. I paired mine up with Nest to find the reverse of what I was looking for. Instead of being able to see and control the status of my garage from within the Nest App (which I’m in with some regularity) I can control my garage and see my Nest devices in the Chamberlain app which I’m not sure why I need to do.

Hmmm. I haven’t played around with IFTTT, but that’s likely next.

We recently got a new car and the plan was to actually park a car in the garage, something that we have not done previously. The new car has Homelink functionality and I was able to train it easily using the visor remote. The car has the ability to auto open and close the garage at a set distance. This seemed amazing and actually was for most instances. I’d open the garage, get in the car, back out and the garage door would close as I pulled away. On returning the garage door would open right as I pulled up. Great, right?

After leaving one morning, we turned around realizing we had forgotten a couple items. Pulled into the driveway and the door started opening, so I stopped it and closed it from the car controls. As we pulled away, we crossed that distance threshold and the door started opening. It’s then I figured out that it was just toggling the open/close and had no knowledge of which position the door was in. Needless to say I turned it off as it’s not to hard to hit the button when you need to. I do think this is an issue on the car side of the equation as the Chamberlain App definitely knows if the door is up or down.

What I like

  • Relatively easy install (clear instructions!)
  • Quiet and smooth operation
  • App integration – Status awareness
  • Automation partnerships

What needs to be improved

  • Nest integration should be bi-directional
  • Bundle option without the deadbolt?

Final thoughts

I’m very happy with Chamberlain’s product here. The instructions were very well written and easy to follow. As long as you aren’t installing a whole garage door for the first time, it’s a pretty easy task to take on. I would feel comfortable telling most people that they could handle the install themselves. As I mentioned previously, this is one of those products that just hangs in the background and does its job. Chamberlain has added some useful additional features and created a product that worth upgrading to. For me, the peace of mind of knowing I can get into the garage if the power is out, and even just knowing the garage door is down is well worth it.

Price: $348
Where to buy: Chamberlain.com and Amazon.
Source: The sample of this product was provided by Chamberlain.

Filed in categories: Reviews

Tagged: ,

Chamberlain Ultimate Security Bundle smart garage opener review originally appeared on The Gadgeteer on September 28, 2018 at 11:00 am.

Note: If you are subscribed to this feed through FeedBurner, please switch to our native feed URL http://the-gadgeteer.com/feed/ in order to ensure continuous delivery.

Docfender fireproof bag protects your valuables

NEWS – There are a lot of fireproof safes on the market, but they are usually big, heavy, and decidedly not going to fit in your luggage.  The Docfender bag will fit in your luggage, so you can easily take your valuable documents when you travel, or when you have to “bug out”, like so many people recently did in my state of North Carolina.  This fireproof and water-resistant bag has a silicone-coated fiberglass exterior and an aluminum foil interior, which not only protects from heat – up to 932°F – but also repels water.

To ensure that your valuables stay inside, the Docfender closes with both a metal zipper and a Velcro closure.  At 15″ x 11″ x 2.5″, the bag is big enough to hold most document types.  The bag can also hold other valuables, like jewelry, money, or even a gun.

You can learn more about the Docfender Fireproof Document bag at the Docfender website and purchase one of your own for $18.66 at Amazon.

Filed in categories: News

Tagged:

Docfender fireproof bag protects your valuables originally appeared on The Gadgeteer on September 28, 2018 at 10:00 am.

Note: If you are subscribed to this feed through FeedBurner, please switch to our native feed URL http://the-gadgeteer.com/feed/ in order to ensure continuous delivery.

Archeer Vinyl Turntable Record Player Review


REVIEW – As an audiophile, I have long had a love/hate relationship with turntables because while I love the unique sound of vinyl, I hate how much it costs to buy an audiophile turntable that is built with the right technology and materials to compliment the other components of even a mid-range audiophile system. And since the number of vinyl enthusiasts has decreased exponentially, the cost of a classic record can be prohibitive. I decided to accept the opportunity to test and review this turntable because I still love vinyl, but I accepted with the understanding that it is not considered audiophile equipment. So here goes.

What is it?

The Archeer vinyl turntable record player is a 3 Speed Turntable with a diamond stylus cartridge. It plays records at 3 speeds which are 33, 45 & 78 RPM and supports 7, 10 and 12″ records. It has 2 built-in 3 Watt speakers and includes auxiliary and Bluetooth connectivity.

What’s in the box


1 x Wooden Turntable
1 x AC Power Adapter
1 x Plastic Turntable Cover
1 x Record Spindle Adapter
1 x User Manual

Design and features

Specifications:

Type: Belt drive turntable, fully automatic

Speeds: 33, 45 & 78 RPM

Turntable Platter: Plastic

Signal-to-Noise Ratio: >40dB

Power Adapter: 5V/ 1A

Frequency Response: 125Hz-10KHz

Output Level: 450mV±150mV

Output Power: 5W

This turntable has the usual tonearm controls that are Auto Stop on/off and the speed selection switch along with the tonearm lever and lock. In addition and as shown below, there is a control panel that has the following controls (from front to back): Power on/off and Volume Control, Power LED, Stop button, Mode button, Previous Track button, Next Track button, Play/Record button, USB Port, Function Indicator and AUX-In Port.


The turntable also comes with the record spindle adapter that stores away when not in use as seen in the first picture below. It is placed on the turntable center spindle when playing 45RPM records that have the larger hole in the center.


At the back of the turntable, there is the power jack and left/right RCA output jacks so that you can connect the turntable to external speakers or a preamplifier/amplifier.


The clear plastic/acrylic cover is connected to the turntable via 2 plastic hinges. The cover has 2 notches that mark where it slides into the hinges.


Underneath the turntable, there are the two built-in 3-watt watt speakers.


PICTURE

Performance

When I first unpacked the turntable, the internal packing material was crushed, and upon further examination, I discovered that one of the plastic hinges that secure the turntable cover to the base was broken. After contacting the vendor, and waiting for a couple of weeks, a replacement was sent for testing and review.

I like the basic features of this turntable. Playing a record is simple and straightforward as with any turntable. I used a 33RPM 12″ LP for my test. The sound out of the speakers if full-range so it lacks any sort of depth or separation of frequencies and exists mostly in the midrange. I also connected the RCA output to my audiophile preamplifier, but the result was the same since there is no equalization with audiophile systems and low quality in = low quality out. Keep in mind that this is not really a criticism of this turntable since by design it is not expected to perform as such. Connecting your phone or mobile device to the turntable is easy and works well. Connecting an iPod or iPhone via a 3.5mm to the AUX-IN port yielded the same result as the Bluetooth connection albeit wired. The feature I like the most is the USB port that allows you to plug in a USB flash drive and record the record as an MP3 file. This is better than having to buy an additional interface to accomplish this. Again, the quality of the sound is the same. I do suppose that if you have powered speakers and/or some amount of external equalization, that you may be able to get a better quality of sound.

Here are the four operational modes and how they function:

Bluetooth Mode:
Turn on the power, press the mode button once, and the function indicator will flash blue. Once you go into the Bluetooth settings on your mobile device, the device “TS5310” should be available to connect to.
AUX-IN Mode:
Turn on the power, press the mode button twice and the function indicator flashes red and blue. You can then connect your device via a 3.5mm cable.
USB Mode:
Turn on the power, plug in your USB flash drive, press the mode button twice, and the function indicator will flash red and the turntable automatically starts playing any music on your USB drive. In this more the previous track, next track and stop functions work.
Record Mode:
Turn on the power, plug in your USB drive to the USB port, Start record to play and press and hold the Play/Rec button until the function indicator flashes red. This means that the recording has started. You can press and hold the Play/Rec button again until the function indicator is steady red to stop the recording and save the file.

What I like

  • The built-in Bluetooth and Auxiliary Port
  • The ease of use
  • The original look

What can be improved

  • Better/safer packaging
  • Better/stronger made hinges for the turntable cover

Final thoughts

The Archeer turntable is an “old-school” throw-back to the original turntable era. It is designed with that simple look but includes convenient and usable features that make it a more inclusive component. However, it is very basic and serves more as a convenience than for a purposeful listening experience. If you are looking for a turntable for basic listening to serve as entertaining ambient sound, this may work. If you are looking for an immersive listening experience, look elsewhere. Regardless, it is not a bad value for the price.

Price: $119.99
Where can I buy: Amazon
Source: The sample for this review was provided by Archeer.

Filed in categories: Reviews

Tagged:

Archeer Vinyl Turntable Record Player Review originally appeared on The Gadgeteer on September 28, 2018 at 9:00 am.

Note: If you are subscribed to this feed through FeedBurner, please switch to our native feed URL http://the-gadgeteer.com/feed/ in order to ensure continuous delivery.