Kiwi Design Google Nest Hub wall mount review

REVIEW – I’m an enthusiastic investor in the Google ecosphere.  I have a Nest thermostat and Hello doorbell.  Before they were rolled up into the Nest brand, I purchased a Google Max, two Google Assistants, two Google Minis and three Google Home Hubs.  I particularly love the Home Hub (now the Nest Hub) – the screen size is just right, great sound and ambient information display with slide show.  The problem is – if you can call it a problem – sometimes where you want the hub there just isn’t a good place for it to sit.  Kiwi Design wants to fix that situation with the Nest Hub Wall mount.  So yeah, let’s check that out.

What is it?

The Kiwi Design Wall Mount for the Nest Hub is just what the name suggests – a mount to fix your Nest hub to the nearest wall or other vertical surface.

What’s in the box?

The Nest Hub wall mount and a brief instruction guide.

Design and Features

The mount is almost entirely metal with a rubber hood that covers the core mounting bracket.  The bracket itself has 4 mounting holes that allow you to permanently fix the mount to a surface where you care to drill into.  Under the wall plate, there is also a 3M sticky pad in case you don’t want to drill holes in your wall or cabinet.

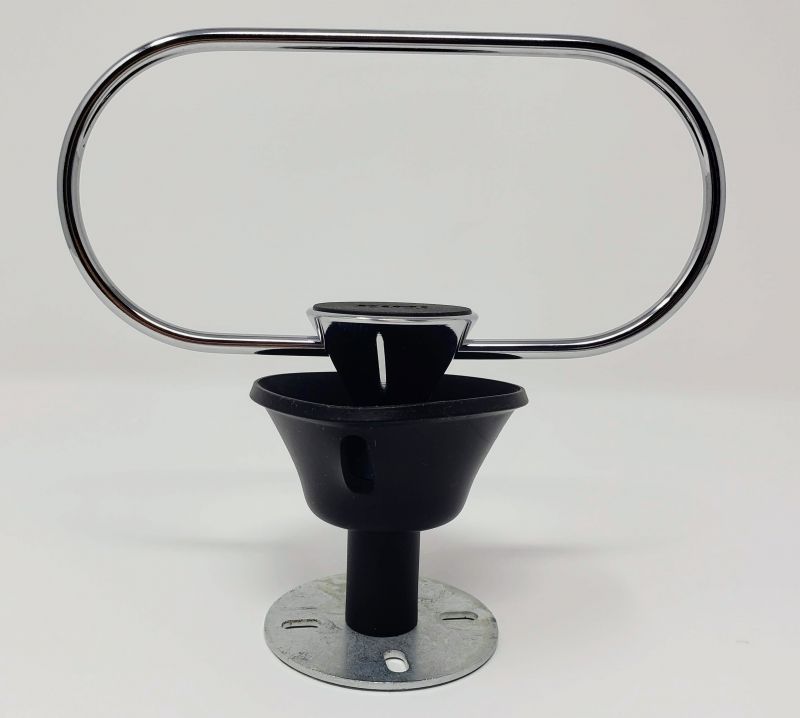
Almost visible in the shot above is the cable management loop (almost visible thanks to black on black coloring).  This is a pretty nifty little feature – just make a doubled-up loop of the excess power cord, push it through the loop and wrap it around the base of the mount.  No unsightly cords dangling all over the place.

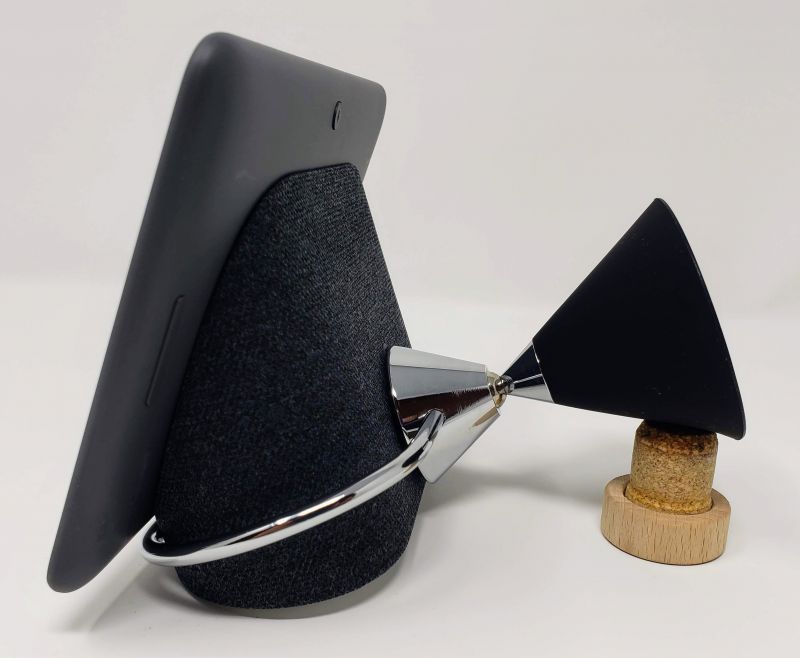
The metal oval is where you place the Nest Hub.  There is a rubber disk on the back side of the oval that protects your Hub from any damage and also provides a friction point to prevent the hub from moving around.  There is a ball joint between the mount and the oval which allows you to re-position the Hub to a suitable angle.

And the Hub sitting in the mount viewed from the front.  Other than a minor bit of the metal oval, the mount is almost completely invisible.

Performance

Kiwi Design certainly brought the rubber to the road with this one.  I decided to mount the Hub that lives in my home office because I wanted to reclaim the desk space but didn’t want to lose the Hub itself.  I mounted it just to the right of my desk over a set of bookshelves where it would be close enough to see without giving up valuable real estate.  I chose to use a wall anchor to mount the…well, mount.  To me, that suggests a more permanent solution than 3M tape, and a solution I am willing to commit to.

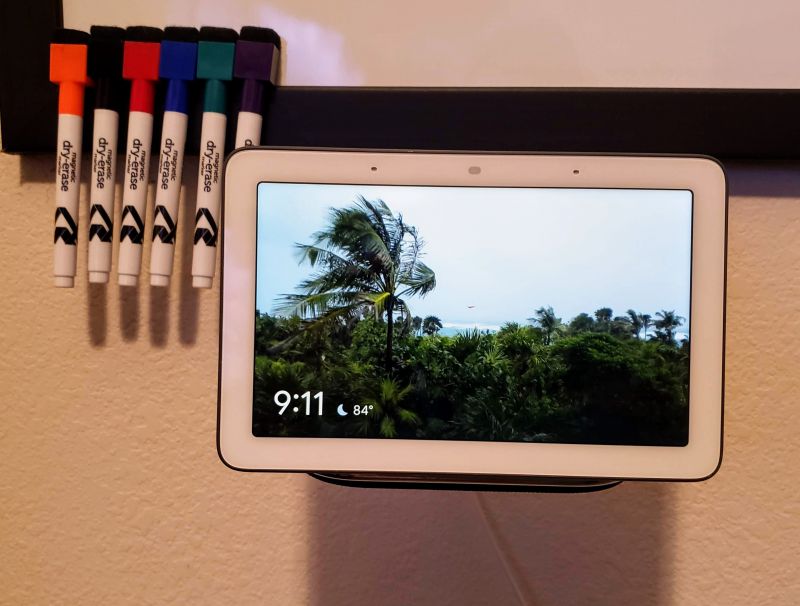
Here it is on my wall under my whiteboard.

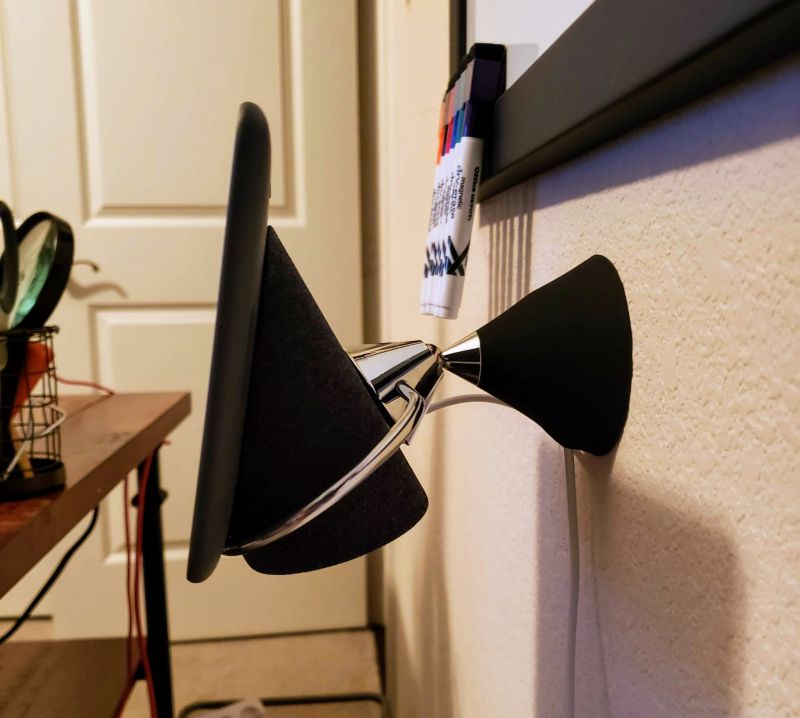
From the side.  As you can see, the ball joint allows me to angle the Hub to the right viewing position, and the entire affair is hidden from view.  The mount is close to perfect – the only thing I would change is to make the swivel mount somehow capable of a 90 degree angle so it could be mounted under a cabinet (thinking ahead to mounting the Kitchen Hub).  Otherwise, this does exactly what you’d expect, it does it well, is solidly made and reasonably priced – some might consider it a little high, but I have an investment in this equipment, so I want premium materials and a mount that doesn’t feel like cheap plastic.

What I Like

  • The look and feel of the mount and how it gets out of the way to let the Hub shine
  • The cord management
  • Being able to angle and swivel the Hub as needs dictate

What I’d Change

  • Make a 90 degree version – although that is a VERY minor issue compared to how well the current mount works

Final Thoughts

The Kiwi Design Wall Mount for the Nest Hub is just what I’ve been looking for.  It feels and works like a well-made unit with all the right touches.  I can definitely see myself buying a few more for my other Hubs and I hope they make a mount for the upcoming Nest Hub Max.

Price: $21.99
Where to buy: The Nest Hub Mount can be purchased directly from Kiwi Design at the link below or from Amazon.
Source: The sample of this product was provided by Kiwi Design.

Filed in categories: Reviews

Tagged: ,

Kiwi Design Google Nest Hub wall mount review originally appeared on The Gadgeteer on August 10, 2019 at 9:00 am.

Note: If you are subscribed to this feed through FeedBurner, please switch to our native feed URL http://the-gadgeteer.com/feed/ in order to ensure continuous delivery.

iOttie Easy One Touch Connect car mount with Alexa review

REVIEW – Andy reviewed the iOttie Easy One Touch Connect car mount almost 2 yrs ago and now iOttie has updated the Easy One Touch with Alexa. Let’s take a look.

What is it?

The iOttie Easy One Touch Connect is a car mount for your mobile phone that can be attached to your windshield or your dashboard and has built-in Alexa functionality.

What’s in the box?

  • iOttie Easy One Touch Connect
  • Adjustable dash/window mount
  • Dash pad
  • 12V power adapter with USB port
  • Instructions

Design and features

The phone holder features a one-handed mechanism that has two gripper arms that hug the sides of your phone, a “foot” rest for the bottom of your phone, and a rubber-covered backrest that doubles as the eject button. There are also two more arms on the sides that you squeeze to open the main gripper arms. See the video clip below that demonstrates how the mechanism works.

A view of the back of the iOttie shows the adjustable footrest at the bottom, the micro USB charging port above it, the adjustable windshield/dashboard mount arm connector in the center, and the microphone mute toggle button at the top.

Attaching the iOttie phone holder to the adjustable mounting arm is as easy as loosening the collar around the connector, snapping the mount in place and tightening the collar again.

The mounting arm has two adjustment points that allow you to customize the length and angle of the arm. In the image above, the arm is at its smallest length.

Now we see the arm fully extended. A thumbscrew on the center of the arm allows you to customize the arm to the desired length.

Another thumbscrew near the base allows for adjustment of the angle of the arm.

I tested the iOttie Easy One Touch mount with my Huawei P30 Pro. The gripper arms had no issues accommodating it or my Pixel 2XL shown in the image above (I was using the Huawei P30 Pro to take the pics). In the image, you’ll also notice that there are LEDs built into the gripper arms. These LEDs provide a visual cue when interacting with Alexa.

Installation

I drive a 2013 MINI Cooper S and didn’t think that I’d have an issue attaching the iOttie mount in my car when I agreed to review it. I knew I wasn’t going to be attaching the plastic mounting pad on my dashboard because the thoughts of sticking something with adhesive to my dash makes me a little queasy. I figured attaching it to my windshield would be no issue because I review dashcams all the time.

Unfortunately, my car is so small that there really wasn’t a good place to put the mount where it wouldn’t interfere with my view of the road. I ended up just stuffing it in one of my cup holders during the testing phase.

Alexa, can you hear me? Alexa? Yoooooo hoooo, Alexa?

After you attach the mount to your windshield or your dash, the next step is to install the iOttie Connect app on your phone. The sole purpose of this app is to connect the mount to the Amazon Alexa app that you also need to install on your phone in order to take advantage of the built-in Alexa functionality.

And here we come to the biggest issue (besides the fact the mount can’t charge my phone) I have with the iOttie Easy One Touch Connect car mount. The Alexa feature just plain sucks. First of all, you have to have the Alexa app on your phone running in the background whenever you want to use Alexa “in” the mount.

I found that even with the app running, the connection between the mount and the app would rarely work without me fiddling with it for a few minutes. Most times the Alexa app would show that the iOttie was offline until I unplugged the 12V power adapter and plugged it back in. Or if I stopped and restarted the Alexa app.

Then when it finally would start working, I would start my drive only for it to stop working at some point during the trip. At least that was my experience many times during my testing of this product. Frustrating for sure.

When the Alexa feature was working, all I had to do was say “Alexa”, and the LEDs on both gripper arms would glow blue and I would hear the iconic Echo tone letting me know that I could give my command to Alexa.

See that’s the thing, the iOttie mount is really just an extra microphone so that you can leave your phone in your bag or pocket. It’s not like a self-contained Alexa device like an Amazon Echo. You have to have your phone for the internet connection AND for the audio which you should setup to go through your car’s Bluetooth.

In all honesty, it is less of a hassle and expense to just leave my phone on the car seat next to me with it paired to my car’s Bluetooth and run the Alexa app on the phone.

See it in action

What I like

  • Easy to mount and unmount device with just one hand
  • Built-in microphone allows you to leave your phone in your bag while interacting with Alexa

What I’d change

  • Add wireless charging capability

Final thoughts

As a vehicle mount, I like the easy one-handed operation of the iOttie. But the fact that it lacks wireless charging capability when it is priced at $70 and the problems that I had with the built-in Alexa feature has me unable to give my recommendation as a good buy. Even if the Alexa feature was reliable, I’d still think this mount is a bit overpriced. Sorry iOttie.

Price: $69.95
Where to buy: Amazon
Source: The sample for this review was provided by iOttie.

Filed in categories: Reviews

Tagged: , ,

iOttie Easy One Touch Connect car mount with Alexa review originally appeared on The Gadgeteer on July 25, 2019 at 11:00 am.

Note: If you are subscribed to this feed through FeedBurner, please switch to our native feed URL http://the-gadgeteer.com/feed/ in order to ensure continuous delivery.

ROBOQI Self Gripping Fast Wireless Car Charger review


REVIEW – Late last year, I tested and reviewed a car cell phone mount with wireless charging, and I was very happy with the functionality and the with the product overall. That device remained in my truck and was used daily, but about a month ago it just stopped charging and the clamping arms no longer open and close. I still very much like and need this type of device and accepted the opportunity to test and review the Roboqi Self Gripping Fast Wireless Car Charger. Will I be disappointed? Let’s see!!

What is it?

The Roboqi Self Gripping Fast Wireless Car Charger is a dashboard/windshield/vent mount for your cell phone that offers easy access to your phone and wireless charging while it is in the mount.

What’s in the box


1 x Roboqi Self Gripping Fast Wireless Car Charger
1 x QC 3.0 DC Power Adapter
1 x USB-C cable
1 x Dash Mount
1 x Vent Mount
1 x Instruction Manual

Design and features

Specifications:


Features:

One Hand Operation:
Take out and put in your phone in 1 second. Automatic wireless car charger with a unique sensor. No button needed.

Fast Wireless Charge:
iCarQi supports Qi fast wireless charging 7.5W compatible for iPhone XS/Max/XR/X/8 8plus & 10W compatible for Android Samsung Galaxy S9/S9+/S8/S8+/S7/Note 8 and 5W other Qi-enabled phone (QC 3.0 adapter included).

Three Mounting Ways:
Two kinds of car mount are provided, and they can be stalled in three different ways: windshield installation, driving-platform installation, air outlet installation. The universal rotary ball, with360 degree of freedom rotation. It can be used at any angle, which brings a flexible range of viewing angle.

5 Reliable methods of Protection:
The iCarQi wireless car charger can detect the voltage of your devices intelligently so as to apply different wireless charging speeds, up to 90% charging conversion. Also includes built-in Over-Temperature Protection, Over-Voltage Protection, Over-Current Protection, and Short-circuit protection keeps your smartphone safe comprehensively.

The charging base has the wireless charger in the center that touches the back of your cell when it is placed in the mount. The clamping arms on each side are controlled by the small protruding button/contact sensor in the lower center of the base.


On the back of the charging base, there is the receptacle for the dash or vent mount. There are also some air vents on the back.

On the bottom of the charger, there is a LED status light and a USB-C port.
The dash mount has two thumb screws that allow you to adjust the mount up/down and to extend the mount in/out.


At the bottom of the dash mount, there is the suction cup that is used to attach the mount to the windshield or dashboard.
A vent mount clip is also included for mounting the charging base to the air vent.

Performance

The dash mount is easily adjustable to extend some distance out from the dash and easily attaches to the dashboard via the built-in suction cup. I do not like to attach phone mounts to my windshield or my air vents. In my opinion, the mount is most stable when mounted on the dashboard. It is very steady despite the roughness of the roads and the potholes that I encounter every day when driving.

The pictures below show the phone in the dash mount. The top left-hand corner of the phone screen shows the charging icon that confirms that the phone is being charged.


The DC power adapter plugs in the vehicle DC port. In addition to the connected charging cable, it has a second USB jack that allows you to charge/power an additional device. The port is backlit by a blue LED. The status LED on the charging base lights red when there is no phone being charged in the base and green when your phone is connected to the wireless charger.


Below is a view of the USB-C power cable connected to the charging base. To remove the phone from the charging base, you simply start to pull it out from the bottom of the phone which disengages the contact sensor seen below and opens the clamping arms. When you place the phone into the charging base and it presses the contact sensor, the clamping arms close.

I am very dependent on my cell phone and my frequent use of it does not allow me to drain the battery to test the charging time from drained to full. However, I will say that whenever I place my phone in the charging base, it is very noticeable that it charges very quickly. For the record, I am using the iPhone 10X Max.

What I like

  • The secure way that the arms hold the phone and how they are activated via the contact sensor
  • The mounting options
  • The wireless charging feature

What can be improved

  • Nothing so far

Final thoughts

This is the second wireless dash mount phone charger that I am testing that is around $50. The previous one started out great but died in less than 3 months. That one had an IR sensor that controlled the clamping arms. This one uses a contact sensor that may prove to be more durable than the previous model. Only time will tell. Otherwise, it works well and does exactly what it is intended to do including providing a fast charge. For now, I will give it two thumbs up!!

Price: $49.99
Where to buy: The Micro Novelty website
Sample: The sample for this review was provided by Micro Novelty

Filed in categories: Reviews

Tagged: , ,

ROBOQI Self Gripping Fast Wireless Car Charger review originally appeared on The Gadgeteer on April 18, 2019 at 9:15 am.

Note: If you are subscribed to this feed through FeedBurner, please switch to our native feed URL http://the-gadgeteer.com/feed/ in order to ensure continuous delivery.

iKlip 3 Deluxe tablet mount review

REVIEW – Tablets are great portable devices, but occasionally you need to use them in places that don’t always have a good place to put them. The iKlip 3 from IK Multimedia aims to provide a solution for that, at least in a couple of key usage scenarios.

What is it?

The iKlip 3 is a tablet mounting solution that provides multiple ways to mount your device. There are three versions: iKlip 3 for Universal mic stand support, the iKlip 3 Video for tripod mounting, and the iKlip 3 Deluxe that has both mounting solutions. This review covers the iKlip 3 Deluxe.

What’s in the box?

  • iKlip 3 holding bracket
  • Universal mic stand mount – Fits any mic stand or pole with a diameter of up to 1.2″ (30mm)
  • Universal tripod mount (1/4″-20 UNC)
  • UNC 1/4″-20 male to 5/8″-27 female thread adapter
  • 5/8″-27 male to 3/8″-16 female thread adapter
  • Quick start guide


Hardware specs

  • Holds any iPad, iPad mini, iPad Air, iPad Pro and tablet model with screens ranging in size from 7″ to 12.9″ with case on
  • Holding Bracket Width: 160mm (min) – 230mm (max) / 6.29″ (min) – 9″ (max)
  • Total Weight: 340gr / 12oz
  • Material: Thermoplastic

Design and features

I volunteered for the iKlip 3 review because I had a specific need that I hoped the iKlip 3 could solve. I wanted to mount my Surface 3 tablet to my tripod so I could use it as a monitor for my camera while taking photos.

The mic stand clamp mount turned out to be a little too small for my larger-than-normal tripod leg, so I mounted it on one of my smaller tripods for testing. The tripod mount included does feature a standard 1/4-20 threaded mount so I’ll be able to use that once I get a little larger clamp for it.


The iKlip 3 certainly feels very rugged. The thermoplastic has a slightly flat finish that helps keep glare and fingerprints to a minimum. The holding bracket attaches to the mounts with a ball & socket connection. The ball portion has a rubberized surface where it contacts the socket. This provides for smooth movement while adjusting your viewing angle without having to loosen the clamp, but also makes it a little more difficult to position precisely.

The holding bracket has recessed areas for your fingers to aid in placing a tablet in the bracket. The bracket also has rubber grips to hold the tablet without marring its finish.

At first, I found it a little difficult to put the device in the holding bracket, but once you figure out exactly how to hold your particular device and how to pull open the bracket, it was pretty easy. It is quite a bit easier to put the device into the clamp when the clamp is actually attached to something.


I did find that I pinched my fingers when placing my phone in the bracket. This was mainly because I was holding it on the side and not from the ends as it’s designed to be operated.

The ball & socket mounting area is perhaps the trickiest part to figure out. At first, I unscrewed it too far and half the socket fell out. I would prefer to see this part be captive so that there was no chance of dropping this part. However, once you figure out that you don’t have to unscrew it that far and you can just pop the ball in with a little pressure it’s not too bad to use. Once the ball & socket is tightened down, you can still position it with mild pressure.


Each of the mounting solutions features a spring mechanism that allows you to rotate the bracket in 12 steps by simply pulling outward and rotating it. I found this to be a little unnecessary because you can always just rotate the ball & socket joint with a little pressure since it never fully locks down.

The include thread adapters are a nice touch, allowing you to adapt from a standard 3/8″-16 tripod thread or 5/8″-27 male mic stand thread to the 1/4″-20 thread used for the tripod mount.


The iKlip 3 comes with free apps from IK Multimedia that can be used for various things, mostly in the area of music recording.

There’s also a slot in the back that can be used to secure interfaces, cables or other accessories.

What I like

  • Strong device clamping mechanism
  • Multiple mounts

What needs to be improved

  • Ball design doesn’t lock down all the way, but is still pretty solid for stationary use
  • Ball socket too easy to come apart
  • Clamping mechanism has pinch points

Final thoughts

Although I list some things that could be improved, they are minor things that either won’t bother most people or don’t impact the normal operation of the iKlip once you figure them out. They are more like “things that could be better” and definitely not deal breakers. Overall the iKlip 3 is a sturdy and versatile clamp that will hold almost all tablets. The mounting options allow you to use it in a multitude of configurations.

Price: $49.99 – $69.99 ($69.99 as tested)
Where to buy: IK Multimedia and Amazon
Source: The sample of this product was provided by IK Multimedia.

Filed in categories: Reviews

Tagged: ,

iKlip 3 Deluxe tablet mount review originally appeared on The Gadgeteer on March 25, 2019 at 9:00 am.

Note: If you are subscribed to this feed through FeedBurner, please switch to our native feed URL http://the-gadgeteer.com/feed/ in order to ensure continuous delivery.

Tech Armor Wireless Charging Car Vent Mount review


REVIEW – As I detailed in my recent review of the expensive and functional Naztech MagBuddy Wireless Charger, most newer cell phones are able to be charged wirelessly and there are a growing number of options on the accessory market these days. Following up with that review comes my experience using the slightly more affordable Tech Armor Wireless Charging Car Vent Mount. At $29.99, the Tech Armor Charger has an innovative method of securing your phone and is serviceable but a bit flimsy.

What is it?

The Tech Armor Wireless Charging Car Vent Mount is a car phone holder that can charge your Qi-enabled phone through contact. The charger holds the phone in place with two side brackets and charges through power coils embedded in the mount. The Tech Armor can deliver 10W of power to certain iPhones and Samsung phones, but other phones, like my Google Pixel 3, will only receive the standard 5W of power.

The Tech Armor arrives in a thin cardboard box that has a picture of the device on the front and details its capabilities. The unit and accessories are well protected inside the box in a molded plastic holder.

What’s in the box?

  • 1 Tech Armor Wireless Car Charger
  • 1 Micro USB Cable
  • 1 Base Stand Attachment
  • 1 User Manual

Design and features

When I first opened the box for the Tech Armor Charger I was excited to see that the brackets were made of aluminum, but unfortunately, I was mistaken. The brackets are made of lightweight plastic made to resemble aluminum.

Despite the plastic construction, the Tech Armor Charger does have an innovative solution for holding your phone. The side brackets of the mount are spring loaded to stay open and are triggered to close when weight is applied to lower bracket.

When you drop your phone down on to the lower bracket, the weight of the phone closes the side brackets which keep your phone in place. The system works well and held my phone in place securely.

On the back of the Tech Armor Charger is a small four slotted vent mount. To mount, push the slots on to the vent fins of your car and the pressure of the slots hold it in place. There is a small nut that tightens or loosens a ball and socket joint which allows you to position the phone at a desirable angle.

If your car’s air vents aren’t compatible with the Tech Armor mount, you can use the supplied Base Stand Attachment to secure the charger.

The Base Stand Attachment fits snugly over the vent mount on the back of the charger.

Once the attachment is connected, you can use the 3M adhesive on the bottom to secure the charger to your dashboard.

I’m not sure how stable the Base Stand option is, but I’m glad they provided a way to use the mount in cars that may not have compatible vents.

The Tech Armor Charger is powered via a Micro USB port on the back of the unit.

The included Micro USB to USB A cable connects to the unit and then to any USB power supply. I was disappointed to find that the Tech Armor Charger did not come with a USB car lighter power adapter.

Setup

Setting up the Tech Armor Wireless Charger is very easy to do. Attach the mount to your car vent, connect the unit to a power source, drop in your phone and you’re good to go.

It took some time to adjust the Tech Armor to the right angle. A few times, I thought the angle was correct, only to have it shift because the unit wasn’t securely attached to my car vent.

Performance

For the price, the Tech Armor Charger performs well. Every time I put my phone into the charger, the mount held it in place and the wireless charger immediately kicked in. There were a few stability issues, but I was able to narrow it down to how my car’s vents work and was able to correct it.

One major complaint though is that because of the way the mount is designed, you’re not able to rotate the phone and use it in landscape mode. If the phone is rotated too much in any direction the weight is removed from the bottom bracket and the phone will fall out. This goes directly against Tech Armor’s claim on the website that the angle of the unit is adjustable.

After repeated use, it’s also clear that despite what it says on Tech Armor’s website, the unit is not able to be operated one-handed. When you drop the phone into the mount you need to use two hands, one for the phone and one to support the unit; the same goes for removing the phone. You can’t remove the phone without securing the unit first.

What I like

  • Stable connection and power
  • Easy setup
  • An innovative way of securing the phone

What needs to be improved

  • Can’t rotate the phone
  • Stability dependent on car vent
  • No car charger included
  • Plastic, flimsy construction

Final thoughts

The Tech Armor Wireless Charging Car Vent Mount is a functional, affordable option for those looking for a way to charge their newer phones on the go. The charger supplies steady wireless power and a stable phone holder if your car’s vents are compatible and stable themselves.  Though, I was disappointed that at a cost $29.99 the charger didn’t come with a car lighter power adapter, was made totally of plastic, and doesn’t give you the option to use your phone in landscape mode. The overall construction is a little flimsy, but the Tech Armor Wireless Car Charger does what it was made to do.

Price: $29.99
Where to buy: Tech Armor and Amazon.
Source: The sample of this product was provided by Tech Armor.

Filed in categories: Reviews

Tagged: ,

Tech Armor Wireless Charging Car Vent Mount review originally appeared on The Gadgeteer on January 30, 2019 at 11:00 am.

Note: If you are subscribed to this feed through FeedBurner, please switch to our native feed URL http://the-gadgeteer.com/feed/ in order to ensure continuous delivery.