Visionect Joan meeting room management device review

REVIEW – If you have more than 1 conference room and more than 1 employee, you’ve most likely run into overbooked meeting space syndrome.  Sure, most corporate calendar systems will help broker online room bookings, but how can you effectively manage the unwashed hoard of conference room squatters?  The Joan system from Visionect takes a run at solving this problem as well as seeking to provide tools that will help your overall communication strategy.  Let’s see how well Joan works…

What is it?

The Visionect Joan system consists of 2 sizes of e-ink tablets managed by a web platform.  There is a 13 inch tablet which is intended to give a complete view of your meeting rooms (probably deployed at a reception desk or other common area) and a 6 inch tablet designed to be a marquee for an individual meeting space.  The displays are e-ink so they are very low power and will last up to a year on a single charge.  The web platform drives all of the devices.

What’s in the box?

  • One tablet (your choice of size)
  • A very brief instruction sheet
  • A micro-USB charging cable

Design and Features

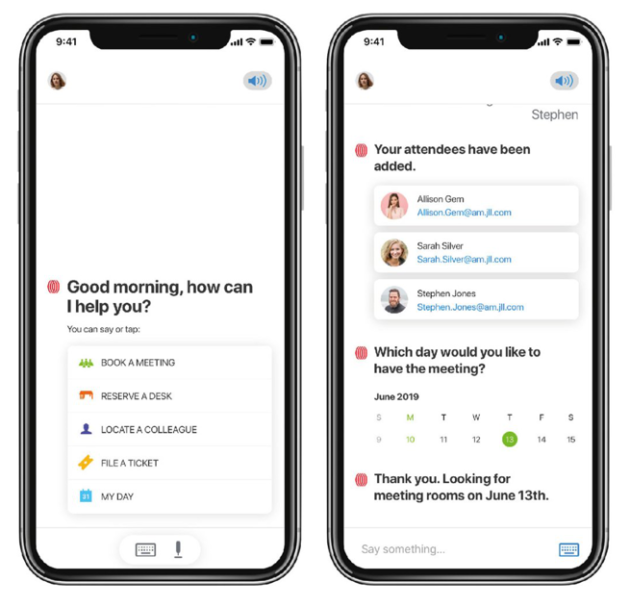
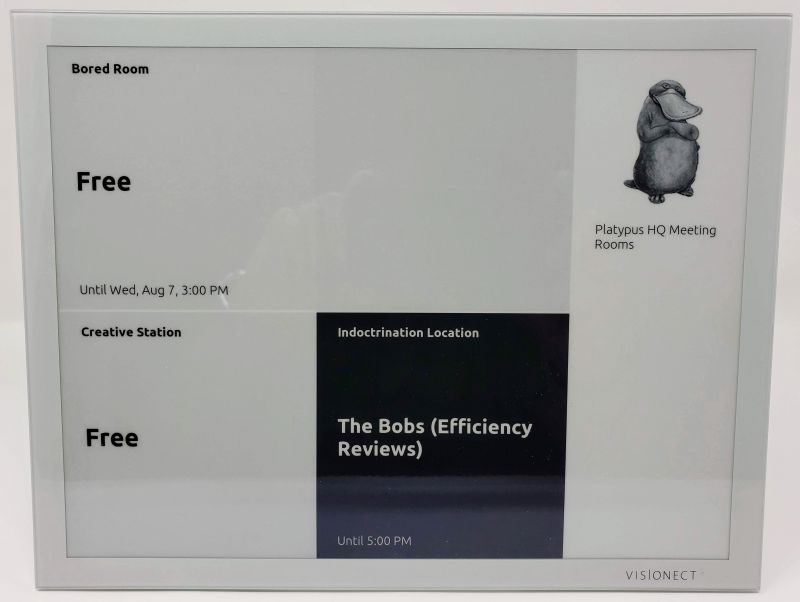
In order to fully take advantage of the Joan system, you need at least 1 each of the 6 and 13 inch tablets.  The 13 inch tablet can serve in a number of capacities, but not more than one at a time.  The larger tablet can act as a single room schedule board, showing current, next and upcoming events in a single room.  The tablet is not a touch screen, though, so it can only display this information and will not allow a user to interact.  There is a room grid view (first picture above) which shows you the current state of up to 9 rooms.  And finally there is a team view – this allows you to select 9 team members and show their current status (in a meeting, available, out of office, etc.).  Buried in the portal is another display mode, a “custom content” display (available only with the Premium subscription – more on this later).  This mode allows you to upload your own images and text to the tablet and can serve as a communications hub.  For example, you can give details about the company picnic, and set that to display Monday through Friday from 9-11 AM on as many devices as you would like.  When active, this custom content will supersede the base function of the tablet – if set to the room grid, the custom content will display from 9-11 AM instead of the room grid.

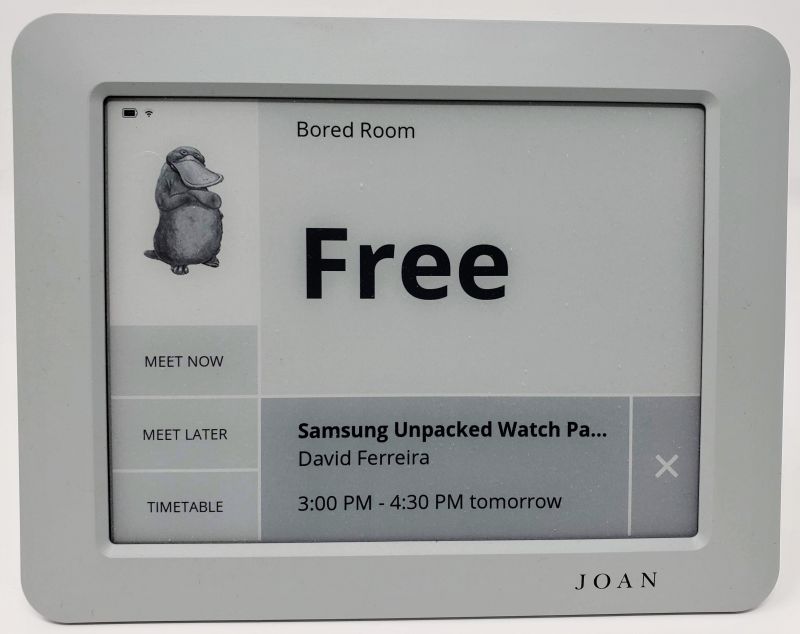
The 6 inch tablet is intended as a single room display and so it has a capability the larger tablet does not – it is a touch screen that allows you to control the room bookings remotely.  In addition to real time booking, the smaller tablet also supports “hoteling”, a concept which is gaining a lot of traction for larger companies with a geographically dispersed team.  When a team member is going to be in the office, that team member can book a desk to work at for the length of time he/she will be on site.  This type of booking is generally longer than a conference room event, so although the concepts are at the core somewhat the same, how companies approach the booking will differ, and so this smaller tablet will support those differences.

Mounting the tables is relatively simple – the 13 inch tablet has VESA mounting holes but also comes with a heavy-duty magnetic pad that attaches to the wall.

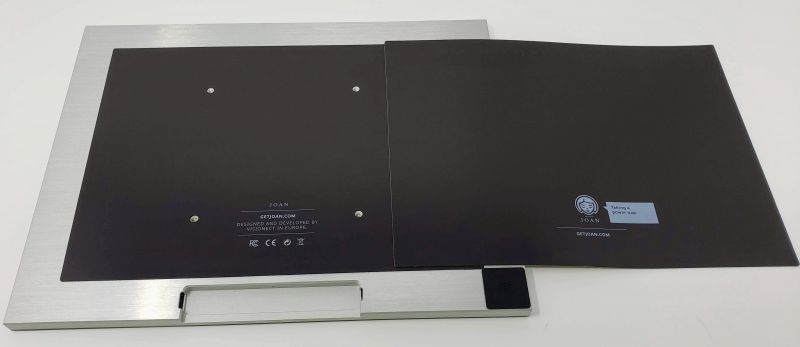
The 6 inch tablet does not have a VESA mount.  Out of the box it supports only the magnetic pad.  Visionect also sells other types of mounts separately, although there are generic 3rd party mounts that will work as effectively for less money.

Joan will also work on an existing display like a TV or large monitor.  As long as you have access to a web browser, your own display can show a status grid of all rooms.  The display is not interactive, though, so you are unable to book or get details on a booking beyond the meeting name, meeting organizer, the number of confirmed attendees, and day/date/time/length of the meeting.  You also need to have a premium subscription to bring your own display – more on pricing and such later.

Setting the system up is not a terribly complicated affair.  To begin, you create an account on the Joan portal.  During the account creation process, you can select from Microsoft Exchange, Office 365, Google G-Suite or CollegeNET 25Live systems.  If your particular calendar system is not directly supported but it can generate iCalendar files, Joan will work with that as well.  For any of the systems you simply provide the credentials Joan will use to retrieve and manage bookings, and Joan will return a list of rooms that you have previously defined.  Select the rooms you want, and you are ready to go (at least, from the portal perspective).

Next you have to pair a device.  In order to do this, you have to download a utility that runs on either Windows or a Mac.  This utility connects to a tablet (6 or 13) via the charging cable and will help you set up the local network.  There is an important gotcha awaiting you here, though.  Because the displays on these tablets are e-ink, they will continue to show information on screen long after there is enough juice in the battery to actually boot up.  When the utility attempts to connect, it does not tell you the device is unable to boot nor does it report on the current battery charge – it simply sits on the “connecting” screen waiting for something to happen.  If your tablet is connected to your computer, odds are it is “trickle-charging”, so it might actually sit on this screen for hours before the battery has enough to power the unit.

Once you get past this issue, it should be smooth sailing.  The device will connect to your wireless network (both 2.4 and 5 mHz networks are supported) and will register with Joan.  Back in the portal, name your device and decide which mode it will operate in.  If in a multi-room display, choose your rooms.  Single room?  Pick the room.  Within minutes the display will pick up the data and you will be live.

Here’s where it gets interesting.  On the 6 inch tablet, you can manage a room directly from the tablet.  For example, you can hit the Meet Now button to automatically book the room for up to 30 minutes (if another scheduled meeting is less than 30 minutes away, the Meet Now button will only allow you to book up to the next meeting).  Almost instantly the meeting is reflected online, so others can double-book.

You can also extend a meeting while the meeting is in progress, but only as long as there is until the next booking or the end of the business day.

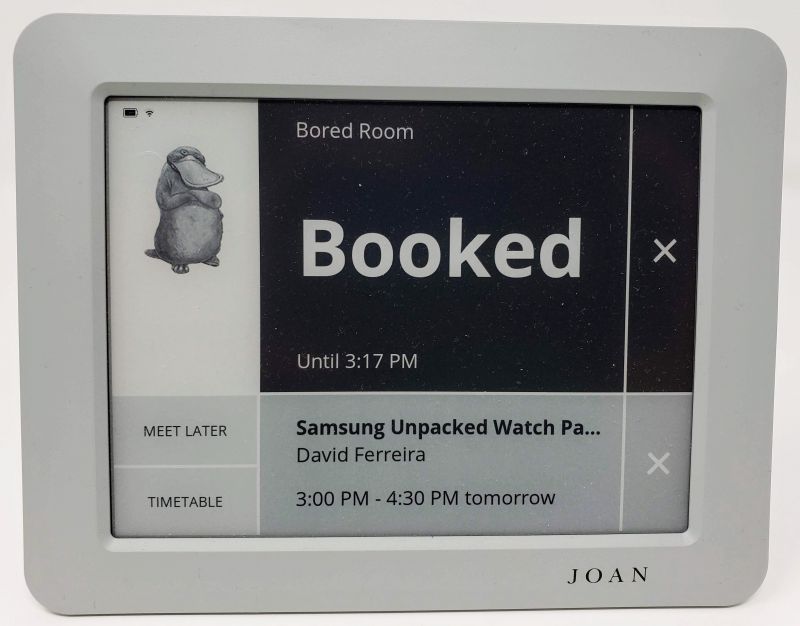
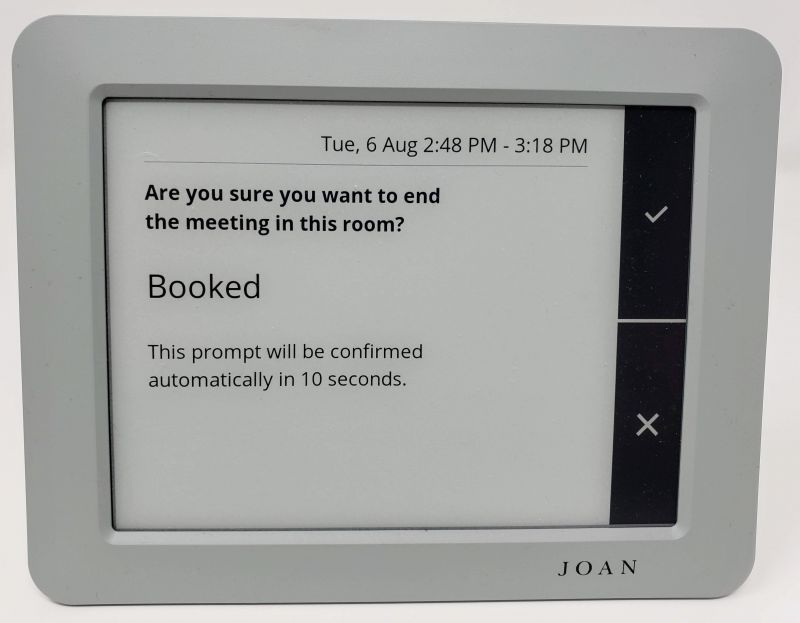
Tapping the X on your booking allows you to end a meeting early and free up the room.  This does not end the meeting online, though – your system will continue to show the room as booked online, but the tablet will show the room as free.

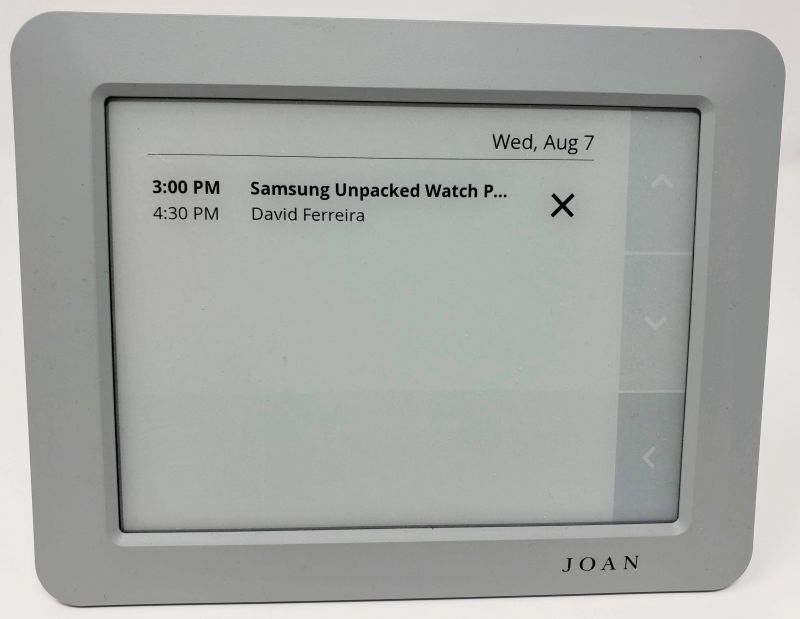
You can also review the room bookings by selecting the Timetable button.

Armed with this information, select the Meet Later button to book the room directly from the tablet.

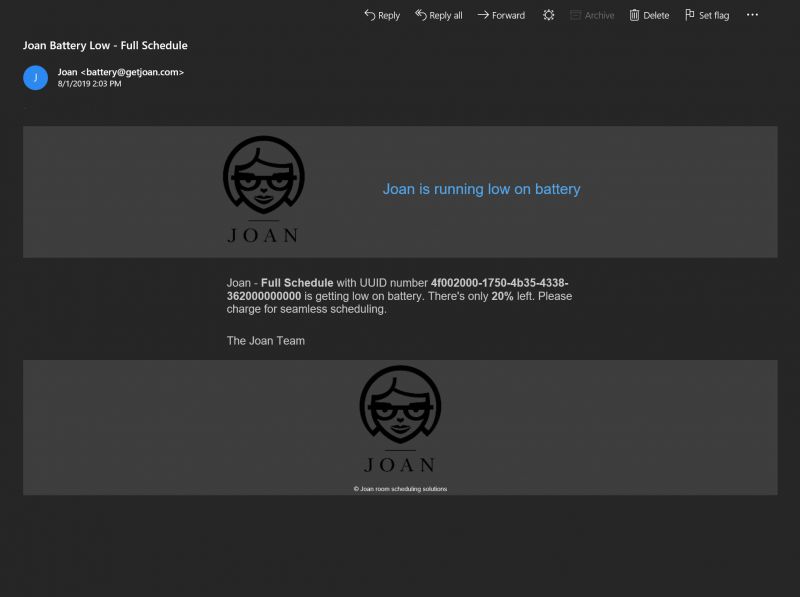
And that’s all it takes to manage your rooms!  The system will even send you email to let you know your battery needs to be charged.  The system is easy to use and has all the right checks and balances to ensure no armed hostilities break out between teams over a double-booked room.

This is where the other shoe drops, though.  Sure, Joan is simple to use but very powerful – and that power comes at a high price tag.  Let’s take my company as an example and price out the system.

First, we want a single master display, so we need a Joan 13 (it comes in either graphite black or slate gray).  That display is $899.  Next, we have 3 conference rooms so that is 3 Joan 6 units (also available in either graphite black or slate gray) at $549 per unit.  Just to get started, we have spent $2,546.  Specialized mounts (secured wall mounts, desk or floor stands), extended device warranties and additional magnetic pads are all extra costs.

Next, there is the subscription cost.  Visionect bills by the device, not by the number of rooms you have to manage as other similar services do.  If you have an Ubuntu virtual machine, you can opt into a self-hosted plan that is essentially free.  The Joan portal manages the devices but the actual scheduling and device display data comes from your hosted instance.  This is a free option up to the point where you have to run your own server – definitely not a “free” choice, but perhaps an acceptable one if you already manage your own IT infrastructure.

Assuming you don’t want this responsibility, Joan also acts as a SaaS provider (Software as a Service).  There are 2 plans available: Standard ($11/month or $119/year per device) and Premium ($21/month or $229/year per device).  It is not entirely clear from the price guide whether the “bring your own display” option counts as a device, but I would assume it does.  The Premium plan gives more integration options (like WebEx meeting rooms and Amazon Alexa management) and additional features (parking management, custom content).

There are some savings in going with annual billing, so for our example we will chose that option.  With 3 devices, our cost is $687, bringing our total cost to start to $3,233.  Not horrific pricing, but not trivial either.

Is it worth it?  If you have room management issues, if your team uses hoteling or if you just want to stay on top of space management, then yes.  If your current system is working for you, probably not.  I will say this, though – if you go with the Joan system, you will be getting one of the best technical support operations around.  I had a few minor issues setting things up for this review, and the Joan team was all over my concerns each time I contacted them.  You won’t feel like you flushed a pile of good money down the drain – they will help quickly and efficiently, and get you back to full operation in short order.

What I Like

  • Pretty much everything: devices, options for integration, support, how well the system works end to end

What I’d Change

  • Price – if you are a startup, this might be a very high cost.  And while both tablets are very well built, it feels like an e-ink display should cost less than this.

Final Thoughts

Visionect’s Joan platform and devices are well thought out and pretty much flawlessly executed.  This would be a life saver at larger companies I have worked for and can scale down to help even the smallest of companies.  If you have the cash and a compatible scheduling system, this could very well be a worthwhile purchase.

Price: Depends on device and configuration
Where to buy: Visionect Joan
Source: A 6 and 13 inch Joan device and a month of Premium service provided by Visionect Joan.

Filed in categories: Reviews

Tagged:

Visionect Joan meeting room management device review originally appeared on The Gadgeteer on August 19, 2019 at 11:00 am.

Note: If you are subscribed to this feed through FeedBurner, please switch to our native feed URL http://the-gadgeteer.com/feed/ in order to ensure continuous delivery.

Stealtho office chair wheels review

REVIEW – Tired of your old, creaky office chair wheels rolling across that cracked plastic mat? Stealtho office chair caster wheels may be just the thing to rejuvenate your trusty office chair.

What is it?

Stealtho wheels resemble inline skate wheels, made of an elastic polyurethane, for a smooth, scratch-free glide across your hardwood floors.

What’s in the box?

Pretty straightforward: I found exactly five replacement wheel assemblies.

Hardware specs

From the product description:

  • STEALTHO embedded support skirt, no wobble even with worn-out base housing holes.
    Wheel has two additional thrust ball bearings in the cage that prevents them from falling out.
  • STEALTHO combined the elastic polyurethane with luminophore on the base of strontium aluminate which can radiate light at a level 20 percent. It increases the wheels wear, as well as makes the wheel glow in the dark and roll over cables. This combination of durability and “no stumble” function gave STEALTHO the basis for its PATENT (currently pending).
  • The body of the wheel is made of heavy-duty tool steel and its shape is achieved by 3-times pressing at a temperature of 3000 ºC, that’s why the set of wheels can withstand up to 660 pounds.
  • STEALTHO wheels fit standard office chairs from Herman Miller Aeron, Mirra 2, Steelcase, Dxracer, Humanscale Freedom, Lazyboy Serta, Hon Nucleus, Boss, Staples, Office depot which have the universal grip ring stem 11 mm x 22 mm (7/16″x7/8″), (don’t fit IKEA).

It’s important to note the last part. The casters will fit chairs that accept a 7/16″ diameter stem. Apparently IKEA, chairs are different.

Setup

Simply pull out your old casters and insert the Stealtho ones. Here’s my dirty office chair, resting atop a floor mat.

Notice how the Stealtho assembly is slightly taller than my original ones. You may have to readjust your seat height.

Wheels installed! Piece of cake. No more floor mat.

Performance

The first thing I noticed was how grippy these wheels are versus my original hard plastic ones. They glided smoothly but sometimes changing directions meant a brief moment of “sticky” grip, similar to wearing new sneakers on a smooth basketball court. However, after a week of use, I noticed the wheels were getting a little dirty and the grippy “squeak” sensation has gone down a bit.

The wheels are advertised as glow-in-the-dark, and it’s true. However, my desk area isn’t very bright so the wheels never got enough ambient light to be visible in the dark. I took a flashlight and “charged up” one wheel to see the effect. You can’t see the wheels in the background, but they’re there… not glowing!

What I like

  • Easy to install
  • Rolls smoothly without the need for a floor mat

What I’d change

  • The glow feature isn’t very powerful
  • I wish the wheels weren’t quite so grippy

Final thoughts

Despite the grippy squeak of the Stealtho office chair wheels, I kind of like not having a plastic floor mat that keeps shifting around my floor. That’s a tradeoff I can live with.

Price: $39.99
Where to buy: Amazon
Source: The sample of this product was provided by Stealtho.

Filed in categories: Reviews

Tagged:

Stealtho office chair wheels review originally appeared on The Gadgeteer on August 9, 2019 at 10:00 am.

Note: If you are subscribed to this feed through FeedBurner, please switch to our native feed URL http://the-gadgeteer.com/feed/ in order to ensure continuous delivery.

Xerox Duplex Combo Scanner review

REVIEW – Each of my two printers at home has a scanner, but neither is a duplex scanner. When the Xerox Duplex Combo Scanner was offered to the Gadgeteer for review, I was excited to try it out. What’s the verdict? Well, it’s relatively small and lightweight. It scanned my large two-sided documents quickly and allowed me to save them as searchable-PDF files (there are lots of file types you may save your scan as). I also found that I was able to scan multiple photos at once and save them as individual files using the multi-crop TWAIN application setting.

However, when scanning a large document, it sometimes would crop off important information close to the edge of the page thus requiring me to rescan that page. In addition, while scanning photos using the multi-crop setting, the scanner would get crop-happy and chop a photo into tiny pieces creating for me my very own unique and challenging puzzle. Anyway, I had to rescan the image by itself without the multi-crop setting. Additionally, the quality of the photo scans was not quite as good as I expected.

Overall, this scanner makes quick work of large two-sided documents and scanning lots of photos but you need to review the scans carefully to make sure all the information is there and the photos are intact.

What is it?

The Xerox Duplex Combo Scanner is a device that will scan your documents and photos using either the duplex Automatic Document Feeder (ADF) tray or the flatbed scanner and will allow you to save the scans digitally in different file types depending on the scan destination. Duplex scanning means that this scanner can scan both sides of one sheet of paper simultaneously. This scanner is meant to supplement your existing printer(s) to give you or your small business additional functionality.

NOTE: This scanner is NOT WiFi or Ethernet compatible. It connects to your computer via USB and uses your computer’s processor and WiFi or Ethernet connection to your network to do its work.

What’s in the box?

  • Xerox® Duplex Combo Scanner
  • Power Supply with Power Plug Adapters
  • USB Cable (USB-A to USB-B cable, USB 2.0 data transfer speed)
  • Spare ADF pad
  • Quick Installation Guide
  • Technical Support Card
  • Warranty Card
  • DVD-ROM including:
    • User’s Manual
    • Visioneer OneTouch
    • Visioneer Acuity
    • ABBYY Business Card Reader
    • ABBYY Fine Reader Sprint
    • Scanner Drivers: TWAIN, EMC® Captiva® ISIS® and Microsoft Windows Image Acquisition (WIA) Driver

Hardware specs

Document Requirements (ADF)

  • Minimum Item Size 3 x 5.9 inches (76 x 150 mm)
  • Maximum Item Size 8.5 x 14inches (216 x 356mm)
  • Capacity 35 pages of 20lb printer paper (75–80 gsm)
  • Paper Thickness 16–28 lbs. (60–125 gsm)

Document Requirements (Flatbed)

  • Minimum Item Size 0.5 x 0.5 inches ( 13 x 13 mm)
  • Maximum Item Size 8.5 x 11.70 inches (216 x 297 mm)
  • Item Thickness 0.39 inch (10 mm)

General Specifications

  • Model Number: XD-Combo
  • ADF Scan Speed: 25 ppm/50 ipm @ 300 or 200 dpi (Color, B&W, or Grayscale)
  • Duty Cycle: 1500 pages/day
  • Optical Resolution: 600 dpi
  • Interpolated Resolution with Visioneer Acuity: 75, 100, 150, 200, 300, 400, 500, 1200
  • Output Bit Depth: 24-bit color, 8-bit grayscale, 1-bit bitonal (black & white)
  • Scan Method: Duplex Automatic Document Feeder (ADF) or Simplex U.S. Letter / A4 Flatbed
  • Scanning Media Supported: Paper, plastic ID cards, photos
  • Image Sensor: CIS (Contact Image Sensor)
  • Light Source: RGB LED lamp
  • Interface: Hi-Speed USB 2.0, compatible with USB 1.1
  • Certifications: UL/C-UL, FCC CLASS B, CE, CB, WEEE, ROHS, ENERGY STAR, MEXICO ENERGY (CFE), RCM, USB-IF, CCC
  • Operating Temperature: 40° ~ 95° F (5° ~ 35° C without condensation)
  • Relative Humidity: 10% ~ 90%

Scanner Dimensions (Trays Extended)

  • Width 15.8 inches (402 mm)
  • Depth 13 inches (330 mm)
  • Height 5.5 inches (139 mm)
  • Weight 5.94 pounds (2.7 kg)

Power Information

  • Power Supply APD (WA-36A24R)
  • DC Jack, 2P, 100~240 VAC, 24 VDC, 1.5 A, 36 W, Class 1, ENERGY STAR, RoHS
  • Scanner Rating: 24 VDC, 1.5 A
  • Power consumption
    • ≤ 15 Watts (during operation)
    • ≤ 6.0 Watts (on standby)
    • < 2.0 Watts (power save after 15 minutes without scanning)
    • ≤ 0.5 Watt (power off)

Cable Information

  • USB cable 1850 mm, 28AWG, with core, RoHS compliant

Software Information – Supported Operating Systems

  • Microsoft Windows
    • 32-bit or 64-bit 7 (Service Pack 1)
    • 32-bit or 64-bit 8 / 8.1
    • 32-bit or 64-bit 10

Scanner Drivers

  • TWAIN, WIA, ISIS

Bundled Software

  • Visioneer® OneTouch®
  • Visioneer® Acuity Module

Design and features

The Xerox Duplex Combo Scanner is a really lightweight and small flatbed/duplex ADF scanner. I was surprised by how lightweight it was. It is almond colored and made of hard matte plastic. The top of the scanner has paper guides and an Input Tray for the ADF. And just below that is the Output Tray.

The plastic control panel is very simple and contains from left to right an LED display, the Up/Down Function keys, a Simplex button, a Duplex button, and a Power button/Status Light. The control panel looks black in my photos by is actually a very dark blue.

If the ADF gets a paper jam or you need to replace the small blue ADF pad, you can do so by lifting the ADF cover. Lifting the Scanner Lid reveals the flatbed scanner. The bottom of the scanner has rubber pads at the corners to prevent scratching furniture or moving around. You’ll also notice that on the left side of the bottom of the scanner is a grey sliding button. This is a locking button that will prevent the scanner from scanning when in the locked position. You must slide this button to the unlocked position in order to use the scanner. The back of the scanner has the power port and the USB-B port that you use to connect to an outlet and your computer, respectively.

Setup

I chose to install the driver and all of the scanning software. I did not install it from the web because I received errors, so instead, I installed the software from the DVD and checked for updates later. The installation took quite a bit longer than I anticipated. Each piece of software required me to accept the terms of use before proceeding.

Performance

Once all the software was installed, I could launch the One Touch 4.6 software which would bring up the above tiny screen of scanning functions. Left-clicking on any of the icons (Scanning Function Presets 1-9) starts the scanning process when the scanner is powered on and connected to a computer. Right-clicking on any of the icons launches the One Touch configuration screen.

The OneTouch application provides nine preset scanning functions for this scanner:

  • Function 1 – “Scan” – the default uses the ABBYY FineReader Sprint application destination and saves the file as a searchable PDF
  • Function 2 – “Search” – the default uses the ABBYY FineReader Sprint application destination and saves the file as an sPDF
  • Function 3 – “Print” – the default uses the Microsoft XPS Document Writer setting destination and saves the files as a BMP
  • Function 4 – “Email” – the default uses the PackagedMail setting destination and saves the file as a PDF
  • Function 5 – “Archive” – the default uses the Transfer to Storage setting destination and saves the file as a PDF
  • Function 6 – “Photo” – the default uses the Transfer to Storage setting destination and saves the file as JPG
  • Function 7 – “Edit” – the default uses the Microsoft Word application destination and saves the file as a DOCX
  • Function 8 – “Contact” – the default uses the ABBYY Business Card Reader application destination and saves the file as a JPG
  • Function 9 – “Magazine” – the default uses the Transfer to Storage setting destination and saves the file as a JPG

Configuration settings for preset scanning functions


The first screenshot above is the OneTouch configuration screen for Scanning Function 1 entitled “Scan”. The default view is the Multi-Function tab which allows you to select the destination of the scan, the saved file type, and the configuration.

The Options tab located at the top of the screen (shown in the second screenshot above) allows you to select things like which destinations to show, “Use job separator when scanning multiple pages”, and “Custom file naming”.

The last screenshot comes up when you click on the Edit button from the default configuration screen. On this screen, you must first unlock the preset configuration by clicking on the lock icon to allow you to adjust the settings.

You can alter the Scan Settings as shown in the last screenshot above…


…Page Settings, Acuity Settings, Redaction Settings (not shown), Advanced Settings, and sometimes Storage Settings depending on which scanning function you are editing.

When selecting the file type from the default configuration screen, you can right-click on the file type to select the quality of the scan e.g. minimize size, normal, or maximize quality.


I tended to use Scanning Preset Functions 1 and 5. Scanning Function 5 is entitled “Archive”. When editing this function, I was additionally able to edit Storage Options settings like where to store the file.

Scanning large two-sided documents

After altering the Scanning Function 1 to my preferences, I was able to start scanning some large two-sided documents by left-clicking on the icon. You can also use the control panel on the scanner to select Function 1 using the Up Function key or Down Function key and then press the Simplex or Duplex button on the scanner.

After the initial scan was completed, I was then prompted to enter a file name because that’s how I configured the scanning function.

Because the ADF tray limits the number of pages it will hold to about 35, I had to divide large documents into sections. After scanning the first section and naming it, Scanning Function 1 opens up the ABBYY FineReader 12 Sprint application which was the destination for Function 1. However, this is only one section of the document that I was scanning and I wanted to save all the sections in one file. To do this, I needed to click on “Add pages” and select “Add from scanner”.

After selecting “Add from scanner”, the right pane of the application displayed settings for the additional scan (so, I guess I’m no longer using the OneTouch scanner settings but the ABBYY FineReader Sprint scanner settings?). I selected the ADF double-sided paper source, Letter (11″x8.5″) paper, 300 dpi resolution, and the Grayscale (Optimal for OCR) setting. I then clicked on the “Scan to Document” button.


While scanning a large document which was about 400 pages long, there where some cropping issues. Periodically, when there was important information near the edge of the page being scanned, it was cropped such that some of the information was lost as shown in the screenshots above. This happened to about 20 pages out of 400.

To illustrate the problem, the first and third images above were scanned using the ADF and lost some details, while the second and fourth images above were scanned using the flatbed scanner and did not lose any detail. I had to rescan the problem pages and place the new images in the correct position in the document then delete the messed-up image. This was a bit tedious. I tried to figure out if settings like “AutoCrop to original” were the problem, but nothing seemed to work.

You can also see in the above scans that even though the scanner was set to scan to 8.5″ x 11″, the widths of each page is slightly different. This drives me crazy! However, even though the pages are slightly different widths, most of those pages did not lose any information.

When I was finished scanning all sections of my large document, I saved it as a searchable PDF by clicking on the red “Searchable PDF” button located in the right pane of the screen. It successfully converted the document into the PDF.

The scan quality of the documents was really quite good – better than the scanners on our printers. The OCR capabilities of the ABBYY FineReader Sprint application was also pretty good. It made most of the text searchable (some text was not very clear on the original to start with).

Overall, even though the scanner made quick work of scanning my large documents, I had to be careful that it wasn’t cutting off important information. In the end, I think it was worth it. I saved a great deal of time using this duplex scanner over my other simplex scanners on my two printers.

Scanning old photos


Using Scanning Preset Function 6, I also scanned lots of old photos. Since I wanted to scan about three photos at a time and save them as individual files, I had to alter the configuration settings for Function 6 to use the TWAIN Driver PLUS settings as shown in the first screenshot above.

After clicking on the “Use TWAIN Driver PLUS settings” checkbox then clicking on the gear icon next to it, it launched the TWAIN driver settings screen (shown in the first screenshot above). I had to select “Advanced” from the dropdown menu located at the top right corner of the screen shown in the second screenshot above to reach the multi-crop settings that I needed which was located under the Advanced tab. It took me quite a bit of time to find the multi-crop setting. But once I found it, I was able to scan three photos at a time and save them as individual files as long as I was saving them as TIFF files (you can’t do this with JPG files).

However, while scanning several photos at a time using the multi-crop setting, the scanner sometimes cropped a photo into small bits as shown above. I’m not sure why – perhaps because of all the vertical lines in this photo? It was necessary to unselect the multi-crop setting and scan the photo by itself in order to get the image to appear correctly as shown above. This slowed the scanning process down some. This happened several times and not just with landscape pictures but also with people. The tops of some people’s heads were cut off and saved as separate files. Perhaps the scanner needs some therapy. Luckily, I was able to scan about two-thirds of my photos without this problem.


The above images are various captures of the same photo to give you an idea of how well the Xerox scanner captures the colors and details of the photo. The first image above is from the Xerox scanner (a 600 dpi JPG). The second image shown above is from the Google Photoscan app on my phone which uses my phone’s camera to capture the photo and the last image is one taken directly with my Pixel 2 XL camera. Each of the photos was resized to 800 x 800, but no other adjustments were made; brightness, contrast, color saturation, color hue, and gamma settings on the scanner were left at the default settings.

The image that best replicates the actual photo is that taken directly from my Pixel 2 XL camera. I suppose with some work, I could get the Xerox scanned image to better replicate that of the original by adjusting the scanner settings or by using photo software. However, if you need a scanner to scan all your old photos, perhaps it’s best to look for a photo scanner.

Overall, the scanner did an adequate job of scanning my old photos. Though you should know that I’m not a really sentimental or nostalgic person. Thus, I felt that I was able to save time by scanning several photos at a time and have the scanner automatically crop them as separate images and save them as separate TIFF files rather than scanning the photos one at a time.

What I like

  • The Xerox Duplex Combo Scanner makes quick work of scanning large two-sided documents
  • For my purposes, it also adequately scans about three photos at once and crops and saves them as individual TIFF files
  • The scanner is lightweight and is relatively small for a flatbed/ADF duplex combo scanner
  • It adds duplex scanning capabilities to your home office or small business at an inexpensive price tag

What I’d change

  • The scan widths of 8.5″ x 11″ scans were cropped at slightly different widths throughout the document, but only about 20 pages of a 400-page document were cropped such that important information was lost, thus requiring me to rescan those pages
  • It cropped some photos into several pieces also requiring me to rescan those photos individually with the multi-crop TWAIN driver setting turned off
  • I would love for it to be WiFi or Ethernet compatible

Final thoughts

When I first received the Xerox Duplex Combo Scanner, I was disappointed that it didn’t connect to my network either via WiFi or Ethernet (it must be connected to a computer via USB to work). However, I think that if those things were included in this scanner as well as the processing power necessary to quickly scan large documents, it would be more expensive. Because the scanner was connected to my computer, it used my computer’s processor and my computer’s WiFi connection to allow me to scan quickly then save the document anywhere that my computer had access to. I guess that means I’ll be hauling my computer into the room where the scanner resides because I don’t have room for the scanner where my computer normally sits.

In addition to the fact that the scanner must be connected to your computer via USB to work, I noticed that when scanning documents, all of the widths of 8.5″ x 11″ scans were slightly different. And on about 20 pages out of 400, the scanner would crop them such that some valuable information was cut off along the edge of the paper. Because of this, I had to rescan those pages and move them to the correct position in the document and delete the old ones before saving the whole document. Incorrect cropping also occurred when scanning in several photos at a time and saving them as individual TIFF files using the multi-crop TWAIN driver setting. Approximately one-third of the time, the scanner would crop one photo into several pieces and save those pieces as separate TIFF files, thus requiring me to rescan them in without the multi-crop setting.

Overall, the Xerox Duplex Combo scanner did a decent job of scanning my large documents quickly and clearly and an okay job of scanning my photos. Using the scanner saved me a lot of time even after correcting for all the issues that I had with it. My husband (who works at home) and I intend on using the scanner mainly for digitizing our personal and work papers so this scanner will suffice for now. If your main purpose is to scan photos, it may be best to search specifically for a photo scanner.

Price: $219.99 (down from $269) from Xerox, $229.99 from Amazon
Where to buy: Xerox or Amazon
Source: The sample of this product was provided by Xerox.

Filed in categories: Reviews

Tagged: ,

Xerox Duplex Combo Scanner review originally appeared on The Gadgeteer on July 22, 2019 at 11:00 am.

Note: If you are subscribed to this feed through FeedBurner, please switch to our native feed URL http://the-gadgeteer.com/feed/ in order to ensure continuous delivery.

6 Gadgets that will take your workspace into the future

ARTICLE – Modern technology is creeping into so many areas of our lives that it makes sense we’d start to see it on the professional level. The enterprise world has always run on certain kinds of technology, but we’re talking strictly about innovative gadgets — many you might see in the IoT or smart market.

You’ve probably heard that the future of modern living lies with the smart home. Well, the same is true of the business world. The technologies and solutions used inside these spaces will significantly improve convenience and productivity, as well as sync up various functions and activities.

Here are six gadgets that will transform your workspace into a more futuristic environment.

1. Interactive Whiteboards

Image via Samsung

There are few things more valuable in a collaborative space or conference room than the whiteboard. For years, these tools were nothing more than low-tech analog boards that you draw or write on using conventional markers. That’s no longer the case.

Electronic or digital whiteboards work similarly to a touch-screen tablet. They can record, store and print all content written or drawn on their surface. Not only does this help save time during work sessions, but it also improves collaboration for everyone that has access to the board. Notes can be added, and the final mockup can be sent to everyone on the team via email or internal applications.

These high-tech whiteboards can interface with mobile devices, allow for real-time adjustments and modifications, display presentations and allow multiple users to interact or add content simultaneously.

Check out GoTouch on Amazon.

2. 3D Printing

Image via XYZprinting

Additive manufacturing, or 3D printing, creates several unprecedented opportunities. Prototypes and conceptual designs can be realized quickly, accurately and on-site. There’s no need to send plans to a manufacturer and wait until it produces a limited run. It can all be handled in-house using a relatively inexpensive printer.

3D printers also allow resourceful engineers to create a vast array of goods, items and devices. A printer can be used to create any type of tool, object or gadget you might need at work.

Plus, any office filled with 3D printed goods is going to look futuristic anyway.

Check out some of our 3D printer reviews!

3. Modular Office Pods

Image via SnapCab

Cubicles suck, and that’s something pretty much everyone can agree on. They do serve a crucial purpose, though — especially in large corporate office spaces. They give each worker a personal environment to work in, separating them from the rest of their department or team.

A lot of offices have moved away from large, cubicle-filled spaces and instead opt for more open and social areas. When you do need that personal and quiet space to get some work done, queue the SnapCab pods or modular office pods. They are cozy workspaces that personnel can enter alone — or with a small crew — to work in peace. It’s a place to go when you don’t want to be in the open or social.

Their modular nature means they’re easy to install and can be connected with other pods and similar modular walls or surfaces. Another would be the SnapCab Portal, which introduces intelligent and integrated multimedia walls.

4. VR and AR

Image via IKEA

Virtual reality (VR) and augmented reality (AR) solutions will truly digitize and transform the average in-office experience.

By using VR, workers can immerse themselves in an entirely digital space or environment. Imagine transporting to an isolated beach to get some work done, or demoing a potential prototype in a realistic, bustling world?

AR, on the other hand, involves projecting digital content or experiences in the real world. “Pokemon Go” is an obvious example, but IKEA’s Place app is another. AR will allow workers to project information in front of them as they work or alter the way they interact with their surroundings — like displaying indicators or notifications on real-world surfaces.

5. IoT and IIoT

Image via Philips

Just as homes are being made smarter through IoT integration, so are office spaces and corporate campuses. The technology is incredibly broad but collectively syncs up all functions, devices and systems to create a more intelligent, automated and convenient environment. Even something as simple as the office coffee maker can be engaged from a mobile device remotely.

During meetings, your smartphone might record important notes and schedule reminders and appointments automatically. A real-time location system can tell you when a co-worker you need to talk to enters the office or when they have free time. Another one can turn on lights when you walk into a room and off again — with no input from you.

6. AI Voice Assistants

Image via JLL

Siri, Alexa and Google Assistant are all voice-enabled AI assistants that can take commands and complete various actions. You can tell Siri and Alexa to turn on additional smart devices in or around your home. While there are many assistants out there, many of them are designed for personal and consumer use. That’s about to change, however.

A company called JLL has created an assistant named JiLL to help out around the office. JiLL is just the first of many as the technology is adapted for work and professional use, in addition to everything else it’s capable of.

Imagine being able to arrange meetings with colleagues, schedule work-related calendar events, send emails and communications, or even submit work orders just by using your voice.

Future offices will be smart, convenient and efficient.

Featured image by Shridhar Gupta

Filed in categories: Articles

Tagged:

6 Gadgets that will take your workspace into the future originally appeared on The Gadgeteer on July 17, 2019 at 8:00 am.

Note: If you are subscribed to this feed through FeedBurner, please switch to our native feed URL http://the-gadgeteer.com/feed/ in order to ensure continuous delivery.

ElevationShelf adds storage without clutter

NEWS – ElevationLab has an attention to detail that’s been present with all their products since the launch of their original phone dock in 2012. The latest product to come from their focus is an under-shelf to help declutter your workspace.

The ElevationShelf mounts under your desk where you may already have their “Anchor” managing your headphones. The shelf comes with pre-applied 3M tape and a cable management clip to make installation simple (screws also included if you’re looking to really lock it down).

Made of a reinforced polymer, it’s extra light and stiff to help carry the load, keeping your workspace clean and pristine. Available now at ElevationLab for $24.95 and you can find more of their products on Amazon.

Filed in categories: News

Tagged: , ,

ElevationShelf adds storage without clutter originally appeared on The Gadgeteer on June 21, 2019 at 9:00 am.

Note: If you are subscribed to this feed through FeedBurner, please switch to our native feed URL http://the-gadgeteer.com/feed/ in order to ensure continuous delivery.