REVIEW – I have been considering getting a high-tech weather station for years now but never had the time/energy to do the product research and make it happen. As a bit of background, I have a degree in atmospheric science and am quite the data-nerd. So when Julie offered up the AcuRite ATLAS weather station, I quickly volunteered to check it out and see if it lives up to my hopes and dreams of collecting ultra-local meteorological data at our home.
What is it?
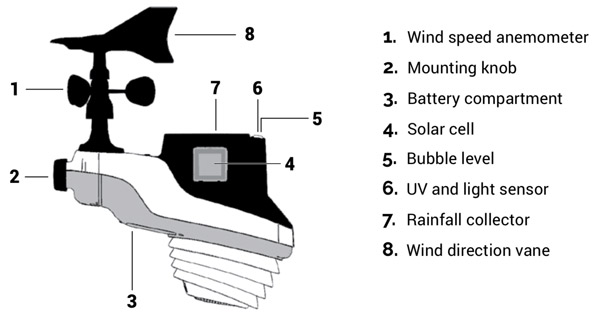
The ATLAS weather station is engineered to collect meteorological data in near real-time and wirelessly transmit it to you in a variety of ways. The ATLAS measures temperature, humidity, wind speed, wind direction, rainfall, UV index, and light intensity. The system transmits this data to either an optional HD touchscreen in your home or uploads it via the optional access point to the internet/cloud, making it viewable on your computer or smart device anywhere you happen to be.
Design and features
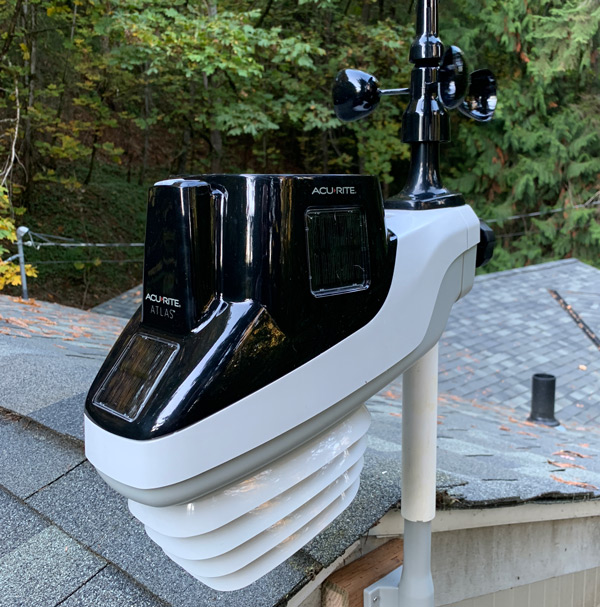
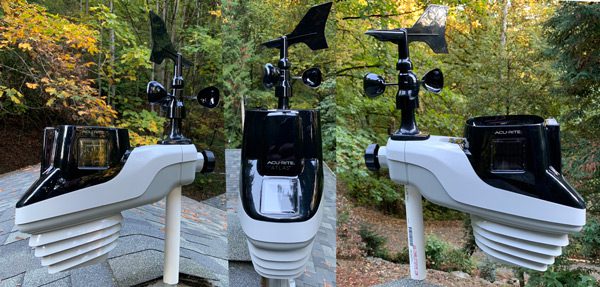
The AcuRite ATLAS is a compact, relatively well-made weather station that collects what I would consider pretty standard meteorological data. Its housing is made from a hard plastic designed to (obviously) withstand the outdoors.
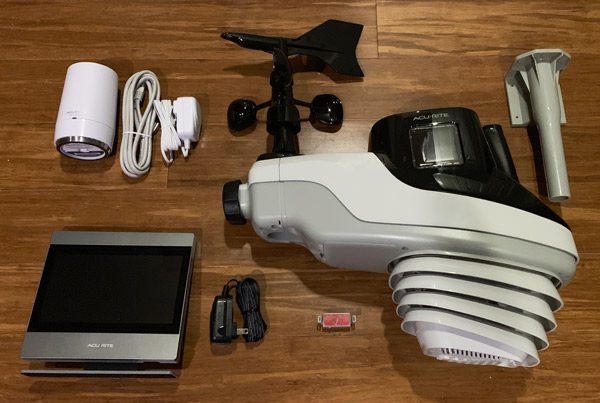
- ATLAS Weather Station
- Wall/post mounting bracket
- High Definition Touchscreen Display (optional $99.99)
- AcuRite Access Point (optional $99.99)
- Lightning Detector (optional $39.99)
Specifications:
| Temperature Range |
-40 to 158° F
-40 to 70° C |
| Temperature Accuracy |
+/- 1° F |
| Humidity Range |
1% – 99% RH |
| Humidity Accuracy |
+/- 2% RH |
| Wind Speed |
0 – 160 mph; 0 – 257 km/h |
| Wind Direction |
360° |
| Wind Direction Accuracy |
+/- 3° |
| Rain |
.01″ intervals (0.25 mm) |
| Rain Accuracy |
+/- 5% |
| UV Index |
0 – 15 index |
| UV Accuracy |
+/- 1 |
| Light Intensity |
to 120,000 Lumens |
| Data Reporting |
Temperature: 30 seconds
Humidity: 30 seconds
Wind Speed: 10 seconds
Wind Direction: 30 seconds
Rainfall: 30 seconds
UV Index: 30 seconds
Light Intensity: 30 seconds |
| Wireless Range |
330 feet (100 meters) depending on home construction materials |
| Wireless Signal |
433 MHz |
| Power |
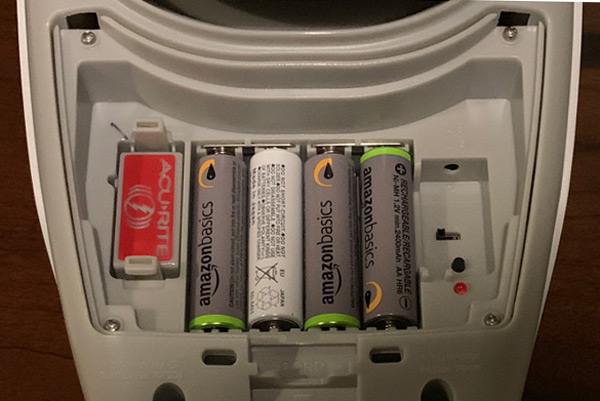
4 AA alkaline or lithium batteries |

The ATLAS weather station is powered by four (4) AA batteries (not included). I thought it was odd AcuRite recommends standard alkaline or lithium batteries versus rechargeable ones. We do our best to only use rechargeables and don’t have any disposable batteries in the house. So I threw caution to the wind and used what we had… Thus far the weather station is no worse for the wear. Hopefully, they recommend non-rechargeable batteries only due to poor performance/endurance in the extreme temperatures. That said, I’ll most likely swap them out when I get the chance.
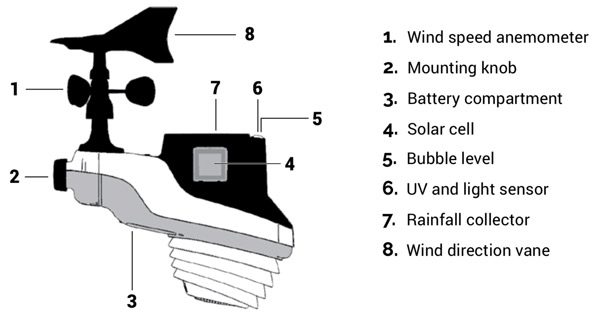
The battery compartment also has a port for the optional Lightning Detector module, pictured here on the left.
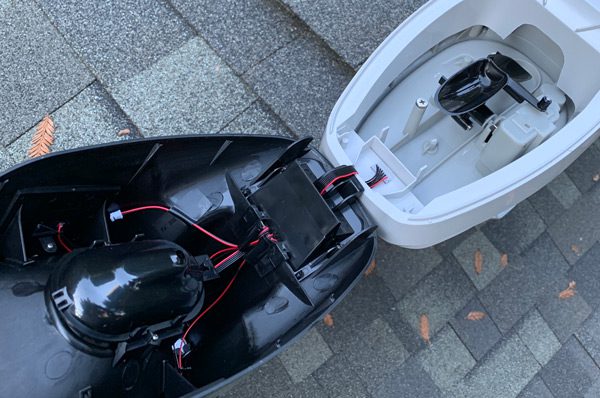
Before mounting the ATLAS weather station, foam surrounding the rain gauge must be removed allowing the plastic rocker to move freely. You definitely have to be careful to not damage or pinch the thin wires or small plastic connectors. The ATLAS is weather hardened but probably would not survive much, if any sort, of fall.
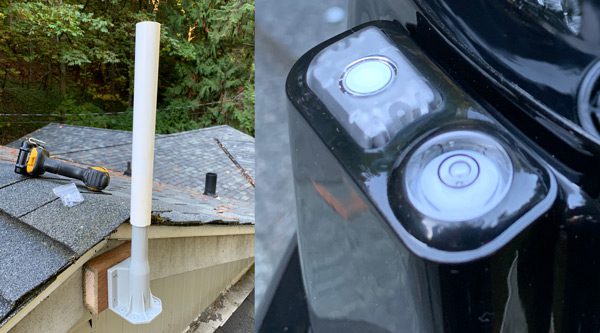
The plastic mount can be installed vertically or horizontally. An extension piece may be necessary to raise the ATLAS high enough away from whatever the mount is attached to. I used a 1 inch schedule 40 PVC pipe I had laying around the garage which worked surprisingly well. I may buy a longer piece to elevate the ALTAS even further above our roof but that may turn out to be unnecessary.
To accurately collect data, the ATLAS has to be level. Here you can see the integrated leveling bubble centered as prescribed (actually the easiest part of the install).

Once installed, you can barely tell the ATLAS is there collecting weather data unless you know where to look.
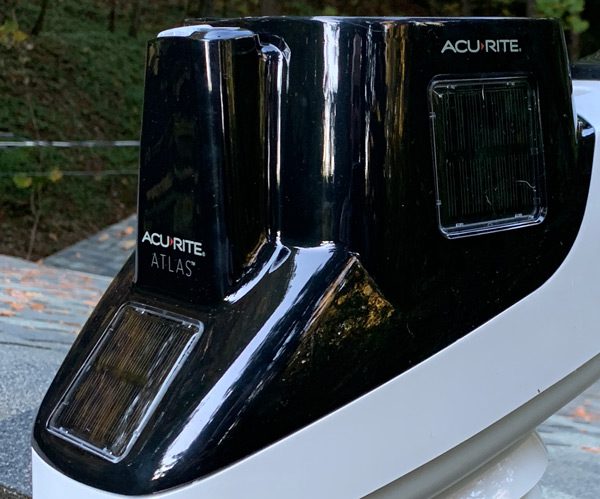
In addition to the AA batteries…when the sun is out, the ATLAS is also powered by three small solar panels built into the housing of the station. The solar cells measure about an inch and a half squared and there is one on the front and each side of the housing.
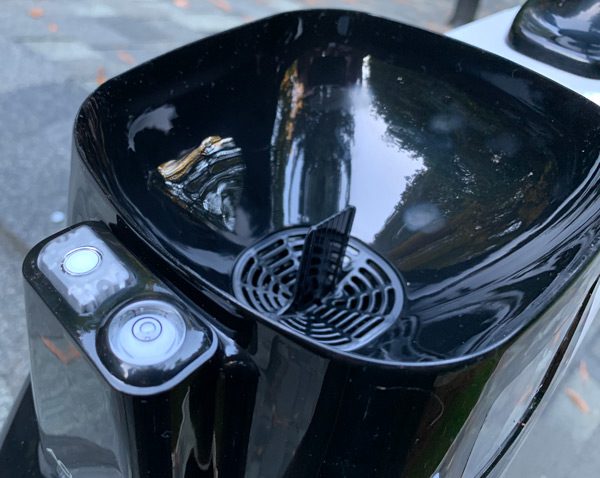
Here you can see the rain gauge intake and UV/light intensity sensor next to the leveling bubble.

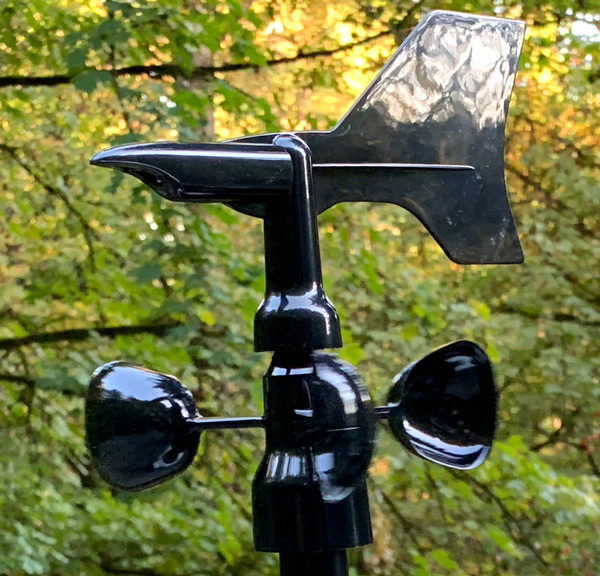
The wind direction and speed sensors are mounted top, rear of the ATLAS. Both sensors move freely in the wind. As long as you face the ALTAS due South, you do not have to tweak any of the settings to receive accurate wind direction.
Optional Accessories:
The biggest and really only issue I have with the AcuRite weather station is that you have to also purchase one of their optional accessories to view/access your data (though they do sell package deals on Amazon).
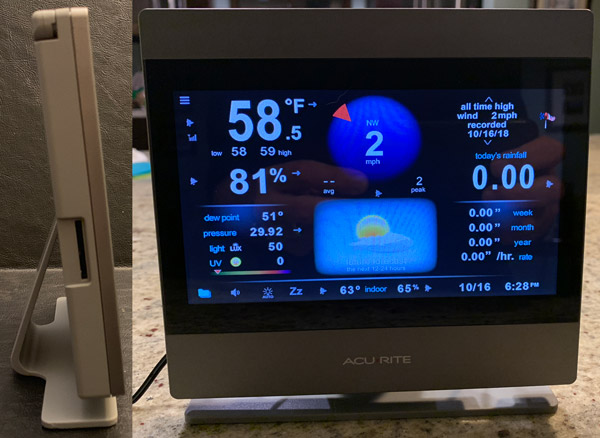
High Definition Touchscreen Display

The high definition wireless touchscreen is clear and bright, though a bit top-heavy (I ultimately mounted it in my office). Displaying all the data in a well thought out layout. Like the smartphone app, the screen also enables you to dig deeper into the data for more thorough analysis. The system’s wireless range is approximately 300 feet depending on what the signal has to penetrate. The display has a built-in antenna that can be raised if need be. There is also a standard SD card slot if you want to capture the data for later review.
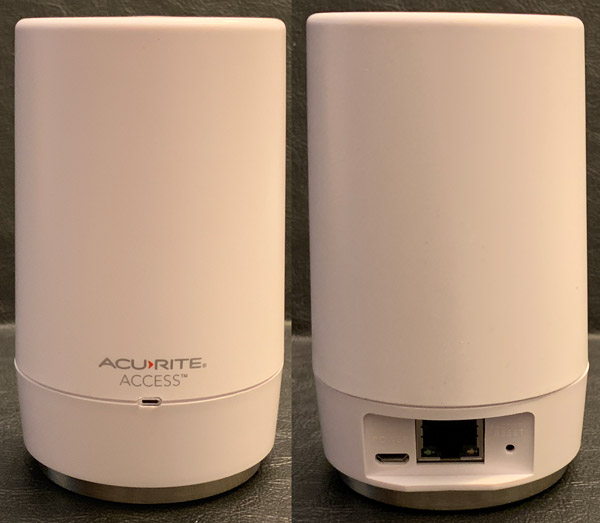
AcuRite Access Point

The AcuRite Access Point plugs into the ethernet port of your router and uploads the ATLAS met data to the myacurite.com website for viewing on your computer, tablet, and/or smartphone. The access point is dual powered via a microUSB plugged power source or three AA batteries as a temporary backup in case your power goes out. Though at that point, my guess is your internet modem and router would be without power limiting/killing your connectivity anyhow.
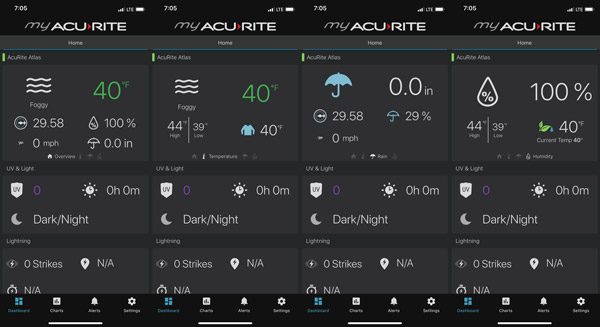
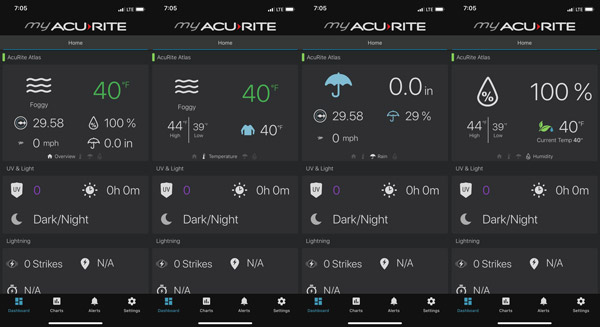
The AcuRite smartphone app does a pretty good job of displaying all the weather data collected by the ATLAS. You’re able to flip thru various data specific screens.
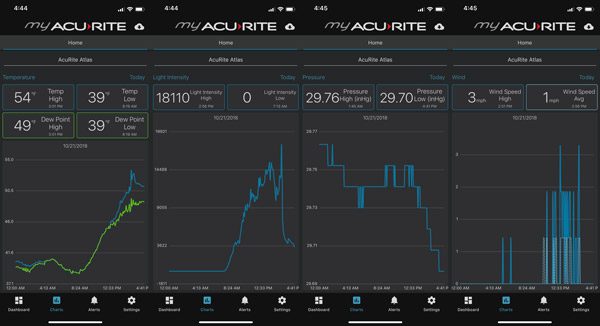
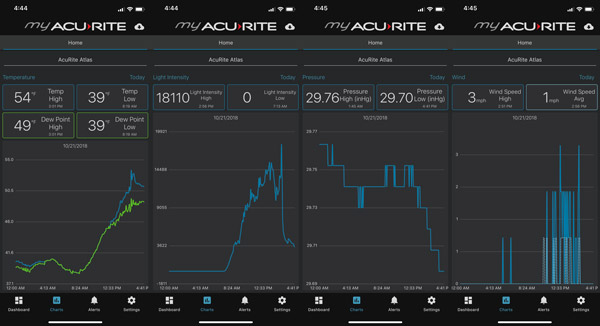
Or dive deeper into any one of the individual datasets to get a closer look as the weather changes over time. The app also enables you to download the data from the AcuRite server and set alerts for extreme conditions.
It is easy to tell at a glance the ambient conditions at your home or wherever you’ve installed the ALTAS. We live pretty far out in the sticks, so when I’m downtown or on travel, it’s great being able to check the app to see how (bad) the weather is at our place.
What I like
- Provides real-time local weather data
- Excellent list of sensors/data collected
- Well made
- Easy to setup
- Solar and battery powered
What needs to be improved
- Should include remote access in the box (vs as optional accessories)
Final thoughts
I really like the ATLAS weather station, it definitely meets my atmospheric scientist data-nerd needs. AcuRite has done an excellent job creating a solid array of sensors in a compact, easy to install/setup design. The HD screen and smartphone app also do a solid job of displaying the meteorological data in an easy to read and understandable manner. That said, seeing the data on either, requires at least $100 more be invested to truly make the system usable. Though the ATLAS with all the accessories (screen, access point, and lightening module) shown here is currently available at Amazon for $261 as a package deal.
Price: ATLAS $149.99 / HD Touchscreen Display (optional $99.99) / Access Point (optional $99.99)
Where to buy: AcuRite.com or Amazon.com
Source: The sample of this product was provided by AcuRite.
Filed in categories: Reviews
Tagged: weather
AcuRite ATLAS Weather Station review originally appeared on The Gadgeteer on November 4, 2018 at 9:15 am.
Note: If you are subscribed to this feed through FeedBurner, please switch to our native feed URL http://the-gadgeteer.com/feed/ in order to ensure continuous delivery.