Wilson Pro 70 Cellular Signal Booster review

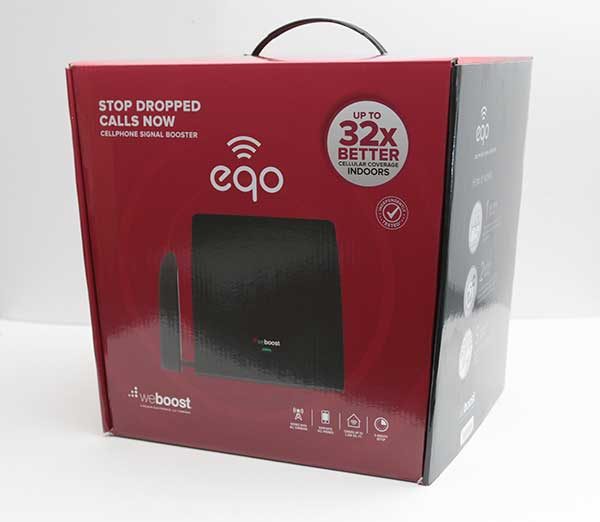
REVIEW – A few years ago, my brother fell while in a rural forest in upstate New York. He totally shattered one of his vertebrae and spent nine months in a full-body cast recovering. When he fell, it was snowy, dark and cold. By some miracle, he located his cell phone, got a tiny signal and called for help. If he hadn’t located his phone, things could have ended much differently. Equipped with this realization, I wanted to see what Wilson’s Pro-series Cellular Boosters could do to alleviate my brother’s weak cell signal woes in his sparsely covered valley farm home.

What is it?

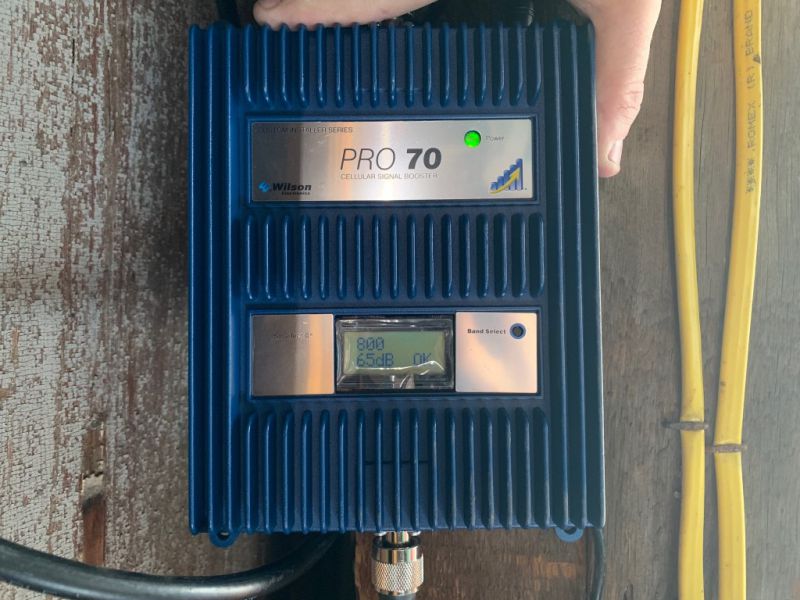
Wilson’s Pro-70 is a cellular signal booster and antenna pair which acts as a transceiver, amplifying signals in an area with weak coverage.

What’s in the box?

List contents – you can remove this heading and section if it doesn’t apply to your review.

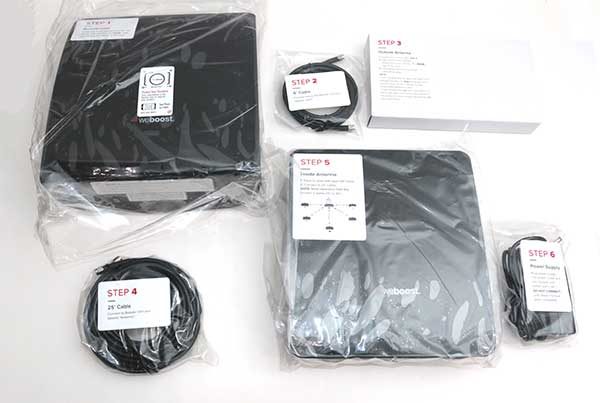
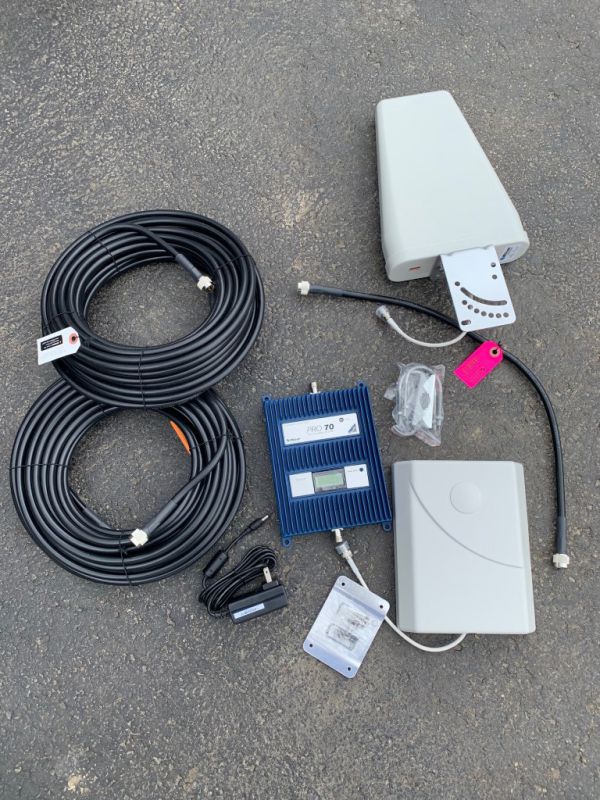
  • Wilson Pro 70 Amplifier with LCD Display
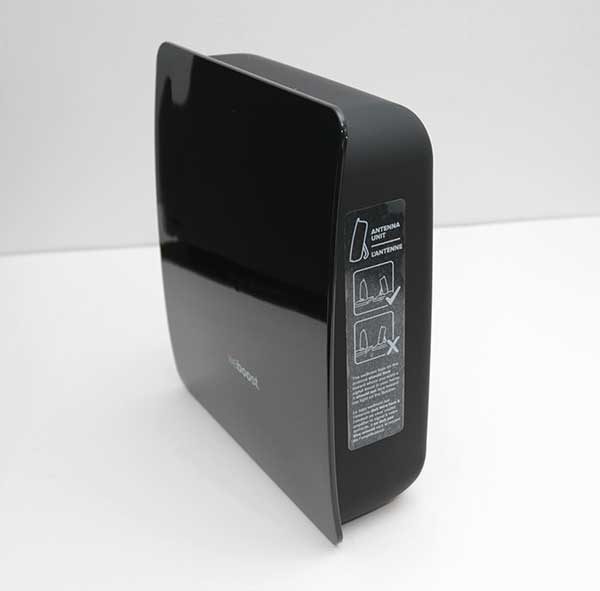
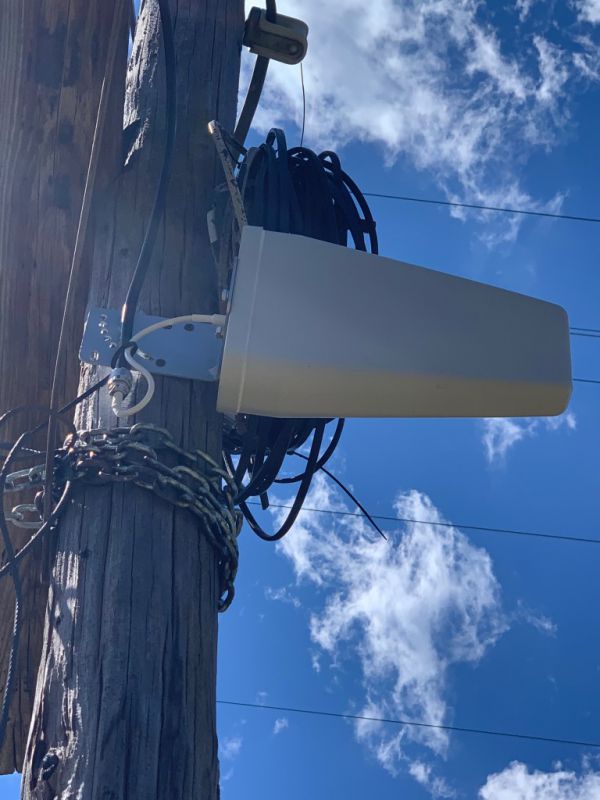
  • Wilson Yagi Directional Outside Antenna
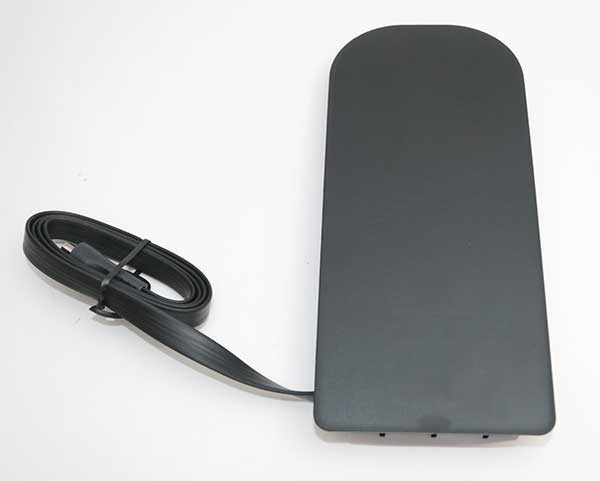
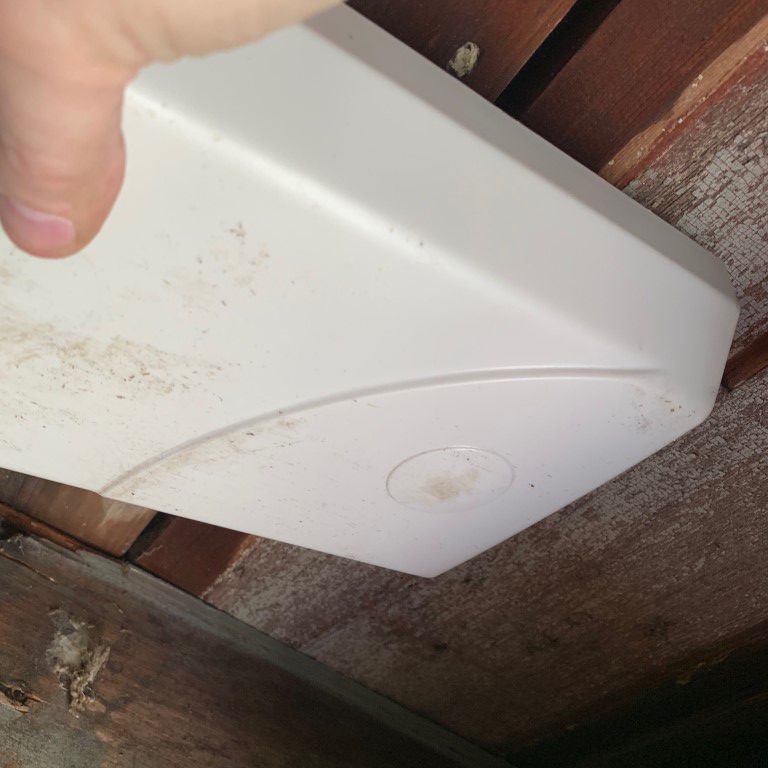
  • Wilson Panel Inside Antenna
  • 75′ Black Ultra Low Loss Cable (952375)
  • 60′ Black Ultra Low Loss Cable (952360)
  • Lightning Protector
  • 2′ Black Ultra Low Loss Cable
  • AC Power Supply
  • Installation Guide

Hardware specs

  • Band 4,5,12,13W (700, 850, 1700 and 2100MHz)
  • Max Gain 70dB
  • 50 Ohm Impedance
  • 12 volt, 3 Amp DC power
  • 15 x 6 x 8.75” booster dimensions
  • 2.78 lbs booster weight

Design and features

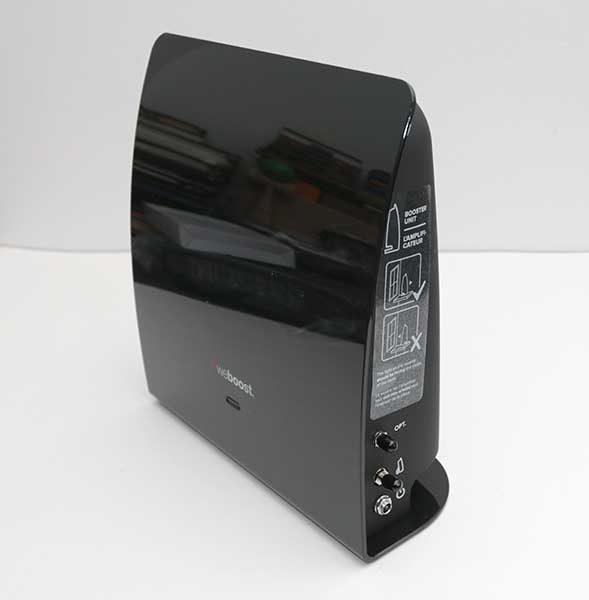
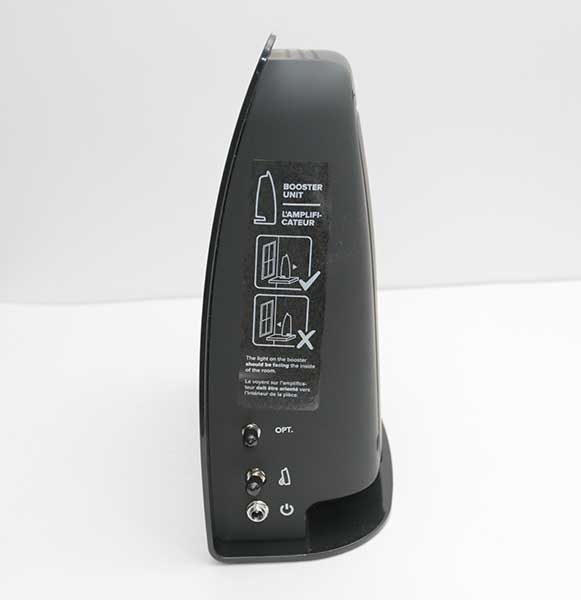
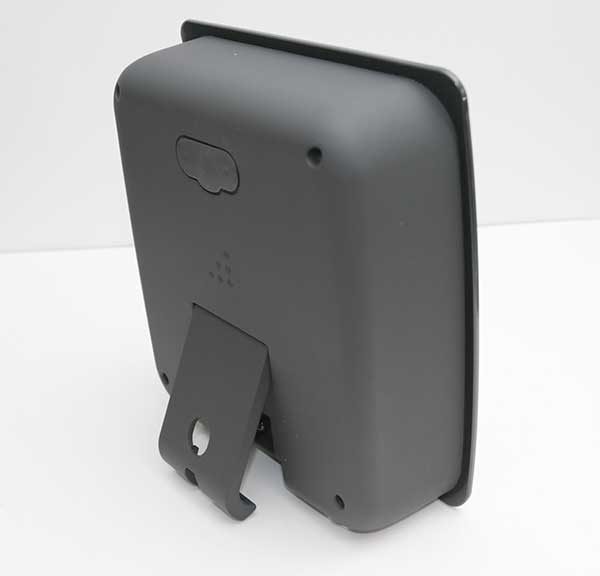
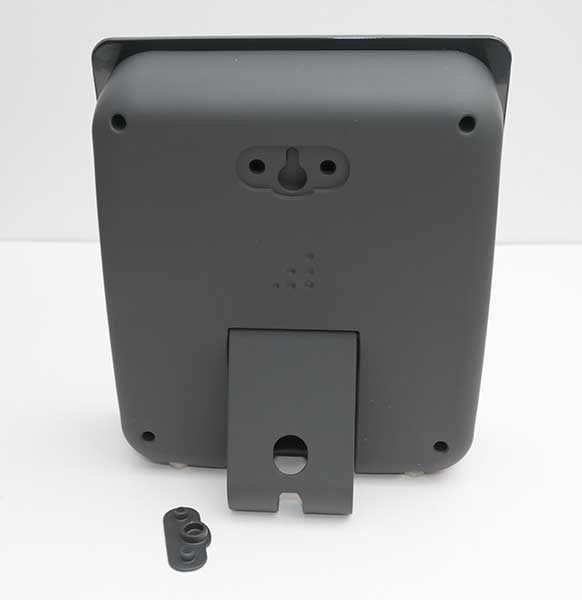
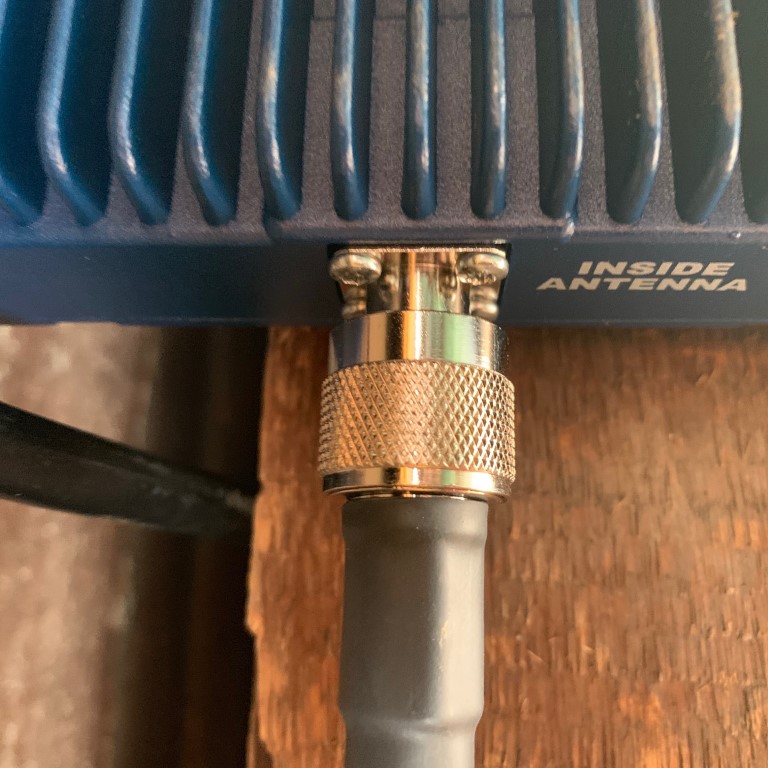
The kit arrived in multiple boxes inside a larger box. Everything needed (almost) for installation was included. The booster has only three connectors, one for power, one the receiving antenna and one for the home antenna.

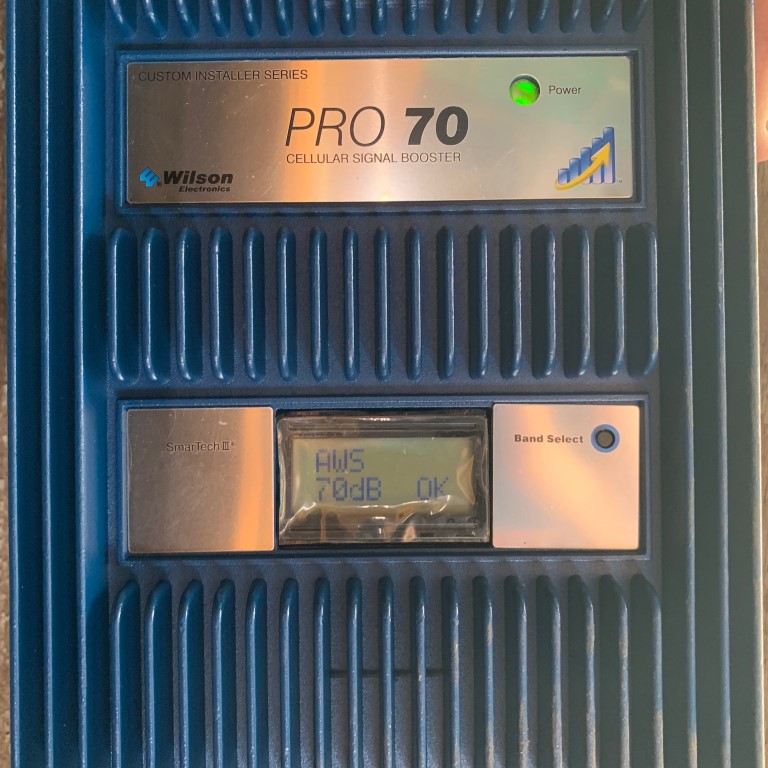
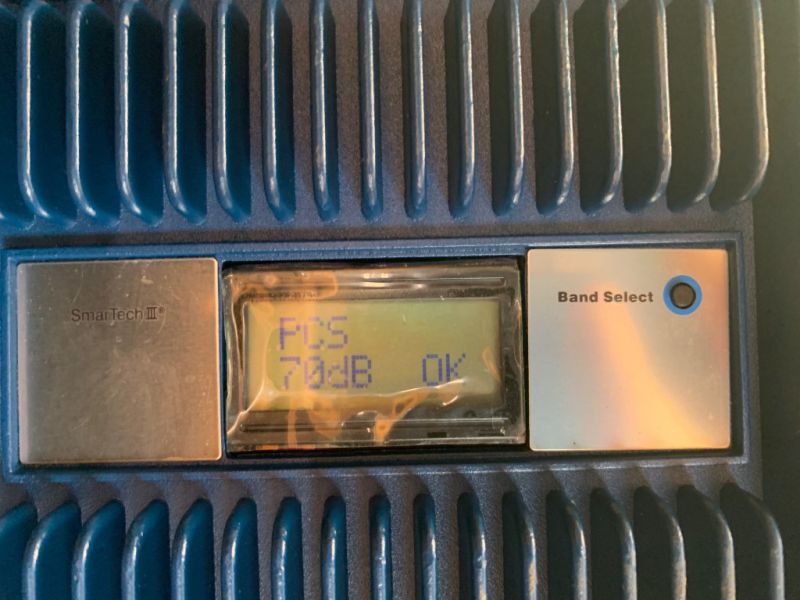
The booster is equipped with an LCD screen and single button to toggle between cellular frequencies, checking signal strength and for issues. A single LED indicates if there are any issues or if everything is working properly.

Setup

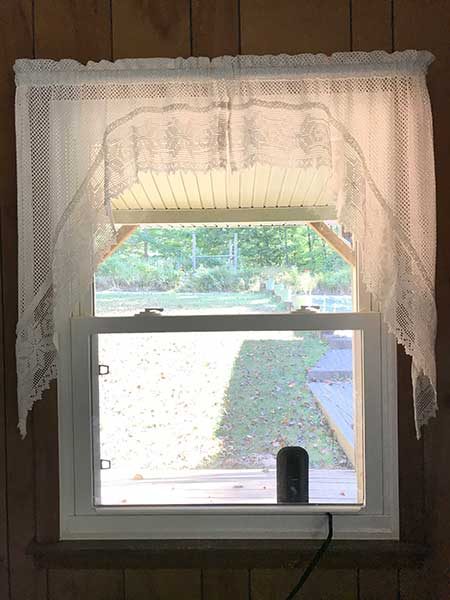
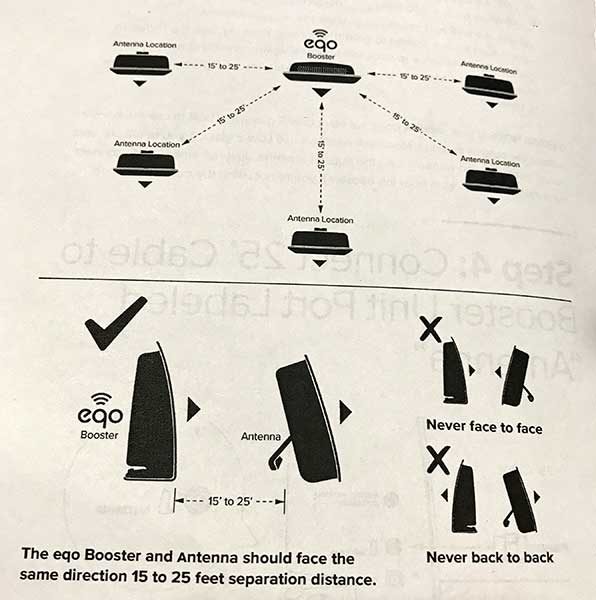
We pulled all of the parts from their cardboard wombs and connected everything together for testing. Because my brother’s farm has several buildings, we elected to initially put the equipment in a small tractor barn. We plugged in all of the parts, plugged in the booster and waited a few seconds. Using the built-in strength meter’ we were able to get an average of 69dB of the signal across all bands. The antennas needed to be separated to keep from talking to each other, but plenty of cable is included.

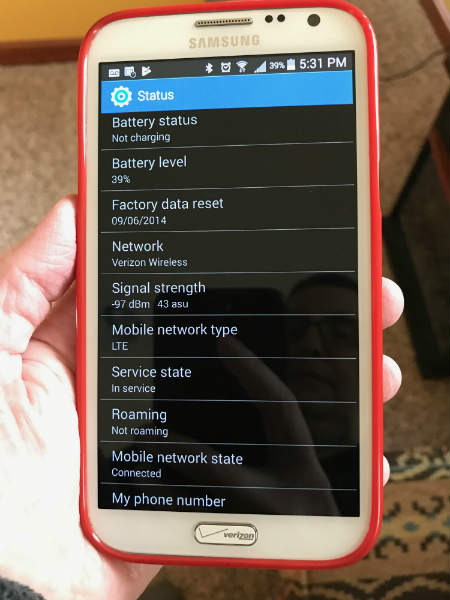
Instantly, I went from no signal (no bars) to a very usable and stable signal. I was amazed because the transceiver required no tweaking, no adjustments, and no customization. It just worked – magic!

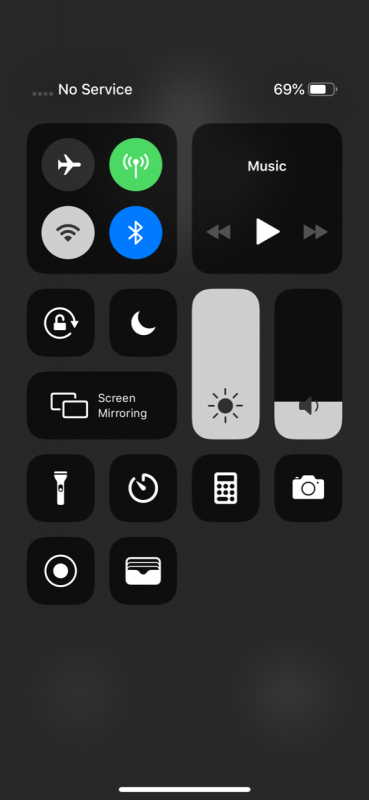
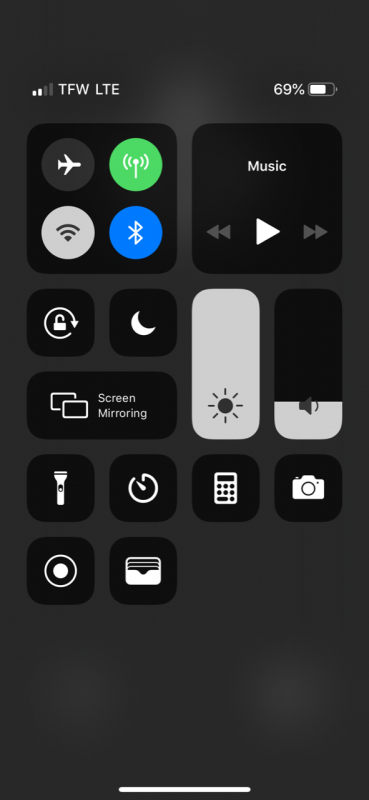
I made a few calls and visited a few web sites to verify I had gone from signal-nada, to full-speed LTE signal.

Since everything tested ok, we uncoiled the cables and mounted the antenna on a pole between the house and barn, attached the lightning protection adapter, routed the equipment and were finished.  We needed to provide a few zip-ties to secure the cables and a ground wire to connect the lightning suppressor to an existing ground rod, but other than that, everything needed is in the box. It should be noted that the sending and receiving antennas can’t be pointed at each other or the system can experience problems.

Performance

Playing the “can you hear me now” game, I walked around the property and was shocked at the area of coverage I had. Of course, there was significantly less signal inside structures, but still, enough to maintain a connection except in the furthest reaches of the house. Mind you, the equipment was placed in a building about 50 feet from the main structure. My brother and I have different carriers and both received a dramatic increase in cellular reception. Again, prior to installing, I had zero cellular signal in or near my brother’s home.

What I like

  • Almost everything needed for installation is included
  • Virtually no set-up needed other than pointing the antennas
  • Solid performance

What needs to be improved

  • Nothing

Final thoughts

In my brother’s case, a cell phone may have saved his life. I’ll never underestimate the value of a solid cellular connection. The Wilson Pro 70 Cellular Booster is a solid, easy to install remedy for weak signal areas. While it’s not a magical solution to rebroadcast LTE to your “back 40” acres of your property, when properly sized (Wilson sells many different sizes) and installed, it will alleviate many issues in home (or in my case, farm) cellular reception.

Price: $899.99
Where to buy: Wilson Amplifier Pro 70
Source: The sample of this product was provided by Wilson Amplifiers

Filed in categories: Reviews

Tagged:

Wilson Pro 70 Cellular Signal Booster review originally appeared on The Gadgeteer on April 30, 2019 at 2:03 pm.

Note: If you are subscribed to this feed through FeedBurner, please switch to our native feed URL http://the-gadgeteer.com/feed/ in order to ensure continuous delivery.

Reolink Go 4G LTE security camera review

REVIEW – I currently have five wireless cameras set up inside my home so that I can keep an eye on my house when I’m not there. But you’ll notice that I said the cameras were all inside the house. I’d love to have several cameras outside the house too, but running power cables, and/or network cables to various locations isn’t something I want to do. That’s why I was excited for the opportunity to review the 100% wireless Go camera from Reolink. Let’s take a look.

What is it?

The Reolink Go is a security camera that uses 4G LTE and 3G for communication and a solar panel to keep it powered. Other than the cable that runs from the solar panel to the camera, the Go camera is 100% wireless.

Hardware specs

Video Resolution 1080p HD at 15 frames/sec
Video Format H.264
Field of View Fixed lens, 110° diagonal
Night Vision Up to 10 m (33 ft)
Digital Zoom 6x digital zoom
Audio High-quality speaker and microphone
Frequency Bands Europe: LTE FDD: B1/B3/B5/B7/B8/B20, WCDMA: B1/B5/B8
Frequency Bands in the United States: LTE FDD: B2/B4/B12, WCDMA: B2/B4/B5
Battery 7800mAh rechargeable battery
Solar Can be powered by Reolink Solar Panel
DC Power Can be powered by 5V/2A power adaptor
Storage Local Storage Supports up to 64GB micro SD card
Working Environment Operating Temperature -10° to 55° C (14° to 131° F)
Weather Resistance IP65 certified weatherproof

What’s in the box?

  • Reolink Go camera
  • Battery
  • Weatherproof jacket
  • Adjustable mounting bracket
  • Bracket hardware
  • micro USB cable

Design and features

The Reolink Go is a security camera that’s shaped a bit like a bullet. It has a white and grey plastic housing with the Reolink logo in blue.

The lens is on the front of the camera and there is a large motion sensor below it with night vision IR sensors, and a status LED.

The “butt” of the camera has a threaded socket for the included mounting bracket.

The back (butt) of the camera twists off to reveal a large battery compartment along with a SIM card slot and a micro SD card slot.

The camera ships with a battery that slides into the camera. Just make sure you pay attention and orient the arrow on the battery compartment with the arrow on the battery before you try to push the battery in place. I say this from experience because I didn’t do this the first time and had a heck of a time removing the battery so I could insert it correctly (facepalm). Anyway, no harm was done… but lesson learned to pay more attention.

You’ll also want to insert your SIM card and micro SD card in their respective slots before you insert the battery. It should go without saying that a SIM card and a micro SD card is not included with the camera.

With the battery and cards in place, you should then put the weatherproof jacket on the camera. This will protect the camera from the weather but it’s kind of a pain to put it on and line up the hole for the mounting bracket.

Before you set up the camera outdoors, you should charge the battery by using a micro USB cable and a port on your computer or a USB AC adapter (not included).

Reolink also sent me their optional solar panel which will charge the Go’s battery from sunlight. The panel has a micro USB cable that plugs into the port on the bottom of the camera and has a protective sleeve that slides in place to keep the connection waterproof.

With the battery charged, cards inserted, and the mounting bracket attached, you can set up the camera outdoors and you’ll be ready to go.

I tested the Reolink Go in several places around the outside of my house. You can see that I’m a real DIYer with a complete with rock stabilization system. 😉

It should go without saying that it’s important that the location where you plan to install the camera has a good 4G or 3G signal. It’s also important to note that the Reolink Go camera does NOT work through WiFi. It only uses cellular. Here in the US, it only works with carriers that use T-Mobile like Freedompop, US Mobile, Ting, Cricket, Mint, Metro PCS, and Tracfone. I bought a pre-paid Mint SIM to test with this camera. Mint also uses T-Mobile. When I bought it, they were having a deal for $20 for 3 months of 5GB of data per month. I had to activate the SIM in a phone first, but then it worked perfectly in the camera.

Reolink app

To view the camera’s live footage, you have to use the Reolink app for iOS or Android. I installed the app on my Pixel 2 XL.


The application is pretty easy to navigate. There’s the main screen that shows a thumbnail image of the camera with status icons for the 4G signal and battery level for the camera.

Tapping the camera thumbnail image takes you to the live view for that camera. This screen allows you to pause the camera, take a snapshot, record video, change from 1080P to Fluent resolution, color to black and white, and go full screen with the live view.


You can also listen to the built-in speaker, have a two-way conversation, and go into the playback/motion clip screen.

I was impressed with the image quality during the day and at night. As you can see from the images, the picture is sharp and clear.


When the camera detects motion using PIR (thermal motion sensing), it will send a push notification to your phone like you see above on the left. You can then go into the playback screen and view the captured clips. Note that the camera does not record video 27/4 even with a micro SD card installed. It just copies the motion clips to the card.

What I like

  • Good image quality
  • 4G capability
  • Can be used outdoors with a solar panel for complete wireless installation

What needs to be improved

  • Only works with T-mobile carriers
  • Needs WiFi capability in addition to cellular
  • Does not record all footage to micro SD card, only motion alert clips are saved
  • Expensive

Final thoughts

I reviewed the Reolink Argus Pro camera a couple months ago and my experience with the Reolink Go compared to the Argus Pro has been the same except that the Go camera uses 4G instead of WiFi. The ability to place the Reolink Go camera anywhere there is a cell signal for the carrier you’re using with it is a game changer. I have considered putting one in my mailbox and mounting the solar panel on the back of the box so that I’ll know when the mail person brings the mail since our mailbox is more than 500 feet away and completely out of sight. So far I’ve just used the camera around my house. Even with heavy rain and cold temperatures down in the 20’s, it’s been working like a champ although some mornings the picture has been a little foggy.

This camera is expensive at $275 for the camera with the solar panel. At that price, I think it should also include WiFi capability and record all footage to the micro SD card. Even without those features, this camera is useful for people who need to keep an eye on their property and don’t want to deal with running cables for networking and power. But obviously, the wireless cellular convenience comes with a price tag.

Price: $249.99 (1 camera), $274.98 (1 camera + solar panel)
Where to buy: Amazon
Source: The sample for this review was provided by Reolink.

Filed in categories: Reviews

Tagged: ,

Reolink Go 4G LTE security camera review originally appeared on The Gadgeteer on January 6, 2019 at 9:00 am.

Note: If you are subscribed to this feed through FeedBurner, please switch to our native feed URL http://the-gadgeteer.com/feed/ in order to ensure continuous delivery.

Mint SIM pairs up with Best Buy to offer 3 Months of free phone service & data

Mobile service provider Mint SIM and BestBuy.com have partnered together to announce a promotion offering new customers three free months of Unlimited Talk & Text including 2GB of 4G LTE each month.

The promotion comes with the purchase of any unlocked device from BestBuy.com with a 7-Day Risk Free Intro Offer. Mint uses the T-Mobile network for their service so as long as you have good T-Mobile coverage in your area, Mint will work great.

“We are thrilled to expand our partnership with Best Buy and bring a truly breakthrough offer to the market,” said Aron North, SVP of Marketing & Creative at Mint SIM. “Combining Best Buy’s enormous unlocked phone selection with Mint Sim’s free service on America’s Fastest Growing LTE Network is truly a win-win.”

“More and more consumers are choosing unlocked phones every day. Mint SIM’s growth has been remarkable and encapsulates how consumers are changing their buying habits when it comes to wireless,” North continued. “As the industry continues to evolve we believe Mint SIM is well positioned to capitalize on these new buying trends.”

For more information about Mint SIM and this new promotion with Best Buy, please visit this special BestBuy.com offer page.

Filed in categories: News

Tagged:

Mint SIM pairs up with Best Buy to offer 3 Months of free phone service & data originally appeared on The Gadgeteer on October 31, 2017 at 10:00 am.

Note: If you are subscribed to this feed through FeedBurner, please switch to our native feed URL http://the-gadgeteer.com/feed/ in order to ensure continuous delivery.

Skyroam SOLIS 4G LTE Global WiFi hotspot review

When we are researching for places to spend our vacation, I always ask Jeanne to make sure that the place where we’ll be staying has internet access. Because perish the thought that I take a vacation where I can’t get a little Gadgeteer work done too.

We went on our last vacation knowing that there wouldn’t be any internet at the cabin we were renting, but I stuffed down my panic because I knew we’d only be gone for 2 full days. And as luck would have it, I had a secret weapon to take with us… the Skyroam SOLIS 4G LTE Global WiFi Hotspot.

What is it?

The Skyroam SOLIS is a portable 4G LTE WiFi Hotspot and 6000mAh power bank that provides unlimited daily internet connectivity by using Skyroam’s proprietary global WiFi network which uses local SIM service from nearly 200 carriers. It partners with the best providers to offer a seamless mobile WiFi experience for world travelers in over 100 countries using a virtual SIM, which automatically picks up the cellular connection in your area.

Using Skyroam means you don’t have to mess around with changing your existing wireless plan or worrying about roaming and overage charges.

What’s in the box?

SkyRoam SOLIS
USB Type-C cable
USB Type-C to USB adapter
Quick start guide

Design and features

The SOLIS looks like a bright orange hockey puck that has a power button on the side and a WiFi button on top.

On the back of the SOLIS is a USB Type-C connector that is used to charge the device which can run for 16 to 20hrs on a charge. The Type-C connector is also where you connect the Type-C to USB adapter so you can use the SOLIS as a back battery for your other gadgets.

The bottom cover of the hotspot can be removed to provide access to the battery compartment. In an age where our gadgets are usually sealed, it’s refreshing that the Skyroam SOLIS has replaceable rechargeable batteries.

Let’s get online

As mentioned above, I was excited to receive the Skyroam SOLIS the day before we were planning visit Turkey Run State Park where I knew that there would be no WiFi at the cabin we’d rented.

I made a mistake of not setting up the SOLIS before we left figuring I could do it when we got to our destination. That was almost a fatal mistake because the first thing you have to do to set up the SOLIS is to create an account – ONLINE. Our Verizon phone barely had a signal, which made getting online to check my email for the account info almost impossible.

After several tries and some patience, I was able to create the initial account and the SOLIS began the connection process. You have to sit through this loading screen every time you disconnect from the SOLIS hotspot and reconnect. It can take several minutes.

Luckily, SOLIS gives you 20 minutes of free time to set up the hotspot, but without a reliable connection where we were staying, it took a few tries to get it up and running.

Once you’re fully connected, you can buy your daypasses. The SOLIS comes with one pass and each additional pass after that is $9. Each daypass gives you unlimited internet access for 24 hours.

Note that you can’t turn off the SOLIS an hour after initiating a daypass, wait a day, turn it back on and expect to still have 23hrs of access left. Each daypass only lasts for 24hrs no matter if you use it during that time or not.

Also, if you travel to different countries within a day, the time left on the daypass will be calculated from the time of the location where you activated the device.

You can always see the status of your connection and time left on your daypass by logging into the Skyroam dashboard.

Each Skyroam SOLIS can support up to 5 connections. While we were staying outside the park, we had our phones and my MacBook connected to the SOLIS. The speed was pretty slow and sometimes the dashboard said it was only a 3G connection because there was barely any coverage for Verizon, AT&T or T-Mobile. But whichever wireless carrier that the SOLIS was using at the time, it was good enough for surfing, emailing, and some light Gadgeteer work.

Just be aware that the Skyroam SOLIS is not a magic internet puck. One of their partnered cell providers has to have coverage in your area for it to provide WiFi access.

Skyroam even works great while driving which means it comes in handy for long road trips where you might not want to use your phone as a hotspot.

Fast forward a few weeks… As I’m writing this review, I’m back home now and am connected to the SOLIS in my basement and have the connection speed that you see above. That probably looks really slow to a lot of you, but it works fine even for watching YouTube and Netflix videos (after some buffering time).

But is it too good to be true?

When we were at the Turkey Run State Park, the speed of the Skyroam SOLIS felt noticeably sluggish, but I was just happy to be able to surf and respond to emails so I wasn’t complaining. I thought the significant slowness of the connection was due to the fact that the cell providers in that area had very weak coverage. But as I was working on this review, I stumbled upon info that was buried in the Skyroam support pages and it made my heart sink a bit.

Skyroam markets the SOLIS as a 4G LTE unlimited global hotspot. Which it is. BUT (and it’s a big but), you don’t really get unlimited 4G speeds with this device. After you use 500mb of data, the speed throttles down to 2.5G speeds for the rest of the 24hr daypass. When I asked Skyroam to explain this wrinkle, Cory Jones, Skyroam’s Vice President, Global Marketing & Product, responded with:

“Our goal is to deliver convenient, omnipresent global connectivity for international travelers at a great value. To deliver that, we’ve optimized our service to give Skyroam customers the best performance across our global footprint of 100+ countries. Most users experience the fastest speeds possible since the majority don’t reach 500mb in 24 hours. For those that exceed 500mb in 24 hours, data speed changes to 2.5G for the remaining period of the 24-hour daypass, which compares favorably in the telecom market.

Many find the simplicity Skyroam offers to be a lifesaver – WiFi on-demand data at one rate worldwide. You can even use one daypass in multiple countries, as well as being shareable with travel buddies and among your gadgets with five devices simultaneously. We focus our service on global travelers who see the value through that lens.”

Well, that stinks.

So I created a test. I checked my speed BEFORE using 500MBs of data (see above) and then I started downloading a 512MB test file.

I thought that I had already hit the 500MB threshold before I started the test download because my MacBook reported that it was going to take 2-4 hours to download the 512MB file. Yikes…

But 30MBs into the download, I was still getting good speed using speedtest.net. So I worked on other things (using the Chrome browser with the same WiFi connection to the SOLIS) and let the test file continue downloading in the background.

I watched a few Youtube videos, surfed some of my favorite sites, read news using Feedly, answered emails, and worked on this review.

Everything slowed to a crawl when the test file download hit the 220MB mark. At that point, other tabs in my browser would not refresh. I paused the test file download and did another speed test and got the results shown above. OUCH. I waited 10 minutes and ran the speed test again with almost identical results.

Just to be sure, I checked the Skyroam dashboard to confirm that I was still connected to 4G. I was. I then decided to toggle power on the Skyroam SOLIS, connect back to it and do another speed test.

Same speed.

That speed might look much too slow to do anything worthwhile on the net, but right now I’m watching a YouTube video while I’m writing this. Granted, it took a minute or so for the video to start playing but once it started, it was fine. Low res, but viewable. So is reading and writing emails, reading my news feeds using Feedly through a browser, and even writing this review.

Bottom line: I do think that the >500MB throttling information should be highlighted for potential buyers instead of hiding it in the Skyroam FAQ pages. What do you think, does a 500MB 4G speed cap make the SOLIS less desirable?

Final thoughts

If you are an avid traveler – especially an international traveler who likes to stay connected, the Skyroam SOLIS Global WiFi Hotspot is an affordable way to have internet access where ever you travel (see the country list on the Skyroam site) when you can’t use your mobile phone as a hotspot.

As long as you can live with slower 2.5G speeds after using 500MB of data, I think the SOLIS is a useful gadget for on-demand internet access that at an affordable price.

Source: The sample for this review was provided by Skyroam. Please visit their site for more info and Amazon to order.


Product Information

Price: $149.99 + $9 for each data daypass
Manufacturer: Skyroam
Retailer: Amazon
Pros:
  • Easy to use
  • Global Internet connectivity
  • Affordable day passes
  • Doubles as a power bank
Cons:
  • Only 500mb is at the highest 4G speeds. Once you go past that, the speed goes down to 2.5G speeds
  • Can sometimes take several minutes to get connected

Filed in categories: Reviews

Tagged:

Skyroam SOLIS 4G LTE Global WiFi hotspot review originally appeared on The Gadgeteer on October 17, 2017 at 2:19 pm.

Note: If you are subscribed to this feed through FeedBurner, please switch to our native feed URL http://the-gadgeteer.com/feed/ in order to ensure continuous delivery.

weBoost eqo 4G cellphone signal booster review

A few months ago we finally ditched our analog phone line. Yes, I know that I’m way behind the curve, but I was required to keep a landline phone line due to my hardwired T1 broadband which I also disconnected. That means that we are now relying on our Verizon phones for contact with the outside world and although I don’t live that far from a Verizon cell tower, the signal isn’t that strong throughout my house. Especially in the basement where dropped calls are the norm. So I was happy to test the weBoost eqo cell phone signal booster when the opportunity presented itself.

What is it?

The weBoost eqo is a cell phone signal booster that is designed to be used in a home or office up to 1200sq ft and has the ability to boost cell signals for any US and Canadian carrier by as much as 32x.

What’s in the box?

eqo Booster
eqo Inside Antenna
eqo Outside Antenna
25′ of Coax Cable
6′ of Coax Cable
Power Supply
User manual

Before we go any further, it’s important to understand that if you don’t receive any signal at all in your location, that the weBoost eqo will not boost the signal because there’s no signal to boost. So with that in mind, let’s continue.

The weBoost eqo is designed to be used indoors and does not require any type of hardware to be installed outdoors.

The setup includes three modules. There’s the Booster unit shown above, which needs to be placed on or near the window sill in your home where you receive the strongest cellular signal.

I used an app called OpenSignal which shows a compass that points to the direction where the cell signal is coming from.

Each of the eqo modules has pictorial diagrams to help you with the setup.

The indoors booster unit has three connections on the right side. There’s one marked Optional, which is where the Outside Antenna connects and the connection below that is for the indoor antenna. At the bottom is where the AC adapter connects.

The Outside Antenna doesn’t really go outside. It goes between your window and the window screen.

The Outside Antenna has a short section of flat cable that can bend under the edge of the window so it can shut.

If you don’t have a window screen, you can use double stick tape to tape the antenna to the outside of the window and if you have a window that can’t open, you don’t have to use the Outside Antenna at all.

Once placed in the window, you connect the 6-foot coax cable to the Outside Antenna cable and then the other end connects to the Booster unit.

The last step is to place the Inside Antenna in an area in your home where the cell signal is weak.

The Inside Antenna needs to be oriented so that it’s pointing in the same direction as the Booster unit as shown above.

The Indoor Antenna has a popout stand so that it can sit on a shelf.

It also has a removable plug that covers slots that can be used if to mount it on a wall.

The 25-foot coax cable connects to the Indoor Antenna behind the popout stand. This is the only downside to setting up the weBoost, you have to route coax cable between each module. For my setup, I had the Booster unit upstairs and the indoor antenna downstairs. That means that I had to route the 25ft of coax from one floor to another.

After the three modules are placed, all that’s left to do before plugging in the AC adapter for the Booster unit is to check your phone’s current signal so you’ll be able to compare before and after signal strength readings.

You can’t really go by how many bars that you see on your phone’s display. It’s better to see the dB signal strength reading. For iPhones, that used to be as easy as dialing *3001#12345#* , but the latest OS update to iOS 11 seems to have killed that feature. Luckily I was able to use Jeanne’s Samsung Galaxy Note 2 which runs Android. With Android you can check the dB signal strength by going to Settings > About Phone > Status or Network > Signal Strength or Network Type and Signal (it depends on the phone and what Android version it’s running).

Before turning on the weBoost eqo, I checked the signal in my basement with my iPhone 7 Plus. It consistently showed 1 bar and Jeanne’s Note 2 would show 113-117 dBm.

After the weBoost eqo was powered on, the iPhone would show 2-3 bars and the Note 2 would show 96-105 dBm. A very nice improvement. Of course, those readings didn’t remain rock steady, but they have been better than without the weBoost eqo powered on.

LEDs on the Booster unit provide a coverage status. If the light is Green, that means you should have good coverage. Orange means you’re receiving a low signal boost and a Red light means no signal boost. The manual includes troubleshooting tips for orange and red light issues.

Final thoughts

There isn’t much more to say about the weBoost eqo other than it does what it is designed to do, boost an existing cellular signal.

As long as you have some signal in your area, this product will do its job. And as long as you don’t mind having to set up 3 different modules connected by coax cable, it’s a good solution for boosting signal strength.

During my testing of the weBoost eqo 4G, we had no dropped calls in our basement, which is a testament that this product works as advertised.

Source: The sample for this review was provided by the RepeaterStore. Please visit their site for more info.


Product Information

Price: $379.99
Manufacturer: weBoost
Retailer: RepeaterStore
Pros:
  • Easy to setup
  • Does not require an outdoor installation
  • Can improve existing signal by as much as 32x
Cons:
  • Have to route coax cables

Filed in categories: Reviews

Tagged:

weBoost eqo 4G cellphone signal booster review originally appeared on The Gadgeteer on September 25, 2017 at 10:22 am.

Note: If you are subscribed to this feed through FeedBurner, please switch to our native feed URL http://the-gadgeteer.com/feed/ in order to ensure continuous delivery.