REVIEW – Having reviewed several dash cams over the last year or so, I wanted to review the Z-Edge Z3D dash cam mainly because it had a remotely mounted rear cam.
What is it?
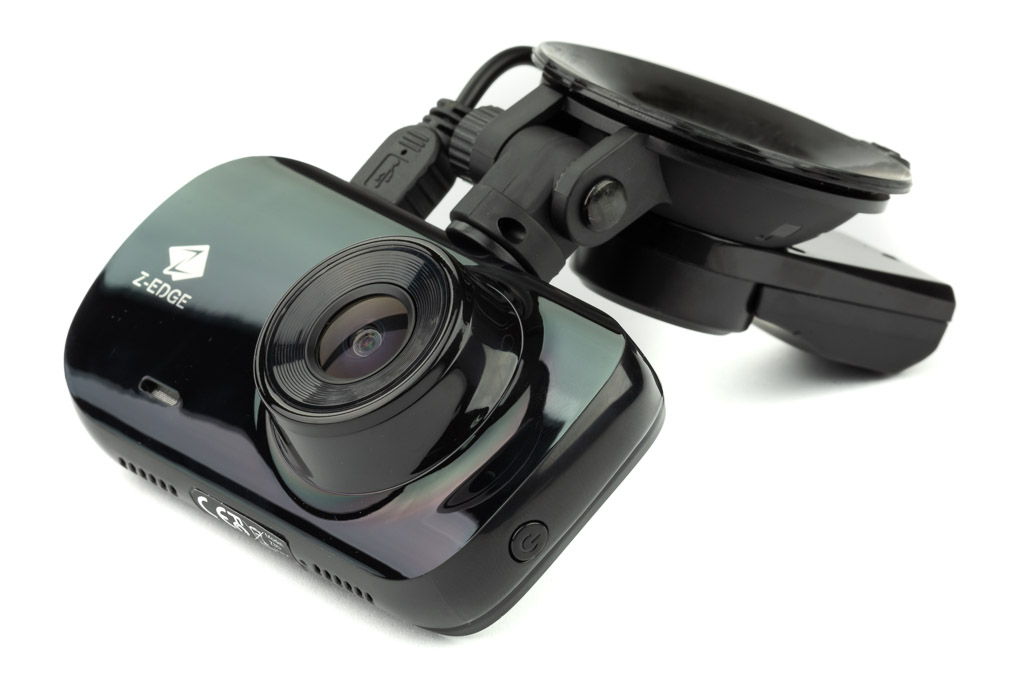
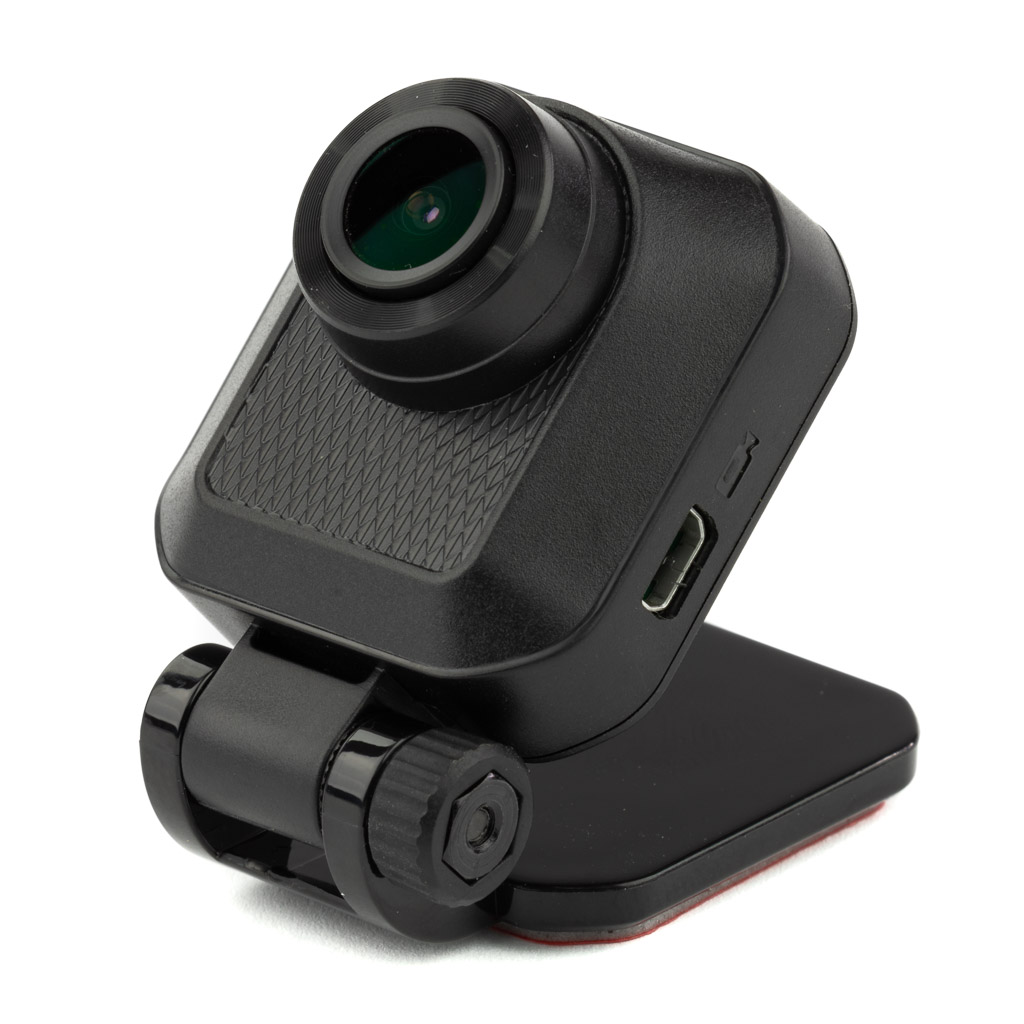
The Z-Edge Z3D Dual Lens Dash Cam is, as it sounds, a dashcam with two cameras. What makes this dash cam different than some of the other dual-camera dash cams is that its second camera is able to be remotely mounted and it includes a GPS feature.
What’s in the box?
List contents – you can remove this heading and section if it doesn’t apply to your review.
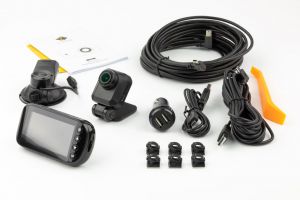
Car Dash Cam
Rear camera
Car mount with built-in GPS
Dual Car Charger
Short Micro USB charging cable
Long Micro USB charging cable
Mini USB cable for rear camera
Cable clips
Wire cable tool
Design and features
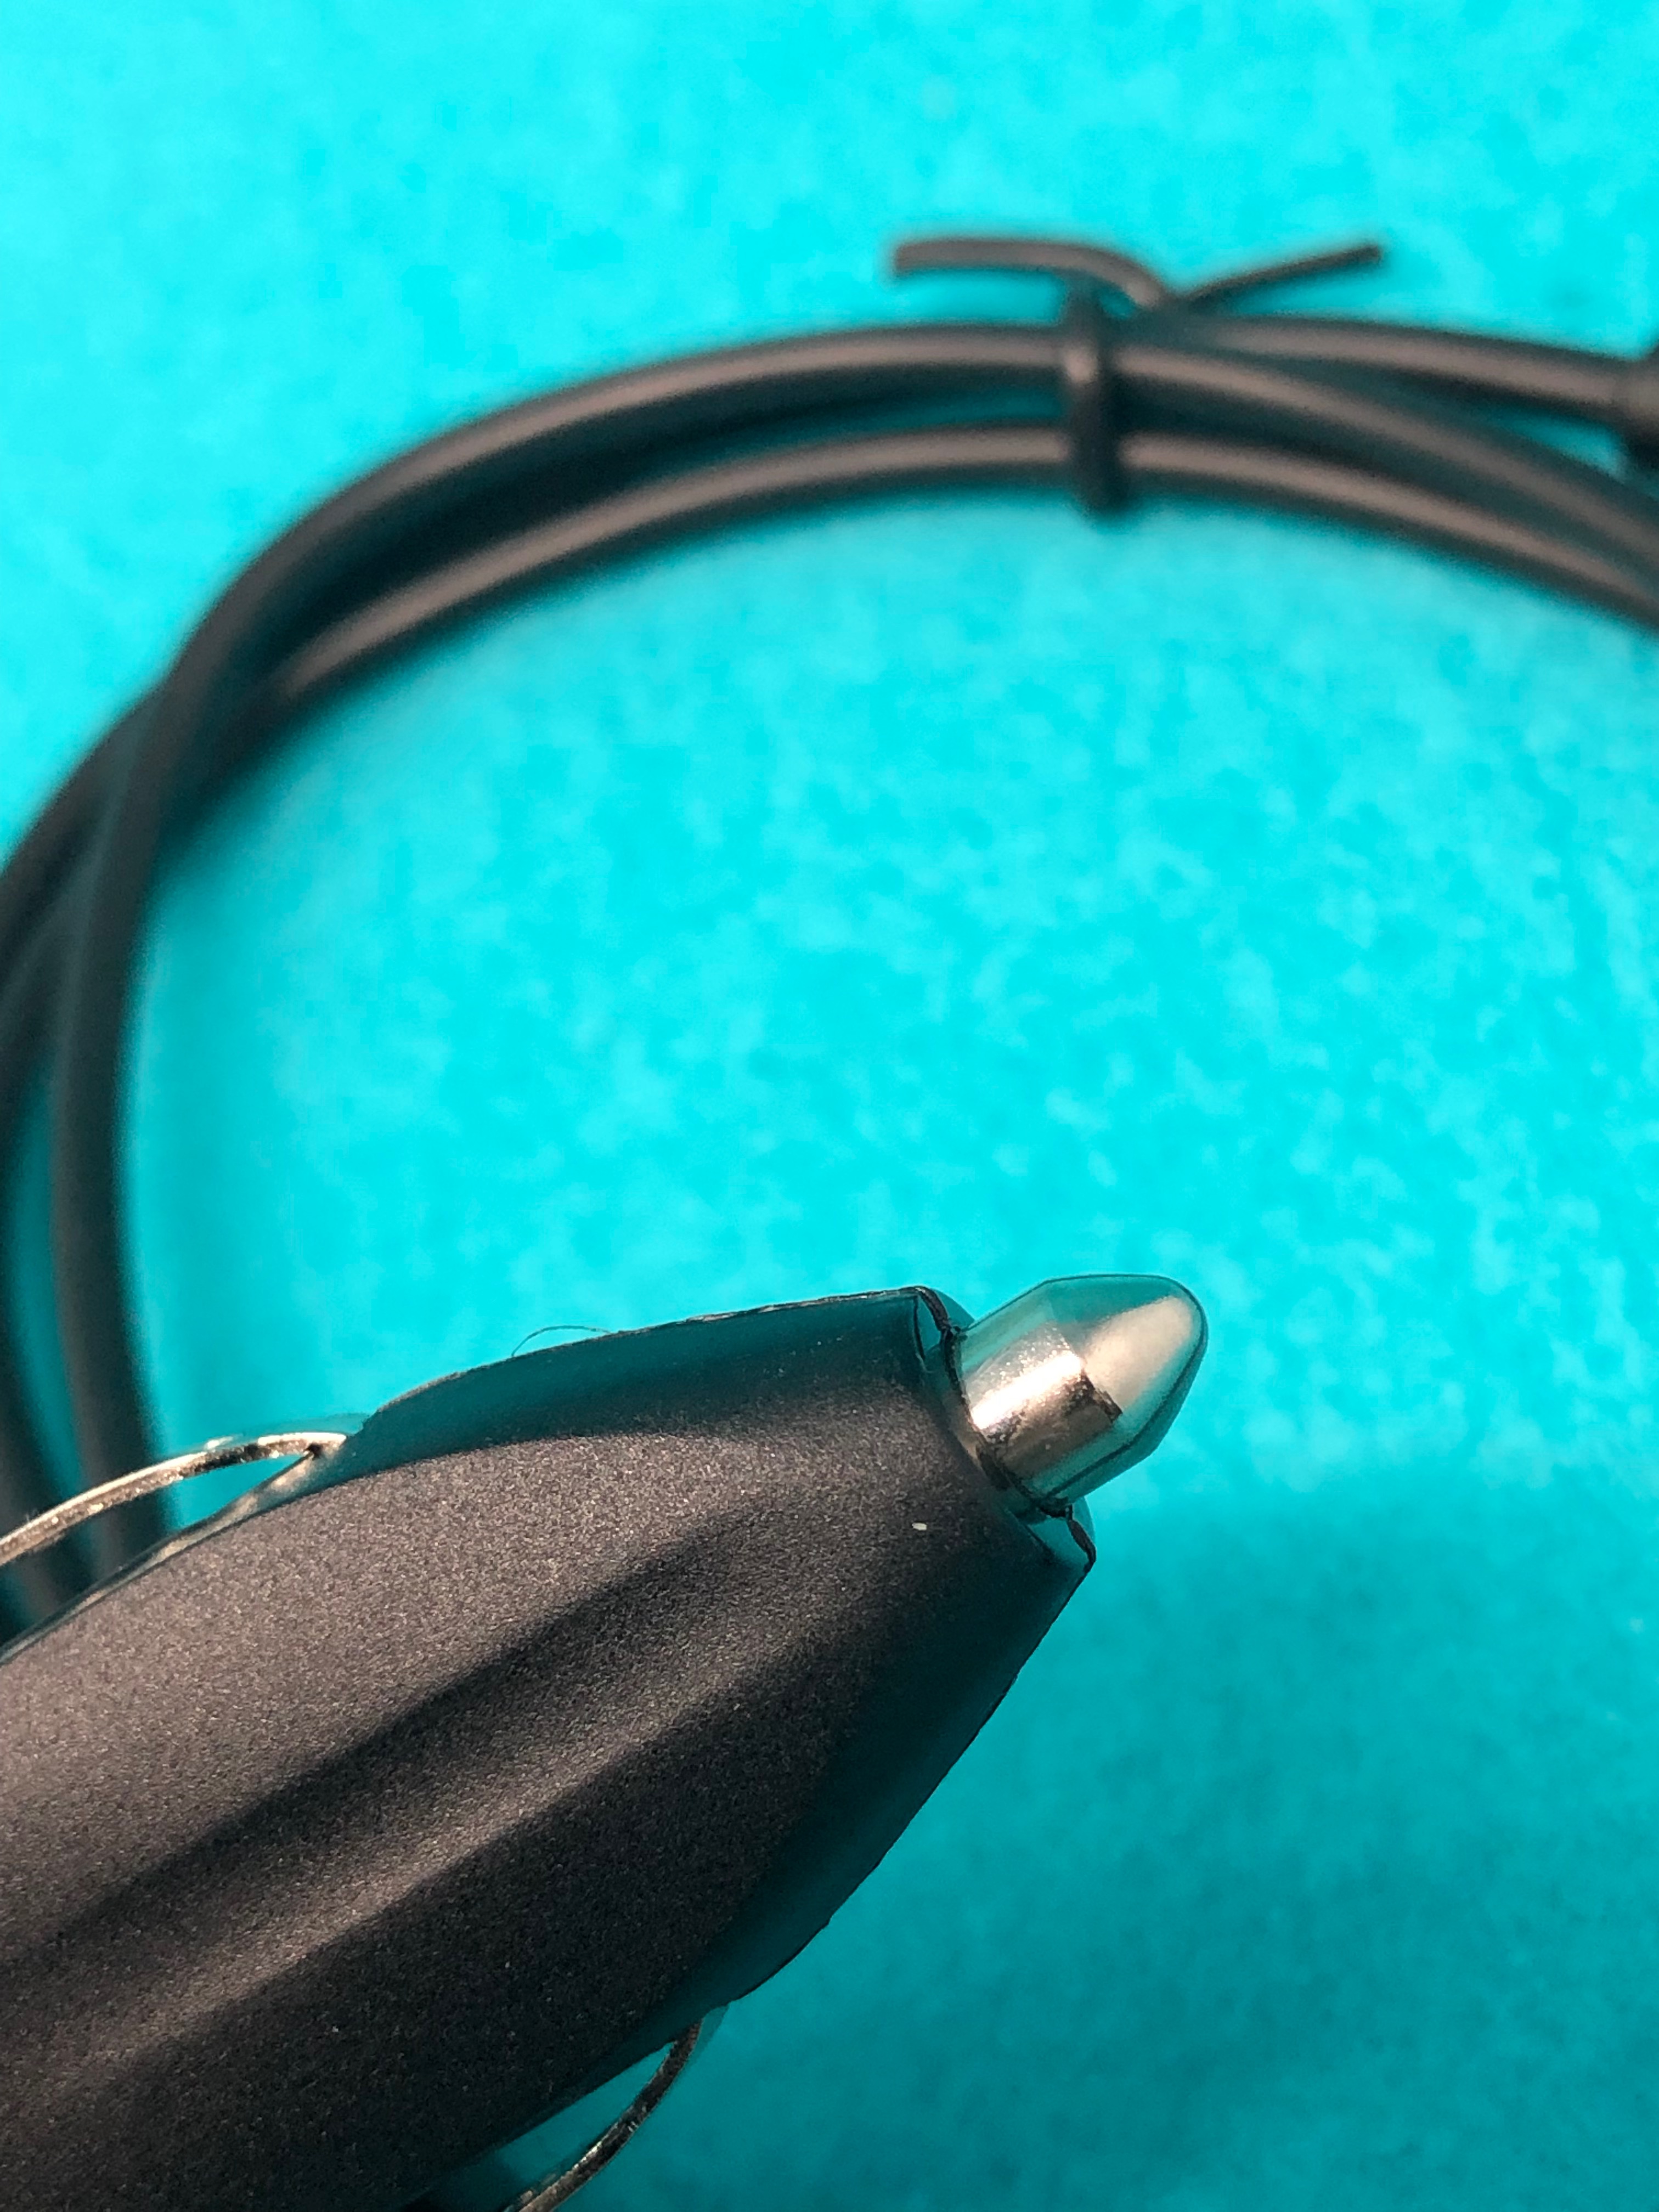
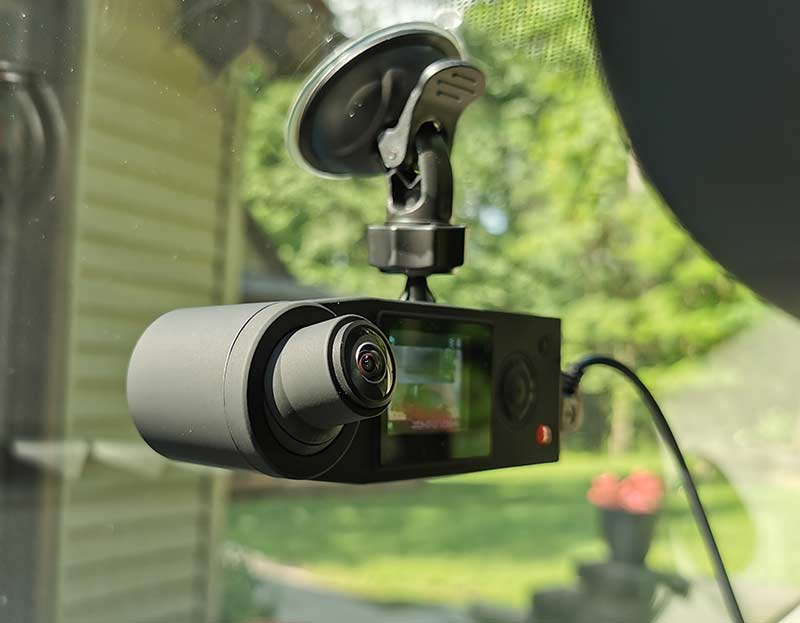
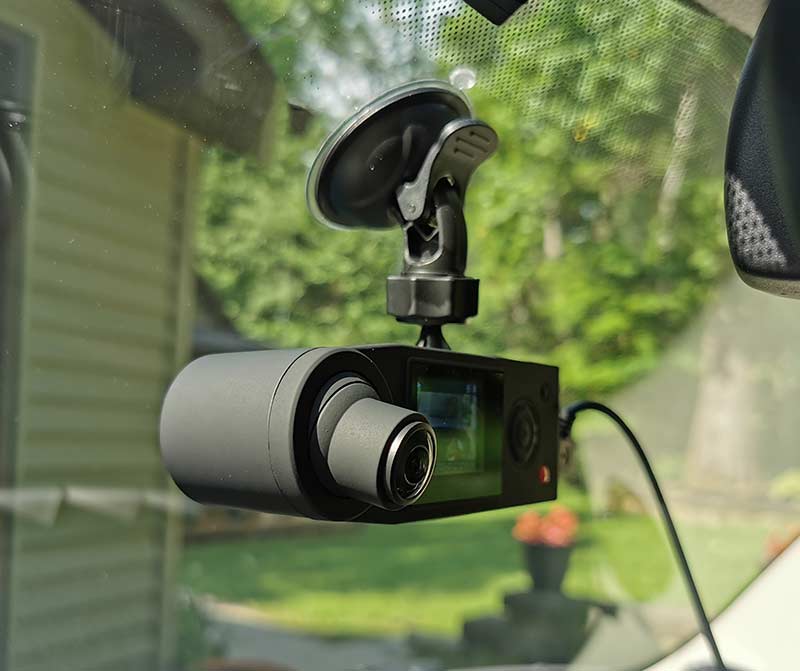
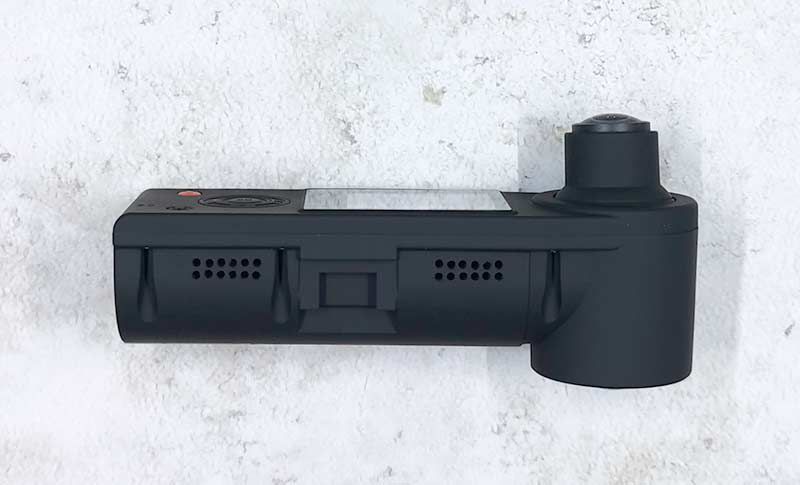
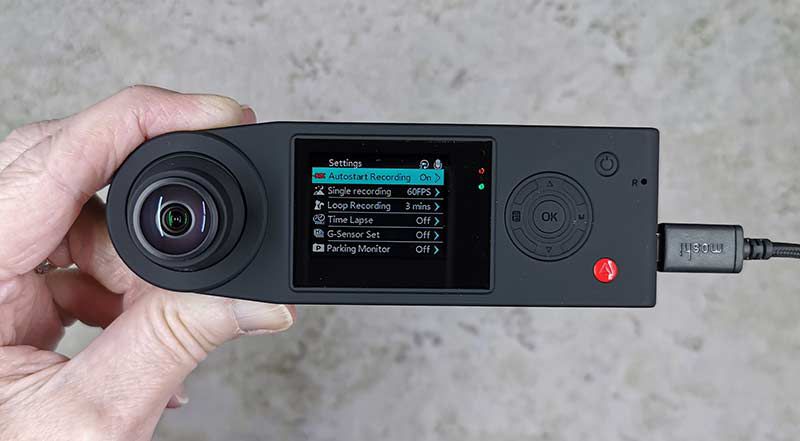
The Z-Edge Z3D is a dual-lens dash cam that can record in Full HD (1920x1080p) at 30fps when using both cameras, and 2560×1440 at 30fps when using only the front camera. Both cameras have a 150-degree wide-angle view. The front camera (the main unit) has a mount that includes a GPS antenna, something not normally seen in a dashcam. The cameras also utilize Wide Dynamic Range (WDR) technology that compensates for light/dark spots and balances the exposure. The mount holds very securely and is a bit easier to install than most other suction cup mounts. The rear camera uses 3M tape to mount to the window.
The included 26 foot Micro USB cable for the rear camera is long enough to reach the rear of just about any passenger vehicle. I was able to route mine all the way to the back of my pickup truck topper. It even works rather nicely through the tinted rear window.
The Z-Edge Z3D is also capable of using an SD memory card up to 128GB, most other dash cams only support up to 64GB. When used with a 128GB card the recording time is approximately 720 minutes or approximately 45 minutes for every 8GB of storage.
Like almost every dash cam, the G-Sensor automatically protects video clips as an “Emergency File” when it detects a collision or vibration to protect them from being overwritten as the device records in a loop, overwriting the oldest files when the card is full.
The parking monitor feature allows the device to monitor the vehicle even when the engine is switched off using its built-in battery. If any vibration is detected by the G-Sensor, it will automatically turn on the dash cam and begin recording. Approximately 30 seconds after the vibration has finished, the device will automatically turn off and return to monitoring mode.
The 2.7″ LCD screen is large enough to easily operate the camera.
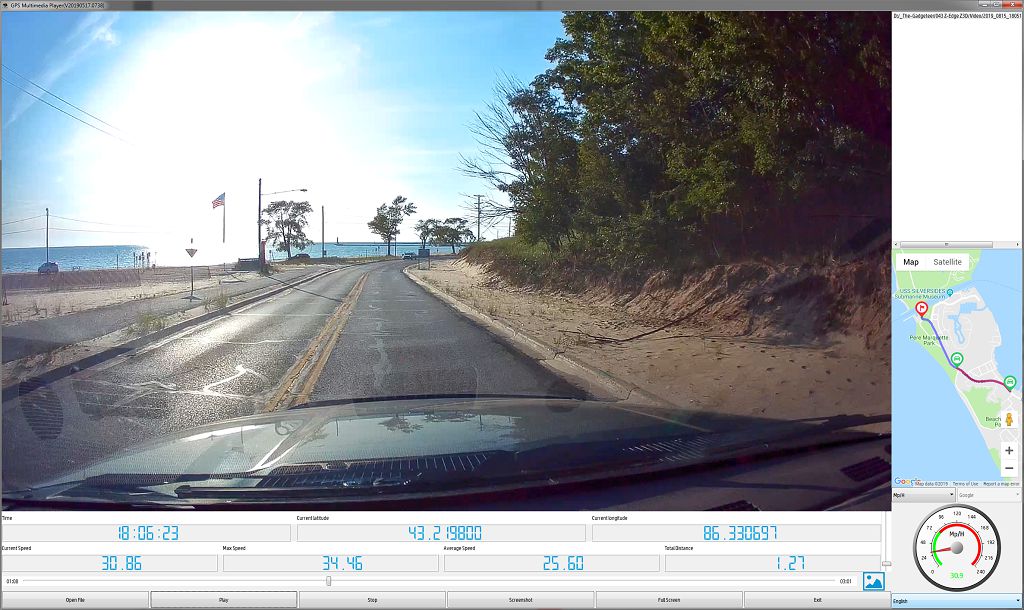
The GPS function saves the location data to a *.map file that can be used with the Z-Edge desktop software to display the location, speed, and route on Google Maps. At first, I thought this was an odd feature, but after opening the video file in the viewer I found it to be pretty neat. It displays the current time, latitude, longitude, current speed, max speed, average speed, total distance, and location on Google Maps and it updates as the video is played.
Sample Video:
What I like
Rear Camera
Dual Car Charger so you’ll still be able to charge something else
GPS Feature
What I’d change
Would like a dedicated save button for protecting files
Final thoughts
Overall this is a pretty nice dash cam. I think it will be my main dash cam for a while as it has all of the features I want.
Price: $139.99 Where to buy: Amazon Source: The sample of this product was provided by Z-Edge.
Note: If you are subscribed to this feed through FeedBurner, please switch to our native feed URL http://the-gadgeteer.com/feed/ in order to ensure continuous delivery.
REVIEW – Over the years, I can recall numerous times when I encountered a Check Engine light on my dashboard instrument display and I would either ignore it until something went wrong and I had to get my car to my mechanic, or until I would go for NYS Vehicle Inspection and be told that I had to have the issue resolved in order to pass the inspection test. In some cases, the issue causing the Check Engine light can be simple and in other cases way more complicated. Regardless of the cause, it would be nice to have some idea of the details of the issue prior to visiting the mechanic. Not to say that all mechanics are dishonest, but in many cases, we become the victim of a “lack of knowledge” robbery and lose everything in our wallet :-). The VXDAS NT510 Professional OBD2 Scanner seems advanced enough for the professional mechanic to start to investigate the issue and useful and informative enough for the less knowledgeable to walk into the mechanic shop and at least sound like – “Hey!! I have some knowledge about what’s wrong with my car”!!
What is it?
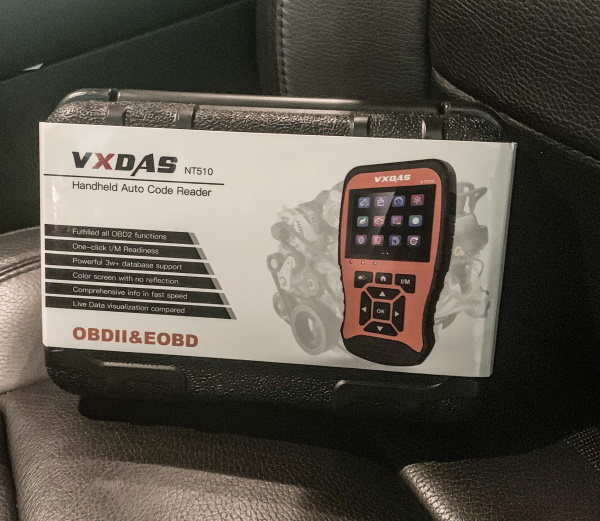
The VXDAS NT510 OBD II code scanner is designed to read and erase vehicle diagnostic codes. It can also retrieve information from the vehicle’s Engine Control Unit (ECU). The ECU is what triggers the Check Engine Light when there is a problem with your car. In addition, the OBD II code reader reads codes indicating faulty parts and once the problem is resolved, it can erase these trouble codes and turn off Check Engine light.
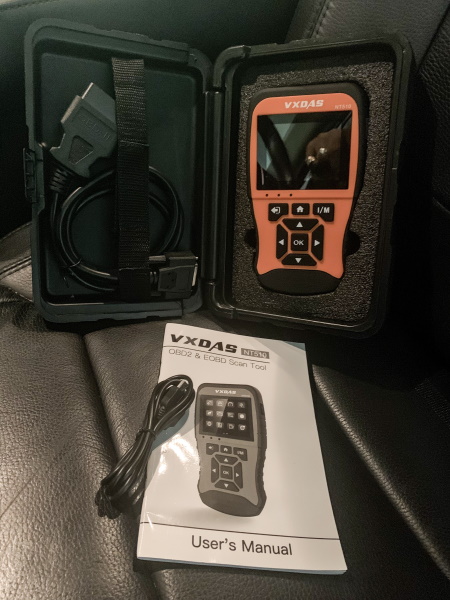
What’s in the box
1 x VXDAS NT510 Scanner
1 x OBD Connector Cable
1 x Mini USB Cable
1 x User Manual
! x Storage Case
Design and features
Features
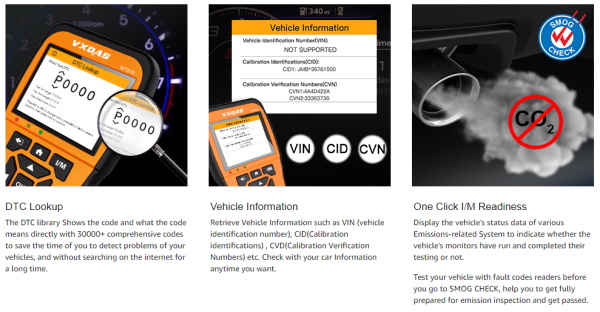
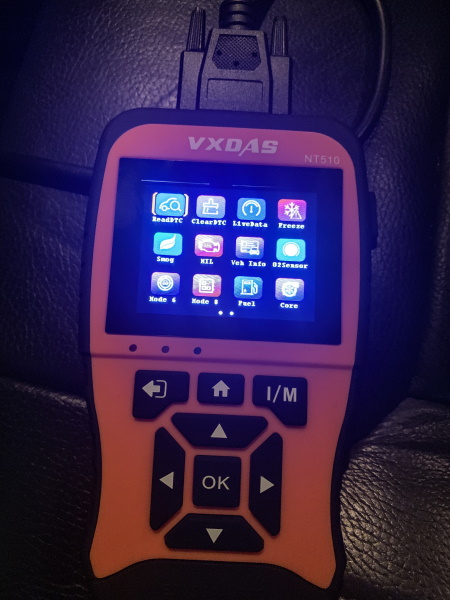
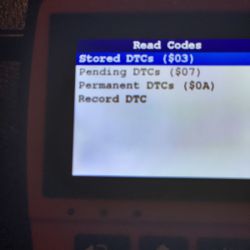
Read and Clear Codes: read and clear engine codes, generic, manufacturer-specific, and pending codes.
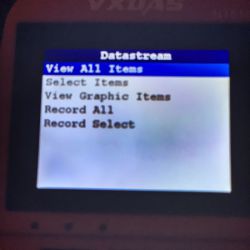
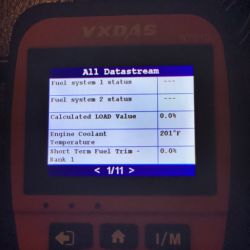
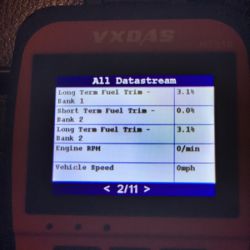
Live Data: read and record live sensor data, 4 parameters comparison supported.
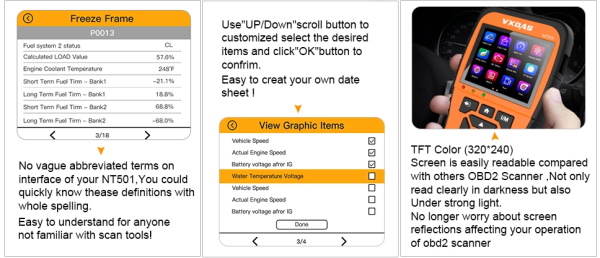
Freeze Frame: a snapshot of the vehicle which shows engine conditions when the MIL on.
O2 Sensor: check the vehicle O2 sensor values.
Mode 6: Advanced test results (like misfire counts) for on-board diagnostic system monitors.
Mode 8(Component test): allows initiating a leak test for the vehicle’s EVAP system.
I/M Readiness: check the operations of the Emission System on OBD2 compliant vehicles.
Battery Test: show battery voltage and comment battery status.
Smog Check: indicate whether or not the various emissions-related systems on the vehicle are operating properly and are ready for inspection and maintenance testing.
MIL Status: MIL is essentially an emission warning light. If the light comes on, it means the OBD II system has detected an emissions-related problem.
Vehicle Info: check the make, years, VIN Code and other detail information of your vehicle.
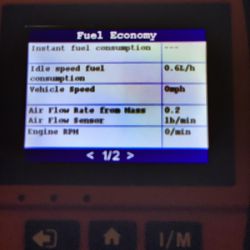
Fuel Analysis: allow viewing the fuel economy of the vehicle.
Core Analysis: allow viewing the performance of the vehicle.
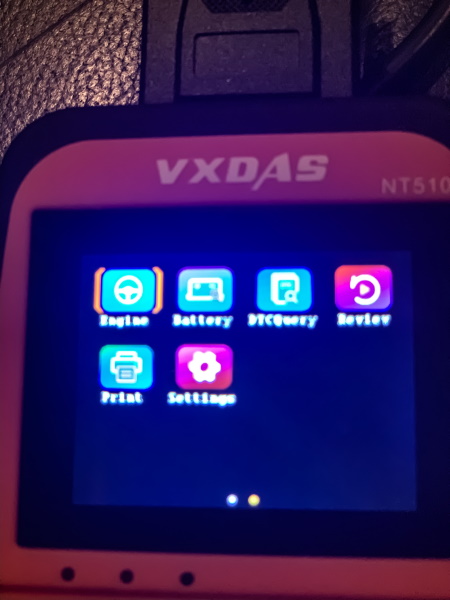
Engine Analysis: allow viewing the engine data of the vehicle
Vehicle Coverage: Works with almost all standard OBD2/EOBD protocols gasoline cars.
Supports all OBD2/EOBD standard protocols: SAE_J1850(PWM, VPW), ISO_9141-2, ISO_14230-4(KWP, KWP-FAST), ISO_15765-4(CAN, CAN-B, CAN-C, CAN-D), SAE_J1939(CAN)
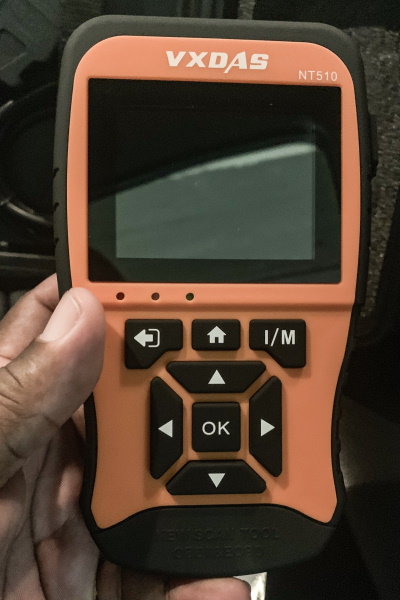
On the front of the scanner, there is the name branding, the LCD display screen, and the navigation buttons.
On the top edge, there is the connector for the OBD connector cable.
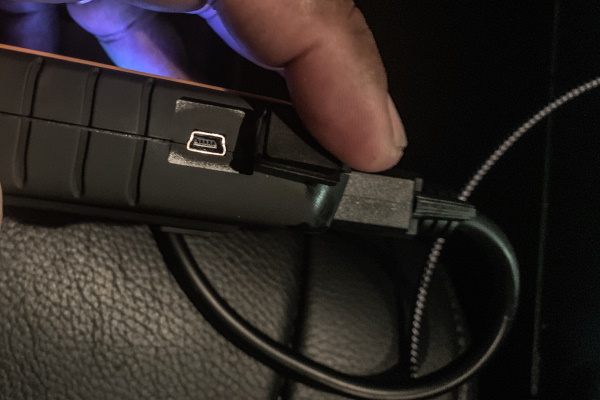
On one side of the scanner, there is a mini USB port for you to use the included cable to connect the device to your computer.
Below is a picture of the two ends of the OBD connector cable.
Performance
As soon as you plug the scanner into the vehicle’s ODD connector, it lights up and the icons are visible. there are 2 screens of icons that have various functions and provide various types of detailed information. The scanner receives its power via the OBD connection when used in the vehicle, and it receives power through the USB port when it is connected to a PC for
updating software and transferring saved files. I am not a mechanic, but I am quite handy, and I could read some the information regarding fuel, etc and I can imagine how useful this can be for both the novice and the professional. The device comes preset to the English language, but via the settings icon it can be changed, The Navigation buttons on the front are quite easy to use to navigate the various options and informational screens. The ignition does have to be turned on for the device to read all of the systems of the vehicle. I tested the scanner on my 2018 Toyota Tundra Crewmax and all of the icons appeared to have some information about the vehicle when selected.
The following is a small sample for the numerous screens of detailed diagnostic information that can be retrieved via the device.
The software for this device is optional, and has to be purchased separately: Diagnostic Software
You can click here to view the manual for more detailed information.
What I like
The build quality
The ease of use
The GUI display
The detailed options
The ability to transfer results to a computer
What I’d change
Provide some version of the software with the device even if only with basic capabilities
Possibly a touchscreen albeit that the cost would be more
Final thoughts
The VXDAS NT510 Professional OBD II Scanner is a useful device for both the novice and the professional, and I say this assuming that the professional can likely use it as a part of their daily use kit. For the novice, the fearful “Check Engine” light can be less menacing and the scanner can be quite helpful when preparing to visit the mechanic to resolve an issue. I am also assuming that the “optional” software will yield much more useful and technical information, which is likely why there is a cost for any version of it. I have reviewed similar devices that were all text readouts in monochrome, and they were not much cheaper than this device. So, in my opinion, for the low one-time price, it is worth if for the novice to keep in their glove compartment. I will let the professionals weigh in on its value with respect to their trade.
Price: $69.99 Where to buy:Amazon Source: The sample for this review was provided by VXDAS
Note: If you are subscribed to this feed through FeedBurner, please switch to our native feed URL http://the-gadgeteer.com/feed/ in order to ensure continuous delivery.
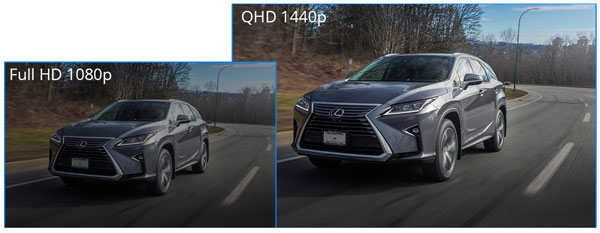
REVIEW – The past few years I’ve had the opportunity to review both of Thinkware’s flagship dash cams: the F800 and F800 PRO. With many other brands to choose from, the 800 series continues to be my dash cam of choice. I’ve even had the Thinkware 12v power cable hardwired into my vehicles enabling all of their features to be fully functional. That said, the only negative/criticism I had in those reviews was the F800’s HD resolution. In today’s high-res world, 1920 x 1080 is a bit meager IMO. Well, Thinkware has finally addressed this shortcoming in the new Q variant of the series, bumping the resolution to 2K QHD (2560 x 1440)…a welcome upgrade. Let’s see if it lives up to the anticipation .
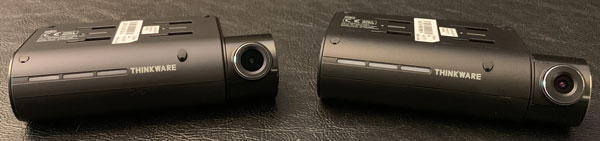
Since the F800, F800 PRO and Q800 PRO are nearly identical in form and function, I will be plagiarizing myself while describing the Q800’s shape, ports, and shared features but dive into what differences there are. Here you can see, that other than lens/camera assembly the F800 PRO and Q800 PRO are identical.
What is it?
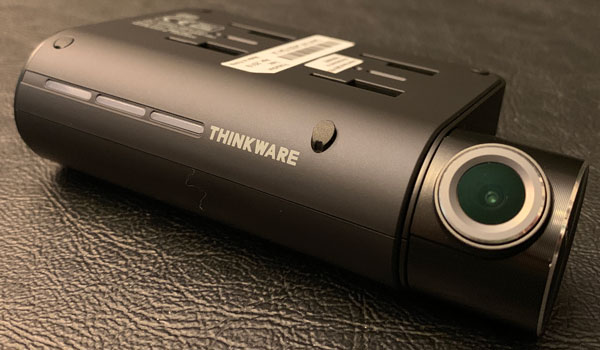
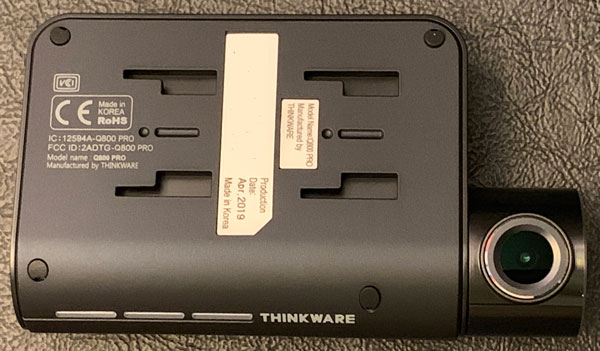
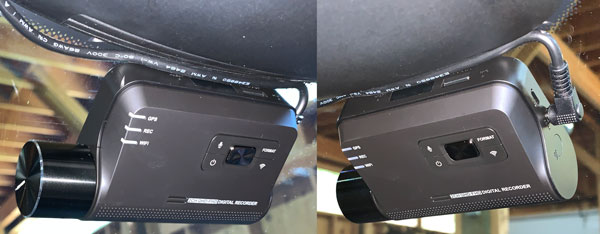
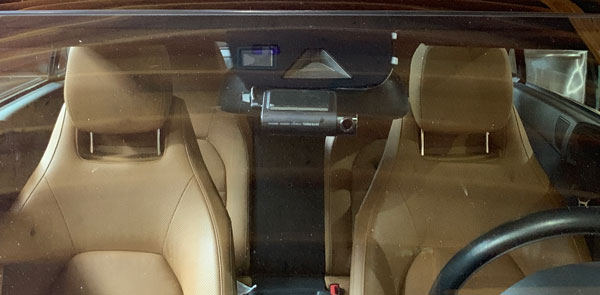
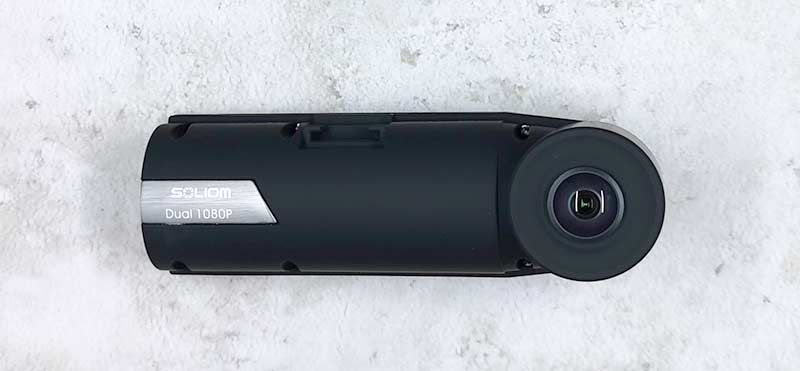
The Q800 PRO is a screen-less dash cam, shaped more or less like a thick deck of cards with a growth on its side to house the lens assembly. Like it’s predecessors, I love the minimalistic, non-distracting form factor of the Q800 PRO. Other than verbal/audio notifications, you can hardly tell it’s installed in your vehicle being tucked behind my rearview mirror. The Q800 PRO is even more stealthy than the original F800, housed in all-black (vs gray) plastic and packed full of the latest tech, features, and Sony’s 2K/high resolution 5.14MP Sony STARVIS camera sensor.
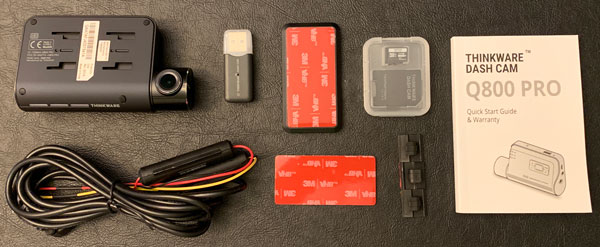
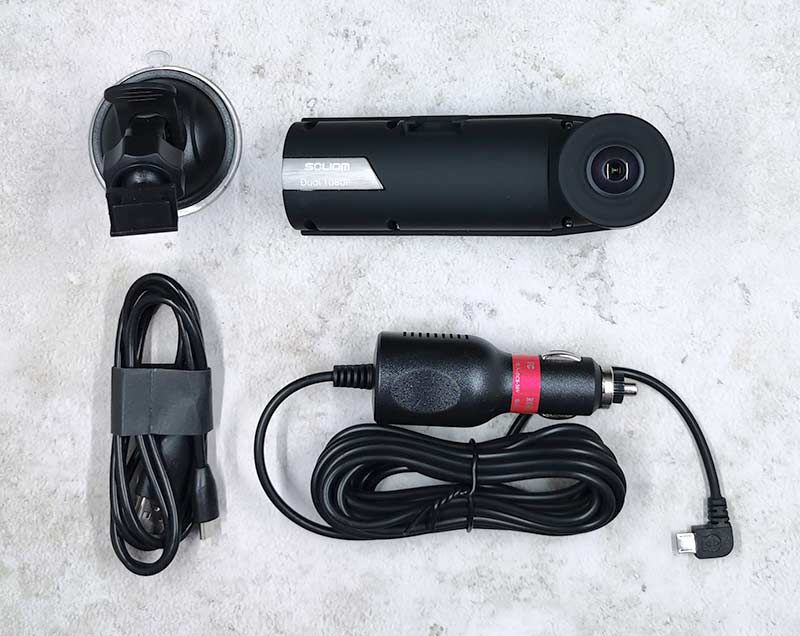
What’s in the box?
Main dash cam unit
Mount with 3M tape (1ea)
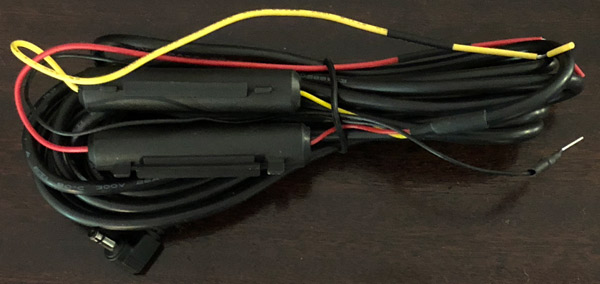
12v power cable
Adhesive cable holders
16gb microSD memory card with adapter (consumable)
Quick start guide/warranty card
Hardware specs
• Resolution: Front – 2K QHD (2560 x 1440) / Rear – Full HD (1920 x 1080) [Optional]
• Camera: Front – 5.14MP Sony STARVIS / Rear – 2.13MP Sony STARVIS [Optional]
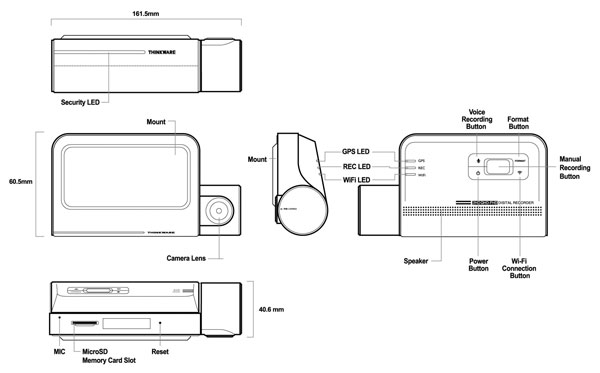
• Frame Rate: 30 fps • Viewing Angle: 140° (Diagonal) • Dimensions (WxDxH): 4.2 x 1.3 X 2.4 inch • Weight: 107.5g (0.237 lb) • Storage Temperature: -4°~ 158°F / -20°~ 70°C • Operating Temperature: 14°~ 140°F / -10°~ 60°C • Capacity: MicroSD card 32/64/128GB (UHS-I) • Input Power: DC 12/24V, Built-in Super Capacitor • GPS: Built-in GPS Antenna
Design and features
The top of the Q800 PRO has four slots that slide onto the mounting plate which allows for easy installation and removal of the device. The mounting plate is securely held to the windshield by a 3M adhesive strip (vs suction cup mount). The dash cam locks onto the mounting plate with a secure, wiggle-free connection.
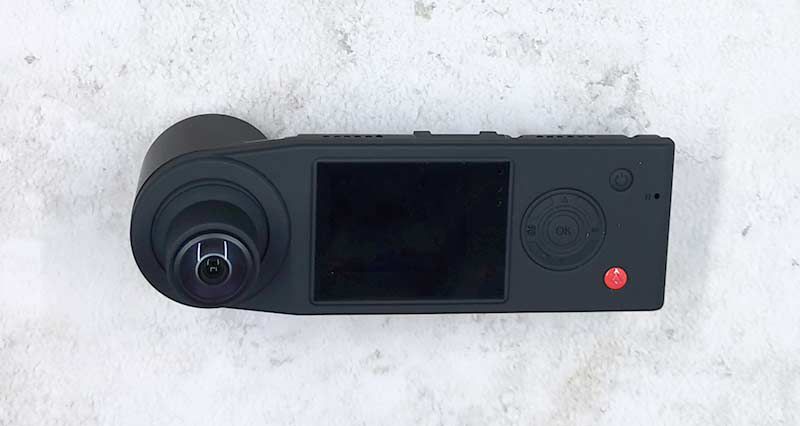
The main face of the Q800 PRO has the mic mute, SD card format, WiFi, and power buttons in addition to the GPS, recording, and WiFi status LEDs located on the left. The Q800 PRO’s speaker is also located on the front of the device. Like the F800 and F800PRO, the Q800 PRO’s speaker impressed me just like its brethren, definitely the clearest and loudest dash cam I have experienced to date.
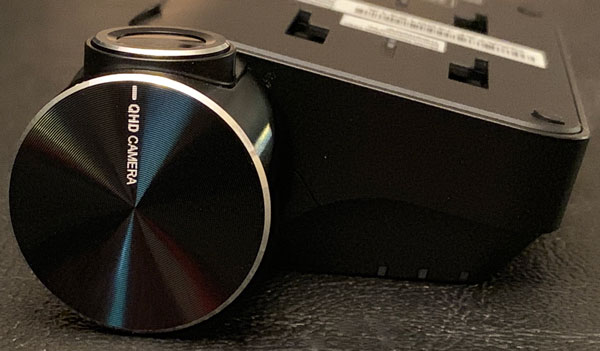
The Q800 PRO’s camera is on the left side of the device, engineered to sit very close to the windshield to reduce distortion and glare. The camera housing is able to rotate vertically approximately 90 degrees to accommodate nearly any windshield angle and vehicle design.
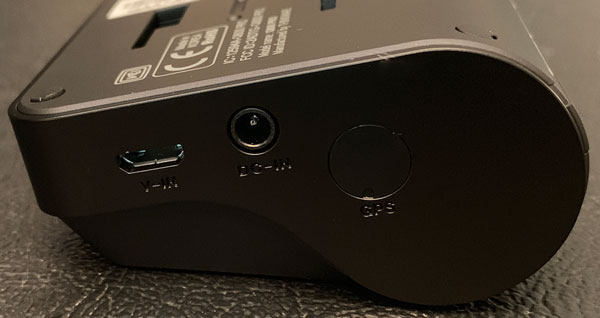
The right side of the Q800 PRO has its video-in, power, and external GPS ports. The video-in port is for the rear, second channel camera. The Thinkware Rear View Camera is an optional accessory that connects to the Q800 PRO via microUSB cable providing HD quality video with a 2.13MP Sony STARVIS sensor and 140 degree viewing angle. The rear video feed can be viewed concurrently with the main, front-facing video on the PC Viewer.
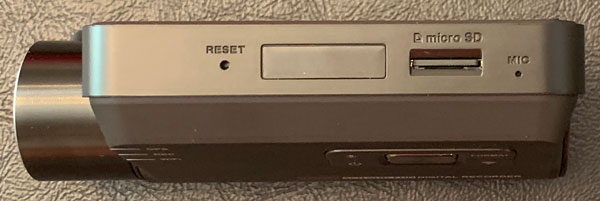
The top of the Q800 PRO has a recessed reset button, microSD card slot, and microphone. Thinkware includes a 16gb microSD card. The Q800 PRO can accommodate up to a 128gb card. Considering the Q800 PRO records in 2K with video taking up twice the space/capacity of standard HD, seems like Thinkware could have included a 32 or better yet 64gb microSD card with their premium device.
Installation
Instead of sending a standard 12v power cable that plugs into your cigarette lighter, Thinkware includes their TWA-SH hardwiring cable with the Q800 PRO. I had the hardwiring cable professionally installed during the F800 PRO review and it has performed perfectly. In addition to looking cleaner and more polished, the hardware kit enables you to use all of the Q800 PRO’s Parking Mode features/capabilities.
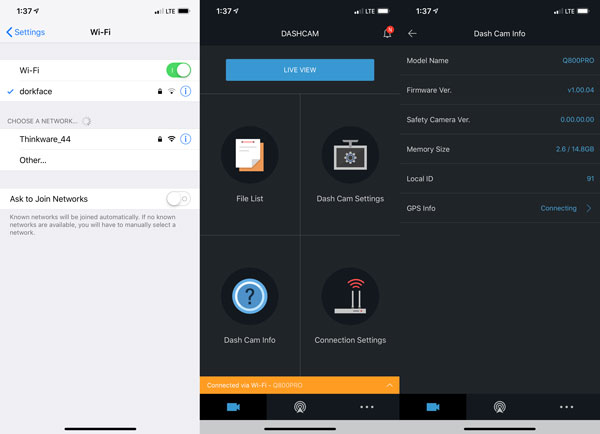
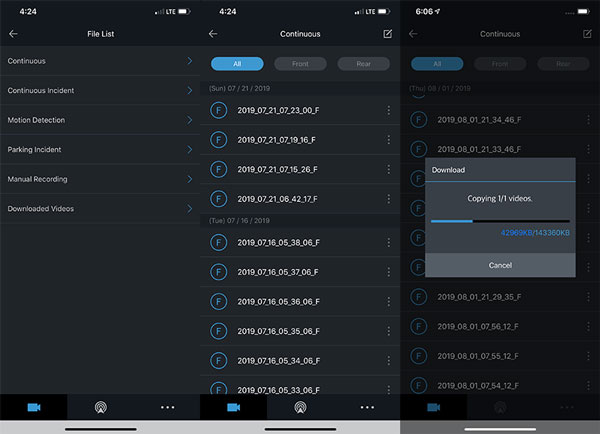
Once installed a majority of the configuring, managing and viewing/downloading video is all done via the Thinkware app available for iOS and Android devices.
The Thinkware app even helps you align the dash cam when first setting the 3M mounting plate as you can see here with the blue & green lines.
Setup and management
Setting up the Q800 PRO’s involves connecting your smartphone to the dash cam via WiFi and using the mobile app to tweak things as you like. The process requires you to press the WiFi button on the front of the dash cam, directly connect to its WiFi (for me it is Thinkware_44), then start up the app.
In addition to accessing the Q800 PRO’s camera (memory card/camera/recording/road safety/system) settings, the app also provides a listing of recordings and enables you to download these files from the microSD card to your smartphone wirelessly. Each 146mb file takes several minutes to download. Viewing videos are definitely easier by removing the microSD card and watching them on the Thinkware viewer on your computer.
Noteworthy Features
Built-in GPS sensor – the 800 PRO series has the FASTEST built-in GPS I have ever tested.
Driver assistance – Includes lane departure, forward collision avoidance, and forward vehicle departure warning.
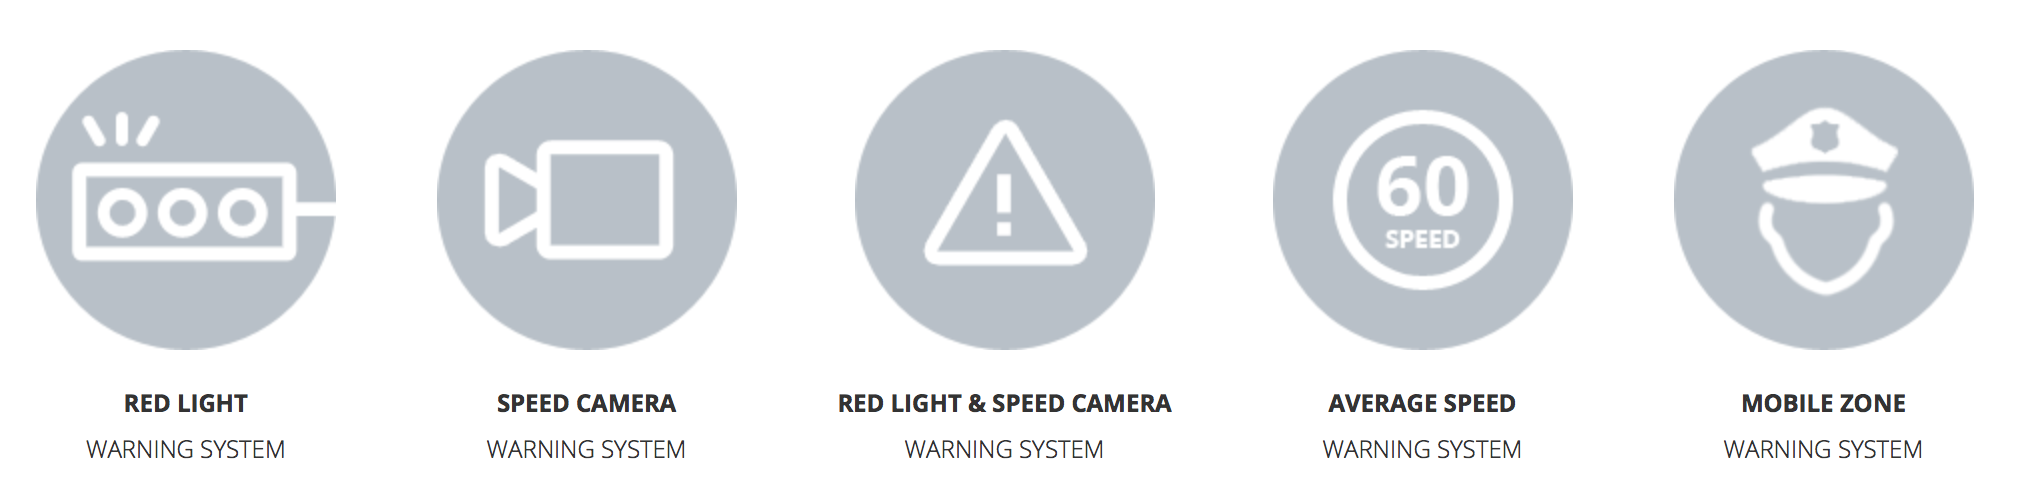
Speed camera alerts – the Q800 PRO has an internal database that warns you when you’re coming up to an intersection or location with a known speed camera standing watch.
High-temperature protection system – a built-in thermal sensor protects the Q800 PRO hardware and data against intense heat by automatically turning it off to prevent overheating.
Dual channel capable (aka second camera) – Thinkware also offers a rear camera that captures HD video @30fps.
Geo-Fencing – allows drivers or parents to stay alert of the vehicle location.
Locate Vehicle – enables drivers to find the vehicle’s current location.
Driving Impact Notification – will notify owners when their vehicle has sustained a significant impact.
Energy Saving Parking Mode – reduces power consumption by 1/3 less and gives 3x longer video recording than typical parking mode.
Performance
Thinkware’s new optical lens and improved 5.14MP Sony STARVIS image sensor combine to deliver impressively crisp and clear video quality in 2K QHD. The Q800 PRO just works…once installed, it blends into your car only needing to be accessed when something bad happens or an alien spaceship zips across the horizon.
Video Quality
As I mentioned above, the Q800 PRO uses a Sony 5.14MP STARVIS QHD (2560 x 1440) sensor that captures 2K video at 30fps. The clarity and detail in all lighting condition is excellent. Like the rest of the Thinkware’s 800 series dash-cams, the Q800 PRO gives you a relatively wide viewing angle with a 140-degree view of the road.
With its better lens and greater resolution, the Q800 PRO’s daytime video is excellent. The detail, color, and clarity make for a much improved image quality over its predecessors.
Thinkware’s Super Night Vision 2.0 and Sony improved Exmor CMOS image sensor are very good at capturing light, producing low-light and nighttime video.
Here is an example of the Park Mode video. Even though my parking garage is dimly lit with shadows and bright lighting, the lights are not overexposed and the detail is very clear and detailed.
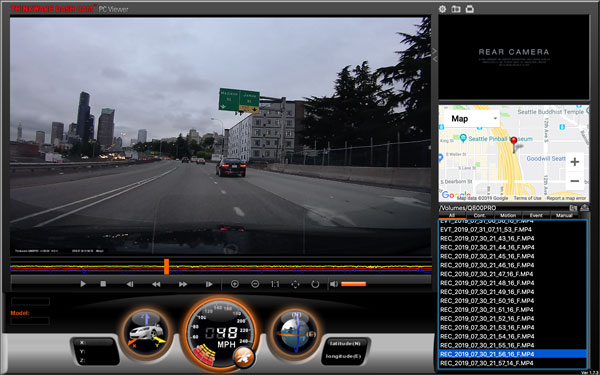
Thinkware Viewer
The Thinkware PC viewer is one of the best features of using their dash cams, very well polished and intuitive. Other dash cam manufactures either create a half-baked viewer or do not offer one at all. The Thinkware viewer is an excellent integrated tool for viewing not only your driving video but speed, lat/long, Google map location, and three-dimensional G-forces the car is experiencing at any particular moment. These G-forces are illustrated in the bar graph under the video and the dial with a car in it with X- Y- and Z- axis in the lower left corner of the window. Like the F800 and F800 PRO, the Q800 PRO records in 1:00 minute blocks but its 2K resolution bumps the file size from approximately 85 to 146mb in size. So, I swapped out the 16gb microSD card Thinkware provides with a 64gb one I had laying around, to (obviously) hold more video at one time before the dash cam overwrites itself.
F800 PRO vs Q800 PRO:
As I mentioned above…other than the lens assembly, there is no outward/physical difference between the F800 PRO and the Q800 PRO. The Q800 PRO’s improved resolution and video are the only things that truly set it apart from the F800 PRO, the features are the same.
What I like
Great build quality
2K QHD (2560 x 1440) resolution
Additional features and functions
Stealthy/minimalistic form factor
Very good video quality (especially Night Vision)
TWA-SH hardwiring cable included
Dual channel/camera capable
Quick GPS lock
Excellent PC viewer
Solid companion smartphone app
Easy to install/use
What I’d change
Included microSD needs to be higher capacity
Final thoughts
I really like Thinkware’s 800 series of dash cams…so much so, I have had them hardwired into several of my vehicles. I have always prefer their screen-less, minimalistic form factor. The Q800 PRO raises the bar by bumping up the camera’s resolution from 1080p to 2K. As I have said in past reviews, I prefer a higher resolution sensor and Thinkware has delivered with their latest & greatest. The Q800 PRO is jam-packed with features you would expect from a high-end dash cam (tho I can see many not using some of its more advanced capabilities). I love the all-black PRO’s stealthy look and vibe. Bottomline: I recommend the Q800 PRO for its video quality, design, features, and polished ecosystem. If you’re thinking of buying or upgrading your dash cam, I definitely recommend the Q800 PRO be on the top of your list.
Price: $299.99 Where to buy: Amazon or Thinkware. Source: The sample of this product was provided by Thinkware.com.
Note: If you are subscribed to this feed through FeedBurner, please switch to our native feed URL http://the-gadgeteer.com/feed/ in order to ensure continuous delivery.
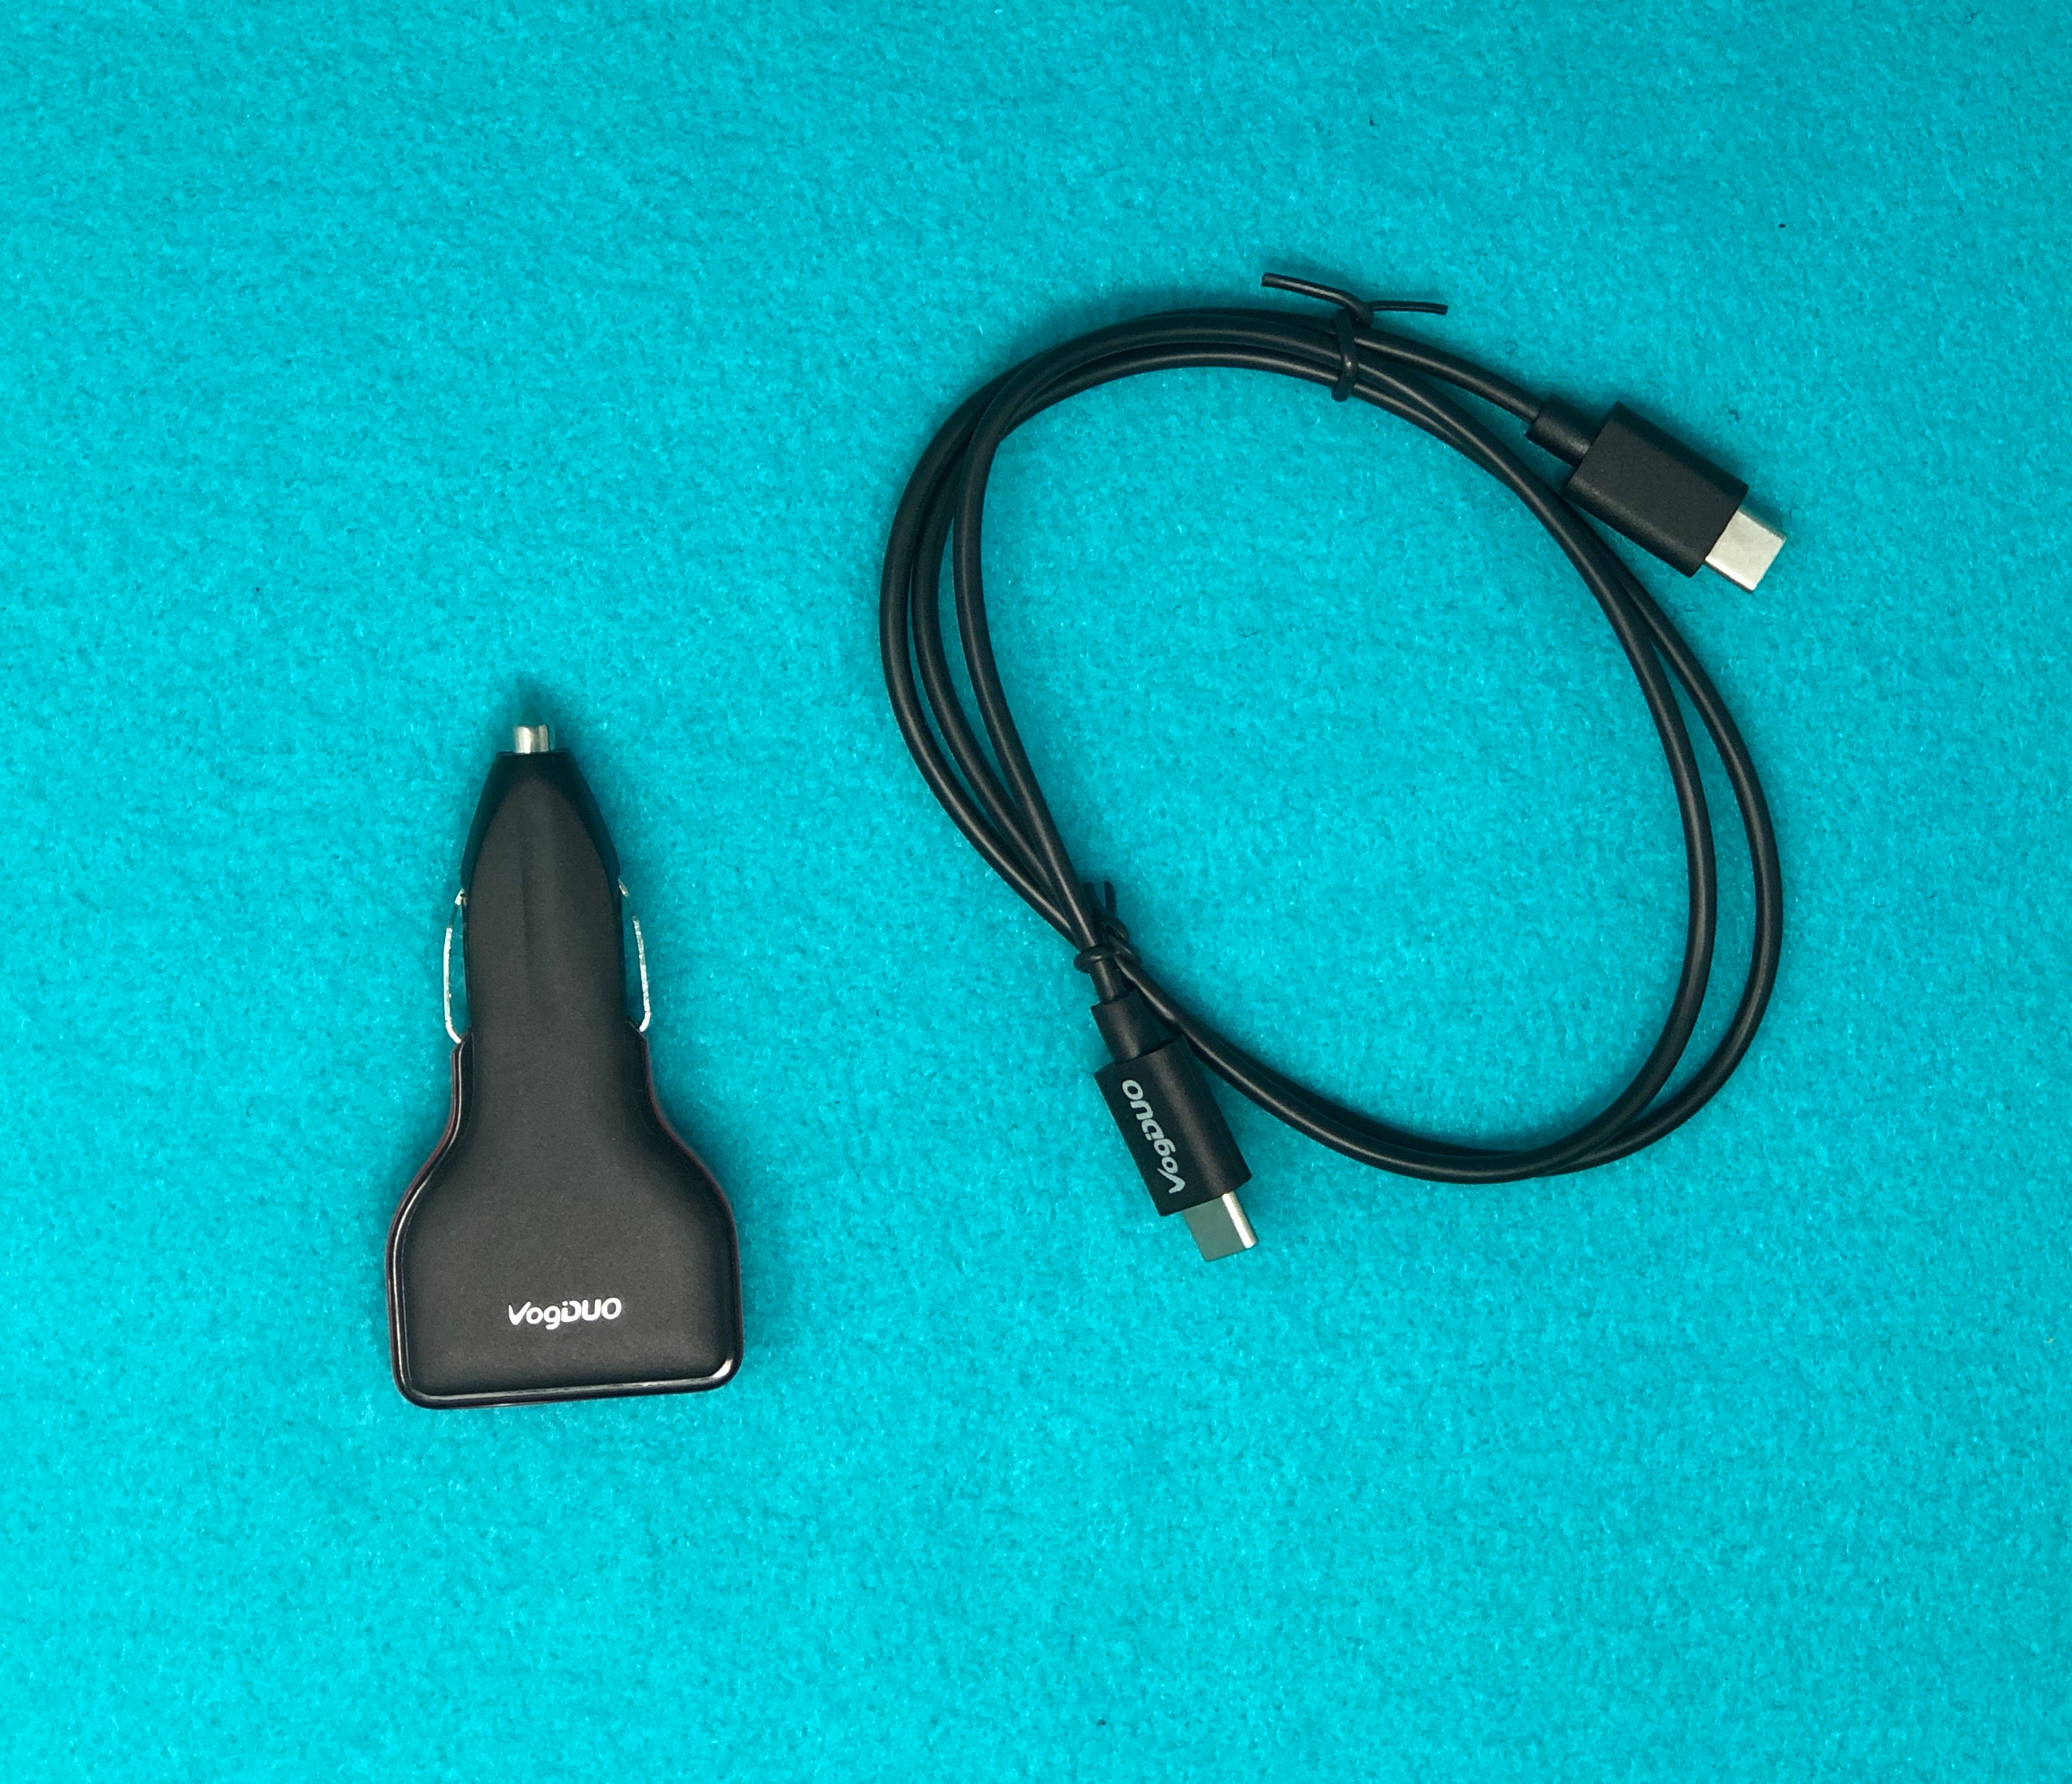
REVIEW – We all have charging units in our cars. It’s part of the Gadgeteer Code. Some of us even have power inverters that provide AC power. With today’s larger devices, however, the trickle of power our cars provide needs to be stepped up a bit for the larger phones, tablets, laptops, action cameras, and gaming boxes we carry around. VogDUO has released their Charger Go to meet this need. I was sent a test unit and have been using it for a few weeks and am ready to report.
What is it?
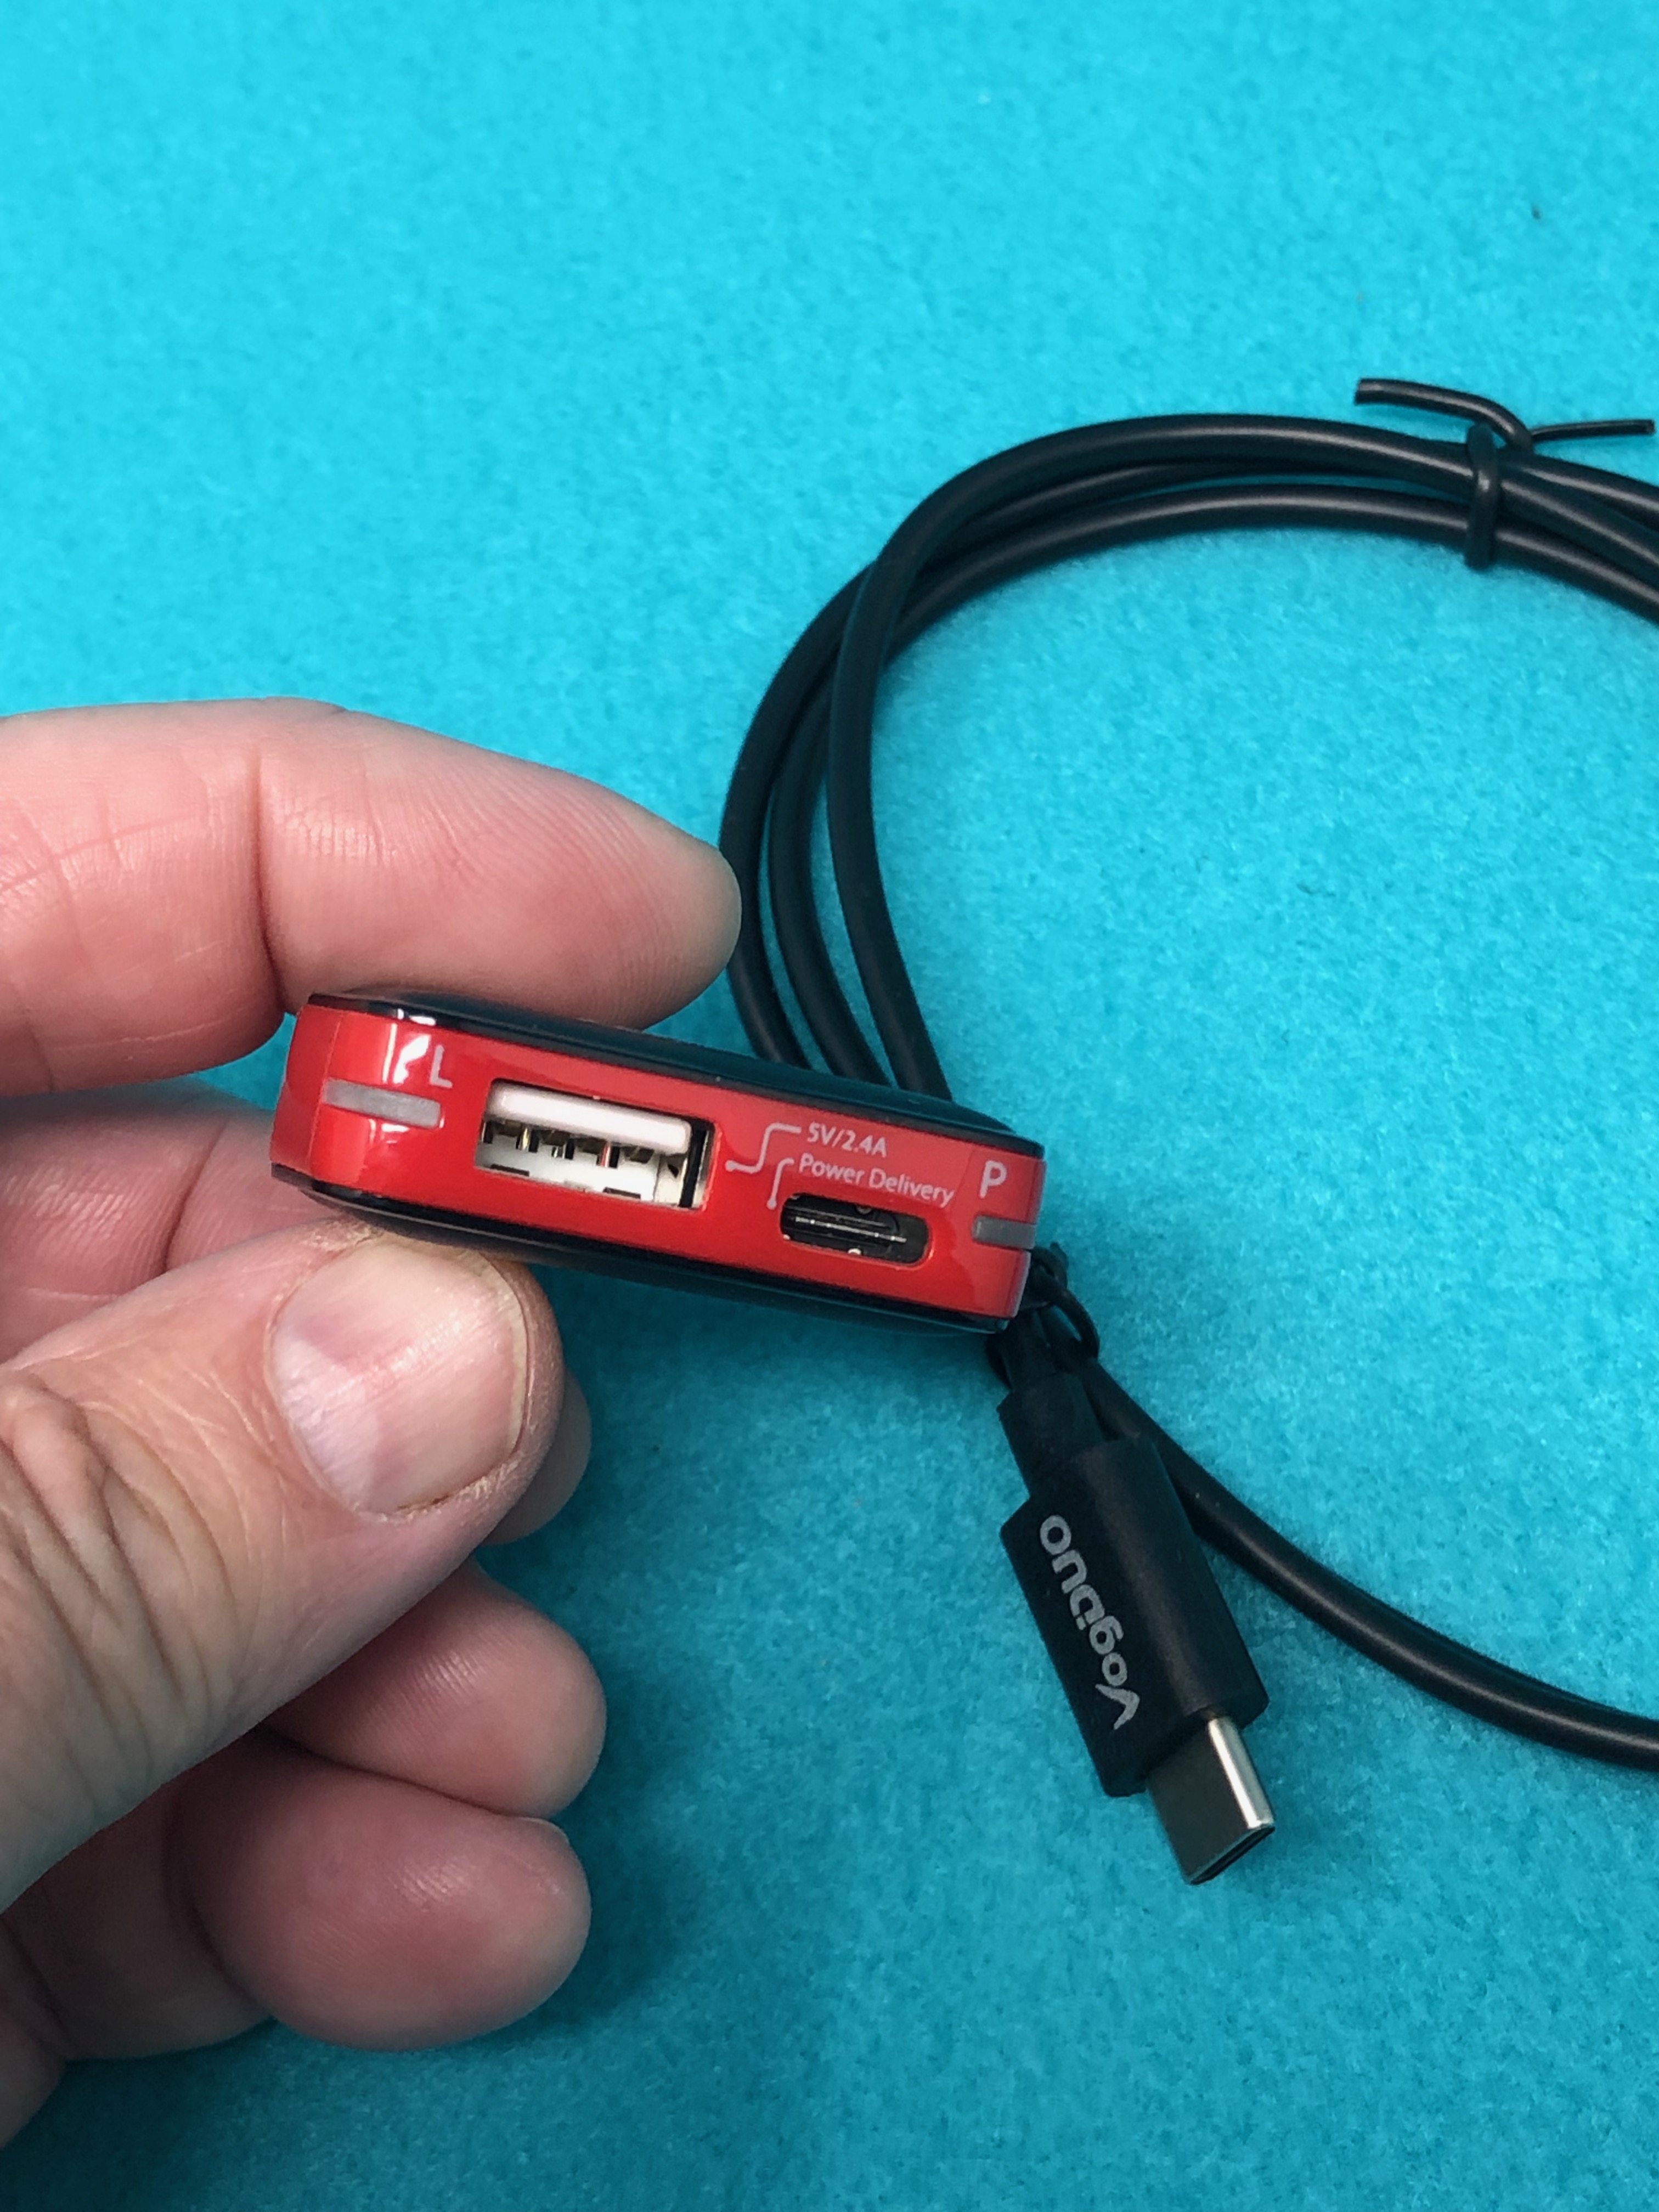
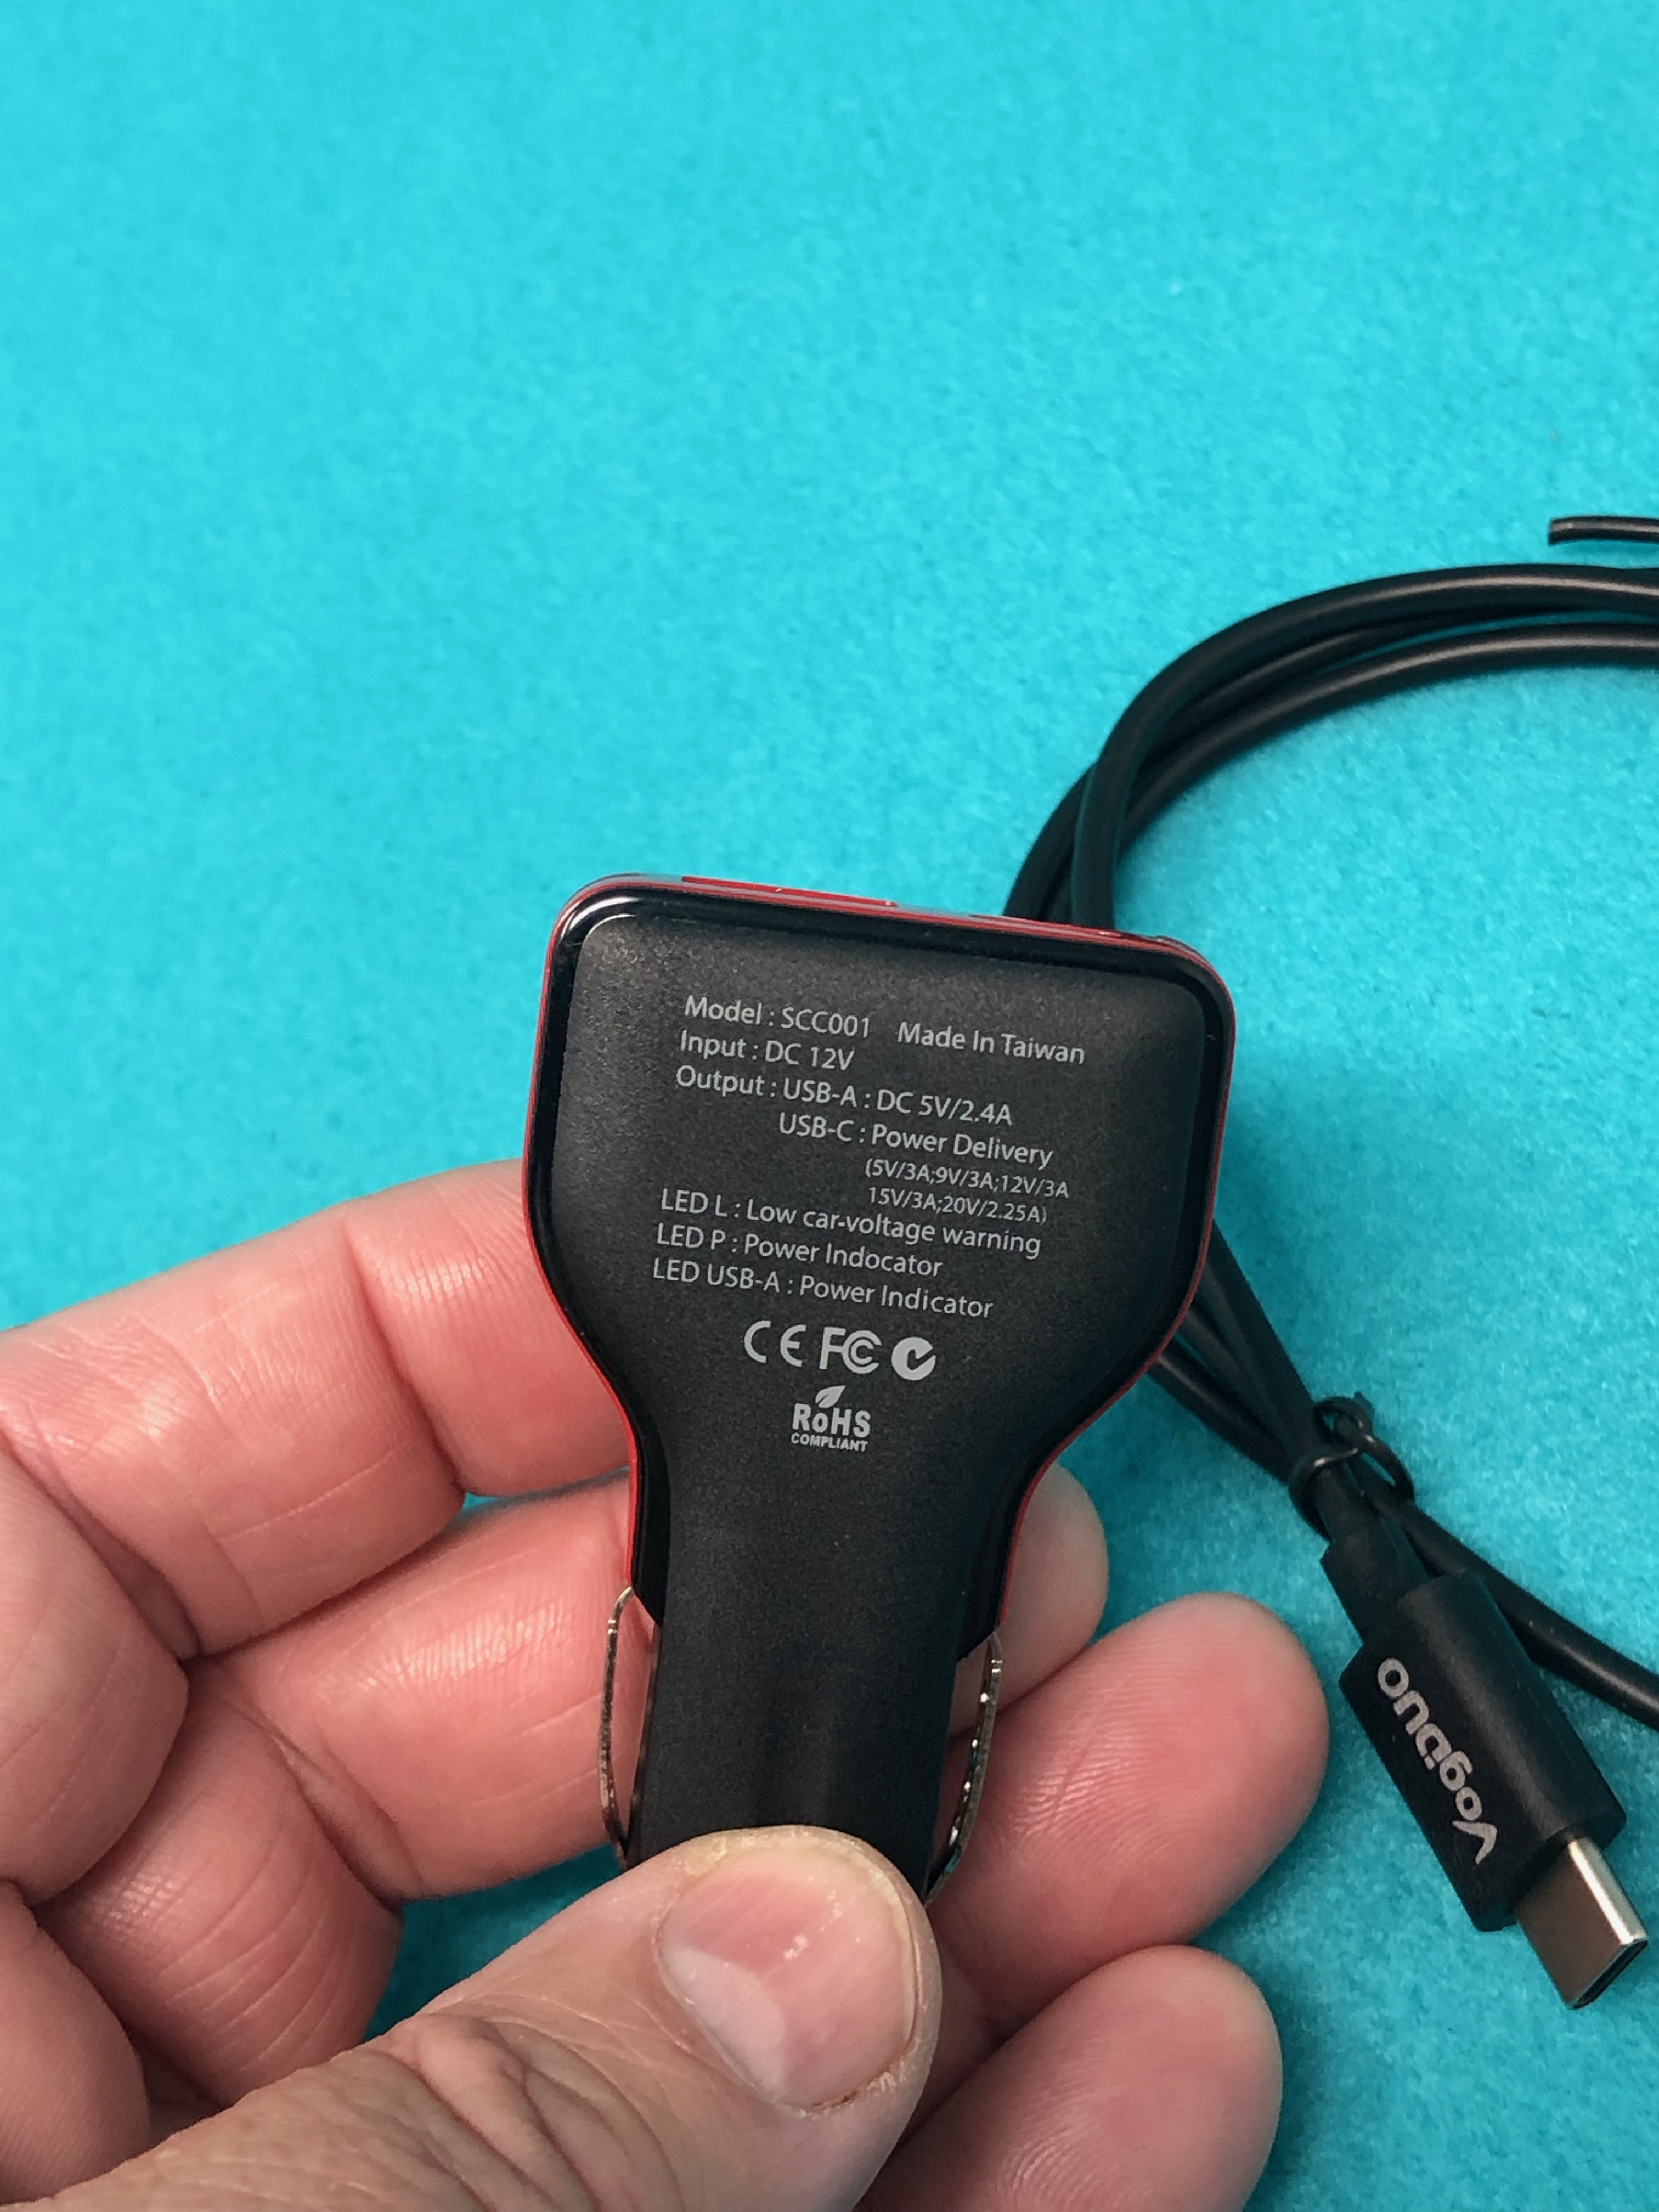
Power adapter for 12 volt systems with both a USB-A and a USB-C port that provides 57 watts of power.
What’s in the box?
The Charger Go itself
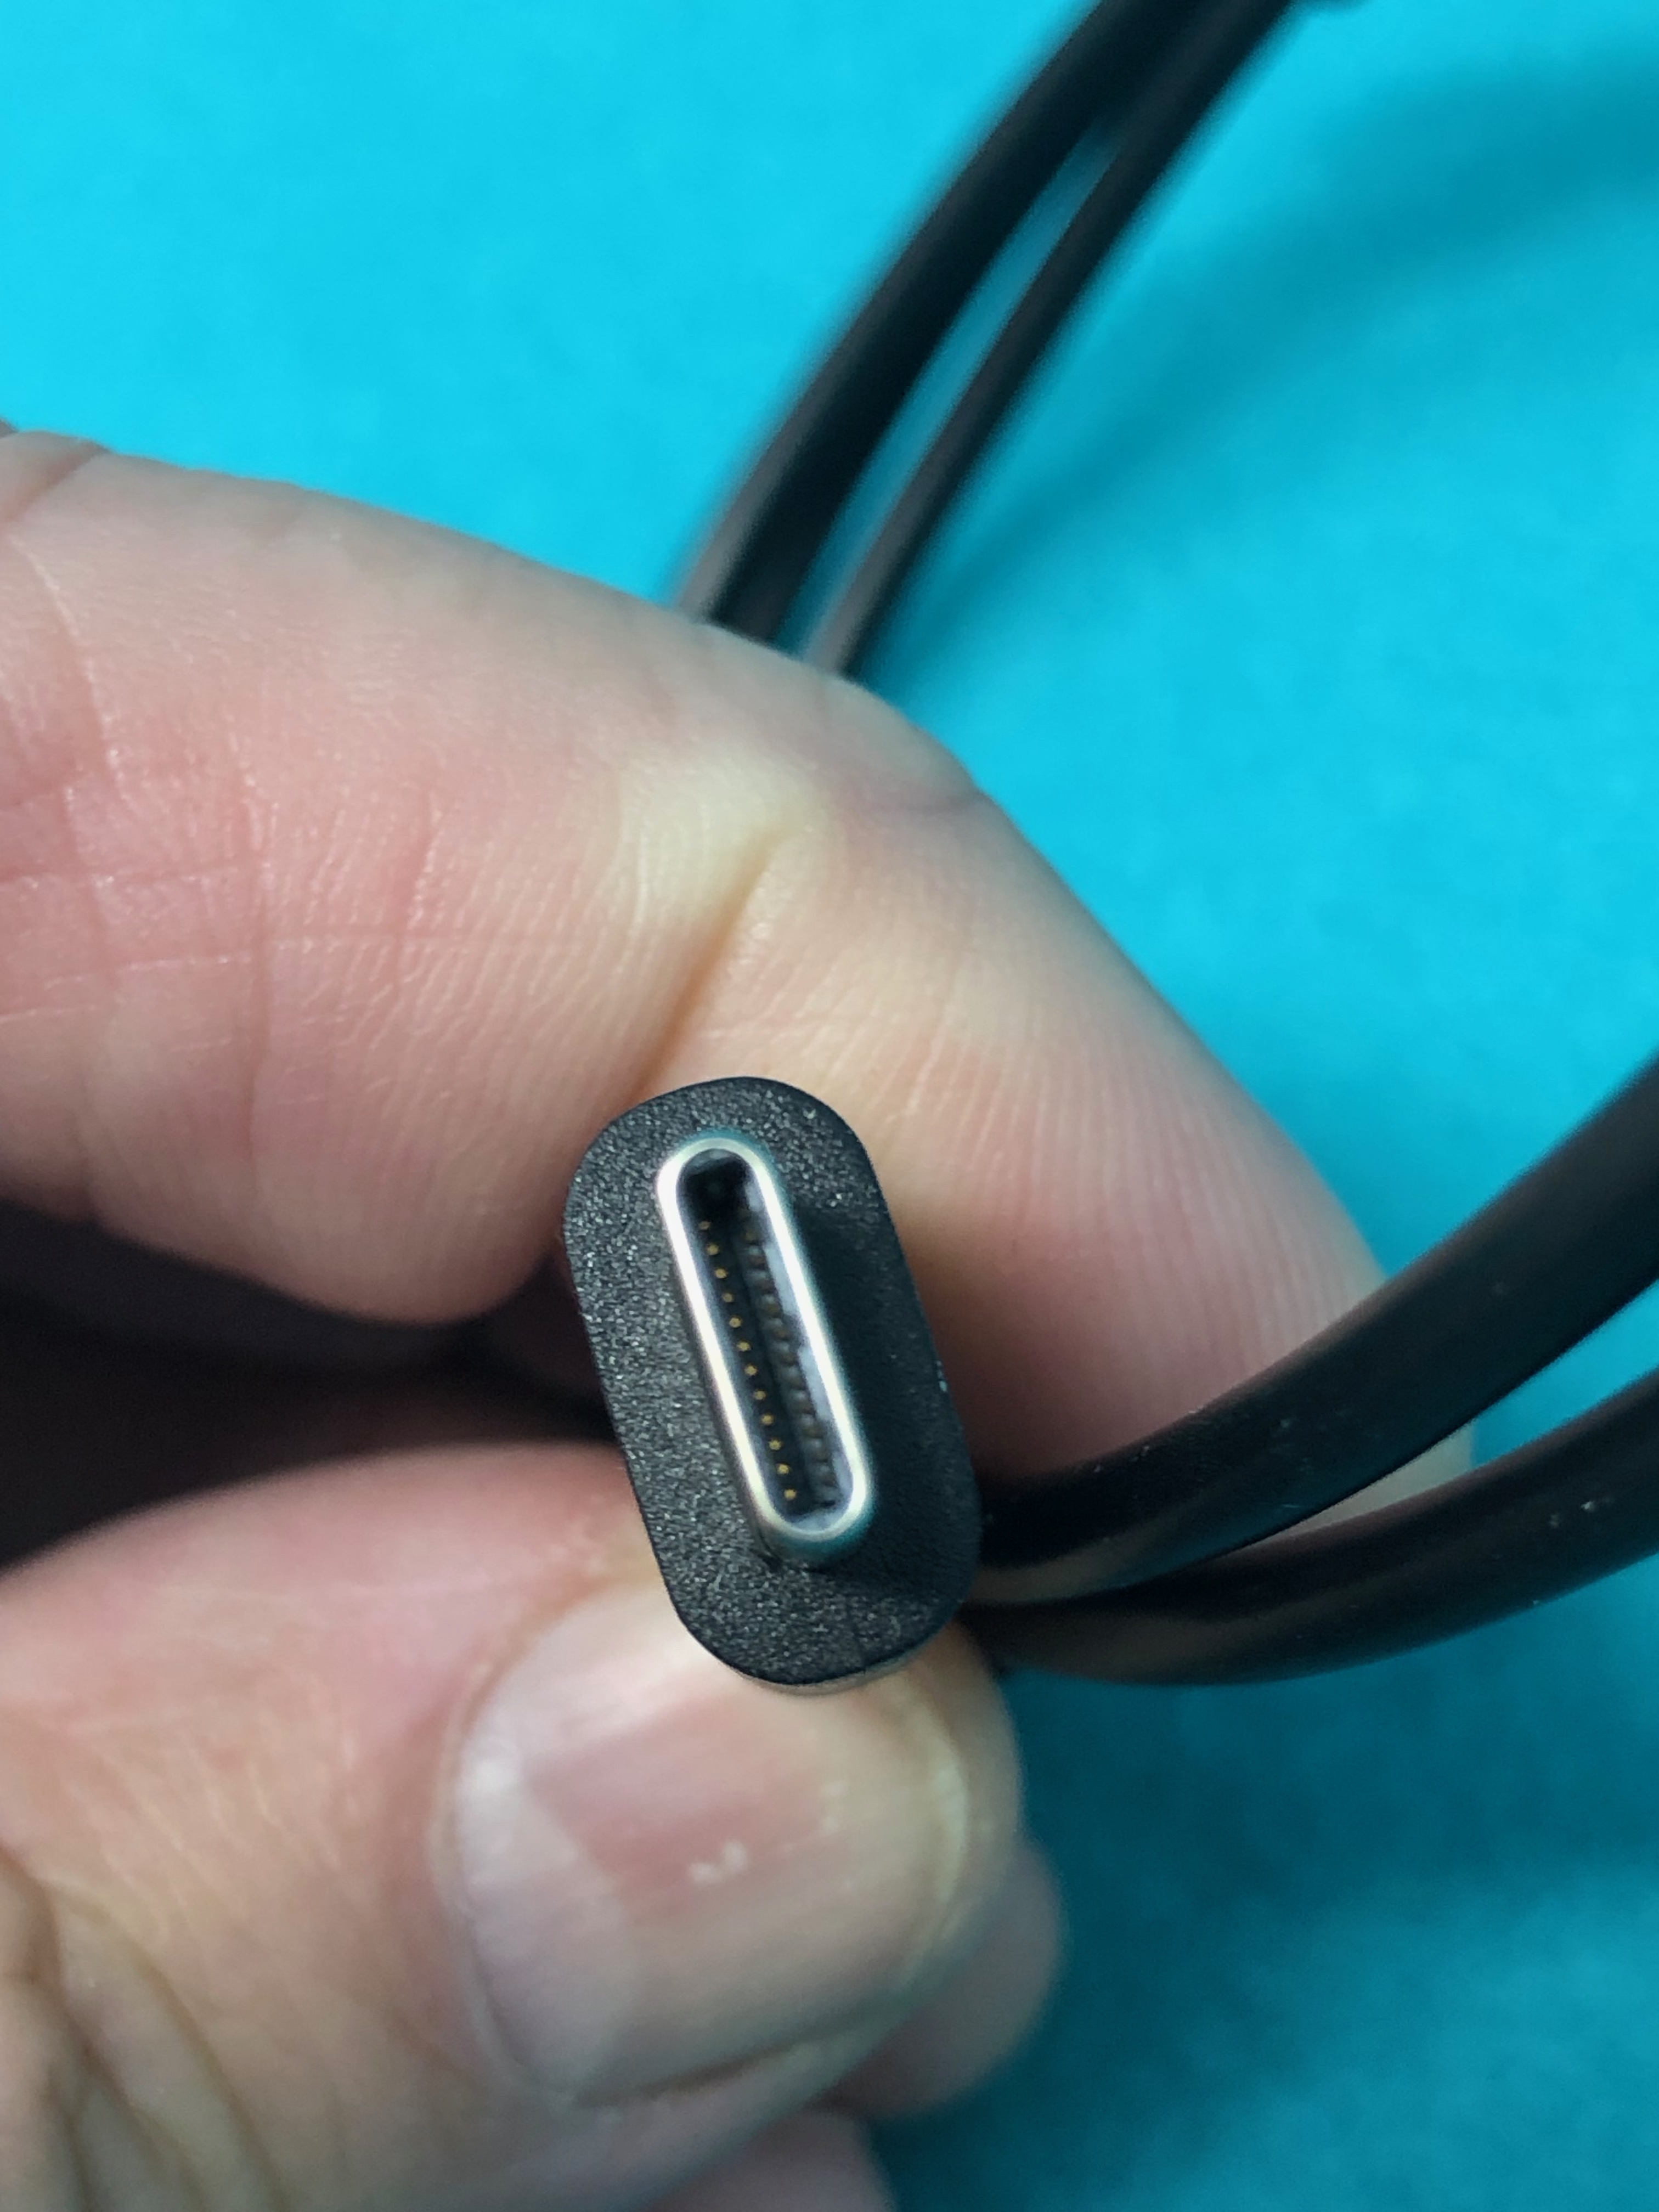
USB-C cable
User Guide
Hardware specs
Power Delivery Technology
Future-Proof USB-C Port
Lowest Profile
Car Battery Indicator
Flame Retardant
Design and features
VogDUO has a lot of varied products to support your gadgets: cables, wall chargers, car chargers, travel kits, etc. The engineering in the Charger Go is a leap forward, however. Not only will it intelligently deliver the correct power for your USB-A devices, but it will (at the same time!) deliver power through the USB-C port to your Switch, iPad, GoPro, or even your USB-C-powered MacBook! While I don’t have a recent MacBook to substantiate that last claim, I can say that the power delivered through the USB-C port will charge your devices faster than other car chargers. I’ve been using it in my car, and have been pleased with the rate that it charges whatever device I throw at it. My power banks (which can take a long time to top up) seem to go from flat to full in no time. My iPhone (8 Plus) gets charged from low to mid-range almost instantly. (I’m running the iOS 13 public beta, so there are some battery-draining things happening on my devices right now!)
When you first take it out of the minimal packaging, you can tell it’s a quality piece. It passes the Gadgeteer “creak” test with flying colors, and the tip is a nice solid piece of metal, rather than a thin punched-out cap.
Another feature of the Charger Go is the profile. I’m not one to be precious about how my car interior looks (it’s a Corolla, mind you!), but the slim device is a lot less chunky than the usual plugs I’ve used. And the fact that it’s made from flame-retardant material makes me rest a little easier, knowing that there’s a lot of electrical witchcraft happening inside.
On one of our recent trips, we rented a car with an infotainment system that warned about leaving navigation or CarPlay on while using battery power and I thought this was an interesting addition. But it was just a simple, “Hey, dummy, you’ve not turned off the accessory power”, not a smart sensor that let you know that the battery was actually getting discharged. The Charger Go has this sensor. If it’s not getting full power from your vehicle’s electrical system, there’s a warning LED that indicates this. Nice touch.
What I like
USB-C!
Very slim unit
Car battery discharge warning
Flame retardant material
What I’d change
Can’t think of a thing
Final thoughts
A car USB charger is nothing new. One with two ports is a little more unique, but still, there are dozens on the market. If you want USB-C as well as the old-school USB-A, you’re going to be hard-pressed to find a good half-dozen. And I know of none that offer Power Delivery besides the VogDUO Charger Go. Plus, the sleek unit has lights for power and a warning LED for your car’s battery. Not a bad package for $50.
Price: regularly $49.99, currently on sale for $39.99 Where to buy: company website Source: The sample of this product was provided by VogDUO.
Note: If you are subscribed to this feed through FeedBurner, please switch to our native feed URL http://the-gadgeteer.com/feed/ in order to ensure continuous delivery.
REVIEW – With all the dash cams on the market, how do you make one that stands out from the rest? You can be like Soliom and make a dashcam with two cameras. One that points out the front of the vehicle’s window and one that points inwards into the car. Why would you want to record what’s going on in the car in addition to outside the car? Maybe you’re a Uber driver or maybe you want to create your own karaoke videos like James Corden. Either way, let’s take a closer look at the G1 360 degree dual dashcam from Solium.
What is it?
The Solium G1 is a 360 degree dual dashcam with a camera that points out the front of the car and one that points inside.
Hardware specs
Processor: Dual Sunplus 6350A processors
Image sensor: Dual Sony Exmor IMX323 sensors with 6 lens fixed f/2.0 apertures
Record both cameras at 190° 1920x1080P@30fps or the front camera only 1920x1080p@60fps at 190°
Display: 1.5 inch TFT LCD display
What’s in the box?
Soliom dual cam dash cam
Windshield mount
12V power adapter
micro USB cable
USB card reader
Reset pin
User manual
Design and features
The Soliom G1 is the first dash camera that I’ve reviewed that has two lenses. There’s the standard lens that points out your front windshield to record your travels and there’s an additional camera that points inside the car.
The front camera that points out the windshield is fixed in one position and has a 190° lens that captures 1920×1080 resolution.
The back (interior) lens has the same viewing angle and resolution, but this lens can pivot in its socket sort of like an eyeball.
For example, here we see it pointing up.
And here we see the lens pointing down. The ability to adjust the angle of the lens is a helpful feature as it helps you get the most coverage inside the car. For example, if I left the lens centered, my rearview mirror would be in the way since I mount my dashcams directly in front of the mirror. You can check out the video clip below to see what the interior video looks like.
The camera is medium-sized with a soft black coating.
The side has a micro USB port for the power cable, a micro SD card slot and a connection for a GPS module. Soliom did not include a GPS module with the camera that they set me to review. They don’t even sell them on their site so I’m not sure of pricing or availability.
Also note that a micro SD card is NOT included with the G1 dashcam.
The G1 has a decent sized 1.5in TFT color LCD that you’ll use for a live view of the cameras and navigating the menus to customize the settings. The LCD is not touch capable, which means you’ll have to use the 5-way nav button on the right to scroll through the settings and make changes.
There’s also a small power button, a status LED, and an emergency button which will lock the current video clip if you press it.
By default, the G1 captures video from both cameras in one split screen .MOV video file as soon as you start up the engine of your vehicle.
You can customize the camera to just record video from the front (windshield) camera if you like and you can change the record length from 1, 3, 0r 5 minute length video clips.
Another option will let you capture time-lapse video which will put all the video from 4, 8, or 12 hours in one video file. See the example video below where I include a short timelapse clip at the end.
The Soliom G1 has most of the features that people want in a dashcam including a G-sensor which will detect an accident and automatically lock a video file so that you can use it for personal or insurance purposes.
The G1 also has a Parking monitor with motion detection so that it will automatically capture video if there is a motion collision to your car or motion is detected. To use this feature you will need to hardwire the camera to car’s battery so it’s always powered on.
See it in action
As you can see from the video clip above, the video quality is decent except that the interior camera does not have night vision. That means video captured while driving at night will not show the driver.
What I like
Records video inside the car as well as outside the car
Both video in one split screen file
What I’d change
Add night vision capability to the interior camera
Allow separate video files to be captured at once. One for inside and one for outside
Add 4K capability
Add wireless capability for offloading video without removing the camera or SD card
Final thoughts
I have enjoyed testing the Soliom G1 dual camera dashcam. It’s a unique camera that allows both exterior and interior video capture. Except for that feature, the rest of the functionality is basic. The camera lacks 4K video, wireless video sharing/downloading, and GPS. If those extra features don’t matter to you and you want the ability to automatically capture split-screen video of your travels inside and outside your vehicle, the Soliom G1 is a decent camera worth checking out. I plan to leave it in my car – at least for now.
Price: $109.99 Where to buy: Amazon Source: The sample for this review was provided by Soliom.
Note: If you are subscribed to this feed through FeedBurner, please switch to our native feed URL http://the-gadgeteer.com/feed/ in order to ensure continuous delivery.


 .
.