Gadgeteer Team EDC 2018 updates – Kathleen Chapman

ARTICLE – My EDC hasn’t changed much from last year. I no longer carry around my iPod Touch 6G and I have added a couple of things. Here is a list of my current EDC. The links for each item will lead you to the review of that item (if there is one) within which you can then click on the link at the end of the review to purchase the item if you are interested.

1. Colonel Littleton No. 18 Leather Hunt Bag

I’ve been using the Colonel Littleton No. 18 Leather Hunt Bag for about 1.5 years and it has held up well. It is very well made using full grain leather, is durable, and holds all that I need it to.  It also saves me from having to go shopping for a new purse every year which I loathe having to do.

2. Small trash bag

Just in case I need one, which happens every now and then.

3. OLALA 7800 mAh Power Bank

This portable charger has saved my phone a few times while running around town. It has built-in micro-USB and Lightning cables which frees me from having to carry around additional cables.

4. Ancicraft Simple Classic Vintage Soft Genuine Leather Pencil Pouch

This leather pencil pouch (7.75″ L x 4″ W) carries all my makeup as well as tweezers and fingernail clippers. It’s not made from the best leather, but I haven’t been able to find a full grain leather pencil/makeup case in this particular size.

5. Lotion/hand sanitizer/pill bottle

I periodically need hand lotion especially in the wintertime, hand sanitizer especially during flu season, and a small pharmacy packed inside my pill bottle for various needs.

6. Loop High Fidelity Earplugs

This is a new item that I carry around with me. I use these to help dampen the sound level of our church service music each week which helps immensely with my hearing issues.

7. 60 inch/150 centimeter retractable tape measure

I use this tape measure all the time. It’s so handy that even my husband uses it while we’re out and about.

8. Microfiber cloth

I use this to clean the various screens/lenses that I carry with me (my phone’s screen and camera lens and my clip-on microscope lens). Underneath the cloth is a wallet-sized card that summarizes the Gospel which lifts my spirits on bad days and reminds me how much I’m loved and that I’m never alone.

9. My First Lab STEM Starter Kit: Smartphone Microscope

This is another new item. I carry this small clip-on microscope around just in case some interesting insects cross my path (I’m an entomologist – I like bugs!). I place the microscope’s lens over my phone’s camera lens to magnify the object. I can then take photos of the object too. Awesome.

10. MPOW Swift Bluetooth 4.0 Headphones

Although the Jaybird X3 earbuds are my primary use headphones while at home, I use the MPOW Swift headphones when I’m away from home just in case I want to pass the time while in line at oh, say, the DMV or something (I might as well learn on YouTube how to build a house while I’m waiting). These headphones are really comfortable, inexpensive and sound great.

11. Anker USB-C to Micro USB Adapter/SIM card tool

Since I upgraded my phone to the Google Pixel 2 XL, I needed an adapter to use with my OLALA portable battery which has the built-in micro-USB cable. I like the adapter and it works well. I also keep a SIM card tool with me just in case I might need a small pointy object.

12. Polar M400 sports watch

I’ve had this watch for years now. It works with my Polar H7 heart rate monitor chest strap and calculates the stats that I’m interested in when I exercise. I also use it to alert me to texts messages and other notifications on my phone. It doesn’t have any other smart features, but it provides enough to keep me happy.

13. Pixel 2 XL phone/Caseology Legion Pixel 2 XL case

I love my Pixel 2 XL phone. It receives OS updates almost immediately which is of utmost importance to me. In addition, the camera is AWESOME – I use it to photograph all my review items. Furthermore, the screen is large enough to watch videos and the fingerprint sensor works really well.

I use the Caseology Legion case on my Pixel 2 XL phone (shown above) to protect it from drops (it’s a military-grade drop tested case). I’d rather not have any case on this beautiful phone, but since I paid $850 for it and I tend to be clumsy, better safe than sorry.

14. Small notepad

You never know when you might need some paper…

15. Garzini Essenziale Finestra wallet

This is my primary use wallet. It is a leather wallet which carries all my necessary cards (6 plastic cards and 5 paper cards) and dollar bills. I’ve used it for almost two years and it looks virtually new. I love it!

16. Benjamin Bott Design Chickadee English Tan ultra minimalist wallet

This is a “full grain English tan Dublin Horween leather (4.5 oz or 1.8 mm)” wallet. This wallet is an awesome durable minimalist leather wallet. It’s gorgeous to look at and incredibly well made. I use it to carry around my restaurant cards, coupons, bandaids, and alcohol wipes.

17. Writing Utensils (in order from left to right in the top photo)

I keep things like the Sharpie highlighter and Twin-Tip permanent marker on hand for highlighting reading materials and for mailing packages.

The Big Idea Ti pens are my favorite pens. The Ti Arto pen (the silver pen) accommodates over 200+ refills and is a nice length pen that also has a great weight and feel to it but requires you to unscrew the cap and post it on the end of the pen. The Ti Pocket Pro (the black pen) automatically adjusts to the length of 80+ different refills and twists open when you need a pen in a hurry.

The Pentel Twist-Erase pencil (the black pencil) is my favorite mechanical pencil because of its simple design and the fact that it contains a replaceable twist eraser. My husband and I have used this pencil since our college days and that was in the last century. You might say it’s vintage.

18. Colonel Littleton Pencil Case

As you can see, I love leather. I love this leather pencil case. It is simple and very well made using full grain leather. It keeps all my writing utensils upright in my purse and easily accessible. It is rather tall (6.5″ H x 3” W), but it fits well in my Colonel Littleton No. 18 Leather Hunt Bag.

Filed in categories: Articles

Tagged: ,

Gadgeteer Team EDC 2018 updates – Kathleen Chapman originally appeared on The Gadgeteer on October 1, 2018 at 10:15 am.

Note: If you are subscribed to this feed through FeedBurner, please switch to our native feed URL http://the-gadgeteer.com/feed/ in order to ensure continuous delivery.

Reolink Argus Pro security camera review

REVIEW – I have several wireless security cameras in my home, but I don’t have any cameras set up to monitor my property outside of my home because I don’t want to deal with running wires for power or connectivity. When Reolink offered me the opportunity to review their Argus Pro camera, I was immediately interested because it uses WiFi and does not require any wiring as it can use a solar panel for power. Let’s take a look at it.

What is it?

The Reolink Argus Pro security camera is a WiFi 1080P camera that can be used outdoors as it’s weatherproof. It can also be powered with a solar panel.

Hardware specs

1080P, 130° Wide Viewing Angle, 33 feet of night vision
PIR Motion Sensor
2.4GHz WiFi
Weatherproof
microSD card slot supports up to 64GB card
Built-in alarm siren

What’s in the box?

Argus Pro camera
Solar Panel (depending on the package)
Battery pack
Outdoor mount
Hook and loop strap
Skin
Reset needle
Surveillance sign
Mounting Hole Template
Micro USB Cable
Pack of Screws
Quick Start Guide

Design and features

The camera has a white plastic shell with a black front where the lens and IR illuminators are located and on the side is a covered microSD slot (microSD card not included) which supports up to a 64GB microSD card.

The back of the camera is actually the 5200 mAh rechargeable battery which snaps in place. The battery recharges using a micro USB cable or a solar panel if you don’t want to worry about running cables to power outlets.


The solar panel is # x # and comes with a mount so you can attach it to a flat surface like a wall or a tree and then orient it to capture the sun’s rays to power the camera.

The solar panel has a cable with a weather-protected micro USB connector that plugs into the back of the Argus Pro.

The Argus Pro can be used indoors, but if you intend to use it outdoors, it’s best if you use the included skin for added protection from the weather. The skin is a thin rubber jacket with a hat-like brim above the camera lens.

Setup

I tested the WiFi signal on my front porch and a few other areas around my home but ended up setting up the camera temporarily on a rock pointing at the front of my house and the solar panel on the ground next to it. Both the camera’s mount and the solar panel’s mount allow for a more permanent installation by attaching the mounts to a wall or other surface with screws, but for testing purposes, this temp setup worked out fine for me.

Reolink app


The app is easy to use and is similar to other security camera apps which show a small live view and offer a way to arm and disarm motion detection. The PIR switch in the images above toggle motion detection. The app also shows the current battery charge status which is very handy if you use the solar panel. The app will tell you if the battery charge drops to 10% so you can do something about it.

The Reolink Argus Pro allows you to see a live view of the camera(s) any time you like but when motion has been detected, you’ll receive a push notification on your phone and an email if you opt to set up email notifications in the app. From there you can click on the notification and see a short video clip of the detected motion as long as you’ve inserted a microSD card in the card slot in the camera. It’s up to you to supply the card. The app will store the clips which can be set to 8, 15, or 30 seconds in length (8 seconds is the default). Reolink also offers a cloud service (currently in beta testing) that provides 10GB free cloud storage for motion clips for up to 15 days. Think of it a backup to the clips on the microSD card. However, this feature/service is only available in the US.

The Argus Pro has decent image and video quality and also offers 2-way audio, and a siren that can be set to go off when motion is detected.

What I like

  • Wireless
  • Solar charging feature
  • 2-way audio
  • Notifications can be emailed as well as pushed to mobile device

What needs to be improved

  • Doesn’t record 24/7 video to microSD card

Final thoughts

There’s a lot to like about the Reolink Argus Pro. My favorite features are that it is weatherproof and works with a solar panel so that it can be placed anywhere outdoors and not need special wiring to install it.

The camera has good picture quality and the app is easy to use. The only disappointment is that the camera only records motion clips to the microSD card instead of 24/7 footage. My guess is that Reolink could easily offer that feature in a future app update.

If you’re looking to add cameras to your property and want an easy no hassle install with no wiring needed, the Reolink Argus Pro is a good choice as long as you have solid WiFi coverage at the install locations.

Price: $154.99
Where to buy: Reolink and Amazon
Source: The sample for this review was provided by Reolink.

Filed in categories: Reviews

Tagged:

Reolink Argus Pro security camera review originally appeared on The Gadgeteer on October 1, 2018 at 9:00 am.

Note: If you are subscribed to this feed through FeedBurner, please switch to our native feed URL http://the-gadgeteer.com/feed/ in order to ensure continuous delivery.

Go beyond the common Post-It note with Cubinote Pro

NEWS – This little printer is the world’s “first internet-enabled sticky note printer and messenger.”  It’s a thermal printer, and it uses special colored Sticky Note paper that’s said to be eco-friendly because it has no backing paper to remove to expose the adhesive.  The special paper is silicone- and BPA-free, and it’s biodegradable and recyclable.  (If you’d rather, you can use it with normal thermal rolls, but you’d lose the color and the adhesive backing.)

Cubinote Pro connects to your mobile device or computer via Bluetooth or through WiFi.  You download an app (for iOS, Android, or Windows Desktop) to create your sticky note.  Anything you can capture and display on your screen – pictures, drawings, text – can be added to the note.  Notes can be a short message, and image, a report, or most anything you want.  You can connect to Cubinote Pro via WiFi from anywhere and print out your note.  The notes can be stuck to anything – calendar, wall, your monitor, files, etc.  Because it’s thermal, you won’t ever need to worry about replacing ink cartridges.

Cubinote Pro should be available early October 2018.  They aren’t showing a price for it right now, but you can leave your email at the Cubinote website to be alerted when it’s ready for purchase.

If you don’t want to wait and don’t really need the internet connectivity, Amazon has a variety of printers that look almost exactly like the Cubinote with Bluetooth and USB 2.0 connectivity.  The nemonic Sticky Note Inkless printer is an example of the Bluetooth sticky note printers Amazon has.  This one is available in a variety of colors.  It also supports iOS, Android, and Windows PC, with Mac support expected soon.  You can get a nemonic printer and a set of three colored sticky paper rolls for $149.95 at Amazon.

Filed in categories: News

Tagged:

Go beyond the common Post-It note with Cubinote Pro originally appeared on The Gadgeteer on October 1, 2018 at 8:00 am.

Note: If you are subscribed to this feed through FeedBurner, please switch to our native feed URL http://the-gadgeteer.com/feed/ in order to ensure continuous delivery.

Julie and Dave talk about the iPhone Xs Max

ARTICLE – Each fall, Apple introduces their newest iPhone that I will drool over, order, and then a few weeks later I return to Apple for a full refund. At least that’s been the way things have gone for me the past few years, unlike my good buddy Dave Rees who told Android to see ya later back in 2016 and hasn’t looked back since.

Dave: “…few years…”??? Julie & I sometimes joke about one of the definitions of insanity is doing the exact same thing over and over again and expecting a different result. I wouldn’t say I never look back, I regularly check out the latest and greatest Android devices, on occasion severely tempted. But the reality is, I truly love Apple’s hardware and for the most part, fully embrace the iOS/macOS ecosystem.

Julie: Dave and I regularly talk about Apple’s new tech and he’s always giving me a hard time about my inability to what he calls “fully embracing the iPhone”. We’ve both had our shiny new iPhone Xs Max 256GB Space Gray phones for almost a week now, so we thought we’d do another tag team post.

First of all, we should let everyone know that our iPhones actually traveled together on what was most certainly the same flight from China to Alaska and then to our respective states last week. We kept texting each other with our UPS status updates because we.are.geeks. 🙂

Dave: Don’t forget about Korea and Kentucky. It was pretty funny when it became very clear our iPhones were sharing an international cab ride. Due to Apple’s just-in-time shipping this year, I was a little worried we wouldn’t see our fancy new tech-toys until the following week. The expected delivery date kept waffling between Friday the 21st and Monday the 24th. Thankfully both arrived safe and on time (and OMG would Julie have had to listen to me whine if she received hers 3 days before me).

Dave: The build and material quality of the iPhone X series of smartphones is impressive, to say the least. The stainless steel casing sandwiched between sheets of glass give the Xs devices an excellent high-quality heft.

Julie: I agree that the look and feel of the Xs Max are impressive. However, I’m unsure about having a glass backed phone because I feel like it’s tempting fate not to use a case with this phone. If you’re like me and don’t like cases either, you’re going to want to pony up for the Apple Care insurance which will provide some peace of mind while scraping even more money out of your wallet. That is if you have any money left after buying the Xs Max because Xs really does mean excess with a price tag of $1249 for the 256GB version of the Max. What the what?! Crazy stupid spendy. But we still spent it didn’t we?

Dave: Yes, yes we did…at midnight within the first few minutes after the Apple store coming back online. Once again texting each other the status of our ordering, cause, we.are.geeks 😉 . The Max plus tax and AppleCare Plus lightened my tech-slushfund nearly $1600. As I told Julie, twice as much as my first car. Crazy indeed.

iPhone Xs Max (left), iPhone X (right)

Dave: I purchased the original iPhone X a year ago and enjoyed using it the entire time. In addition to build and material quality, its near bezel-less OLED screen and form factor was extremely nice as well. It was great having a Plus sized screen in a regular iPhone body. I got pretty used to the X’s size and do admit I was a bit worried about the Max’s larger size. Now that I have used the Xs Max for about a week, it doesn’t feel all that huge. The added volume and weight are well worth the Max’s gorgeous 6.5″ OLED screen.

Pixel 2 XL (left), iPhone Xs Max (right)

Julie: I didn’t have any qualms about ordering the larger Xs Max because a quick scan of the specs told me that it was almost exactly the same size as my Pixel 2 XL which I’ve been using close to a year now. Upon receipt of the iPhone, I wasn’t surprised by the size and had no issues adjusting to it. But what I did notice right away was how much heavier the Max is compared to the Pixel 2 XL. Dave says that means it’s got more quality. I just think it’s heavier, but I do agree that that the iPhone is very well made and wow, that display is so pretty. It is noticeably nicer looking than my Pixel 2 XL’s display.

Dave: The larger screen was truly the selling point for me. I could have easily muddled thru with the original iPhone X. But my hope was to use the Max as not only my smartphone but as an iPad replacement as well. I travel a good deal for my day job and with each trip, I would have to debate what tech to take based on time on the plane, length of the trip, and what I needed to get accomplished while away. The iPhone Xs Max’s screen is not only beautiful but immersive too. Even the Gadgeteer Kid didn’t complain when we watch videos together while killing a bit of time. While I haven’t had to travel during the first week of ownership, I do plan on taking just it on my next cross-country travel for my media consumption needs. Reducing my load to just my work laptop & iPhone.

Julie: Having enjoyed a Pixel 2 XL for so long, adjusting to a display without an always-on feature has been tough. I rely on that feature all the time because my phone is also my clock and I use my phone as my alarm clock on my nightstand. Being able to glance over in the middle of the night to see the time is very convenient. It’s also convenient to see notification icons without having to pick up the phone or press a button. And another screen feature that I miss that the iPhone doesn’t have is the song title display when music is playing. I use that feature ALL the time.

Julie: I was also bummed that the rumor that Apple was ditching the lightning connector in favor of a USB-C connector turned out to be false.

Dave: I was a bit disappointed as well. With the rumored 2018 iPad Pros due within weeks, it would have been the perfect time for Apple to go all-in with USB-C. That said, we have MANY lightning cables laying around our home. So for us at least, we’ll be able to hold out until Apple sees the light.

Dave: The new speaker design is a definite improvement over past generation iPhones. The stereo sound is clear, loud, and detailed. They can easily fill a decent sized room with sound and watching a movie is easily as nice as on an iPad.

Julie: I rarely listen to music through the speakers or watch video without using headphones. But yes, I agree that if you want to, the speakers do a good job.

Julie: You know the biggest feature of the iPhone to impress me is the FaceID scanner. I’ve been so used to using a fingerprint scanner all these months that I hated the idea of not having a fingerprint scanner. I thought the face scanner would be similar to the scanner that I remembered on Samsung’s Galaxy S9 and remembered that it wouldn’t work in the dark or with my glasses off. But I’ve been super happy with how fast and accurate the facial scanner on the iPhone Xs Max performs. It’s fantastic whether I have my glasses on, in the dark, or even holding the phone at weird angles. I haven’t missed the fingerprint scanner at all.

Dave: I completely agree, FaceID works very well. I’ve been without a home button for nearly a year and don’t miss it at all. The added screen real estate gained from giving it up is definitely worth the trade. I rarely have an issue with FaceID but I can’t say I never have to type in my passcode. 

Julie: I haven’t used a physical home button for the past year either. But that brings up another topic – gestures. Do you like them? I’m not a huge fan of having to swipe up to get back to the home screen. I prefer the virtual home button and back button that Android uses over the swipe up or swipe left to right gestures of iOS. Mainly it’s because I have some issues with my right hand/thumb, so it’s tough for me to do the swipe gestures while holding the phone in my right hand without employing my other hand to perform the gesture.

Dave: After a year of use, I am completely comfortable using gestures to dance around my iPhone. Though I do admit, even with my larger hands, using gestures is easier with the smaller X(s) than it is the Xs Max. I find myself using two hands much more often while using my Max partly cause I do not want to drop the four-figure device but it is just easier/faster/less strain. 

Julie: Let’s talk about the camera. You can see some of my sample images below that have not been edited. All in all, I think the Xs Max does a great job in all lighting conditions. The center picture was taken in a really dark restaurant where I needed to use the iPhone’s flashlight to read the menu. It’s got a lot of shadows, but I was surprised that you can see skin tones.


Dave: No matter what smartphone I use, the camera is THE most important feature for me. Not only do I use it for capturing moments of fun, family, and friends but for my review work here @the-Gadgeteer. I abandoned my digital SLR and high-end point-and-shoot cameras long ago, replaced by my iPhone. And have never looked back. That said, best I can tell from limited use this week, the Xs Max is excellent, just as good as the original X…probably/most likely better but time will tell.

Julie: I’m in the same boat as far as no longer using a DSLR. If the phone doesn’t have a great camera, then I won’t consider buying it. That’s why I love my Pixel 2 XL 😉 But that said, I have been using the Huawei P20 for 99% my review product shots since I got it.

Julie: I also love the goofy little things that iOS 12 added to the camera that turns me into a giant headed cartoon character!

Dave: OK, the irritating part of Julie’s giant headed cartoon pic…I can’t figure out how to create one of myself (even though Julie tried to explain it to me). Should be intuitive to a longtime iOS user correct??? Now I grant you I haven’t spent all that much time trying nor have I researched how to do it…but still.

Dave: The new addition I like best in iOS 12 is the Screen Time feature that tracks not only how much you use your device but breaks down that time by the type of consumption (social media, gaming, productivity, etc) and/or individual apps. This feature can combine all your devices use (iPhone & iPad) or share data across family members (so parents can better stalk their kids).

Julie: What do you think about battery life on the Xs Max? I have been really happy with it. I’ve been able to go more than a day between charges which is usually not typical with my phone usage patterns.

Dave: I found the battery life on the iPhone X to be good and on the Xs Max to be impressive. I use my smartphone a lot during the average day and I have yet to drop below 50%. 

Julie: I’ve also been happy with the phone’s snappy performance too. I haven’t noticed any problems launching or switching between apps. Everything is smooth as butter.

Dave: Yep, zero complaints here. The iPhone X was zippy and I believe the Max is just a hint faster/smoother. But considering how much the Xs Max costs, I would expect nothing less.

Julie: Dave loves his iPhone Xs Max and for me, it’s the same story as last year… I love the hardware, but it’s several little things that keep me from wanting to fully commit to switching back to the iPhone/iOS. Some of those little things are lack of an always-on display for time and notifications, no iMessages app for Windows computers, and the navigation gestures. I thought Dave was going to start crying when he saw my iMessages chat color change from blue to green yesterday. But of course, we’ll be revisiting this saga again next year with the iPhone Y or whatever Apple decides to call it.

Dave: Or better yet the Y Max Plus…alright all kidding aside, I have zero buyers regret. I’m very pleased with the iPhone Xs Max and my purchase. Granted it is excessively expensive but for those folks living in the Apple world who can afford it, you will not be disappointed. Especially for those who own a Plus device where there is little to no size differential, the upgrade will be well worth it. And lastly, Julie sticking with Android enables me to live vicariously thru her as she tries the latest and greatest Android devices. We chat about many of those over the year and I’m often tempted but quickly/eventually come to my senses.

Julie: What about all of you out there? Loving your iPhone Xs Max? Did you switch from Android to a new iPhone? Let us know your thoughts.

Filed in categories: Articles

Tagged:

Julie and Dave talk about the iPhone Xs Max originally appeared on The Gadgeteer on September 30, 2018 at 4:44 pm.

Note: If you are subscribed to this feed through FeedBurner, please switch to our native feed URL http://the-gadgeteer.com/feed/ in order to ensure continuous delivery.

EACHINE E58 RC Pocket Quadcopter Drone review

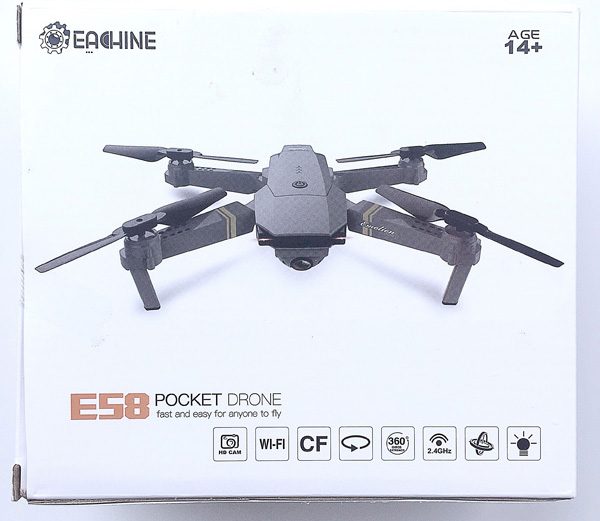
REVIEW – Drones are all the rage today, and they have become significantly more complex and feature-rich.  While high-end drones like the DJI Mavic Pro are capable of all sorts of aerobatics and videography, not everyone can afford one, so there is a large and growing market for less expensive drones that are still fun to fly and provide many of the features of their higher-end cousins.  One such product is the Eachine E58 RC Pocket Quadcopter Drone.  While it is basically a smaller version of the granddaddy Mavic Pro, it is still loaded with features while being significantly more affordable.  Let’s check it out!  Gadget on!

What is it?

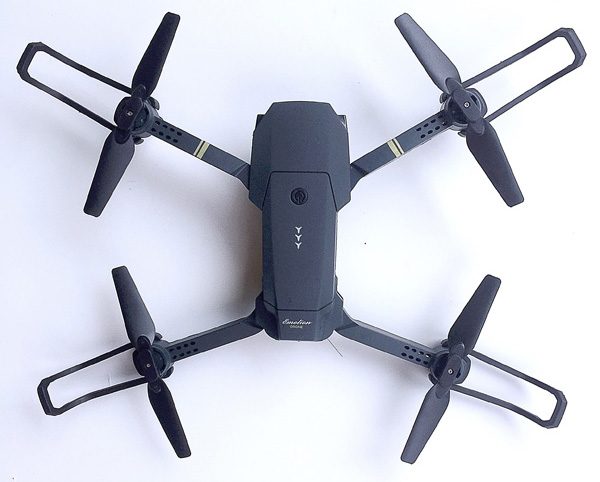
The Eachine E85 Quadcopter Drone is a small, foldable, radio-controlled drone that is styled to be, in appearance and essential functions at least, a miniature version of the larger and much more expensive DJI Mavic Pro drone.  So it is basically a drone clone (see what I did there?).

Hardware specs

  • 2.4 GHz remote control
  • Glass lens FPV (First Person View) camera that can rotate from 0 to 90 degrees downward that includes the following functions:
    • 2MP still images camera
    • 720p HD video camera
  • WiFi control (with app) capable LED lamp with nightlight function
  • Gravity sensor
  • 6-axis gyroscope
  • Headless mode
  • One-key takeoff and landing
  • Trajectory Flight with mobile phone app
  • Three speed modes
  • Quadcopter includes 3.7V 500mAh rechargeable Lithium battery
  • One-key return
  • 360-degree roll
  • Micro SD card slot (card not included)
  • Controller requires (4) AA batteries (not included)
  • Time to full charge = 60-70 minutes
  • Flight time = 7-9 minutes
  • RC range = 80-100 meters
  • Dimensions:
    • 27 x 19.5 x 5cm (arms not folded)
    • 12.5 x 7.5 x 5cm (arms folded)

What’s in the package?


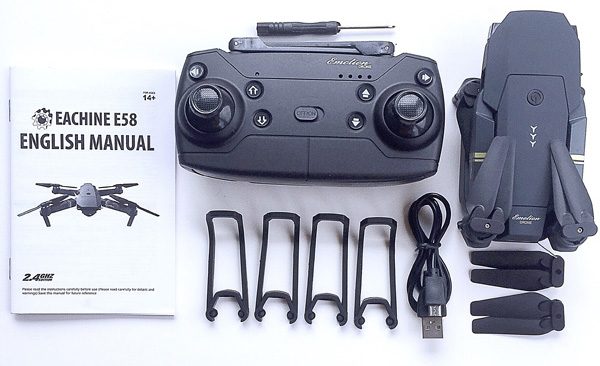
  • 1 x Eachine E58 RC Quadcopter drone
  • 1 x Transmitter
  • 1 x 3.7V 500mAh Lipo Battery
  • 1 x Micro USB Charging Cable
  • 4 x Prop Guards
  • 4 x Spare Blades (2 sets of 2)
  • 1 x Small Screwdriver
  • 1 x User Manual

Design and features

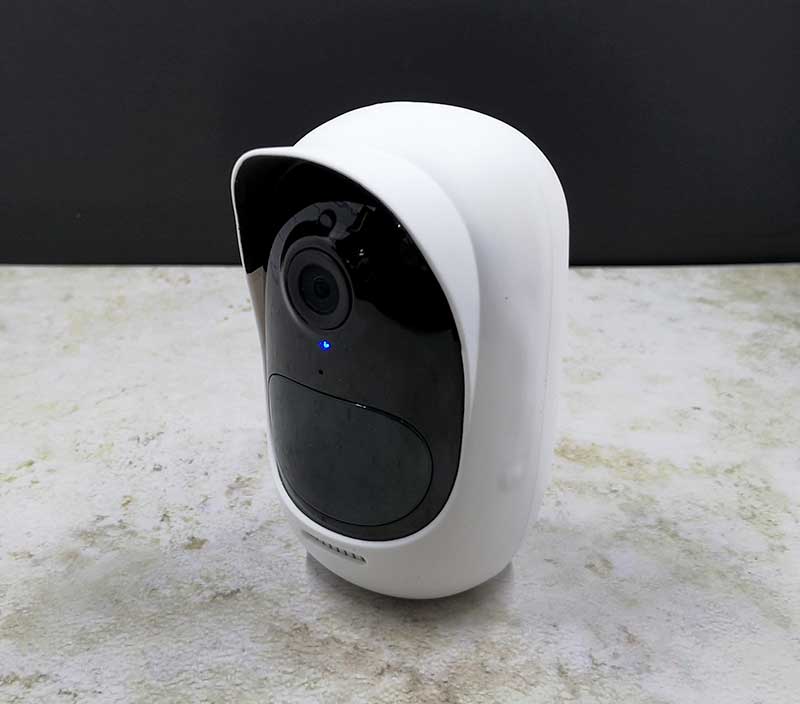
My first impression of the E58 was that is was very small and compact when folded down.  Smaller than I had imagined, actually, and because of this it seemed very portable and easy to take with you.

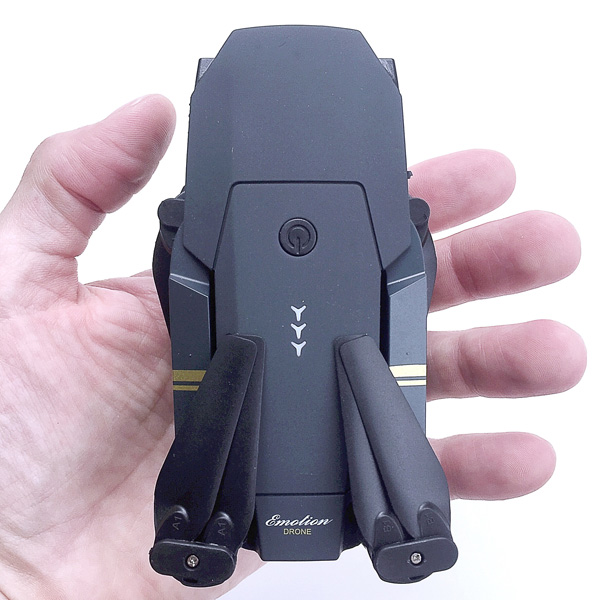
In fact, the E58 is small enough to almost fit in the palm of my hand, and is very lightweight.  However, even when folded down it actually feels fairly solid, like it isn’t going to just fall apart on you if you bump it against something, the way a lot of drones feel to me.  It would be easy enough to place it into a backpack or other bag for transport, but I think it might get banged up quite a bit if it were not put into some type of case first—do a Google search for “E58 drone case” and you may find some good options for this.

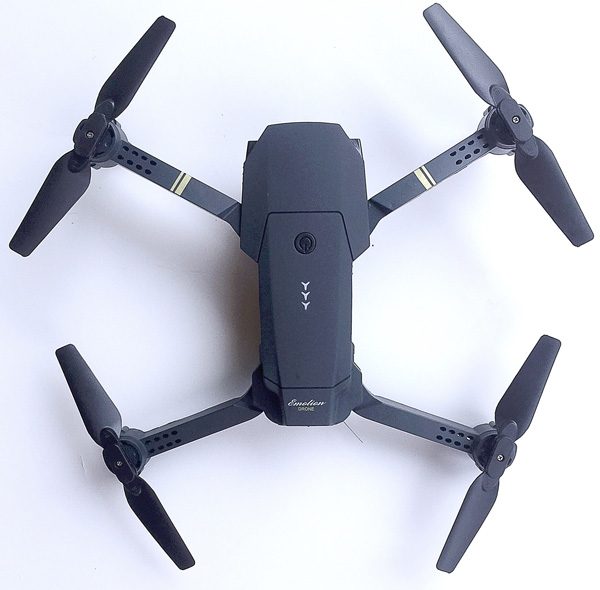
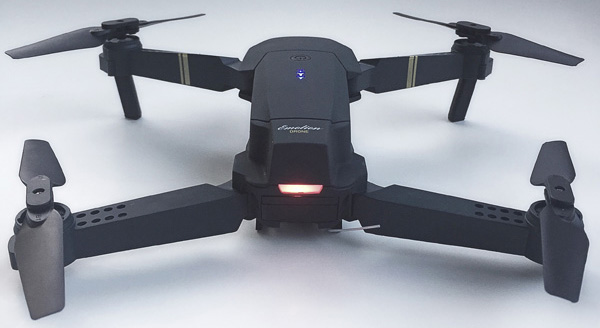
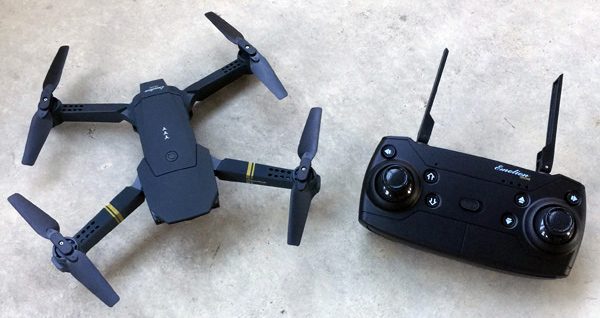
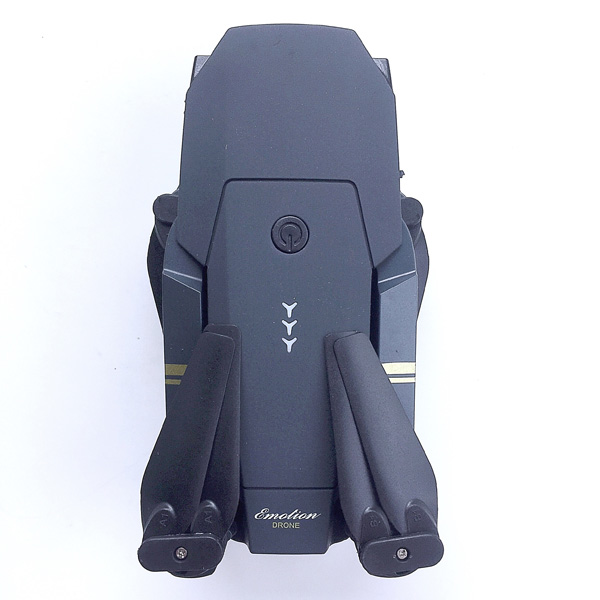
After folding out the E58’s four legs, my very next impression was that, in appearance, it is truly a clone of the DJI Mavic Pro quadcopter drone, which is one of the current granddaddies of high-end drones.  The E58 is basically a nearly exact copy in appearance but in miniature.  I don’t think this is a bad thing at all; I really like the low-profile, futuristic the styling of the Mavic Pro myself, and Eachine did a really solid job of mimicking the Mavic Pro’s Styling for their E58.

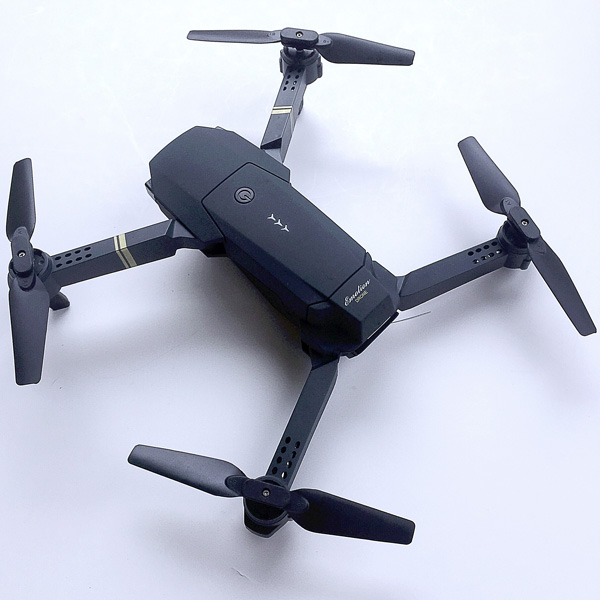
Above, another view of the E58 with its “arms” fully extended.

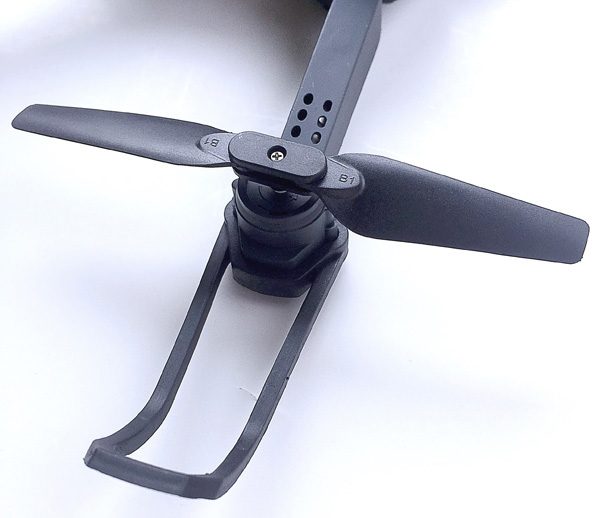
The E58’s four props are each basically hinged twin props. This allows them to be collapsible for transport and storage, but when spinning, centripetal acceleration will cause them to deploy outward, essentially forming a single prop blade at the end of each of the E58’s “arms.”

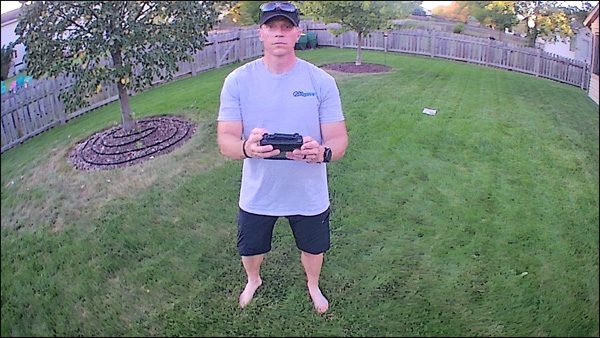
Each of the props is labeled “A” or  “B” and each must be installed on the correct legs of the E58, or the drone will not fly optimally (if at all).  In addition, the E58 includes four “bumpers” that can be attached to each leg to protect the props.  As a fairly new drone pilot, I installed these on the E58 before I took it out for its first test flight, as seen in the above image.  In fact, these bumpers saved the E58 from my flight control learning curve multiple times, as I seemed to repeatedly find items in my yard to collide with.

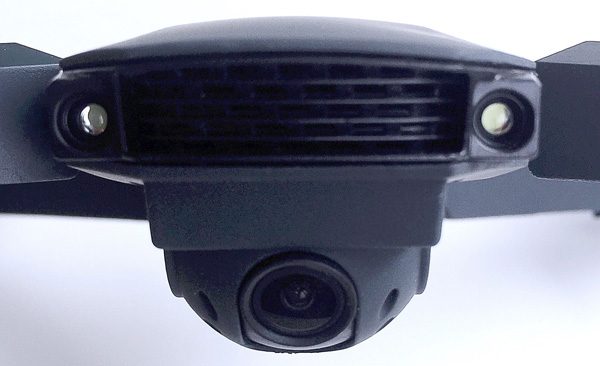
To me, the “front” of the E58 almost appears to be a “face” as seen above.  There are two lights on either side of a grille, with the E58’s camera mounted at the “chin” position.

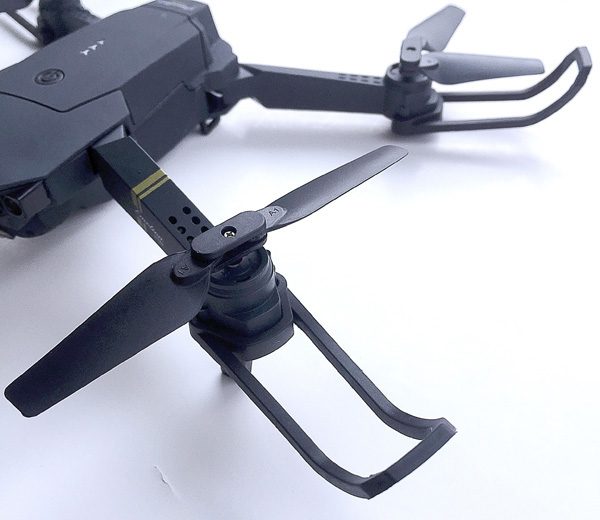
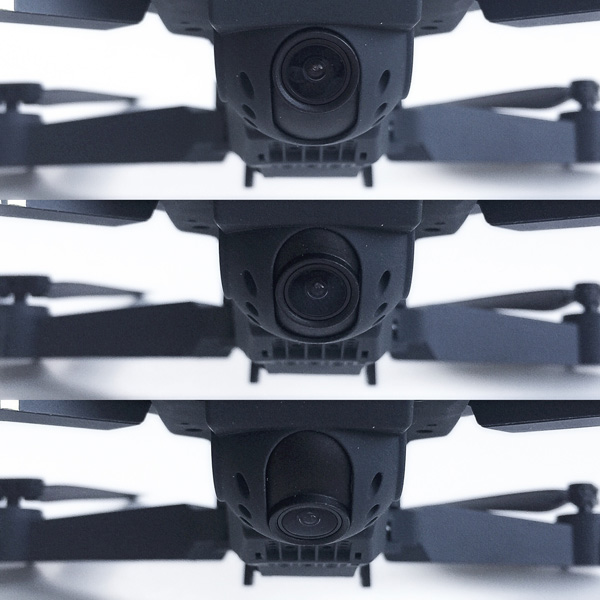
The E58’s camera is mounted on pivot that, although it does not move side-to-side, can be manually positioned from zero degrees (straight forward) to 90 degrees (straight down) prior to flight, as shown above, and it slides smoothly along its track, not in discreet stopping points.  The camera has a glass lens for clarity and friction seems to hold its position in place once set, even during crashes.

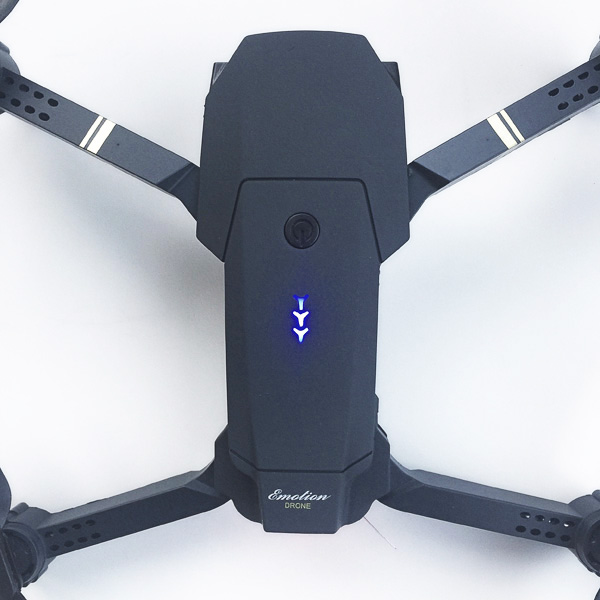
Pressing the power button on the top of the E58 turns it on.  As seen in the image above, there is a column of three blue LED lights on the top of the E58’s fuselage that to me resemble the logo of the popular game “Destiny.”  (Probably a coincidence, but still fun.) In any event, these three LEDs are not battery power level indicators as you might expect; they merely indicate when the E58 is powered on.

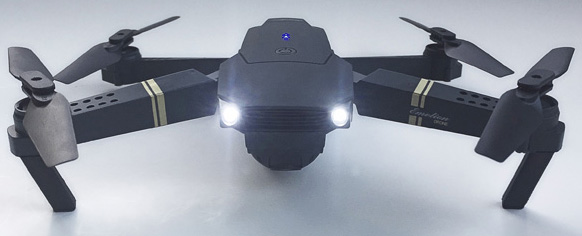
As mentioned above, the E58 has a pair of white lights on the front that, when illuminated, appear to almost be headlights, as seen in the image above.  Having two headlights on the front can help with visually determining orientation of the E58 in lower-light flying conditions.

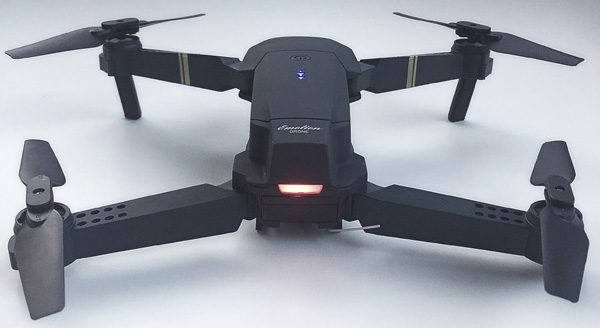
In addition to the “headlights” on the front, the rear of the E58 includes a single red light bar that resembled as car’s tail light, as seen in the image above.  Again, this light on the rear can help in visually determining the flight orientation of the E58.

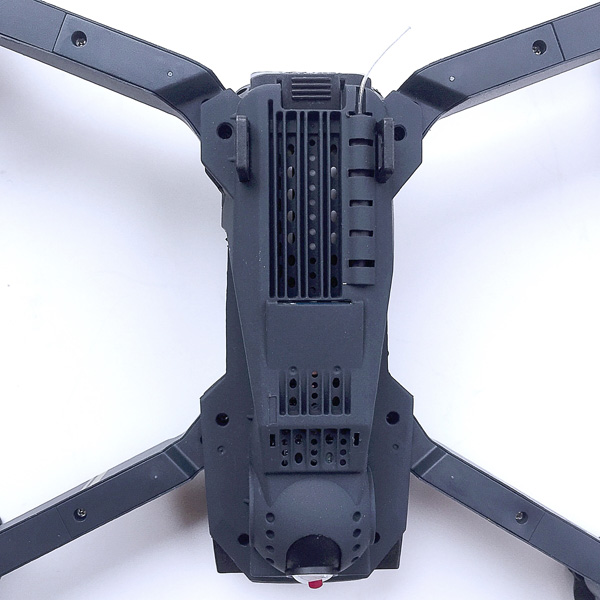
Let’s take a look at the underside of the E58.   As seen in the image above, a small antenna that resembles a short length of fishing line protrudes from the back end of the drone.  Also, you can see some of the electronic innards of the E58, visible through the slats of a grille on its underbelly.  There are several sets of grilles and holes around and on the E58’s underside, presumably to allow heat to escape during flight, since I did notice that the E58 gets quite warm after only a few minutes of operation.

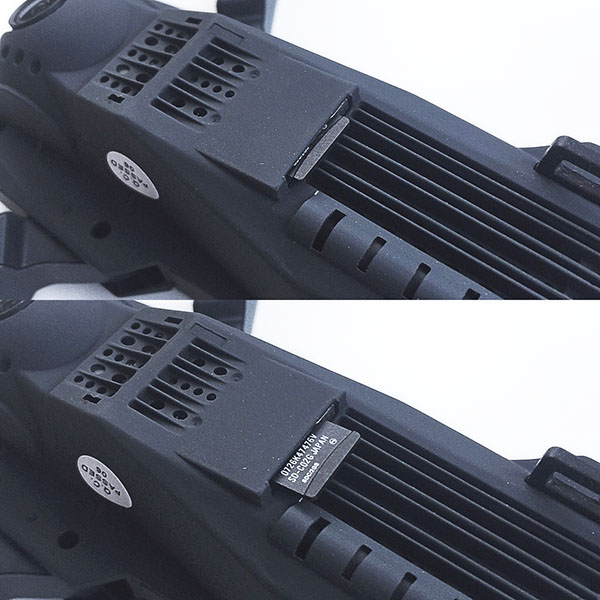
Another feature located on the underside of the E58 is the Micro SD card slot, which is spring-loaded so the card “clicks” in place when pressed in and “clicks” back out when pressed again.  The E58’s video and still camera can record to this Micro SD card during flight.  The drone can record 720p onboard to this card.  Note that a Micro SD card is not included, you must supply your own.

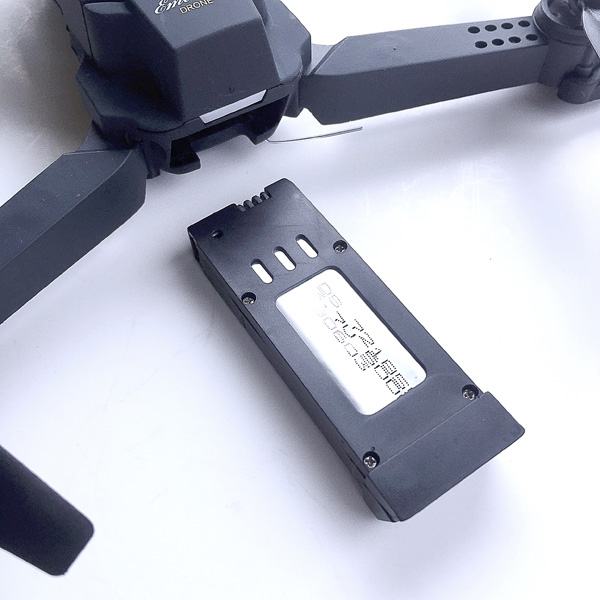
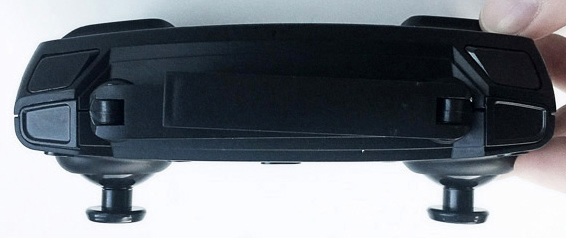
The E58 is powered by a single, rechargeable 3.75V battery that slides into a slot in the back of the drone, as seen in the image above.

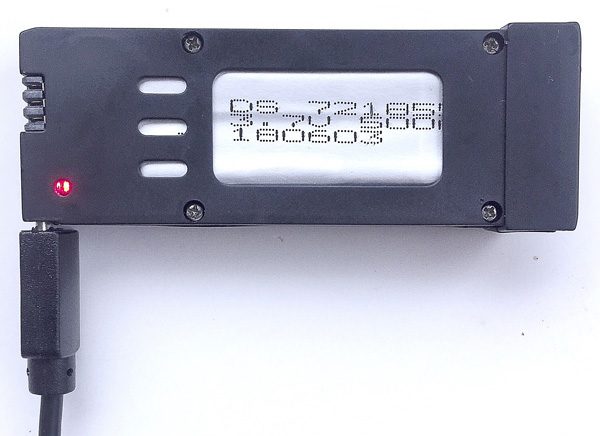
This battery is charged by simply plugging in the included micro USB cable, as seen in the image above.  When charging, a small red LED is illuminated, which turns off when the battery is fully charged, which is typically about an hour if it has been fully drained.

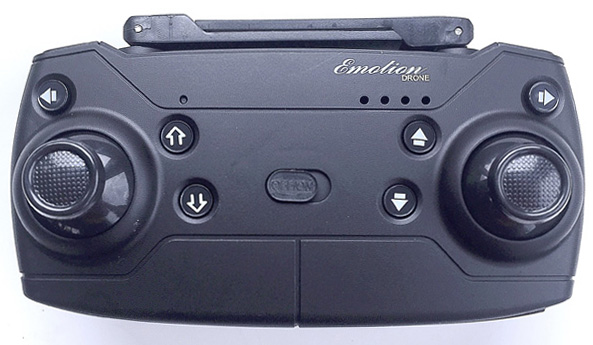
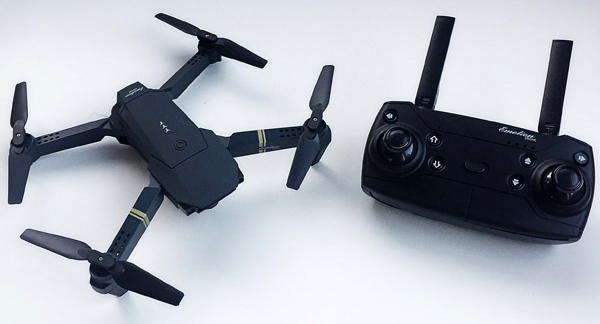
Next, let’s check out the E85’s controller.  As seen in the image above, it has two joysticks and multiple buttons that are all used to control various features of the E58 during flight.  It resembles the styling of the DJI Mavic Pro drone’s controller as well, which I suspect is not a coincidence.

The controller has two collapsible “antennae,” that appear to be for styling purposes only and not for any sort of actual function.  In addition, the controller has a hidden tray that slides out from the bottom and can be used to mount a smartphone (more on this below).

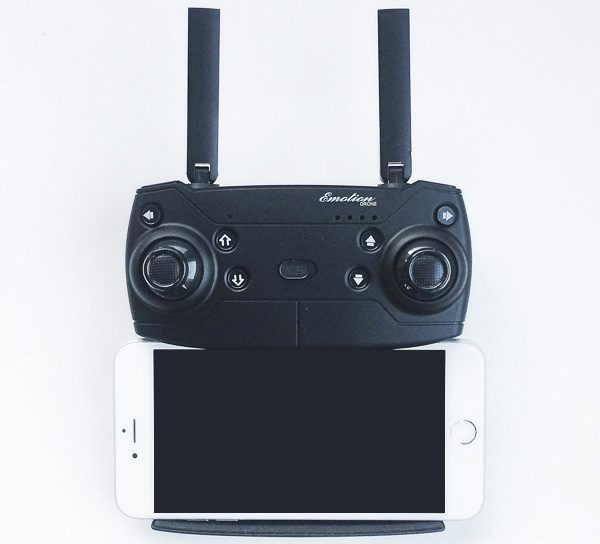
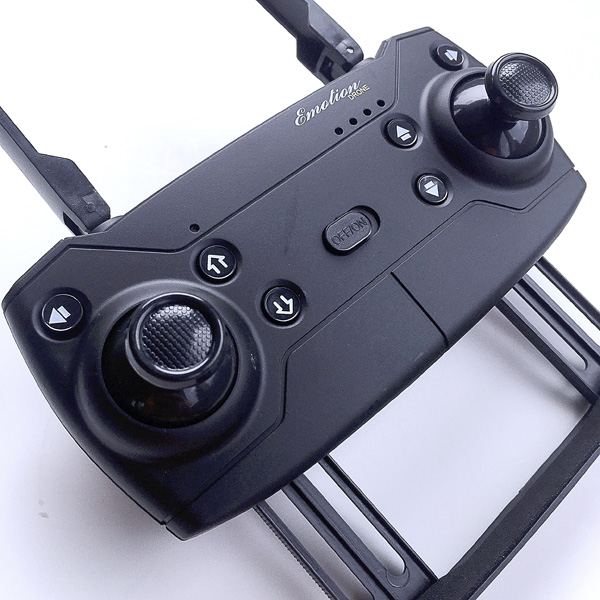
The controller’s smartphone tray held a phone as large as an iPhone 6 Plus, as shown above; however, this seemed to be putting quite a bit of strain on the tray and I wouldn’t recommend placing a phone quite this wide here.

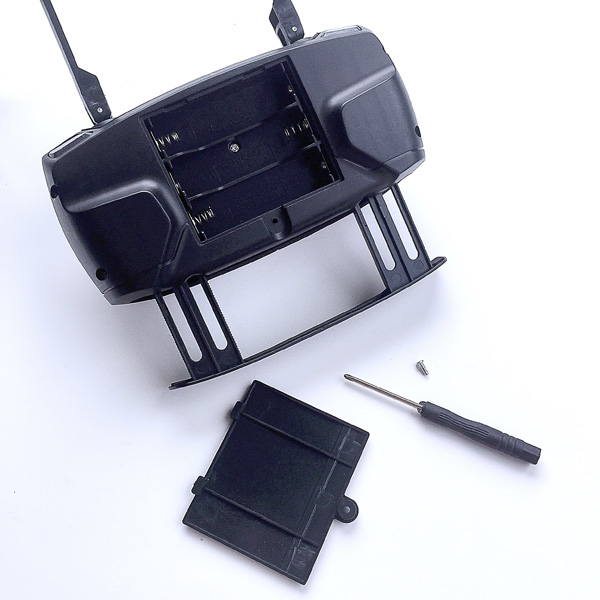
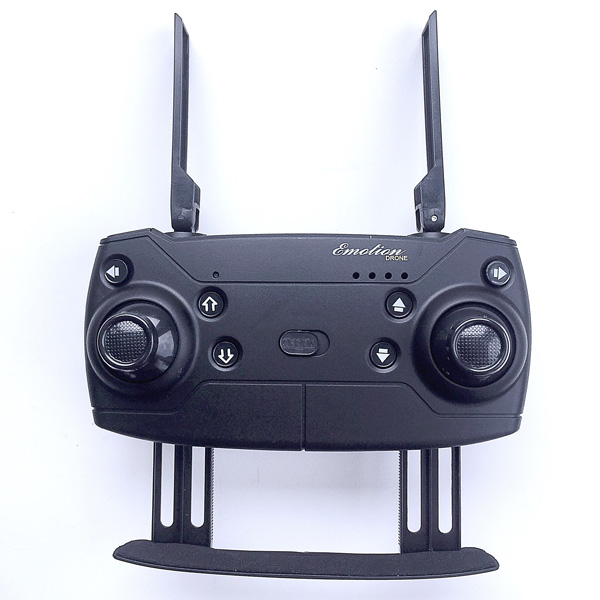
The E58’s controller is powered by three (3) AA batteries, which are not included.  However, a small screwdriver is included, which facilitates removal of the tiny screw that holds the battery cover in place, as seen in the image above.  Just be sure not to lose that screw, or you’ll be screwed (pun intended).

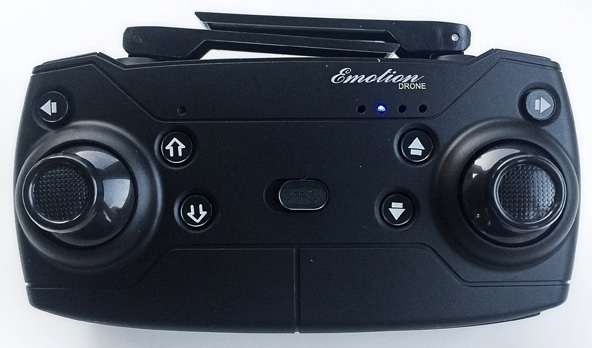
Sliding the On/Off switch in the center of the E58’s controller powers it on, which is indicated by the illumination of a small blue LED, as seen in the image above.  As with the E58 drone itself, this LED appears to be in a bank of four that would seem to indicate the controller battery’s power level, but this does not seem to actually be the case; only the second LED from left is ever illuminated and this did not ever seem to change no matter the controller’s remaining power level.

Let’s take a look at the controls, starting with the front face of the controller.  The left joystick controls the throttle; forward on the stick is increased throttle, backward on the stick is decreased throttle.  Letting go of the stick allows it to center itself.   Pushing the stick right or left will rotate or “yaw” the drone about its vertical center axis in that direction.  Pushing the right joystick up or down controls the forward and reverse motion of the drone, while pushing the right side stick right or left “slides” the drone laterally in that direction.  One other feature of the joysticks is that the E58 can be calibrated by pushing both joysticks down and to the right.

The arrow buttons in the upper left and upper right of the controller are the fine tuning left and right controls.  The hollow up and down arrow buttons to the left of the on/off switch are the one-touch launch and one touch land buttons.  The one-touch launch button starts the motors and immediately launches the drone into the air, while the one-touch land button brings the drone down to the ground fairly gently, then kills the motors.  The solid up and down arrow buttons to the right of the on/off switch are the fine tuning forward and backward controls.

Next let’s look at the four buttons on top of the controller, as seen in the image above.  Starting from the left side, the button in the upper left, farthest from the front of the controller, operates the “Headless Mode” (a short press) and One-Key Return (a longer press).  The Headless Mode essentially make the drone fly as if the controller is its reference point; I found this mode to be difficult to adjust to.  The One-Key Return was a bit dodgy.  Because this is a lower-end drone without the GPS capability of the higher-end drones, this “return” function does not work as well as you might expect.  It basically turns the drone around to a heading that is pointing toward you, but you have to actually fly it back to your location yourself; it does not fly itself to you.  The button in the lower left, closest to the front of the controller, is the Photo/Video button, though this button never did seem to work; I had to control the still and video camera features with the app on an iPhone (see more on this below).  Moving to the right side, the button in the upper right, farthest from the front of the controller, operates the “360 Flip” (a short press) and Emergency Stop (a longer press).  The 360 Flip is fun; you press the button, then press the right joystick left or right to force the ED58 to flip in that direction.  Also, be very careful with the Emergency Stop—it kills all of the motors immediately and the drone drops to the ground like a rock, which could be very damaging if the drone is at high altitude and drops onto a hard surface (fortunately I only tried the E58 on grass).  The button in the lower right, closest to the front of the controller, is the Speed Switch.  This cycles the drone from 30% to 60% to 100% then back to 30% speed level with each press.  As a neophyte drone pilot, I kept the E58 in 30% most of the time while I acclimated to the controls, but I can tell you that the 60% and 100% speed rate settings are quite fast and experienced pilots will really like them.

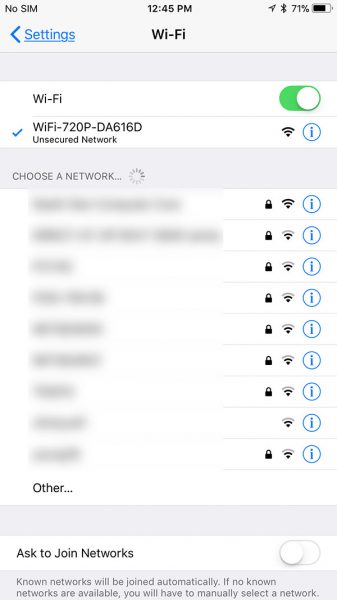
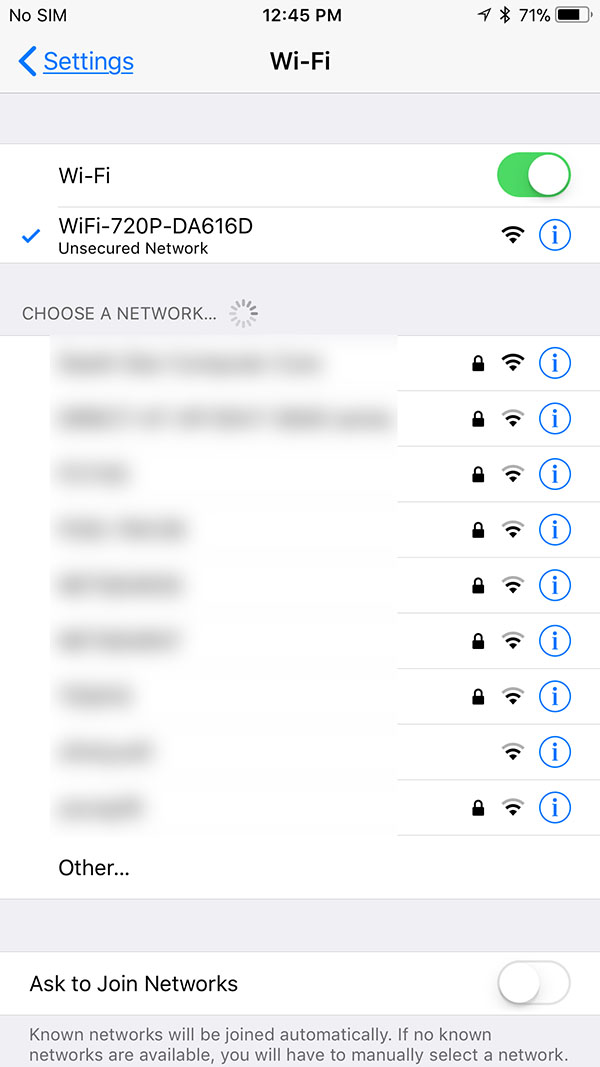
Next, I tried controlling the E58 via app.  Eachine recommends an app called “JY UFO” which I downloaded for free from the iOS App Store.  Since the E85 has WiFi capability and essentially projects a mini Wi-Fi hotspot, I followed the instructions on the app and connected the drone to the iPhone by going to Setting on the iPhone, then Wi-Fi, then selected a signal called “WiFi-720P-DA616D,” seen above.  This essentially connected the iPhone to the E58 just as if it were a WiFi router; however, this is really only a link between the E58 and my iPhone, with no actual internet access and no data roaming, so you don’t need to be in range of an actual WiFi router to make this work.  I then re-launched the JY UFO app and started playing around with the controls.

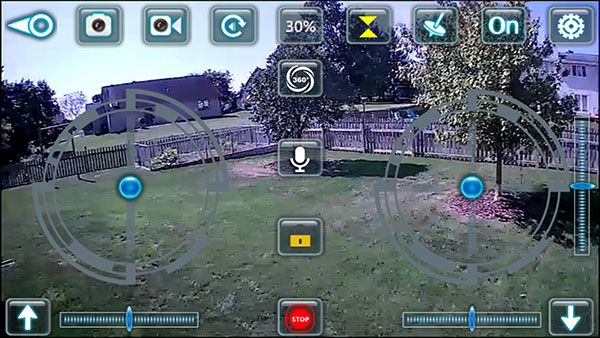
The above image depicts what I saw on the JY UFO app.  The background of the app is what the E58’s camera is “seeing” at any given moment.  The left and right joysticks, as well as other controls, are simulated on the app’s screen.  In addition, the app allows the E58 to be controlled in gyro mode, which bypassed the simulated joysticks on the screen and lets you control the flight attitude of the E58 by tilting and tipping it.  However, I found this to be quite challenging (I probably need a lot more practice on this).   Yet another method of controlling the E58 with the app is “Mission Planner” mode, in which you trace a trajectory on the app’s screen, then the app directs the E58 to fly in that trajectory.  I didn’t find this mode of controlling to be all that accurate or useful.

Of particular interest is that, as mentioned above, I could only control the still and video recording features using the app, not the controller.  Using the JY UFO app allowed me to record both images and video in 1280×720 resolution; the still images were stored in my iPhone’s Photos, while the video was stored on the Micro SD card.  The images had a bit of a “fisheye” effect, but the video footage did not.  Although I found the E58’s dedicated controller a but easier to learn, I liked having the flexibility to control it with the app instead; this way, if I wanted to leave the controller behind to save space, I always have my phone with me as a controller.

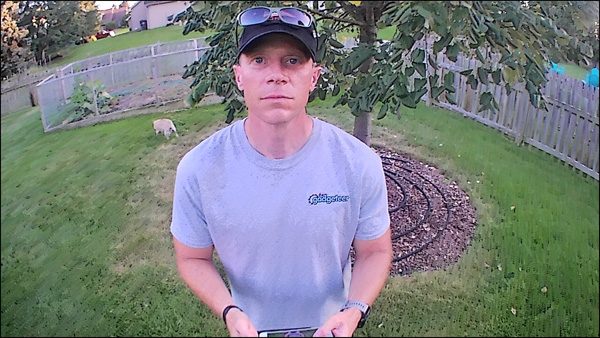
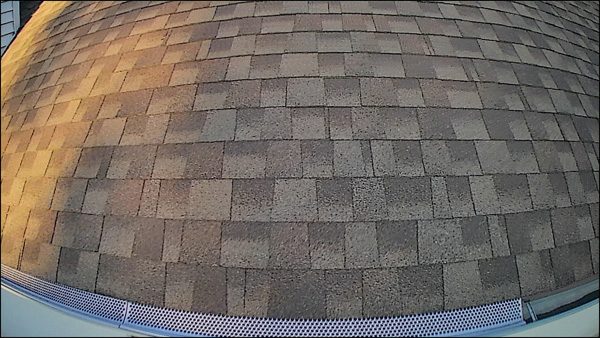
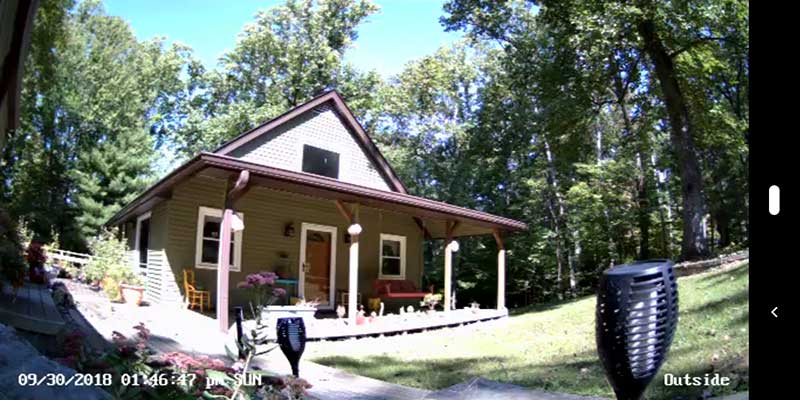
I flew it over my roof a bit.  I could envision using the E58 to check out how clogged my gutters are getting, or even to check for shingle damage after a severe storm; however, the resolution does not lend itself to a great deal of detail.

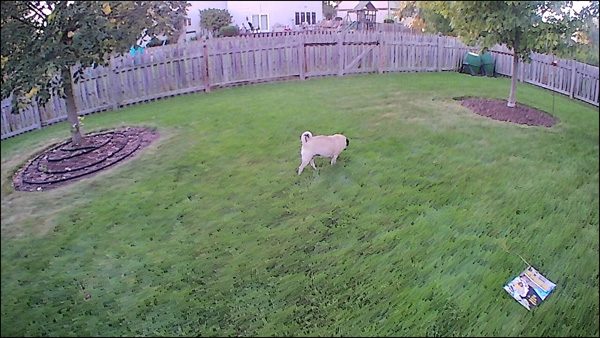
I even followed one of my pugs around the yard with it.  (FYI, she didn’t seem to pay much attention, unless I flew really close to her.)  I didn’t have the opportunity to fly the E58 in elevated wind conditions, but I did have a few breeze gusts here and there, and it stayed surprisingly stable in these conditions.

I was able to get about 8-10 minutes of flight time before the E58’s battery was drained, which it indicated by blinking its lights just before it fully died.  However, you could purchase multiple batteries and swap them out for longer flight sessions.

What I like

  • Very portable: small, compact size and lightweight
  • Styled like the DJI Mavic Pro Quadcopter Drone
  • Stable–can basically hover if you can get it set up right, which is great for photos and videos
  • Fairly easy to fly once you get the hang of it (but I still need some practice!)
  • Fairly robust to crashes despite having a fragile look and feel

What needs to be improved

  • Camera/video button on controller appears to be non-functional; these functions can only be controlled when using the smartphone app
  • The instruction book is very difficult to understand due to the broken English translation (presumably from Chinese)

Final thoughts

EACHINE E58 RC Pocket Quadcopter Drone is a small, lightweight, miniature drone that has a lot of features, is fairly easy to learn and quite fun to fly once you get the hang of it.  It can also record some decent photos and videos and has multiple options for controlling it.  Considering what you actually get with this drone and its “fun factor,” I think it is a pretty decent value for its price of $75.99.

Price: currently $64.99
Where to buy: Can be purchased directly from Eachine, from Amazon
Source: The product sample for this review was provided by Eachine.

Filed in categories: Reviews

Tagged:

EACHINE E58 RC Pocket Quadcopter Drone review originally appeared on The Gadgeteer on September 30, 2018 at 1:19 pm.

Note: If you are subscribed to this feed through FeedBurner, please switch to our native feed URL http://the-gadgeteer.com/feed/ in order to ensure continuous delivery.