REVIEW – Having reviewed several dash cams over the last year or so, I wanted to review the Z-Edge Z3D dash cam mainly because it had a remotely mounted rear cam.
What is it?
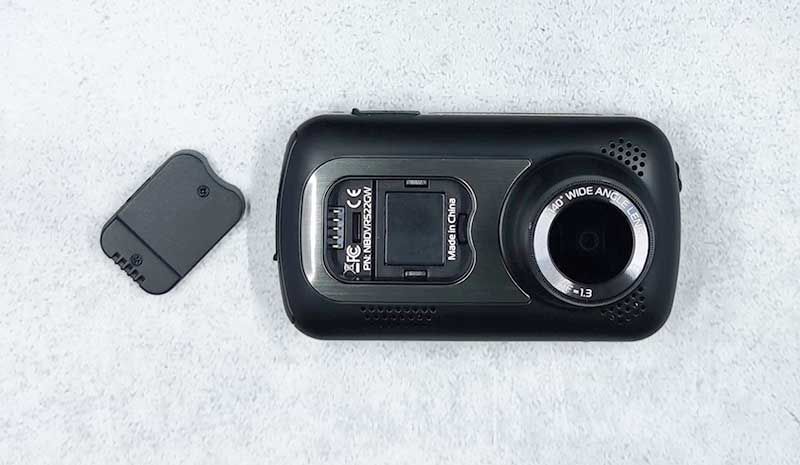
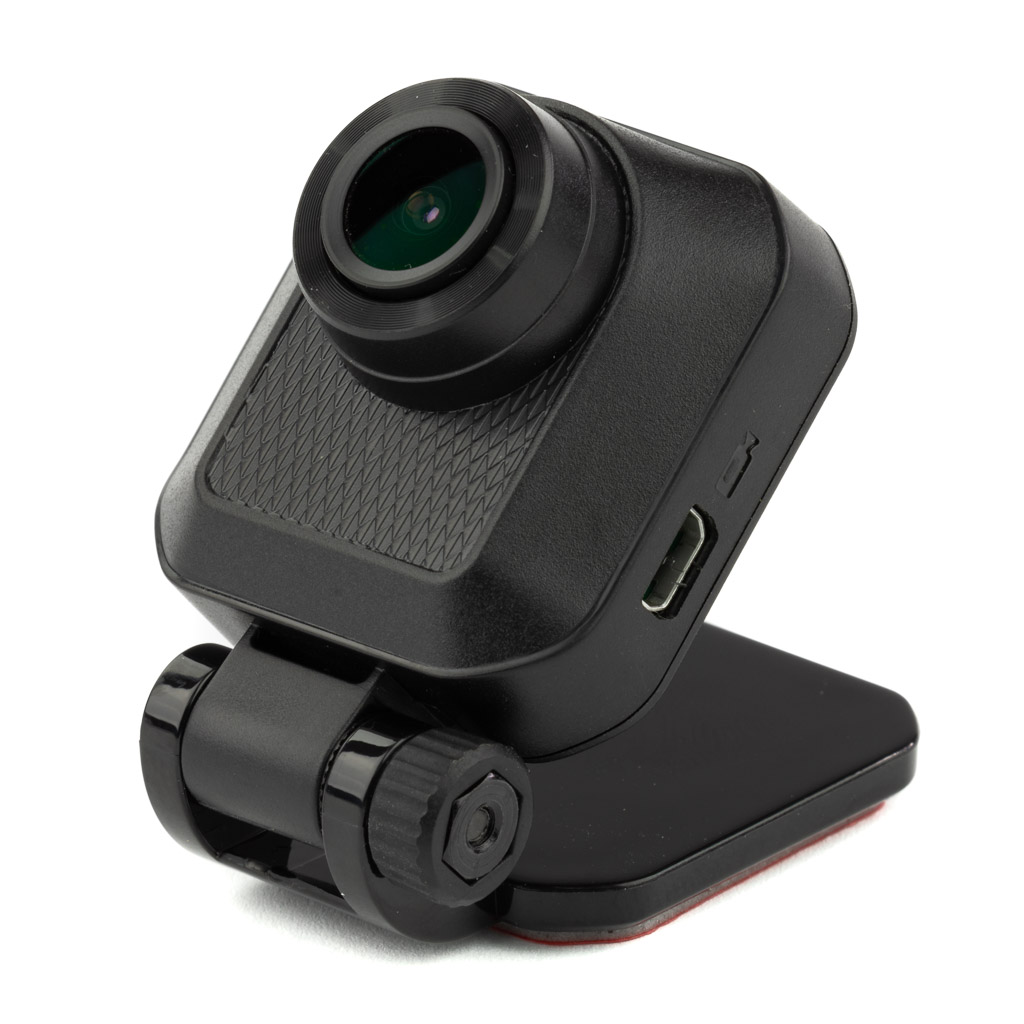
The Z-Edge Z3D Dual Lens Dash Cam is, as it sounds, a dashcam with two cameras. What makes this dash cam different than some of the other dual-camera dash cams is that its second camera is able to be remotely mounted and it includes a GPS feature.
What’s in the box?
List contents – you can remove this heading and section if it doesn’t apply to your review.
Car Dash Cam
Rear camera
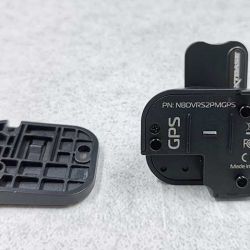
Car mount with built-in GPS
Dual Car Charger
Short Micro USB charging cable
Long Micro USB charging cable
Mini USB cable for rear camera
Cable clips
Wire cable tool
Design and features
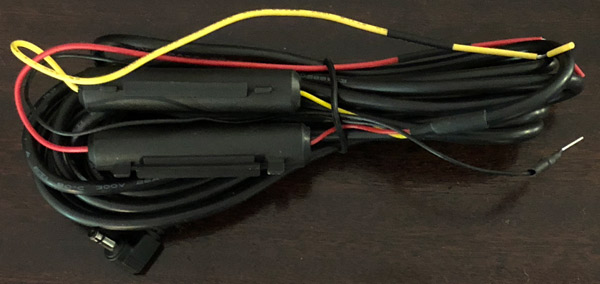
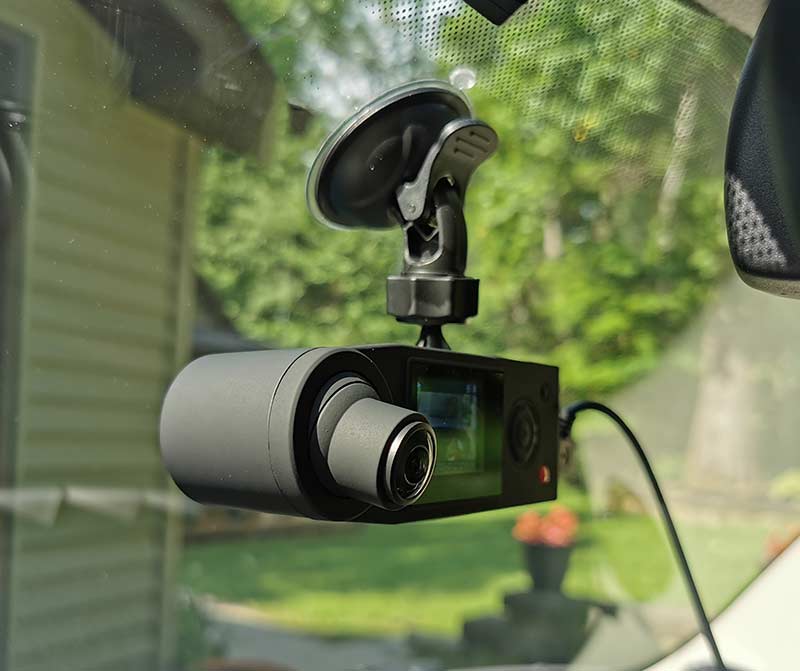
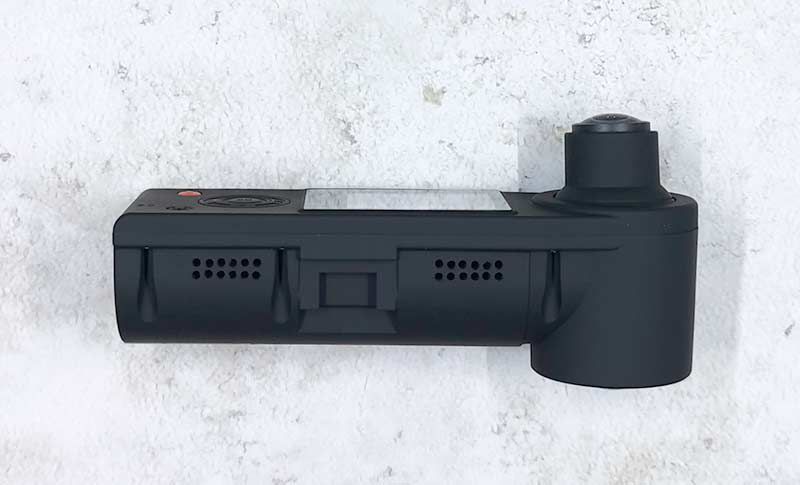
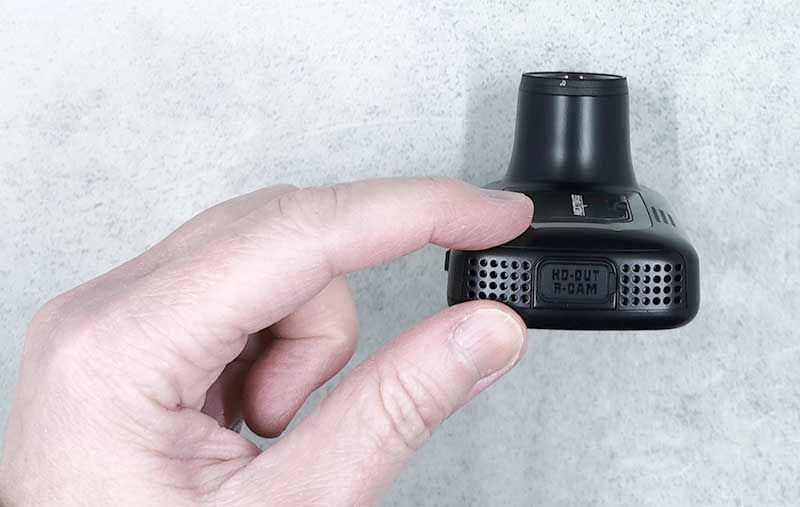
The Z-Edge Z3D is a dual-lens dash cam that can record in Full HD (1920x1080p) at 30fps when using both cameras, and 2560×1440 at 30fps when using only the front camera. Both cameras have a 150-degree wide-angle view. The front camera (the main unit) has a mount that includes a GPS antenna, something not normally seen in a dashcam. The cameras also utilize Wide Dynamic Range (WDR) technology that compensates for light/dark spots and balances the exposure. The mount holds very securely and is a bit easier to install than most other suction cup mounts. The rear camera uses 3M tape to mount to the window.
The included 26 foot Micro USB cable for the rear camera is long enough to reach the rear of just about any passenger vehicle. I was able to route mine all the way to the back of my pickup truck topper. It even works rather nicely through the tinted rear window.
The Z-Edge Z3D is also capable of using an SD memory card up to 128GB, most other dash cams only support up to 64GB. When used with a 128GB card the recording time is approximately 720 minutes or approximately 45 minutes for every 8GB of storage.
Like almost every dash cam, the G-Sensor automatically protects video clips as an “Emergency File” when it detects a collision or vibration to protect them from being overwritten as the device records in a loop, overwriting the oldest files when the card is full.
The parking monitor feature allows the device to monitor the vehicle even when the engine is switched off using its built-in battery. If any vibration is detected by the G-Sensor, it will automatically turn on the dash cam and begin recording. Approximately 30 seconds after the vibration has finished, the device will automatically turn off and return to monitoring mode.
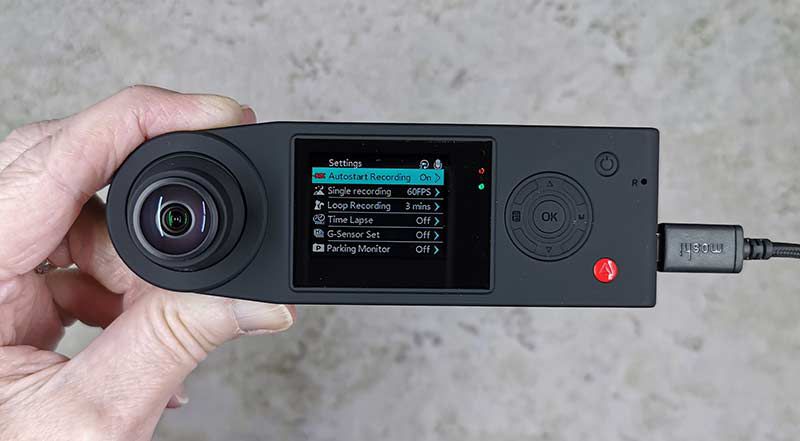
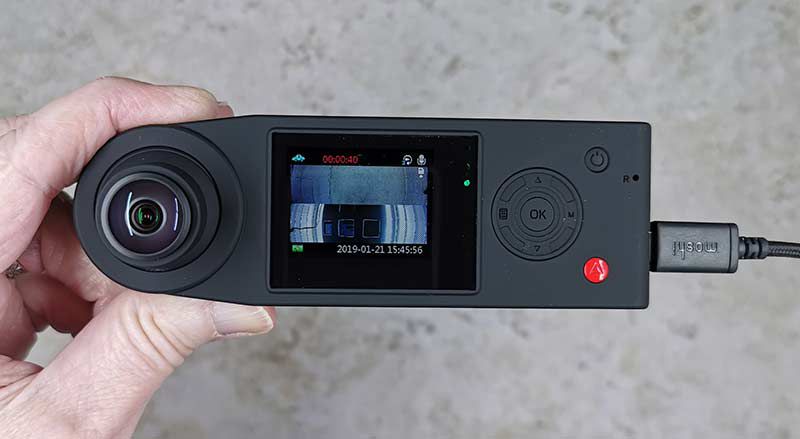
The 2.7″ LCD screen is large enough to easily operate the camera.
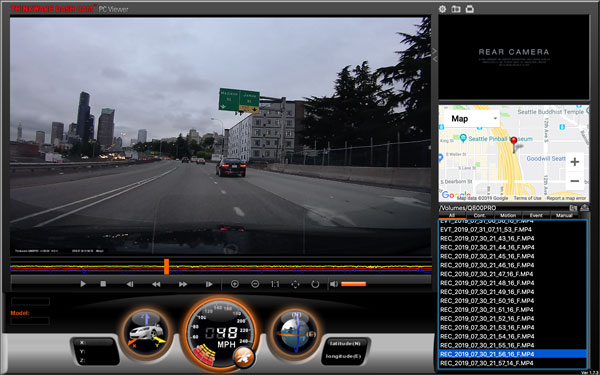
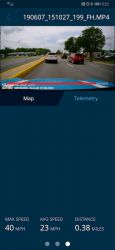
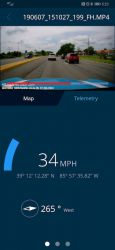
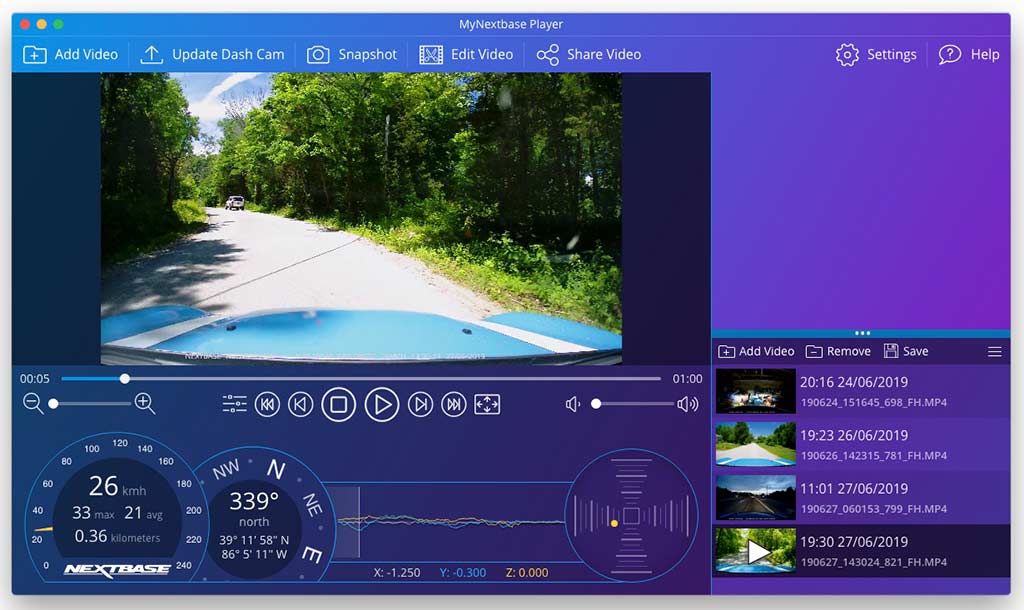
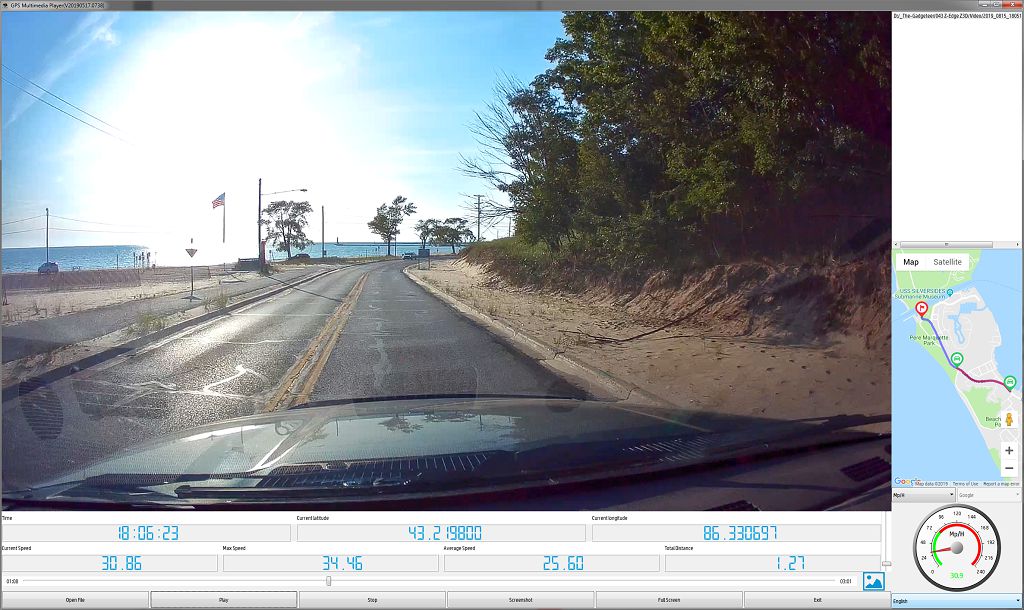
The GPS function saves the location data to a *.map file that can be used with the Z-Edge desktop software to display the location, speed, and route on Google Maps. At first, I thought this was an odd feature, but after opening the video file in the viewer I found it to be pretty neat. It displays the current time, latitude, longitude, current speed, max speed, average speed, total distance, and location on Google Maps and it updates as the video is played.
Sample Video:
What I like
Rear Camera
Dual Car Charger so you’ll still be able to charge something else
GPS Feature
What I’d change
Would like a dedicated save button for protecting files
Final thoughts
Overall this is a pretty nice dash cam. I think it will be my main dash cam for a while as it has all of the features I want.
Price: $139.99 Where to buy: Amazon Source: The sample of this product was provided by Z-Edge.
Note: If you are subscribed to this feed through FeedBurner, please switch to our native feed URL http://the-gadgeteer.com/feed/ in order to ensure continuous delivery.
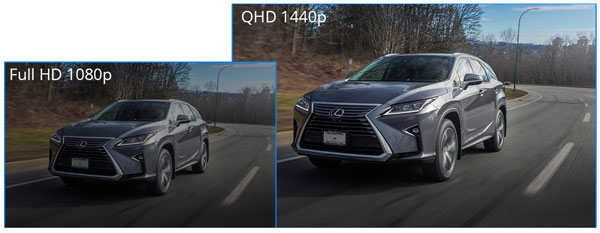
REVIEW – The past few years I’ve had the opportunity to review both of Thinkware’s flagship dash cams: the F800 and F800 PRO. With many other brands to choose from, the 800 series continues to be my dash cam of choice. I’ve even had the Thinkware 12v power cable hardwired into my vehicles enabling all of their features to be fully functional. That said, the only negative/criticism I had in those reviews was the F800’s HD resolution. In today’s high-res world, 1920 x 1080 is a bit meager IMO. Well, Thinkware has finally addressed this shortcoming in the new Q variant of the series, bumping the resolution to 2K QHD (2560 x 1440)…a welcome upgrade. Let’s see if it lives up to the anticipation .
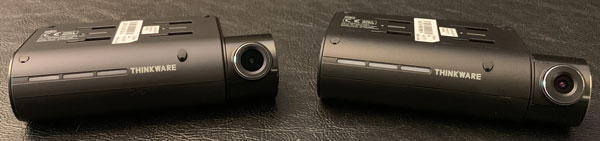
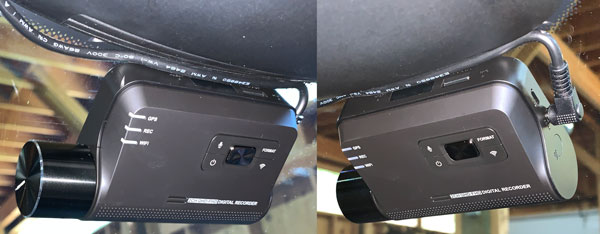
Since the F800, F800 PRO and Q800 PRO are nearly identical in form and function, I will be plagiarizing myself while describing the Q800’s shape, ports, and shared features but dive into what differences there are. Here you can see, that other than lens/camera assembly the F800 PRO and Q800 PRO are identical.
What is it?
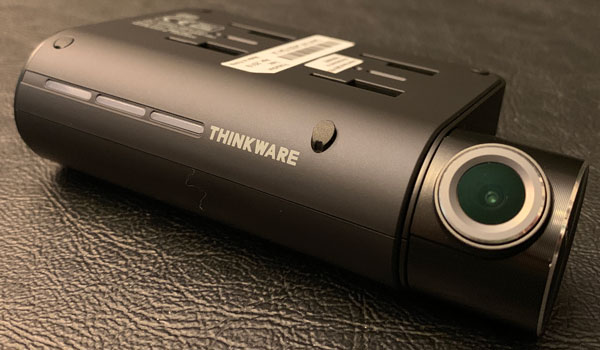
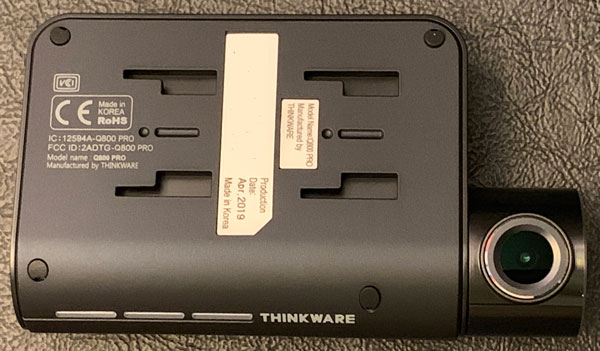
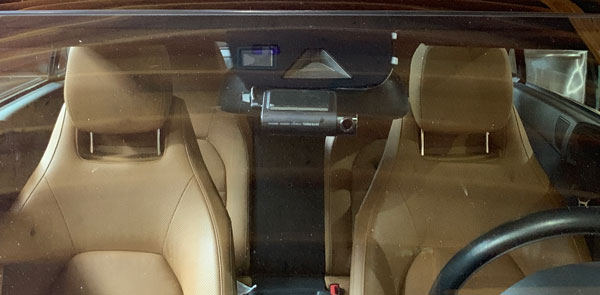
The Q800 PRO is a screen-less dash cam, shaped more or less like a thick deck of cards with a growth on its side to house the lens assembly. Like it’s predecessors, I love the minimalistic, non-distracting form factor of the Q800 PRO. Other than verbal/audio notifications, you can hardly tell it’s installed in your vehicle being tucked behind my rearview mirror. The Q800 PRO is even more stealthy than the original F800, housed in all-black (vs gray) plastic and packed full of the latest tech, features, and Sony’s 2K/high resolution 5.14MP Sony STARVIS camera sensor.
What’s in the box?
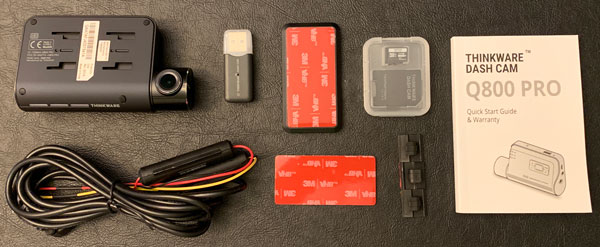
Main dash cam unit
Mount with 3M tape (1ea)
12v power cable
Adhesive cable holders
16gb microSD memory card with adapter (consumable)
Quick start guide/warranty card
Hardware specs
• Resolution: Front – 2K QHD (2560 x 1440) / Rear – Full HD (1920 x 1080) [Optional]
• Camera: Front – 5.14MP Sony STARVIS / Rear – 2.13MP Sony STARVIS [Optional]
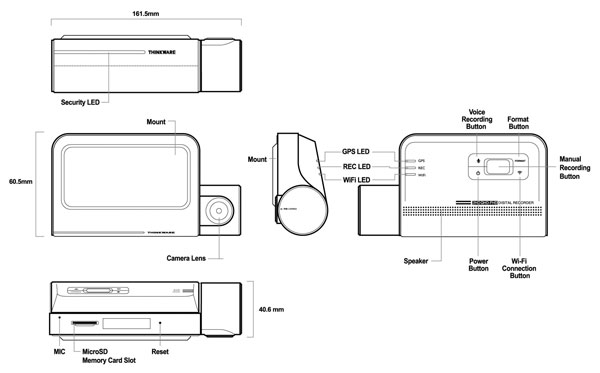
• Frame Rate: 30 fps • Viewing Angle: 140° (Diagonal) • Dimensions (WxDxH): 4.2 x 1.3 X 2.4 inch • Weight: 107.5g (0.237 lb) • Storage Temperature: -4°~ 158°F / -20°~ 70°C • Operating Temperature: 14°~ 140°F / -10°~ 60°C • Capacity: MicroSD card 32/64/128GB (UHS-I) • Input Power: DC 12/24V, Built-in Super Capacitor • GPS: Built-in GPS Antenna
Design and features
The top of the Q800 PRO has four slots that slide onto the mounting plate which allows for easy installation and removal of the device. The mounting plate is securely held to the windshield by a 3M adhesive strip (vs suction cup mount). The dash cam locks onto the mounting plate with a secure, wiggle-free connection.
The main face of the Q800 PRO has the mic mute, SD card format, WiFi, and power buttons in addition to the GPS, recording, and WiFi status LEDs located on the left. The Q800 PRO’s speaker is also located on the front of the device. Like the F800 and F800PRO, the Q800 PRO’s speaker impressed me just like its brethren, definitely the clearest and loudest dash cam I have experienced to date.
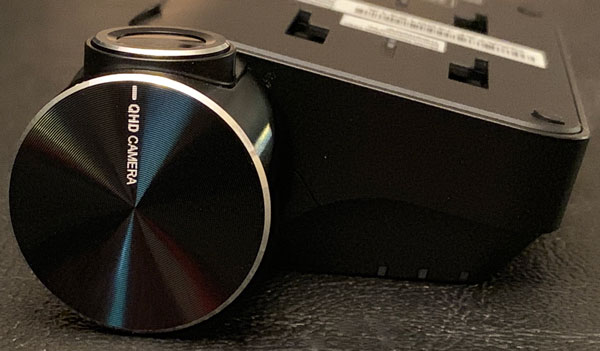
The Q800 PRO’s camera is on the left side of the device, engineered to sit very close to the windshield to reduce distortion and glare. The camera housing is able to rotate vertically approximately 90 degrees to accommodate nearly any windshield angle and vehicle design.
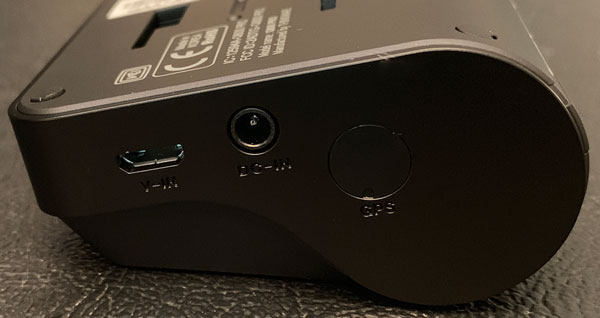
The right side of the Q800 PRO has its video-in, power, and external GPS ports. The video-in port is for the rear, second channel camera. The Thinkware Rear View Camera is an optional accessory that connects to the Q800 PRO via microUSB cable providing HD quality video with a 2.13MP Sony STARVIS sensor and 140 degree viewing angle. The rear video feed can be viewed concurrently with the main, front-facing video on the PC Viewer.
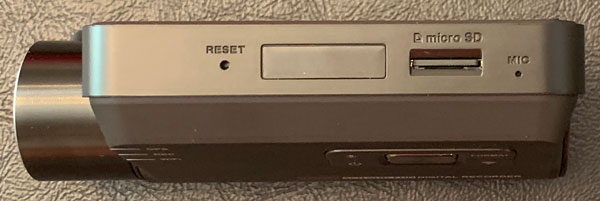
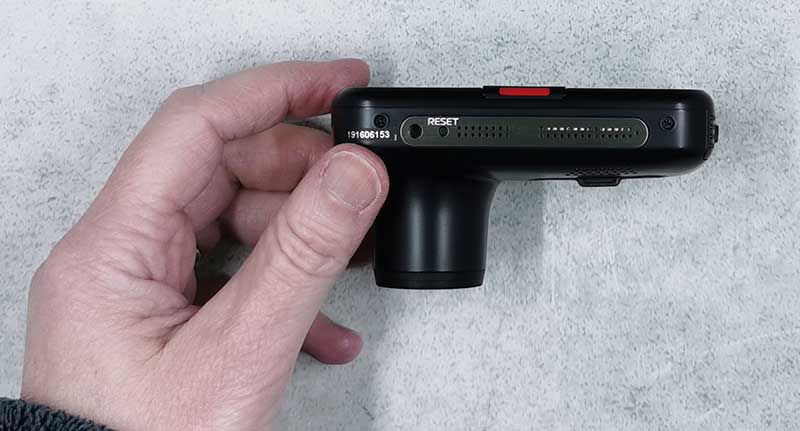
The top of the Q800 PRO has a recessed reset button, microSD card slot, and microphone. Thinkware includes a 16gb microSD card. The Q800 PRO can accommodate up to a 128gb card. Considering the Q800 PRO records in 2K with video taking up twice the space/capacity of standard HD, seems like Thinkware could have included a 32 or better yet 64gb microSD card with their premium device.
Installation
Instead of sending a standard 12v power cable that plugs into your cigarette lighter, Thinkware includes their TWA-SH hardwiring cable with the Q800 PRO. I had the hardwiring cable professionally installed during the F800 PRO review and it has performed perfectly. In addition to looking cleaner and more polished, the hardware kit enables you to use all of the Q800 PRO’s Parking Mode features/capabilities.
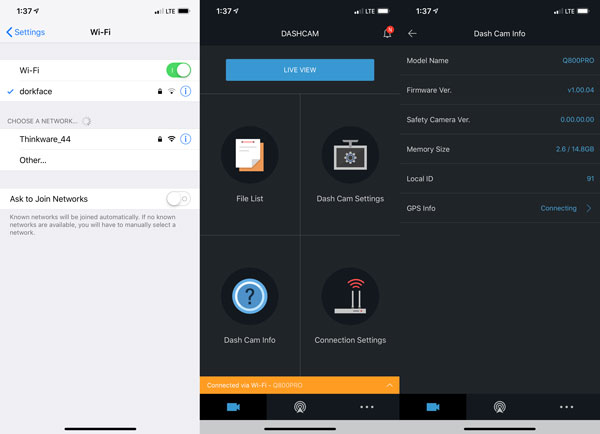
Once installed a majority of the configuring, managing and viewing/downloading video is all done via the Thinkware app available for iOS and Android devices.
The Thinkware app even helps you align the dash cam when first setting the 3M mounting plate as you can see here with the blue & green lines.
Setup and management
Setting up the Q800 PRO’s involves connecting your smartphone to the dash cam via WiFi and using the mobile app to tweak things as you like. The process requires you to press the WiFi button on the front of the dash cam, directly connect to its WiFi (for me it is Thinkware_44), then start up the app.
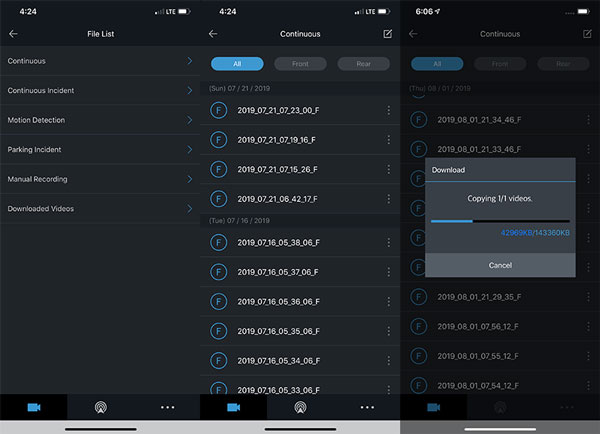
In addition to accessing the Q800 PRO’s camera (memory card/camera/recording/road safety/system) settings, the app also provides a listing of recordings and enables you to download these files from the microSD card to your smartphone wirelessly. Each 146mb file takes several minutes to download. Viewing videos are definitely easier by removing the microSD card and watching them on the Thinkware viewer on your computer.
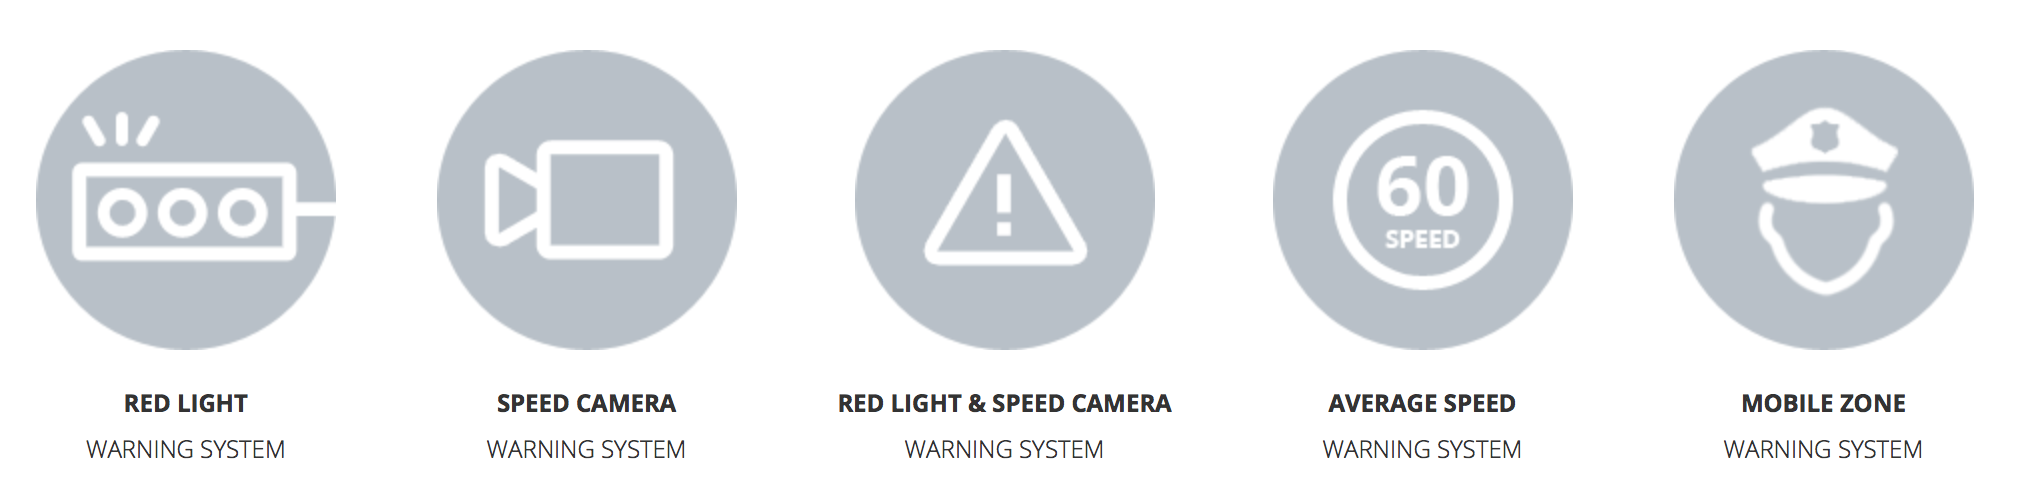
Noteworthy Features
Built-in GPS sensor – the 800 PRO series has the FASTEST built-in GPS I have ever tested.
Driver assistance – Includes lane departure, forward collision avoidance, and forward vehicle departure warning.
Speed camera alerts – the Q800 PRO has an internal database that warns you when you’re coming up to an intersection or location with a known speed camera standing watch.
High-temperature protection system – a built-in thermal sensor protects the Q800 PRO hardware and data against intense heat by automatically turning it off to prevent overheating.
Dual channel capable (aka second camera) – Thinkware also offers a rear camera that captures HD video @30fps.
Geo-Fencing – allows drivers or parents to stay alert of the vehicle location.
Locate Vehicle – enables drivers to find the vehicle’s current location.
Driving Impact Notification – will notify owners when their vehicle has sustained a significant impact.
Energy Saving Parking Mode – reduces power consumption by 1/3 less and gives 3x longer video recording than typical parking mode.
Performance
Thinkware’s new optical lens and improved 5.14MP Sony STARVIS image sensor combine to deliver impressively crisp and clear video quality in 2K QHD. The Q800 PRO just works…once installed, it blends into your car only needing to be accessed when something bad happens or an alien spaceship zips across the horizon.
Video Quality
As I mentioned above, the Q800 PRO uses a Sony 5.14MP STARVIS QHD (2560 x 1440) sensor that captures 2K video at 30fps. The clarity and detail in all lighting condition is excellent. Like the rest of the Thinkware’s 800 series dash-cams, the Q800 PRO gives you a relatively wide viewing angle with a 140-degree view of the road.
With its better lens and greater resolution, the Q800 PRO’s daytime video is excellent. The detail, color, and clarity make for a much improved image quality over its predecessors.
Thinkware’s Super Night Vision 2.0 and Sony improved Exmor CMOS image sensor are very good at capturing light, producing low-light and nighttime video.
Here is an example of the Park Mode video. Even though my parking garage is dimly lit with shadows and bright lighting, the lights are not overexposed and the detail is very clear and detailed.
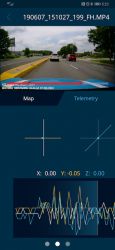
Thinkware Viewer
The Thinkware PC viewer is one of the best features of using their dash cams, very well polished and intuitive. Other dash cam manufactures either create a half-baked viewer or do not offer one at all. The Thinkware viewer is an excellent integrated tool for viewing not only your driving video but speed, lat/long, Google map location, and three-dimensional G-forces the car is experiencing at any particular moment. These G-forces are illustrated in the bar graph under the video and the dial with a car in it with X- Y- and Z- axis in the lower left corner of the window. Like the F800 and F800 PRO, the Q800 PRO records in 1:00 minute blocks but its 2K resolution bumps the file size from approximately 85 to 146mb in size. So, I swapped out the 16gb microSD card Thinkware provides with a 64gb one I had laying around, to (obviously) hold more video at one time before the dash cam overwrites itself.
F800 PRO vs Q800 PRO:
As I mentioned above…other than the lens assembly, there is no outward/physical difference between the F800 PRO and the Q800 PRO. The Q800 PRO’s improved resolution and video are the only things that truly set it apart from the F800 PRO, the features are the same.
What I like
Great build quality
2K QHD (2560 x 1440) resolution
Additional features and functions
Stealthy/minimalistic form factor
Very good video quality (especially Night Vision)
TWA-SH hardwiring cable included
Dual channel/camera capable
Quick GPS lock
Excellent PC viewer
Solid companion smartphone app
Easy to install/use
What I’d change
Included microSD needs to be higher capacity
Final thoughts
I really like Thinkware’s 800 series of dash cams…so much so, I have had them hardwired into several of my vehicles. I have always prefer their screen-less, minimalistic form factor. The Q800 PRO raises the bar by bumping up the camera’s resolution from 1080p to 2K. As I have said in past reviews, I prefer a higher resolution sensor and Thinkware has delivered with their latest & greatest. The Q800 PRO is jam-packed with features you would expect from a high-end dash cam (tho I can see many not using some of its more advanced capabilities). I love the all-black PRO’s stealthy look and vibe. Bottomline: I recommend the Q800 PRO for its video quality, design, features, and polished ecosystem. If you’re thinking of buying or upgrading your dash cam, I definitely recommend the Q800 PRO be on the top of your list.
Price: $299.99 Where to buy: Amazon or Thinkware. Source: The sample of this product was provided by Thinkware.com.
Note: If you are subscribed to this feed through FeedBurner, please switch to our native feed URL http://the-gadgeteer.com/feed/ in order to ensure continuous delivery.
REVIEW – With all the dash cams on the market, how do you make one that stands out from the rest? You can be like Soliom and make a dashcam with two cameras. One that points out the front of the vehicle’s window and one that points inwards into the car. Why would you want to record what’s going on in the car in addition to outside the car? Maybe you’re a Uber driver or maybe you want to create your own karaoke videos like James Corden. Either way, let’s take a closer look at the G1 360 degree dual dashcam from Solium.
What is it?
The Solium G1 is a 360 degree dual dashcam with a camera that points out the front of the car and one that points inside.
Hardware specs
Processor: Dual Sunplus 6350A processors
Image sensor: Dual Sony Exmor IMX323 sensors with 6 lens fixed f/2.0 apertures
Record both cameras at 190° 1920x1080P@30fps or the front camera only 1920x1080p@60fps at 190°
Display: 1.5 inch TFT LCD display
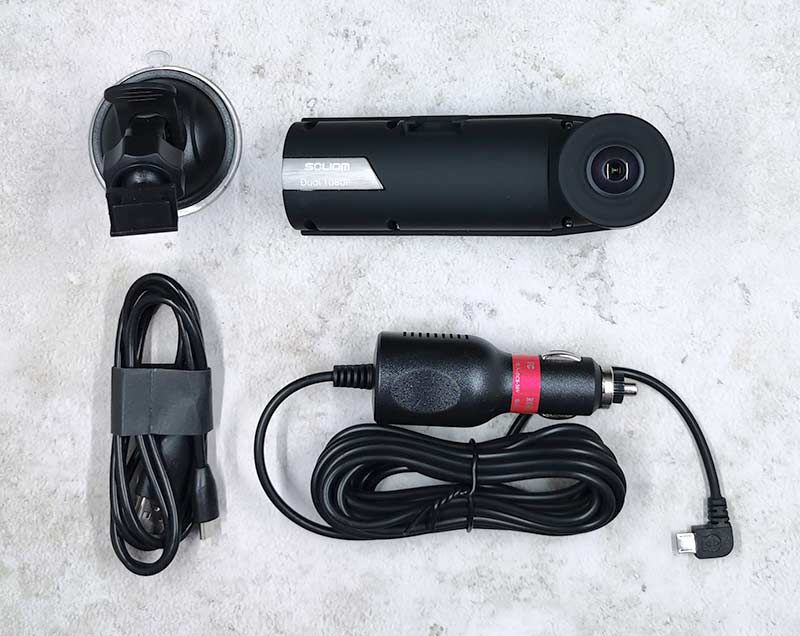
What’s in the box?
Soliom dual cam dash cam
Windshield mount
12V power adapter
micro USB cable
USB card reader
Reset pin
User manual
Design and features
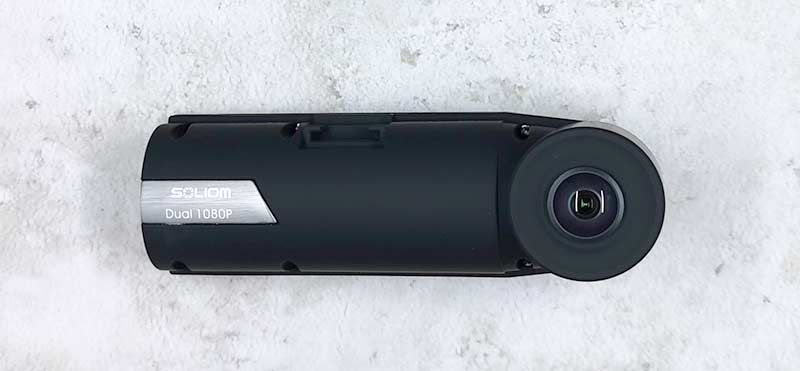
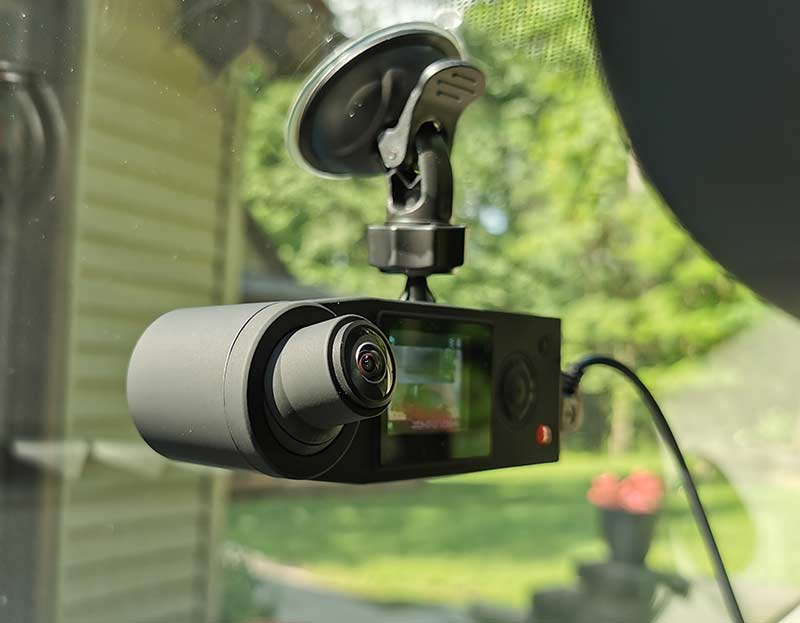
The Soliom G1 is the first dash camera that I’ve reviewed that has two lenses. There’s the standard lens that points out your front windshield to record your travels and there’s an additional camera that points inside the car.
The front camera that points out the windshield is fixed in one position and has a 190° lens that captures 1920×1080 resolution.
The back (interior) lens has the same viewing angle and resolution, but this lens can pivot in its socket sort of like an eyeball.
For example, here we see it pointing up.
And here we see the lens pointing down. The ability to adjust the angle of the lens is a helpful feature as it helps you get the most coverage inside the car. For example, if I left the lens centered, my rearview mirror would be in the way since I mount my dashcams directly in front of the mirror. You can check out the video clip below to see what the interior video looks like.
The camera is medium-sized with a soft black coating.
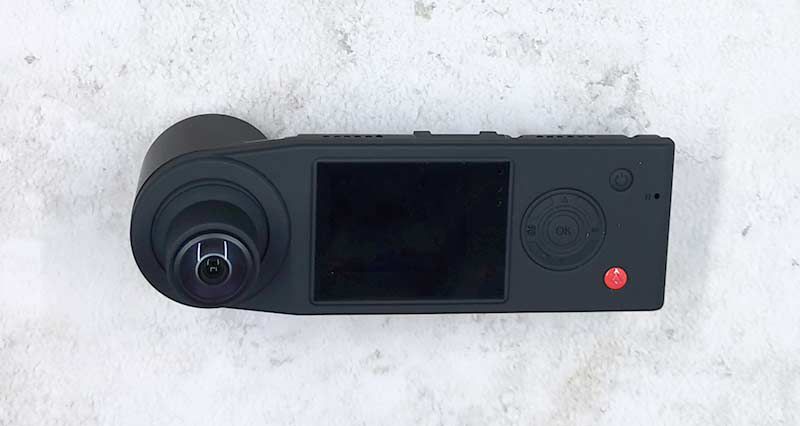
The side has a micro USB port for the power cable, a micro SD card slot and a connection for a GPS module. Soliom did not include a GPS module with the camera that they set me to review. They don’t even sell them on their site so I’m not sure of pricing or availability.
Also note that a micro SD card is NOT included with the G1 dashcam.
The G1 has a decent sized 1.5in TFT color LCD that you’ll use for a live view of the cameras and navigating the menus to customize the settings. The LCD is not touch capable, which means you’ll have to use the 5-way nav button on the right to scroll through the settings and make changes.
There’s also a small power button, a status LED, and an emergency button which will lock the current video clip if you press it.
By default, the G1 captures video from both cameras in one split screen .MOV video file as soon as you start up the engine of your vehicle.
You can customize the camera to just record video from the front (windshield) camera if you like and you can change the record length from 1, 3, 0r 5 minute length video clips.
Another option will let you capture time-lapse video which will put all the video from 4, 8, or 12 hours in one video file. See the example video below where I include a short timelapse clip at the end.
The Soliom G1 has most of the features that people want in a dashcam including a G-sensor which will detect an accident and automatically lock a video file so that you can use it for personal or insurance purposes.
The G1 also has a Parking monitor with motion detection so that it will automatically capture video if there is a motion collision to your car or motion is detected. To use this feature you will need to hardwire the camera to car’s battery so it’s always powered on.
See it in action
As you can see from the video clip above, the video quality is decent except that the interior camera does not have night vision. That means video captured while driving at night will not show the driver.
What I like
Records video inside the car as well as outside the car
Both video in one split screen file
What I’d change
Add night vision capability to the interior camera
Allow separate video files to be captured at once. One for inside and one for outside
Add 4K capability
Add wireless capability for offloading video without removing the camera or SD card
Final thoughts
I have enjoyed testing the Soliom G1 dual camera dashcam. It’s a unique camera that allows both exterior and interior video capture. Except for that feature, the rest of the functionality is basic. The camera lacks 4K video, wireless video sharing/downloading, and GPS. If those extra features don’t matter to you and you want the ability to automatically capture split-screen video of your travels inside and outside your vehicle, the Soliom G1 is a decent camera worth checking out. I plan to leave it in my car – at least for now.
Price: $109.99 Where to buy: Amazon Source: The sample for this review was provided by Soliom.
Note: If you are subscribed to this feed through FeedBurner, please switch to our native feed URL http://the-gadgeteer.com/feed/ in order to ensure continuous delivery.
REVIEW – Do you have a dash cam in your vehicle yet? A dash cam is a type of gadget that you install and then forget about it. The hope is that you’ll never need it unless it’s to review some fun footage it captured instead of accident footage.
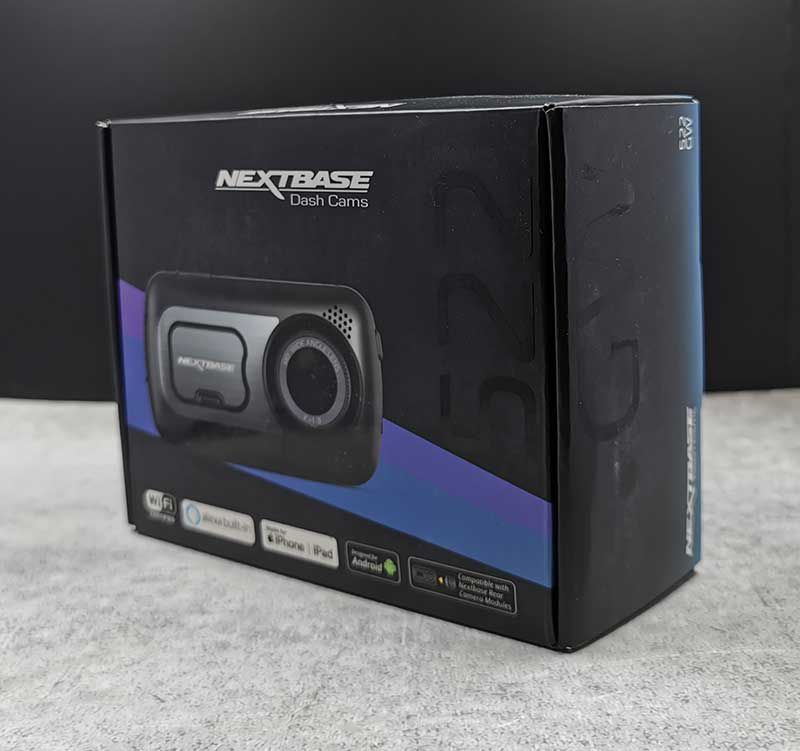
Choosing a dash cam can be similar to choosing a laptop or a smartphone. There are so many dash cams available that it can be difficult to choose one. I’m here today to make your choice even more difficult because I’m going to tell you about the 522GW dash cam from Nextbase. Put on your seatbelt and let’s take it for a ride.
What is it?
The Nextbase 522GW dash cam is a camera that sticks to your windshield and automatically records video footage as you drive your vehicle.
Hardware specs
Resolution: 2560×1440 @ 30fps, 1080p HD @ 60fps
Lens: 6 layer f1.3
Viewing Angle: 140°
Screen: 3″ HD IPS Touch screen
GPS: 10Hz
Bluetooth: Bluetooth 4.2
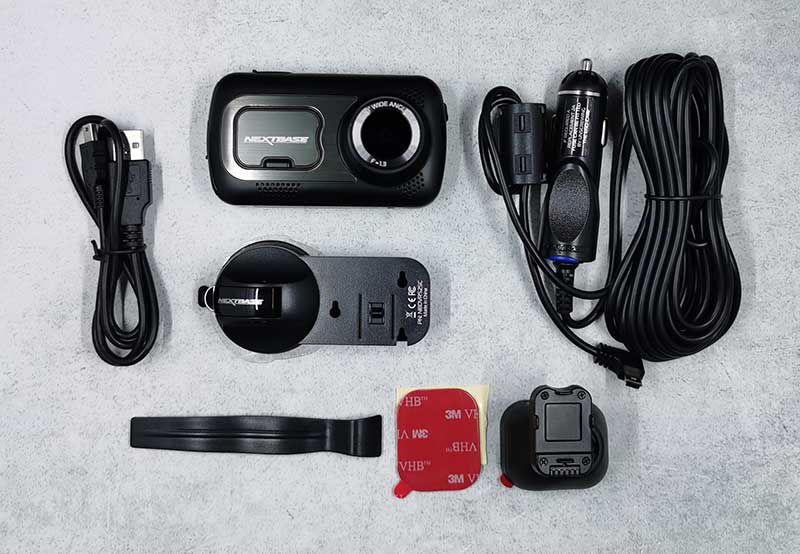
What’s in the box?
522GW dash cam
Windshield suction mount
Click & Go GPS mount
Power cable fitting tool
Vehicle power adapter
mini USB cable
Design and features
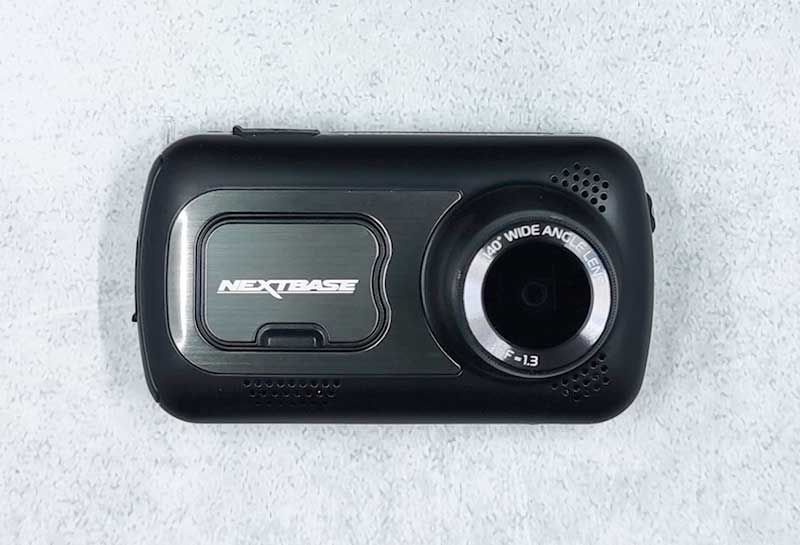
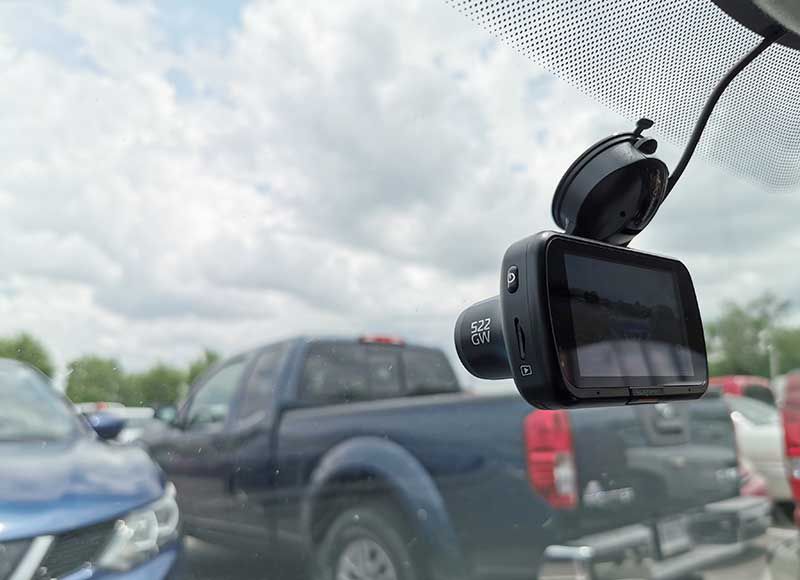
The 522GW dash cam is one of the larger dash cams that I’ve had the opportunity to review. This isn’t necessarily a bad thing, but it does mean that it will be easily noticed if someone looks at your windshield.
As you can see, the lens sticks out from the body of the dashcam quite a bit. If you look closely at the image above and the one below, you can see that the front edge of the lens has an adjustable polarizing filter ring. You can turn this ring to reduce any glare from your dash board.
You will also notice the USB port. This can be used to connect the camera to your computer in order to transfer video files.
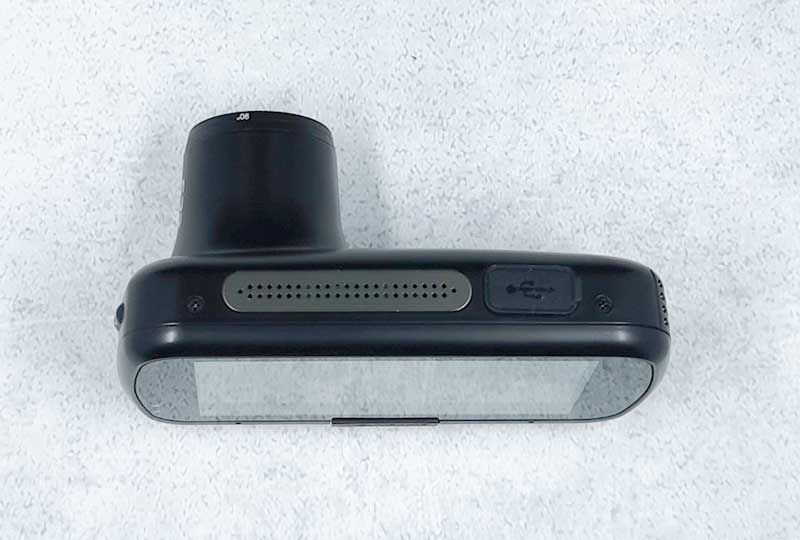
On one side of the camera, there is a covered port that can be used to attach an optional rear camera or connect the camera to a larger monitor using an HDMI cable.
The other side of the camera has a power button and a micro SD card slot.
On the bottom of the Nextbase 522GW dash cam is a light sensor for the Screen Dimming feature and a reset switch.
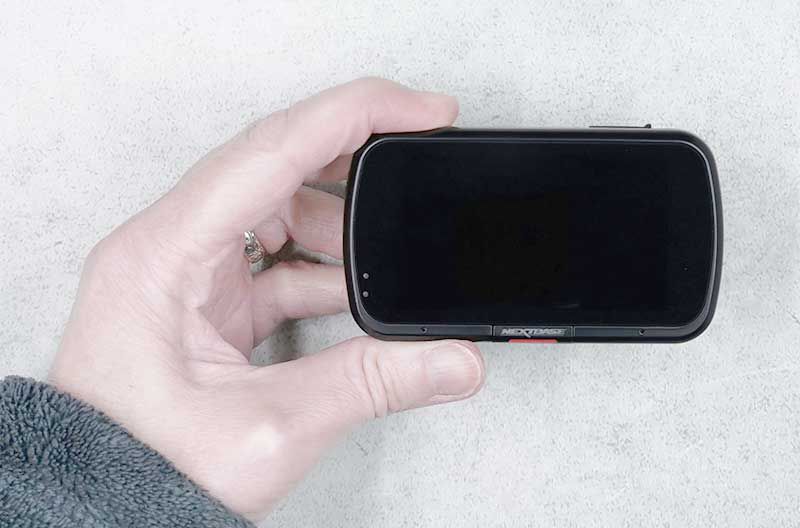
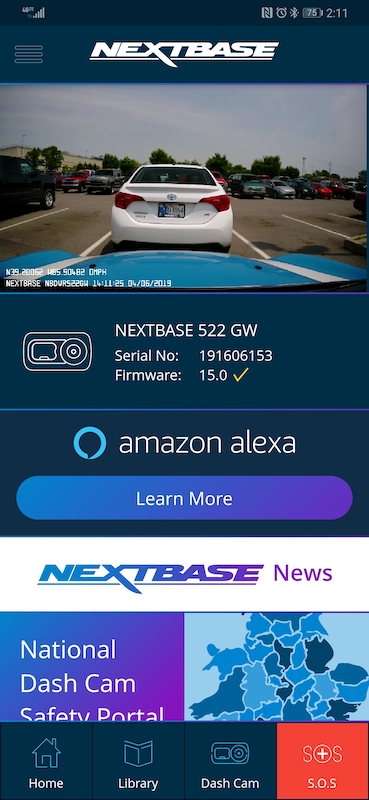
The back of the camera has a large color touch screen that you use to customize the settings. You can do this through the myNextbase Connect app as well. Since the settings configuration and even a live view of the camera can be accomplished through the MyNextbase app, a built-in screen really isn’t needed.
Below the display is a red button that you can press to make a separate video file containing 10 seconds prior to the button press and 20 seconds after the button press. This video file is saved to the Protected folder on the micro SD card.
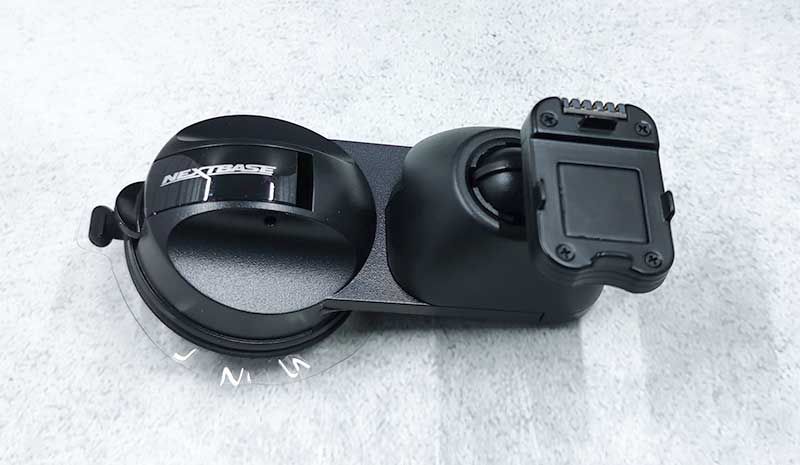
There’s a magnetic cover on the front of the camera that protects a connector for the included Click & Go GPS mount.
The Click & Go GPS mount is a windshield mount that uses 3M adhesive. But if you’re like me and prefer not to stick a strong adhesive directly to your windshield, you can remove the adhesive part of the Click & Go GPS mount and attach it to the included suction mount and use that instead.
The suction mount has a lever that makes it easy to stick and unstick the mount from the windshield.
Once installed on your windshield, the power cable can be routed and hid under the car’s headliner and plastic molding around the windshield using the included tool. This tool helps you wedge the cable under the plastic for a much neater installation.
The myNextbase Connect app
You don’t have to use the myNextbase Connect app with this dash cam, but doing so makes it easier to configure the camera’s settings and watch/download recordings without removing the microSD card from the camera.
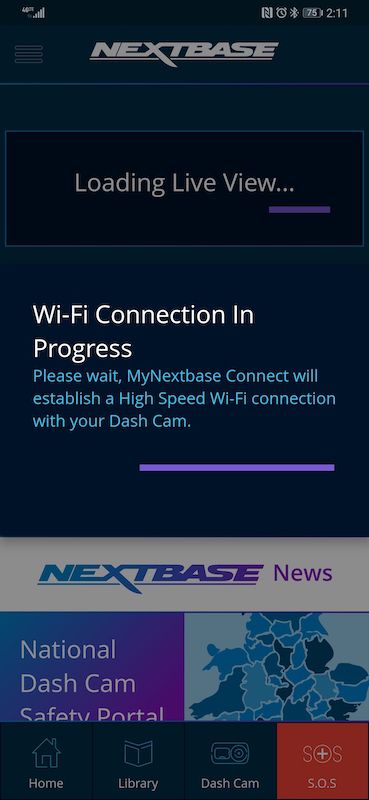
Setting up the app is relatively easy, but I did find it to be a little fiddly at times. For one thing, the app connects to the dash cam via WiFi and initiating that connection can be painfully slow. I also had issues configuring the Alexa feature. But more about that in a minute.
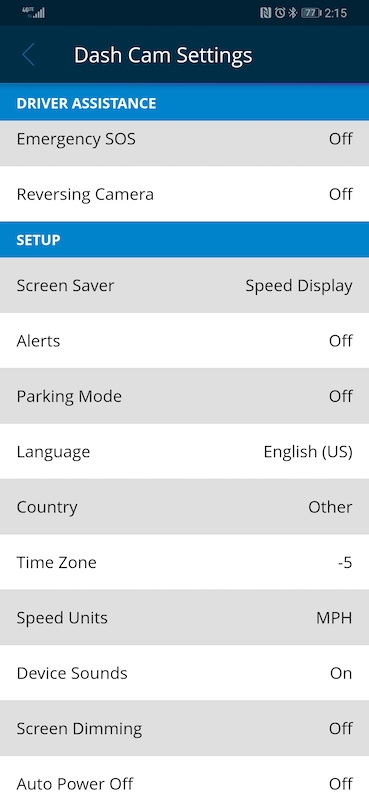
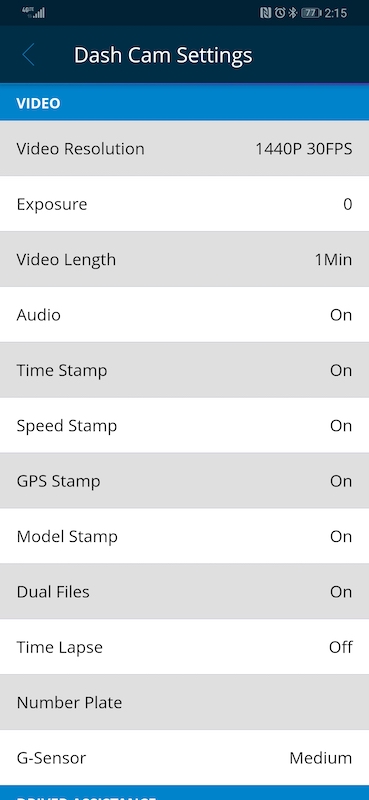
There are many settings that you can adjust and features that can be toggled. Some of these settings include:
You can also toggle the screensaver so that your speed is shown on the dash cam’s display instead of the live view.
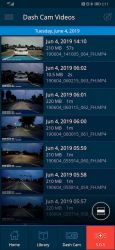
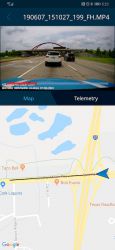
Accessing the video from the dash cam is easy with the app. I like that the Nextbase app collects speed, and GPS info so that it can show an animated map of your travels for each video clip.
Some of the other features of this dash cam include:
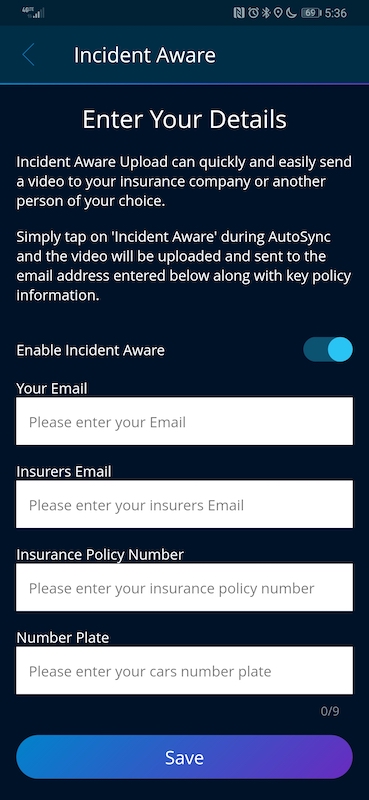
Intelligent Parking Mode (Incident Aware)
When this feature is enabled, it records any bump or physical movement on the vehicle when left unattended. Of course, this means that you’ll need to provide power to the camera at all times for it to work.
I didn’t crash my car on purpose to test this feature, but it was activated when I drove over a pothole and it saved a locked video that wouldn’t be overwritten.
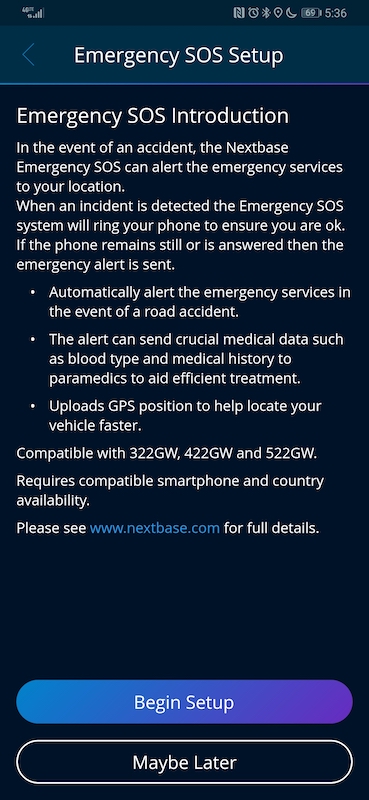
Emergency SOS
In the event of an accident where the driver is unresponsive, the Nextbase Emergency SOS feature can alert the emergency services of your location along with important medical details that you add to the app.
When an accident is detected, the Emergency SOS feature will do some checks before contacting emergency services. This includes calling your phone. If you answer it, it will cancel the action to contact emergency services.
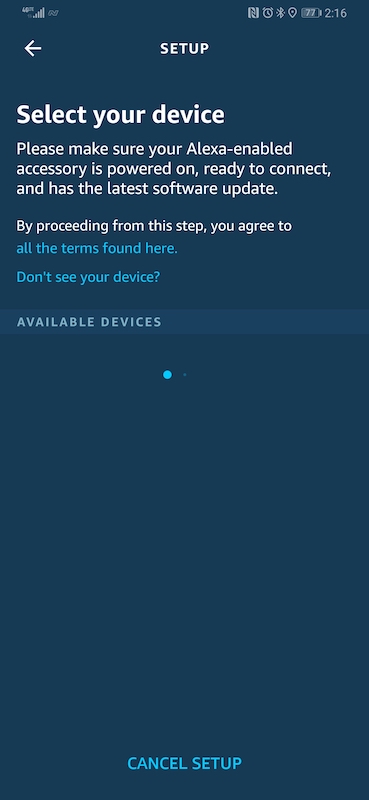
Alexa
The feature that I had the most trouble setting up was the Alexa feature. This feature requires that you also install the Alexa app on your phone and have it running when you want to use this feature. My first attempt configuring Alexa with the 522GW Nextbase dash cam wasn’t successful and I ended up having to uninstall the MyNextbase Connect app, the Alexa app, and the Bluetooth pairing with the dash cam on my phone. Then I had to reinstall and reconfigure everything. Doing all of this was successful but it only allowed me to test the Alexa feature for one test drive. The next time I tried it, it wouldn’t work again and I refused to uninstall everything for a 2nd time to try to get it working.
I questioned the people at Nextbase as to why an Alexa feature would even be necessary or desirable when you could just use the Alexa app on your phone and be done with it. This was the response that I received.
Here is why you would want Alexa in the Dash Cam rather than just on your phone:
1 – The Nextbase Dash Cam has two inbuilt microphones specifically tuned to pick up speech in a car – making the recognition of your voice commands significantly better than through a single microphone on a phone. Having 2 very sensitive microphones near your head is very beneficial to voice recognition.
2- In order to make Alexa work on a phone you need to “press” the Alexa symbol on the phone to activate it. With the Dash Cam you don’t need to touch the screen
3- As the dash cam is connected to your phone, you will shortly be able to “control” the dash cam with commands like “take a photo” or “lock that video” – using an upcoming Nextbase dash cam “Skill”. This will soon give handsfree control of the dash cam.
4- You can have you phone in a bag/pocket and still control Alexa – to then play music through your car speakers etc
If you notice their third reason, it states that the Nextbase skill is not yet available. So at this time, you can only use the feature for other Alexa commands like asking about the weather, playing music, etc. It’s also important to know that the audio from Alexa comes from your phone and not the dash cam. So yeah, I really don’t see the point.
Video quality
Let’s see some video clips from the Nextbase 522GW dash cam.
If you don’t want all the info at the bottom of each video, you can toggle off the various stamps like time, GPS, and speed.
Desktop app
Nextbase also offers a desktop app for Windows and Mac that will let you load the videos from the micro SD card to see the same info that you can see when you watch them through the mobile app.
What I like
Built-in GPS
Expansion capability for rear cameras
Trip info in app
Mounting options
What I’d change
Lower the price
Improve connection speed between app and camera
Implement Alexa skills
Fix Alexa connectivity problems
Final thoughts
The Nextbase 522GW is a nice dash cam and it worked well for me except for the Alexa feature and slow WiFi connection. The camera has good video quality in day time and night time. I do think it’s a little overpriced though as I’ve seen other 2K dash cams with GPS capability and G-Sensor features for less than $200.
Price: $259.99 Where to buy: Nextbase Source: The sample for this review was provided by Nextbase.
Note: If you are subscribed to this feed through FeedBurner, please switch to our native feed URL http://the-gadgeteer.com/feed/ in order to ensure continuous delivery.
REVIEW – I’ve reviewed quite a few different dash cams in the past. When the Nonda Smart Dash Cam review came along I saw that it was quite a bit different in form factor and jumped at the opportunity to review something a little different – and different it was!
What is it?
The Nonda Smart Dash Cam is a screenless dash cam. It records on its own, but you use your smartphone to configure its settings and, if desired, view the video.
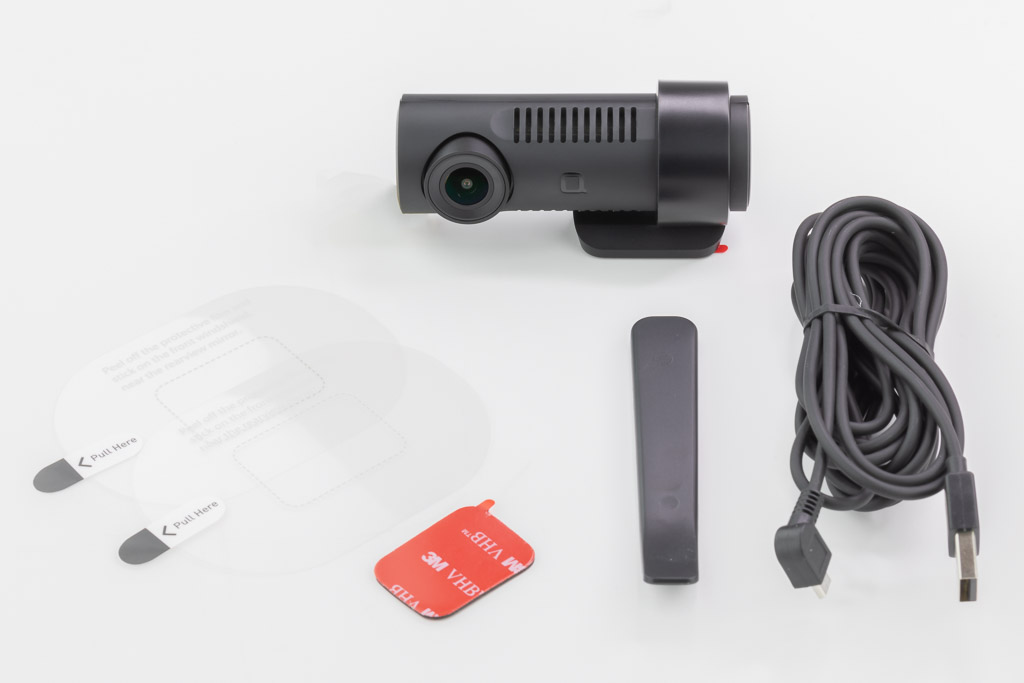
What’s in the box?
List contents – you can remove this heading and section if it doesn’t apply to your review.
Dash cam
Micro-USB power cord, but no power adapter
Window mount film (2)
Extra mounting tape
Removal tool
Setup
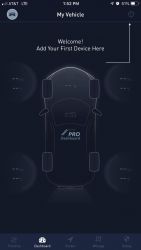
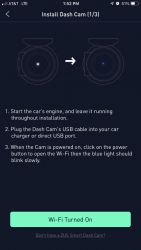
First, you install and start the ZUS app. After six intro screens that advertise features, you’re brought to a screen that prompts you to sign in. You must either sign in with Facebook or create an account with an e-mail address.
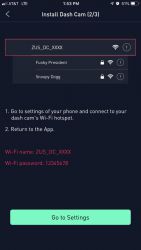
Next, you have to add the camera to the app. After signing in you have to press the button on the camera once to turn on Wi-Fi mode. Then in your phone settings connect your phone Wi-Fi to the camera. Once connected you can add a device.
Design and features
The Nonda Smart Dash Cam has a design that is unlike most other dash cams in several ways. This unusual design has both benefits and drawbacks.
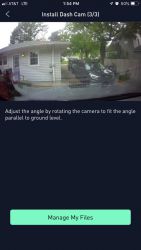
First, its mounting method is different in that instead of a suction cup and ball swivel mount, it uses a small window cling and a tape mount. The cylindrical body can rotate allowing vertical view adjustment, but there is no horizontal adjustment.
This mounting method provides a very sturdy mount but lacks the adjustability that some people may like. It also limits the mounting location to the area in the center of the window, near the rear-view mirror in order for the camera to point directly forward. The sturdy mount most likely won’t move during an impact like many of the ball type mounts can.
Secondly, the screenless design means that to make any changes to the settings you must first start the Wi-Fi mode, connect your phone’s Wi-Fi to the camera, then start the Nonda app. Once the app is connected, you tap “Dashboard” then select the camera which will show you the recorded clips. Once on that screen, you can access the camera settings.
There are a couple of benefits to this design that I could think of. 1) If you have teen drivers, they don’t have access to erase videos. 2) There’s no screen to distract you or others.
As for buttons and lights, there’s one button with an LED light in it. Pressing the button once turns on Wi-Fi mode, which is indicated by the LED blinking. It’s worthy to note that while in Wi-Fi mode that camera does not record, so you can’t just use your phone as a screen for that camera while driving. I did find the LED status light a but hard to see in the daytime, I would prefer it to be a little brighter.
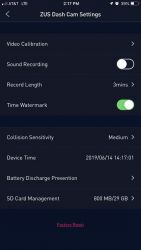
The camera itself has a 140-degree view and records in 1080p. It has auto collision detection to automatically save files in the event of an impact. An SD card is not included. The camera settings include the ability to turn on and off sound recording (default is off), record length, time watermark, collision sensitivity, device date/time, battery discharge prevention, and SD card management.
The app for the Nonda Smart Dash Cam is called “ZUS Smart Driving Assistant” that connects to the camera and other optional Nonda smart devices for your car such as a backup camera, tire pressure monitors, vehicle health monitor, and more. The app is designed to work with those other devices, so the dash cam is not the primary focus of the app, making the viewing of video or getting to the camera settings a multi-step process. Without the other devices, you’ll tap something only to be presented with information about buying or connecting the other device.
The app opens to a “Timeline” view, which is basically a blog for Nonda’s website and ads for their stuff. This is quite annoying as I would rather have it open to the “Dashboard view” where it shows all of your devices. Once there you can tap on the dashcam to access the video and settings.
The app has a “Finder” feature that is supposed to locate your car, but when tapped it only prompts me to “Add a ZUS smart Device” – which I thought the dash cam was, but when I tap “Add a ZUS smart Device” it just takes me to the vehicle settings, which lists the devices, including the camera, but does not allow you to select one. The “Mileage” and “Safety” features work the same way, but the Safety feature is understandable because it requires a separate device. I contacted Nonda Customer Care via their in-app contact feature. Not only did they respond on a Sunday, but they also did so in about 20 minutes. Their response was: “The Finder feature will only work with the ZUS charger or ZUS smart vehicle monitor… The Smart Dash Cam is only a camera and does not have any other functions on the ZUS App.” – Well, so much for it being a “Smart Dash Cam”.
The app also notified me of a firmware update for the camera. The process to upgrade the camera firmware through the app was easy and had great instructions during the process.
There are a bunch of settings in the app for your vehicle information, however, these aren’t used for anything unless you install one of the other smart devices such as the Smart Vehicle Health Monitor.
Sample Video
The video from the Nonda Smart Dash Cam is as expected, a high-quality 1920×1080 video. The camera also saves a 640×360 version of the video, presumably to make smartphone playback quicker and/or easier to share.
What I like
Sturdy design
Large lens
Hides well behind the rear-view mirror
What I’d change
You shouldn’t have to create an account to use a dash cam
The app leaves you feeling like they’re just trying to sell you more stuff
There’s no way to manually save a recording from being overwritten
Better LED status light
Final thoughts
Although I could see this camera appealing to certain persons, I personally prefer a camera with a screen. It does not have the features of many other dashcams such as photo taking ability, or the ability to do a time-lapse video or monitor while the vehicle is parked. I also prefer the adjustability of the suction cup mounts. I think if you added the smart charger the app would feel much more useful with its parking monitoring and mileage log.
Price: $99.00 Where to buy: Nonda and Amazon Source: The sample of this product was provided by Nonda.
Note: If you are subscribed to this feed through FeedBurner, please switch to our native feed URL http://the-gadgeteer.com/feed/ in order to ensure continuous delivery.

 .
.