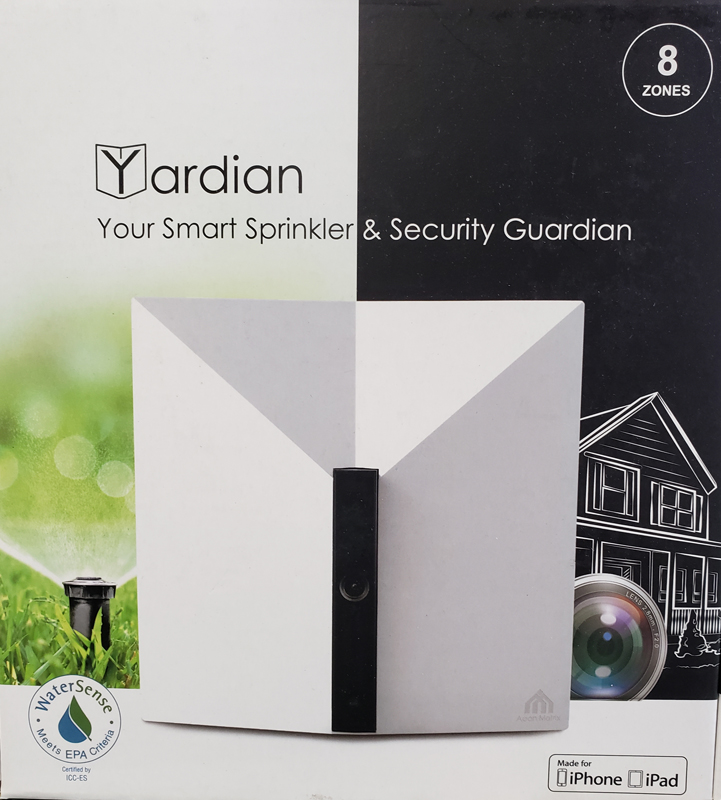
REVIEW – Watering the lawn. A mundane task, dragging around hoses and sprinklers and remembering (or forgetting) to turn them off. Or, you can go with a sprinkler system, typically controlled by a simple timer where you select days to water, and how long to water each zone. But, what happens when the weather changes? You have to remember to turn the system on or off, or adjust times based on how dry it is. Aeon Matrix wants to help, with the Yardian. Yardian calls itself, “Your Smart Sprinkler & Security Guardian”.
What is it?
Yardian is a smart sprinkler controller. It can start and stop your sprinkler zones on your schedule, or, its own “smart schedule” based on your soil type, geographic location, and weather. In addition, it has a built-in HD camera – more on that later. Let’s see how well Yardian handles the two roles.
What’s in the box?
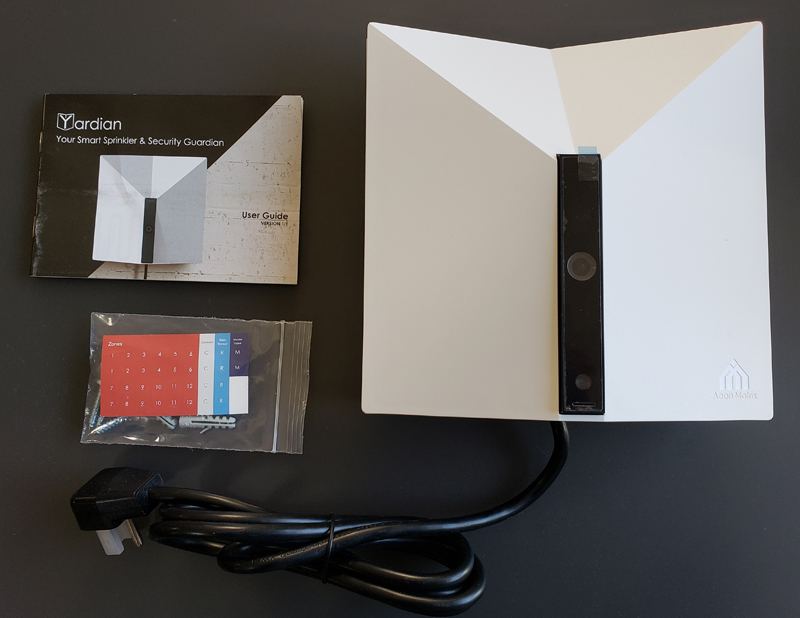
- Yardian controller with integrated power cord
- Bag with wire labels, and drywall anchors
- User guide
The box itself is printed with a quick start guide inside the top of the box.
Hardware specs
Sprinkler controller
- 8-zone or 12-zone (I was sent the 8-zone)
- AC powered
- Support for a rain sensor
- Support for a master valve
- WiFi certified
- Wet location safe (can be installed outside)
- WaterSense certified
Security camera
- 720p HD
- 1/4” CMOS sensor
- 130-degree field of view
- Night vision
- Light sensor
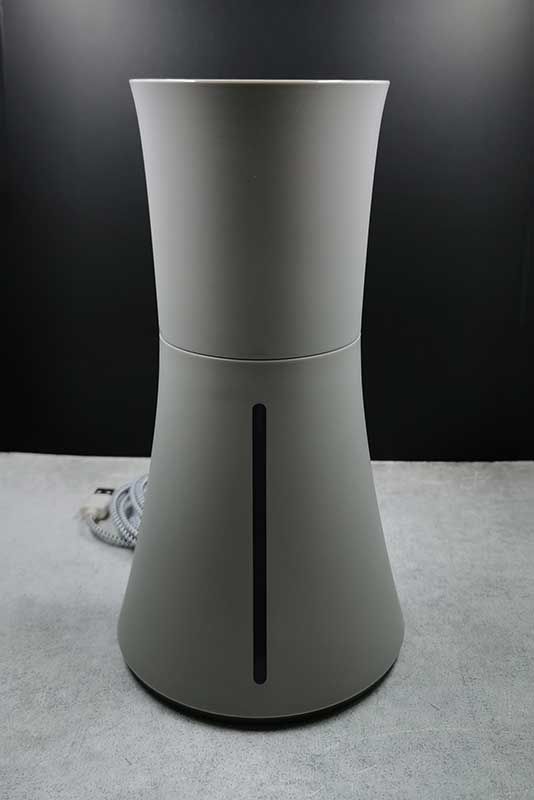
Design and features
The Yardian is a stylish looking unit. There are no controls on the device itself. All sprinkler control is done via the free app available for Android and IOS.
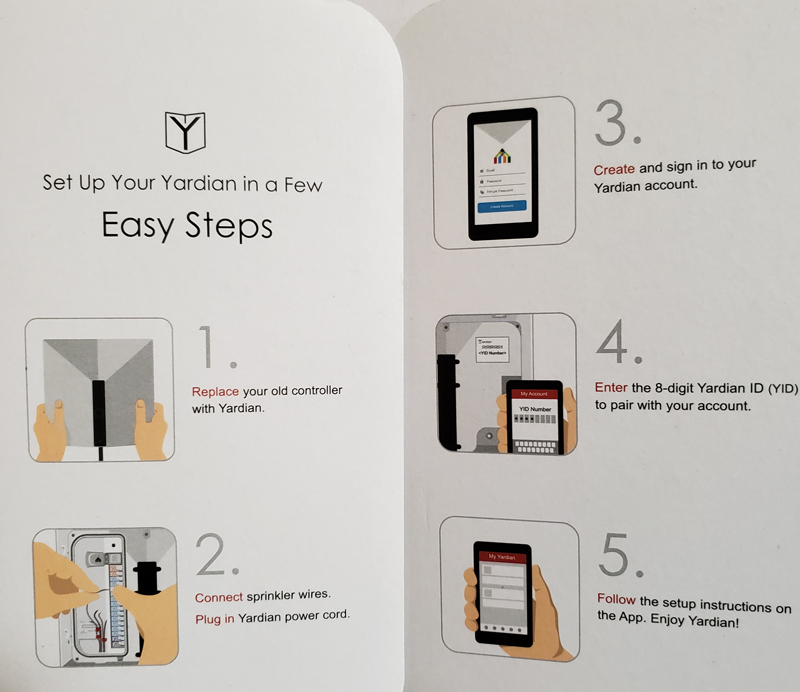
Setup
Setup was fairly simple, with one hiccup.
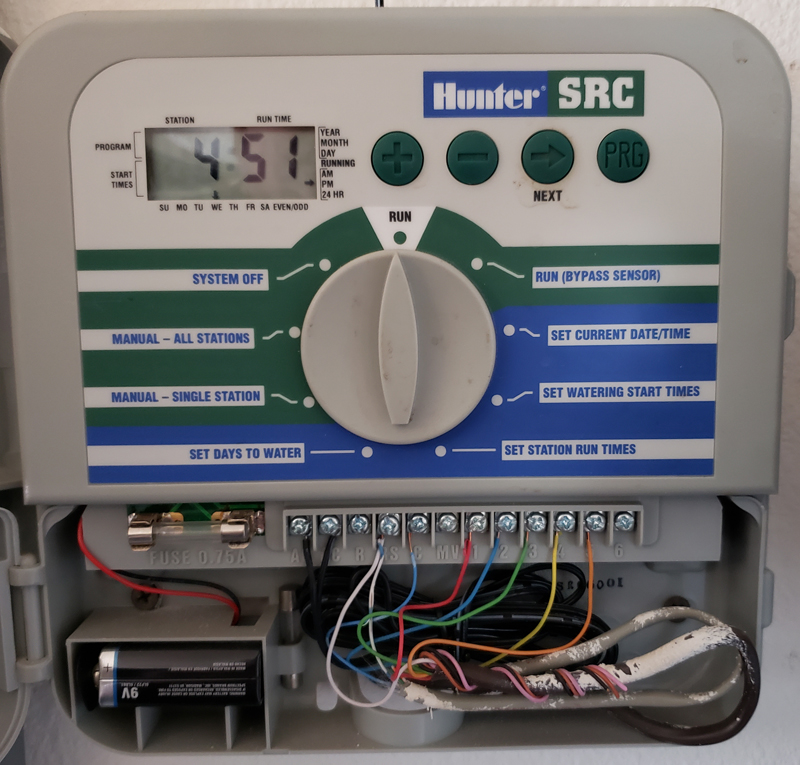
I started by photographing my existing controller. I did this mainly to document what wires went where.
I then applied the supplied wire labels which were coded for zone numbers, rain sensor, and common wire.

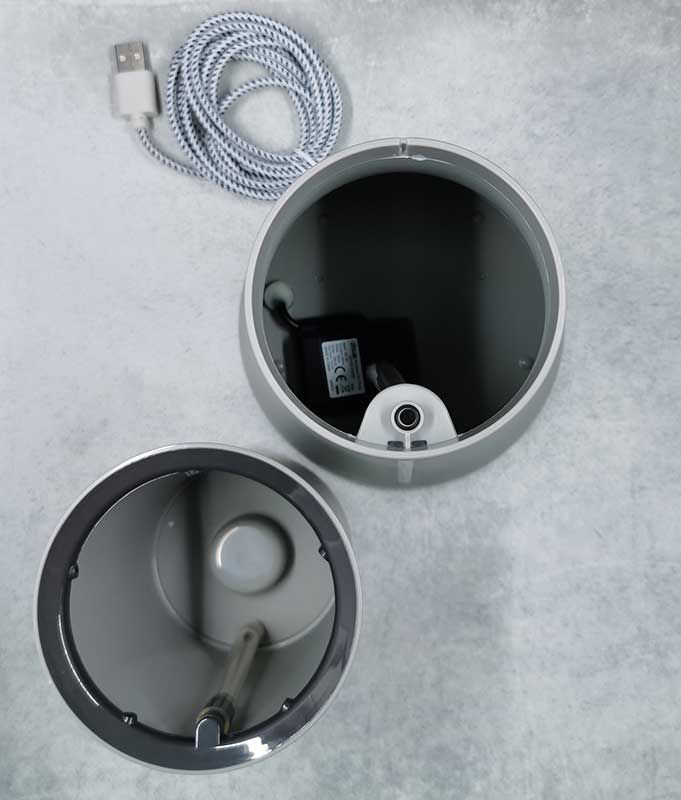
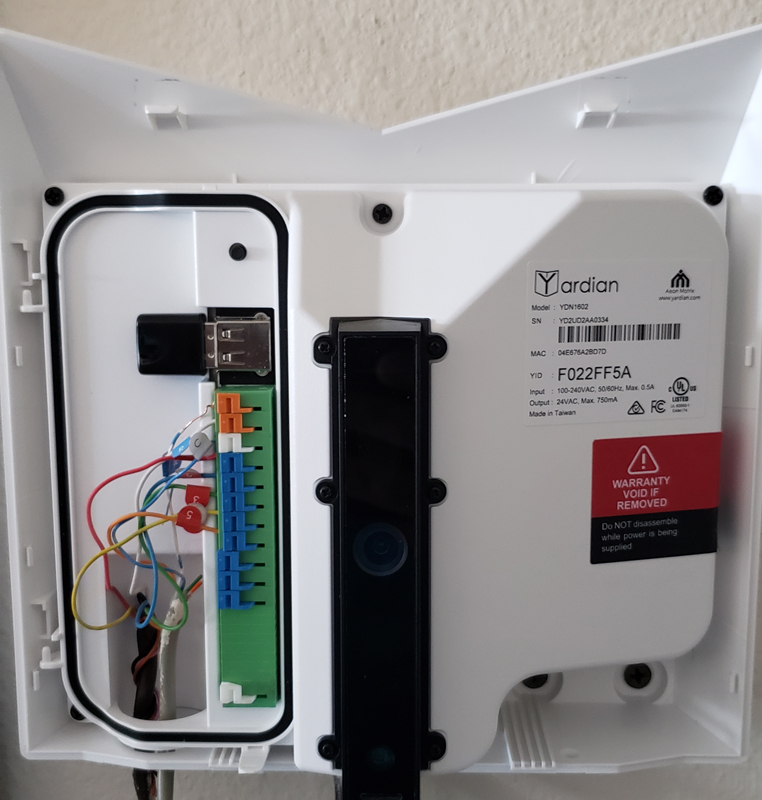
Snapping off the decorative cover of the Yardian here’s what you see:
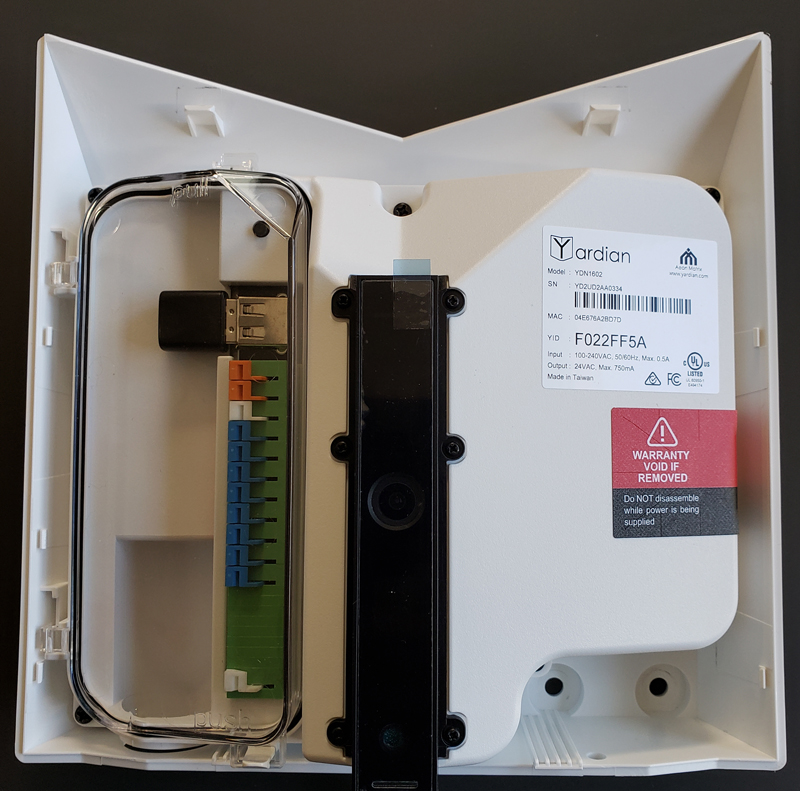
On the left is the wiring block. It is enclosed under an o-ring sealed, weatherproof cover. The Yardian can be installed outside, which is important if you want to use the pest repel feature of the camera. The wiring block uses simple pinch-style connectors. You pull back the colored tab, insert the wire, and release the tab to pinch the wire in place, making the electrical connection, They are color coded with orange for the rain sensor, white for the common wire and blue for the zone wires.
Right above the wiring block is what looks like a thumb drive. It is actually the supplied WiFi dongle. Right above the dongle is the button for WiFi reset and factory reset.
On the right side, we find a label with the eight-character Yardian ID that is used during the setup.
After removing the old controller, mount the Yardian on the wall and connect the wires. Once done, plug in the Yardian and wait for the status light (which is at the top of the black bar) to flash green. This indicates that you are ready to pair the Yardian.
At this point, you need the Yardian app. I installed from the Google Play store and set up my Yardian account in the app. The app asks to find your location, or you can provide your zip code and city. It then shows you potential water suppliers and you choose the appropriate one. The app also will provide info on local water restrictions. This is a great feature to help keep you in compliance if your community restricts water use.
Clicking on “pair” in the app gets the setup process underway. This is where you enter the Yardian ID from the sticker to pair the controller to your account. Once paired, the status light will blink blue/green, indicating you are ready onboard the Yardian to your WiFi. This is also where I ran into the hiccup.
First, the disclaimer: I don’t have standard WiFi. I use an Eero mesh WiFi router with three access points. It appears that might have caused the issue as all three of my access points were in play during the onboarding. Theoretically, this should not cause any issues, however, I was never able to get the Yardian to onboard to my WiFi.
A quick trip to the Yardian support site yielded an alternative method to onboard via a USB drive:
- Create a text file with the name “yardian_cmd.json” using any editor on a PC
- Copy the following line to the file:
{“event”:”AE_NET_SETAPINFO”,”sSsid”:”XXXXX”,”sPassword”:”YYYYY”}
where XXXXX is replaced with the SSID of the WiFI network
and YYYYY is replaced with the WiFi password
- With the status LED blinking green/blue, replace the WiFi dongle with the USB drive
- When the LED turns purple, unplug the Yardian, replace the WiFi dongle and plug back in
- Wait for the green LED to go from blinking (searching for network) to solid green (online)
I did all this and ta-da – I was in business. The Yardian was online and available in the app.
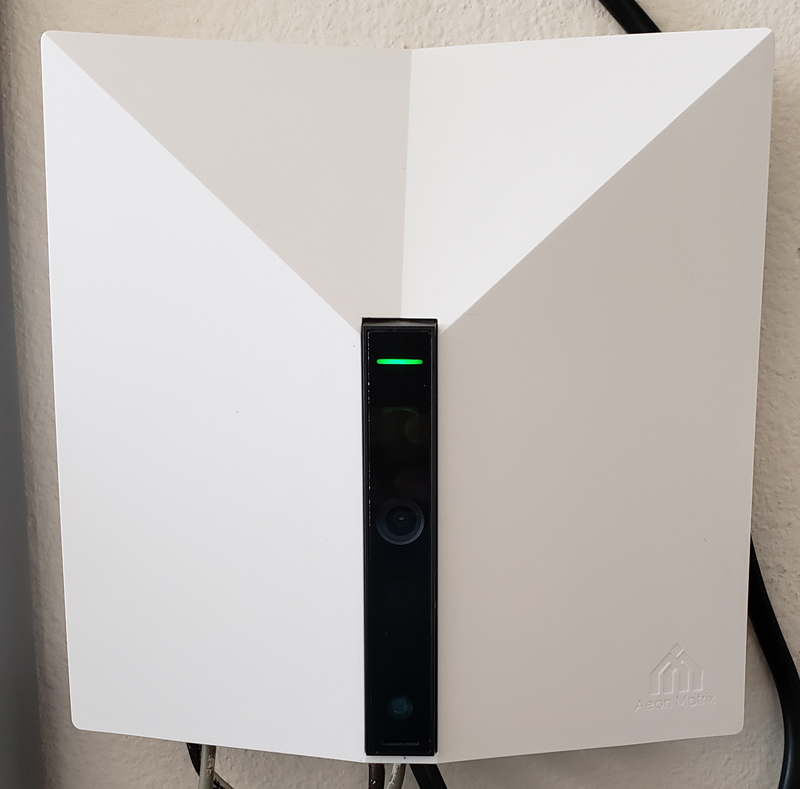
I popped the cover back on and was ready to test. Also, you can see the green status LED here, indicating that the Yardian is online and ready to water.
Performance
The app
A quick note on the app – updates appear to happen in-app. Right after installation, when I ran the app, it said it needed to update and then proceeded to download and install its own update. About a week later, the same thing happened. Rather than use the Play Store or iTunes to handle the updates, the app handles them internally. The issue is that when there is an update in the app store, there generally is some indication of what the update contains. In this case, I got an update a week into testing, but I have no idea what got updated. Then, after about a week, I did receive a Play Store app update for Yardian. It only said “bug fix”, so I don’t really know what changed.
Sprinkler controller
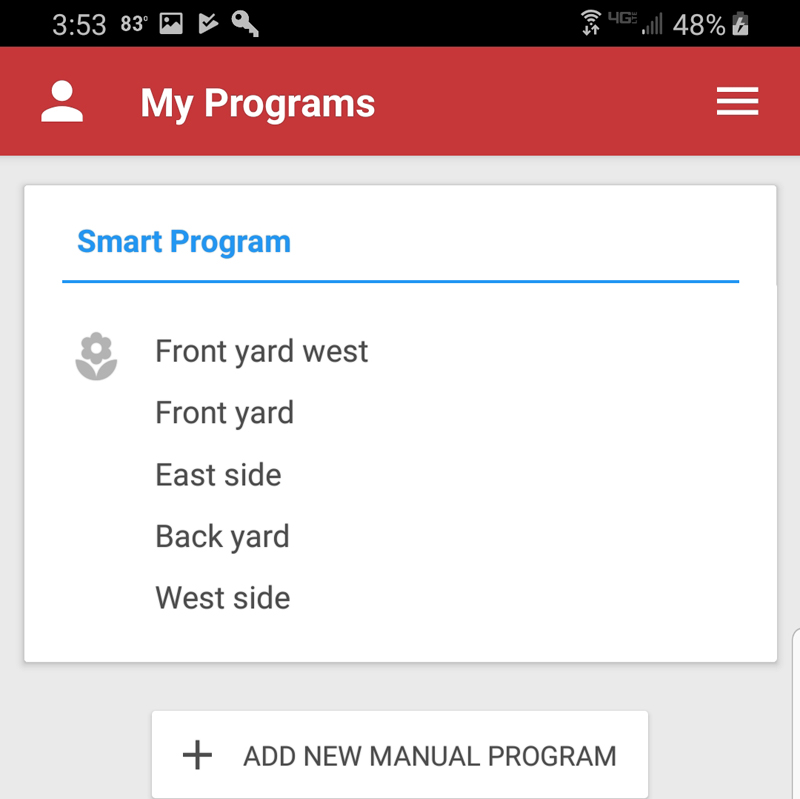
I started setting up my five zones.
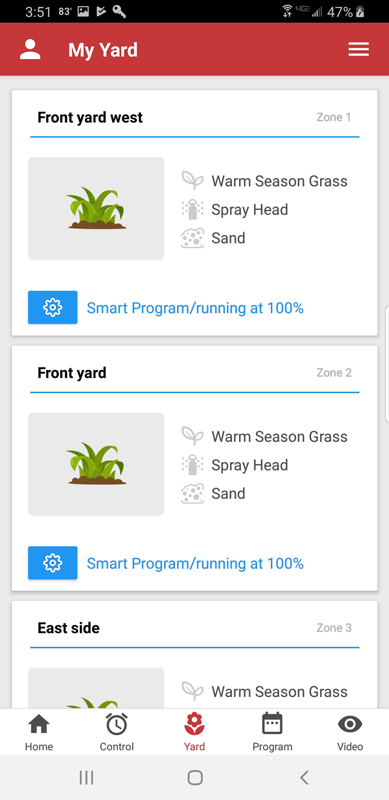
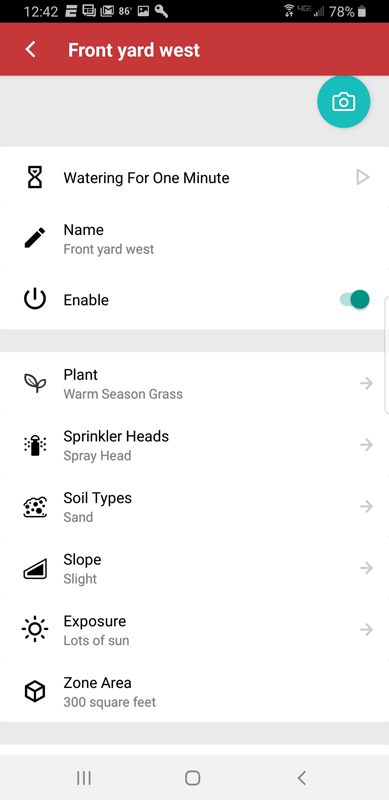
You get to define the type of soil, relative slope of the zone, amount of sun the zone receives daily, square footage, and the type of grass or plants in the zone. This helps Yardian to determine how much to water each zone. You can even add a photo of the area if that helps identify the area.
At the top is a button to water for one minute to help you identify each zone. This is where I ran into hiccup #2, although this was in no way, the Yardian’s fault.
I clicked the button with anticipation of seeing my sprinklers come alive. But they didn’t. Long story short, my old controller had an odd requirement for the rain sensor, requiring one of the two wires to actually go to the common port, and the common wire went to the rain sensor port. Once I figured that out and changed the wires on the Yardian, all was good and the sprinklers came alive. All five zones came on and turned off on command.
The Yardian is supposed to have the ability to automatically scan your system and enable zones automatically. I manually enabled my five zones, so I can’t comment on how effective that is. Since you have to visit each zone to set it up, enabling it at the same time really isn’t a bother.
After the zones are enabled and you verify their operation, you can set up an automatic “smart” watering schedule and manual schedules. Each zone can only be part of one schedule.
Since part of the attraction of the Yardian is its smart features, I opted for the smart schedule for all zones.
The smart programming takes into account recent watering amounts, the information you provided about each zone, including soil type, amount of sun, slope and such, as well as local weather events and forecasts. The Yardian makes decisions every day about how much to water based on all these inputs.
In addition, you can set up skip rules to prevent watering under certain conditions.
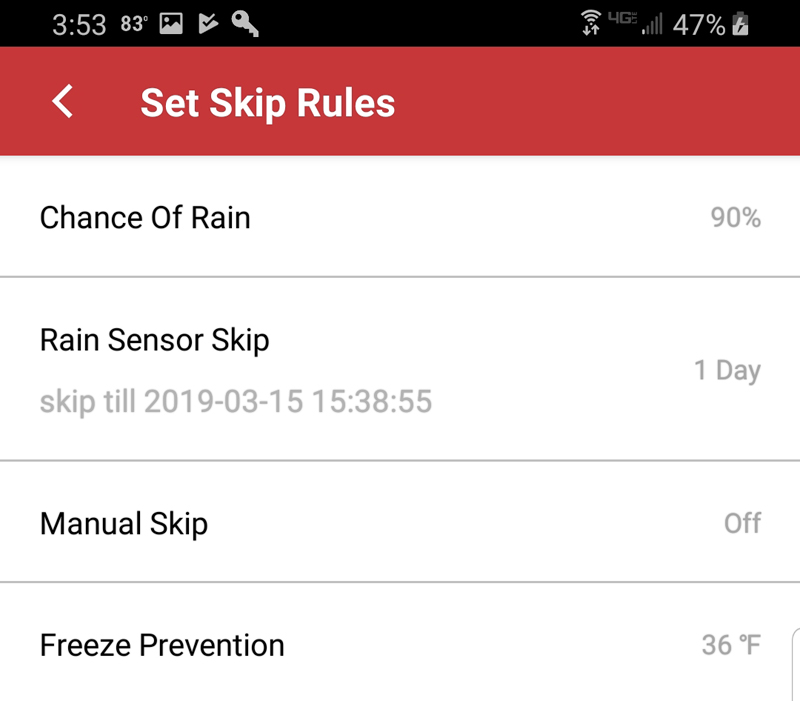
You can manually skip a day, or automatically skip if the temperature goes below your defined temperature, if your rain sensor detects rain or if the forecasted chance of rain exceeds the value you provide.
You can also have the Yardian adjust watering based on any local watering restrictions you may have. These are automatically applied by the app, based on your local rules. The Yardian maintains a database of all local watering restrictions.
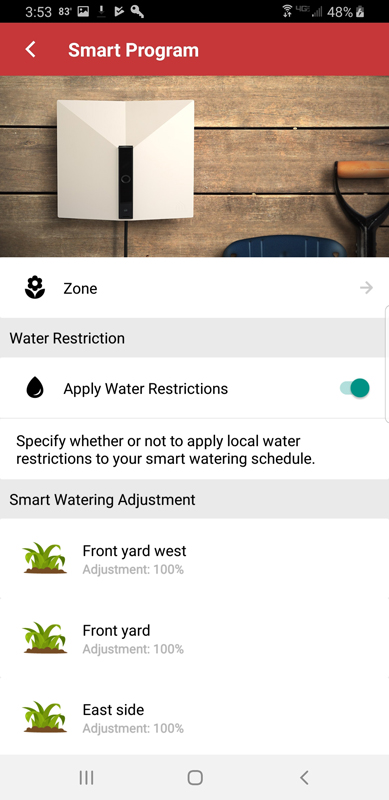
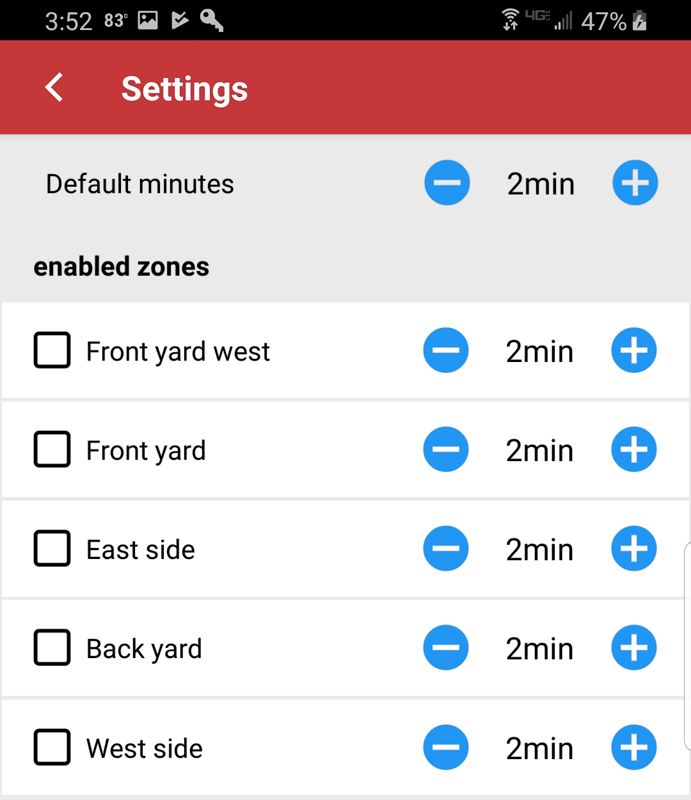
Each zone can be further customized by adjusting the percentage of water the Yardian will apply. This can be beneficial if you replant an area and want to provide additional water. Each zone can be adjusted from 10% to 160% of the smart program calculated amount. You can also define smart watering time windows so the Yardian won’t soak your backyard picnic.
If you elect to bypass all the smart features, the Yardian can be used like a regular sprinkler timer, where you schedule each zone manually with start times and durations. You can still benefit from Yardian’s smarts, however, by providing a seasonal adjustment to water more in hot, dry months and less in cool, moist months.
One frustration with the weather features is that there is no indication where the weather comes from. Without knowing the exact source of the weather, I have no idea if the weather is actually what I’m seeing out my window. I live in a large ZIP code and many times it’s raining like crazy at the south end of the ZIP code and we get nothing up here at the north end of our ZIP code. It would be nice if they could tell you what the source of the weather was or use something like Weather Underground to let you assign a specific local weather station. I have an AcuRite weather station in my backyard that reports on Weather Underground and that would be perfect. I contacted Yardian support about that. They told me that their current weather source is Aeris Weather, a commercial weather provider. It uses automated airport weather reports closest to your ZIP code. They told me that my weather was coming from Inverness Airport, about 22 miles from my house. That’s not very close, and if you know central Florida weather, the weather can be very different only a mile away, let alone 22. They did state that they are working on an update to be able to use Weather Underground stations and they will update me when that happens. I can say that their support team was very responsive, even on the weekend.
Yardian works with Alexa and IFTTT. After installing the Yardian skill in the Amazon Android app, I was able to control the Yardian with commands like:
“Alexa, ask Yardian to water zone 1 for 2 minutes.”
“Alexa, ask Yardian to stop watering.”
The IFTTT functions are limited to:
- Record Yardian water history in Google Sheets
- IF I press a Button widget, THEN start a zone
- IF a watering event is executed, THEN send an email to me
- IF a watering event is executed, THEN receive a notification and a Gmail message
- Start a zone by a Google Calendar event
- Start a zone at the time you wish
- Get an email when Aeon Matrix publishes a new trigger or action
- Get an email when a new Aeon Matrix Applet is published
Finally, you can control zones the old fashioned manually way via the Yardian app.
You pick the zone(s) you want to run and the time for each and then you can start them on demand.
After you get everything configured, the app gives you a snapshot of what’s happening.
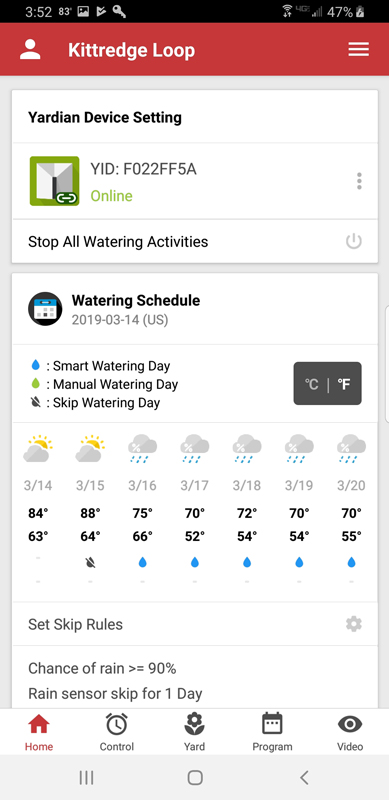
The watering schedule shows a blue drop on smart program days, green on manual days and a black slashed drop on days with no watering scheduled.
There is a messages section that breaks down individual zone starts and stops, so you don’t have to go check each zone individually.
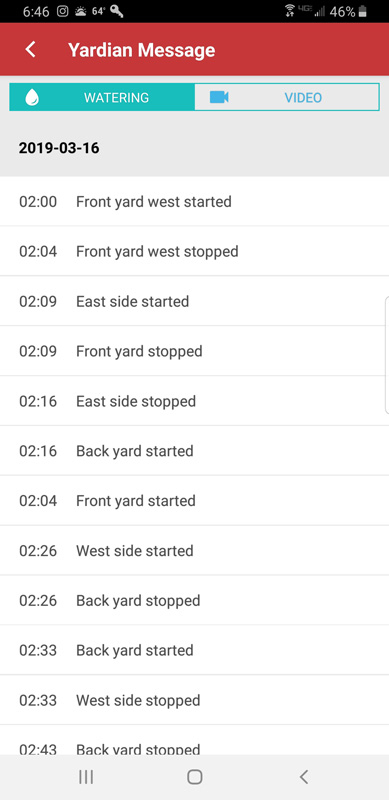
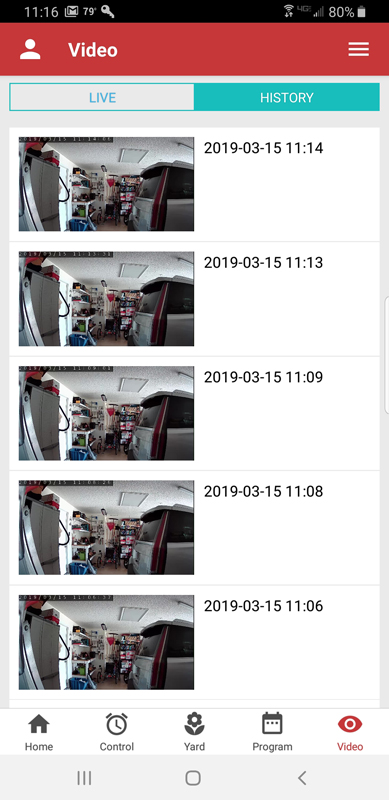
But…the messages, while separated by date, aren’t sorted in any discernable order. They aren’t sorted by time nor are they sorted by zone. So, this isn’t as useful as it could be. The same is true for the camera messages on the video tab.
Finally, the app shows you a two-week view of water usage. The app doesn’t say how it determines how many gallons are used. I assume it is based on how big you tell the app the zone is, combined with the type of sprinkler heads you tell the app are installed in this zone. In my case, my zones have mixed types of heads, geared heads mixed with spray heads, and they both put out water at different rates. It isn’t an ideal setup, but that’s the way it was when we bought the house. I won’t count on the gallon volume to be accurate, but it will show me the relative difference in water use.

As you can see, the Yardian hasn’t watered for a week. We aren’t in the growing season here in central Florida, so this is pretty typical. We generally only water once a week or so, less if like now, we’re in a bit of a cold snap with temps in the 70s and 40s to 50s at night.
After a few more days of no watering, I contacted Yardian support. Again, I have to compliment them for their fast response. I never waited more than a couple hours for a return message. Pretty impressive.
It seems that they have been having issues getting correct data from their weather provider, for some ZIP codes, including mine. Per Yardian:
We have implemented a fixed [sic] on your zip code.
We have reset your water level so your schedule looks good now.
The problem is, when Aeris failed to deliver completed weather data (for example, moisture data is missing) to calculate the ET (evapotranspiration), we won’t know what’s the “right” data to use.
After that, Yardian finally watered, however, only on two of my five zones, and only a little bit.
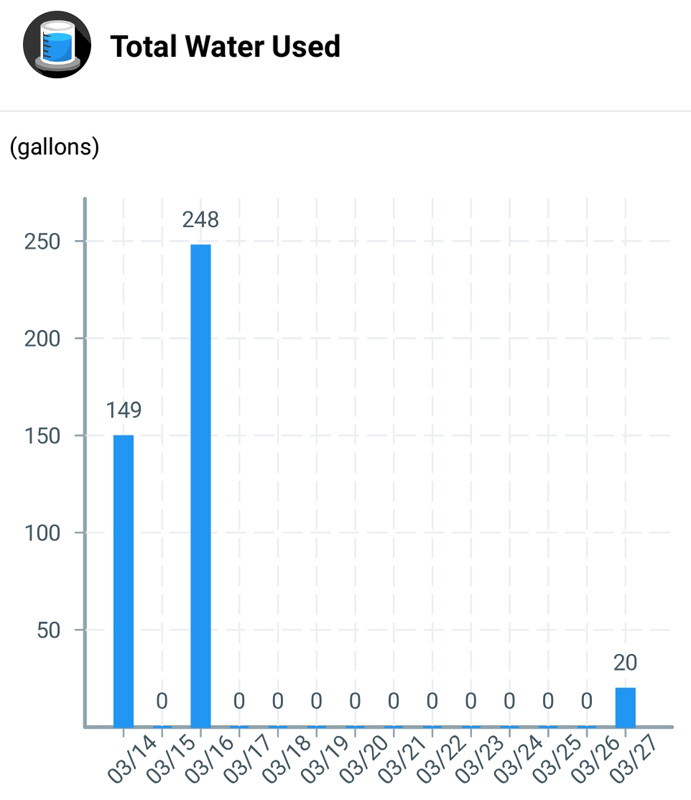
On the plus side, we got a bunch of rain after that, for the first time in more than a week. Yardian provided a notification, and a message indicating that my rain sensor tripped, and will suspend watering for a day. At least this means I wired the rain sensor correctly!

Yardian seems to be on the right track fixing their weather reporting, at least for my ZIP code. They report that they are adding support for personal weather stations, so time will tell if that ultimately solves the weather reporting problem.
HD camera
The idea of adding a camera to a sprinkler controller seemed like an odd combo to me. But, having a security camera in the garage isn’t really a bad idea.
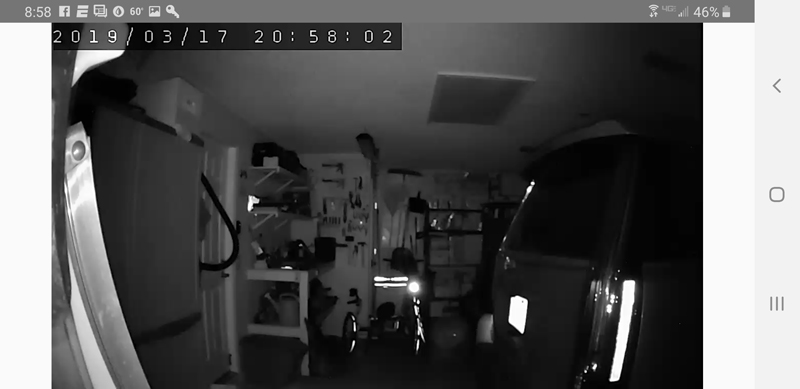
The camera produces 720p HD video that overall, looks pretty good.
The camera also has a night vision mode that produces acceptable video.
By default, the Yardian does peer to peer live video streaming, avoiding storage altogether and streaming directly to your device. But, that’s only live video. If you want to view historic video, you have to choose video cloud recording. Video clips are stored free for 24 hours and are viewable and downloadable via the Yardian app. Well, they are supposed to be downloadable per the documentation.
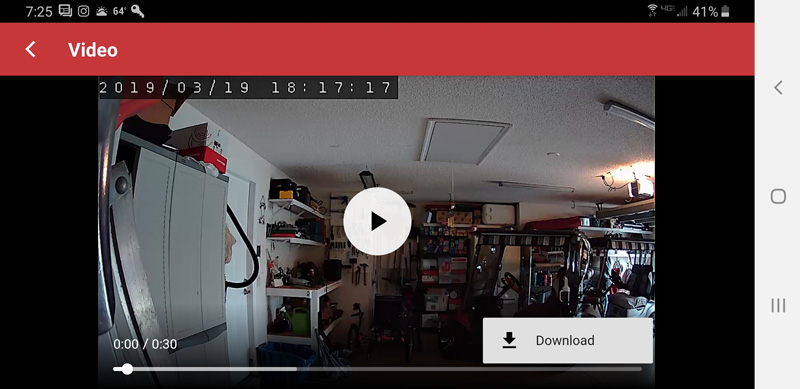
I tried to download multiple videos to use in this review. I clicked the triple-dot icon on the video screen and it brought up a download button. That button did exactly nothing. No files were downloaded to my phone. So, this feature appears to be a work-in-progress.
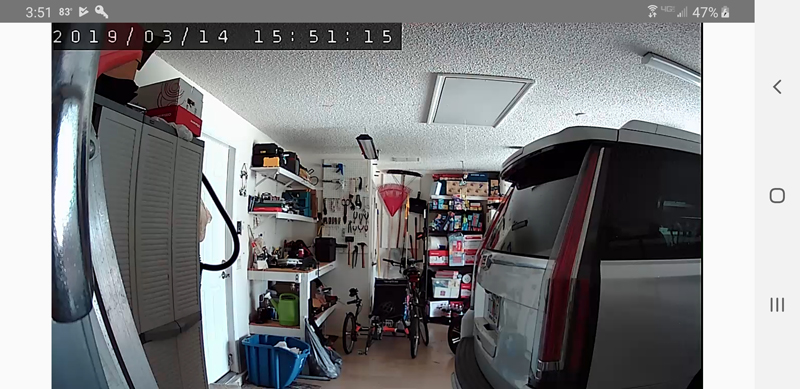
The Yardian is weatherproof, so it can be installed outside. This means the camera could watch a potentially interesting area, like an entry door or, a garden. The Yardian has a pest deterrent feature, where motion detected on the camera can activate a single zone for a set period of time. Setting up the Yardian to watch your garden and setting that zone as the deterrent zone could help scare the critters away from your fresh produce. At least in theory.
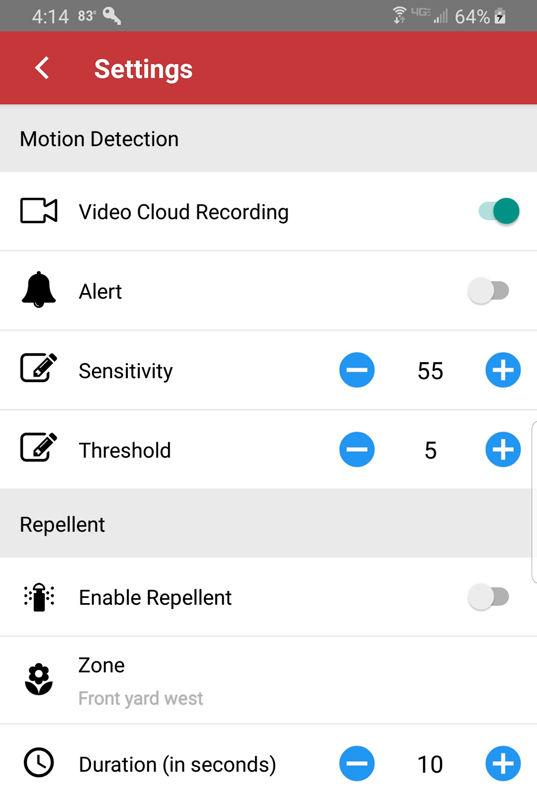
It’s actually a great idea, but how it is implemented seems more like an afterthought. I have the Yardian installed in my garage. Part of the camera setup includes changing settings for sensitivity and threshold, along with app notifications and whether you want to send the videos to Aeon Matrix’s free cloud storage.
This is where the “more on that later” comes in. No matter how I set the threshold and sensitivity, I could not get the camera to work as I expected. It would either not trigger, trigger essentially continuously, or trigger after something moved by the camera, recording too late to actually see what triggered the recording.
I went to Aeon Matrix’s support site for guidance setting the parameters, since I obviously couldn’t figure it out.
Here’s what the site says:
The “Sensitivity” and “Threshold” settings determine what will be registered as “motion” from Yardian’s camera. You can customize your settings to your preference.
“Sensitivity” – Lower sensitivity levels require more activities to trigger an event in motion detection.
“Threshold” – The higher the threshold, the larger the object required to trigger an event in motion detection.
Please remember to save the settings if you make any changes.
Note: currently Yardian camera would detect light changes as motion. We are working on a smarter solution to reduce false alarms. In the meantime, please set sensitivity lower (~10) and threshold higher (~80) to reduce false alarm.
It appears that the camera, especially the triggering of the camera, is still a work in progress. Bottom line is that I simply could never get the camera to work properly. In my garage, with absolutely nothing moving, it would still trigger more or less continuously, recording a whole bunch of nothing. Or, it would trigger after motion, missing the catalyst and recording…a whole bunch of nothing.
Based on this, I would be hard-pressed to recommend using the pest repellent feature, as you would likely cover that zone in tons of water, scaring away shadows. And its value as a security camera is questionable until they update their triggering logic to work on something other than lighting changes.
What I like
- WaterSense certified – may be eligible for a water savings rebate
- Aesthetically pleasing design
- Easy wiring
- Easy app setup
- Comprehensive app with tons of customization options
- Concept of an included security camera
- Alexa and IFTTT integration
- Comprehensive online help
- 24-hour free online video storage
- Support team was very responsive
What needs to be improved
- WiFi setup didn’t work, at least with my WiFi setup, but there was a workaround
- It would be nice to be able to define mixed zones in terms of what is planted there
- Implementation of the included security camera – simply using changes in light isn’t useful
- Video download does not work at all
- Having more of a local weather source would improve weather accuracy – they report that this is in the works
- Messages should be sorted by time
- In-app updates don’t provide any information on what was updated
Final thoughts
Overall, I like the Yardian and plan to keep it set up at my home. I like the idea of smart watering, where it will potentially save me a few bucks in water while also being more ecologically responsible. I hope that some usability features, like message sorting and better local weather, can be fixed with a software update. With its comprehensive settings options and smart programming, as a sprinkler controller, it is a great product, and it looks great doing its job.
As a security camera or a pest deterrent, it is pretty useless. I hope that Aeon Matrix can provide a software update to fix the issues with the camera. I do like the idea of a camera watching my garage door, but in its current state, it doesn’t get a passing grade. It does not reliably record and you can’t download the videos. Time will tell on this part.
We have Yardian. Per the box, it is “Your Smart Sprinkler & Security Guardian”.
Summary
- Smart sprinkler: Absolutely!
- Security guardian: Absolutely not!
Price: $179.99 8-zone; $199.99 12-zone
Where to buy: Amazon
Source: The sample of this product was provided by Aeon Matrix.
Filed in categories: Reviews
Tagged: gardening, Outdoors
Aeon Matrix Yardian smart sprinkler controller with HD camera review originally appeared on The Gadgeteer on April 3, 2019 at 8:00 am.
Note: If you are subscribed to this feed through FeedBurner, please switch to our native feed URL http://the-gadgeteer.com/feed/ in order to ensure continuous delivery.