AmpliFi Instant System review


REVIEW – I live in an apartment building that was built many years ago and besides its very thick brick walls, all of the studs are metal. It is surprising to see how much this construction can weaken an otherwise great wireless signal. My initial solution was to place additional access points in the areas with a weakness in the signal, and that seemed to work for a while. However every so often, my Roku and Amazon streaming sticks seemed to still suffer from a weakness in the signal. I was very excited when I got the opportunity to test the Amplifi Instant System, with the hope that it would finally solve my wireless signal woes. Let’s see if it did.

What is it?

The Amplifi Instant System is a network mesh system that allows you to extend the reach of your wireless network to ensure a strong signal in areas beyond the capabilities of your base modem/router.

What’s in the box


1 x Amplifi Instant Router
1 x Mesh Point
2 x AC Adapters
1 x Instruction Manual
1 x Ethernet Cable

Design and features

Specifications:

On one side of the Instant Router, there is an ethernet port for connection to the main router or modem, an additional pass-through port to hard wire to another device, and the USB AC adapter port.


On the front of the Instant Router, there is a touchscreen that shows the date, time and status of the router.


On one side of the mesh device, there is an ethernet port that allows you to hardwire another device and the USB AC port.


At the bottom of each component, there is a LED light that goes around the entire base.

Performance

Setting up this system literally took only a few minutes. Once I connected the Instant Router to my main router, and downloaded the app, and followed the easy steps through the app, the router was fully functional and ready to go. I then plugged in the mesh device in an area in my home with a usually very weak signal, and via the app was quickly able to make the wireless connection between the router and the mesh device. and Voila!! My entire home now has a very strong and fast wireless signal everywhere. It is just that simple.


At the bottom of each component, there is a LED light that surrounds the edges. Not only is it nice looking but it senses the darkness of a room whether it is nighttime or the lights are turned off, and it turns off or on to match the ambient lighting.


APP

The app is not only used to set up connectivity but also for a host of other functions including monitoring, testing, troubleshooting and setting preferences. Here are some screenshots from the app:


What I Like

  • The size
  • The build quality
  • The ease and quickness of setting it up
  • The App and its capabilities
  • The general reliability of the connection and the speed of the connection
  • The sleek and attractive design
  • The LEDs and their sleep capability
  • The wireless range

What can be improved

  • For me, the Amplifi Instant just works, so no issues here

Final thoughts

The Amplifi Instant in a great solution for extending your wireless signal to areas of weakness within your desired jusridixction. It is very easy to set up and for me it works flawlessly. I highly recommend it as a solution for this type of isse, and I give Amplifi two thumbs up for this product.

Price: $179
Where to buy: Amplifi website and Amazon
Source: The sample for this review was provided by Amplifi

Filed in categories: Reviews

Tagged: ,

AmpliFi Instant System review originally appeared on The Gadgeteer on November 22, 2018 at 3:00 pm.

Note: If you are subscribed to this feed through FeedBurner, please switch to our native feed URL http://the-gadgeteer.com/feed/ in order to ensure continuous delivery.

Act quickly and you can get the Fingbox for $69

NEWS – I reviewed the Fingbox in December 2017 here on the Gadgeteer. It is a small hockey puck-sized device that you connect to your router (it is NOT a firewall). It helps you to keep an inventory of the devices on your home WiFi network and will detect when a new device connects to your network. The Fing app then allows you to block the new device manually or automatically thus protecting your network from nearby intruders. It also allows you to detect all the new or anonymized devices that are within range of your network (Fings calls this feature the Digital Fence). In addition, it detects your home’s WiFi hotspots, detects bandwidth hogs, and allows you to schedule or manually pause internet access to your network devices. The app has been updated several times since 2017 and is now much more user-friendly.

Some commented to my review that the Fingbox was interesting but a little too pricey ($129 at that time). However, now it is available for $69 on Fing’s websitebe sure to use code: VIPBLACKFRIDAY (not the advertised BLACKFRIDAY code which makes the Fingbox $74). I received an email that says the sale is good until the end of the day November 17, 2018. If you miss this sale you could try the code BLACKFRIDAY to try to get it for $74. Additionally, it looks like standard shipping is free! It’s a great device and I recommend it especially if you don’t have a newer router that provides a lot of the features this device provides.

Filed in categories: News

Tagged: ,

Act quickly and you can get the Fingbox for $69 originally appeared on The Gadgeteer on November 16, 2018 at 5:36 pm.

Note: If you are subscribed to this feed through FeedBurner, please switch to our native feed URL http://the-gadgeteer.com/feed/ in order to ensure continuous delivery.

Kano Computer Kit Touch review

REVIEW – Have you ever wanted to learn to program/code? Or maybe you have a young child who wants to write their own programs. The Computer Touch Kit from Kano will not only help you learn the fundamentals of programming, but it will let you do that learning on a touchscreen computer that you build yourself. How much fun is that? Let’s find out?

What is it?

The Kano Computer Touch Kit is a Raspberry Pi based computer kit that helps teach kids and adults how to program using Python and Javascript programming languages.

What’s in the box?

USB Board for connecting other devices
DIY Speaker
HDMI Cable connects the screen to computer
Blocks x3 keeps parts connected
Screen Case protects the screen
Power Cables
Battery
Touchscreen Cable
Custom Raspberry Pi – 1.2GHz quad Cortex A53 – 64bit with 1GB of RAM
Power Board
SD Card
Microphone
Screen
USB Keyboard
Stickers
Storybook / User manual

Build your own touchscreen computer

Kano includes everything you need to build a touchscreen computer along with easy to read step by step instructions with clear illustrations. I felt like a little kid spreading all the colorful components on the floor around me as I sat crosslegged flipping the pages in the storybook which lead me through the steps to build the computer.


No tools are necessary for the build as everything snaps into place on the back of the touchscreen just like your favorite building blocks. Kano even includes wire routing blocks for the cables to keep everything neat and tidy.


As you place each component on the board, the book explains in basic terms the function for each part without being too technical or boring.

The computer even comes with a plastic case to protect the parts and to give it a finished look that allows you to see your handy work.


The whole setup is pretty impressive and the build process was fun without taking too long. I didn’t time it, but I don’t think it took me more than 30 minutes to put everything together.

I built a computer, now what can I do?

After everything is assembled, it’s time to turn it on and start learning to program. This is the point where I ran into two issues. First of all, the USB power adapter that was included in the package that I was sent, had a European plug style. But you can use any USB adapter that you already have. That’s what I did and it worked fine.

The next problem that really threw me for a loop for a few minutes can be seen in the image above. When the Kano computer powered up, the screen was upside down. I immediately thought that I had assembled the computer incorrectly and started feeling bummed that I would have to take everything apart and go through the building steps again. But then I looked closer at the storybook/manual and saw a small note that said you could go into the settings to flip the screen. Whew! Crisis avoided. But, I think the screen flip option should come up immediately upon bootup instead of having to find the setting once everything is running. Or maybe even have a physical switch on the side that will flip the display.

The bootup process starts out at a command line and guides you through typing in a few commands. I liked this part because I’m a Unix nerd and this kind of stuff is right up my alley.  Yeah, don’t pay attention to the fact that I left a space out of the command shown in the screenshot above 😉

After the OS boots, you’ll be greeted with a more modern interface with menus and apps that you can launch with your finger or select with the included wireless keyboard which has a built-in touchpad.

You can learn to program by using the story mode option that lets you wander around a forest to talk to people and go on quests. It reminds me of an old-school Zelda style 8bit video game. The programming sections lead you through learning sessions that help you learn how to use drag and drop modules to build and customize a program.


You will learn the fundamentals of building a program including using loops and variables. You can then make the program which will let you compile and run it. Your completed programs can be saved to memory so you can revisit and change them later.

After you go through all the lessons and built-in games, you can add more by visiting the online Kano community for more creations.

The Kano computer isn’t a one trick pony, it’s an actual computer and even comes with other apps like a YouTube viewer and web browser pre-installed.

Be aware that this isn’t going to be a computer that your child or an adult will want to use as a full-time computer because it isn’t very speedy. Certain functions feel sluggish and sometimes I wondered if the computer had crashed because there wasn’t any type of live status message on the screen that indicated that it was still working.

What I like

  • Step by step instructions make it fun and easy to build
  • Teaches basic programming fundamentals
  • The computer can be used for other things

What needs to be improved

  • Make the internet browser and YouTube apps optional for a parent to install

Final thoughts

When I was a kid, I would have absolutely LOVED the Kano Computer Kit Touch. Heck, I’m an adult now and I thoroughly enjoyed building the computer and going through the learning quests. The colorful components and step by step instructions made the process fun while injecting STEM (Science, Tech, Engineering & Math) knowledge and skills.

Price: $279.99
Where to buy: Amazon
Source: The sample for this review was provided by Kano.

Filed in categories: Reviews

Tagged: , ,

Kano Computer Kit Touch review originally appeared on The Gadgeteer on October 15, 2018 at 3:49 pm.

Note: If you are subscribed to this feed through FeedBurner, please switch to our native feed URL http://the-gadgeteer.com/feed/ in order to ensure continuous delivery.

ABOX Raspberry Pi 3B+ Starter kit review

REVIEW – I love to tinker.  I love gadgets.  And I love when those two worlds collide, resulting in something I made and is useful.  The Raspberry Pi is one of those computing devices that – if you can define a use for it – is practical, easy to use, and brings satisfaction to even the most curmudgeonly tinkerer (aka me).  ABOX produces a few different Raspberry Pi kits and today we are going to look at the Starter version.  Does it have what you need to get started?  Read on to find out…

What is it?

The ABOX Raspberry Pi 3B+ Starter kit is a bundle of everything you will need to get started with the world of Raspberry Pi – except a keyboard, mouse, and monitor.

What’s in the box?

  • A Raspberry Pi 3B+ motherboard with 4 USB 2.0 ports, a gigabit Ethernet port, an HDMI port, audio out, power and micro-SD card reader.  This is the latest model of Raspberry Pi, with a processor that is 19% faster than the previous version, dual band 802.11ac wireless networking and Bluetooth 4.2.
  • A 32 gig micro-SD card pre-loaded with NOOBS, a great utility that will help first-time RPi’ers to load an operating system like the Linux distro Raspbian.
  • A USB 2.0 micro-SD card reader for your other computer that will allow you to load a different operating system like Retro-Pi for gaming.
  • Heatsinks for the motherboard – most Raspberry Pi cases do not have fans, so this helps dissipate heat.
  • A 5v power supply to provide electrons to your Raspberry Pi.
  • An HDMI cable to connect to a monitor.
  • A “Getting Started” booklet that will walk you through installing the Raspbian operating system.
  • A standard case to house the whole affair (minus the “Getting Started” booklet).

Setup

Setup doesn’t get much simpler.  Peel the tape off the back of the heat sinks and attach them to the two chips (in the picture, the upper left chip and the one immediately to the right and lower – it is pretty easy to figure out which goes where).  Open the case and put the board in place.  Close the case, and you are ready to get started.

This is the power, HDMI and audio out ports in the case.

The Ethernet and USB 2.0 ports on one side…

…and the micro-SD slot with the card installed on the other side.  Plug in your keyboard and mouse, connect a monitor and then plug in the power cable.

Load your operating system and you are ready to explore the world of Raspberry Pi.  It is that simple.

Is it worth it?

Depends.

These kits are a great, hands-on way to teach kids about STEM.  They are also great for home automation projects like creating your own Amazon Alexa device.  Into retro-gaming?  Again, another great use.  And this is the point – if you can find a use for this, a kit like the ABOX is the right way to get started.  If you are uncertain about what a Raspberry Pi is or what it can do, you might want to read more before spending the money.  So it really comes down to whether this particular kit is the right one.

And the short answer is yes, it is.  The motherboard and case are standard issue, so no difference between these and the components you will find in other kits.  The differentiation comes in the other components included in the Starter set.  The power cord is a solid, UL-listed version with a convenient on-off switch installed.  The HDMI cable is molded and shielded.  A name-brand micro-SD card that is fast enough to support the Pi.  And the instruction booklet will get you started – as far as getting an operating system loaded and functioning.  After that, you are free to explore as you like. ABOX has packaged great components that will help launch you into the Raspberry Pi world.

What I like

  • (Almost) everything you will need to get started (bring your own mouse, keyboard and monitor)
  • Good quality components that make it easier for the beginner to get started
  • An instruction book that gets you to the launch of the operating system

What should be improved

  • A fairly minor point, but a couple of pictures on how to assemble the case and motherboard would probably help the extreme beginner or kids getting started on their own

Final thoughts

Getting everything you need in one box is the difference between success and frustration when you are beginning.  There are plenty of tutorials on the Internet that will help you take an assembled unit and make it into something, but few will tell you what you actually need to get started.  ABOX is bridging that gap with kits like this.  From unboxing to install, the process took me a little over an hour – and a fair portion of that was spent finding a wired mouse that I could start with (once up and running I switched to a Bluetooth mouse – it’s just that brief getting started time where that – or a Logitech unifying device – is needed).

So what am I going to do with this?  I think I am going to make a retro gaming setup.  A couple of USB game controllers and installation of the Retro-Pie operating system, digging up some games on the Internet, and soon the sweet sounds of Donkey Kong will once again reverberate through my living room.  Or maybe I will buy a LCD screen component and some sensors to use as a weather station.  Or add the camera module and build a facial recognition device that will show either my wife or I a custom-built news and information feed.

Or maybe I will do all 3…where is my credit card again?

Price: $78.99 with the 32 gig memory card, $68.99 with the 16 gig version
Where to buy: Amazon
Source: The sample for this review was provided by ABOX.

Filed in categories: Reviews

Tagged:

ABOX Raspberry Pi 3B+ Starter kit review originally appeared on The Gadgeteer on October 5, 2018 at 12:00 pm.

Note: If you are subscribed to this feed through FeedBurner, please switch to our native feed URL http://the-gadgeteer.com/feed/ in order to ensure continuous delivery.

BenQ EX350IR Curved Monitor review


REVIEW – When editing photos or videos, a reasonably sized display with great color reproduction is really essential. I have always been a fan of the quality of BenQ monitors, but I have not purchased a new one for quite some time. When I was offered the opportunity to review one of their newer curved monitors, I jumped at the chance to see if they could keep me as a fan. Here is how it went:

What is it

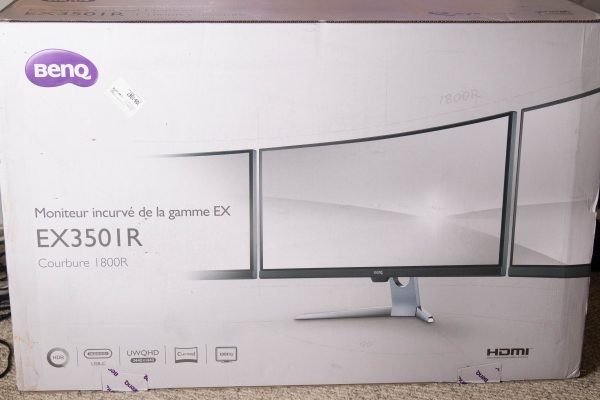
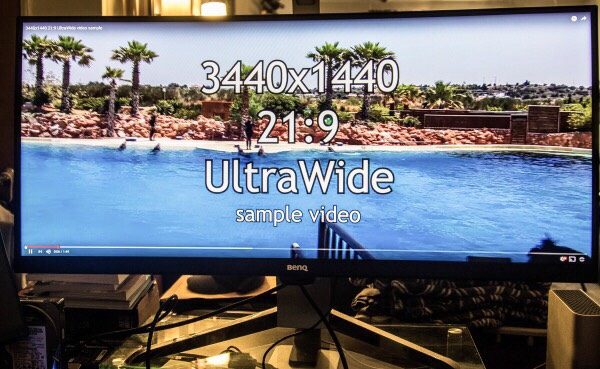
The BenQ EX350IR is a 21:9 35″ Vertical Alignment MonitoCurved Monitor, boasting a  3440 x 1440 resolution.

What’s in the box

Unpacking

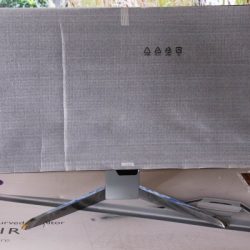
As you can see from the pictures below, the monitor and the accessories arrived well-packed and in a very large box that was cushioned in every way with styrofoam. The screen also had additional protection.


Contents


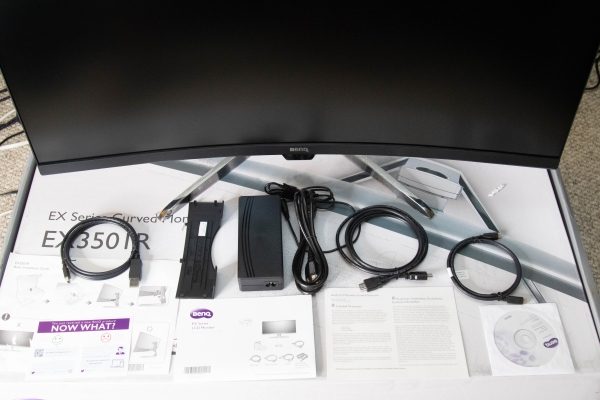
1 x BenQ EX350IR Curved Monitor
1 x System CD-Rom
1 x Power Cord
1 x Power Adapter
1 x DisplayPort to Mini DisplayPort Cable
1 x HDMI Cable
1 x USB Type-C Cable
1 x Back Cover
1 x Quick Start Guide

Specifications

Size: 35″
Screen Area: 32.26 x 13.62″ / 81.94 x 34.59 cm
Panel Type: VA LCD
Native Resolution: 3440 x 1440
Aspect Ratio: 21:9
Pixels Per Inch (ppi): 103 ppi
Brightness: 300 cd/m2
Contrast Ratio: 2500:1
Dynamic Contrast Ratio: 20,000,000:1
Refresh Rate: 100 Hz
Adaptive Sync Technology: FreeSync
Bit Depth / Color Support: 8-Bit (16.7 Million Colors)
Color Gamut: 100% sRGB
Response Time: 4 ms (GtG)
Viewing Angle: Horizontal: 178°
Vertical: 178°

Connectivity:
2 x HDMI 2.0
1 x DisplayPort 1.4
2 x USB (USB 3.0) Output
1 x USB (USB 3.0) Input
1 x USB Type-C
1 x 3.5 mm Output

HDCP Support: Version 2.2
Dimensions (W x H x D): 32.8 x 19.8 x 8.8″ / 83.4 x 50.4 x 22.4 cm
Weight: 22.93 lb

Design and features

The BenQ EX350IR Curved Monitor is a beautiful curved monitor that has a 178-degree viewing angle from each side. It is a 21:9 format that has a HD resolution up to 3440 x 1440.
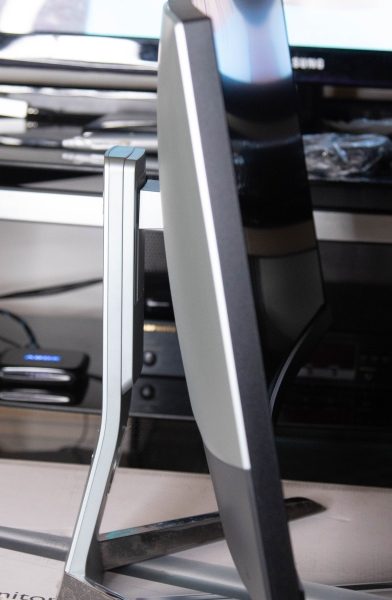
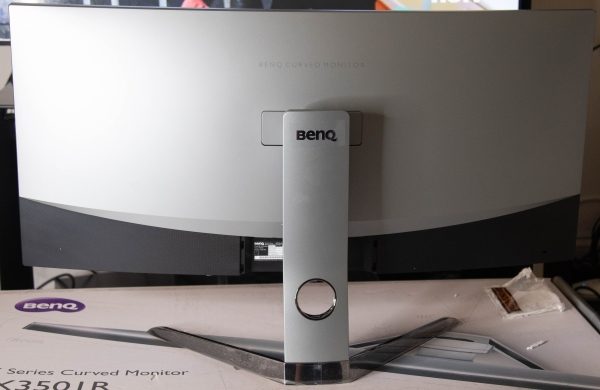
The picture below shows the back of the monitor with the hole in the stand to pass the connected cables through. I already have holes on my desk to triage the cables, so I did not use this feature. You can also see where the stand with its triangular style platform connects to the back of the monitor. Ths stand can be removed, and an optional VESA wall mount transfer kit can be purchased separately and attached so that the monitor can be VESA mounted.

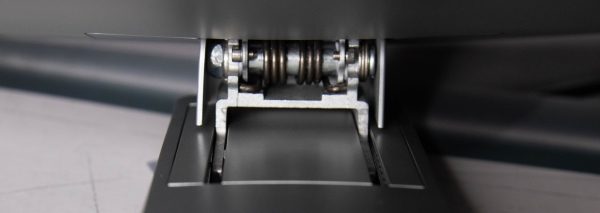
This angle below shows the tracks on the stand between the stand and the monitor that allow the height of the monitor to be raised or lowered simply by pulling it up or pushing it down. The tracks provide the necessary tension to keep it firmly in place. The visible spring that you see controls the tension when tilting the display.

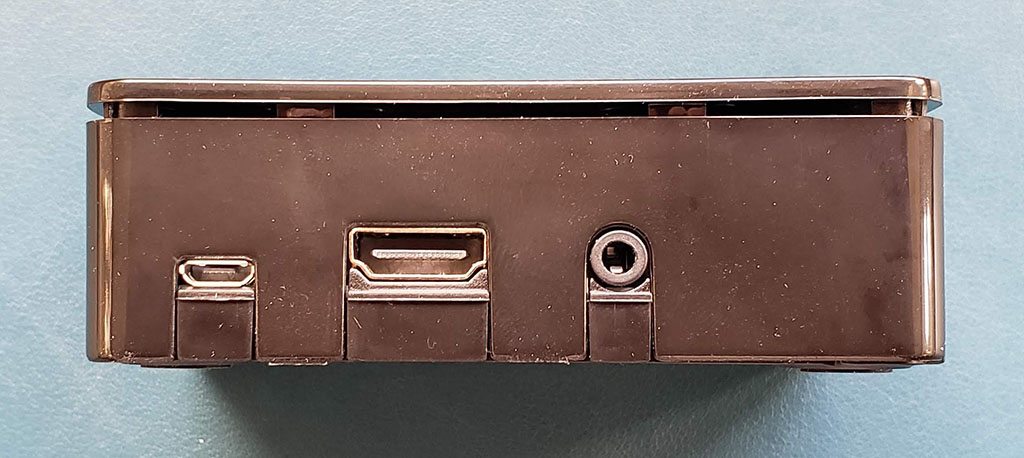
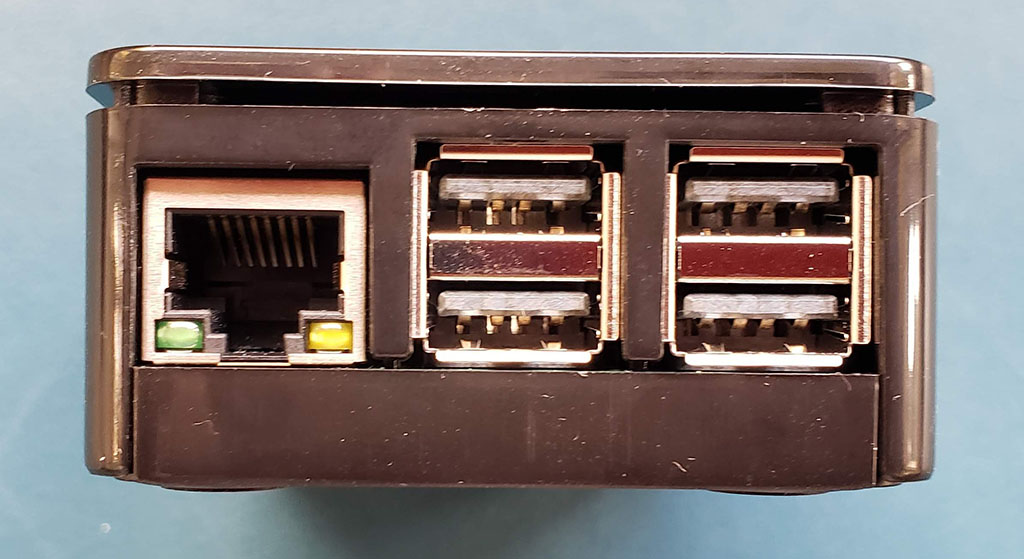
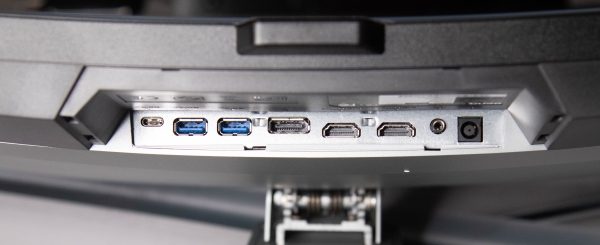
This monitor has a nice selection of ports. (From left to right as pictured below):
1 x USB Type-C Port
2 x USB 3.0 Ports
1 x DisplayPort
2 x HDMI Ports
1 x Headphone Jack
1 x DC Power Input Jack


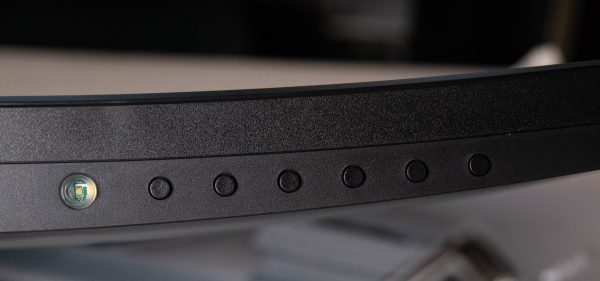
If you are facing the front of the monitor, the control buttons are underneath the bottom right side of the display (From left to right):
Button 1 – Power Button: Power On /Off
The next 6 buttons are “Control Keys or hotkeys” (Pressing any control key brings up a menu function)
Button 2 – Input Hot Key: Input Selection
“The Custom Keys perform as hotkeys to provide direct access to pre-defined functions. You can change the default setting and designate different functions for these keys”.
Button 3 – Custom Key 1: Picture Mode
Button 4 – Custom Key 2: Contrast
Button 5 – Custom Key 3: Brightness
Button 6 – Menu: Activates the Main Menu
Button 7 – Exit: Exit On Screen Display Menu
(For the record, I did not change any of the functions of the Custom Keys, since they worked well for me at the factory default settings)

Performance

I connected the monitor to my main workstation where many nights I work into the early morning hours editing videos and photos. (Note: Some aspects of the following pictures are purposely blurred).


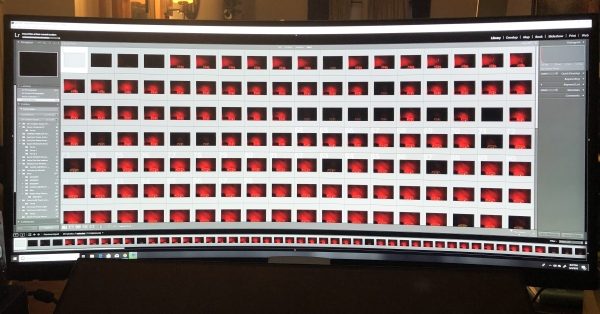
In my testing, I worked with Adobe Premiere, LightRoom, and Photoshop, as well as PortraitPro Studio as my main editing tools. This monitor performed flawlessly. The color reproduction was great and extremely close to being 100%”true”. I made sure that I left everything as it was right out of the box, and did not do any color calibration. The added desktop space 0f 3440 x 1440 @21:9 is really great to work with, and this 35″ monitor still seems massive when compared to my previous 29″ monitor.


Here are some screenshots of the actual applications that I work with:


While I am not a gamer, I did test using a few gaming demos to see what they looked like on this display. While it may not be realistically visible in the pictures below, the colors are great from edge to edge, and I did not notice any kind of color bleeding or dead pixels in any scenario throughout my testing.


The refresh rate of this monitor works very well for all of my needs and for all of the applications that I work with. And since I work a lot with editing and rendering videos, that is a major help when rendering and utilizing “live view” simultaneously.

In terms of additional hardware functions, I also tested the audio output jack. The sound is very good and close to the sound I get from my external USB DAC. However, for my purposes, I did not find it practical to have the headphone cable draped across my desk from the bottom of the monitor. If the choice is to use the audio output from the monitor, I would suggest using a Bluetooth audio transmitter and receiver to make the connection wireless.

What I like

First of all, I absolutely love the size of this display. I also love the color reproduction and the refresh rate. The build quality is great and despite its size, this monitor is sturdy and stable. It performs very well for photo and video editing, as well as for watching movies and performing everyday tasks.

The only thing that could make me more overjoyed about a BenQ monitor like this is if/when I get the opportunity to test a 4K version. For me, the 4K capability would make a BenQ monitor like this the “above all” monitor for my use.

What can be improved

Since this monitor has a sizeable bezel, I think the design would work better if the control buttons are on the bottom right front face of the monitor. In my opinion, the design that places the buttons underneath the display where you have to feel for them, and either memorize their position or keep pressing buttons until you get the right ones is not practical unless there is at least a corresponding label on the front.

Final thoughts

Since I have always been a fan of BenQ monitors and their quality, I was expecting a whole lot in the design, build, and performance of this monitor, and it does not disappoint. While there is the issue of the location of the control buttons that I find inconvenient, that is as far as “MY” negatives go. We may all have a difference of opinion about a product like this, especially when it is a major part of the typical workflow experience. However,  I would not hesitate in any way to recommend this monitor. Just like with my previous BenQ monitor that I purchased probably over 12 years ago, I am a fan.

Price: $849.00
Where to buy: Amazon and B&H Photo Video
Source: The sample for this review was provided by BenQ.

The post BenQ EX350IR Curved Monitor review appeared first on The Gadgeteer.

Filed in categories: Reviews

Tagged: ,

BenQ EX350IR Curved Monitor review originally appeared on The Gadgeteer on July 2, 2018 at 11:00 am.

Note: If you are subscribed to this feed through FeedBurner, please switch to our native feed URL http://the-gadgeteer.com/feed/ in order to ensure continuous delivery.