Logitech Craft keyboard review

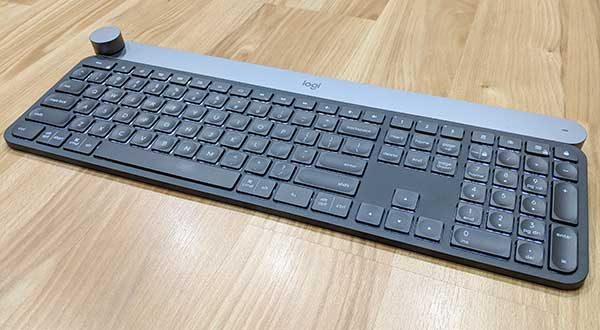
I’ve been writing about and reviewing products for over 20 years now and in that time, I’ve come to learn that the most important tools for my job are a camera, a mouse, and a keyboard. Today I want to tell you about a new keyboard that I’m testing (and typing on right now). It’s the Logitech Craft keyboard and it’s a stunner.

What is it?

The Craft keyboard from Logitech is a full-sized premium wireless keyboard that’s been designed to be used on your desk when paired with a laptop, desktop computer, phone or tablet.

Hardware specs

Connection support: Logitech Unifying 2.4GHz wireless technology Bluetooth Low Energy technology
Power: Rechargeable with USB type C cable (included)
Size: 5.87 x 16.93 x 1.26 in

Design and features

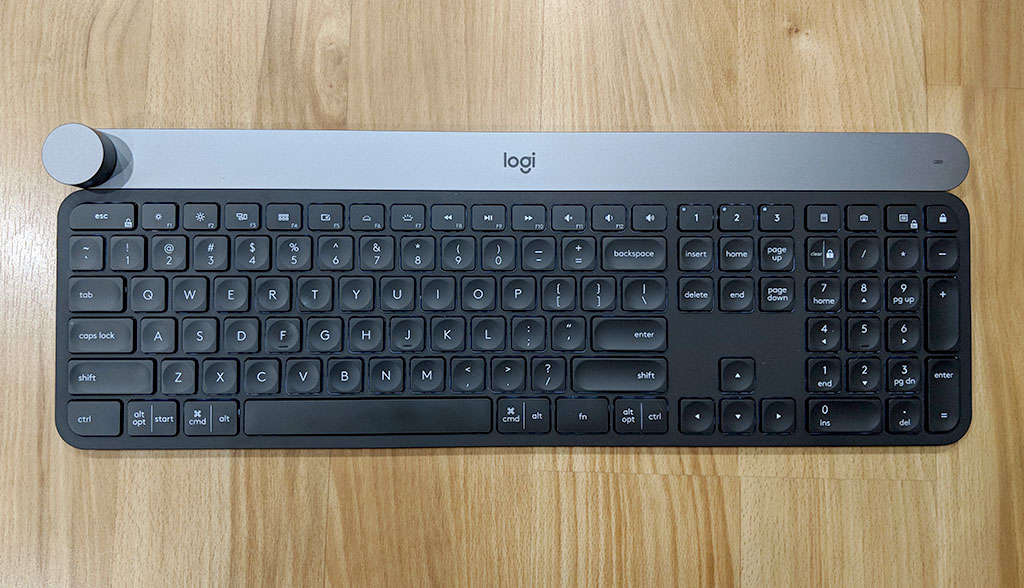
The keyboard has low profile non-mechanical keys that are more like a laptop keyboard than a traditional desktop keyboard. You can click the image above to get a closer look at the QWERTY layout which includes a dedicated number pad on the right side and a row of function keys along the top.

The keys have a comfortably rounded depression on top of each key and the matte finish of the plastic feels great under your fingertips.

Even though the Logitech Craft keyboard does not have mechanical keys, I really really like the feel of the keys. I’m a touch typist, so I’m picky when it comes to keyboards, and I enjoy typing on this one.

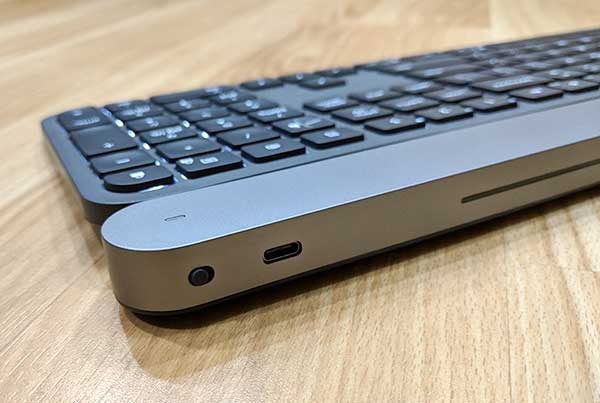
The Logitech Craft keyboard has a power switch on the back and a USB Type-C port beside it which is used to charge the keyboard’s internal batteries. According to the Craft product page on Logitech’s site, the keyboard’s batteries should last for a full week on a charge. That has to be a mistake because I’ve been using this keyboard for several weeks and it’s still going strong.

There’s a small LED in the upper right corner of the keyboard will glow red to indicate that the keyboard needs to be recharged.

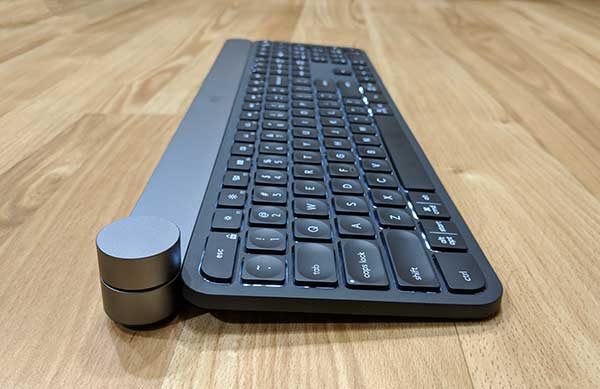
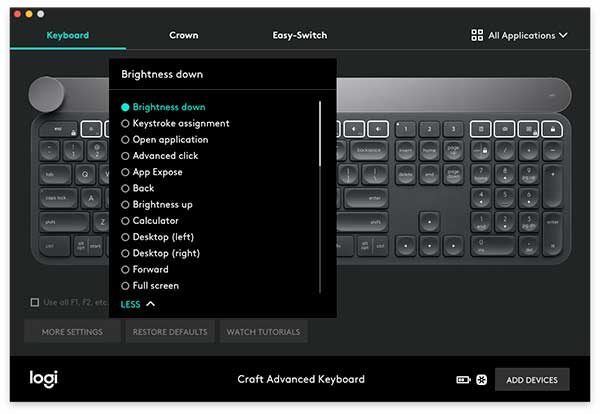
One of the notable features of the Craft keyboard is the Crown input dial in the upper left corner. This smoothly turning knob provides a different function in a variety of applications and can be customized in the Logitech application that you can install on your Windows or macOS computer.

If you don’t install the application, turning the Crown will adjust volume levels up and down on your computer, while pressing the dial will play or pause music, and pressing and turning the dial at the same time will adjust screen brightness.


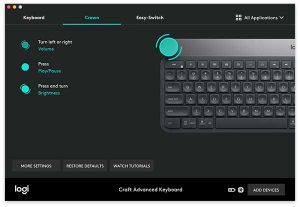
When you install the Logitech Options application, it will detect the applications that you have installed on your computer and will allow you to customize what the Crown can do in each of these apps when each detected app is in focus.

For example, if you are working in a web browser like Chrome or Firefox, turning the Crown will let you switch between tabs.

In Photoshop, the Crown can do different things based on the tool that you have selected. If you have the cropping tool selected, rotating the Crown will zoom in and out on your image, if you have a paintbrush selected, turning the Crown will change the size of the brush, etc.

Once you can train yourself to use the Crown, it becomes very useful.

You can also add other applications not detected by the Logitech Options app to add Craft Crown capabilities to other apps on your computer.

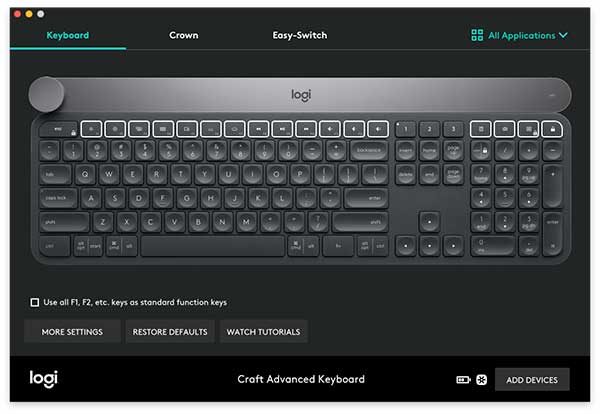
In addition to customizing the function of the Crown knob, you can also customize the function of the F-keys.

Unfortunately, you can’t setup macros for the F-keys. You can only choose from a list of features.

By default, the function keys already offer features that will let you set screen brightness, media controls including next, previous track, play/pause and volume. But you can also use it to show open windows or show all apps.

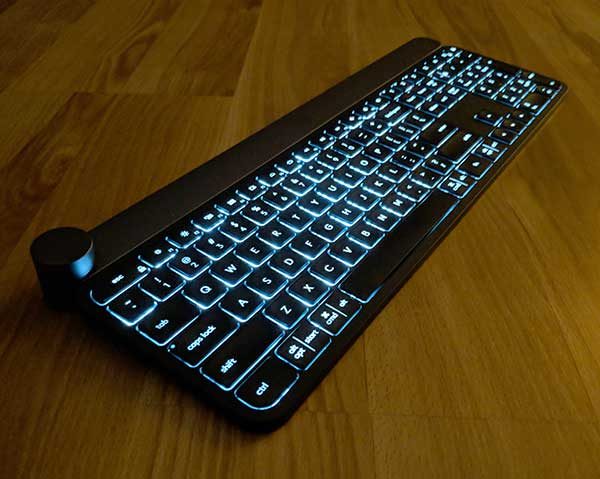
The Logitech Craft keyboard also has backlit keys. You can adjust the brightness of the keys using the function keys and built-in proximity sensors will cause the keys to light up to “welcome” you when your hands get near the keyboard after it’s been idle and then the backlight will fade in intensity depending on ambient lighting. I have the backlight turned off to save battery life, but the “welcome” feature still works even with that setting.

This keyboard can be paired with up to 3 devices using Bluetooth and/or the unified USB dongle that is included with the keyboard. Switching between paired devices is easily accomplished using the dedicated 1, 2, and 3 device switch keys next to the number pad.

I did all my testing of the Logitech Craft keyboard with my 12″ MacBook and a Pixel 2 XL smartphone. Switching between devices was fast and effortless.

What I like

This keyboard has a premium look and feel. It’s heavy which is a good thing. It stays put and won’t slide around on your desk.

The feel of the keys and the sound of the keystrokes has a perfect level that’s not too loud or too soft.

I like using the Crown knob mainly for adjusting volume and sometimes find that I forget to use it in other apps because I’ve used my mouse or keyboard shortcuts for various functions for so long that it’s tough to break that habit and use a different way of doing things.

One feature that I was really surprised to have with the Craft keyboard is a Windows-style delete key that even works when paired with my MacBook. If you’re familiar with macOS computers, you’ll know that the delete key is really a backspace key which removes the character to the left of the cursor but we don’t have a dedicated key to delete the character to the right of the cursor like Windows computers. I am excited that the delete key on the Craft keyboard lets me have the best of both worlds.

What needs to be improved

If battery life is really only supposed to last 1 week per charge, then that would be at the top of my improvement list.

As I mentioned above, I’ve been using this keyboard for 3 or more weeks every day for at least an hour and it’s still running on the initial charge, so I can’t complain about battery life until I’ve had a lot more time with this keyboard.

Look for an update after the first of the year when I am able to get a better handle on battery life expectations.

Another improvement I’d like to see is the ability to program macros for the F-keys instead of only being able to choose from a pre-set list of functions using the Logitech Options app.

Final thoughts

I enjoy using the Logitech Craft wireless keyboard. The keyboard is very well made and I find it comfortable to type on. The Crown knob adds a new way to interact with my apps that is fun and intuitive.

If the $200 price tag doesn’t frighten you away, the Logitech Craft keyboard is worth checking out.

Source: The sample for this review was provided by Logitech. Please visit their site for more info and check Amazon for lower prices.


Product Information

Price: $199.99
Manufacturer: Logitech
Retailer: Amazon
Pros:
  • Can be used with up to 3 devices
  • Comfortable keys and layout
  • Programmable knob and function keys
  • Delete button for macOS devices
Cons:
  • Expensive
  • Possible battery life limitations (I will need to revisit this)

Filed in categories: Reviews

Tagged: ,

Logitech Craft keyboard review originally appeared on The Gadgeteer on December 3, 2017 at 3:00 pm.

Note: If you are subscribed to this feed through FeedBurner, please switch to our native feed URL http://the-gadgeteer.com/feed/ in order to ensure continuous delivery.

StarTech USB/SATA Drive Duplicator and Eraser review


The StarTech Drive Duplicator and Eraser for SATA and USB Flash Drives is a powerful, simple to use, and versatile tool for IT professionals or consumers who routinely need to manage a number of different types of data drives. Although it’s lacking in documentation and is a bit expensive at the suggested retail price of $796.99, the Drive Duplicator can replace a standard computer tasked with the same operations.

The Drive Duplicator comes in standard StarTech packaging, no frills and well-protected with clear indications of the product functions.

What’s in the Box

  • 1 – SATA/USB duplicator and eraser
  • 1 – 12v DC Power supply
  • 4 – Universal power adapters (NA/JP, UK, EU, ANZ)
  • 2 – Drive-connector cables
  • 2 – Drive pads
  • 1 – Quick-start guide

The unit comes with five different types of international power cables, including two for the U.S., one with a ground plug and one with a wired ground.

The design of the unit speaks much to the functioning of it, simple and direct. A glossy back top with four membrane buttons, an LCD screen and 12 LED indicator lights is met on the sides by a textured hard plastic casing.


Both sides of the unit have connections for USB 2.0 and standard 22 pin SATA drives. You can use 2.5-inch and 3.5-inch SATA SSDs or HDDs with the unit. The top of the unit has the connection for the power plug and an on/off rocker switch.

To be honest, the rocker switch causes me a lot of anxiety as it can easily be knocked into the off position during vital operations.

The connections on either side of the unit are clearly marked Target and Source. There are separate LED indicator lights (yellow, green and red) for each input.

The quick-start guide recommends always using the included SATA drive connector cables when connecting SATA drives to prevent damage to the SATA connectors on the unit and the drives themselves.

Soft, mousepad-like “drive pads” are also recommended for use when using SATA drives.

For my SATA testing, I used two identical 120gb SSDs connected via the drive connector cables.

For USB testing I used two identical 2gb USB flash drives.

With SATA drives and power plugged in, the unit takes up a good bit of space and is rather unwieldy. Although, considering that it can replace a computer doing the same functions, it’s a small caveat.

All operations are controlled via menus on the LCD screen and the membrane buttons. The menus take a little getting used to at first, but for basic functions like copy and erase, the process is pretty simple to activate. The LEDs indicate drive functions; yellow indicates that the drive is connected correctly, green indicates that activity is occurring, and red indicates that an error is occurring.

The Drive Duplicator supports six erase modes and four copy modes as well as cross-interface support allowing you to copy SATA-to-USB or USB-to-SATA.

One of the most useful functions of the unit drive erasure. I use it daily to wipe USB flash drives that come out of usage rotation and for wiping SATA drives that are being put into new machines. The unit provides you with six different erase modes. The one I use the most is the basic Quick Erase mode, but it also includes Single Pass Overwrite (Full Erase), 3-Pass Overwrite (DoD) Erase, 3-Pass Overwrite and Compare, Secure Erase and 7-Pass Overwrite. The 3-Pass DoD Overwrite is compliant with the U.S. Department of Defense (DoD) secure erase standard; the drive is overwritten three times to make sure data is completely wiped.

The default modes on the unit have a failsafe in place to protect the Source drive from being erased, but with a little trip through the menu-tree you’re not only able to erase a single SATA or USB drive, but two drives simultaneously.

As you can imagine, with bigger drives the multiple overwrite modes take significantly more time. But, as with the copy modes, since the unit’s functionality is hardware based as opposed to software based, it’s still faster than comparable operations on a computer.

For copying, the drive duplicator provides four duplication modes; Quick Copy, All Partitions, Sector-by-Sector (Whole Drive) and Percentage Copy. Again, like erasing, the mode I use the most is Quick Copy. Copy times between SATA drives are very impressive, but when duplicating USB drives, the lack of USB 3.0 support becomes painfully obvious.

At smaller sizes, the copy times aren’t much of an issue, especially in Quick Copy mode. However, when utilizing the cross-interface duplication (SATA to USB or USB to SATA) it would be really useful to be able to access the higher speeds that USB 3.0 offers.

Despite the lack of USB 3.0 support, the copy modes of the unit are still incredibly useful. The compare function of the duplicator is particularly helpful as it checks the drives after a copy has finished to make sure the copy operation was successful. Keep in mind, with any copy mode, the target drive must be the same size or larger than the source drive.

Sector-by-Sector mode is great for creating an exact replica of a source drive. All data and empty space are copied to the target drive so even hidden partitions will be duplicated. I use this mode a lot for testing purposes, creating a backup of an entire drive for safekeeping before I work on the original drive.

Overall, the StarTech USB/SATA Drive Duplicator and Eraser is a great, super useful device with a ton of functionality. Although the suggested retail is $796.99, I found it for significantly cheaper at a number of different outlets. At any of these prices, it’s still a great buy because it basically replaces an entire computer running the same operations. Plus, the Drive Duplicator is backed by a StarTech.com 2-year warranty and free lifetime technical support.

Specifications

  • Product ID: SU2DUPERA11
  • Product Weight: 15.9 oz [450 g]
  • Product Measurements: Length: 5.3 in, Width: 3.5 in, Height: 1.1 in
  • Power Source: AC Adapter Included
  • Drive Connectors: 2 – 22 pin SATA Data + Power (7 + 15 pin) Receptacle, 2 – USB Type-A (4 pin) USB 2.0
  • Maximum Data Transfer Rate: 6.6 GB per minute
  • Drive Size: 2.5in & 3.5in
  • Compatible Drive Types: SATA & USB Flash Drive
  • Warranty: 2 Years

Source: The sample for this review was provided by StarTech. Please visit their website for more info and Amazon.


Product Information

Price: $796.99
Manufacturer: StarTech
Retailer: Amazon
Requirements:
  • 2.5/3.5” SATA SSDs/HDDs or USB attached storage
Pros:
  • Versatile
  • Supports any operating system
  • Basic functions are simple to use
Cons:
  • Expensive
  • No USB-3.0 support
  • Minimal Documentation / Instructions

Filed in categories: Reviews

Tagged: ,

StarTech USB/SATA Drive Duplicator and Eraser review originally appeared on on June 26, 2017 at 10:24 am.

Note: If you are subscribed to this feed through FeedBurner, please switch to our native feed URL http://the-gadgeteer.com/feed/ in order to ensure continuous delivery.

Carved puts a little bit of nature on your tech

We love our gadgets, but sometimes they can be a little too… blah. After you see a hundred shiny black plastic or aluminum gadgets, you’ve seen them all. If you would like to find a way to make your phone, backup battery, speakers and more look different than everyone else’s, then you need to check out these gorgeous cases and battery packs from Carved.

Carved makes cases for the iPhone (duh!), Samsung Galaxy phones (even the new S8s!), the iPad Air, the Google Pixel and even the Nexus 6P.

Their cases combine different types of wood and resin to create a one of a kind look that will turn heads.

Even their 6000mAh power banks will have people asking you where you got them.

The power banks are priced at $55 and the cases range from $24 to $59. You can find more about them and order one at carved.com

Filed in categories: Cases and Covers, Computer Gear, News

Tagged:

Carved puts a little bit of nature on your tech originally appeared on on April 6, 2017 at 8:00 am.

Note: If you are subscribed to this feed through FeedBurner, please switch to our native feed URL http://the-gadgeteer.com/feed/ in order to ensure continuous delivery.

Penclic Mouse R2 Wireless pen-style mouse review

Workplace ergonomics have become a significant problem in the U.S., with repetitive strain and related injuries costing over $20 billion annually in healthcare costs and lost productivity. Swedish-based Penclic looks to combat this problem through design, producing ergonomic and comfortable computer accessories that emphasize comfort and productivity.

For this review, I am testing the Penclic Mouse R2 Wireless, the latest generation of their pen-style mouse. It’s a slick little piece of engineering, with some additional productivity features on top of excellent ergonomics. Let’s take a walk through the details and see if it’s right for you.

First Impressions

The base of the unit is about a half the size of a traditional mouse, with a pen-style grip attached vertically to the base. A USB nano receiver is included for wireless use. A USB cable is also included for charging the rechargeable battery, and can also be used to drive the mouse while charging. The package includes a felt bag, a nice touch for traveling and commuting.


Out of the box, the Penclic Mouse shows its heritage in Scandinavian engineering. The design is compact, sleek, and balanced. Materials and build quality are excellent, with nice tactile feel to all the appropriate surfaces. There are no whimsical color schemes or artsy design flares here… it looks and feels like a business tool, ready for action.

Device Setup and Walkthrough

I tested the mouse on three devices (a 13″ MacBook, a 15″ Thinkpad, and an iMac desktop), and found that setup was seamless every time. You remove the protective tab to activate the rechargeable battery, plug in the USB receiver, and flip the “on” switch under the base. That’s it. No drivers to install. You’re off and running!

The pen itself is a bit thicker than a standard pen and attaches to the base via a ball joint that allows 360-degree rotation. There is a total of five buttons on the pen itself. The top of the pen sports a primary “left click” button and a set of rocker-panel-style buttons for “right click” and “middle click” actions. The thumb-side of the pen includes two additional buttons for “back click” and “forward click”. A scroll wheel is positioned on the base, designed to be used with your pointer finger when holding the device is a classic pen-style grip.

(Speaking of thumbs: I should note that the model I tested is only made for right-handed users. Penclic does offer left-handed models as well as ambidextrous models on their web site.)

Under the base, you’ll find the on/off switch, a button to reset the wireless connection (typical on all wireless mice), and an access panel to get to the battery. There’s a port on the front of the base to plug in the wired USB cable when a recharge is required.

Using the Penclic Mouse R2 Wireless

I quickly learned to appreciate the overall design of this mouse. You grip it and use it just like a traditional pen. You can position it at just about any angle that is comfortable for your hand and wrist, and the base stays solidly planted on your work surface. The base and pen are substantial enough that it doesn’t feel like it’s going to slip out of your hand, and rubberized grip surfaces ensure that you have steady control of the mouse through all ranges of motion. It really does feel good to use for extended periods of time.

As far as performance goes, I was pleasantly surprised by the fluidity of motion the mouse presents in actual use. Response is light and easy, requiring much less hand movement than a traditional mouse to get across the screen. Control is precise with smooth, fluid response to your hand gestures without any additional calibration or adjustments. You can tweak the control for different screen resolutions, but I never had to make an adjustment switching between laptops and desktops. It also works consistently on just about any surface without a dedicated pad, which is great for work on-the-go.

The buttons and scroll wheel took a little more time to get used to. I’ve included an illustration from the Penclic web site so you can see how the arrangement works. Everything is positioned naturally where your thumb and pointer finger fall when you grip the barrel, and tactile feel is excellent. It is different from a traditional mouse or track pad, however, and takes some practice to adjust to the configuration. I would expect that you would have a much faster adjustment if you are used to other stylus-type pointing devices.

Battery use is very efficient. The product claims that it can last 3 months on a single charge. Another nice touch: battery life is improved by an automatic shut-down after 10 minutes, and re- activates on first click. There’s an LED indicator on the base that glows red when recharge is required and switched to green when fully charged. I did have to charge it after the first day of use but haven’t had to charge in two weeks of regular activity.

Overall, I would say that it took a couple of hours before I was completely comfortable with using the Penclic. Once I got there, I actually found it to be easier to perform all the usual tasks (web browsing, working in spreadsheets, traversing e-mail, etc.) with significantly improved comfort and less strain on my hand and wrists. I’m a believer.

Conclusions and Pricing

After two weeks of constant use, I completely appreciate the benefits of the Penclic R2 Wireless Mouse. Not only does it deliver on comfort and ergonomics, but it’s clear that Penclic has carefully examined all aspects of the device to improve your day-to-day performance. If you’re having trouble with strain or discomfort related to using a traditional mouse, the Penclic R2 Wireless Mouse may be right for you. In fact, I would say that the ergonomics and design make it worth a look even if you don’t have these issues.

Penclic offers a series of models and options ranging in price from $70 to $100 USD, in addition to some great information about office ergonomics on their web site. Visit the penclic web site to learn more!

Source: The sample for this review was provided by Penclic. For more info visit their site and Amazon to check prices and order.


Product Information

Price: £59.99
Manufacturer: Penclic
Retailer: Amazon
Pros:
  • Ergonomic, comfortable design
  • Easy to setup
  • Solid, substantial feel in regular use
  • Solid construction
  • Excellent design and usability details
Cons:
  • Takes some adjustment to get used to

Filed in categories: Computer Gear, Reviews

Tagged:

Penclic Mouse R2 Wireless pen-style mouse review originally appeared on on April 2, 2017 at 10:03 am.

Note: If you are subscribed to this feed through FeedBurner, please switch to our native feed URL http://the-gadgeteer.com/feed/ in order to ensure continuous delivery.

Autonomous SmartDesk 2 standing desk review

In my business travels, I’ve been starting to see more standing desks appear in the offices of both large corporations and small startups.  As health related studies have recommended periodic standing breaks for workers that are desk-bound, the convenient benefits of a standing desk are obvious.  Here, we will be reviewing the SmartDesk 2 from Autonomous.

SMARTDESK 2 OPTIONS

The SmartDesk 2 has several standing desk options to choose from.

Tabletop options include:

  • 5 different surface finishes from simple white or black to wood grains.
  • 6 different table shapes with different lengths(53″ or 70″), “cutout” styles, and curvatures

Frame options include:

  • 3 different colors consisting of white, black, or grey.
  • 2 different frame platform options:
    • Home Edition consisting of a single motor capable of supporting 220 lbs through a 29″ to 47″ height range
    • Business Edition consisting of dual motors capable of supporting 300 lbs through a 24″ to 51″ height range

For this review, we have a white rectangular 53″ tabletop with a white Business Edition frame platform.

DELIVERY

Your order comes in two boxes, presumably so they can efficiently send you separate tabletop/frame color options according to your order.
The box containing the frame is the heavier of the two, checking in at 67 pounds. It was laid down horizontally on my porch, and wasn’t the easiest package to handle as the size of the box was slightly unwieldy.
The tabletop package weighs a much more manageable 38 pounds and had outer nylon straps, enabling you to use those as handles to lift the package inside.
Overall, bringing the frame box indoors may require two people, or the box can be opened outside where the individual components can be removed separately.

Since my desk would be installed in a 3rd floor office attic space, it was easier to remove the contents from the frame box and bring each of the components individually upstairs.

UNBOXING

Opening the frame box, each of the components were housed with foam inserts protecting the contents from each other and from external damage.
In fact, my frame box had a sizable gouge on the side, but the foam did its job as all the components were undamaged.
Tucked away inside the foam inserts were a few more accessories.  A parts bag included bags of screws, adhesive backed cable organizers, and your standard fare Allen wrench.  The screw bags were each labeled with fastener specifications (i.e. Mx12) which removed any doubt for screw selection during assembly.
A few electronics components were stored here including a controller box, a control pad, a power cord, and two cables that connect the actuators to the controller box.

Likewise, there were foam inserts for the box containing the tabletop protecting both its edges and surfaces.

TABLE DESIGN

The frame platform consists of several parts:

The tabletop is supported at each end with an “I” beam shaped configuration.  The horizontal pieces are comprised of the “side bracket” on the top, and “feet” at the bottom.  The vertical section, the “leg”, feature 3 tiered ‘telescoping’ structures that extend via a linear actuator.  The telescoping action is what ultimately gives the standing desk it’s height adjustability.

The tabletop is supported by horizontal components consisting mainly by 2 “crossbar ends” at each end of the table.  Both “crossbar ends” are joined together with lengthwise adjustable “center rails” that can accommodate all the different length tabletop options.

The tabletop itself is a nice semi gloss surface with rounded edges.  A “switch” panel at the right front edge controls the height of the table.  There are two cable holes at the rear of each side of the table to provide some measure of cable management.

ASSEMBLY

Assembly of the Smartdesk was straightforward and felt similar to putting together a piece of furniture from IKEA when it came to degree of difficulty.
The assembly manual consisted of two sheets with diagrams and instructions on half of a page.  The diagrams were small and sometimes it was difficult to discern details like screw placement.  I think I would have preferred a full sheet per page to have much larger diagrams to view.
Additionally, λutonomous had an assembly video on their YouTube channel.  I personally prefer paper instructions, but the video showed exactly how everything is installed/fastened to make things clear.
Assembly started with laying the desktop with the finished surface down and with the predrilled holes facing up.
The horizontal frame support for the desktop was initially positioned into place using the specified predrilled hole locations as a guide.  The vertical legs were then positioned into receptacles on the frame.
The toughest part of the install was here, where you had to line up the holes of the leg and frame.  The leg needed to be raised just about a millimeter or two to line up the holes.
The relative locations of all the holes between the frames, desktop, and legs fit well and you never felt you had to force fit anything. Overall, the Smartdesk felt well manufactured from an assembly standpoint.
The last part of assembly involved the wiring of the linear actuators and the control panel.  A “controller box” serves as the junction between the power cable, and the wiring for the other electric/electronic components.  It was unclear where the “controller box” needed to be mounted, despite the paper and video instructions.  I suspect that different tabletop options may have different locations for the controller.  I assumed it would be located towards the back of tabletop, around the center.  I moved the controller into different predrilled screw hole locations until the hole brackets on the controller lined up with them.
The “switch” panel mounting point was in a far more obvious location based on its screw holes.  One thing to note, the “switch” sticks out on an angle beyond the perimeter of the tabletop.  So, if the table is upside down, care must be exercised to ensure you don’t bend the panel when you attempt to flip the table right side up.
 Once all the electronic components were mounted, it was a matter of routing wires from each leg actuator to the “controller box”.  There weren’t any instructions in the manual or video to guide you with this.  It was a matter of common sense to plumb the wires as neat as possible, and the included adhesive backed cable clips held the wires into their final position.
Finally, a metal flange and cover were inserted into the 2 cable holes of the desk.

I would estimate that it would have taken me 20 minutes to assemble the desk if I wouldn’t have stopped to take notes and pictures for review purposes.  It probably could have gone faster if one were to use an impact driver on the fasteners.  However, there weren’t that many screws to deal with, and I felt more comfortable in this case using simple hand tools to ensure that I didn’t cross thread the metal holes or over torque the wood holes.

AESTHETIC IMPRESSIONS

I tend to prefer minimalist modern furniture with clean lines and minimal decorative details.  So I liked the look of the all white table top/frame combination of my SmartDesk.  It blended in well with the mid-century modern style furniture and seating I had in my office space.

USAGE IMPRESSIONS

Operation of the SmartDesk was pretty straightforward via the control switch.  There are buttons for “up” and “down” along with four numbered “memory” positions.
Pressing any of the buttons moved the tabletop in a smooth fashion with a satisfying “whirring” sound.
I liked how the actuator attenuated as it reached it’s minimum or maximum heights.  It eased into those extremes which prevented jarring of the components and it felt sophisticated.
The “memory” feature was a convenient feature, as you could store positions for multiple sitting and standing heights.
At my height of six feet, I found that a 43-inch tabletop height was the most comfortable setting to type on a keyboard while standing.  With an additional potential for 9 more inches of travel, I imagine that this desk could easily accommodate someone well over 6 feet tall.
As far as stability goes, even at it’s highest tabletop height on a carpeted floor, it still took some effort to topple the table over.  So the length of the feet of the frame seemed to provide sufficient leverage from easily tipping the table over.
After using the SmartDesk for a few weeks, everything still worked nominally and the table still felt sturdy.  All this despite constant everyday abuse from my kids who liked to all sit on the desk and fiddle with the controls to mimic an elevator ride.
The only critique I had about the SmartDesk was that the power cable could stand to be longer.  You will need to have a power outlet within 2 feet outside of one of the legs in order to accommodate a fully raised desk position.

Additionally, once you set various electronics on the table, like a computer, laptop, and/or monitor, you’ll have power cables dangling from the tabletop.  You’ll have to exercise care and judgment to ensure that when the tabletop is at its fully extended position, that the power cables are sufficiently long enough and don’t snare on other objects while the table is in motion.  It would be nice if there was some sort of cable management system or hardware to make the cables tied in a neat fashion while maintaining freedom of movement.  I suspect this is generally an issue with most, if not all, standing desks.

FINAL THOUGHTS

The Autonomous SmartDesk 2 is a welcome addition to my space.  The clean lines, sturdy build, and well-executed height adjustability add up to a desk that will stay in my home office for the foreseeable future.  I feel far more productive now that I have the ability to periodically work from a standing position.
Source: The SmartDesk 2 was provided by λutonomous for this review.  For more information, please visit Autonomous.ai
 

Product Information

Price: $299.00
Manufacturer: Autonomous
Pros:
  • – easy assembly
  • – well constructed and manufactured
  • – fits in well with modern and contemporary room designs
Cons:
  • – Could use longer power cable
  • – Could use some sort of cable management system

Filed in categories: Computer Gear, Reviews

Tagged: ,

Autonomous SmartDesk 2 standing desk review originally appeared on on April 1, 2017 at 9:00 am.

Note: If you are subscribed to this feed through FeedBurner, please switch to our native feed URL http://the-gadgeteer.com/feed/ in order to ensure continuous delivery.