Berrolia No.2 Aluminum iPhone mount review

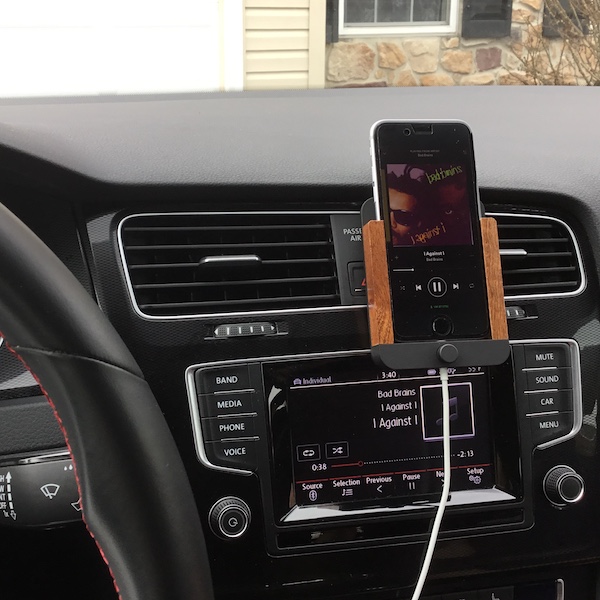
If James Bond was looking for an iPhone mount appropriate for his vintage Aston Martin, he’d probably pick the Berrolia No. 2 iPhone Mount. It’s classy. It’s beautifully constructed. Is it right for you? Let’s grab a martini (preferably shaken, not stirred) and check it out!

First Impressions

When I received the Berrolia No. 2 iPhone Mount for this evaluation, my first impression was… luxurious. Just look at it. Not only does it look premium, but it feels weighty and substantial in your hand. It even comes packed in a cool aluminum cylinder, with molded foam inserts for protection.   
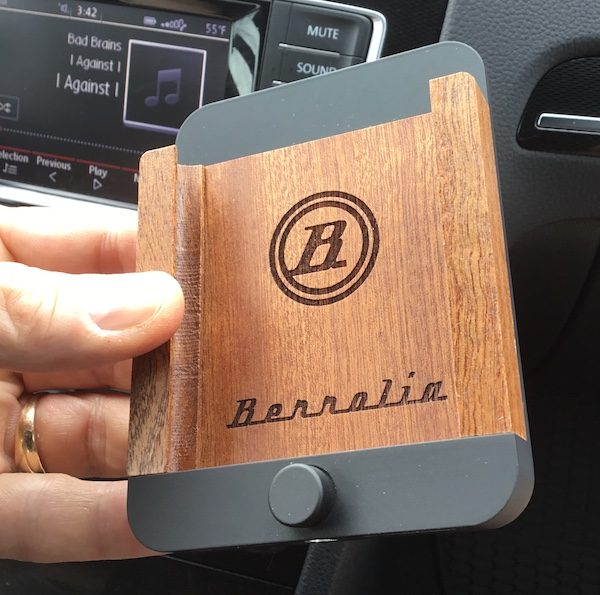
Looks aside, construction and materials are top-notch. The frame is made from premium-grade aluminum, which looks to be powder coated with a slightly rubberized surface. The wood is mahogany, with the Berrolia logo laser etched into the back piece. Everything is precision cut and the assembly is rock solid, with no noticeable gaps or cheap bits to be found. Even the clips are heavy & solid, and look like they won’t bend or snap after repeated use. All the finishes are smooth and pleasant to the touch.

This is no bargain-basement car cradle, folks. It just oozes style and quality craftsmanship.

Mounting the Cradle
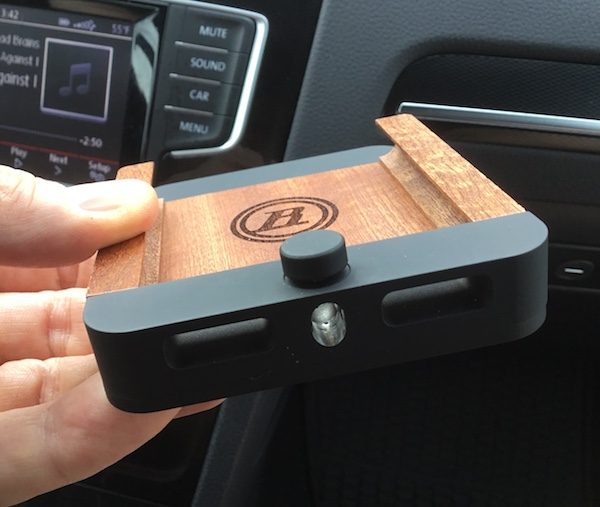
The Berrolia mounts to the air vent on your car, and it requires that your vent employs horizontal fins to clip onto. There’s another quality twist here: there’s a leather (possibly leatherette) mounting pad included in the package. You place the pad on the fin of your air vent, then slide the clip over the pad. Not only does this add extra grip, but it prevents scratching from the beefy metal clip. In my car, I found that the cradle stayed put once it was mounted, and was not prone to getting knocked off by an accidental bump. Nice.
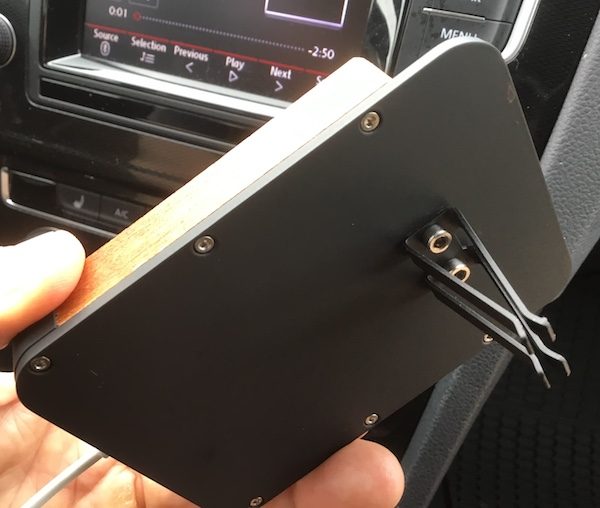
Once you have the mount in place, you can install your lightning cable. I found this to be another nice aspect to the design. There’s a knob on the front of the unit that you unscrew to allow the cable to pass through. The cable is inserted perpendicular to the unit. You pull the cable through, twist it to a position parallel to the mount, and pull the cable back down to lock it in position. Screw the knob back in place, and the lightning cable isn’t going anywhere.
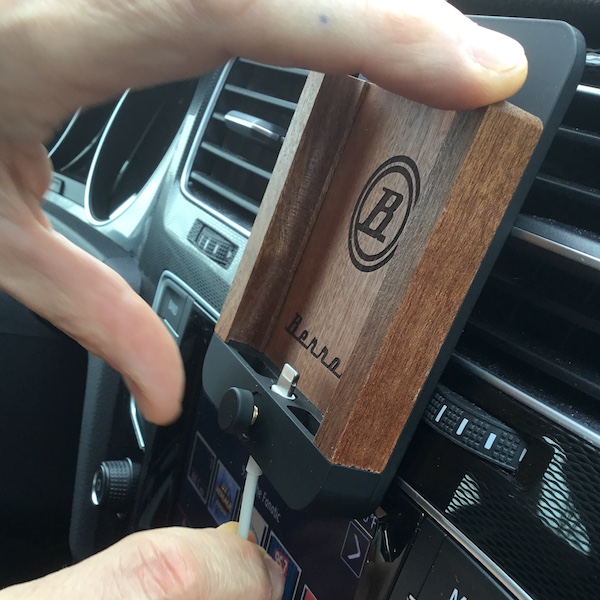
The whole operation took about a minute to complete, at which point I could add my phone.

Daily Use

There are tracks on either side of the mount specifically designed for the iPhone, so it slides smoothly in and out of the cradle and plugs right into the lighting plug. It’s a silky smooth, one-handed operation that requires no wiggling or adjustment to get the phone in and out of the cradle.

After dozens of car trips, I’ve found that the construction continues to deliver. There’s no looseness anywhere in the unit. The lighting cable mount hasn’t loosened up. The finishes continue to look good after regular abuse, with no abrasions or scratches developing in the surfaces. It’s rock solid.

As far as on-the-road use goes, it’s a great mount. It stays firmly planted where you set it, even with the occasional bump or nudge. It’s nice to have the phone in a position where it doesn’t distract you from driving, especially if you are using Google Maps to get from point A to B. And one handed operation is a great for safety, so you are not fumbling around for your phone while trying to focus on the road. I really like it.

Some Caveats

There are three important issues that you should aware of in the middle of all of this luxury precision goodness. First, the mount is designed precisely to fit your iPhone. You can’t use it with a cover or case. I don’t like my iPhone to go naked, so this required me to take off my case every time I got in the car. I get that this detracts from the whole look and slick performance, but it is kind of an annoyance (especially if you have a complicated cover). Berrolia does make the leather versions of the mount that we have reviewed here, and they appear to have some tolerance for accepting a thin case on your phone.

Second, the cable mount is precisely machined to fit the Apple lightning cable. Third party cables are not likely to work with this setup. I found this out the hard way, as my car has a MIDI port that requires a third party MIDI-to-lightning cable. It would not fit in the mount, so I needed to acquire a lightning-to-USB adaptor, then I could plug the Apple-supplied cable into that. Most newer cars have a USB port so this won’t be an issue, but it’s a bit of a bummer if you use third-party lightning cables.

Finally Berrolia only provides this particular style of mount in the black/walnut finish, specifically for the iPhone 6, 6s and 7. They do offer a range of leather covers in different colors and styles which also accommodate iPhone 5 models or the larger iPhone 6 Plus and iPhone 7 plus. You’Il want to check your iPhone model and car interior to find the right match for you. 

Conclusion and Pricing
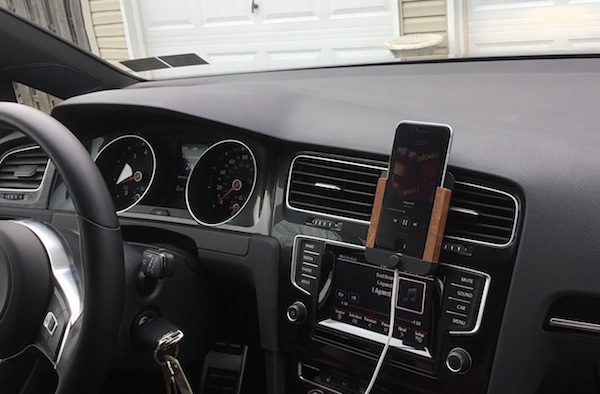
There’s no doubt that the Berrolia No. 2 iPhone Mount is a classy upgrade from a cheap plastic car mount. Not only does it deliver on style, but it is impeccably constructed and sure to stand up to years of abuse. Retail price is placed at 79 Euros (about $85 USD) which seems in line with the quality of the unit. If you are OK with the caveats, I feel its a luxury upgrade that’s worth the price. Happy motoring!

Source: The sample for this review was provided by Berrolia. For more info visit their site.


Product Information

Price: €79 (~$84.50 US)
Manufacturer: Berrolia
Pros:
  • Luxury look and feel
  • High quality materials and construction
  • Easy to install
Cons:
  • Does not work with iPhone covers
  • Requires original Apple lightning cable
  • Sized specifically to the iPhone 6/6s/7, though leather options are available for other models

Filed in categories: Car Gear, iOS, Reviews

Tagged:

Berrolia No.2 Aluminum iPhone mount review originally appeared on on March 31, 2017 at 10:00 am.

Note: If you are subscribed to this feed through FeedBurner, please switch to our native feed URL http://the-gadgeteer.com/feed/ in order to ensure continuous delivery.

ThruNite TH20 Headlamp review

Since I began participating in (and actually completing) GORUCK Challenges back in 2014, I’ve thought a lot more about headlamps than I ever thought I’d think about headlamps. I have one that I have worn for thirteen GORUCK events and for tasks around the house, and it has performed fairly well for me, but it’s starting to act wonky and I had been considering getting one that was a bit more heavy-duty, and that could take more abuse. Thus, it was serendipitous timing that Julie offered the ThruNite TH20 Headlamp for review. With its super-adjustable beam brightness and metal body, not to mention tough-looking styling, I thought it would be worth trying. Let’s check it out!  Gadget on!

Tech Specs

Per the ThruNight site:

  • Max output = 520 lumens (using 14500 battery)
  • Peak Beam Intensity =1120 cd
  • Beam Distance = 67 m (max)
  • LED type = CREE XP-L V6 LED with a lifespan of 20+ years of run time
  • Brightness Control Mode & Runtime (Tested by one Eneloop AA 2450mAh NIMH rechargeable battery) = Logarithmic scale brightness adjustment, which varies by battery type.  Below shown values are for AA battery:
    – Firefly (0.3 lumens, 14 days
    – Infinity Low (1.6 lumens, 21 hours
    – Infinity High (230 lumens, 95 minutes )
    – Turbo (250 lumens, 93 minutes)
  • Working voltage =0.9-4.2 Volts
  • Power = 1x AA battery or 1x Li-ion 14500 battery
  • Reflector = Orange peel finish
  • Weight = 96g or 3.3 oz (without battery)
  • Dimensions = 70 mm x 24.5mm
  • Waterproof rating = IPX-8 (2 meters for 30 minutes)
  • Impact Resistance = 1 meter
  • Material = Main body is aircraft grade aluminum body with premium type III hard anodized anti-abrasive finish
  • Accessories included = O-ring, spare rubber slot

Options

The ThruNite TH20 headlamp is available with the following options:

  • Cool White beam
  • Neutral White beam (reviewed here)

Packaging

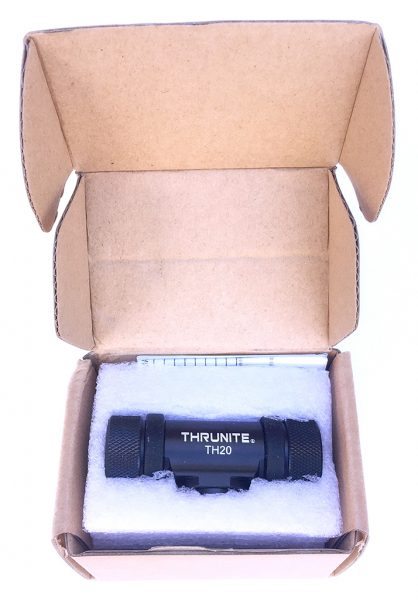
The ThruNite TH20 headlamp’s packaging was a simple fold-over lid style box.  The box is small, roughly the size of its contents with little wasted material and is made from recyclable corrugated cardboard material, all of which I consider a plus.  However, it has no window or other transparent area from which to view the product inside, which I generally consider a minus.  The caveat to this is that a view-ability of the product inside is only really useful if a product is sold in a retail setting; products sold only and shipped directly to the buyer do not have as much a need for view-ability of the product.

In addition to the corrugated cardboard box, which provides an outer layer of bump protection, inside the box, the TH20 headlamp is nestled snugly into a thick piece of foam for additional protection during the shipping and handling process.

Contents

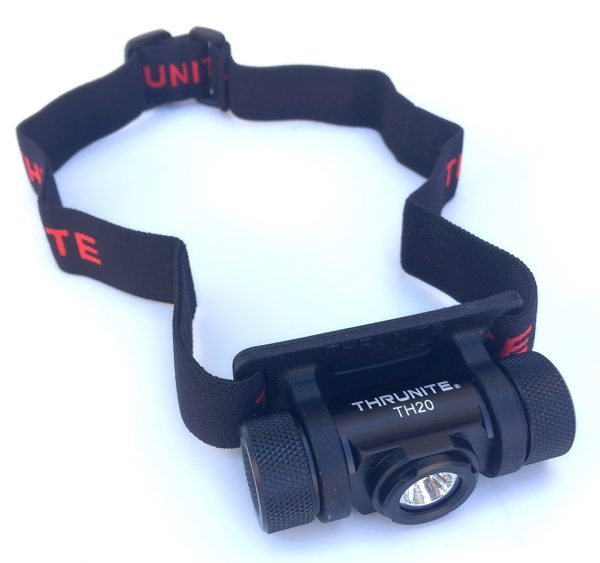
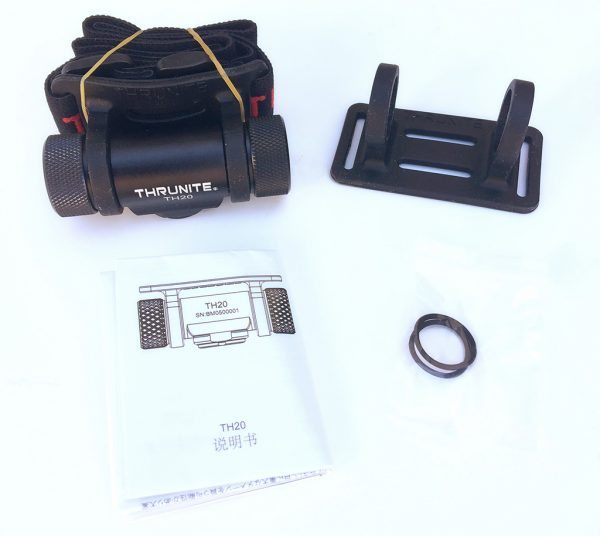
The contents of the ThruNite TH20 Headlamp are shown above, and listed below:

  • TH20 Headlamp
  • Instruction manual
  • Spare O-rings (2x)
  • Spare rubber mounting bracket

Features, Functions, and Performance

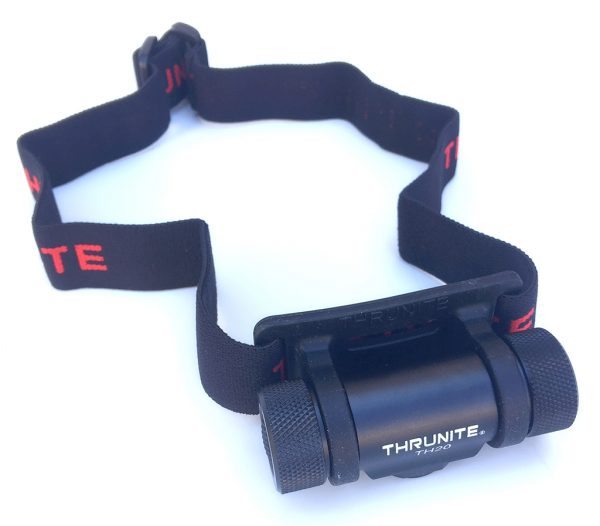
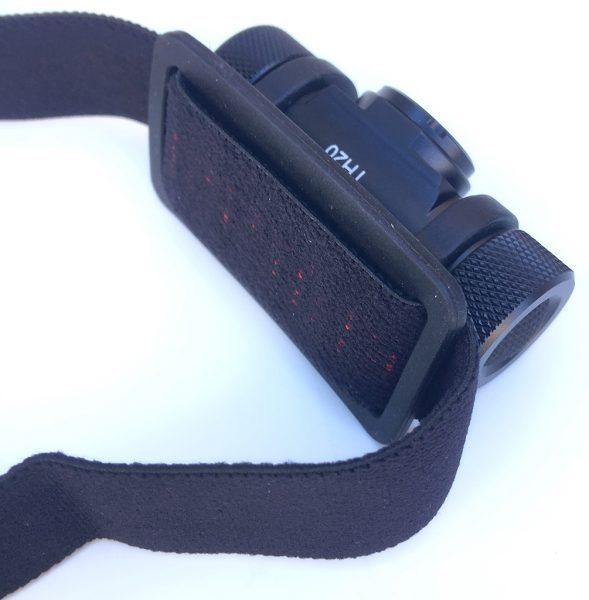
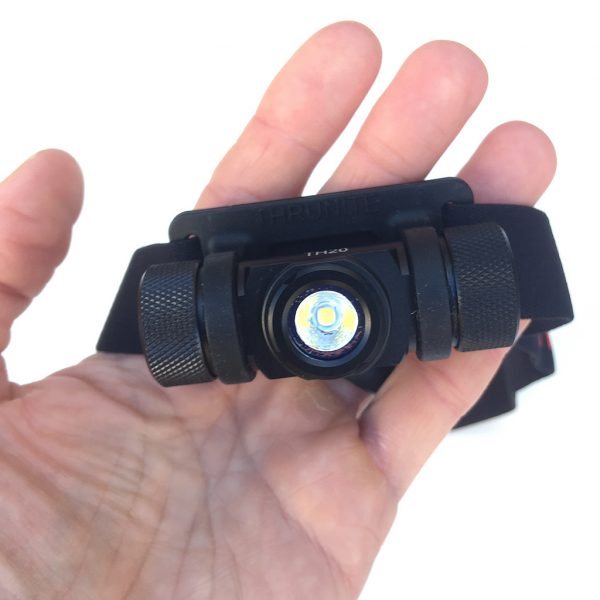
Right out of the box, my initial impression of the TH20 headlamp was that this thing feels solid.  Very solid.  With the main body being made from aircraft grade with a premium type III hard anodized anti-abrasive finish, it feels very heavy-duty and tough.  The adjustable elastic head strap appeared to be fairly standard, but well-built.  However, I found the rubber mounting bracket to be a bit curious.  I had expected it to be more like a hard plastic, but it is a very soft material.  More on this later.  Curiously, the TH20 arrived with the main body rotated such that the lens was pointed in a downward directly, and I had to rotate the body upward to be able to actually use the lens (as seen below).

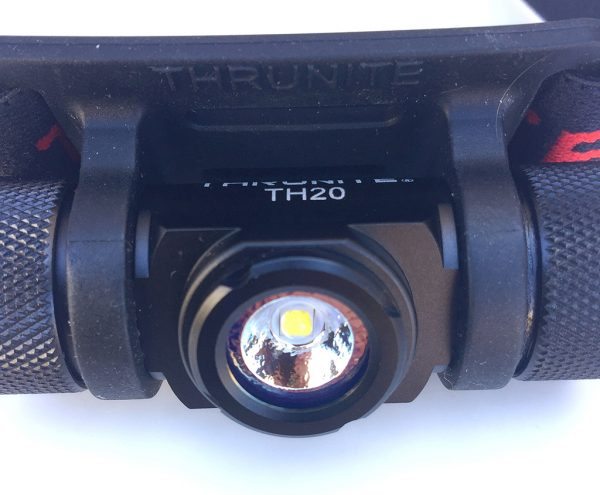
After rotating the main body upward, the lens was visible and ready to be used, as seen above.  The ThruNite logo and TH20 model number are printed on top of the body in white, which gives a good contrast against the matte black body.

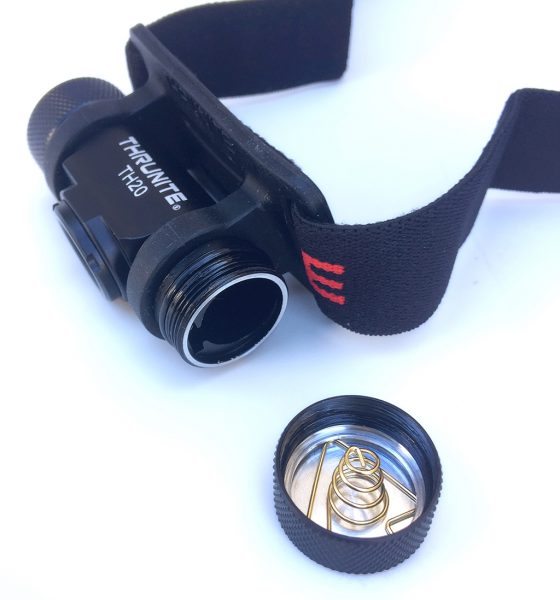
In addition to the main body, TH20’s battery cap is made from aluminum as well.  The aluminum components aid in heat dissipation, which could potentially be an issue when using the brightest modes for a long period of time, and in particular when using a Li-ion 14500 battery.  It has an O-ring seal that prevents moisture ingress, which contributes to its impressive IPX8 moisture resistance rating, which basically means that the TH20 can be submerged to a depth of 1 meter (though ThruNite claims it to be 2 meters, and it may well withstand this).  Note also that a battery is not included with the TH20, you must provide your own.  Although the TH20 can use either a single, standard AA battery or a more high-performance Li-ion 14500 battery, I only evaluated it with an AA battery because I had one on hand.  Li-ion 14500 batteries can be somewhat expensive and unless I was planning to do some back country camping or other extended duration activity, I would most typically use an AA battery with the TH20.

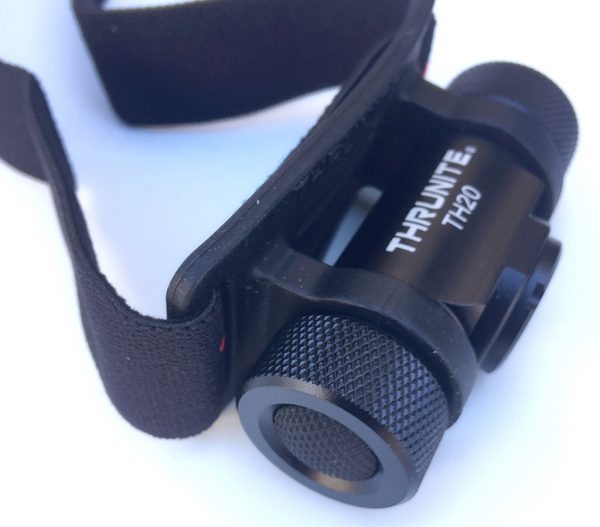
The switch end of the body as well as the battery cap are aluminum also, and both have a diamond-knurl pattern machined into them to provide a better grip when rotating the body or removing the cap, which is excellent if your hands happen to be wet.  In fact, the knurling made it very easy to unscrew the cap and change the battery.  The single switch controls all of the modes of the TH20 (more on this below). The switch is a “clicky” and it has a rubber cap which contributes to the device’s IPX8 moisture resistance.  Additionally, the switch is easy to use, even when wearing gloves.

The lens itself is surrounded by a thick, raised bezel that provides added protection to the lens and reflector.  Also, you can see that the reflector has an orange-peel finish which helps provide a more smooth, uniform beam of light than one with a smooth reflector finish.

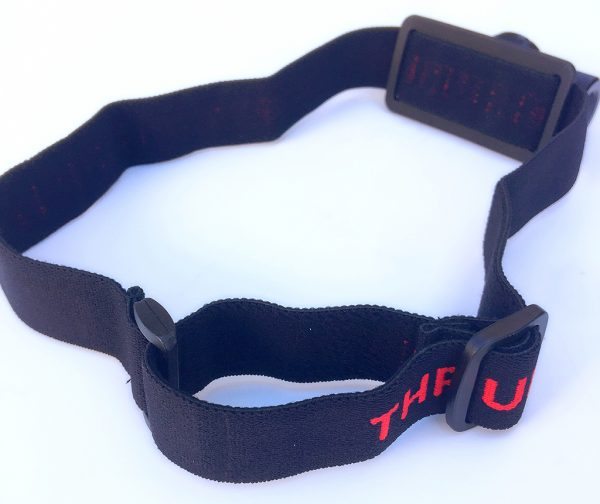
The head strap is a 1-inch wide strip of elastic material that is looped through the rubber holding bracket.  Having a segment of the strap against your head provides a bit of cushion and comfort in this spot, which will typically be against the wearer’s forehead (see images below).

The head strap is adjustable and I found that it held tight once adjusted, so I didn’t need to worry about it loosening accidentally while I was using it.

The version of the TH20 reviewed here had an LED that produces a Neutral White light beam, meaning that it has a bit more of a yellow tint compared with the Cool White light version, which has a bit more of a blue tint.  I prefer the Neutral White LED light because I think it appears more like natural light, but this is of course just my own personal preference.  One big downside of the TH20 to me is the lack of a red light mode.  I find a red light mode to be useful in overnight GORUCK Challenge events for preserving night vision and keeping a lower profile and also when reading books in bed, in order to keep from waking up my wife.

The TH20 has several modes of operation that are all controlled by the single “clicky” style button on the right end of the main body. Initially, when the headlamp is off, a quick press turns it on.  A long press on the switch activates Firefly Mode. Once in Firefly mode, long-pressing and holding the switch gradually ramps between Infinity High and Infinity Low modes and back down to Infinity High again—just release the switch at your desired brightness. A double click press on the switch from any mode activates Turbo mode, and another double click press activates a mode where the TH20 automatically blinks the Morse Code for “SOS.”  A quick press in any mode turns the TH20 off.  In addition, the TH20 will “remember” the last Infinity setting it was in and will return to that setting when turned on.  I found these modes a bit tricky to learn at first, but once I did, they became second nature.  Having the ability to ramp gradually between Infinity High and Infinity Low modes was very useful to allow me to adapt my light level for various conditions.

Because of the way the TH20’s main body is held in its rubber bracket, it is very easy to rotate it up or down to virtually any position you may need it to be in, rather than just a handful of discreet positions as with other headlamps I have used.  Also, the rubber bracket holds the main body tightly and does not allow it to wander out of position.  The downside of the rubber bracket is that it can be a bit difficult to rotate the body within it and I sometimes needed to use two hands to do so.

So in practical terms, just how bright is it?  Using the AA battery and in full Turbo mode, I was able to illuminate my back yard and a good portion of my neighbor’s yard, out to a distance of probably 30 yards.  The beam might have gone farther had my neighbor’s house not been in the way.  In addition, I took it out for an after-dark ruck training session and it worked great—it was handy to be able to slightly adjust the beam for various lighting conditions.  I would probably characterize this headlamp’s  operation as more of a “flooder” (wider, shallower illumination) than a “thrower” (farther, narrower illumination).  However, for most things that I used or would use the TH20 for, that functionality is perfect.

Conclusion

The ThruNight TH20 Headlamp is very durable and functional.  Its aluminum body, O-ring battery cap seal and rubberized switch contribute to its impressive IPX8 moisture resistance, and its knurled ends help with gripping the device to adjust its position when wet.  Its rubber bracket holds the main body very securely in position, but it can sometimes be difficult to adjust the position one-handed.  The reviewed version here gave pleasant Neutral White beam and while it is probably more of a “flooder” than a “thrower,” this functional worked fine for me, but I’m sure would have been even brighter had I used a Li-ion 14500 battery rather than a standard AA battery.  It has several modes of operation, with its gradual “Infinity” settings being very useful for dialing in a specific brightness depending on your changing needs. The only mode it is missing is a red beam mode.  If you are looking for a durable headlamp with high moisture resistance and unique brightness level adjustment ability, have a look at the very affordable ThruNite TH20, which retails for $29.99.

Source: The sample for this review was provided by ThruNite. Please visit their site for more info or to order. Use the coupon code: THRUNITE to save 5% on orders through the ThruNite store. You can also check Amazon.


Product Information

Price: $29.99
Manufacturer: ThruNite
Retailer: Amazon
Requirements:
  • 1x AA or 1x Li-ion 14500 battery
Pros:
  • Very durable construction
  • Impressive moisture resistance
  • Multiple modes of operation, with "Infinity" setting being very useful
Cons:
  • No red light mode
  • Sometimes difficult to rotate body position one-handed

Filed in categories: Outdoor Gear, Reviews

Tagged:

ThruNite TH20 Headlamp review originally appeared on on March 31, 2017 at 7:46 am.

Note: If you are subscribed to this feed through FeedBurner, please switch to our native feed URL http://the-gadgeteer.com/feed/ in order to ensure continuous delivery.

Notion home awareness sensor kit review

Home automation, security, and remote monitoring are all hot topics right now. The ability to know that everything at your property is fine when we’re not physically there is a priceless gift for chronic worriers and people who like to feel in control. There are many systems on the market that will let you install cloud-enabled smoke alarms, window and door alarms, temperature alarms, leak detectors and more. But I’m going to tell you about a system where one sensor can do all of those things. Let’s take a look at the Notion home awareness sensor kit.

What is it?

The Notion home awareness sensor kit is a home monitoring system that uses a bridge and wireless sensors that will tell you if a door has been opened or closed, a window has been opened or closed, if there’s a leak, if the temperature is higher or lower than a set temp, and if there’s a smoke alarm. But instead of picking and choosing different sensors to monitor different things, each Notion sensors can do everything.

What’s in the box?

You can buy Notion systems with 3 or 5 sensors. I received the 3 sensor package which includes:

1 Notion bridge
3 Notion sensors
Quick start guide

Design and features


The Notion system consists of a bridge and a set of sensors. The bridge shown above looks like an AC adapter. It’s made of white plastic and has an LED on the top edge that blinks green to indicate that it’s communicating with the sensors.

The sensors are also made of white plastic with an LED at the 9 o’clock position.

The sensors are 2-inches across and have adhesive on the bottom that can be used to stick the sensor to a door, window, ceiling, etc.

You’ll also notice the QR code on the bottom, that’s used during the setup phase to identify each sensor that you want to install.

The sensors run on a CR2477N coin cell lithium battery. According to their online FAQ, that battery should power the sensor for about a year.

Installation


Setting up the Notion system is extremely easy. The first step is to install the Notion app on your iOS or Android device. You’ll then create an account and follow the step-by-step instructions to add the sensors to the bridge.

I installed one sensor on my basement door by peeling and sticking the adhesive.

I placed another Notion sensor on the front door. If you notice the oblong sensor above the Notion in the image above, that’s a sensor from the SimpliSafe security system that I reviewed almost 8 years ago.

I put the third sensor in the bedroom.

Note that each Notion bridge can handle up to 15 sensors on its network.

Each sensor can have a maximum of 3 tasks that can be chosen from the list above. When you add one task, it affects the rest of the tasks that you can add to that one sensor. For example, if you choose Door as one of the tasks, you’ll not be able to also add the window task to the same sensor.


Some of the tasks can be customized to alert based on a certain condition like the temperature going above or below a specified temp.


Once you’ve setup the tasks for each sensor, you can view their status through the app’s sensor screen. Clicking on each task will show you more details about that task including a log of alarms and the ability to customize how you would like to be alerted when an event is detected.

You can add multiple people to your Notion account who will be notified when an alarm is detected and you can also set a quiet time when you will not be notified of an alert or you can set the system to only notify you when you’re away from home.

The screenshot above might lead you to believe that the Notion system will alert fire or police if an alarm is detected. It won’t. The app just detects the emergency numbers based on your location and puts them on a screen for your reference. Of course, you really just need to call 911.

Using the system


After the Notion bridge and sensors are installed and configured through the app. You can just sit back and wait to be notified about alarms. The notifications show up on your mobile device like you see above.

Sounds fantastic right? Yeah, that’s what I thought. But unfortunately, it has not been all rainbows and unicorns…

Problems from the start

Things worked pretty well for the first day when I was mainly testing the door opening and closing tasks. But the next day, the basement sensor started reporting that it had gone offline.


It spontaneously came back online only to disconnect again the next day. Before you ask if the bridge was not close enough to the sensor, it was in the same room with an unobstructed line of sight to the sensor about 20 feet away.

I left the sensor in that state for a couple of days just to see if it would come back online on its own. It didn’t. I then removed the sensor’s cover and that must have done something (what, I don’t know) to fix it because it’s been online ever since.

That said, another sensor has gone offline and would not reconnect until I removed the cover and jiggled the battery.


The next problem happened today when the front door sensor reported that it had detected a leak when there was absolutely no water, steam, condensation or anything remotely damp near it. The weird thing is that when I went into the sensor log page, it didn’t show that it had detected a leak. An hour later a sensor that was sitting on the desk next to me also notified me of a non-existent leak and this time it did show up in the log but again, there was no reason for it to detect water.

Testing sensor tasks

I tested the leak detection feature and found that it doesn’t take much water for it to send an alert. But I don’t know why it sometimes detects a leak when there isn’t one to detect.

I also tested the door opening and closing tasks which was more reliable than the other tasks.

The temperature task also works well.

The most disappointing task is the smoke alarm task because the sensor does not really detect smoke at all. It actually listens for an existing smoke alarm and alerts off of the sound which I think is a lame way to do it because the sensor depends on a working smoke detector to work.

Final thoughts

I like the idea of the Notion home awareness sensor kit and had high expectations for it. But it didn’t take long to discover that this system has some technical problems:

The sensors randomly disconnect.
The sensors detect leaks when there aren’t any.
The smoke alarm task doesn’t really detect smoke.
No notification when sensor batteries are low.

Add in that the system won’t work without power and an internet connection and it just has too many issues for me to be able to recommend it.

Source: The sample for this review was provided by Notion. Please visit their site for more info.


Product Information

Price: $219 (3 sensors and 1 bridge), $299 (5 sensors and 1 bridge)
Manufacturer: Notion
Pros:
  • Easy to set up
  • Each sensor can do multiple things
  • No monthly fees
Cons:
  • Smoke alarm doesn't detect smoke
  • Leak detection task is not reliable
  • Sensors randomly disconnect
  • Won't work without power or an internet connection

Filed in categories: Home and Kitchen, Reviews

Tagged:

Notion home awareness sensor kit review originally appeared on on March 30, 2017 at 11:14 am.

Note: If you are subscribed to this feed through FeedBurner, please switch to our native feed URL http://the-gadgeteer.com/feed/ in order to ensure continuous delivery.
Treblab X11 Wireless Bluetooth Earbuds review

I’m a firm believer in futurism, the coming-true of farfetched science fiction concepts. One of the seemingly impossible devices I remember reading about was featured in Ray Bradbury’s dystopian novel Fahrenheit 451. The main character’s wife would lie awake at night listening to the “beetles” in her ear — tiny radio earbuds — chittering away deep into the night.

I used to long for such devices to exist, truly wireless earbuds, so that I could listen to my own music unhindered by cables or heavy batteries. And wouldn’t you know that less than 20 years after reading that book, I’d be holding in my hands something very similar to a then-preposterous concept, the Treblab X11 Bluetooth Earbuds.

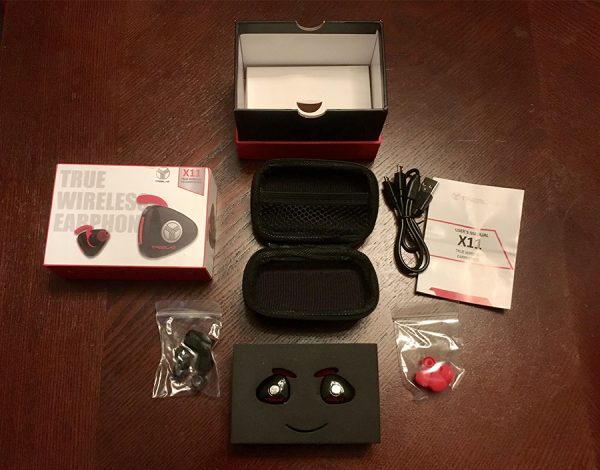
Comes with everything shown, including two complete sets of earplugs, both foam and rubber. Very welcome!

In 2017, Treblab’s “truly wireless earbuds,” as they call them, are actually not such an usual device. All the same, I was amazed at how small and lightweight the X11’s were and eager to put them to the test.

What’s in the box?

  • The earbuds
  • Carrying case
  • Manual
  • 3 sizes of rubber eartips
  • 3 sizes of foam eartips
  • Split-end Micro USB charging cable
  • Manual

The Specs

The X11 earbuds sport Bluetooth 4.1 profile, a 6-hour battery life, 38-foot signal range (which seemed accurate in my testing), and an inline mic for placing and receiving phone calls. Charging was a simple affair thanks to the special split micro-USB cable that allowed for both earbuds to be charged simultaneously.

The included charging cable is split at the end to charge both earbuds from the same cord.

Interestingly, powering on just one earbud activates both the left and right audio channels for single-earbud use. I believe that’s what gave me such a hard time with the pairing process. It’s a bit of a chore to get both earbuds paired to the device and each other, as they show up as two separate devices in the Bluetooth pairing process. But after the initial weirdness, everything was pretty smooth.

Durability and Design

The construction of the earbuds seemed very solid. I’d say that they’re fine to toss into a front pocket or gym bag, but I’d probably stick them in their case or a smaller container simply to avoid losing them. After placing them in my ears, they were practically weightless. There’s virtually no chance they would accidentally fall out of your ears.

You’d be very hard-pressed not to find a perfect fit for your ear canals with at least one of the six supplied eartips. There are 3 sizes of both foam and rubber tips, which felt generous to be given so many options.

Both earbuds have a button on them that acts as play/pause for music and answer/hang-up for phone calls. There is no volume control on them. The buttons are located directly over your ear canals, so the force required to press them forced the earbuds painfully deeper.

One quirky feature of the earbuds is that while they’re powered on, they flash a very bright blue light. About every 8 seconds or so. The entire time they’re on. Since I was testing these at work, I chose to cover up the buttons with tape to keep from distracting my neighbors (and myself) with the blue strobes. But I imagine that steady blinking would be great for visibility in low-light running.

Pay no mind to the tape I placed over the flashing, blue lights.

Sound

Initially, I found the sound quality a bit lacking. The bass seemed weak and the treble a little too hissy. But then I realized that the default eartips were a bit too loose for my ear canals. Once I switched over to a larger set and formed a better seal, the sound quality improved dramatically.

After finding the right fit and EQ setting, the sound quality jumped up to very good. The bass was punchy, mids seemed very clean and the treble, while still a little too hissy for my taste, did not deteriorate and contrasted clearly with the heavy bass. I’d consider them to be perfect for workouts and running. The volume reached dangerously loud levels at around 50% of my iPhone’s volume threshold, so it’s safe to say they’re plenty loud. Hours into the testing, I was genuinely surprised they sounded as good as they did, considering their tiny size, wireless connectivity and relatively unheard-of brand.

But then, brand isn’t everything.

I managed to get about 5 hours of battery life out of them before I got a spoken “low battery” voice prompt in my left ear. The battery level dropped from 30% to 20% in a moment and then powered off very soon after that. They won’t carry you through a full work day, but a long run or gym session? No problem.

If you’re in the market for a pair of wireless earbuds that you can throw in your ears and essentially ignore after that, at just under $80, Treblab’s are tough to beat.

Source: The sample for this review was provided by Treblab. Please visit their site for more info or Amazon to purchase now.

Filed in categories: Audio, Video, TV, Bluetooth Gear, Reviews

Tagged:

Treblab X11 Wireless Bluetooth Earbuds review originally appeared on on March 30, 2017 at 8:00 am.

Note: If you are subscribed to this feed through FeedBurner, please switch to our native feed URL http://the-gadgeteer.com/feed/ in order to ensure continuous delivery.
Pelican Bottle Drinkware review

I have been a sportster/athlete most of my life, enjoying tennis, running, karate, basketball, etc. When I was younger, I did a poor job of drinking enough water to stay hydrated. Horribly so, but youth allowed me to power thru 99% of the time. As I have gotten older, I do a much better job drinking liquids throughout my day. Sadly though, that sometimes means buying water in plastic bottles. And while I diligently recycle, I still have twinges of guilt. To help alleviate this, Pelican has recently released a new product to help you fill up as you go… Pelican Bottles is the latest addition to their rugged Drinkware collection and is a tough, “go anywhere, do anything” vessel designed to withstand the harshest of rough and tumble lifestyles. 

Note: Images can be clicked to view a larger size.

I love Pelican products, I have used them for decades both at home and at work. It is impressive just how much abuse they can withstand. Pelican’s Drinkware Bottles are created with that same bring it on attitude. Pelican Bottles are engineered with 18/8 pro grade stainless steel finished with a sweat-proof, powder-coated exterior that ensures greater durability and solid grippability.

Specifications:

  • Length:  3.62″ (9.2 cm)
  • Height:  11.00″ (27.9 cm)
  • Capacity:  32oz
  • Weight: 1 pound (empty) / 3 pounds (full of water)

Features:

  • Double-wall vacuum insulation for extreme hot & cold retention
  • Copper-plated inner wall and 18/8 stainless steel
  • Sweat-proof, powder-coated finish
  • Non-slip rubber base
  • Spill-proof lid with easy-carry handle
  • Lifetime Guarantee

The Pelican Bottle has double-walled construction with vacuum insulation for better hot and cold thermal retention. As stated above, the interior wall is made from 18/8 stainless steel with a copper-plated inner lining and vacuum insulation between it and the outer wall. The cap is made from rigid plastic that screws on easily and has what appears to be a rubber or silicone o-ring to seal the vessel liquid-tight.

Pelican has designed the Bottle’s cap to be an easy-carry handle for “effortless transport”. The loop on the cap is meant to be carried by hand or attached to your EDC bag. The thermos itself is engineered to be spill-proof.

The Bottle’s non-slip rubber base not only adds extra surface grippability but increased durability from bumps and drops as well. This wide base is engineered to (hopefully) not topple over, preventing spillage of the bottle’s contents. But the wider base on the 32oz. and 64 oz. Bottles make it so they will not fit into most, if any, car cupholders. As an aside, this made me smile: pretty funny how Pelican needs to warn folks to not microwave a metal bottle…though I bet it would make for an excellent Slow Mo Guys video 😀 .

Pelican Bottles are available in black or white, with capacities of 18 oz., 32 oz., and 64 oz. Pelican Bottles come with a lifetime guarantee. I selected the 32oz. Pelican Bottle and it definitely fits the three bears scenario. Not too big and not too small, for me at least but your need may be different.

Now I grant you a thermos is not the most high-tech piece of hardware…no matter how nicely constructed. But the Pelican Bottle is an excellent addition to my EDC gear. I’m considering using the Pelican Bottle to upgrade my old plastic bottle I continue to reuse around the office or perhaps as a emergency source of water in my fun car. But whether you are going on a hike, long ride in a car, or bringing your favorite beverage to watch your kids sports team play, the Pelican Bottles is a great way to transport your hot or cold drinks with you.

Source: The sample for this review was provided by Pelican. Please visit their site for more info.


Product Information

Price: $39.99
Manufacturer: Pelican
Pros:
  • Very well made/solid construction
  • Quality materials
  • Easy to carry
  • Great thermal insulation
  • Good grippability
Cons:
  • None

Filed in categories: Health, Fitness, Sports, Outdoor Gear, Reviews

Tagged:

Pelican Bottle Drinkware review originally appeared on on March 29, 2017 at 11:00 am.

Note: If you are subscribed to this feed through FeedBurner, please switch to our native feed URL http://the-gadgeteer.com/feed/ in order to ensure continuous delivery.