Notion home awareness sensor kit review

Home automation, security, and remote monitoring are all hot topics right now. The ability to know that everything at your property is fine when we’re not physically there is a priceless gift for chronic worriers and people who like to feel in control. There are many systems on the market that will let you install cloud-enabled smoke alarms, window and door alarms, temperature alarms, leak detectors and more. But I’m going to tell you about a system where one sensor can do all of those things. Let’s take a look at the Notion home awareness sensor kit.

What is it?

The Notion home awareness sensor kit is a home monitoring system that uses a bridge and wireless sensors that will tell you if a door has been opened or closed, a window has been opened or closed, if there’s a leak, if the temperature is higher or lower than a set temp, and if there’s a smoke alarm. But instead of picking and choosing different sensors to monitor different things, each Notion sensors can do everything.

What’s in the box?

You can buy Notion systems with 3 or 5 sensors. I received the 3 sensor package which includes:

1 Notion bridge
3 Notion sensors
Quick start guide

Design and features


The Notion system consists of a bridge and a set of sensors. The bridge shown above looks like an AC adapter. It’s made of white plastic and has an LED on the top edge that blinks green to indicate that it’s communicating with the sensors.

The sensors are also made of white plastic with an LED at the 9 o’clock position.

The sensors are 2-inches across and have adhesive on the bottom that can be used to stick the sensor to a door, window, ceiling, etc.

You’ll also notice the QR code on the bottom, that’s used during the setup phase to identify each sensor that you want to install.

The sensors run on a CR2477N coin cell lithium battery. According to their online FAQ, that battery should power the sensor for about a year.

Installation


Setting up the Notion system is extremely easy. The first step is to install the Notion app on your iOS or Android device. You’ll then create an account and follow the step-by-step instructions to add the sensors to the bridge.

I installed one sensor on my basement door by peeling and sticking the adhesive.

I placed another Notion sensor on the front door. If you notice the oblong sensor above the Notion in the image above, that’s a sensor from the SimpliSafe security system that I reviewed almost 8 years ago.

I put the third sensor in the bedroom.

Note that each Notion bridge can handle up to 15 sensors on its network.

Each sensor can have a maximum of 3 tasks that can be chosen from the list above. When you add one task, it affects the rest of the tasks that you can add to that one sensor. For example, if you choose Door as one of the tasks, you’ll not be able to also add the window task to the same sensor.


Some of the tasks can be customized to alert based on a certain condition like the temperature going above or below a specified temp.


Once you’ve setup the tasks for each sensor, you can view their status through the app’s sensor screen. Clicking on each task will show you more details about that task including a log of alarms and the ability to customize how you would like to be alerted when an event is detected.

You can add multiple people to your Notion account who will be notified when an alarm is detected and you can also set a quiet time when you will not be notified of an alert or you can set the system to only notify you when you’re away from home.

The screenshot above might lead you to believe that the Notion system will alert fire or police if an alarm is detected. It won’t. The app just detects the emergency numbers based on your location and puts them on a screen for your reference. Of course, you really just need to call 911.

Using the system


After the Notion bridge and sensors are installed and configured through the app. You can just sit back and wait to be notified about alarms. The notifications show up on your mobile device like you see above.

Sounds fantastic right? Yeah, that’s what I thought. But unfortunately, it has not been all rainbows and unicorns…

Problems from the start

Things worked pretty well for the first day when I was mainly testing the door opening and closing tasks. But the next day, the basement sensor started reporting that it had gone offline.


It spontaneously came back online only to disconnect again the next day. Before you ask if the bridge was not close enough to the sensor, it was in the same room with an unobstructed line of sight to the sensor about 20 feet away.

I left the sensor in that state for a couple of days just to see if it would come back online on its own. It didn’t. I then removed the sensor’s cover and that must have done something (what, I don’t know) to fix it because it’s been online ever since.

That said, another sensor has gone offline and would not reconnect until I removed the cover and jiggled the battery.


The next problem happened today when the front door sensor reported that it had detected a leak when there was absolutely no water, steam, condensation or anything remotely damp near it. The weird thing is that when I went into the sensor log page, it didn’t show that it had detected a leak. An hour later a sensor that was sitting on the desk next to me also notified me of a non-existent leak and this time it did show up in the log but again, there was no reason for it to detect water.

Testing sensor tasks

I tested the leak detection feature and found that it doesn’t take much water for it to send an alert. But I don’t know why it sometimes detects a leak when there isn’t one to detect.

I also tested the door opening and closing tasks which was more reliable than the other tasks.

The temperature task also works well.

The most disappointing task is the smoke alarm task because the sensor does not really detect smoke at all. It actually listens for an existing smoke alarm and alerts off of the sound which I think is a lame way to do it because the sensor depends on a working smoke detector to work.

Final thoughts

I like the idea of the Notion home awareness sensor kit and had high expectations for it. But it didn’t take long to discover that this system has some technical problems:

The sensors randomly disconnect.
The sensors detect leaks when there aren’t any.
The smoke alarm task doesn’t really detect smoke.
No notification when sensor batteries are low.

Add in that the system won’t work without power and an internet connection and it just has too many issues for me to be able to recommend it.

Source: The sample for this review was provided by Notion. Please visit their site for more info.


Product Information

Price: $219 (3 sensors and 1 bridge), $299 (5 sensors and 1 bridge)
Manufacturer: Notion
Pros:
  • Easy to set up
  • Each sensor can do multiple things
  • No monthly fees
Cons:
  • Smoke alarm doesn't detect smoke
  • Leak detection task is not reliable
  • Sensors randomly disconnect
  • Won't work without power or an internet connection

Filed in categories: Home and Kitchen, Reviews

Tagged:

Notion home awareness sensor kit review originally appeared on on March 30, 2017 at 11:14 am.

Note: If you are subscribed to this feed through FeedBurner, please switch to our native feed URL http://the-gadgeteer.com/feed/ in order to ensure continuous delivery.

Tell whether your faucet temperature is hot or cold at a glance with this LED faucet

When several people use the same faucet, you never know what water temperature you might experience when it’s your turn. With the LightInTheBox Temperature Sensitive Single Handle Centerset LED Lavatory Faucet, you no longer have to whip your hand in and out and risk scalding your skin to see if the water might be too hot. Just looking at the LED equipped faucet will tell you whether the temperature is cold (below 25° C/77° F = Green Light), warm (26-35° C/78-95° F = blue light), hot (36-45° C/96-113° F = red light) or approaching dangerous temperatures (above 45° C/113° F = flashing red light). 

According to the Burn Foundation,

Hot Water Causes Third Degree Burns…
…in 1 second at 156º
…in 2 seconds at 149º
…in 5 seconds at 140º
…in 15 seconds at 133º

…Hot tap water is a major cause of burn injury. As with other scald burns, young children and older adults are most at risk.

…Before placing a child into the bath or getting into the tub yourself…The temperature should not exceed 100º F/39º C. A child’s delicate skin will burn more quickly than an adult’s.

…[You should] Adjust the thermostat setting on your water heater to produce a water temperature of 120º to 125º or less.

In addition to adding a measure of safety to your bathroom, the LightInTheBox Temperature Sensitive Single Handle Centerset LED Lavatory Faucet adds a bit a color to it as well with the LED lights. The faucet is made of a solid brass body with a chrome finish and uses a tempered glass spout. It is powered by 4 AA batteries, measures 6″ x 4″ x 2″, installs in a single hole, and comes with two water hoses. It is available from Walmart.com for $54.99.

Filed in categories: Health, Fitness, Sports, Home and Kitchen, News

Tagged:

Tell whether your faucet temperature is hot or cold at a glance with this LED faucet originally appeared on on March 30, 2017 at 9:00 am.

Note: If you are subscribed to this feed through FeedBurner, please switch to our native feed URL http://the-gadgeteer.com/feed/ in order to ensure continuous delivery.

Treblab X11 Wireless Bluetooth Earbuds review

I’m a firm believer in futurism, the coming-true of farfetched science fiction concepts. One of the seemingly impossible devices I remember reading about was featured in Ray Bradbury’s dystopian novel Fahrenheit 451. The main character’s wife would lie awake at night listening to the “beetles” in her ear — tiny radio earbuds — chittering away deep into the night.

I used to long for such devices to exist, truly wireless earbuds, so that I could listen to my own music unhindered by cables or heavy batteries. And wouldn’t you know that less than 20 years after reading that book, I’d be holding in my hands something very similar to a then-preposterous concept, the Treblab X11 Bluetooth Earbuds.

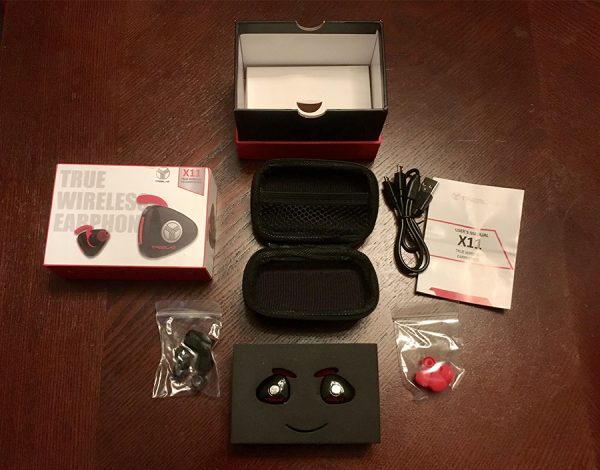
Comes with everything shown, including two complete sets of earplugs, both foam and rubber. Very welcome!

In 2017, Treblab’s “truly wireless earbuds,” as they call them, are actually not such an usual device. All the same, I was amazed at how small and lightweight the X11’s were and eager to put them to the test.

What’s in the box?

  • The earbuds
  • Carrying case
  • Manual
  • 3 sizes of rubber eartips
  • 3 sizes of foam eartips
  • Split-end Micro USB charging cable
  • Manual

The Specs

The X11 earbuds sport Bluetooth 4.1 profile, a 6-hour battery life, 38-foot signal range (which seemed accurate in my testing), and an inline mic for placing and receiving phone calls. Charging was a simple affair thanks to the special split micro-USB cable that allowed for both earbuds to be charged simultaneously.

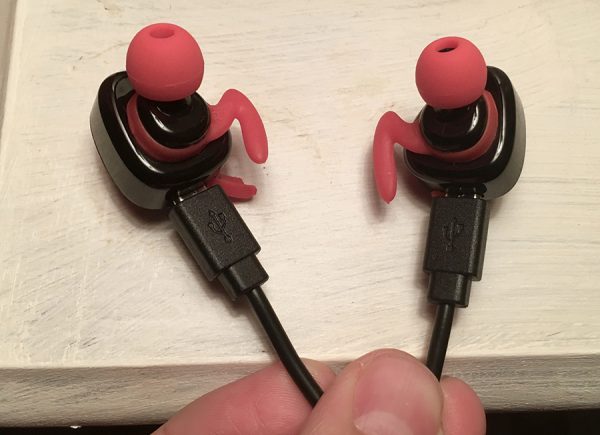
The included charging cable is split at the end to charge both earbuds from the same cord.

Interestingly, powering on just one earbud activates both the left and right audio channels for single-earbud use. I believe that’s what gave me such a hard time with the pairing process. It’s a bit of a chore to get both earbuds paired to the device and each other, as they show up as two separate devices in the Bluetooth pairing process. But after the initial weirdness, everything was pretty smooth.

Durability and Design

The construction of the earbuds seemed very solid. I’d say that they’re fine to toss into a front pocket or gym bag, but I’d probably stick them in their case or a smaller container simply to avoid losing them. After placing them in my ears, they were practically weightless. There’s virtually no chance they would accidentally fall out of your ears.

You’d be very hard-pressed not to find a perfect fit for your ear canals with at least one of the six supplied eartips. There are 3 sizes of both foam and rubber tips, which felt generous to be given so many options.

Both earbuds have a button on them that acts as play/pause for music and answer/hang-up for phone calls. There is no volume control on them. The buttons are located directly over your ear canals, so the force required to press them forced the earbuds painfully deeper.

One quirky feature of the earbuds is that while they’re powered on, they flash a very bright blue light. About every 8 seconds or so. The entire time they’re on. Since I was testing these at work, I chose to cover up the buttons with tape to keep from distracting my neighbors (and myself) with the blue strobes. But I imagine that steady blinking would be great for visibility in low-light running.

Pay no mind to the tape I placed over the flashing, blue lights.

Sound

Initially, I found the sound quality a bit lacking. The bass seemed weak and the treble a little too hissy. But then I realized that the default eartips were a bit too loose for my ear canals. Once I switched over to a larger set and formed a better seal, the sound quality improved dramatically.

After finding the right fit and EQ setting, the sound quality jumped up to very good. The bass was punchy, mids seemed very clean and the treble, while still a little too hissy for my taste, did not deteriorate and contrasted clearly with the heavy bass. I’d consider them to be perfect for workouts and running. The volume reached dangerously loud levels at around 50% of my iPhone’s volume threshold, so it’s safe to say they’re plenty loud. Hours into the testing, I was genuinely surprised they sounded as good as they did, considering their tiny size, wireless connectivity and relatively unheard-of brand.

But then, brand isn’t everything.

I managed to get about 5 hours of battery life out of them before I got a spoken “low battery” voice prompt in my left ear. The battery level dropped from 30% to 20% in a moment and then powered off very soon after that. They won’t carry you through a full work day, but a long run or gym session? No problem.

If you’re in the market for a pair of wireless earbuds that you can throw in your ears and essentially ignore after that, at just under $80, Treblab’s are tough to beat.

Source: The sample for this review was provided by Treblab. Please visit their site for more info or Amazon to purchase now.

Filed in categories: Audio, Video, TV, Bluetooth Gear, Reviews

Tagged:

Treblab X11 Wireless Bluetooth Earbuds review originally appeared on on March 30, 2017 at 8:00 am.

Note: If you are subscribed to this feed through FeedBurner, please switch to our native feed URL http://the-gadgeteer.com/feed/ in order to ensure continuous delivery.

There’s no need for a guard dog when you have a GuardPeanut!

I got a giggle out of the thought of this gadget because I was imagining an angry little peanut screaming at the dog in a tiny voice, “There’s a new sheriff in town!” while protecting my bag of Doritos or something. However, after reading what it can do, I can definitely see how it could be useful.

This cute little smart anti-theft device will alert you when it is moved via Bluetooth connection to your smartphone or tablet. You could connect it to a door, your luggage, your purse, a bike, a backpack or that hidden snack stash in the cupboard you’ve been trying to catch someone raiding in the middle of the night…the options seem endless. The app allows you to view an unlimited timeline of the objects movement history as well so you don’t have to have constant Bluetooth connection in order to track the movement of something.  You can order a GuardPeanut on Amazon for $29.99 and get yourself some piece of mind knowing that your things are being watched over when you aren’t there.

Filed in categories: Bluetooth Gear, News

Tagged:

There’s no need for a guard dog when you have a GuardPeanut! originally appeared on on March 30, 2017 at 7:00 am.

Note: If you are subscribed to this feed through FeedBurner, please switch to our native feed URL http://the-gadgeteer.com/feed/ in order to ensure continuous delivery.

Julie’s gadget diary – I’m going to be really tired tomorrow and quite a bit poorer

I have been using a Nexus 6P as my main phone since the fall of 2015. It’s been a really nice device, but it’s time that I hand it down to Jeanne so she can ditch her older than dirt Samsung Galaxy Note 2 and I can move to something new like the Samsung Galaxy S8! 

I just finished watching Samsung’s Unpacked Event where they officially unveiled the Galaxy S8 and S8+ devices. I’m excited about the new phones. The event itself didn’t sway me to want to buy one of them though. I had already decided that I would be buying one months ago. My only struggle has been trying to decide which one to choose: S8 or S8+. I’ve finally made up my mind to go with the S8. The S8+’s crazy large display is very tempting, but I’m looking forward to having the same size screen as my Nexus 6P in a more pocket-friendly size.

The Samsung Galaxy S8 and S8+ devices won’t be available until April 21st, but pre-orders start at 12:01 AM tomorrow morning through Verizon, AT&T, and T-Mobile. The S8 will be priced at $750 and the S8+ will be $850 from AT&T and T-Mobile, but only $720 and $830 through Verizon, which is the carrier that I use. Verizon and T-Mobile are also including a new Samsung Gear VR headset and other goodies.

I also want to buy a Samsung DeX dock which will let you connect the S8/S8+ to a monitor, keyboard, and mouse for a full-screen PC-like experience. I’m really excited to try that feature. Right not there isn’t any info about pricing or availability. But if it’s up for pre-sale at 12:01 tomorrow morning, I’m adding one to my shopping cart along with a black S8.

Check out Samsung for more info on the new Galaxy S8 and S8+ devices (Note: at the time I’m posting this, they haven’t added any specific product info).

Is anyone else as excited as I am to get their hands on one of these new phones?

[Source: The Verge, CNet]

Filed in categories: Articles

Tagged: ,

Julie’s gadget diary – I’m going to be really tired tomorrow and quite a bit poorer originally appeared on on March 29, 2017 at 1:04 pm.

Note: If you are subscribed to this feed through FeedBurner, please switch to our native feed URL http://the-gadgeteer.com/feed/ in order to ensure continuous delivery.