Hedgehog umbrella review

REVIEWS – When you live in southern Indiana, you just never know what the weather is going to be like. It’s February but we’ve had lots of rain and even thundersnow. Yes, that’s really a thing here. This week I’ve been testing the stormproof and unbreakable Hedgehog Umbrella. Let’s check it out.

What is it?

The Hedgehog Umbrella is a compact umbrella designed in Canada to withstand winds of up to 70MPH without turning inside out. That’s hurricane category 1 wind speeds.

Design and features

They sent me a Gen 2 in Sky Blue. The canopy is made of a 210 thread-count Water Repellent Pongee fabric that’s thin, but strong. You can choose from a variety of colors and you can even buy replacement canopies to easily switch out. Even better is the fact that they are going to soon offer a service where you can design your own canopy by uploading an image.

The umbrella ships with a slipcover which you’ll probably toss and promptly lose after the first time you use it.

When it’s collapsed and wrapped for storage, the umbrella measures 13 inches long and it weighs close to a pound. I consider this a medium sized umbrella that is small enough to fit in a backpack. I’ve seen and used umbrellas that are much smaller and easier to carry around, but this is the perfect size if you want true coverage and protection from rain. The ultra small ones really aren’t that useful in a storm.

The Hedgehog has a comfortable soft touch handle with a thick elastic cord. You might think that you can deploy the umbrella by pressing the button on the handle. You would be wrong. Unfortunately, there’s nothing automatic about the Hedgehog. This is a fully manual umbrella which is a bit disappointing given the price but I can understand that the automatic mechanisms are probably the weakest point of an umbrella the designers of the Hedgehog decided to bypass any issues by not including that feature.

So to open the Hedgehog, you just hold the handle in one hand and use your other hand to push the carbon fiber frame up the handle to the locking point at the top.

I don’t think I’ve ever seen such a robust frame as the one on the Hedgehog umbrella. It’s very sturdy and they claim that it is unbreakable.

When fully deployed, the umbrella is very roomy and large enough to that a friend can share with you.

When it’s time to collapse the umbrella, you just press the button on the center frame mechanism and it will unlock it so it can fold and slide back down the center handle.

The Hedgehog umbrella is perfectly balanced so it’s comfortable to walk with and I found that the canopy was large enough that I remained completely dry in all but sideways downpours.

What I like

  • Extremely well made
  • Withstands up to 70MPH winds
  • Ability to switch out the canopy
  • Ability to design your own canopy – coming soon
  • Lifetime warranty

What needs to be improved

  • It takes two hands to deploy it due to the lack of an automatic push button mechanism
  • Pricey

Final thoughts

The Hedgehog umbrella is very well made. I have no doubt that it’s been designed to last for years and the ability to switch out the canopy if there’s ever damage or if you just want a new color is great. The only issue I have with the umbrella other than the high price is that it takes two hands to open and close it. I don’t like wrestling with an umbrella when I’m going into and out of buildings and cars. I just want to hold it out in front of me, press a button and start walking. With the Hedgehog you can’t do that. If that’s not a deal breaker for you and you also live in a very windy/rainy area, this is definitely an umbrella to have in your bag.

Price: $79.00 – $99.00
Where to buy: Hedgehog Umbrella
Source: The sample for this review was provided by Hedgehog Umbrella.

Filed in categories: Reviews

Tagged: ,

Hedgehog umbrella review originally appeared on The Gadgeteer on February 22, 2019 at 11:00 am.

Note: If you are subscribed to this feed through FeedBurner, please switch to our native feed URL http://the-gadgeteer.com/feed/ in order to ensure continuous delivery.

Minger Govee Wireless Thermo-Hygrometer with WiFi Gateway Review

REVIEW – I have always been a weather nerd.  From my earliest memories, I remember watching the sky hoping and praying for a good thunderstorm to roll across the area.  I had even originally planned to be a meteorologist until I found out how many calculus classes were required for the degree!  That being said, the lack of a degree in meteorology never kept me from being fascinated by the weather and capturing the data associated with it. Hey, my real job is a data analyst so go figure!  When the Gadgeteer offered up the opportunity to review the Govee Wireless Thermo-Hygrometer with WiFi Gateway I jumped at the review.  Read on to see how well it worked out for me.

What is it?

The Govee Wireless Thermo-Hygrometer with WiFi Gateway is exactly what it says it is.  It comes with a wireless hub you plug into the wall and connect to your home’s WiFi.  Then you can attach multiple of their Thermo-Hygrometer units to the gateway and monitor the temperature and humidity in various places around your home.  You just need to be sure you place the sensors where a WiFi signal is available.  You can then install the Govee Home app on your IOS or Android device and see the values those sensors are returning anywhere your phone gets a cellular signal.

They mention monitoring a baby’s room or maybe a wine cellar for those who are lucky enough to have one.  Another good place to put one if there is enough room is a cigar humidor.  Basically put them anywhere you want to monitor the temperature and humidity.   I placed one on my back deck on a side rail (it did not blow off in 45 mph wind gusts the other day so I put it in a good spot) that was out of any direct sunlight but had good airflow.  The other I placed in my living room.

I have owned what I call a professional weather station and have learned a lot about where you should place temperature sensors outside.  Ideally, they should be 6 feet off the ground in a well ventilated spot not in direct sunlight.  Way back when I first got my original weather station I had the temperature sensor mounted under an eve on the side of my house.  Yes, it was in shade, but all the heat rose and was trapped under that eve so my temperature readings were a good 10 degrees or more than they should have been!

What is in the box?

The box was very plain and simple, but it may have been because I received this device for review and it was not the true public packaging.  That being said, there were only four things in the box.

  1. Two wireless temperature and humidity sensors.  They both had a pair of triple A batteries inside and I simply removed the cover and pulled a tab to make the batteries touch the contacts.
  2. One user manual
  3. One gateway hub that plugs into a standard US socket.  It only works with 2.4 GHz WiFi not 5 G.

Setup and Use

Setup for this set of sensors is pretty painless.  The first thing you do is to install the Govee Home app on your phone.  It is available for both Android and IOS.  The next series of screens will take you through the setup starting with the 4 screenshots above. When you first open the app you are presented with this screen.  I clicked on the top left blue badge titled ‘Become a Savvy User’.  It took me to the next screen explaining the benefits of becoming a Savvy User.  I like discounts and I like voicing my opinion (go figure!) so I joined.  The next page is the signup page where you enter in your email and pick a password.  The fourth screen shows me logged in and now a Savvy User.

The next four screens now show the steps I went through to set up the gateway and temp-humidity sensors.  I clicked on the home screen icon at the bottom of the page.  From the home screen, I then clicked on the plus sign on the top right hand of the screen to add a device.

The first screen above shows the plethora of devices they offer.  This particular screenshot is on the second page of products and I picked the Wi-Fi Smart Gateway.  The user product manual that came with it specified that I was to add the gateway first so that is why I picked it instead of the Wireless Thermo-Hygrometer.

Once I picked the gateway, I was presented with the second screen.  I followed the instructions after plugging in the device into an outlet that was in the same room as my router.  The third screen popped up quickly and I switched over to my phone’s WiFi connections and connected to the Govee Gateway.  I then went back to the app and saw the 4th screen above.  What you don’t see is the next screen where I had to enter in my WiFi password and connect the gateway to my router.  Now the gateway is on my WiFi network.

Immediately after I was connected to the network I was presented with the top left screen above.  I was happily surprised to see the Gateway found my two sensors and immediately connected to them.  The top one is the one outside and the bottom one is the one in my living room.  Note that I have since changed the name of both devices to something meaningful through the settings screen offered on each device.  You can see the main screen gives a nice overview of the current temp and humidity of each device.  If you click on any one of the devices you are presented with the second screen which is the hourly screen.

The detail screens (these are the ones you get when you click on a device from the main screen) all default to display the hourly screen.  From there you can pick day, week, month or year.  You can also see the settings icon on the top right of the page.  The second screenshot above shows the hourly screen.  The third and fourth screens show you the popup that happens when you touch one of the points on the screen.  I like how it pops up the detail to show the temp and time/date it happened.  This works for both temp and humidity.

The next screenshot above is the weekly screenshot.  We had a front come through early Sunday morning and you can see the drop in temperature and humidity.  The next two screenshots are the monthly displays.  The third one is how it pops up very compressed.  The app lets you use two fingers and expand the data points which is really cool.

The second screenshot is the month expanded.   Something else that is really cool for a data nerd like me is the export data button you can see on the bottom of the third screen.  If you click on that you get the fourth screen.  You can specify intervals down to the minute and then pick start and end times.  When you click the little paper airplane up top the app will send you a CSV file in the mail with all of the detail.  Very cool!!

This last screenshot shows you the devices settings page.  I have scrolled down a bit, but at the very top is where you can give the device a meaningful name. The rest of the screen is dedicated to alarm notifications.  You can set the min and max temp and humidity and if the device exceeds either one you will get a notification from the app.  This works exactly as it should.  I set the min temp for outside to 57 degrees and I started getting notifications the moment it dropped below that.  There are also calibration options which I also think is a nice feature.  If you have another thermometer that you trust implicitly, you could use it to calibrate the ones from Govee.

What I like

I love how easy the device is to use.  The app is very flexible allowing you to see temp and humidity values across any number of time periods.  I also find the ability to export the data into a CSV file a big plus.  Being able to set alarm notifications would also be a big plus for anyone putting these sensors in sensitive areas like a baby’s room, greenhouse or cigar humidor.  They also offer a fast return service.  If you ever experience a problem with the device, the app lets you put in your Amazon order number and they will send you a replacement right away with no need for you to send the old one back.  They have a two-year replacement warranty.  I personally never tried that feature, but it seems to be a cool option to have.

What needs to be improved

I cannot find anything that needs to be improved.  What can I say, I love this device.

Price: $79.99
Where to buy: Amazon
Source: The sample for this review was provided by Minger.

Filed in categories: Reviews

Tagged: , ,

Minger Govee Wireless Thermo-Hygrometer with WiFi Gateway Review originally appeared on The Gadgeteer on January 26, 2019 at 9:00 am.

Note: If you are subscribed to this feed through FeedBurner, please switch to our native feed URL http://the-gadgeteer.com/feed/ in order to ensure continuous delivery.

AcuRite ATLAS Weather Station review

REVIEW – I have been considering getting a high-tech weather station for years now but never had the time/energy to do the product research and make it happen. As a bit of background, I have a degree in atmospheric science and am quite the data-nerd. So when Julie offered up the AcuRite ATLAS weather station, I quickly volunteered to check it out and see if it lives up to my hopes and dreams of collecting ultra-local meteorological data at our home.

What is it?

The ATLAS weather station is engineered to collect meteorological data in near real-time and wirelessly transmit it to you in a variety of ways. The ATLAS measures temperature, humidity, wind speed, wind direction, rainfall, UV index, and light intensity. The system transmits this data to either an optional HD touchscreen in your home or uploads it via the optional access point to the internet/cloud, making it viewable on your computer or smart device anywhere you happen to be.

Design and features

The AcuRite ATLAS is a compact, relatively well-made weather station that collects what I would consider pretty standard meteorological data. Its housing is made from a hard plastic designed to (obviously) withstand the outdoors.

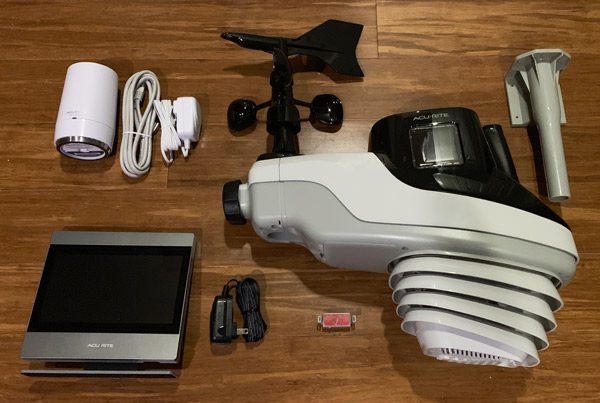
  • ATLAS Weather Station
  • Wall/post mounting bracket
  • High Definition Touchscreen Display (optional $99.99)
  • AcuRite Access Point (optional $99.99)
  • Lightning Detector (optional $39.99)

Specifications:

Temperature Range -40 to 158° F
-40 to 70° C
Temperature Accuracy +/- 1° F
Humidity Range 1% – 99% RH
Humidity Accuracy +/- 2% RH
Wind Speed 0 – 160 mph; 0 – 257 km/h
Wind Direction 360°
Wind Direction Accuracy +/- 3°
Rain .01″ intervals (0.25 mm)
Rain Accuracy +/- 5%
UV Index 0 – 15 index
UV Accuracy +/- 1
Light Intensity to 120,000 Lumens
Data Reporting Temperature: 30 seconds
Humidity: 30 seconds
Wind Speed: 10 seconds
Wind Direction: 30 seconds
Rainfall: 30 seconds
UV Index: 30 seconds
Light Intensity: 30 seconds
Wireless Range 330 feet (100 meters) depending on home construction materials
Wireless Signal 433 MHz
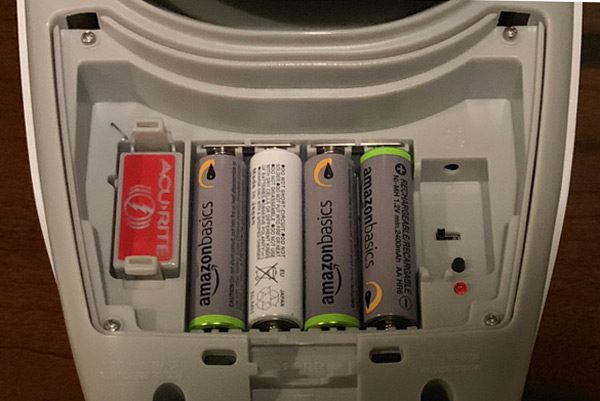
Power 4 AA alkaline or lithium batteries

The ATLAS weather station is powered by four (4) AA batteries (not included). I thought it was odd AcuRite recommends standard alkaline or lithium batteries versus rechargeable ones. We do our best to only use rechargeables and don’t have any disposable batteries in the house. So I threw caution to the wind and used what we had… Thus far the weather station is no worse for the wear. Hopefully, they recommend non-rechargeable batteries only due to poor performance/endurance in the extreme temperatures. That said, I’ll most likely swap them out when I get the chance.

The battery compartment also has a port for the optional Lightning Detector module, pictured here on the left.

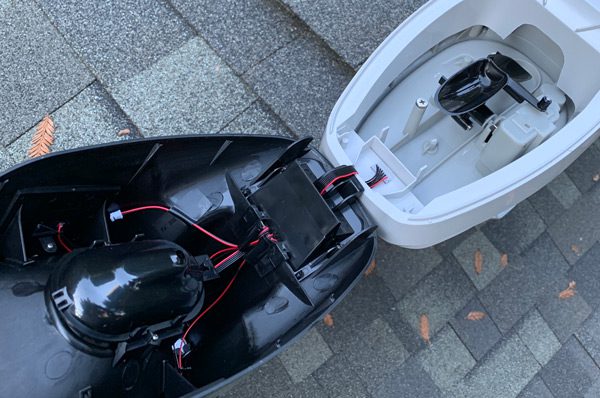
Before mounting the ATLAS weather station, foam surrounding the rain gauge must be removed allowing the plastic rocker to move freely. You definitely have to be careful to not damage or pinch the thin wires or small plastic connectors. The ATLAS is weather hardened but probably would not survive much, if any sort, of fall.

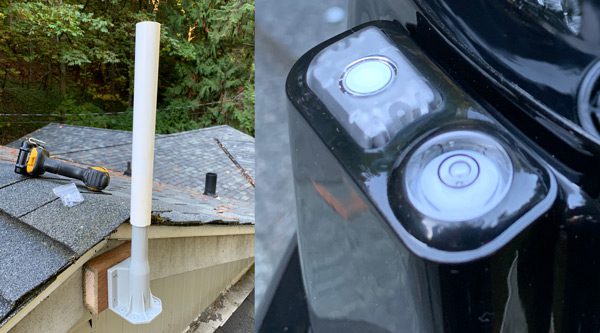
The plastic mount can be installed vertically or horizontally. An extension piece may be necessary to raise the ATLAS high enough away from whatever the mount is attached to. I used a 1 inch schedule 40 PVC pipe I had laying around the garage which worked surprisingly well. I may buy a longer piece to elevate the ALTAS even further above our roof but that may turn out to be unnecessary.

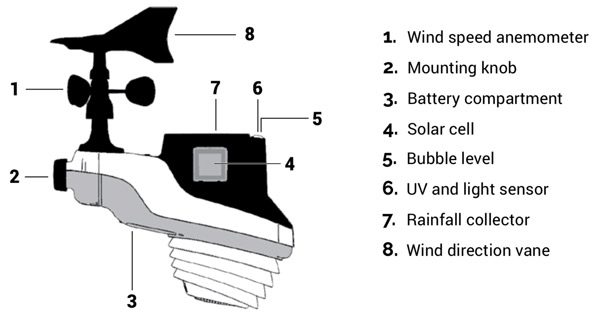
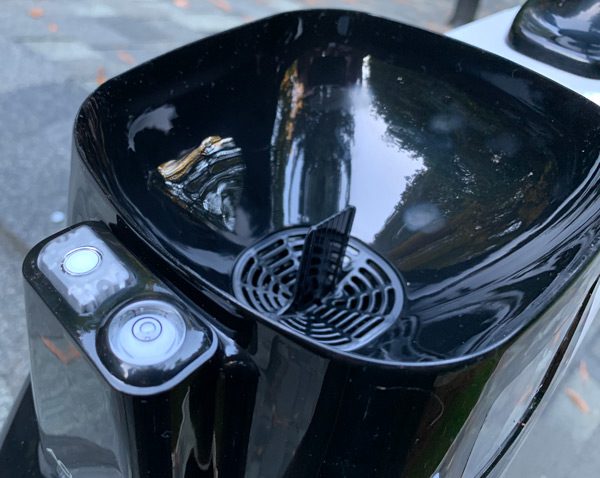
To accurately collect data, the ATLAS has to be level. Here you can see the integrated leveling bubble centered as prescribed (actually the easiest part of the install).

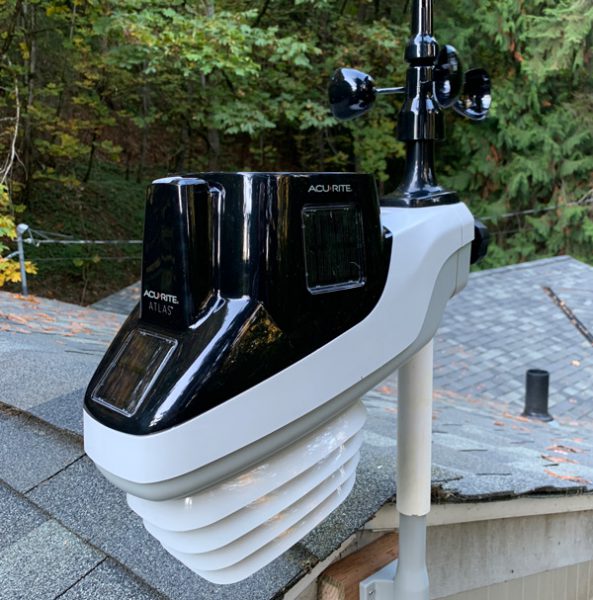
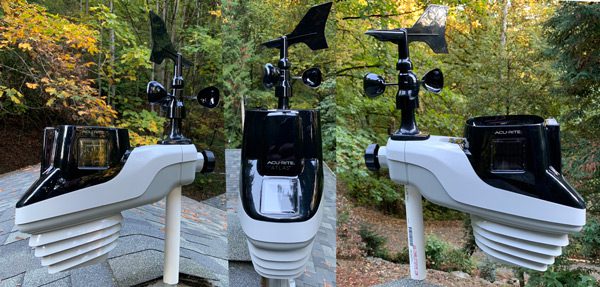
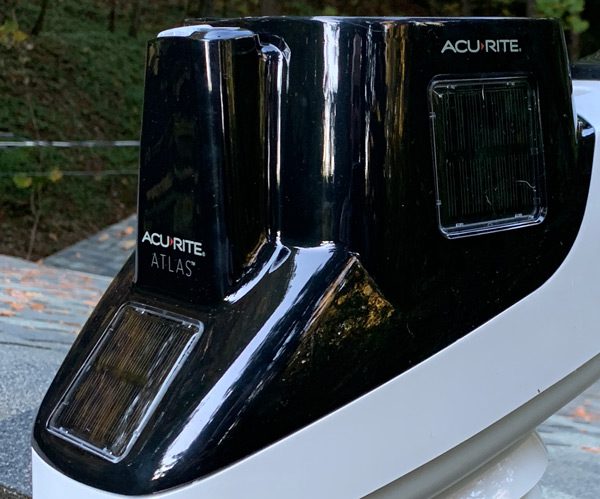
Once installed, you can barely tell the ATLAS is there collecting weather data unless you know where to look.

In addition to the AA batteries…when the sun is out, the ATLAS is also powered by three small solar panels built into the housing of the station. The solar cells measure about an inch and a half squared and there is one on the front and each side of the housing.

Here you can see the rain gauge intake and UV/light intensity sensor next to the leveling bubble.

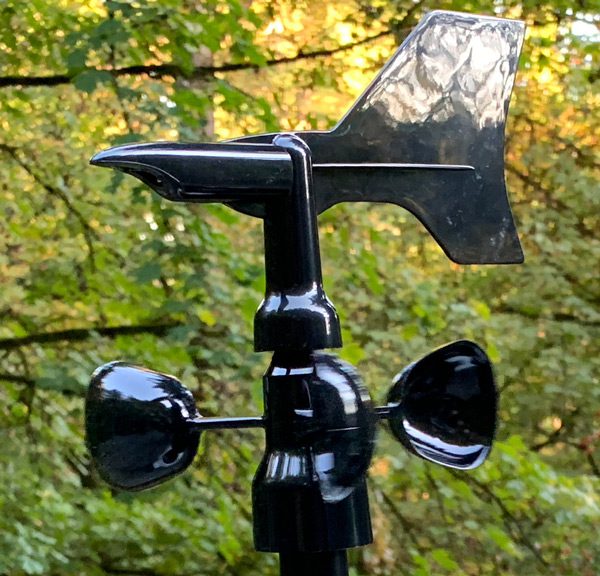
The wind direction and speed sensors are mounted top, rear of the ATLAS. Both sensors move freely in the wind. As long as you face the ALTAS due South, you do not have to tweak any of the settings to receive accurate wind direction.

Optional Accessories:

The biggest and really only issue I have with the AcuRite weather station is that you have to also purchase one of their optional accessories to view/access your data (though they do sell package deals on Amazon).

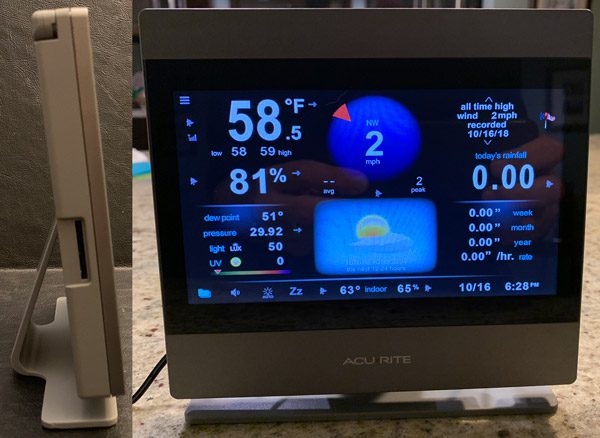
High Definition Touchscreen Display

The high definition wireless touchscreen is clear and bright, though a bit top-heavy (I ultimately mounted it in my office). Displaying all the data in a well thought out layout. Like the smartphone app, the screen also enables you to dig deeper into the data for more thorough analysis. The system’s wireless range is approximately 300 feet depending on what the signal has to penetrate. The display has a built-in antenna that can be raised if need be. There is also a standard SD card slot if you want to capture the data for later review.

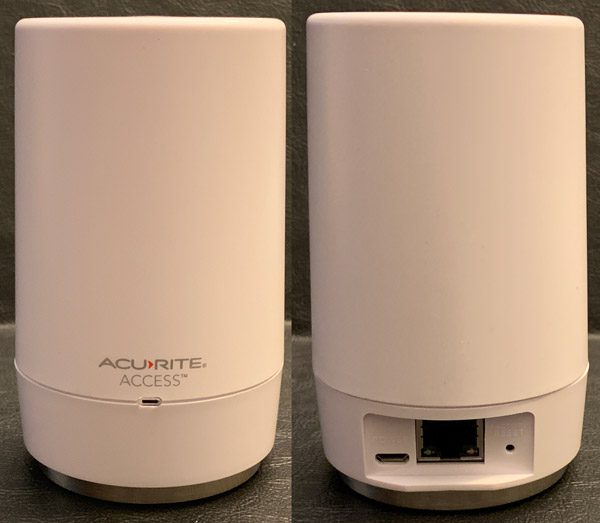
AcuRite Access Point

The AcuRite Access Point plugs into the ethernet port of your router and uploads the ATLAS met data to the myacurite.com website for viewing on your computer, tablet, and/or smartphone. The access point is dual powered via a microUSB plugged power source or three AA batteries as a temporary backup in case your power goes out. Though at that point, my guess is your internet modem and router would be without power limiting/killing your connectivity anyhow.

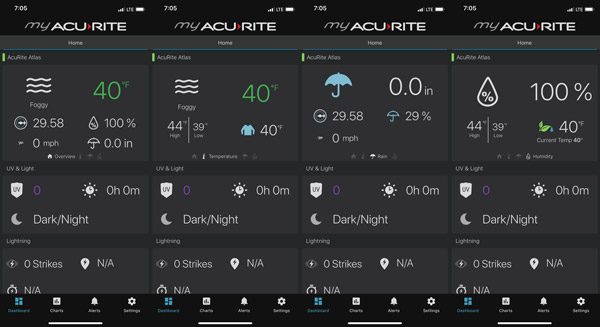
The AcuRite smartphone app does a pretty good job of displaying all the weather data collected by the ATLAS. You’re able to flip thru various data specific screens.

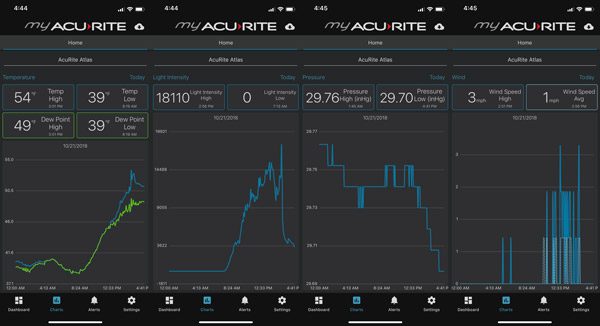
Or dive deeper into any one of the individual datasets to get a closer look as the weather changes over time. The app also enables you to download the data from the AcuRite server and set alerts for extreme conditions.

It is easy to tell at a glance the ambient conditions at your home or wherever you’ve installed the ALTAS. We live pretty far out in the sticks, so when I’m downtown or on travel, it’s great being able to check the app to see how (bad) the weather is at our place.

What I like

  • Provides real-time local weather data
  • Excellent list of sensors/data collected
  • Well made
  • Easy to setup
  • Solar and battery powered

What needs to be improved

  • Should include remote access in the box (vs as optional accessories)

Final thoughts

I really like the ATLAS weather station, it definitely meets my atmospheric scientist data-nerd needs.  AcuRite has done an excellent job creating a solid array of sensors in a compact, easy to install/setup design. The HD screen and smartphone app also do a solid job of displaying the meteorological data in an easy to read and understandable manner. That said, seeing the data on either, requires at least $100 more be invested to truly make the system usable. Though the ATLAS with all the accessories (screen, access point, and lightening module) shown here is currently available at Amazon for $261 as a package deal.

Price: ATLAS $149.99 / HD Touchscreen Display (optional $99.99) / Access Point (optional $99.99)
Where to buy: AcuRite.com or Amazon.com
Source: The sample of this product was provided by AcuRite.

Filed in categories: Reviews

Tagged:

AcuRite ATLAS Weather Station review originally appeared on The Gadgeteer on November 4, 2018 at 9:15 am.

Note: If you are subscribed to this feed through FeedBurner, please switch to our native feed URL http://the-gadgeteer.com/feed/ in order to ensure continuous delivery.

Florence is headed this way, and my thoughts have turned to emergency preparedness

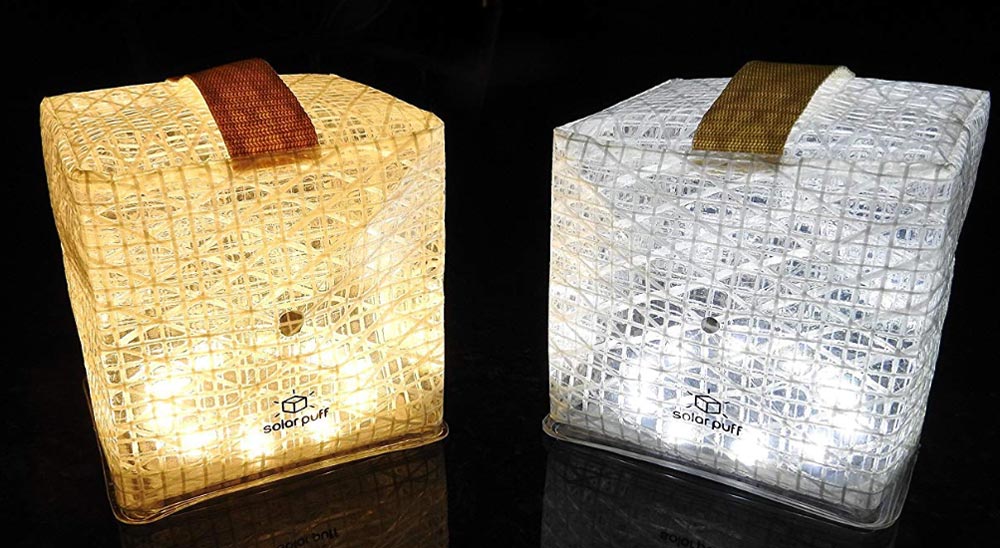
NEWS – Here in North Carolina, we’ve experienced way too many hurricanes coming ashore over the years.  Florence seems to headed our way right now, and it’s time to think about laying in supplies in case we experience power outages and disturbances in other services.  The SolarPuff light would be a good light to have on hand in case of such emergencies, or it would be great to use for camping and other outdoor activities.

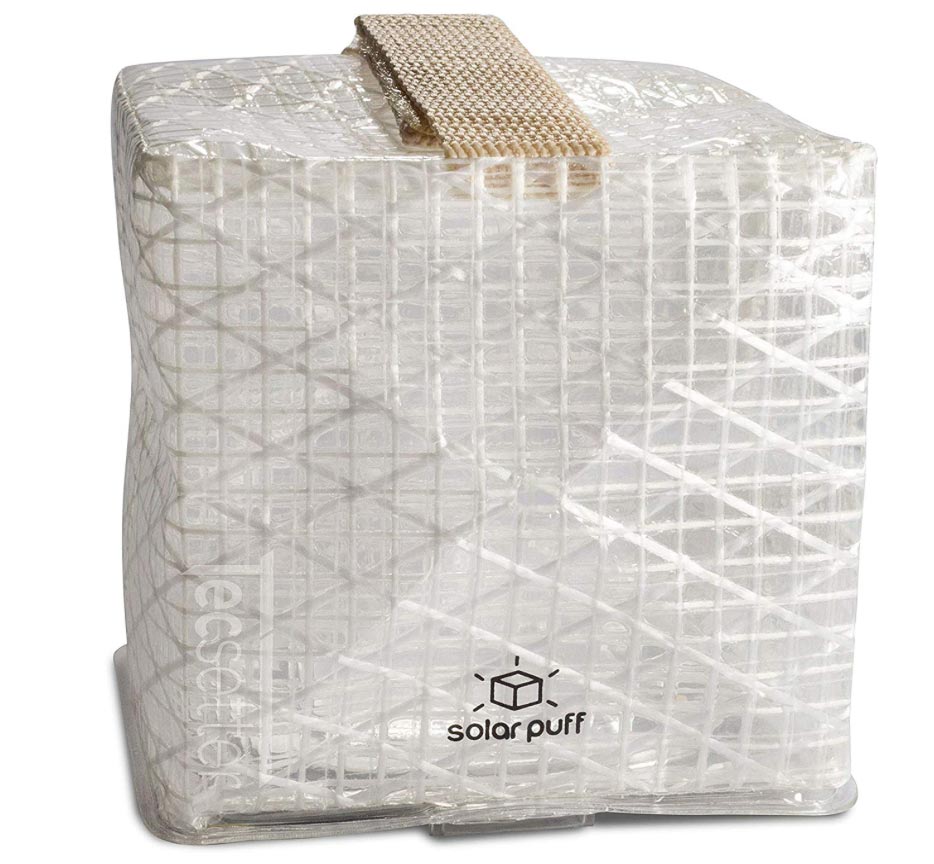
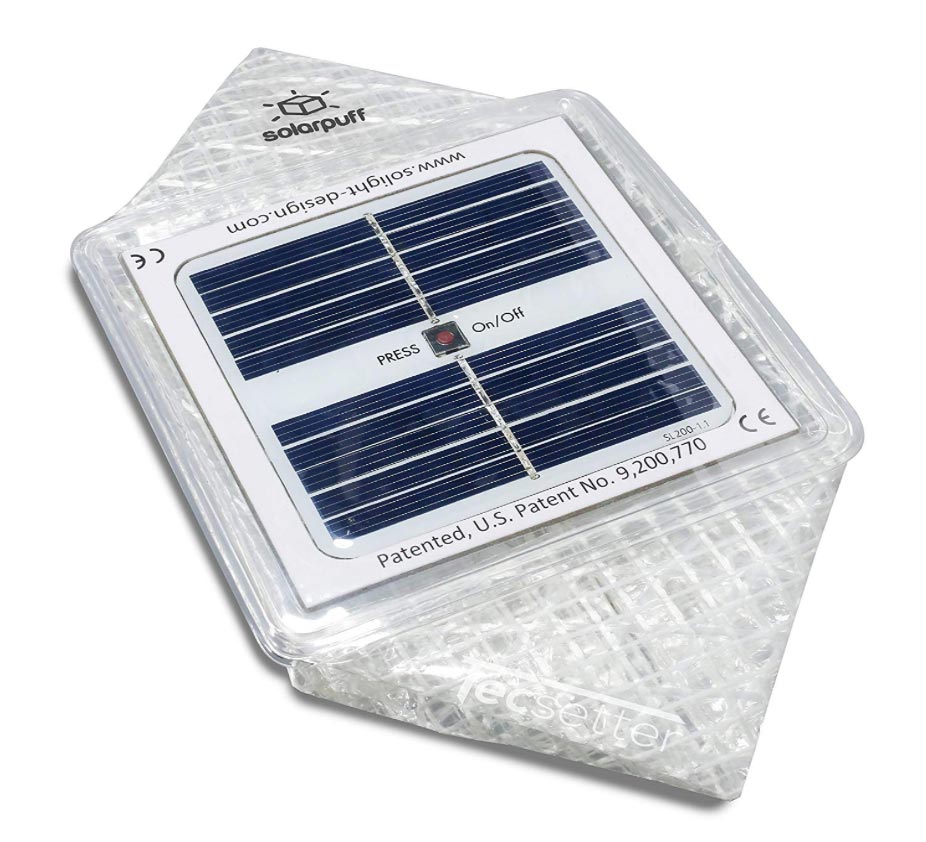
The SolarPuff is made of water-resistant and recyclable PET, so it’s suitable for indoor or outdoor use.  The small cube weighs 2.6 ounces and folds down to only 0.25″ thick, and it can be hung on a backpack with the solar panel exposed to charge the batteries.  Opened up, the SolarPuff can light up a 100 ft² room.  It has three modes: low, high, and flashing emergency light.  You can expect up to 12 hours of light from batteries that have had 12 hours of charging time.

It’s available in a soft-white version or a bright white version.  Each is $29.99 at Amazon.

Filed in categories: News

Tagged: ,

Florence is headed this way, and my thoughts have turned to emergency preparedness originally appeared on The Gadgeteer on September 10, 2018 at 9:00 am.

Note: If you are subscribed to this feed through FeedBurner, please switch to our native feed URL http://the-gadgeteer.com/feed/ in order to ensure continuous delivery.

Wireless Emergency Alerts (WEA) explained: AMBER alerts and what the heck is a Severe Alert vs. an Extreme Alert and how do I turn them off?!?

Here’s the scenario: I’m at home in the middle of the night sleeping, dreaming of eating doughnuts without guilt when suddenly I’m jolted out of my blissful reverie by my phone’s blaring emergency broadcast alert. I fumble around frantically to find my phone to determine the type of impending doom that’s about to befall me and mine only to find that it’s a flash flood warning which is not a threat to me where I live. Uuuugh! Sometimes this happens when I’m in a meeting or in a class or watching a recital and I’ve diligently silenced my phone except for the Wireless Emergency Alerts (WEA) that get through in mortifying fashion. Most of my alerts have been flash flood warnings, so how do I turn those off?

In all seriousness, these alerts were implemented to warn us of highly dangerous situations and I’m thankful that they exist. They save lives. But before I get into how to alter the emergency alert settings I want to explain a little about the alerts.

About Wireless Emergency Alerts (WEA)

Who issues emergency alerts: They are issued by government alerting authorities like the National Weather Service (NWS), Department of Homeland Security, and state and local public safety agencies according to Weather warnings to go!, a publication issued by the National Weather Service (NWS).

How are the alerts sent?: “Federal, state, local and tribal public safety agencies must apply to FEMA to become alert-originating authorities. Once the alert-originators are authorized, FEMA authenticates the sender and the alert. FEMA transmits the WEA to the more than 100 participating wireless providers who may have customers in that designated alerting area. Only those customers in that target area receive the alert.” (from ctia.org – the Cellular Telecommunications Industry Association – an international nonprofit organization that represents all sectors of wireless communications).

They are not text messages: Some of these alerts might look like text messages but they are not and are thus not affected by network congestion that may affect mobile voice or text messaging services. According to ctia.org, the emergency alerts will be no more than 90 characters, contain the type of alert it is and the time, who is affected and what action to take and the agency issuing the alert.

Types of alerts/examples of alerts: There are only three types of alerts that you will receive according to the Federal Communications Commission FCC:

  1. Alerts issued by the President
  2. Alerts involving imminent threats to safety or life
  3. AMBER alerts (named after “9-year-old Amber Hagerman, who was kidnaped while riding her bicycle in Arlington, TX, and then brutally murdered” according to amberalert.gov; also stands for America’s Missing: Broadcasting Emergency Response)

So, in addition to severe weather and AMBER alerts, you may receive evacuation orders, terrorist threat alerts, chemical spill alerts, etc. according to the FCC.

Wireless carrier/device limitations: It is important to know that some phones may not be WEA compatible. If that is the case for you, you may still receive alerts via mobile apps. Also, your wireless carrier must participate in the WEA program for you to receive the alerts; however, more than 100 mobile carriers, including all of the largest carriers, participate in the WEA program according to ctia.org.

Alerts are location dependent: Alerts are issued according to your current location. Thus, if you are traveling, you will receive alerts according to the location you are visiting. In other words, if you are using a cell tower in the alert zone, you will receive that alert according to the FCC. Since the alerts are dependent on the cell tower you are currently using, you and a friend can be in the same location but if you are using different cell towers, you may not receive the same alerts (FCC).

Altering your alert settings

Can the alerts be turned off?: Depending on your wireless carrier and type of phone that you use, you can turn off some of these alerts but you CANNOT block alerts issued by the President. And, since these alerts are so important, they will ignore your Do Not Disturb settings. For my own purposes, I’m focusing on altering the settings of the weather alerts that I receive. Since I spend most of my time at home as a homeschool teacher where flash floods are not a threat, I do not want to receive those unnecessary warnings. So I dug into my phone’s settings to investigate how to turn this alert off.

Location of alert settings on phones: Where in the world are the WEA (or Emergency broadcasts) settings? It’s fairly straightforward to find those settings on an iPhone. They are located in Settings > Notifications > (scroll to the bottom) Government Alerts. Under Government Alerts there are only two settings to turn on or off: AMBER Alerts and Emergency Alerts.

However, if you use an Android phone, it turns out the alert settings could be anywhere (well almost anywhere it seems), depending on the phone (the following list of steps is based on the Android phones I have at home and steps I have googled for some other phones):

  • Android 7: Phone Settings > Sound > Emergency broadcasts
  • Android 5 and 6: Phone Settings > More > Emergency broadcasts
  • Older Android versions: Phone Settings > More > Wireless & Networks > Cell Broadcast settings  (from phonetipz.com)
  • Samsung Galaxy S7: Phone Settings > Privacy and Emergency > Emergency Alerts > More button > Settings (from tomsguide.com)
  • HTC One M9 and LG G6: Emergency Alerts app > Menu icon (vertical ellipsis) > Settings (from tomsguide.com)

You can also alter the alert settings via your messaging app on your Android 7.0 phone:

  • Messenger > Menu icon (vertical ellipsis) > Settings > Advanced > Wireless Alerts > Menu icon (vertical ellipsis) > Settings


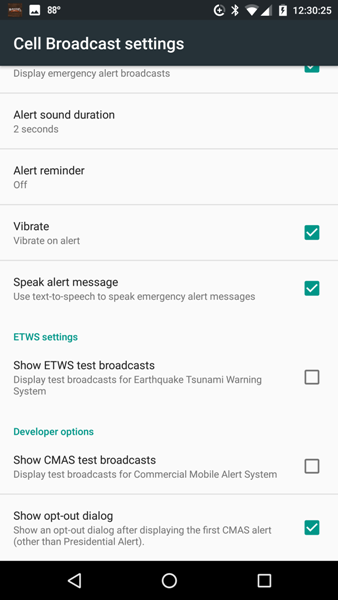
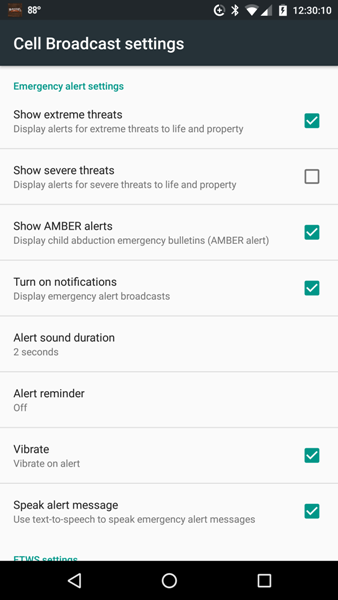
Android emergency alert settings: These are broken down into more detail than iPhone users have access to. The above screenshots show the various alerts and alert settings that you can disable or enable on your Android phone. They are:

  1. Show extreme threats
  2. Show severe threats
  3. Show AMBER alerts

You also have the option to enable the following: display notifications, select the duration of the alert sound, set an alert reminder, vibrate on alert, speak alert messages, display test broadcasts for the Earthquake Tsunami Warning System (ETWS), display test broadcasts for Commercial Mobile Alert System (CMAS – this is an older name for what is now known as Wireless Emergency Alerts), and show an opt-out dialog after displaying the first CMAS alert (other than Presidential Alert).

By default, all of my alerts were enabled. You might be saying to yourself just as I did, “I want to receive tornado alerts but not flash flood alerts. So, is a flash flood a severe threat or an extreme threat? And what exactly is the difference between the two?” *scratching head*

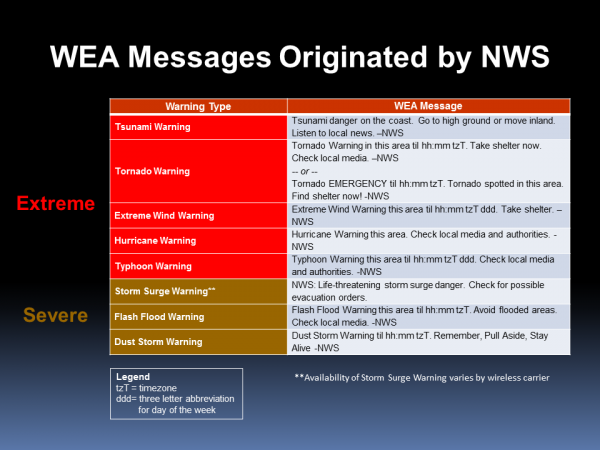
It turns out that severe threats and extreme threats include the following (the table above and the following information come from the NWS):

Severe threats (see the table above for warning details):

  • storm surge warnings
  • flash flood warnings
  • dust storm warnings

Extreme threats (see the table above for warning details):

  • tsunami warnings
  • tornado warnings
  • severe wind warnings
  • hurricane warnings
  • typhoon warnings

Now, knowing the difference between Severe threats and Extreme threats, I unselected the Show severe threats so that I could avoid getting flash flood warnings. So, there you have it. All about Wireless Emergency Alerts. Whew! That was a lot of work just to figure out how to turn off Flash Flood warnings!

Filed in categories: Articles

Tagged:

Wireless Emergency Alerts (WEA) explained: AMBER alerts and what the heck is a Severe Alert vs. an Extreme Alert and how do I turn them off?!? originally appeared on on June 30, 2017 at 8:00 am.

Note: If you are subscribed to this feed through FeedBurner, please switch to our native feed URL http://the-gadgeteer.com/feed/ in order to ensure continuous delivery.