HipOptical prescription lenses and frames review

REVIEW – I got my first pair of glasses when I was in the third grade and I’ve been wearing glasses ever since. I did have a couple of years where I wore contacts, but unfortunately, I became allergic to the proteins that stick to the lenses and had to go back to being a four-eyed geek.

I was never that self-conscience about wearing glasses and have liked being able to change my look and style with new frames every couple of years. What haven’t I liked though? The price of prescription lenses and frames. Is there an alternative to buying glasses from your local eye doctor? You bet! Let’s check out one option – HipOptical.

What is it?

HipOptical is an online store that sells eyeglasses with prescription lenses and no eye exam required. Just fill in your prescription details (that you get from your eye doctor) and within about two weeks, your new glasses will arrive in the mail.

Design and features
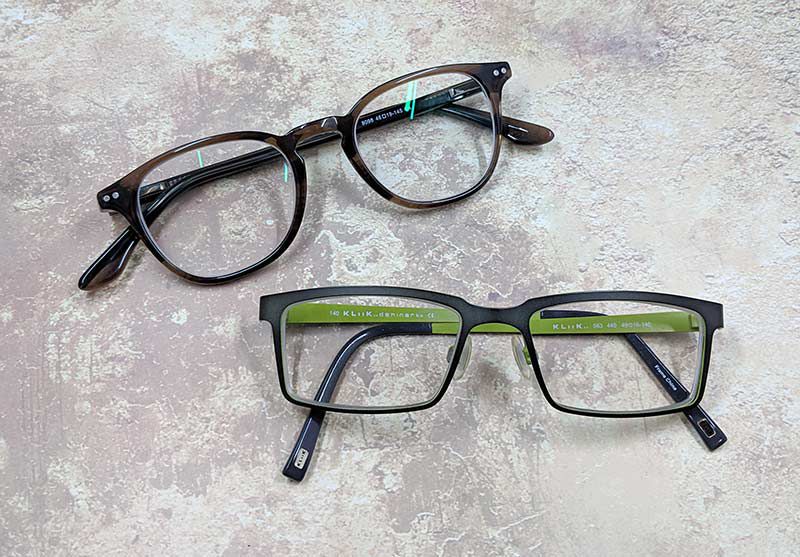
HipOptical offers a variety of frame styles for men and women that include plastic frames and metals frames. In the image above, the frames at the top are from HipOptical and the ones below are the $500+ frames and lenses that I ordered from my local eye doctor last year. If you think that is expensive, I thought that was a bargain compared to my previous $800 lenses and frames.

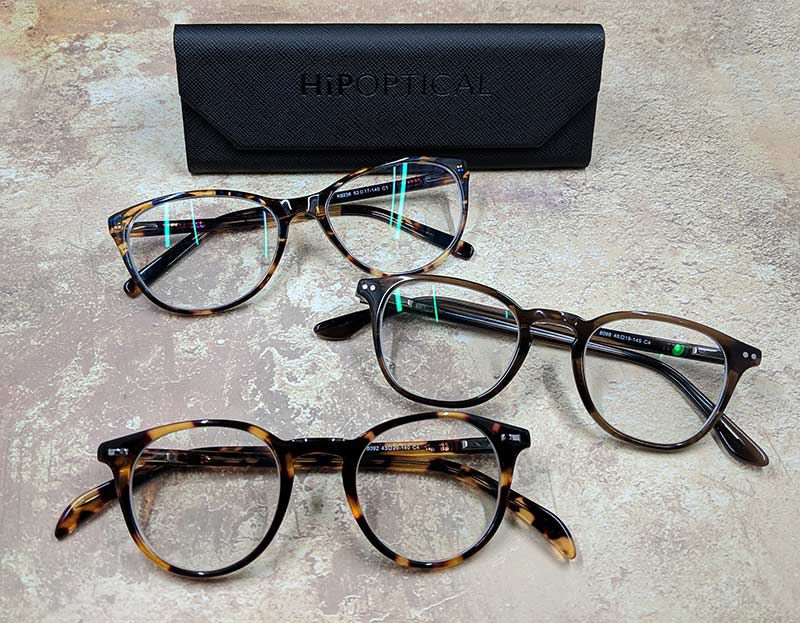
HipOptical sent me three different frames with prescription lenses. From top to bottom the styles are Bryce, Canterbury, and Hambelton.

Two pairs of the glasses have progressive (bifocals) and special blue light filtering lenses and the other pair has progressive and transition lenses. If you’re not familiar with transition lenses, they automatically turn into sunglasses when you go out in the sun.

Each pair of glasses come with a folding case and a polishing cloth.


Selecting your frames through the HipOptical website is straight forward and easy to do. Each frame is shown alone and on a model which you can see from various angles.

Detailed info about the size of the frames is also included. After you select a frame, then you can choose the type of prescription lens that you want.

You have 3 choices. No lenses at all, single vision, or progressive lenses (bifocals). I am old so I picked progressive lenses 😉

Then you get to choose extra features for the lenses which include no features/clear, light responsive/transitions, or blue light filtering. Note that you can’t have blue light filtering lenses AND light responsive lenses.

As you choose the features, the price at the bottom reflects the changes to show the total charges.

The last step is to upload a file or photo with the prescription. Then you submit the order and wait for the frames to arrive which is around 7-14 days but they are working on getting that down to 7 days max.

I found the frames to be very well made. Comparing them to some of my older more expensive frames, I could tell little to no difference between them.

The blue light filtering lenses look just like the other lenses which do not have this feature. They aren’t a weird yellow shade but are perfectly clear like you see above.

I couldn’t really detect that the blue light filtering was doing anything while using the glasses and working on my computer. I don’t know if I’m that sensitive to blue light. I can work in front of a computer all day long and can go right to sleep.

I also found that the light responsive lenses reacted to sunlight exactly like my current lenses.

Note that all of the HipOptical lenses have a superhydrophobic, anti-reflective, and scratch-resistant treatment and they are covered against scratches within the first 12 months.

What I like

  • Price
  • Ease in ordering
  • 30 money back guarantee

What needs to be improved

  • Would be great to have a virtual fit tool that could use the buyer’s face

Final thoughts

One thing to keep in mind when ordering glasses and frames online is that you’ll probably need to have them properly fitted once you receive them. You can usually do this by going into a store, but they charge you since you didn’t purchase the glasses from them.

I think HipOptical frames and lenses are a terrific value. The ordering process is easy and they offer free shipping and returns. And for each purchase, they donate a pair of glasses to someone in need by partnering with Restoring Vision.

If you are frustrated with the price of glasses at your local eye doctor, you should give HipOptical a try the next time you need a new pair of glasses.

Price: Varies depending on the frame and lens options but the ones sent to me were $107 and $117. Use promo code Gadgeteer and safe 30% your order (expires 4/21/19)
Where to buy: HipOptical
Source: The samples for this review were provided by HipOptical.

Filed in categories: Reviews

Tagged:

HipOptical prescription lenses and frames review originally appeared on The Gadgeteer on April 15, 2019 at 2:07 pm.

Note: If you are subscribed to this feed through FeedBurner, please switch to our native feed URL http://the-gadgeteer.com/feed/ in order to ensure continuous delivery.

Skylum Software AI-powered Luminar Flex one-touch photo editing software review

REVIEW – Cameras today are amazing. Phone cameras, point-and-shoots, mirrorless, and full-on DSLRs all produce pretty jaw-dropping images, right out of the camera, all on automatic.  You can certainly tweak them in-camera by changing ISO, aperture, shutter speed, and white balance, but that definitely requires a deeper knowledge of photography and the specifics of your camera. Let’s face it – sometimes, you only have time for a quick snap before you lose the image completely. In those cases, especially in difficult lighting conditions, you get fair images, but they can be better.  That’s where Luminar Flex comes in.

What is it?

Luminar Flex is a plug-in for Photoshop. Photoshop Elements and Lightroom Classic for Windows & MacOS, Apple Aperture, and Photos for MacOS.  It offers artificial intelligence (AI) driven, one-touch image improvement with a wide variety of styles available, along with creative control of almost all aspects of how the filters are applied.

What’s in the box?

Actually, there isn’t a box.  The software is available as a download.  Once downloaded, it installs pretty much like most software.

During the installation process, it identifies your installed software and presents a list of supported packages.  You choose which ones you want the plugin installed to.

Design and features

Luminar Flex’s biggest nicety is a large number of preset AI-driven styles.  These don’t do anything that you can’t do yourself in Photoshop. What it does do is take potentially dozens of steps and reduce that to a single click to get the results you want.  For the purists out there, this might not be what they want.  There are some photographers that want to control every single aspect of their edits and are willing to take the time and effort and to get those results.  For most of us, however, Luminar Flex makes simple work of getting terrific results quickly and easily. And, for the purists, once they see how Luminar Flex applies styles, and the tools it provides to tweak the process, they might get onboard as well.

Luminar Flex installs both as a plugin and as a standalone package.  You have the option of editing single images or applying a style to batches of images.

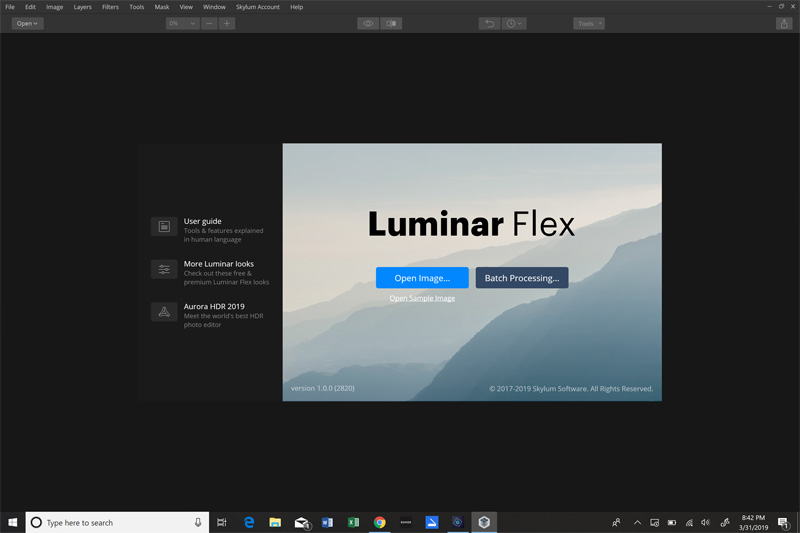
Running the package directly, you get that option at startup.

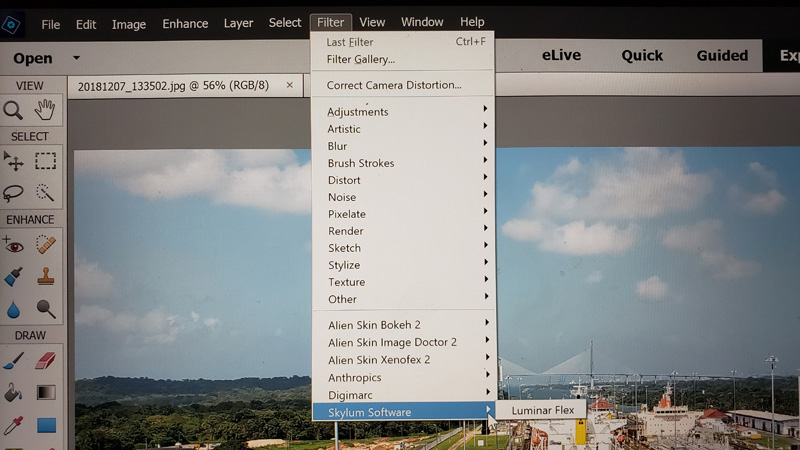
If you are already editing an image in Photoshop (or another supported software), you access the plugin via the Filter menu.

Performance

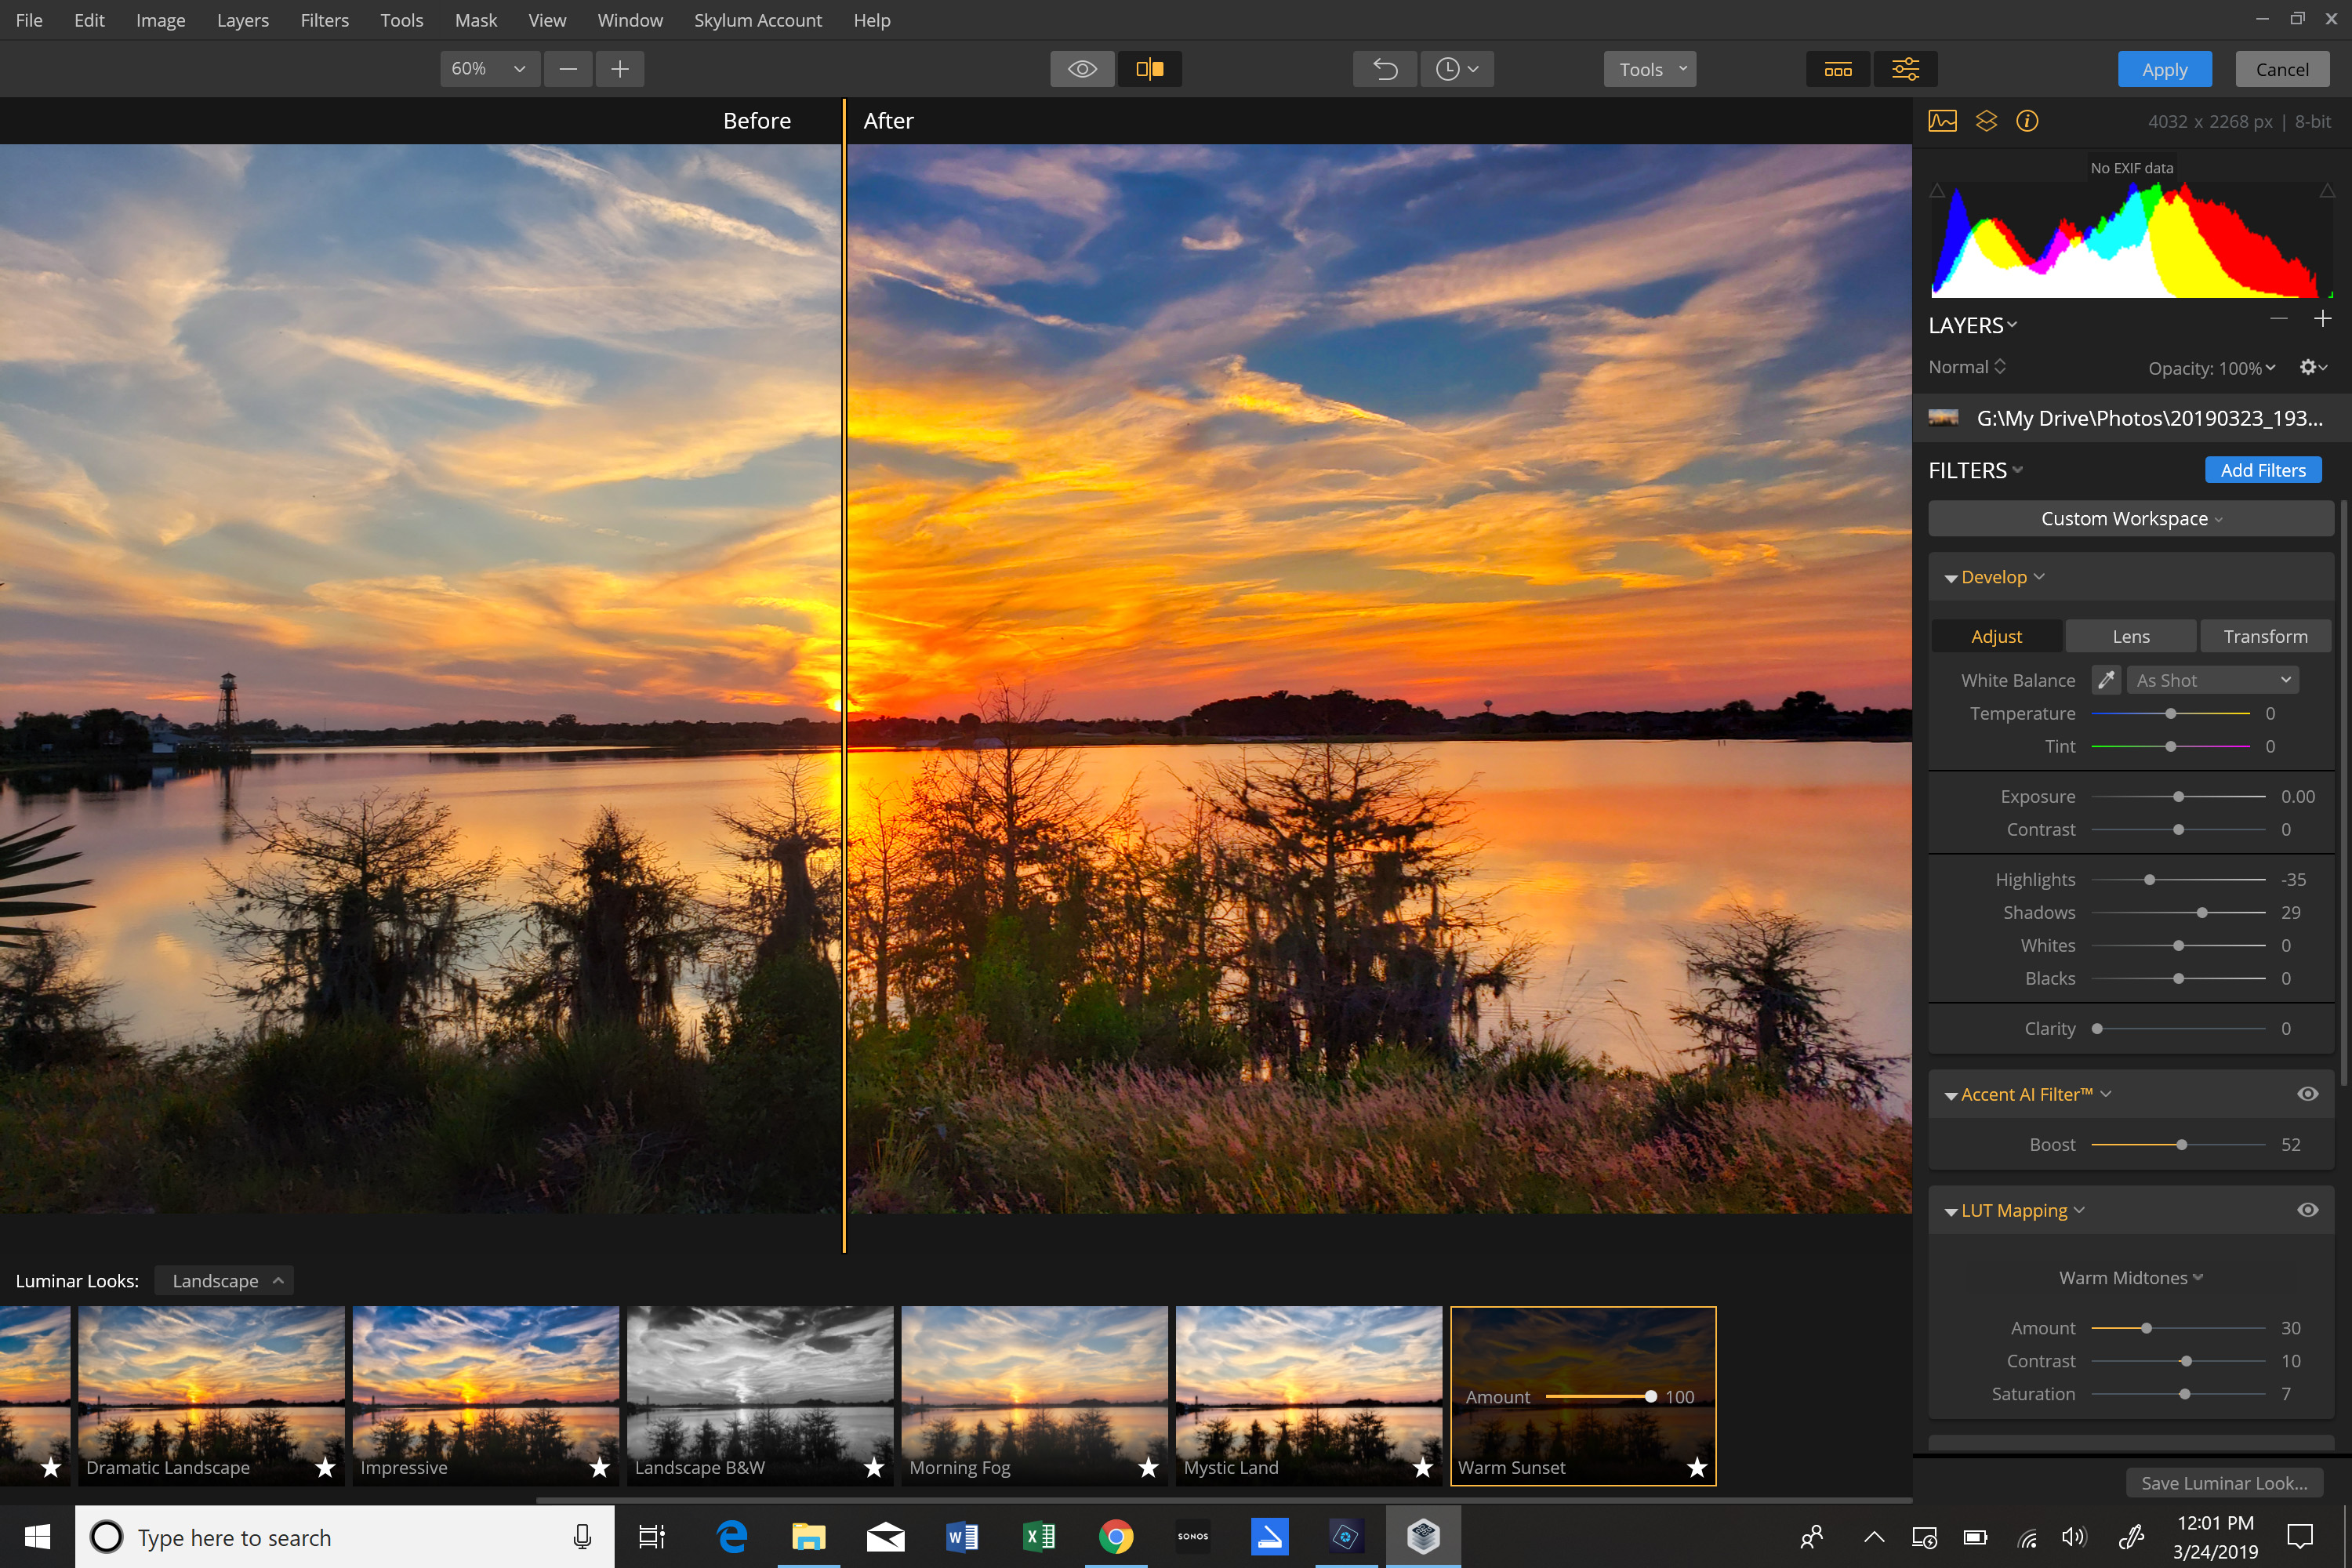
Either way you open an image, you are dropped into Luminar Flex’s main editing window.  It defaults to a results view where you see the results of the applied style.  I used the split view where you see a side-by-side before/after view.  You can move the slider back and forth to see before and after really easily.  I liked this feature a lot. Before is on the left and after on the right.

For this sample, I used the Warm Sunset style.  The default is to apply the filter 100%.  The selected style (along the bottom on the right) shows a slider where you can reduce the intensity of the style until you get something you like. To change styles, just click on a style window along the bottom.

Once you get what you like, clicking the Apply button on the upper right applies the changes and returns you to your image editing software. If you are editing via the standalone app, you can export the image as a JPG, PNG, TIFF, JPEG-2000, Photoshop or PDF image. You can resize on export, apply additional sharpening, change color space, and resolution.

There are over 50 preset styles that can attack whatever issues you need to improve in your image. They are AI-driven to analyze your image and make smart adjustments to improve contrast, bring out details, enhance the sky and foliage, reduce haze, reduce color casts, simulate a polarizing filter to eliminate reflections and so on. Filters are grouped as:

  • Professional
  • Portrait
  • Landscape
  • Creative
  • Aerial
  • Black and white film emulsion
  • Analog

In addition, you have complete creative control. On the right side of the screen is a complete palate of image controls where you can manually adjust nearly every part of the image enhancement process. You can apply different style filters in different layers, blending them to get really impressive results.  In addition, you have complete control over how the filters are applied by changing blending modes.  The bottom line here is that while it is one-touch simple, you also have complete creative control.

All this sounds great, in theory, but what really matters is how the end results look.  Let’s take a look and see how Luminar Flex did.  Because the vast majority of casual photographers out there will likely use presets as they are delivered in the software, I used preset filter styles without applying different layers or blending modes.

Images

Here are three images.  The left image is right out of a drone with difficult lighting.  The middle was a one-touch edit with another of Skylum’s tools, AirMagic plugin for drone photography.  The right image is from Luminar Flex’s aerial improvement filter.

Luminar Flex added richer colors in the sky and water.  I was pretty impressed.

Here is a side-by-side using Luminar Flex’s black and white filter.  It did a great job choosing appropriate levels for the individual colors, rendering light and dark areas very well.

This image of an eagle stealing lunch from an osprey is straight out of the camera.

After applying Luminar Flex’s detail improvement filter, the details are much sharper and really pop.

Here is a view looking north from the Panama Canal.  Overall, I thought this image looked pretty good.

After running it through Luminar Flex’s sky enhancer, the image jumps off the screen. The sky was really that blue, but limitations on how a camera averages a scene produced the somewhat flat image above.

Here’s another side-by-side example where Luminar Flex really pulled details, especially in the sloth’s fur, that are hard to pick out in the original. It also improved contrast in the leaves without making the colors unnatural.

This is another example of color and contrast improvement.  This is Curacao on a semi-cloudy day.

Luminar Flex enhanced the colors, water, and sky, making the image look more like what it looked like in-person.

I was pretty impressed with this edit.  Here is a great horned owl, right out of the camera on automatic, with terrible back-lighting, confusing the camera into severely under-exposing the image.

Using the Analog-1 filter, not only did it bring out the detail in the image, but it did an amazing job protecting the subtle details by not blowing out the already overblown sky. If you look just to the right of the owl and the leaf pair, you can still see a little strand of Spanish moss that I would have expected to be lost in processing.

Finally, one more example of Luminar Flex’s ability to really get details in your images tack-sharp.

After processing, everything looks sharper, has more contrast and a nice, warm glow.

What I like

  • The wide variety of included and available filters
  • Simple operation
  • Availability of full-range editing control

What needs to be improved

  • It was a little slow, taking perhaps 30-45 seconds to export on some images, but that may be due to my Surface Book’s limited 8GB of RAM.
  • The names of the individual filters don’t necessarily tell you what it will do – most are descriptive, but not all, so some experimenting is required

Final thoughts

Luminar Flex is a dream tool for the lazy photographer.  It can take mediocre images and make them good, and good images and make them great. It does all this without requiring the user to have a deep knowledge of image editing, making powerful image processing accessible to a wide audience. But, if you want to really get into the nitty-gritty, Luminar Flex has all the tools for that as well, making it an editing expert’s dream tool as well.

Price: $70 for the basic version; $79 (limited time offer) includes additional Signature Looks;  $109 includes Signature Looks and Landscape Course video learning course
Where to buy: Direct from Skylum Software
Source: The sample of this product was provided by Skylum Software.

Filed in categories: Reviews

Tagged: ,

Skylum Software AI-powered Luminar Flex one-touch photo editing software review originally appeared on The Gadgeteer on April 15, 2019 at 10:51 am.

Note: If you are subscribed to this feed through FeedBurner, please switch to our native feed URL http://the-gadgeteer.com/feed/ in order to ensure continuous delivery.

Arcanus 55 Private Wealth Safe review

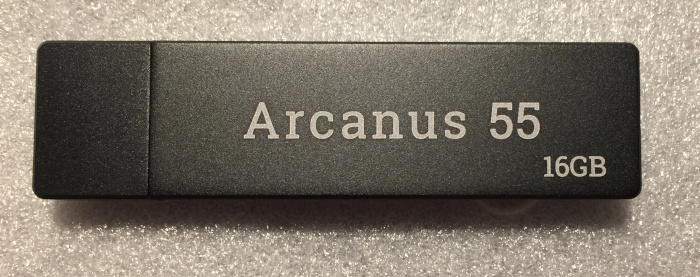
REVIEW – The Arcanus 55 Personal Wealth Safe (a.k.a. Privacy Paranoid Vault) is a combination of a sophisticated, encrypted 16 GB USB drive and a rugged, waterproof, electronically isolated vault designed to protect the USB drive and other small items.

What is it?

The Arcanus 55 Personal Wealth Safe (a.k.a. Privacy Paranoid Vault) is a combination of a sophisticated, encrypted 16 GB USB drive and a rugged, waterproof, electronically isolated vault designed to protect the USB drive and other small items. The isolation vault provides protection from crushing, water infiltration, and acts as a Faraday cage protecting the contents from damage or snooping from to electromagnetic fields.

What’s in the box?

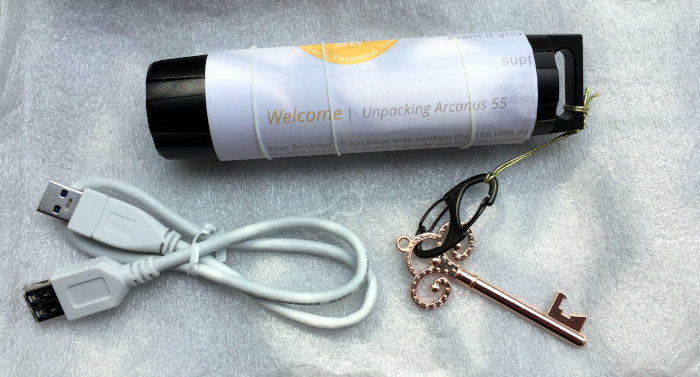
The Arcanus 55 system comes packed in a foam sleeve inside a sturdy cardboard box. The box contains the following

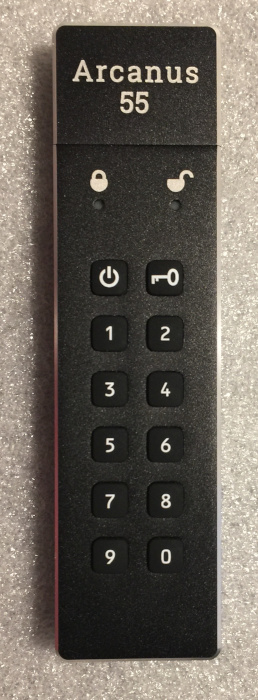
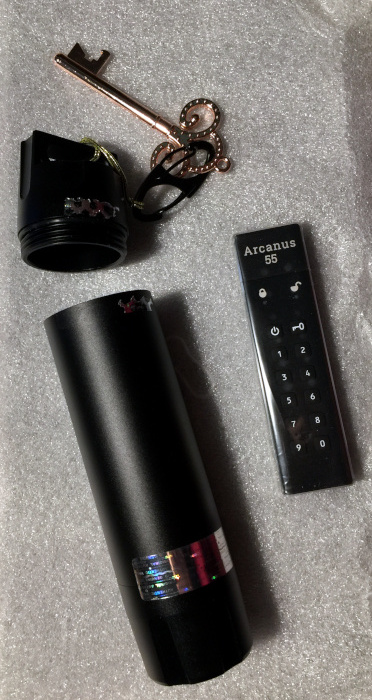
  • 16 GB encrypted USB drive with a metal case and external keypad
  • A metal vault with screw caps at each end
  • Multiple holographic seals
  • Small s-style carabiner
  • A USB-A extension cable
  • Decorative key
  • Quick-start instructions


Hardware specs

The Arcanus 55 vault is 15 cm long (including the loop) and 3.7 cm in diameter. It weight 129 grams.

The encrypted USB drive has a metal case and is 9.15 cm long, 2.4 cm wide, and 1 cm thick. It weights 36 grams. The cap at the top is removable to expose a USB-A connector.

Design and features

The Arcanus 55 system is designed to be the ultimate portable protection for your data by providing encryption for your data, physical protection through the use of a metal body of the USB drive, protection from environmental threats (water, dust, electromagnetic fields), and tamper-evident seals. This combination should be sufficient for the needs of most people’s data. It isn’t going to protect national secrets, but then national secrets shouldn’t be on a thumb drive.

Setup

When I opened the package, I was confused to find no obvious USB drive. When I read through the quick-start sheet, I found that the drive was inside the vault which had tamper-resistant seals already in place. Breaking one of the seals, allowed me to extract the drive.

Before using the drive the default security code must be reset according to the instructions on the guide.

Once the security code has been reset, I removed the cap, entered the security code, and inserted the drive into a free USB port.

I had some problems completing the reset of the security code and getting the drive to unlock. A quick email to Arcanus 55’s technical support address and an arranged phone call later, I was able to get the drive set up.  The instructions were a bit unclear on the key sequences needed to unlock the drive. This has been updated in a new quick-start guide which will ship with new units and is available online.

Performance

In addition to my initial difficulties getting the drive to accept a new security code, I also had trouble getting the drive to unlock. Both of these problems could be traced back to user error, rather than hardware or software failures. The first problem had to do with the speed at which I was entering the numbers on the keypad. I was informed that the presses have to be discrete with a brief pause between presses and not the rapid fire keying that I am used to with phones, keyboards, and ATMs. The second problem was incomplete instructions for the operation of the drive. Before the USB drive will recognize a security code, the key button must be pressed and only then will the code be accepted. A press of the key button submits the entered security code to unlock (if the code is correct) the drive.

Data is stored in encrypted form and is encrypted / decrypted on the fly for added security. I was concerned that this would negatively impact the drive’s performance, but this ended up not being an issue.  The Arcanus 55 USB key works at least as quickly as any of the other encrypted USB drives that I own (including drives from most of the major players). I did not perform rigorous read/write speed tests, but merely timed transfer operations to and from the Arcanus 55 drive and compared these to the same operations on other drives.  I was also able to playback 1080p video from files on the encrypted drive using VLC media player.

As an added layer of protection, you may install the included holographic seals over the joints where the caps screw onto the vault body. These seals are very difficult to remove without leaving a trace and serve as evidence of tampering with your vault.

In the event that your drive is lost or stolen, the encrypted storage system will not allow your data to be accessed, even if the chips are removed from the USB drive. If you need to quickly erases the drive because you have forgotten the security code, or you are under duress and want to make sure that your data is secure, a quick process will erase the decryption key and provide a wipe of the drive indices. Your data is now inaccessible (even with the security key). The drive may be reused by repeating the setup routine and selecting a new security code.

An important bit of information that was given to me during my technical support call is that if the unit has been left sitting without being plugged in for long periods of time (say “cold” storage), the unlocking functions and decryption systems may not work until the drive has been plugged in and the on-board power system has been allowed to recharge.

What I like

  • Rugged vault–strong, good seals, keeps water and dirt out
  • USB drive is physically strong and seems resistant to accidental damage
  • Drive is relatively speedy and performs at least as well as my other encrypted USB drives

What needs to be improved

  • Quick-start instructions (improved version now available on website)
  • Decryption key entry sequence timing needs to allow for shorter times between key presses
  • Add a USB-C connector version or add a UBC-A (female) to USB-C (male) adapter cable.
  • Since the product literature talks about securing the vault into your bag with a carabiner or similar method, the clip that is included in the package should actually be able to clip onto the hard point on the vault.

Final thoughts

The Arcanus 55 Private Wealth Vault system is more than adequate for my needs when it comes to protecting my personal information. We have stored copies of our important household and personal papers on the drive and we carry this when we travel in case of an emergency. We have left a copy of the security code with our lawyer (who also has copies of the documents as well).

Price: $92.76
Where to buy: Arcanus 55, Inc.
Source: The sample of this product was provided by Arcanus 55, Inc.

Filed in categories: Reviews

Tagged:

Arcanus 55 Private Wealth Safe review originally appeared on The Gadgeteer on April 15, 2019 at 9:42 am.

Note: If you are subscribed to this feed through FeedBurner, please switch to our native feed URL http://the-gadgeteer.com/feed/ in order to ensure continuous delivery.
GL.iNet GL-MT300N-V2 (Mango) mini travel router review

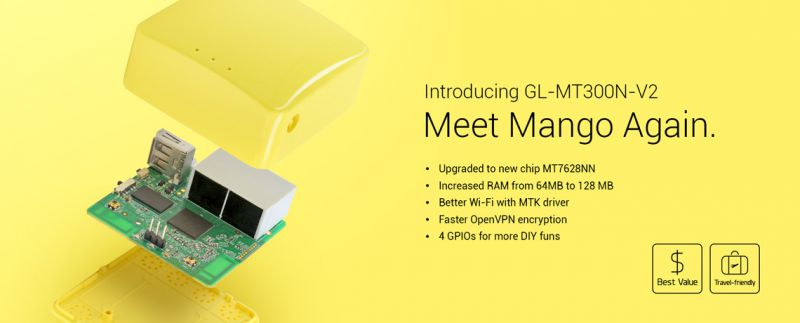
REVIEW – Since my last review of the TP-Link TL-WR802n , I found a few things that I wasn’t happy with and went on the lookout for something to address the shortcomings. After searching high and low I came across the GL.iNet range of mini routers.  They have a whole series of mini routers with different specifications and their boxes are aimed not only those wanting mobile internet routers but also useful boxes to integrate into IOT type projects. In fact many of them have GPIO connectors (you can see them in the picture above).  After much ummming and ahhing and weighing up specification versus price versus my use case I ended up purchasing the GL-MT300N-V2 ( Mango). How does it differ from the TL-WR802n?  Read on.

What’s in the box?

Note: Once again I’m not going to get into the technical side of things with this box. You can read the specs in the top graphic or from the web site.

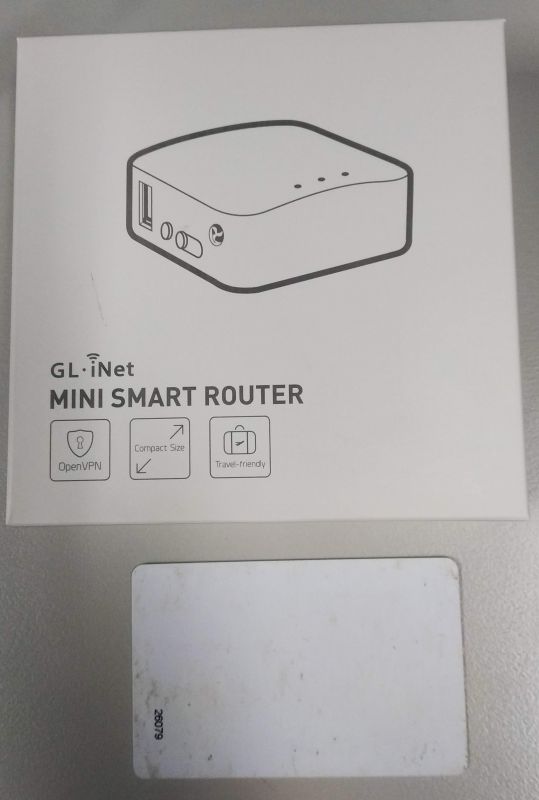
The Mango comes in a nice small box with just basic graphics and without any fancy colours (very dirty access card for size comparison, the only credit card I had in my wallet without personal information 🙂 )

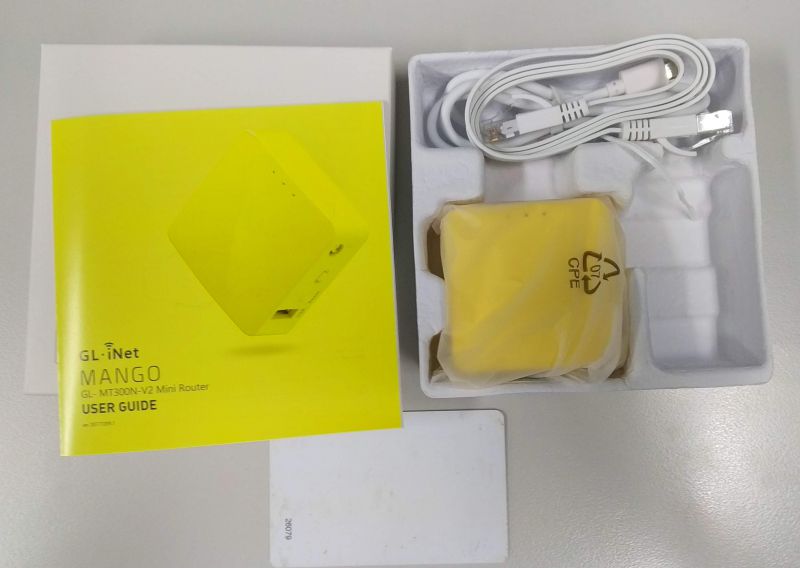
But once you open it up you get an eyeful of colour. Inside the box is an instruction manual, USB Micro cable, a nice quality Ethernet cable and an even smaller but very brightly coloured router. Everything  is cardboard and recyclable which is always nice (not sure about the cable ties? )

Size

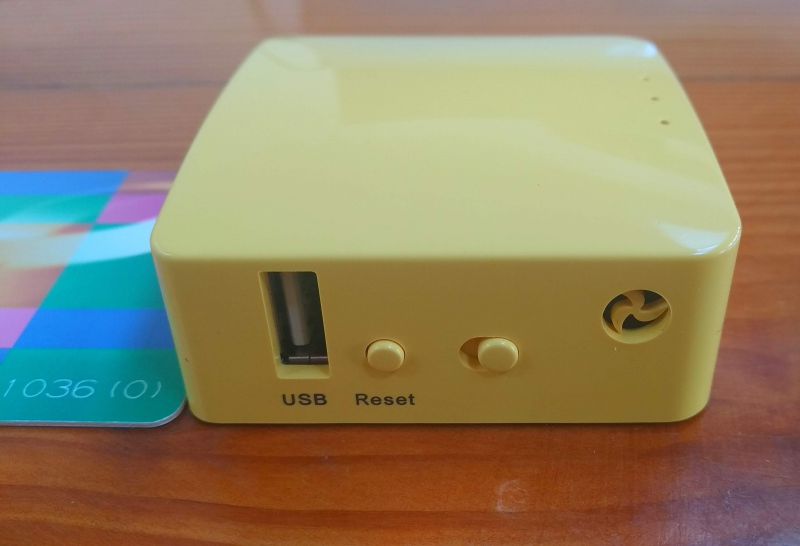
I’m still amazed by what can be fitted into this little box.  Here you can see it compared to a standard credit card.  At 58*58*25mm and  39g it’s a very portable device and yet gives you all the functionality of a full size router. On the top all you have is a power, a customizable and a WiFi traffic LED.

Ports

On the right hand side is a USB port, a reset switch and an on/off switch (more on that later 🙂 ). The little “propeller” is just a heat dispersion hole (there’s a matching one on the otherwise blank side).

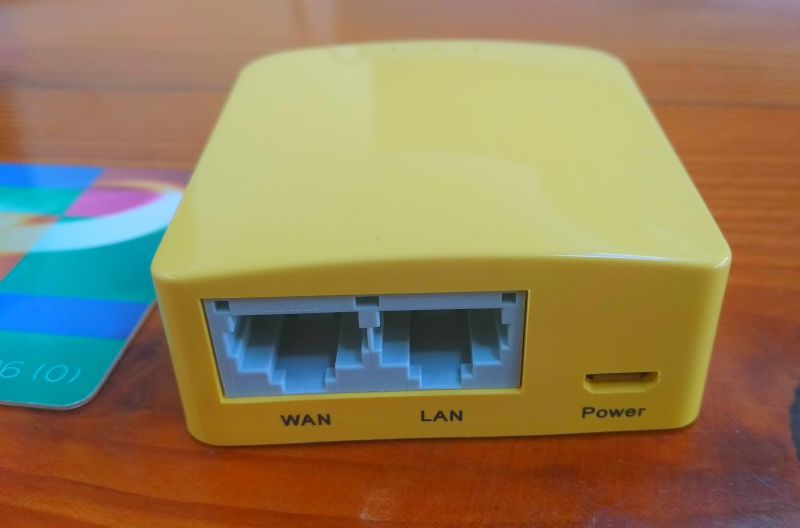
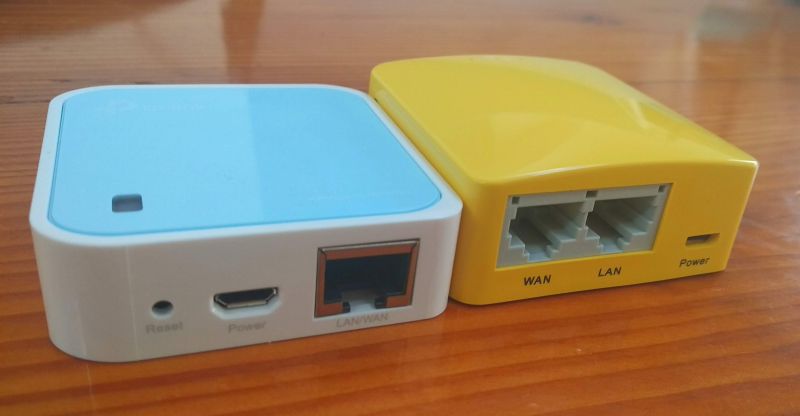
On the back is a 100 Mb WAN and LAN port. If you’re using this to wirelessly connect and need an additional LAN port you can configure the WAN port to act as an additional  LAN port too for wired devices. On the right a micro USB port for power. From a WiFi perspective, it supports 2.4Ghz 802.11n only.

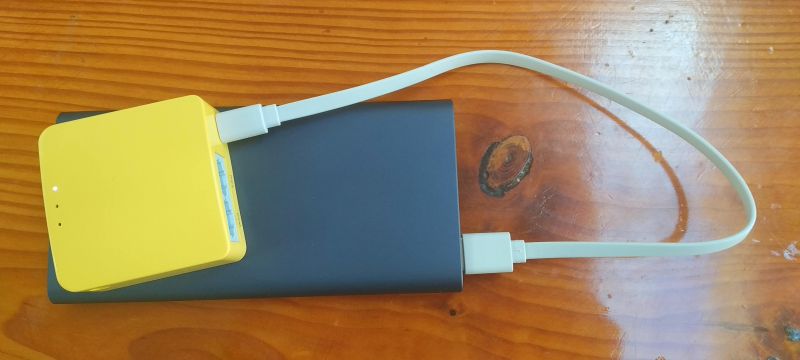
Because this is powered by 5V 1A, then you can easily power this by various methods: a 5V 1A AC adapter (like for your smartphone), via a USB port on a desktop/notebook/tablet or even via a powerbank.  Above you can see the Mango and my Xiaomi 10000MAh powerbank (must get a shorter cable 🙂  ).  I haven’t timed exactly how long I get out of the powerbank but I can advise based on experience it would be at least a day.

Interface

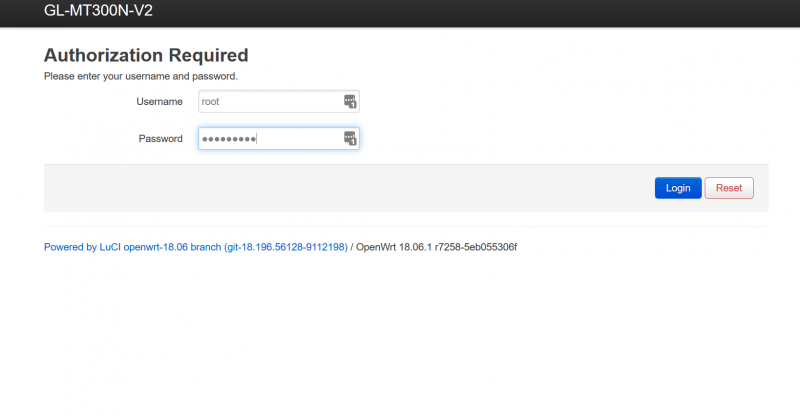
The Mango is running OpenWRT.  Anybody that’s ever played with OpenWRT will probably agree that it’s not as user friendly as the proprietary interfaces that most vendors place on their routers (mainly made for the “domestic” market).  That being said, GL.iNet has written a custom interface on the top of OpenWRT, that automates and makes things much easier to do than having to enter into OpenWRT. If you want to get rid of GL.iNet’s interface you can flash it with native OpenWRT or there is also an option to load a TorGuard specific firmware.

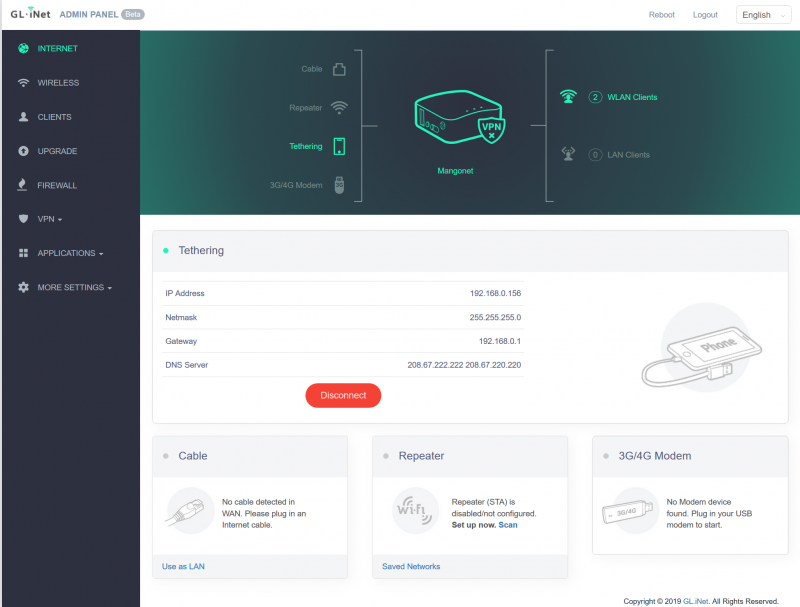
GL.iNet has automated a lot of functions. You can see above where I’ve basically just plugged in my 4G MiFi device and the router automatically recognizes the device and sets the router up so that the  USB  just works as my WAN port. Normally with OpenWRT initially you’d have to research the relevant “packages” to load, use an SSH session or use the LUCI  interface to load and configure the packages and then test to make sure you’ve got everything right.

On the main screen, you can see that as default you can run as a standard wired router, a repeater, a Smartphone tether or a 4G dongle router. Where required these functions are all wizard driven.

In the settings on the right you can manage all your “standard routery stuff” ; WiFi settings, set time servers, DHCP, changing your DNS servers etc. without having to delve into OpenWRT’s more complex interface.

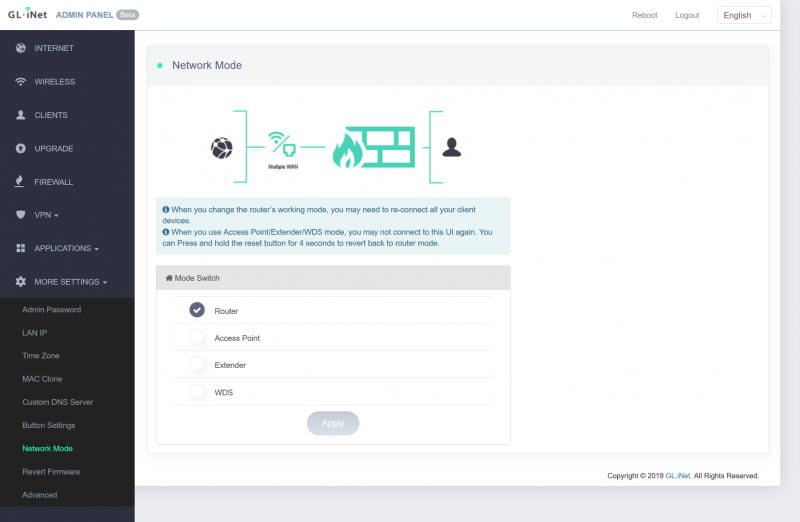
Additionally, there’s easy access to change the unit into an Access Point, WiFi extender or a WDS bridge.

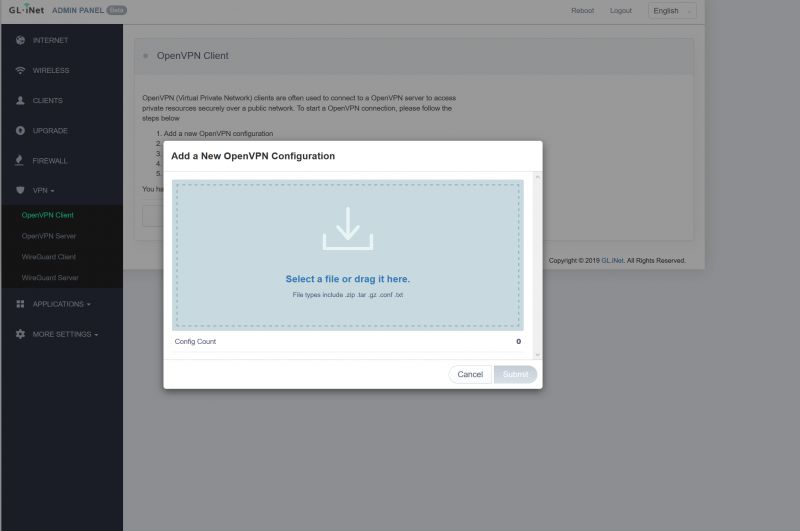
The unit supports both OpenVPN and Wireguard out of the box, and I’m guessing most people will use OpenVPN at the moment until Wireguard matures.  Most VPN providers will supply .cfg files for their various servers.  You just need to download and drop and drag your config files to the Mango. Much easier than using the OpenWRT native interface. By using your VPN at a router level, it means that you don’t have to have a VPN client installed on all your endpoints, and is especially useful where your end point might not have a VPN client available. Alternatively, you could even make this a VPN server rather than a client.

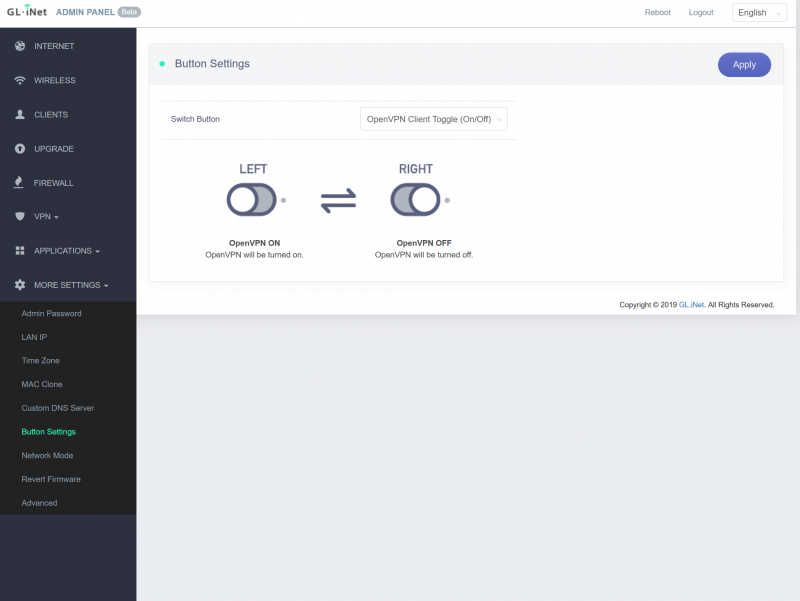
Remember that switch on the right hand side? It can be used as a physical switch to turn your OpenVPN or Wireguard Service off or on without having to enter the interface.

Plug in a USB drive and the unit uses SMB shares and you should be able to see your drive on most devices. Certainly works on both my Windows and Android devices easily. Useful while you’re on holidays for streaming movies or music or for backing up your photos and sharing them with your holiday buddies on your local holiday LAN 🙂

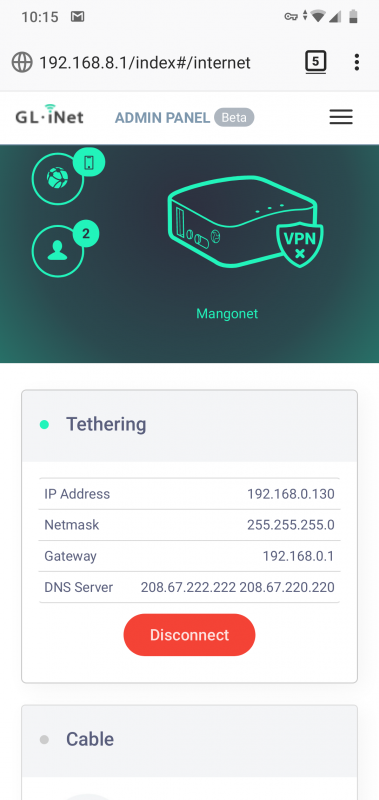
On top of that their interface scales nicely to mobile devices.  Looks neat and tidy and means you don’t have to scroll all over the place like you do with some web based router interfaces on mobile devices.

The custom built GL.iNet interface is nice and makes things very simple however if you’re a bit more familiar with OpenWRT and you just want to use an interface you’re familiar with or there are things the simplified interface won’t do for you then if you go to the “Advanced” tab you get your familiar OpenWRT Luci interface.

Compared to the WR802n

My last review was based on the TP-Link TL-WR802n nano router. I bought the Mango to address a few shortcomings I’d come across since buying the WR802n:

  • The firmware on the TL-WR802n is proprietary and hasn’t been updated since April 2017
  • It doesn’t support OpenVPN, the method that most VPN providers require now (you can of course still run a client based VPN client)
  • The Mango supports OpenWRT which gives me much more flexibility and I only need to load what I want
  • The Mango has a USB port to support USB media and USB 4G dongle tethering

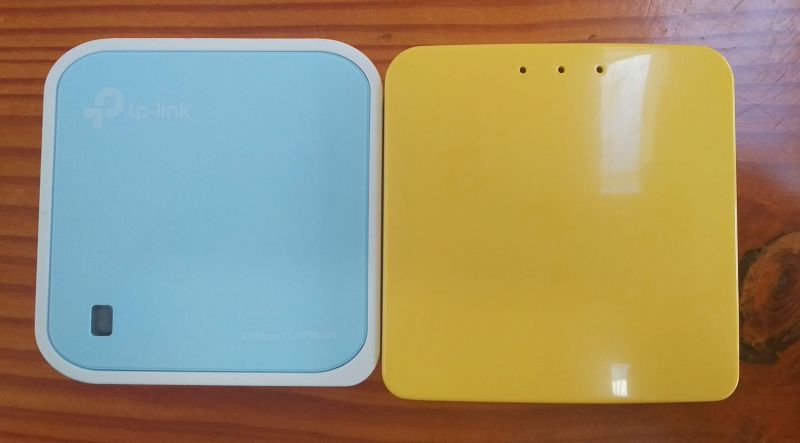
You can see that size wise both units are very similar.

The Mango is ever so slightly taller.  But for the added WAN port, USB port and firmware functionality I’m willing to put up with the slightly larger size.

You can do all the things you can with the WR802n with the Mango but more.

Want a small video server to share? Want a small video server in your car to keep the kids happy on the long trip? Need to share a USB 4G Mifi wingle or tether a smartphone? Need to VPN your whole LAN (and hence all your devices) when you’re staying in that dodgy little hotel overseas? Want to control your devices like a roller door via WiFi? Want to set quotas on the kids for that expensive overseas 4G service you had to purchase while on holidays? These are just some of the scenarios where the Mango could be used.

Don’t get me wrong, the WR802n is still a great and tiny device and it does it’s main 5 functions well, is easy to setup and if you’ll be happy with the WR802n will all depends on your needs and requirements.

Support

I had a minor issue with my WiFi on my unit. There’s an option to email support but I used the assistance chat line (which is basically Facebook Messenger) and received a reply within 10 minutes. The technician was helpful and solved my issue quite easily. Nice to know that support is readily available. (Don’t forget time zones may, however, make a difference to response times).

What I like

Many of the reasons I liked the WR802n still stand for the GL-MT300N-V2; the size, the portability, the flexibility. However for around the same price the additional hardware ports on the Mango, the support for OpenWRT as well as it’s customized interface and all it’s functionality just expands the usage of this box so much more than the WR802n.

What I don’t like

There’s not much I don’t like about the box. If I have to be really picky, the bright yellow/orange colour is……bright. In my WR802n review, I said that it was small and discrete and not something that the IT guys on patrol will be immediately drawn to.  The Mango isn’t quite so discrete 🙂

Again like the WR802n, it’s not the most powerful router in terms of processing power or WiFi range but it’s not made to be a powerhouse be all and end all unit, but a portable, “spot solution” device.

Final thoughts

If you’re in the market for a small, portable travel router it’s really pretty hard to beat, and it’s not only while you’re traveling that it’s useful either.  All the basic functionality you need is all there at your fingertips and is easy to set up with GL.iNet’s custom skin over the top of OpenWRT. For me, the basic requirement is still around having my own firewalled LAN when using a public wired or wireless internet connection but the fact that I can do so much more if I want to just makes this a much more flexible solution. If you require more advanced functionality you’ve got the whole plethora of OpenWRT modules to play with and access to the OpenWRT interface. Sure I’d love a dual band AC Wifi router (WISP repeater on one channel and run my LAN on another to increase effective bandwidth) but that comes at a price (in both $$ and size). This bright little unit should see me through the next few trips away and serve me well.

Update

I’ve just loaded their latest Beta firmware on it and it includes a VPN Policy Manager in its custom interface. You can easily set a domain, IP or MAC address to either use or not use the VPN. Really handy for those devices mentioned above that might not have a native VPN client or maybe if you only want say your Netflix device to run through your VPN.  🙂 Nice to know that the custom interface is still being developed to make “common” functionality easy to deploy.

Price: Approx $21
Where to buy: GL-iNet and NewEgg
Source: The sample for this review was purchased with my own funds.

Filed in categories: Reviews

Tagged: ,

GL.iNet GL-MT300N-V2 (Mango) mini travel router review originally appeared on The Gadgeteer on April 15, 2019 at 8:34 am.

Note: If you are subscribed to this feed through FeedBurner, please switch to our native feed URL http://the-gadgeteer.com/feed/ in order to ensure continuous delivery.
Naztech Power Hub4 charging station review

REVIEW – Even though our household only consists of my husband and myself, I always seem to have issues finding an available outlet on our kitchen bar to charge up a piece of tech.  We both own tablets and we both own phones.  Then there are the plethora of other gadgets like watches, bicycle computers, and other tech devices that need charging.  When the Naztech Power Hub4 came up for review I jumped on it to see if it could meet my family’s charging needs.  Let’s see how it worked out for us.

What is it?

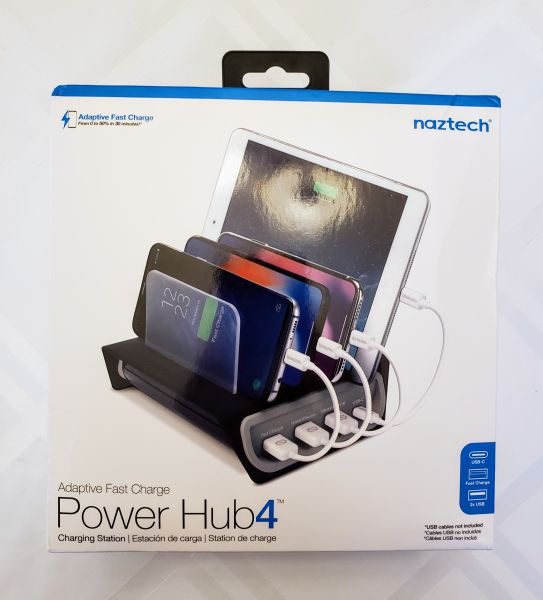
The Naztech Power Hub4 is an adaptive fast charging power station that has slots and ports to charge up to four different devices all at the same time.

What’s in the box?

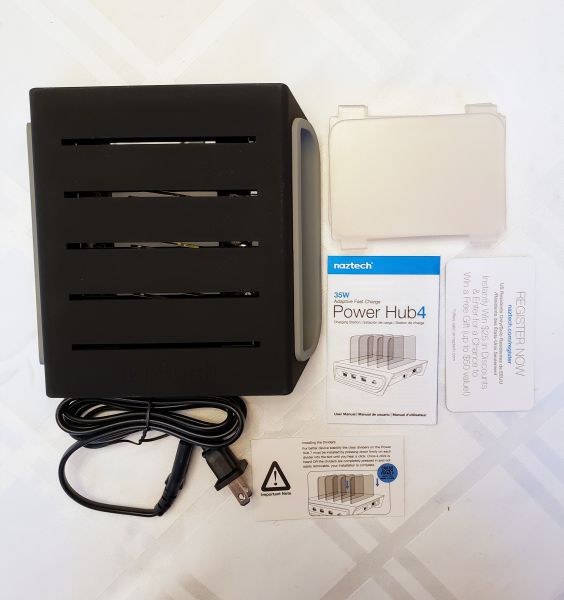
The following items came in the box:

  • The charging hub itself
  • The power cord
  • Five frosted plastic dividers
  • A fold out instruction book
  • A register now card
  • Another card with specific instructions on how to insert the plastic dividers

Hardware specs

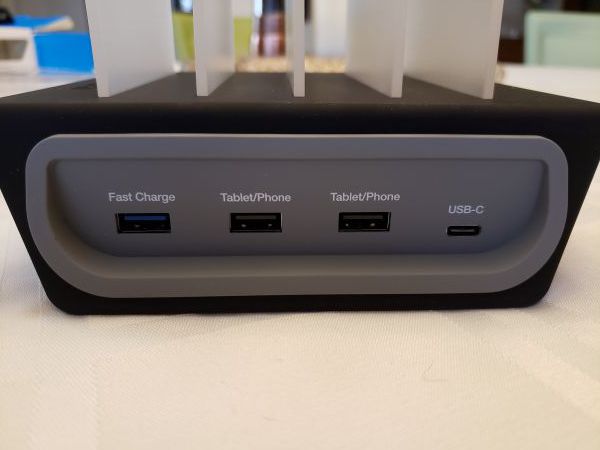
The Power Hub4 can supply up to a full 35 watts of power.  All four ports can charge at the same time.  There is one USB-C slot that can rapid charge devices like the Galaxy S9.  The USB-C port is rated at 5 volts.   There is also an adaptive rapid charge USB port that will charge at 5 volts/3 amps, 9 volts/2 amps, or 12 volts/1.5 amps.  The two remaining USB ports share 5 volts/ 2.5 amps.

Design and features

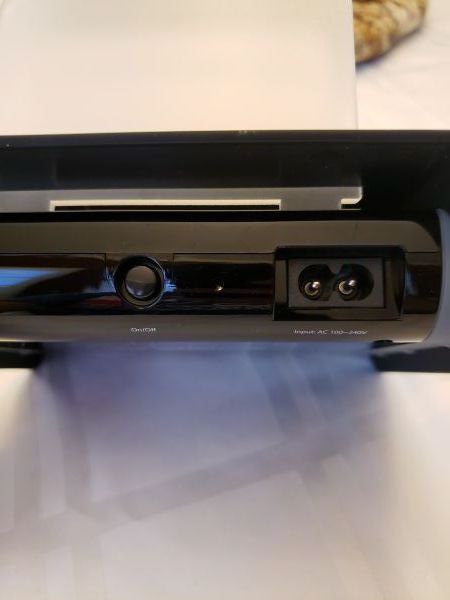
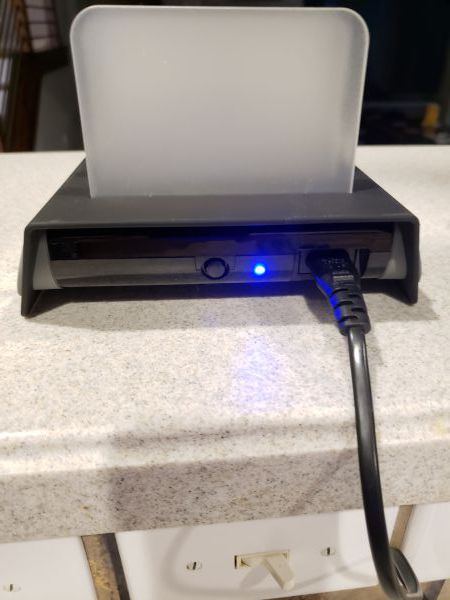
The first picture above shows the back side of the device.  On the far right is where the power cord would plugin.  To the left of that is the on/off power button.  I like that you can actually turn this off when not in use.  A blue LED to the right of the power button will shine when it is turned on.  It is very bright and I would not recommend placing it in any room where you want complete darkness.

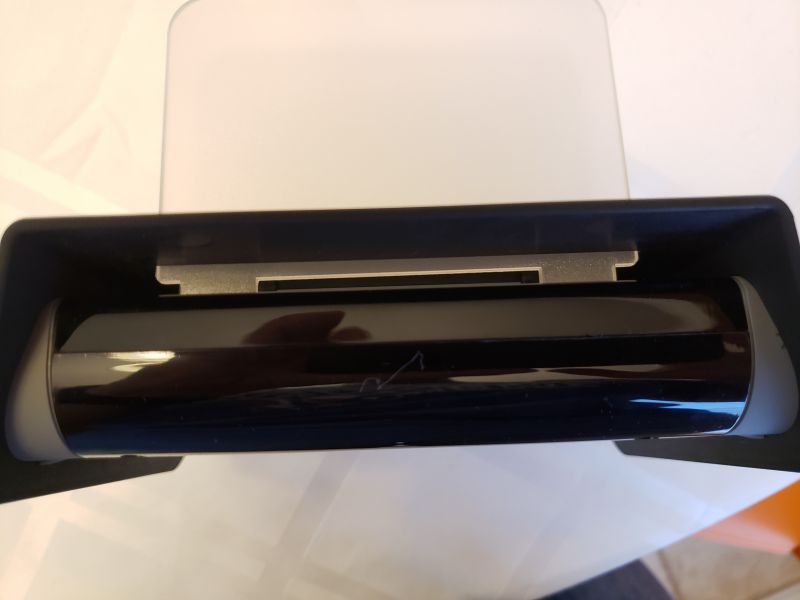
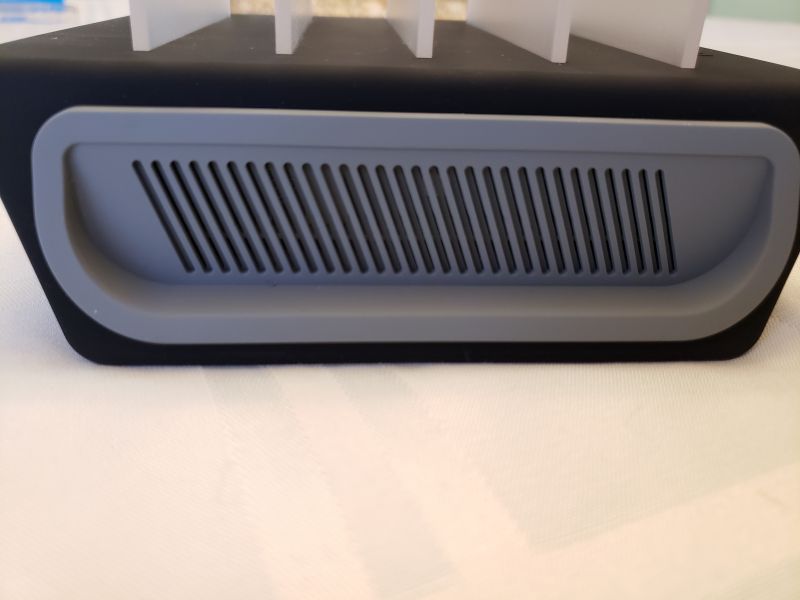
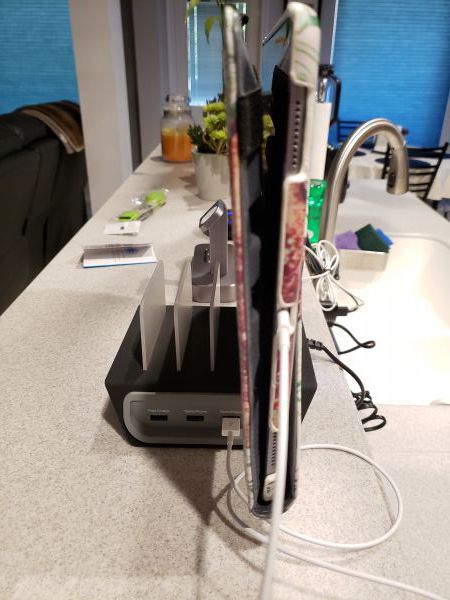
The next two pictures show the front and the side of the device opposite the ports.    You can see on the front picture how the plastic divider inserts into the device.  When this picture was taken, the divider was not pushed all the way down.  The small card that came in the box, said to specifically push down very hard until you hear a click.  I had to push pretty hard, but I did hear a click for each one.  The second picture shows the dividers fully inserted.  You can also see there are venting slots on that side of the device.

This last picture shows the device plugged in and the LED turned on.

Performance

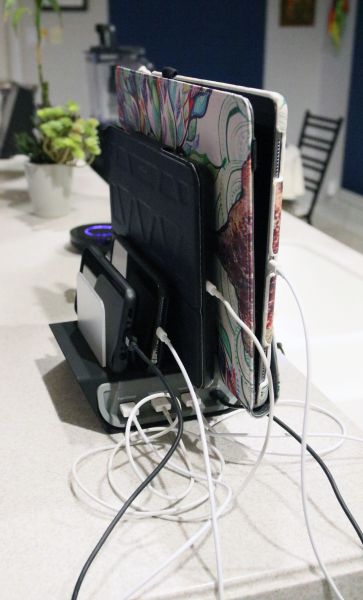
The Power Hub4 is very sturdy.  I have a full-size IPad Pro with a pretty substantial cover on it.  As you can see from the pictures above it held the IPad just fine.  The dividers did not bend or show any kind of difficulty holding it in place.  The hub itself did not feel tippy and felt solid.

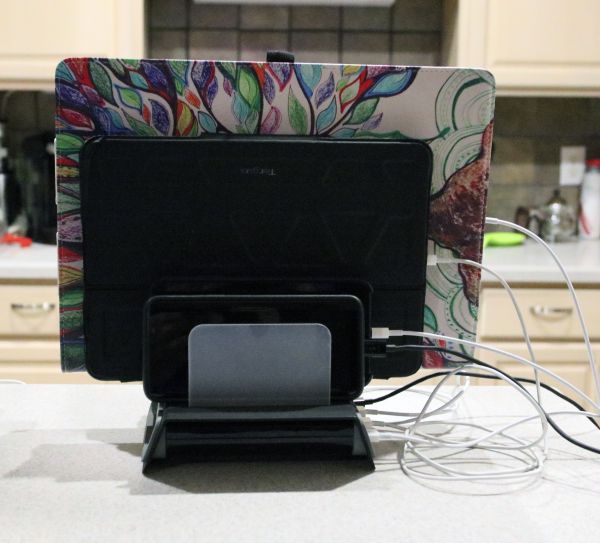
The next two pictures show the hub fully loaded.  I  have my IPad Pro and my husband’s newest model IPad.  I also have his IPhone X and my Samsung S9.   They were all charging just fine.  The Samsung would rapid charge on either the USB-C or the rapid charge USB port.  My only real complaint was the wad of cables  on the right side of the device.

What I like

  • It can charge up to 4 devices at the same time.
  • It has a rapid charge USB and rapid charge USB-C ports.
  • The rapid charge USB port is adaptive.

What needs to be improved

  • No cables come with the device.  I broke down and ordered some short versions of the cables we need.  My OCD just could not stand that tangled looking mess of cables on the side of the hub.

Final thoughts

All in all, I would recommend this hub to anyone looking for a way to charge multiple devices at the same time.  The fact that it can rapidly charge and be adaptive is a big plus.

Price: $69.99
Where to buy: Amazon or B&H Photo Video
Source: The sample of this product was provided by Naztech

Filed in categories: Reviews

Tagged:

Naztech Power Hub4 charging station review originally appeared on The Gadgeteer on April 14, 2019 at 1:53 pm.

Note: If you are subscribed to this feed through FeedBurner, please switch to our native feed URL http://the-gadgeteer.com/feed/ in order to ensure continuous delivery.