Rabbit Charger review

REVIEW – In an effort to tidy up our kitchen and get rid of messy charging cables laying on counters and the kitchen table, I have been testing the Rabbit Charger. This square charger installs over your existing wall outlet to provide a dual charging cable that can charge iOS devices, USB-C devices or micro USB devices.

What is it?

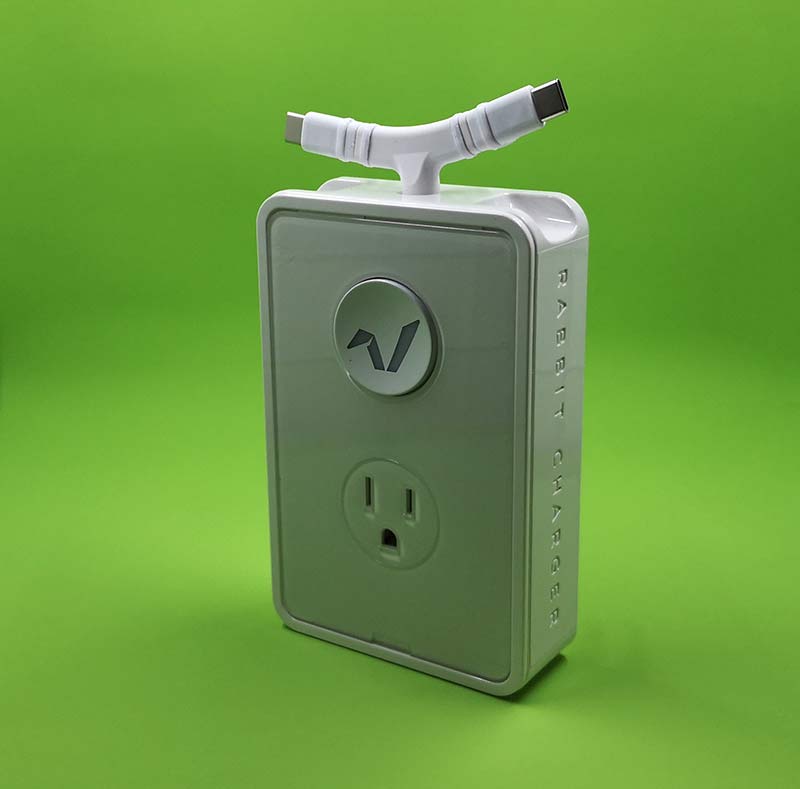
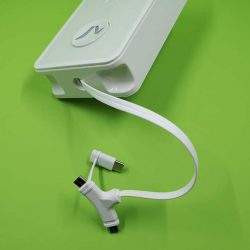
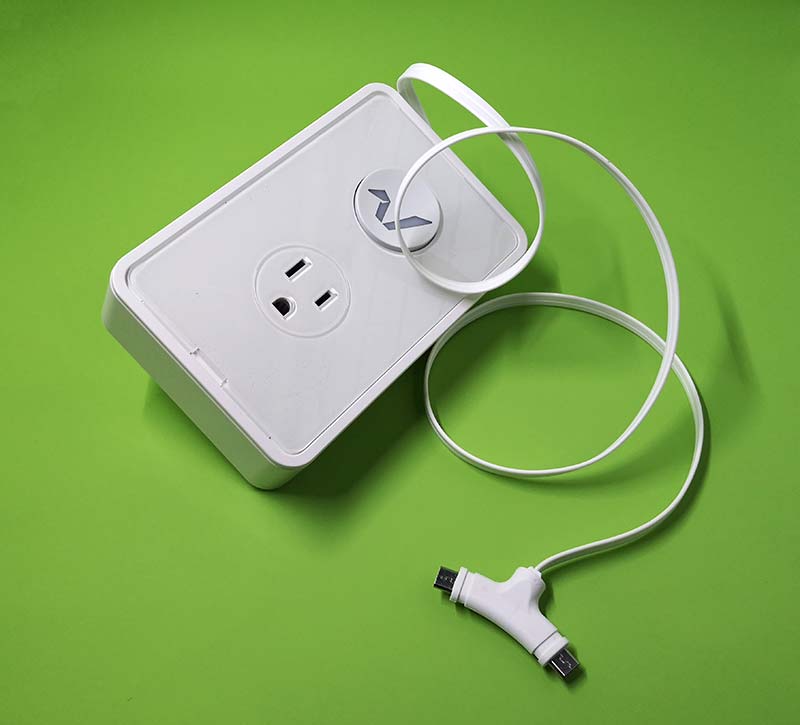
The Rabbit Charger is basically a retractable charging cable holder with swappable tips and the ability to charge two devices at once delivering up to 3.0 amps per tip. The charger gets its cute name from the dual connectors that pull out from the top of the device and are reminiscent of bunny ears.

What’s in the box?

Rabbit Charger
Micro USB Charging Tips (Built-in x2)
USB-C Charging Tips (Swappable x2)
Tethers (x2)

Design and features

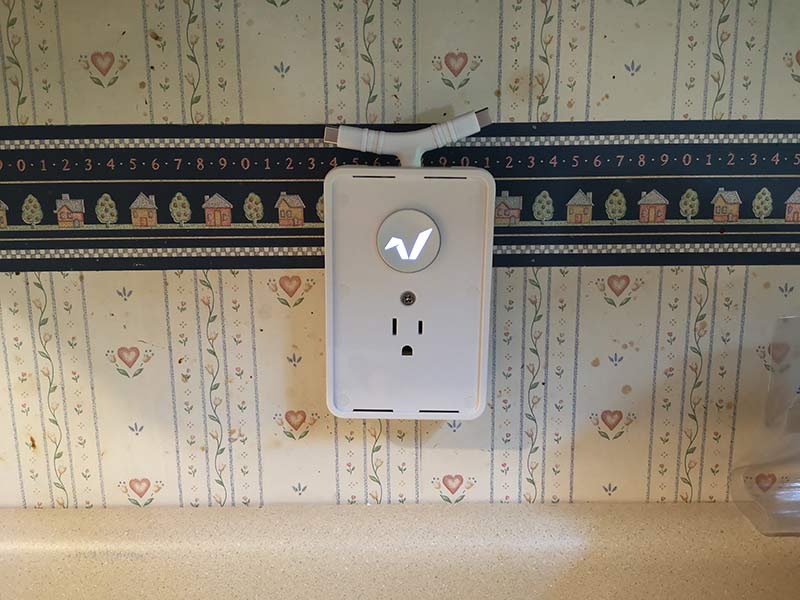
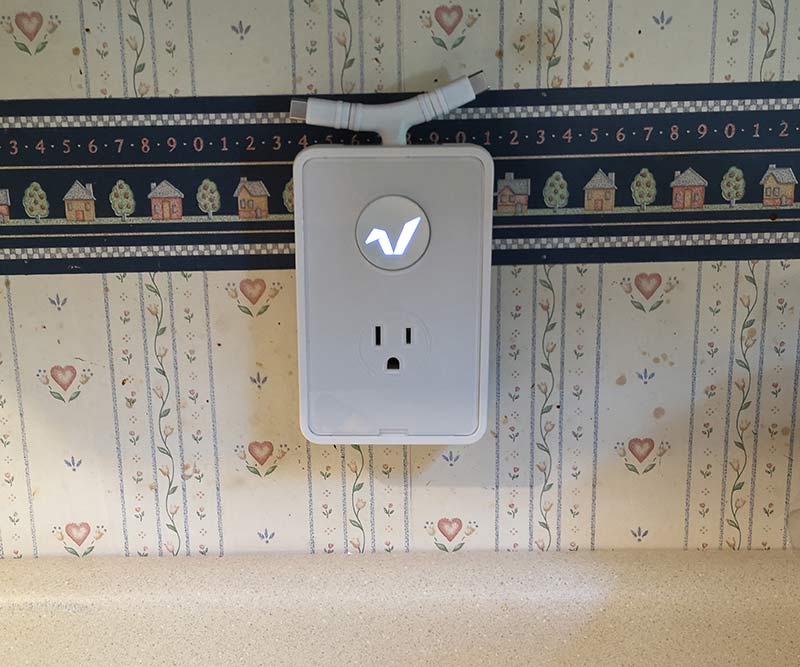
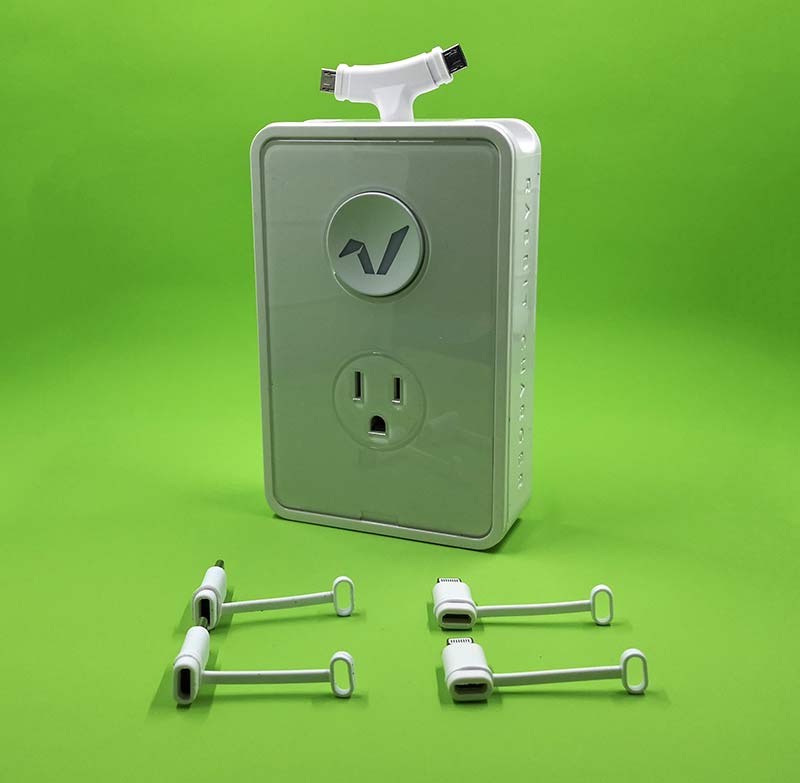
The Rabbit Charger is a white plastic box with a 28-inch retractable cable that pulls out from the top of the unit. A lighted button on the front of the charger retracts the cable when you’re done using it.

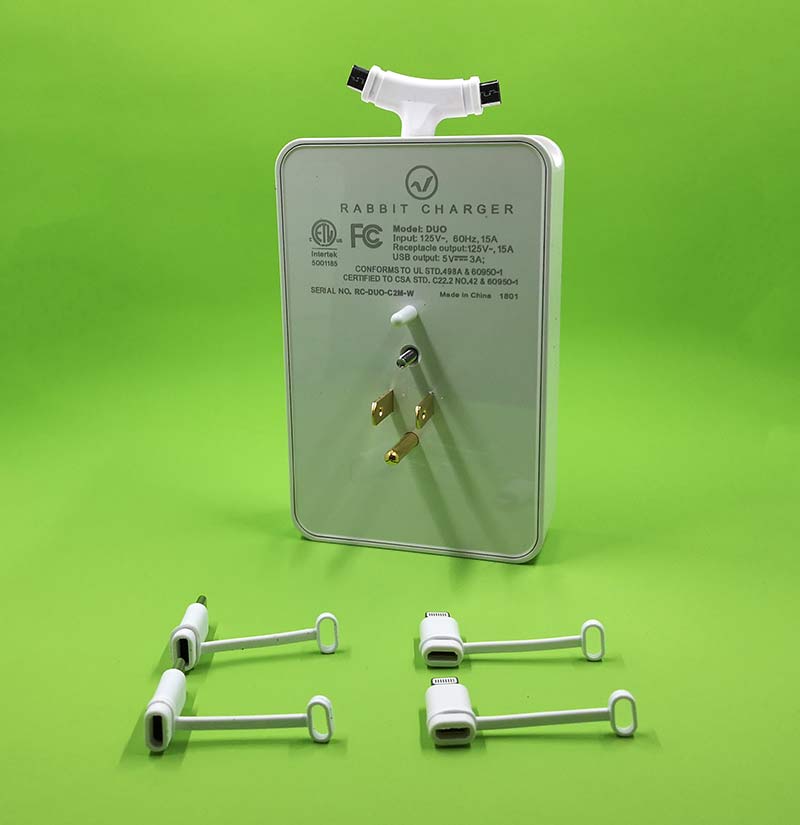
The back of the unit has a 3-prong plug that plugs into an existing wall outlet after you remove the outlet’s cover.

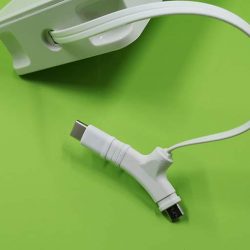
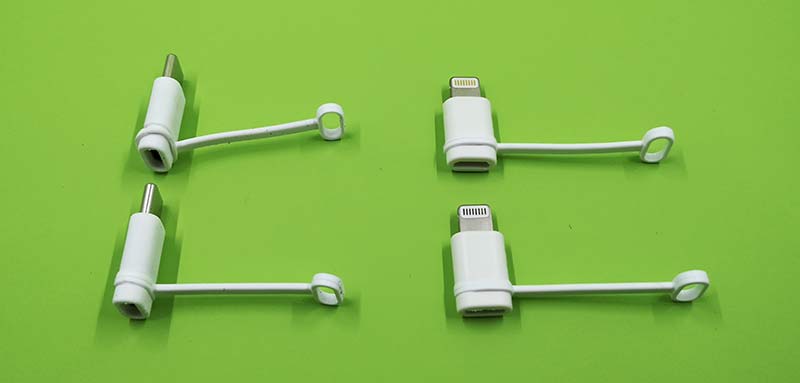
The Rabbit Charger has 2 micro USB connectors built into the cables and it comes with 2 USB-C tips that install over the existing micro USB tips. You can also buy Apple-certified Lightning tips for $9.95 each which I think is a bit on the spendy side.

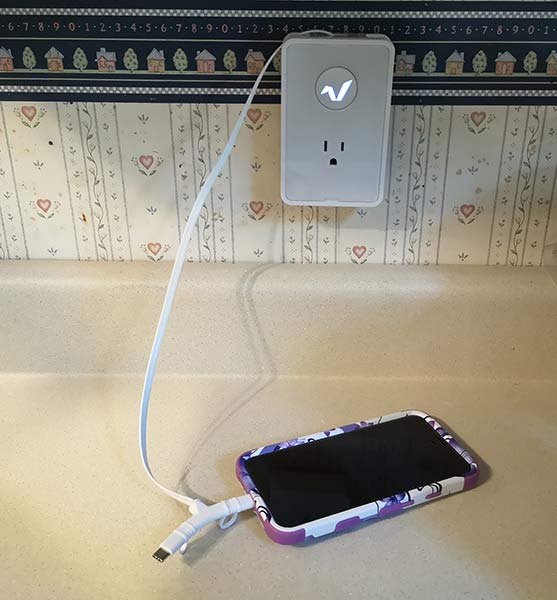
The flat cable pulls out from the top of the charger with a firm tug.


The swappable tips install over the top of the built-in micro USB tips with the included tether straps.

The whole unit is slightly larger than a switch plate cover, but about an inch or so thick.

Installation

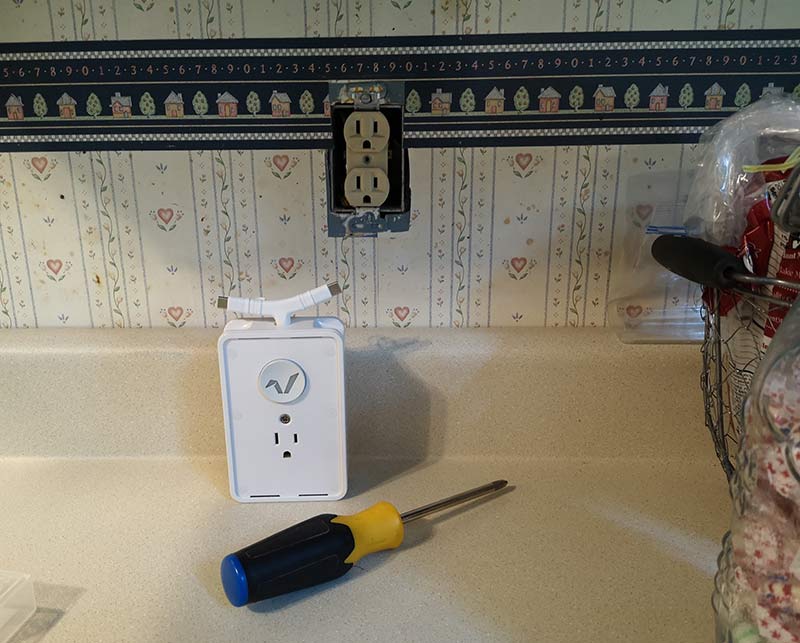
Installing the Rabbit Charger is quick and easy, but you will need a screen driver to remove the screen from an existing outlet’s switch plate.

Once the plate has been removed and the receptacle is exposed, you can remove the plastic cover on the front of the Rabbit Charger and plug it into the outlet so that the plug in the charger plugs into the bottom port of the wall outlet.

You will know that everything is connected properly when . you tighten the built-in screw and the retract button lights up like you see in the image above.

Then you can replace the plastic cover on the front of the charger and you’re ready to go.

Jeanne has been using the Rabbit Charger for a couple of weeks with her Pixel and likes that she doesn’t have to see cables lying around the kitchen or think about putting them in a drawer when she’s finished charging her phone. Since the Rabbit Charger delivers up to 3.0 amps per tip, I’ve used it to charge my Samsung Galaxy Tab 3 and my Pixel 2 XL at the same time using the USB-C tips. Just be aware that the Rabbit Charger does not support quick charging.

What I like

  • Easy to install
  • Can charge 2 devices at once
  • Lighted button is like a night light

What needs to be improved

  • Blocks one outlet
  • Does not support quick charging
  • Too expensive by itself and way too expensive if you need to add Lightning tips

Final thoughts

The Rabbit Charger installs easily and provides a handy way to keep charging cables tidy and somewhat out of sight. It is expensive though especially if you’re an iOS user and want 2 Lightning tips because that will cost you an extra $19.90 + the $49.95 price of the charger itself. That comes out to a whopping $69.85 for a two device charger that doesn’t even support quick charging. In my opinion, that’s too expensive for a charging box with a retractable cable feature. What do you think?

Price: $49.95
Where to buy: Amazon
Source: The sample for this review was provided by Rabbit Charger.

Filed in categories: Reviews

Tagged:

Rabbit Charger review originally appeared on The Gadgeteer on July 19, 2018 at 11:30 am.

Note: If you are subscribed to this feed through FeedBurner, please switch to our native feed URL http://the-gadgeteer.com/feed/ in order to ensure continuous delivery.

Momentum Niro WiFi Garage Door Controller with Built-in Camera review


REVIEW – Here was a typical scenario in our household: We’re getting ready to go somewhere and hop into the car parked in the garage. We open the garage door, back out, and drive away. “Did I close the garage door?” my husband asks me. After thinking about it, I respond, “I don’t remember.” We then turn the car around to go back to the house to check to see if we closed the garage door.

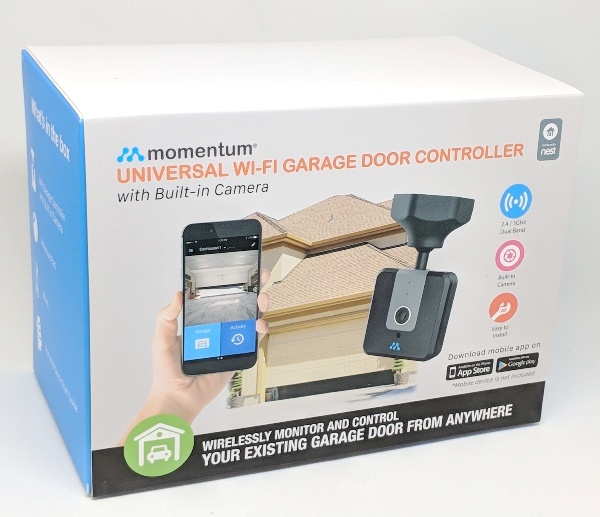
Products like the Momentum Niro Universal WiFi Garage Door Controller with Built-in Camera help to eliminate such scenarios. I was able to review this product and found that it works fairly well. You can open or close the garage door from anywhere, view the live video stream within the garage, and manually take pictures or record video. Furthermore, you can set up rules to create automatic recordings and send notifications when motion or sound is detected. It works with the Nest thermostat but does not appear to work with Alexa, Google Home, Apple HomeKit, or other smart home systems. In addition, the app needs a little reorganization.

What is it?

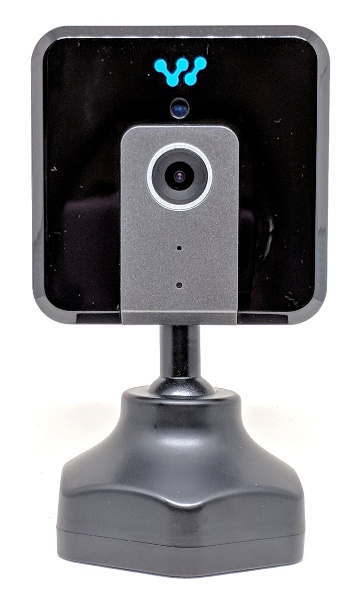
The Momentum Niro Universal WiFi Garage Door Controller with Built-in Camera is a WiFi garage door controller with a built-in 720P camera that attaches to your existing compatible garage door openers. It allows you to monitor, record movement or sound from within the garage, and open or close your garage door from anywhere using the Momentum app. It will also send you notifications of any motion or sound event detected.

Hardware specs

Camera: HD Camera with 720P sensor
Field of View: 110° wide-angle lens
Motion Detection: Adjustable sensitivity with push notifications
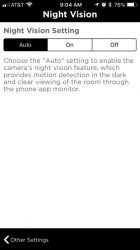
Night Vision: Infrared LEDs with Automatic Night Vision Mode
SD Card Slot: Micro SD Slot (up to 128GB SD Card)
Compatible Garage Doors: Garage Compatibility List
Connectivity: 802.11 b/g/n Wi-Fi connection @ 2.4GHz or 5.0GHz
Audio: Two Way Audio
Dimensions: Height: 5.30”, Width: 3.00”, Thickness: 0.99”
Weight: 5.30 oz
Power: 100-240V
Warranty: 1-Year Limited Warranty 

What’s in the box?
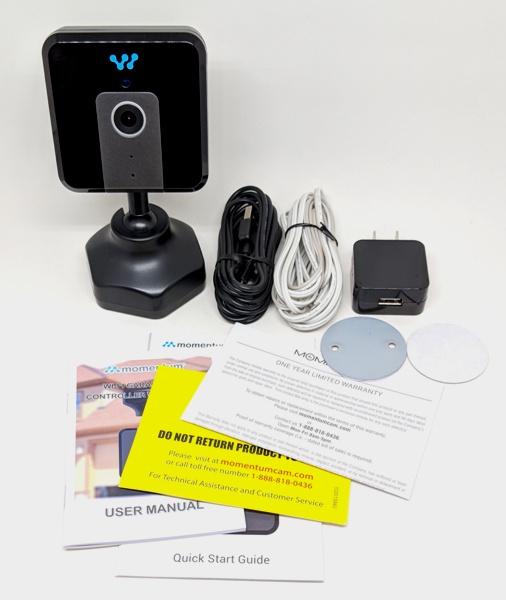
  • Momentum Niro Garage Door Controller
  • USB Cable
  • Power Adapter
  • Garage Door Control Wires
  • Mounting Plate (round metal plate)
  • Round 3M Double-sided Adhesive Tape
  • Niro Quick Start Guide
  • Niro User Manual

Design and features

The Momentum Niro Universal WiFi Garage Door Controller comes with a built-in camera which resides in a rigid plastic housing. Starting from the top of the device, you can see the infrared light for night vision, the camera lens, the microphone, and the indicator/status light.

The indicator lights are as follows:

  • solid red light: the camera is booting up
  • slow blinking red light: disconnected from WiFi
  • double blinking blue light: ready to connect to WiFi
  • blinking blue light: connected to WiFi
  • solid blue light: a user is currently live streaming
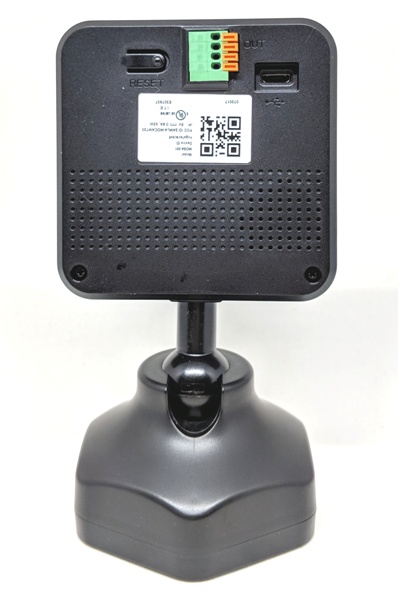
In the above photo starting from the left, the back of Niro shows the reset button, the wire connector ports (in green), the release buttons (in orange), the micro-USB power port, and the built-in speaker. The whole assembly is mounted on a plastic ball pivot hinge to allow you to rotate and position Niro as you wish.
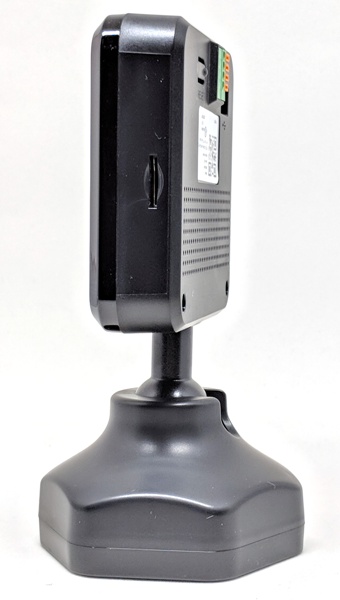
One side of Niro contains the micro-SD card slot which will accommodate a card up to 128GB. You can save videos to Momentum’s cloud or an SD card (not provided). You do not have to use a cloud plan to use Niro. Yay! But just in case you are interested, they have a 7-day event recording plan for $5 per month and a 30-day event recording plan for $10 per month (see Momentum Capture Cloud Service). I generally gravitate toward devices that have local storage rather than pay for a cloud plan.
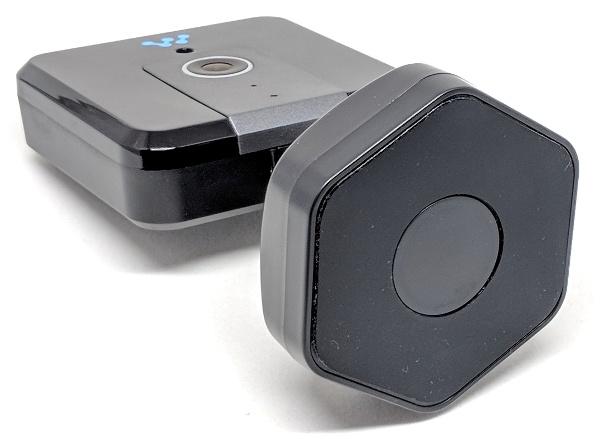
The bottom of Niro has a silicone base and a magnet that you can use to mount it to the metal mounting plate.

Setup

App Setup
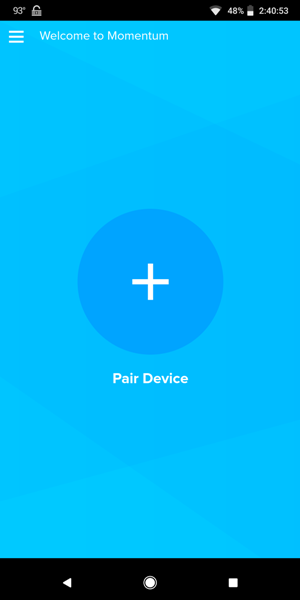
The first thing I needed to do was to download the Momentum app onto my phone (Pixel 2 XL) and create an account. I then needed to pair Niro to the app.
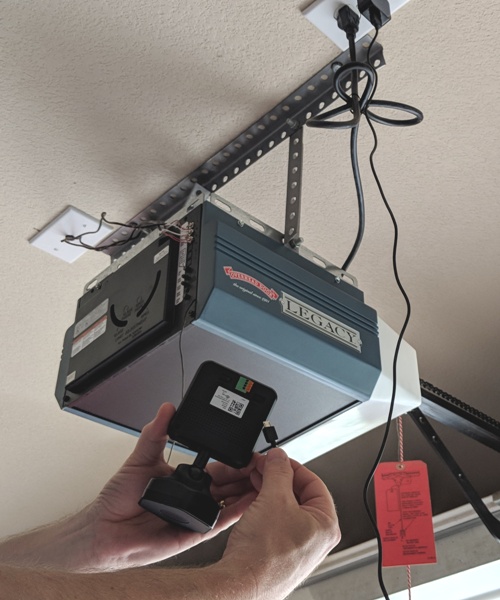
To pair Niro with the app, I needed to plug it into an outlet. We used the same outlet that our garage door opener was connected to.
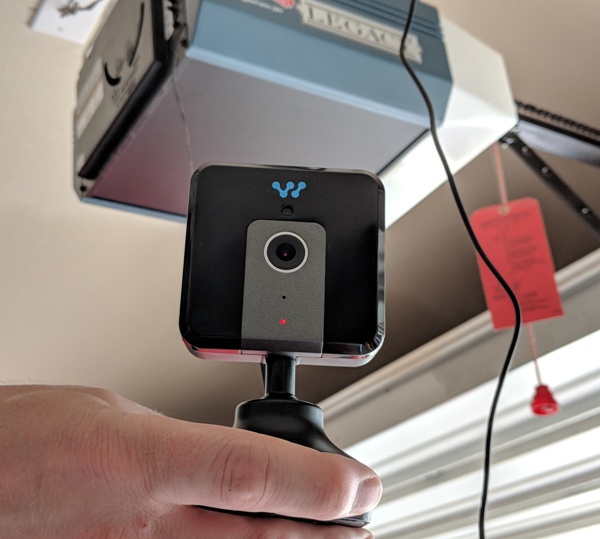
Once plugged in, the status light was a solid red indicating that Niro was booting up.
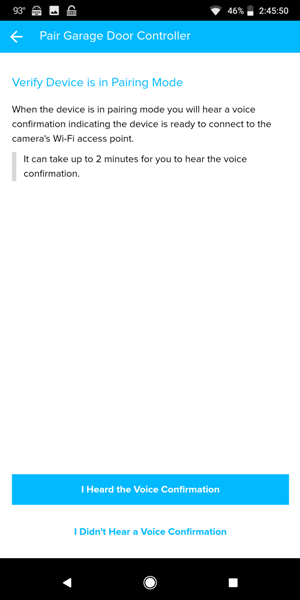
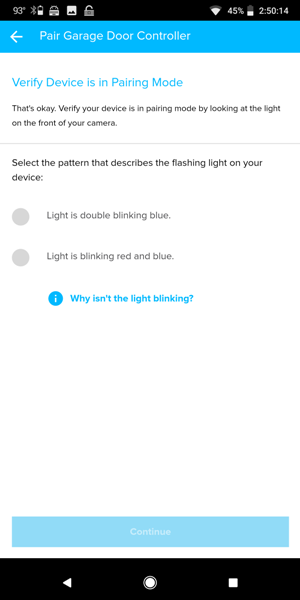
After booting up, I was supposed to hear a voice stating that Niro was in pairing mode but unfortunately, I didn’t. Instead, I had to verify that the status LED light was flashing red and blue and thankfully it was.  I then went back into the app, tapped on “Pair” and tapped on the “Momentum Niro Garage Door Controller” from the list of other Momentum devices.
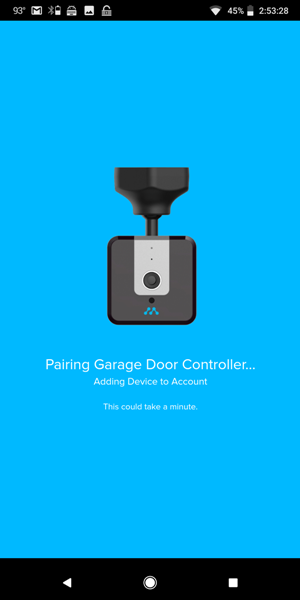
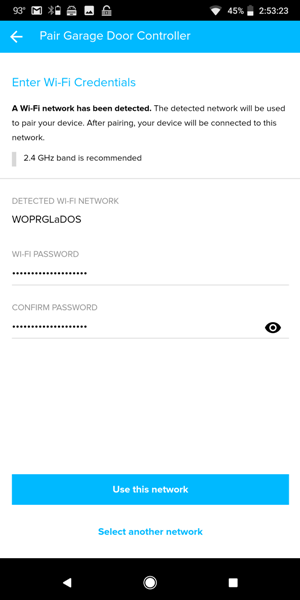
At that point, I then selected my WiFi network and entered my credentials.

After pairing with the app and connecting to my network, I then tried to update the firmware but it failed the first time. It did finally update.
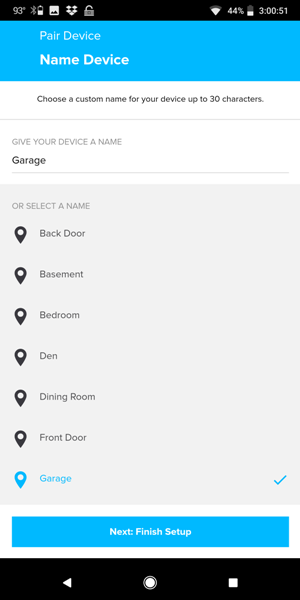
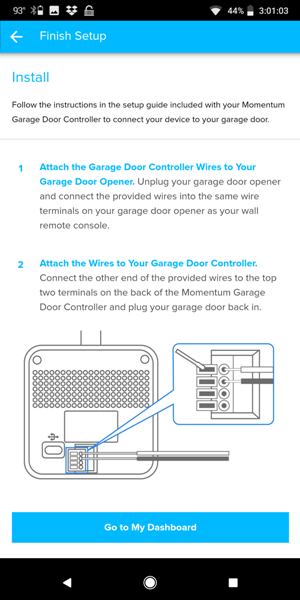
Next, I named my Niro garage door controller “Garage”, after which I needed to complete the rest of the physical installation of the device.

Niro Garage Door Controller setup
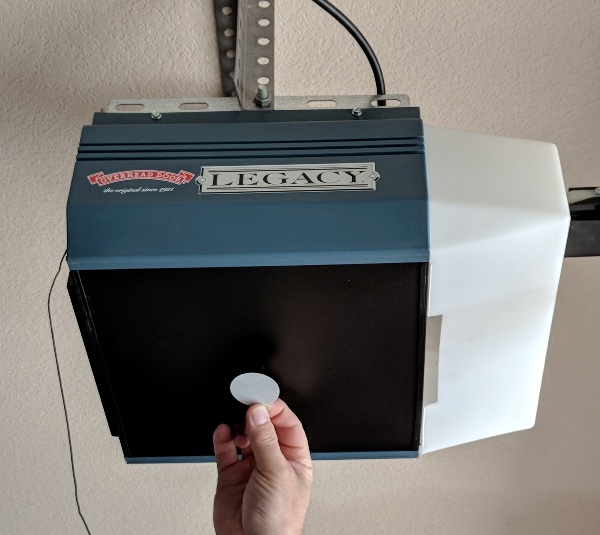
We used the double-sided round 3M adhesive provided and placed it under our garage door opener. You could then attach Niro to this adhesive disk, but instead, we chose to attach the round metal plate to the adhesive.
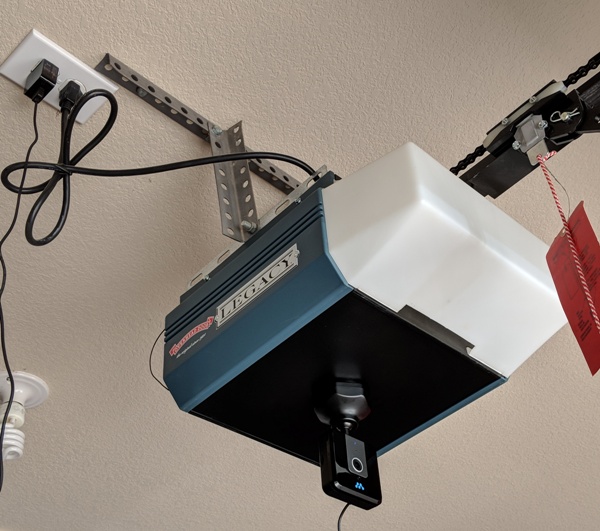
Then we attached Niro magnetically to the metal plate. This allows us to easily remove Niro should we ever need to.
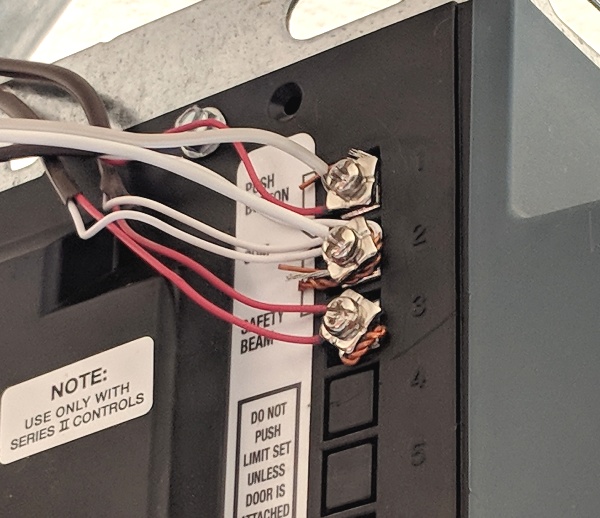
Next, we needed to attach the wires to the garage door opener. The garage door controller wire provided is much longer than what is needed, so we trimmed the wire and stripped the insulation at the end we cut (use this end to connect to the garage door opener terminals shown above).

The two wires, beige and white, were attached to the 1 and 2 positions of our opener by unscrewing the screws and wrapping the exposed ends of the wires around each screw and then tightening them. These terminals on your garage door opener are most likely already connected to your push button controller, and by connecting Niro to the same terminals, you are installing two switches in parallel. This will ensure that either the push button or Niro will open or close the garage door at any time.
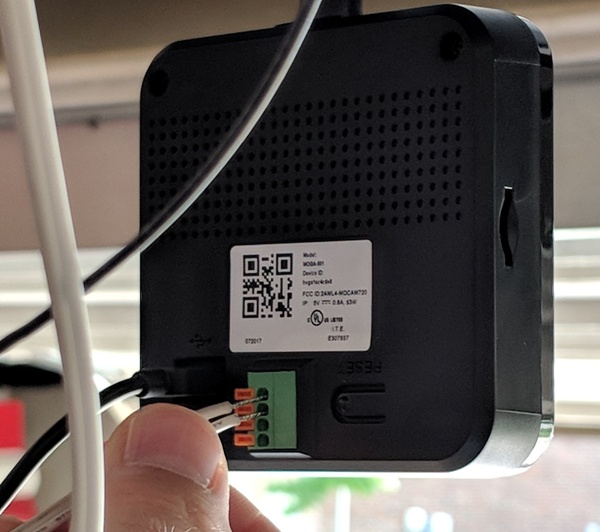
The other ends of the wires needed to be attached to Niro in the first two wire connector ports. “Note: Both wires are neutral, so it doesn’t matter which color wire goes into which of the two ports. However, make sure the open wire ends are not touching each other.” (-Niro Quick Start Guide).

If you happened to trim the control wire to a more reasonable length as I mentioned above, be sure to use the tinned ends (the ends that were stripped by the manufacturer and coated in solder to be rigid) because they will more easily fit into the tiny holes in the back of the Niro.
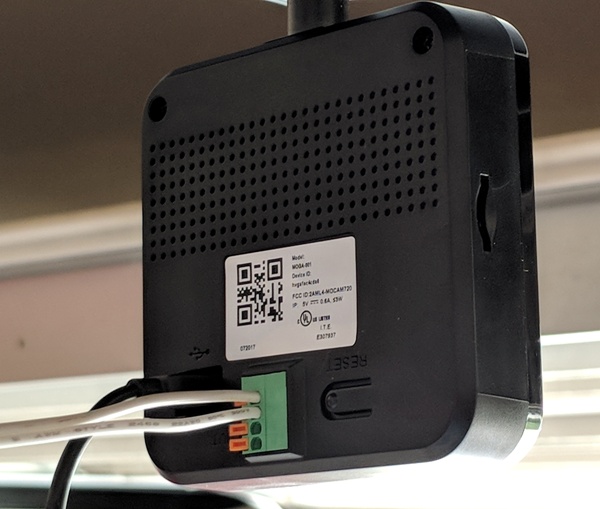
To insert the wires, the orange release buttons needed to be depressed.
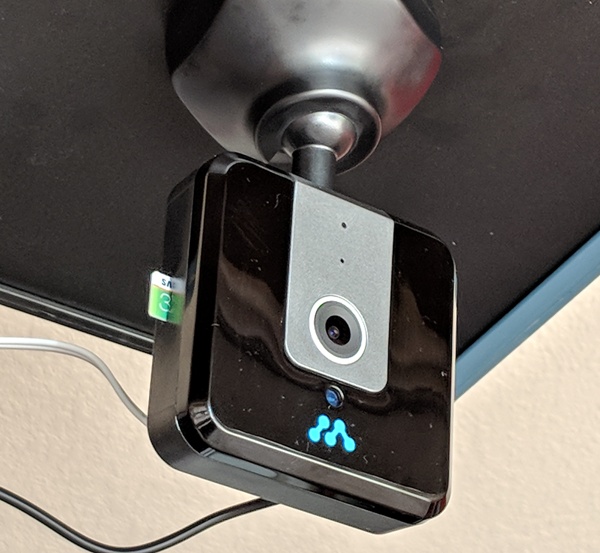
Last, I inserted a 32 GB micro-SD card into the slot (this slot will accommodate up to 128GB).

Performance
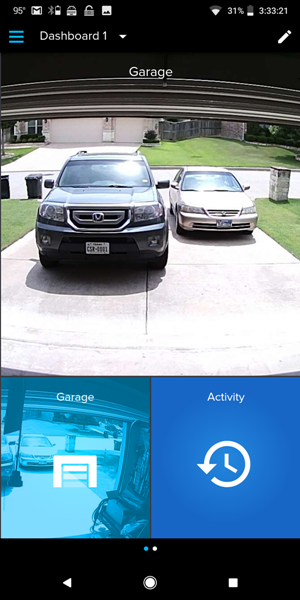


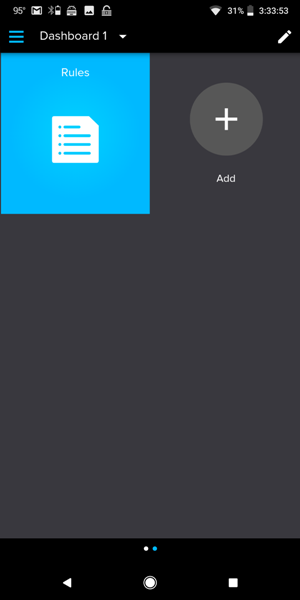
The default Momentum dashboard has three tiles on it. However, you can change the dashboard appearance if you wish by tapping on the pencil icon located at the top right corner as shown in the first screenshot above.

Camera tile

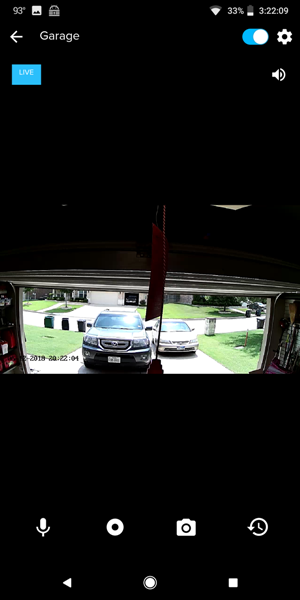
To access the live video feed and camera controls, you must tap on the “Camera” tile which is the largest tile located at the top of the dashboard. In addition to the live video, it will allow you to tap on each of four icons located at the bottom of the screen (center screenshot above): Microphone icon for two-way communication, Record Video icon for manually recording video, Camera icon for manually taking a screenshot of the live video, and Activity icon for  viewing the activity for the day.

While in the “Camera” tile of the app, to perform two-way communication, you must press the Microphone icon once to speak to the person in front of the Niro camera and then again in order to hear them speak to you. To manually record a video, you need to tap on the Record Video icon to start the recording and then again to stop it. To take a picture, you need to tap on the Camera icon. The last icon is the Activity icon which will take you to a list of all the activities recorded.

I was able to speak to a person in the garage easily and the audio quality was fine. Additionally, recording and taking screenshots were easy too. I could view my manual video recordings and photos in the Activity list; although it takes a few minutes or so for them to show up there.

Garage tile

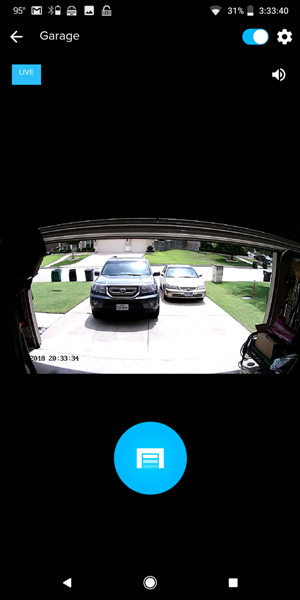
Next, you can access the garage door controls by tapping on the “Garage” tile in the lower left corner of the dashboard (the one that has a garage door icon on it). From here, you can view the live video feed and open and close the garage door. Most of the time I was able to open the garage door by using the app. However, there were a couple of times when I opened the app and it was unable to connect to the Niro garage door controller. This is a concern and thus you may want to carry a backup garage door remote when this happens.

I’m not sure why the “Camera” and “Garage” tiles couldn’t be combined into one. That way all the garage door and camera controls are all together for each of your Niro controllers.

By the way, the live views from the “Camera” and “Garage” tiles are normally identical. I actually adjusted the camera down in the right screenshot above which is why it looks different from the center screenshot.
Settings

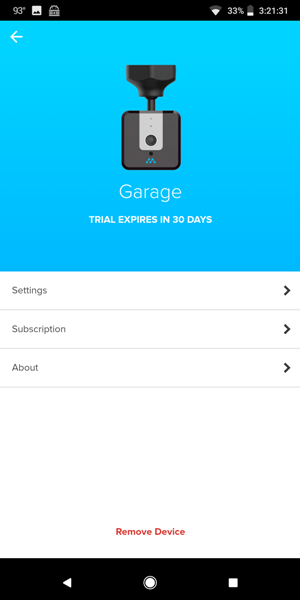
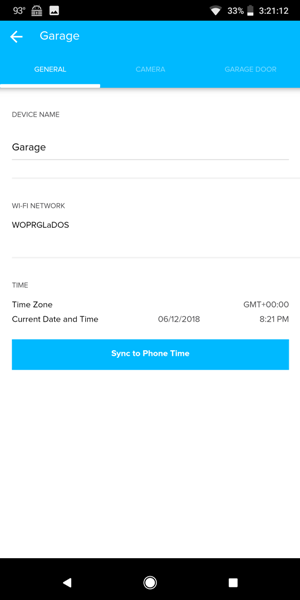
While in the live video feed portion of the app, there is a gear icon located in the upper right corner of the screen that will give you a list of options to choose from: “Settings”, “Subscription”, or “About”.

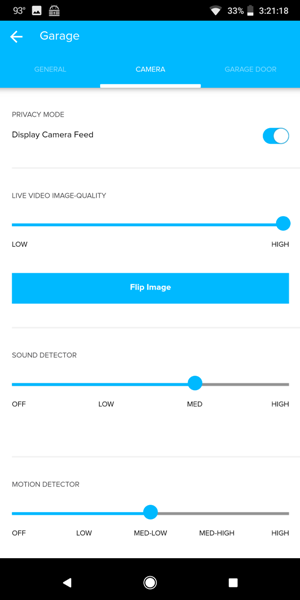
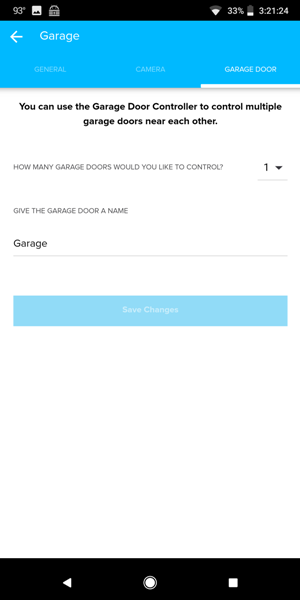
In the settings, you can change the name of your device (second screenshot above), adjust the live video image quality, and adjust the sensitivity of the sound and motion detectors. You may also view camera backups on the SD card or format the card (third screenshot above). Additionally, you can set the garage door controller to control multiple garage doors near each other (last screenshot above).
Creating and using Rules

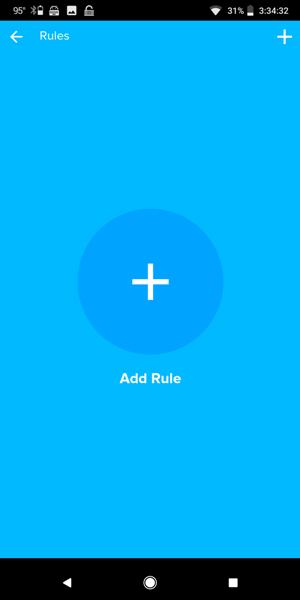
If you swipe left on the default Momentum app dashboard, you will see one other tile – the “Rules” tile. By tapping on it, you can create your own rules to trigger the Niro camera.
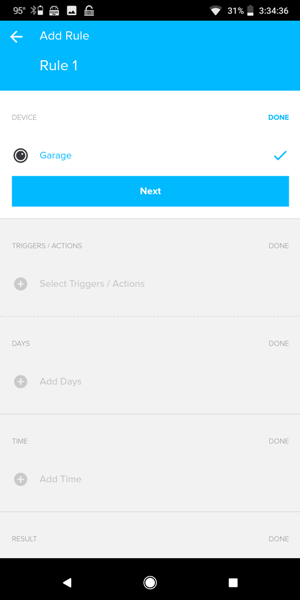
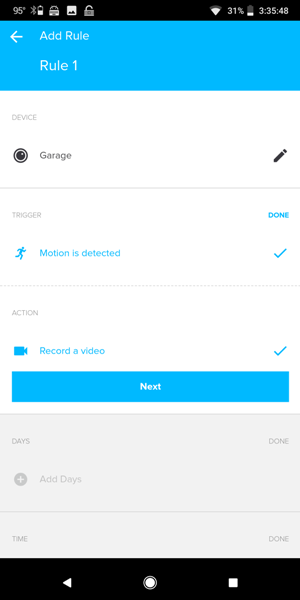
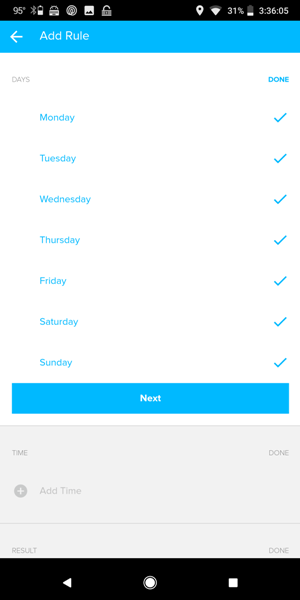
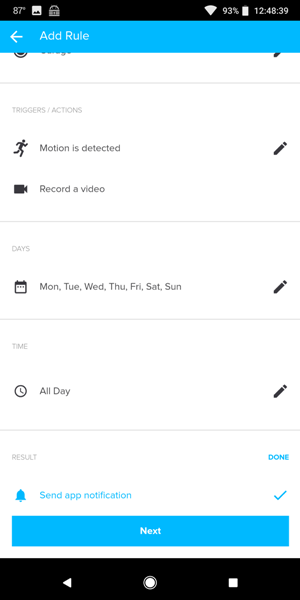
I created a rule for my Niro garage door controller. I only had one Niro, so it was already selected under the list of “Devices”. Then, under “Trigger”, I selected “Motion is detected” and under “Action”, I selected “Record a video”. Actually, I was unable to select anything else under “Trigger” or “Action”. I then selected which days and the time of day I wanted to detect and record motions. And last, I selected “Send app notification”.
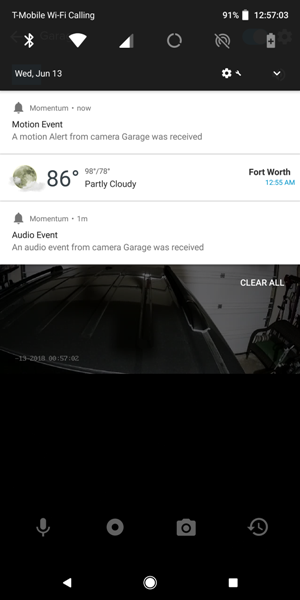
Whenever Niro detected a motion, it would automatically record video of it and send me a notification. Notice that it also sent a notification that an “Audio Event” was detected in the screenshot above.

Here are a couple of samples of the video quality and audio quality of the Niro camera. Notice how nicely the camera switches from IR nighttime (our garage has no windows so it is dark when the garage door is closed) to daytime video.

While using Niro for about a month, I noticed that every recording was only 19 seconds long. Often, this was not enough time to record the entire motion event so another 19-second video was recorded to finish capturing it. However, the second video starts about 20 seconds after the end of the first video thus missing the end of the motion event and capturing nothing in the second recording. I received a motion event notification for each recording. There does not seem to be a way to alter the 19-second video recording length in the settings.

In addition, I noticed that I would receive another motion event notification a few minutes after closing the garage door. Perhaps it was due to the garage light shutting off thus eliminating shadows detected by the camera. You can adjust the sensitivity of the motion detector although it may not eliminate this issue.

You can use the Momentum app to control your Nest thermostat. To pair your Nest with the Momentum app, you must tap on the menu icon located in the upper left corner of the dashboard and select “Pair device”. Once paired, tapping on the thermostat tile on the Momentum dashboard flips it over. One side allows you to adjust the Nest to “Home” or “Away” modes. The other side allows you to change your temperature settings by sliding up or down on the snowflake icon or flame icon.

What I like

  • Installation was easy
  • I was able to check to view the garage door status and open/close the garage door while away from home
  • Transitioning from nighttime vision to daytime was seamless
  • It works with the Nest thermostat

What needs to be improved

  • Garage door and camera controls should be located in the same tile on the app
  • Allow the user to change the duration of the automatic recordings
  • It doesn’t appear to work with Alexa, Google Home, Apple HomeKit, or other smart home systems

Final thoughts

I really enjoy using the Momentum Niro WiFi Universal Garage Door Controller with Built-in Camera. First of all, it was wonderfully easy to install. Furthermore, I was able to connect to Niro to check on my garage door status and open/close the garage door from anywhere. There were only a couple of times that I could not connect with Niro. Thus, I suggest that you keep your garage door remote with you, just in case.

There are a few things that mildly bothered me. First of all, it would be nice to have all the garage door and camera controls all in one place. Next, it would be nice to allow the user to alter the video recording durations beyond 19 seconds. Third, Niro only works with the Nest thermostat. It doesn’t work with Alexa or Google Home (or other smart home systems except for Nest). Other than these drawbacks, I really enjoy using the Momentum Niro. Please be sure to check your garage door opener for compatibility with Niro before purchasing.

Price: $99.88 – $99.95
Where to buy: Amazon and Momentum
Source: The sample of this product was provided by Momentum

Filed in categories: Reviews

Tagged: ,

Momentum Niro WiFi Garage Door Controller with Built-in Camera review originally appeared on The Gadgeteer on July 19, 2018 at 9:00 am.

Note: If you are subscribed to this feed through FeedBurner, please switch to our native feed URL http://the-gadgeteer.com/feed/ in order to ensure continuous delivery.
Burkley Leather Business Briefcase review

REVIEW – The classic leather briefcase never goes out of style, does it? Today we’re checking out the Burkley Leather Business Briefcase, a classy leather brief for the business minimalist. How does it do in our testing? Let’s go to work! 

What is it?

It’s a minimalist leather briefcase sized for tablets and laptops up to 13”.

  • Dimensions : 14.5″ x 11″ x 2.75″
  • Weight: 15 ounces
  • Material : Top Grain Burnished Tan Genuine Leather, felt interior
  • Removable adjustable shoulder strap
  • Leather handles
  • Reinforced corners and metal feet
  • Gunmetal finish hardware

Design and features

The design of the Burkley Leather Business Briefcase is simple, elegant, and focused. It’s a good looking piece of gear that will dress up your business look, even if you’re going a bit more casual:

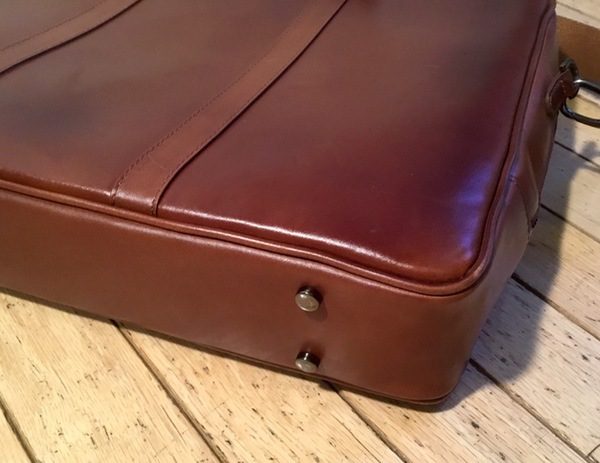
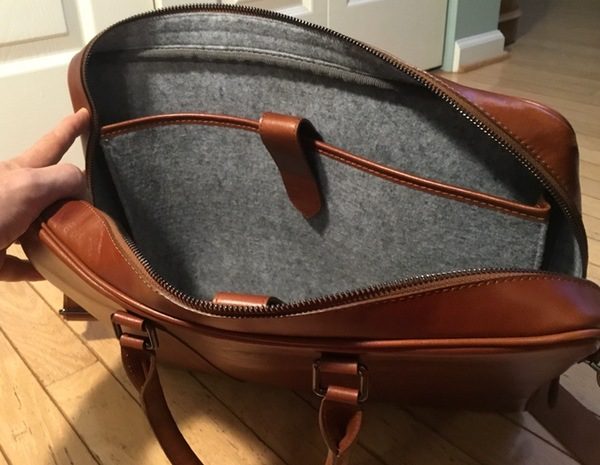
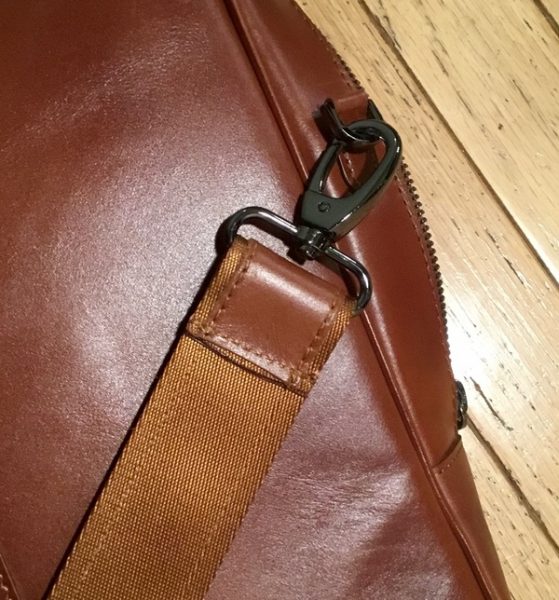
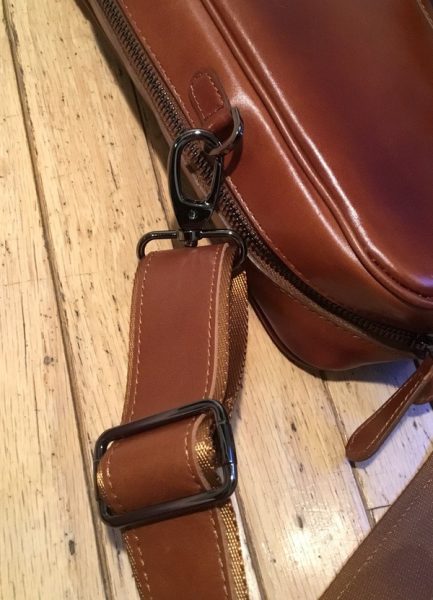
There’s some lovely detail work in the assembly of this briefcase. The primary material a lightweight vegetable tanned leather with a light grey felt interior. The trim work and finishing is tight, and the stitching looks good from all angles. Gunmetal hardware used throughout the bag pairs nicely with the burnished tan leather in my tester. Reinforced corners, and metal studs on the base round out the body work. Toss in the (tastefully sized) embossed buffalo Burkley logo, and you have a very attractive package. Check out some of the detail work:

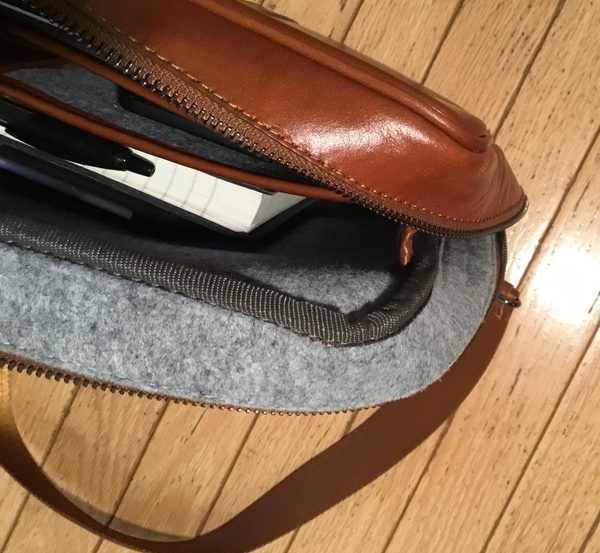
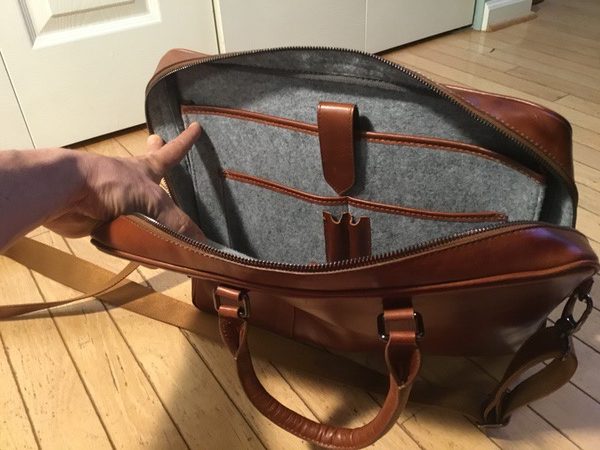
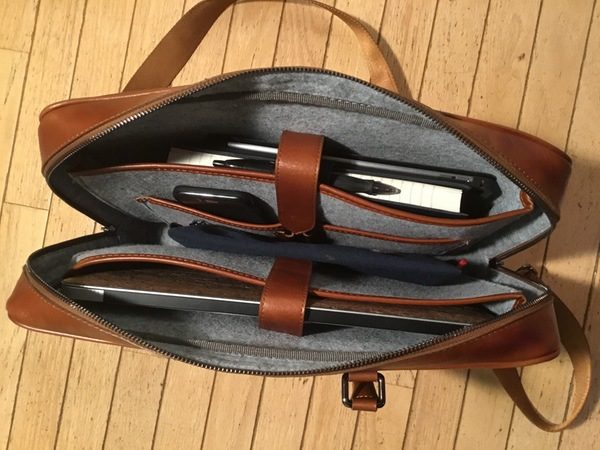
The form factor is that of a top loading brief, with the zips that travel 8” down the sides of the bag for easy access to the interior. All of your storage is in the main compartment, which features matching 14” x 9” x 1.25” laptop/tablet pockets, a pair of 6” by 6” thin pockets, and two pen loops sized for thin writing utensils (like the Apple Pencil). Here’s are pics of the interior faces. Note that the nice finishing work carries through to the felt pockets:

Two carry options round out the design of the Burkley Leather Business Briefcase. A pair of substantial leather carry handles are used for briefcase-style carry. The detachable shoulder strap is made from a copper-colored nylon weave with a generous 52” adjustable length. There’s no shoulder pad, but the 1.5” wide strap is more than comfortable given the weight of the bag (15 ounces unloaded). Attachment points are offset with one on each side of the zip, which aids in keeping the bag closer to your body in over-the-shoulder or cross-body carry maneuvers.

In Use

If you’re looking to make an impression when you walk into the boardroom, this bag will do the job. The timeless silhouette is all class, and you won’t look like a wandering Sherpa hauling your massive gear bag into that meeting. It’s also got great usability. Everything is simple, easily accessible, and functions flawlessly. The pockets are just the right size and texture to slide items in and out easily without a lot of fumbling. I especially like the twin (and equal sized) laptop/tablet pockets on the interior. Specialty pockets in a small bag like this would limit my options. With this setup, I can run with a laptop and my big ol’ iPad Pro, or swap either out for a smaller iPad and/or notebooks as needed without compromising the remaining available space. This is good.

On the flip side, minimal means leaving all of your extra junk at home. Lean and mean is the packing style for this bag. It will accommodate a 13” MacBook and/or a tablet (up to an IPad Pro with the Apple keyboard and case), plus a notebook… but there’s not much room to spare after that. I have a think organizer pouch in there for little bits. You could toss some little items in there in the remaining space (like a smaller power brick), but that’s about it.

Here’s the thing: at a mere 15 ounces and a small carry volume, it’s ridiculously easy to toss about. It’s great for being on the go, provided you don’t need all of your extra stuff with you.

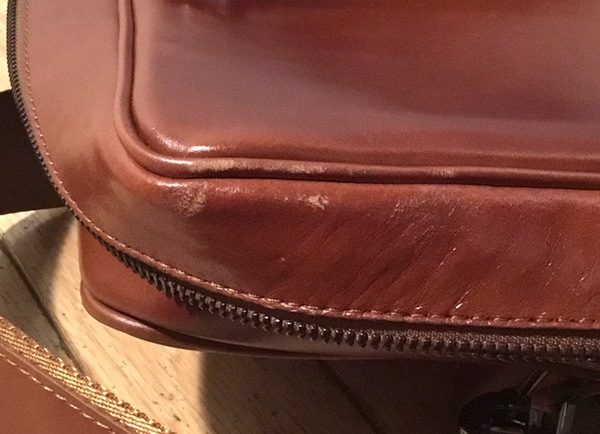
If there’s one area of concern for me, it’s in the potential durability of the leather. I’m already starting to see some wear in one of the corners, just a few weeks in:

See that light color starting to show through? That means that the leather (and the dye job) is really thin. While the bag is beautifully finished and assembled, I’m concerned that the leather doesn’t match up to the $299 retail price on this bag. The 90-day warranty (manufacturer’s defects only) is also pretty light. If this was a cheaper bag  I’d be less concerned… but you have many, many buying options at the $300 price point. I’ll also do some more extensive durability test in the coming weeks to see how it holds up!

What I like

  • Elegant style and classic good looks
  • Super lightweight
  • Great finishing touches
  • Minimalist design with excellent day-to-day usability

What needs to be improved

  • The thin leather may lead to long-term wear issues
  • Concerns about value relative to the selling price

Final thoughts

The Burkley Leather Business Briefcase is a beautiful, well-executed brief that will fit the bill if you’re looking to upscale your business style. You can’t go wrong on the classic looks and excellent usability of this bag. The thin leather, however, raises some durability concerns for me if you beat your bags up. We’ll see how it holds up under long-term testing!

Price: $299.00
Where to buy: Visit the Burkley Leather web page to purchase this bag.
Source: The sample of this product was provided by Burkley Leather.

Filed in categories: Reviews

Tagged: ,

Burkley Leather Business Briefcase review originally appeared on The Gadgeteer on July 18, 2018 at 3:58 pm.

Note: If you are subscribed to this feed through FeedBurner, please switch to our native feed URL http://the-gadgeteer.com/feed/ in order to ensure continuous delivery.
Apeman Trawo action camera review


REVIEW – Ever since the famous GoPro Action Camera was launched, many companies have tried to follow that model by creating a similar product with similar features, but for a lower cost. I recently got the opportunity to test and review just such a product. Here are the results:

What is it?

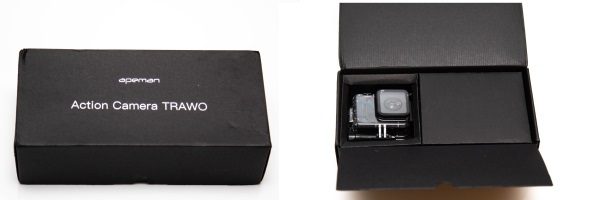
The Apeman Trawo Action Camera is a GoPro style action camera, with 4K capability and a host of similar GoPro features for capturing action and movement footage in all types of environments and scenarios.

What’s in the box

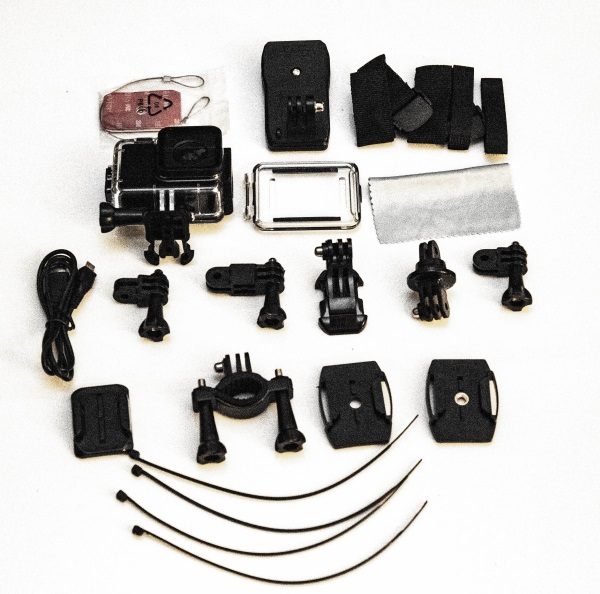
1 x Apeman Trawo Action Camera
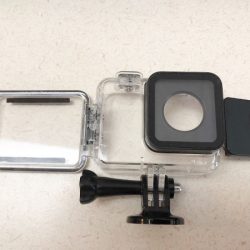
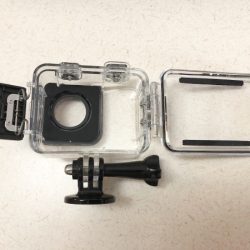
1 x Waterproof Case
1 x Additional Rear case Cover
1 x Micro USB Cable
7 x Various Case Mounts
1 x Micro Fiber Cleaning Cloth
1 x Pack of Velcro Straps (Assorted Sizes)
4 x Plastic Ties
1 x Wire Strap with Double-Sided Tape
3 x Base Mounts (@ with ¼-20mm female mounts)

(I received a pre-release version of this camera, so no instruction booklet was included in the box)

Design and features

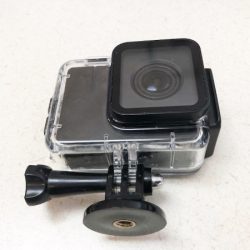
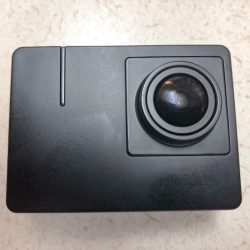
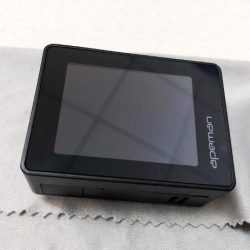
Much like other Action cameras available today, the Apeman Trawo Action Camera is a small compact action camera that without the waterproof case measures approximately 2 1/4″ x 1 3/4″ x 1″. When in the waterproof case, it measures approximately 3″ x 2 1/2″ x 1 1/2″ at the widest and longest sides. The LCD screen is approximately 1 1/2″ x 1 1/4″. It is well built and in my opinion, it does not feel cheap in any way.


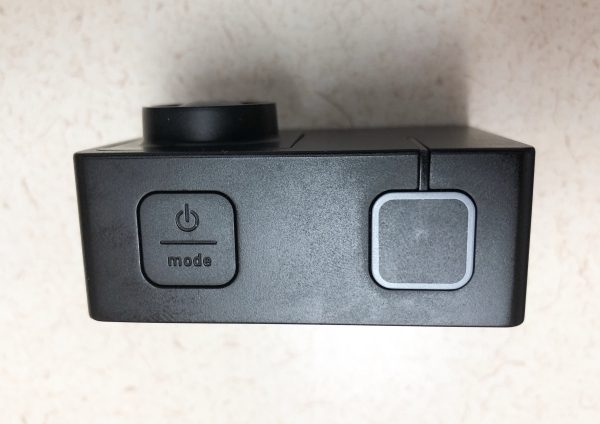
The controls for the camera are on the sides. On the top of the camera, there are 2 buttons. With the camera facing forward, the top left button has 2 main functions on the button. The front of the button powers the camera on and off and the back of the button switches the camera mode between video, camera, viewing, settings modes. The button on the top right turns the record function on and off, works as the shutter button for taking pictures and also works as the selection button when in settings mode.


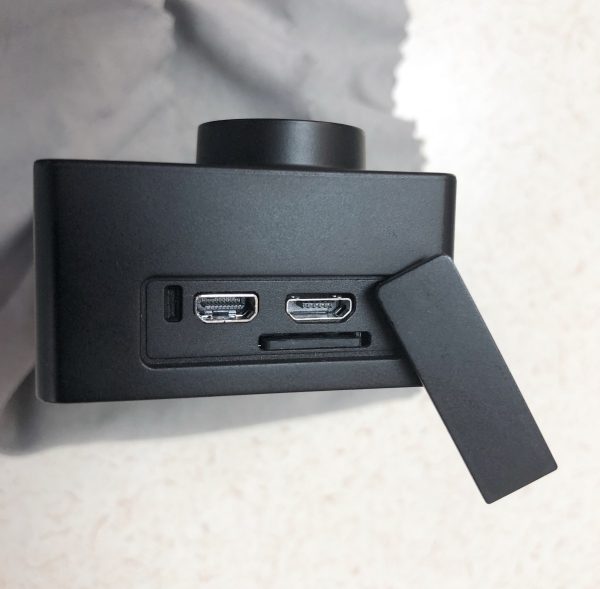
On the left side of the camera, there are 3 ports with a removable cover. These ports are the micro SD card slot, the micro USB port, and the micro HDMI port.


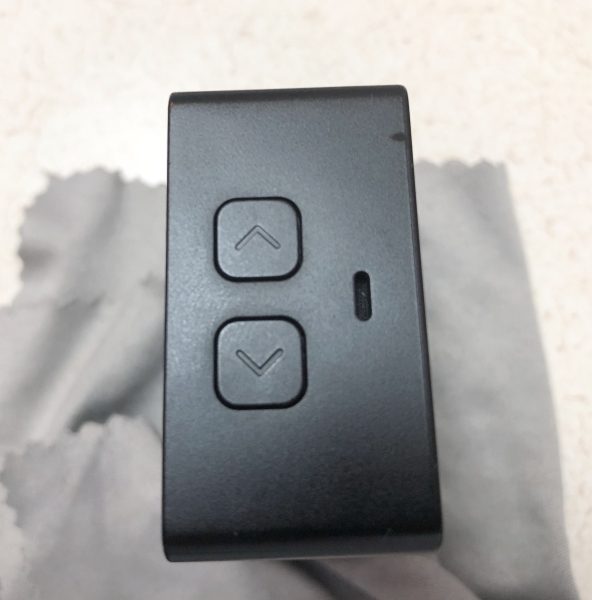
On the right side of the camera, are the up and down buttons for navigating.


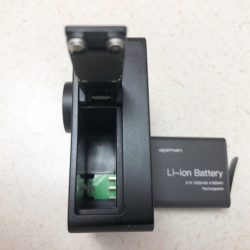
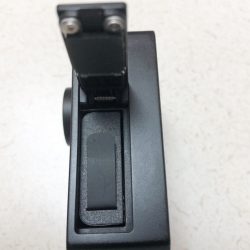
At the bottom of the camera, there is the battery port and cover.


The waterproof case that comes with the camera has water-sealed buttons that mirror the buttons on the camera, but the sides with the ports and battery are sealed.


Settings

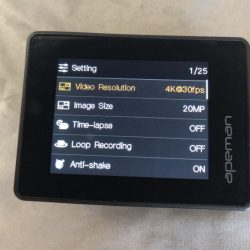
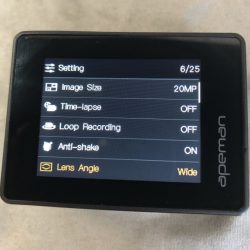
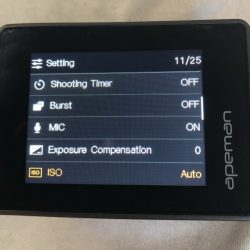
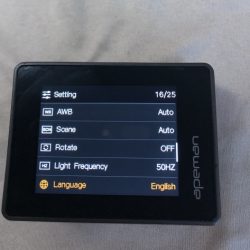
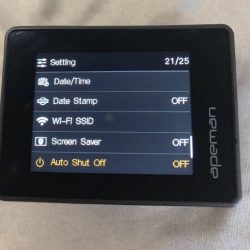
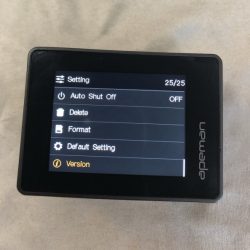
The Apeman Trawo has a large selection of settings that offer great customization. Navigating through the settings is very easy and every choice is very clear. The following is the list of settings located on the “settings” screen. I have provided details on the first 2 since many folks would want that preliminary information:
Video resolution – 720P@60fps 1280* 720 ~ 4K@30fps 3840*2160
Image size from – 3MP 2048*1536 ~ 20MP 5120*3840
Time-lapse, Loop Recording, Anti-Shake, Lens Angle, Shooting Timer, Burst, Mic, Exposure Compensation, ISO, AWB, Scene, Rotate, Light Frequency, Language, Date/Time, Date Stamp, Wi-Fi SSID, Screen Saver, Auto Shut Off, Delete, Format, Default Setting, Version.
(See Settings Screens Below)


Performance

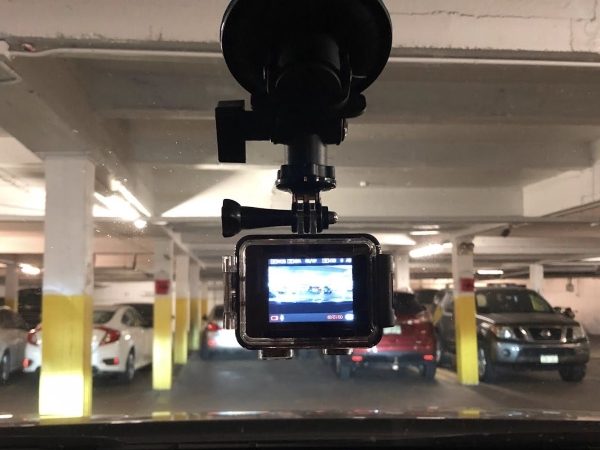
I used the action camera for daily activities to see how it would stand up to things I normally do. For the first test, I bought a windshield mount, and I tried it out as a dashcam.


The footage I got was very good and the stabilization worked well. However, the camera seemed to have some negative effects from the heat of the sun through the windshield. Let me first say that before each test, I charged the battery overnight to ensure that it was fully charged. Each time I used it, it either shut down at around an hour or so of use, or when it didn’t, the battery drained very quickly, or the sensors told the camera that it was drained. Each time the battery indicator was red, and when I removed the camera from the windshield mount and powered it off, waited a bit and powered it back on, the battery showed back in the white, but also on the low side. My conclusion is that there must be some effect from the heat.

Here is some footage from the dashcam: (Notice near the end of the video when I am driving on really rough roads, how well the Anti-shake works).

My next test was to see if the waterproof case was, in fact, waterproof and to see what kind of underwater footage I could get with the water thrashing up against the camera. For this test, I purchased a waterproof monopod with a 1/4″-20mm stud.

I then submerged the camera into the waves of the shoreline of the Atlantic Ocean. I am not a diver so I am not sure what the depth threshold is, but the case is definitely waterproof. Here is some of the footage:

The Action Camera also takes wide and clear pictures. (You can choose the lens angle in the settings)

Hisi 4K CAM

What I like

I like the small form factor of the camera that mirrors that of the GoPro. I like that is records in 4K, and that the waterproof case really is waterproof. The footage is great.

What can be improved

  • Battery response to heat
  • Better battery life
  • Addition of a detailed instruction booklet

Final thoughts

When I first received the Apeman Trawo Action Camera for review, I was expecting a less than capable GoPro knockoff that like many similar products, would not do any one thing very well. I must say that I am quite surprised by the performance and capabilities of this action camera. It performs very well, albeit with a few issues that I am sure can be overcome. It offers great footage and great resolutions, and the stabilization actually works. When comparing the price to other action cameras that offer the same quality and features, in my opinion, this is a great choice.

Price: $139
Where to buy: Amazon
Source: The sample for this review was provided by Apeman.

Filed in categories: Reviews

Tagged: ,

Apeman Trawo action camera review originally appeared on The Gadgeteer on July 18, 2018 at 9:00 am.

Note: If you are subscribed to this feed through FeedBurner, please switch to our native feed URL http://the-gadgeteer.com/feed/ in order to ensure continuous delivery.
Guardzilla 360 Outdoor All-In-One HD Camera review

REVIEW – There is almost no end to the number of security cameras on the market today, which is one of the reasons I’ve put off buying one. When the chance to review the Guardzilla 360 security cam came along, I jumped at the opportunity to see just what it could do.

What is it?

The Guardzilla 360 Outdoor All-In-One HD Camera is weatherproof Wi-Fi enabled outdoor security camera capable of notifying you via your phone when motion is detected. It also has the ability to stream live video to your phone and much more.

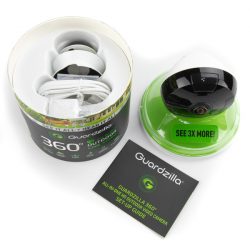
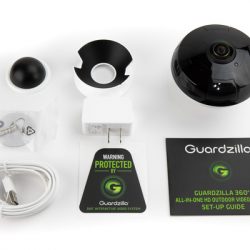
What’s in the box?

  • Guardzilla 360 Outdoor All-In-One HD Camera
  • Power adapter and 10′ power cord
  • Wall/ceiling mount
  • Desk stand
  • Window sticker
  • Setup Guide


Design and features

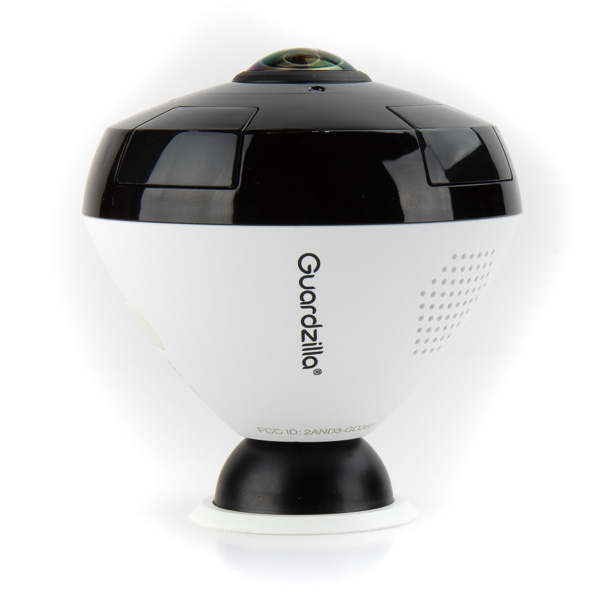
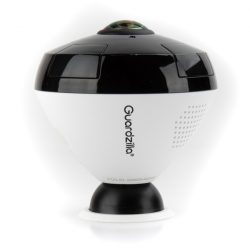
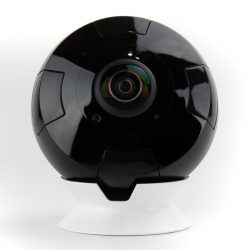
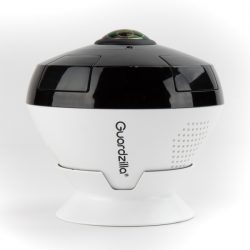
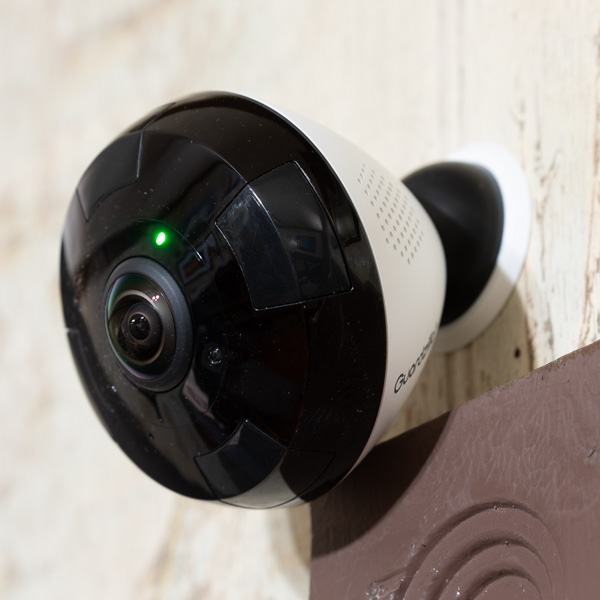
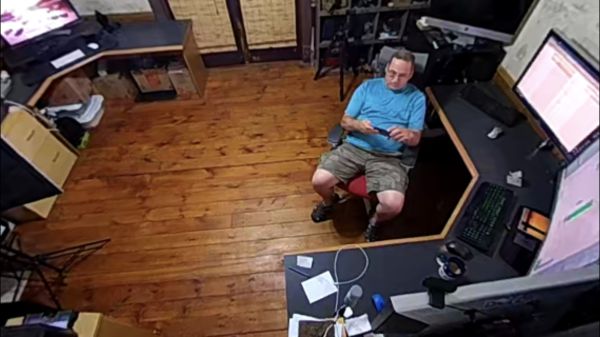
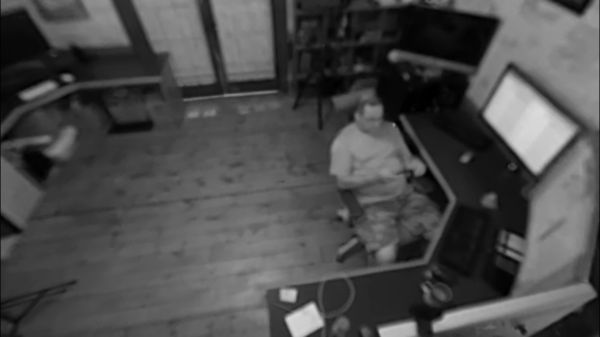
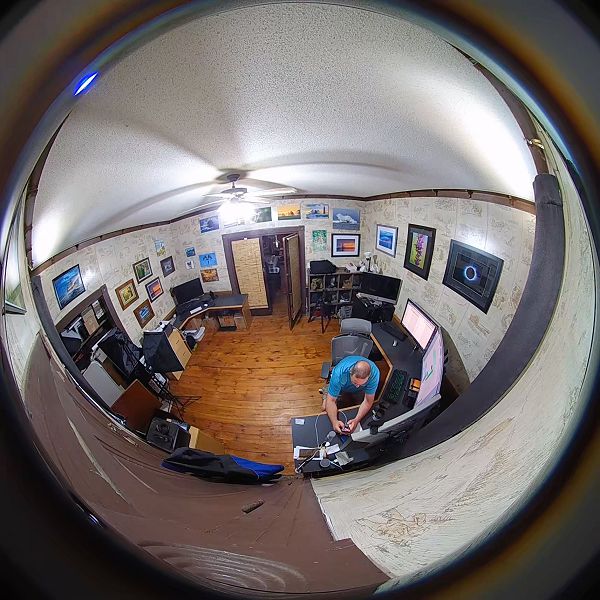
The Guardzilla 360 is designed to be able to see in all directions when mounted on a ceiling, wall, or table top. In effect, it’s just half of a sphere and not a full 360 degrees like a 360 action camera. When used as a security camera, as it’s designed, it’s perfect. You can simply swipe your finger on your phone screen and view an entire room or look in every direction if mounted on a ceiling.

The Guardzilla 360 has versatile mounting options such as a stand for placing it on any flat surface and a magnetic mount for mounting it to a wall or suspending it from a ceiling or eave. The magnetic ball mount is not only fantastic for pointing the camera in any direction, but it’s also extremely strong. I chose to mount it on my wall to monitor my office.

The Guardzilla 360 can run from both an AC power cord, or from the built-in rechargeable battery. The battery option is really nice in the case of a power outage or temporarily placing it somewhere.

The setup of the camera was pretty straightforward and easy. You can connect multiple cameras. I had only one camera, and each time I started the app it would automatically start with that camera selected.

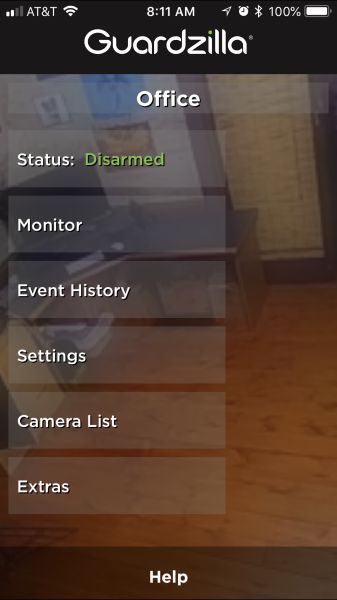
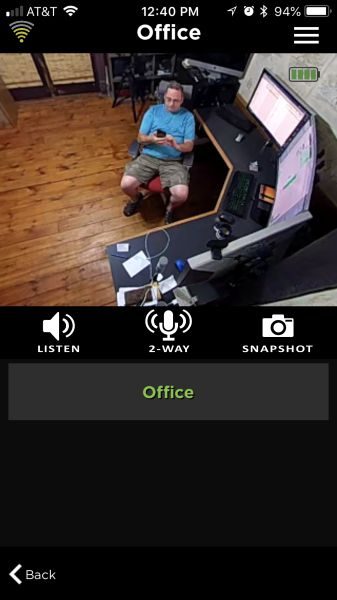
Monitoring is as simple as tapping the “Monitor” button in the app. Once you’re monitoring you can adjust the volume, brightness, contrast, point-of-view, and designate whether it is mounted on a wall, ceiling, or table top.


Rotating your phone also rotates the view to full screen:

The night vision of the camera is good, however, sometimes there is a noticeable degradation in the picture quality, almost as though it’s not focusing correctly. I didn’t notice that before the last firmware update. The non-night vision mode actually performs pretty well in very low light.

Saving a snapshot during monitoring saves the full 360 image to your camera roll:

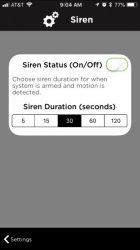
I found that the 90dB Siren just didn’t seem to be very loud. I’m not sure if it’s just me but I expected it to be much louder. My iPhone app showed it to be about 70dB at about 6 feet away, which is just over a regular speaking volume. There’s also no way to manually trigger the siren, it’s only set off when the motion detection is on. There is a setting for how long it plays though: 5, 15, 30, 60 or 120 seconds.

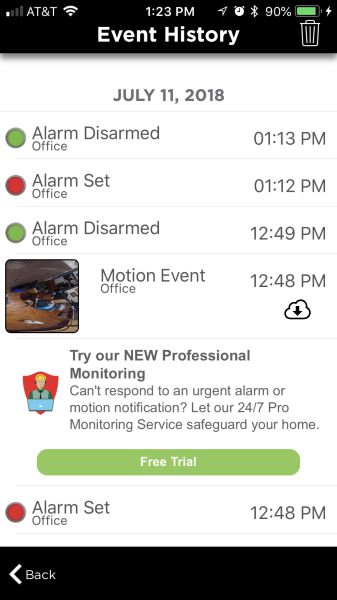
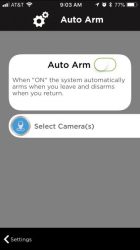
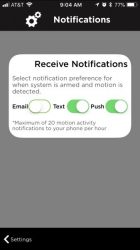
The motion sensors worked very well. Motion detection can be set to low, medium, and high. I set mine to low to avoid picking up my pets as often, but it would still pick up a person walking into the room. When the camera is “armed”, it can send an e-mail, text, and phone push notifications when motion is detected. Notifications were very quick and often arrived within 3 seconds. There is an event history list in the app where you can view events such as alarm set, alarm disarmed, motion events, images taken manually, etc. All motion events are captured in 8-second video clips and retained for two days for free. Cloud storage options provide longer video retention options. There’s even a setting to automatically arm and disarm the camera when you’re away by using your phone’s GPS location.

There is a listen feature that lets you hear what happens around the camera as well as a two-way talk feature that allows you to have two-way conversations through the camera’s speaker and mic.

The Guardzilla 360 can also integrate with other devices and services such as Nest, IFTTT applets, Alexa, and Google Assistant.

Guardzilla also offers professional 24/7 security monitoring for only $9.99 a month.

The one thing I would really like to be able to do is view the camera via a desktop browser. I work from home, and there are times I would like to monitor the front of my house when I’m expecting a delivery. Browser-based monitoring would be much easier than trying to do that via my phone.

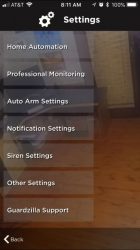
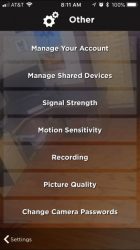
There are quite a few settings for the app, but they aren’t all on one screen. If I had to choose something that I would like to see changed, I would prefer if they were organized differently, and showed the current setting value without having to tap on it. Here are a just some of the setting screens in the app:

What I like

  • No blind spots in camera coverage
  • Very good motion detection
  • Built-in rechargeable battery
  • Magnetic ball mount
  • Phone software automatically updates the camera firmware

What needs to be improved

  • The monitor view slowly creeps to the left (could be an issue with my phone)
  • A desktop browser-based viewer would be nice
  • Louder siren
  • Manually triggerable siren
  • Better indication of what video is saved in the cloud

Final thoughts

Overall I really like the Guardzilla 360 camera, and almost all of the things I would like to see improved could probably be addressed in future app updates. Guardzilla really seems to be on top of things also as they updated the app a couple of times while I was doing this review.

Price: $199.99
Where to buy: BestBuy
Source: The sample of this product was provided by Guardzilla

Filed in categories: Reviews

Tagged:

Guardzilla 360 Outdoor All-In-One HD Camera review originally appeared on The Gadgeteer on July 17, 2018 at 11:00 am.

Note: If you are subscribed to this feed through FeedBurner, please switch to our native feed URL http://the-gadgeteer.com/feed/ in order to ensure continuous delivery.