Switchmate Bright instant smart lighting switch review

Last year I reviewed the original Switchmate Smart Light and now they have recently come out with version two which they’ve named the Switchmate Bright. Let’s give this smart light switch controller a try.

What is it?

The Switchmate Bright is a wireless controller for your existing light switch (toggle or rocker style) that physically toggles the switch on and off with your smartphone or a simple touch.

What’s in the box?

Switchmate Bright
2 AA batteries
Switchmate stickers
Instructions

Design and features

The new version of the Switchmate is significantly smaller (narrower) than the original version.  It is available in white or ivory. I was sent the white version.

It’s made of plastic with a touch-enabled switch on the front and a motion sensor at the top.

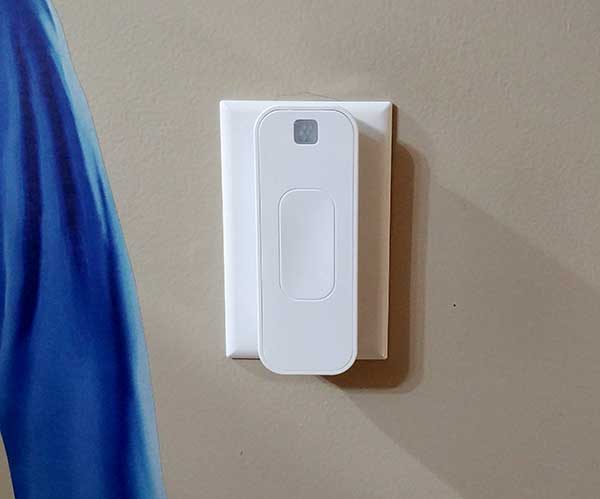
On the back of the Switchmate are two magnets that help this device achieve an almost install because absolutely no tools or wiring is needed. It uses the magnets to stick/attach to the existing light switch cover.

The slot on the back of the Switchmate fits over the light switch and a motor inside the Switchmate manually flips the light on and off.

Installing the Switchmate Bright

Installation is about as simple as it can get. First, you slide the battery cover off the back of the Switchmate, insert the included AA batteries, and put the cover back in place. According to the Switchmate FAQ, batteries should last between 8 and 12 months before they need to be replaced.

Then you install the iOS or Android version of the Switchmate app on your mobile device. The app will guide you through the rest of the setup which asks you touch the switch on the front of the Switchmate so the app can detect and connect to the switch via Bluetooth LE. Switchmate does not use WiFi or need an active connection to the internet to work.

Then you place the Switchmate Bright over your existing light switch with the switch in the ON position. The magnets on the back of the Switchmate make contact with the screws in the switch cover to hold it in place.

That’s it. You’re done. Plug and play.

Using the Switchmate Bright

After the Switchmate Bright has been installed, you can touch the front of it to toggle the switch on or off. You can also use the app to toggle the switch, have the Switchmate set to turn on the light when motion is detected, set the switch to turn on and off at predetermined times, or use your voice in the app to tell the Switchmate to toggle the switch.

Using your finger to toggle the light just by touching the face of the Switchmate works every time. When the switch is touched, a blue LED will blink. This is the easiest way to use the Switchmate, but it’s not exactly going to give you a smarthome kind of experience. That’s where the Switchmate app comes in.


The app is where you configure timers, motion detection settings, and can enable the welcome home feature.

There are two timers that you can set that enable you to program the Switchmate to turn the light on and off at the times you specify. You can also have these timers set to repeat based on the day of the week, weekends, and more. The nice thing about the timers is that they work even if you’re not within Bluetooth range of the Switchmate. Once the timer is set, it will happen regardless of the location of you and your mobile device.

The motion detection feature can also be customized to only work during certain hours of the day and you can specify how long you want the light to remain on after motion has been detected.

There’s also the Welcome Home feature that you can enable so that the Switchmate will turn on the lights when you arrive home.

How far is the control range for this switch? The claim is up to 150ft. My house isn’t that large, but I was able to control the Switchmate that I installed downstairs from upstairs at the other end of the house. And the nice thing is that the app will show you if the light is on or off by the way the onscreen control button looks. If it’s dark, the light is on and if it’s light, the light is off.

Like the original version of the Switchmate, there can be a slight lag when you press the onscreen button in the app and when the switch actually toggles. The delay is the longest after not using the switch in awhile. But is lightning fast if you toggle it again.

And just like the first Switchmate, there is still a motorized sound when the switch activates.

Voice control

The Switchmate will soon work with Alexa, but for now, you can tap the microphone button in the app and use your voice to tell the named switch to turn on or off.

The voice commands you use for the Switchmate begin with “Turn” and then the name of the Switchmate switch and finally the function which is “Off” or “On”. For example, if I named my Switchmate “front porch” and I wish to turn it off then I would press the microphone in the upper left-hand corner of the app and would then say “Turn front porch off” and Switchmate should turn that light off. I didn’t have a lot of great success using my voice to control the Switchmate. It took more time repeating my command than just tapping the button for the light in the app to toggle it on or off.

Final thoughts

If you’ve been thinking about adding a smart lighting feature to your home but didn’t want to buy brand new bulbs for all your light fixed or deal with hubs, wiring, etc. The Switchmate Bright is one of the easiest ways to add digital control for your lights. Just open the package, install the batteries, install the app, slap the Switchmate over your existing switch and you’re done.

I like gadgets that are easy to install and just work. The Switchmate Bright is that type of gadget.

Source: The sample for this review was provided by Switchmate. Please visit their site for more info and Amazon to order.


Product Information

Price: $39.99
Manufacturer: Switchmate
Retailer: Amazon
Pros:
  • No tools needed installation
  • Simple application
  • Timers, voice control, and motion detection settings
  • Does not require an internet connection
Cons:
  • None

Filed in categories: Reviews

Tagged:

Switchmate Bright instant smart lighting switch review originally appeared on on July 14, 2017 at 1:42 pm.

Note: If you are subscribed to this feed through FeedBurner, please switch to our native feed URL http://the-gadgeteer.com/feed/ in order to ensure continuous delivery.

Wemo Wi-Fi Smart Dimmer Light Switch review


As I slowly add parts to automate my home, I’m always interested in the gadgets that are being released to make life easier or… just cooler.  The WemMo Dimmer is one of those devices that just makes sense. 

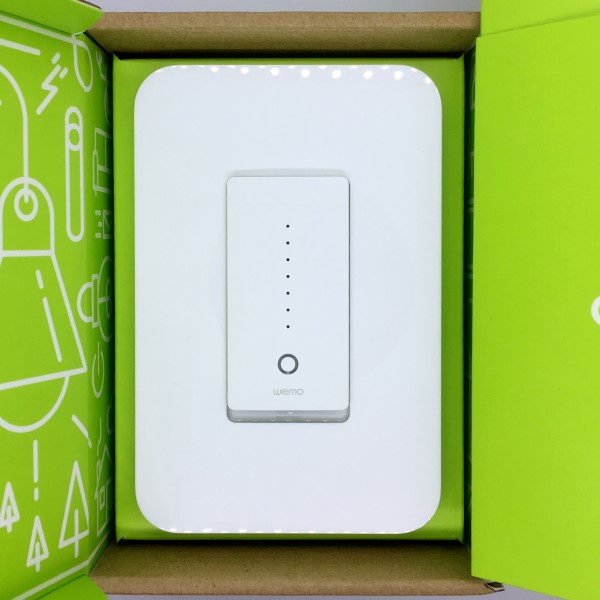
The dimmer arrived in, okay, I’m man enough to admit, sexy packaging. Outside, the box is your run-of-the-mill cardboard color with some white graphics showing the WeMo logo, a line drawing of the dimmer, and a diagram of “suggested†dimmer settings with such settings as “3 am  bathroom run.†  It made me smile. Inside, the box is an almost shocking shade of green. A green that could wake up a sleepy Gadgeteer! Lots more with graphics adorn the tri-fold enclosure.  Opening the package reveals the elegantly designed dimmer switch and a slot marked “get set.â€

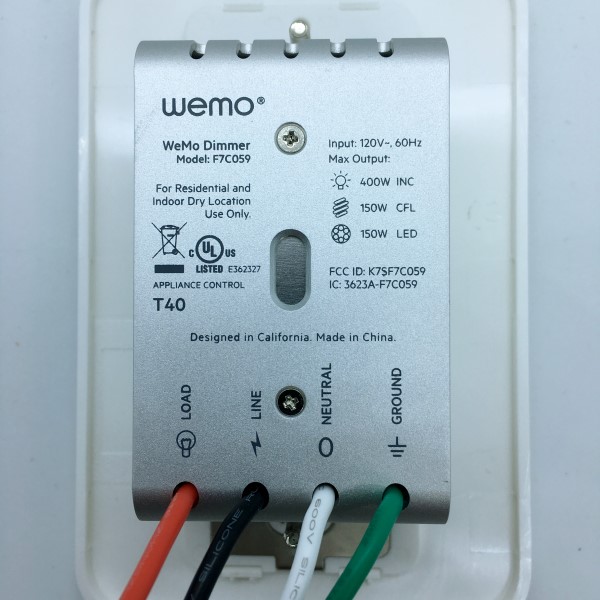
Wemo’s “Let’s go†manual is a comprehensive instruction manual for installing the dimmer. Graphics and text are easy to understand, waking an installer, even a novice, through the sometimes frightening aspects of home wiring this installation requires. The kit even includes the wire nuts and labels to make sure (no pun intended) wired don’t get crossed.

I had no trouble identifying the wiring and what needed to be done to replace a hallway ceiling lamp switch, probably the most often used switch in my home. Turning off the circuit breaker, I removed the old-style switch and wired the WeMo. One note of caution: the Wemo Dimmer is considerably more bulky that the switch it’s replacing. If there are additional wires in the back of your electrical switch box, you might have a challenge fitting everything back in. Tucking the wires back as far as they will go helps. Make sure you don’t pop the wire nuts off when you do this or you will likely get a surprise when you turn the breaker back on. Of course, if you’re uncomfortable doing this wiring yourself, ask a handy friend or hire a professional. Above all, please be careful.

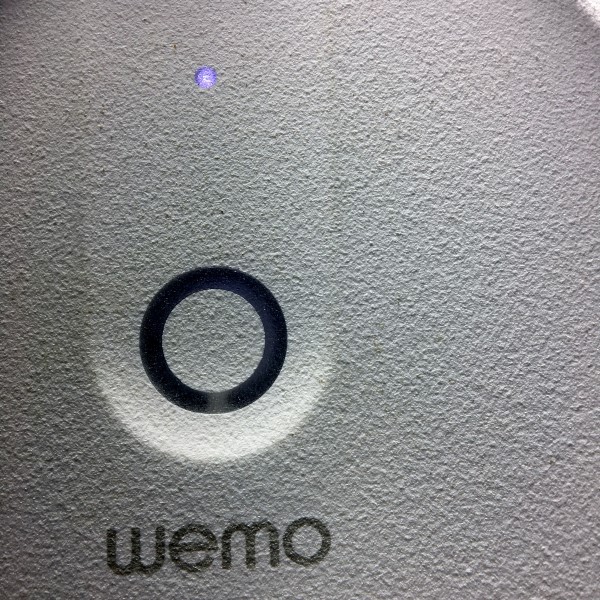
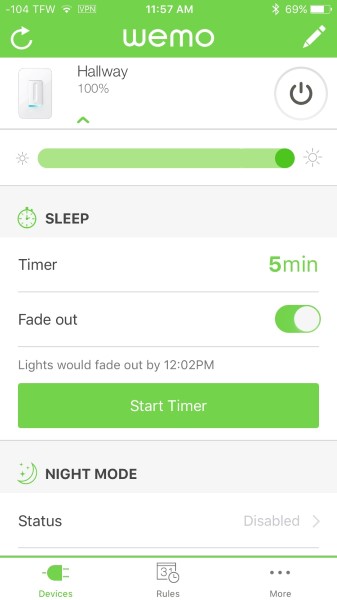
Once the switch was in and the juice turned back on, the Dimmer flashes some funky disco lights and settles into a flashing blue. I downloaded the app and followed the instructions from the manual. Similar to many typical smart devices, my phone connected to the Wemo Dimmer’s Wi-Fi and walked me through setting my bulb type, pairing with Alexa and connecting to my home network. At no point did I feel lost and the entire process progressed very smoothly.

Now the fun part… Now that the dimmer was paired with Alexa, I could issue voice commands to turn on, off or even set a brightness percentage. Pretty slick! I fiddled around with the app and found I could access any lamp function I desired on my home network and through cellular 4G with very little lag. I even connected through a VPN in Thailand and found the same, fast, results.

Moving on, I was able to set timers, set the app to turn off the light after a specific time, and put the dimmer into “Away†mode to randomize turning the light on and off for home security. The app also connects to IFTTT, but I have yet to see what goodies I can find. It seems Wemo really thought things out. Well done.

So far, I am thrilled with the ease of use, functionality, and reliability of the Wemo Wi-Fi Smart Dimmer Light Switch. Given the opportunity, I would gladly replace every switch I have with them.

Source: The sample for this review was provided by Wemo. Please visit their site for more info and Amazon to order.


Product Information

Price: $79.99
Manufacturer: Wemo
Retailer: Amazon
Pros:
  • Well written directions
  • Simple setup
  • Great connectivity
  • Lots of functionality options
Cons:
  • Expensive

Filed in categories: Reviews

Tagged: ,

Wemo Wi-Fi Smart Dimmer Light Switch review originally appeared on on July 5, 2017 at 8:46 am.

Note: If you are subscribed to this feed through FeedBurner, please switch to our native feed URL http://the-gadgeteer.com/feed/ in order to ensure continuous delivery.

Koogeek SK1Smart Socket review


I’m in the process of slowly automating my home, so when the opportunity to review the Koogeek SK1 Smart Socket, I jumped at the opportunity. I anticipated turning light on and off from afar, and dimming them to suit a particular mood… I get ahead of myself. 

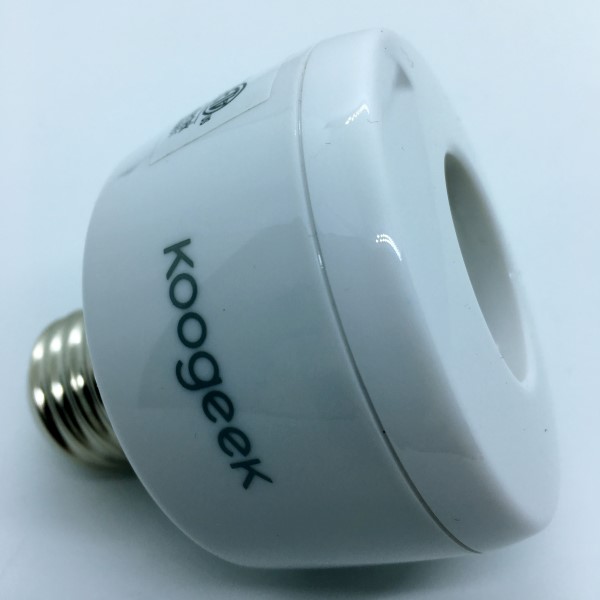
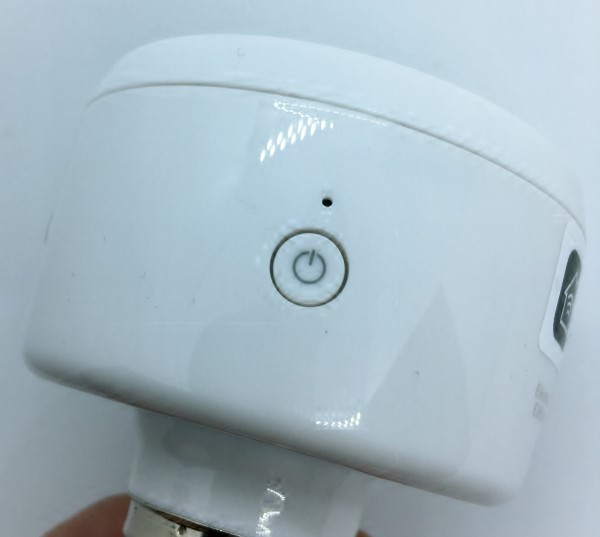
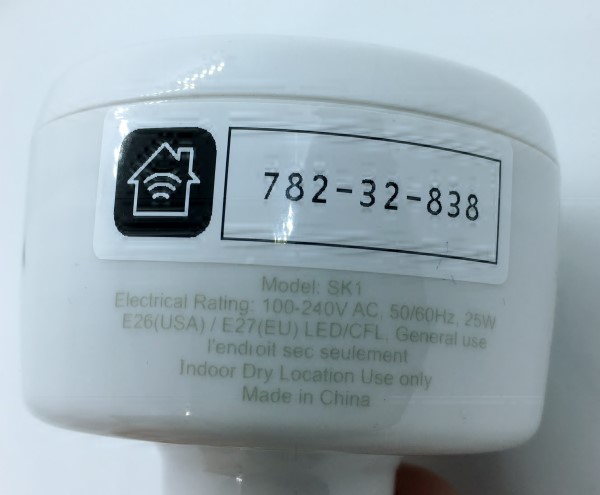
The Koogeek socket arrived in a sturdy box, nestled in a form-fitting plastic tray and a tiny 3” X 3” instruction card. The socket itself is very basic, about 3 inches in diameter, a standard bulb socket on one end, and the flange that goes into the lamp’s socket on the other. There is a single pushbutton on the socket to perform all of its functions, including turning the lamp on and off without using the app.

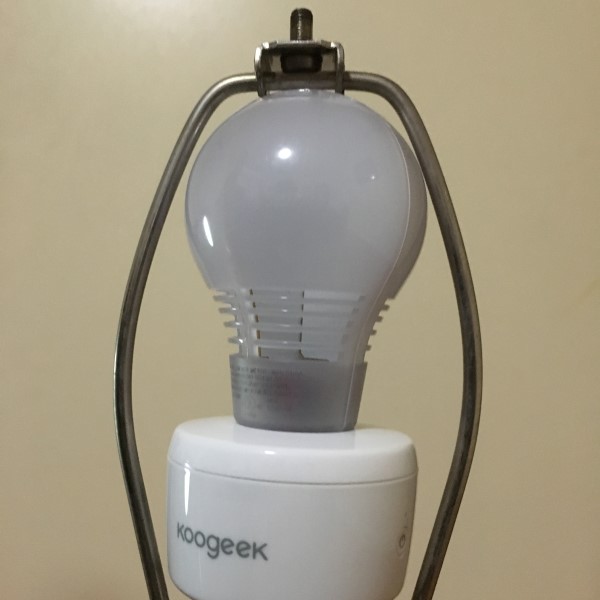
Screwing the lamp into a lamp socket revealed the first hurdle in my plan to electronically dominate my home: With the Koogeek socket installed, the bulb is raised about 1.5 inches from the existing socket. I found that in the lamp I had chosen for use, the bulb was raised enough to contact the loop that holds the lampshade. I found a slightly smaller profile bulb that fit, but it’s still tight. On lamps that have more space above the bulb, this would not be an issue.

I downloaded their app, created a user account and went through the pairing process. It was refreshingly simple. Screw in the bulb, screw the socket into the lamp, turn the lamp on and hold the solitary pushbutton until it flashes. Open the app, click the “+”, and type in the number of the device conveniently located on the socket and that form-fitting plastic tray it arrived in. Nice touch. I can imagine if this device were placed in a difficult to reach location, it might be tedious to get the number from the socket itself.

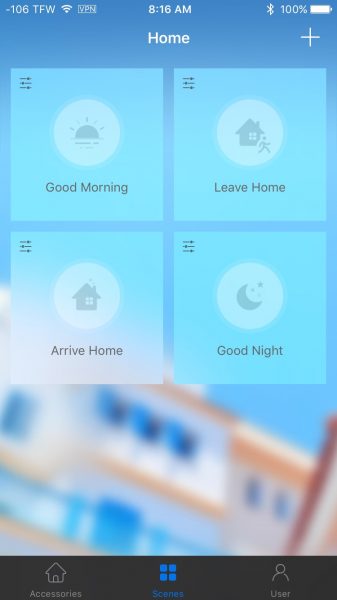
Voila! I’m in business. The whole process taking no more than a minute. The app reliably turned the bulb on and off from any location in my home. I moved on to creating scenes – essentially macros for automating multiple Koogeek device actions into a single button. For example, I used the “Good Night” scene to turn the light off. If I possessed additional Koogeek products, it would have been simple to string my desired instructions into a Scene and execute with a touch of a button.

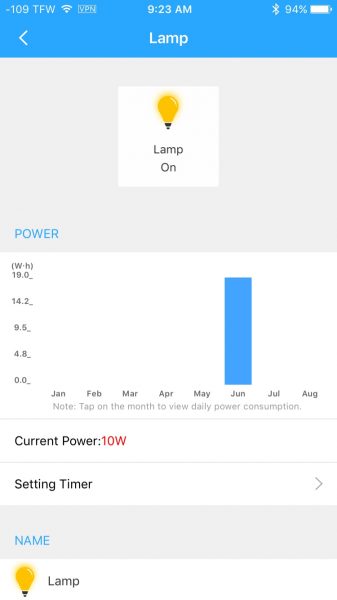
I searched everywhere in the app for a method to dim the lamp only to find, there is none. Nope, my dreams of dimming the lights before movie time were gone. Bummer. Also non-existent was the ability to put the socket on a timer – The app page is blank. Another bummer. What they do have is a nifty “details” page showing the lamps power consumption and historical usage.

Koogeek’s app is compatible with Apple’s ”Home” app, inviting me to further integration fun. After going through the process of adding the socket to the app, I found the functionality to be virtually identical – on, off, and scenes. That’s it. The device is touted to have Alexa connectivity, but this is limited to Koogeek’s P2 socket at this time.

Next, I attempted to control the socket when disconnected from my home network (on a 4G cellular network), only to find Koogeek requires integration through Apple TV, which unfortunately I do not own, so I was not able to test remote functionality.

I found the Koogeek SK1 socket useful, but only for the most basic functions and only while in my home. The socket is sturdy and reliable but lacks many of the functions of its competitors such as dimming, timers and the ability to control away from the home network. I’m hopeful that as Koogeek’s products evolve, more functionality will be added.

Source: The sample for this review was provided by Koogeek. Please visit their site for more info and Amazon to order.


Product Information

Price: $39.99
Manufacturer: Koogeek
Retailer: Amazon
Pros:
  • Simple setup
  • Reliable performance
Cons:
  • Lacks dimming
  • Lacks scheduling
  • Lacks control away from home network
  • No Alexa connectivity

Filed in categories: Reviews

Tagged: ,

Koogeek SK1Smart Socket review originally appeared on on June 30, 2017 at 9:00 am.

Note: If you are subscribed to this feed through FeedBurner, please switch to our native feed URL http://the-gadgeteer.com/feed/ in order to ensure continuous delivery.

LEDVANCE’s Sylvania Lightify Gateway review

The LEDVANCE Gateway is a smart hub that interprets commands from a Wi-Fi network and transmits them to devices on its ZigBee network, and also monitors the status of those devices and reports it to authorized users. It is metaphorically the jam that holds all of the intelligent LEDVANCE products together. But, like the jam that holds your sandwich together, there are competing brands to choose from and different qualities of each. What you choose depends on your preferences and, to some extent, budget. Ok, enough of this metaphor, I’m getting hungry and want to check out this hub. Let’s see how it works and what it has to offer.

You may have noticed that the manufacturer listed in the title of this post is LEDVANCE but the device is branded with the Osram trademark. This is because in January 2016, Osram GmbH spun-out some of its business units into a new company named LEDVANCE. The portfolio of the new company includes, amongst other units, connected and intelligent lighting solutions for smart homes and smart buildings. The app on the iTunes store and the Google Play site are still branded as Osram, even though the iTunes app has been revised 6 times and the Android app 7 times since the rebranding.

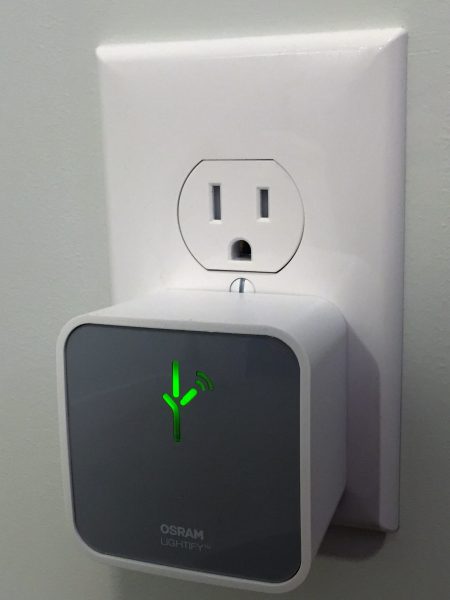
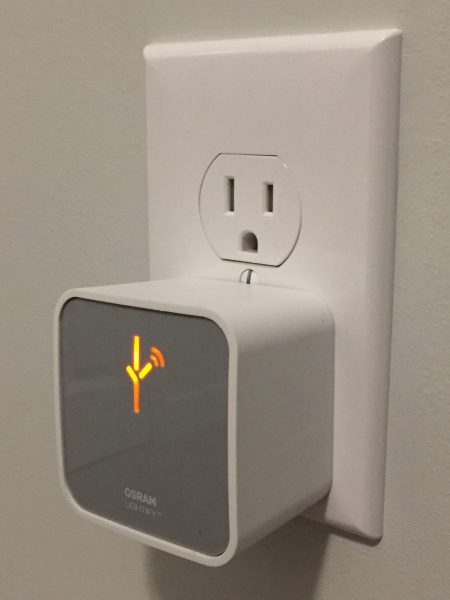
The actual product is a 60 mm wide, 60 mm high, and 41 mm deep (not including the outlet prong) box. The plug is a 15 amp non-polarized design so it permits the most flexibility when installing it into your chosen receptacle. When installed and configured correctly the symbol on the front (which I think looks like the alphabet used by the Predator) glows green with just enough brightness that it is easy to tell it is functioning during the day but isn’t obtrusive at night. When the hub is offline the symbol glows orange/amber and when it is logging into the WI-FI it blinks orange/amber. The gateway requires 5 watts, so that’s 3.65kWh/month, or less than a dollar.
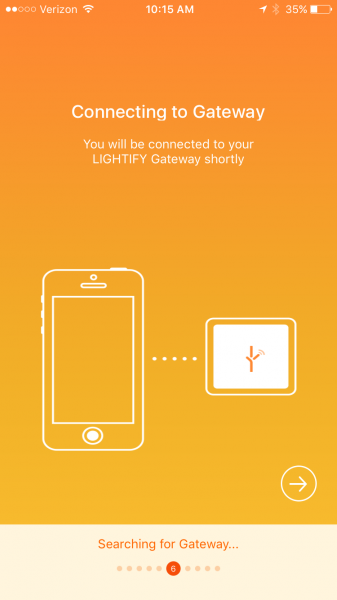
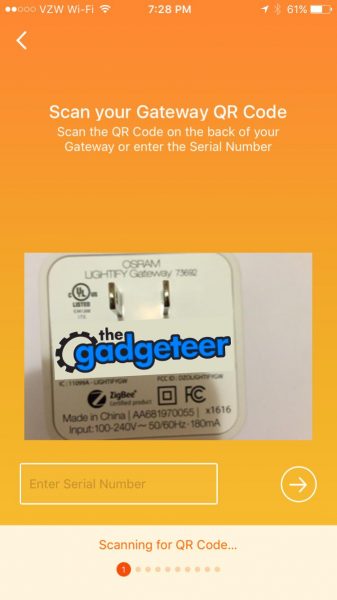
The set up process is easy but sort of lengthy, the video that they send to you in the sign-up email is not found on YouTube, and the only other YouTube videos are in German. So, I’ll describe the setup here and provide some pictures to go along with it for those of you who don’t sprechen Deutsch. These are iPhone screenshots but the process on the iPhone and Android is very similar. I’ve covered the MAC addresses, SSID’s and passwords used with The Gadgeteer logo for security. Download and install the companion app before plugging in the hub. Current versions are 32 MB for iOS and 27 MB for Android. The first step is to scan a QR code on the back of the hub. This allows the app to look up the SSID and password of the hub’s built in ad hoc Wi-Fi network. Alternatively, you can type in the 13 character alphanumeric serial number. (If you plan to integrate this into Amazon Alexa, write down the serial number; you’ll need it later, but you’ll also need to keep the hub plugged into the wall.)
Assuming you don’t have an existing account you must create an account here and verify that it is a real account. I just used a throw-away Mailinator account for this demo. The account will be verified so you need to use an account that you can actually access. You may share this account login information with up to four other devices to permit shared operation of the hub. App settings will be synchronized across each device through the internet.
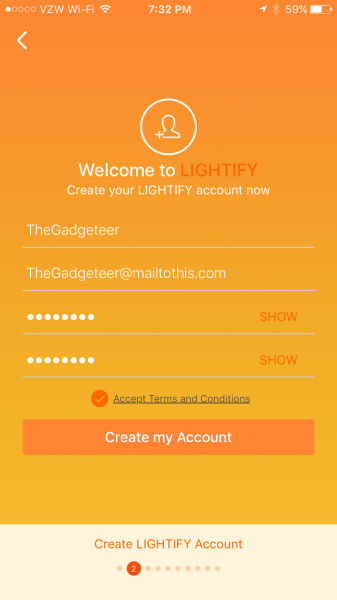
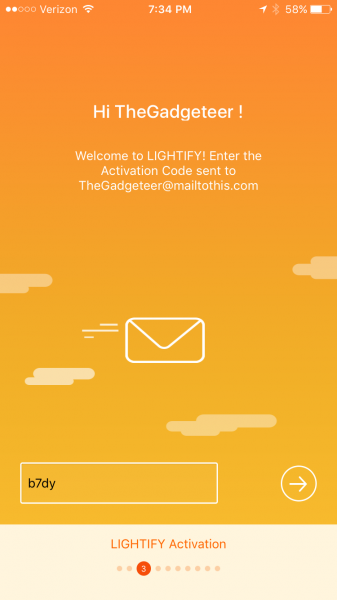
 After creating the account you can finally install your hub. The unit will power up and start an ad-hoc Wi-Fi network. The app will conveniently display the password to the network and display the name of the SSID you need to join. Task switch to the settings screen and join the provisional Wi-Fi network.
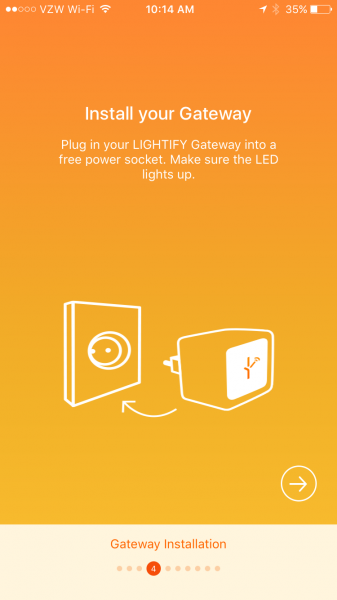
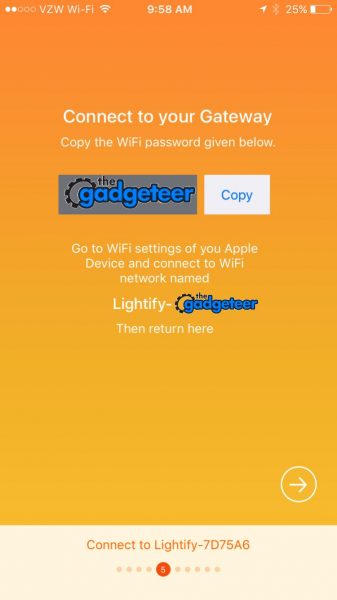
  After task switching back to the app, and after the phone is connected to the hub, it will search for 2.4 GHz Wi-Fi hotspots (or 2,4 GHz in Europe) and display the detected SSID’s on the next screen. If you don’t broadcast your SSID you can still type it in by selecting “Hidden Networks”.
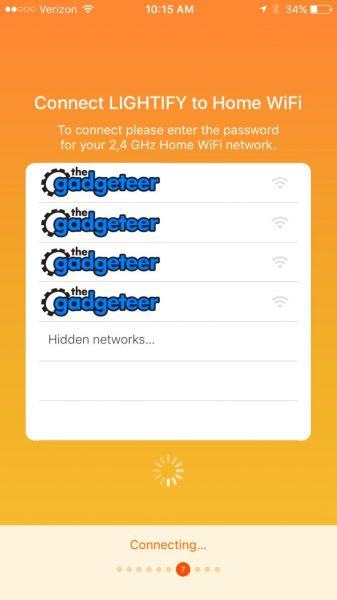
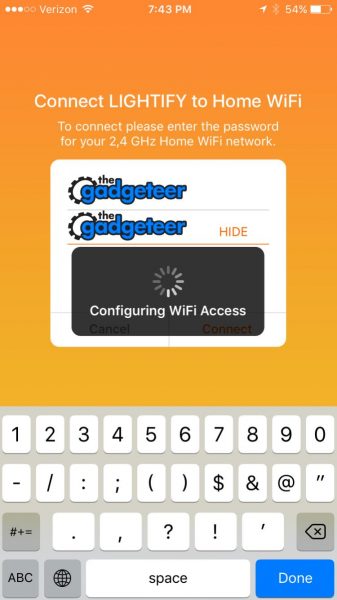
Here you will provide the password to your SSID and the hub will associate itself with your home Wi-Fi network. Mid last year, this article was published on how there were security flaws in the Osram app and how the home Wi-Fi password was not encrypted in the app. The app has since been patched and this security flaw has been fixed. Also, unlike SmartThings, there is no option to run the hub off of a wired connection and there doesn’t appear to be a battery backup to the AC power.
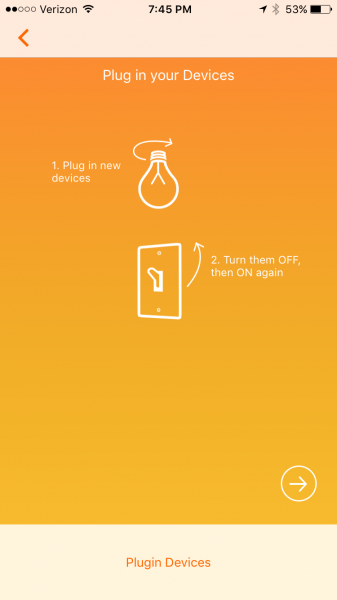
Once the hub has associated itself with your network it will ask you to plug in your devices. Turning them on, off, and on again should signal the controller within each to join the newly established network. ZigBee devices can only be part of one network at a time. If the lamp is not responding then you may need to turn it on for 5 seconds and off for 1 second 6 times in order to reset the controller. Other devices may have a hard reset button.
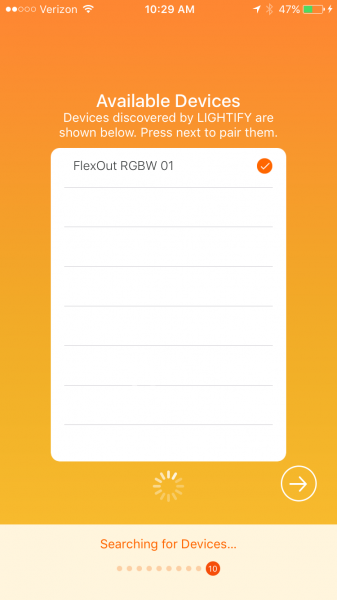
 

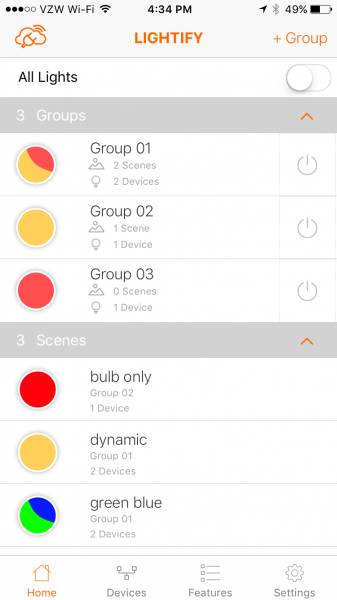
After the devices are found you are brought to the home screen.  This will show two empty categories: group and scene. Groups are collections of devices that you can turn on or off at the same time and apply dynamic lighting presets to all at once (more about this later). Scenes are groups of devices that have preset settings, but not each device in a scene has to have the same settings. Each device in a scene may have independent or shared correlated color temperature, brightness, or hue. Think of a scene in a theatrical production: there may be some bright lamps with red filters and some dim lamps with blue filters. This arrangement could be set by selecting one scene button on the Lightify app.

The cloud with a plug on top of it means that the hub is communicating with the smartphone/tablet using a local Wi-Fi router and also an internet connection. If the smartphone/tablet is not using the same router (if Wi-Fi is turned off on the phone) then the plug disappears. In this case there is about a 0.2 sec delay between pressing the on button on the phone and the light turning on/off. If communication through the router is used then the response time to the button press is almost instantaneous.

To create a group press the + group in the upper right. it will take you to a screen where you can enter an group name and select which device, from amongst all the devices on the network, belong to the group. Once the group is created return to the Home screen. On the home screen the switch to the right of each group looks like a Decora switch that is pressed in when active and flat when switched off. Pressing the circle to the left of the group name will take you to a device settings screen where the settings for each or every device in the group may be set. (More about this in the next paragraph).   On the device setting screen there will be a + Scene button on the top left which you may use to save the current condition of the devices within the group. Pressing the name on the home screen will allow you change the name and set the members of the group. Once a scene is created the color of the button on the home screen will roughly match the colors of the devices in the scene.
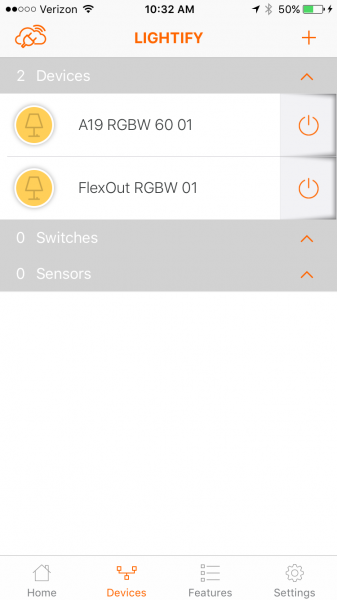
On the devices screen, each device is listed in a separate category. The color of the icon roughly matches the selected hue of the bulb. Pushing either the icon or the name brings you to the device settings screen.
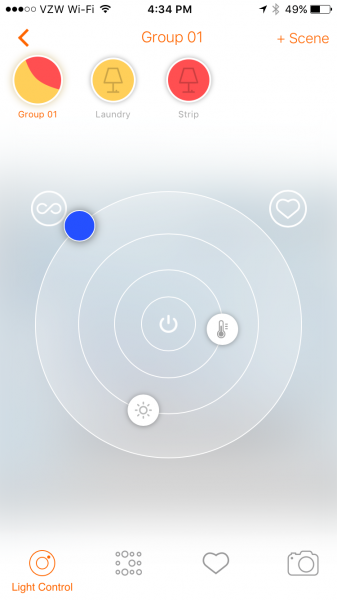
The device settings screen has a main light control wheel that features rotary sliders around a central on/off pushbutton. Adjusting the correlated color temperature sets the hue to the correct color, from cool blue to warm orange. The intensity may be adjusted independently of the hue. Using the outermost slider turns the display into a color wheel which allows the user to specify the hue and saturation. If the Lightify lamp is lit while you are adjusting these settings it changes color according to your selection. The lamp is very responsive to your color and brightness selections which makes finding a lamp color an easy experience. Unfortunately, there is no record of actual RGBW values. Pressing the device name at the top of the screen allows the user to edit the name of the device. Pushing the rocker switch icon at the top left allows the user to change the default appearance of the device. There are three more buttons at the bottom of the screen: Presets, Favorites, and Camera.
The presets screen shows 14 different color presets. There are three presets that are static color settings: plant light, active, and relax. There are two long-period dynamic lighting presets called day light and good night light. The good night light will fade to off in a user-set amount of time and the day light will simulate the color of sunlight throughout the day. The other light patterns are short-period dynamic lighting presets and include Fireplace, Ocean, Evening, LIGHTIFY Loop, Candy, Polar light, White and White, Activate, and Chill Down. The speed of the color change may be set for each dynamic preset and the brightness may be changed for all of these except for Activate and Chill Down.

The color loops and the dynamic lighting are unique features of the Lightify gateway. I was unable to create this with the SmartThings hub CoRE programming, but it may be duplicated if the actual header information is programmed into a SmartThings program. Still, this would take some above average programming knowledge. The main differentiator is the speed at which colors may change. Note that the presets may not be saved as favorites, may not be saved as scenes, and will not resume if the bulb is turned off. They may only be set from the device screen or the group screen.

The favorites button lists the 16 favorite user settings for each device. The favorites may be saved by pressing the circle inscribed heart to the top right of the setting wheel. Note that when I added my Android phone account to the iPhone account that the existing favorites disappeared. The favorites show the approximate hue and brightness, but there is no way to name the favorite.

The camera icon allows the user to match the hue of the light to a grouping of pixels in a stored image or a captured photo. This is a neat trick but I believe it is mostly a tool to demonstrate the range of the RGBW lighting capabilities.

There are six more capabilities of the gateway. Four of them are under the Features menu: Scheduler, Wake-up light, Vacation Modes, TV Simulation. The scheduler will simply turn on the light for a predetermined period every weekday the scheduler is selected. Any number of schedules may be set, so more than one on-off cycle may be scheduled per day. The wake up alarm will dim the selected light from a low brightness to bright daylight and then switch off at a desired time. The smartphone/tablet that created the wake-up event will signal an alarm (alarm and tickling [sic], digital alarm clock, fog horn, old alarm clock and ringing, seagulls on beach, whistle, or wild birds). The acoustic alarm won’t sound if the smartphone/tablet is in silent mode. The vacation mode will turn on and off the lights between every 5 minutes and every 2 hours (user-selectable) in the time period selected. Finally, there is a TV simulator that uses the color loops to simulate a TV being watched within a user-selected time period.

The settings menu allows the lights to work with Nest home and away profiles so that different lighting can be set to each mode. The settings screen on the iPhone allows customization of the today screen widget, and a widget is also available on Android, that allows the user to set group and scene lighting from outside of the app.

Lastly, the gateway can be integrated with Amazon Alexa smart home automation to permit devices to be turned on and off and set to a percent intensity. Sadly, Alexa doesn’t allow the setting of color or correlated color temperature. Alexa only controls devices through the gateway; if you want to control groups you need to define them within the Amazon smart home settings. Also, since you will have to speak the name of your device, make sure it is one that you will be able to roll off your tongue. In the images above I have FlexOut RGBW 01 listed as a device but I renamed this to Strip for use with Alexa.

In conclusion, the LEDVANCE Lightify Gateway provides flexibility and creativity in the operation of lights and plugs. The gateway provides limited automation in the form of turning on and off lights and plugs using ZigBee switches and sensors, programming lights and plugs using timers and alarms, and coordinating modes with a Nest thermostat.  The gateway also allows limited control with Amazon Alexa. More advanced automation, such as integration with IFTTT, Stringify, or other home automation devices is not supported. However, this gateway is available for $32.59 alone, and is often packaged with LEDVANCE lamps for even larger savings. If you want to explore home automation without breaking the bank, and if you want flexible, responsive, and creative lighting capabilities from the palm of your hand, then the LEDVANCE Lightify Gateway may be just what you’re looking for.

Source: The sample for this review was provided by LEDVANCE Sylvania. Please visit their site for more info and Amazon to order.


Product Information

Price: $32.59
Manufacturer: LEDVANCE Sylvania
Retailer: Amazon
Requirements:
  • Requires active WiFi Network and LIGHTIFY Compatible ZigBee Products
  • Free LIGHTIFY App runs on Apple iOS7 or above and Android 4.1 or above
Pros:
  • Inexpensive
  • saves favorite settings
  • color looping
  • scheduler
  • Nest and Amazon Alexa enabled
Cons:
  • No IFTTT or Stringify

Filed in categories: Home and Kitchen, Reviews

Tagged: ,

LEDVANCE’s Sylvania Lightify Gateway review originally appeared on on April 3, 2017 at 10:03 am.

Note: If you are subscribed to this feed through FeedBurner, please switch to our native feed URL http://the-gadgeteer.com/feed/ in order to ensure continuous delivery.
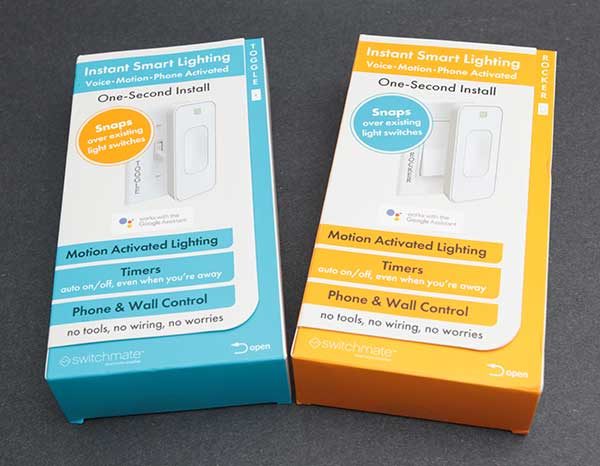
PureSwitch Wireless Smart Plug review

If you’re a seeker of new and innovative accessories to control your smart home, read on fellow venturer!  The PureSwitch smart plug, made by PureGear, is a gem of a find and integrates with Apple Homekit to allow you to operate your appliances and doohickeys from wherever you are.  Let’s check it out. 

The Device

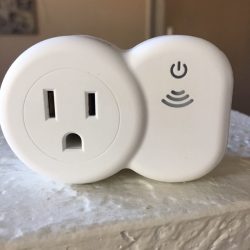
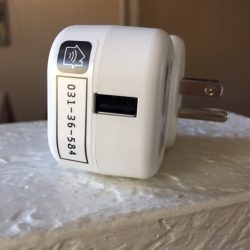
There is one outlet on the plug and one USB charge port.  This will be pretty convenient to plug in my bluetooth earbuds and free up a USB port on my computer. You can see in the pic on the right below that there is a little circular button that is flush with the edge of the outlet that you really wouldn’t know was there unless you searched for it. That is the manual on/off toggle switch if for some reason you want to power it on or off without unplugging the particular appliance that is plugged into it.


Setup

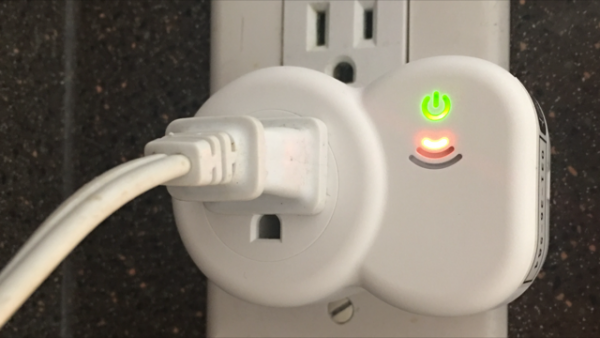
I decided that I would use this device to control the fan located in my daughter’s room, so I simply plugged the outlet into the wall, and plugged the fan into it. The image below depicts the plug being on, but not connected to the wireless network. After the outlet is paired, the wireless indicator turned green.

One thing to note is that this smart plug is only compatible with devices running iOS 8.1 or later and you must have your Wi-Fi enabled on the device (by saying device I’m referring to iPhone, iPad or iPod touch).

Next up is heading over to the App store on your device and downloading the free PureSwitch app. Once I downloaded it, I opened it and it asked me to add a “home”. If you already have a home set up in Homekit you will see it listed and you simply add this accessory to whatever room you’d like. If this your first accessory using the Apple Homekit, then you will need to set up your home.

The App

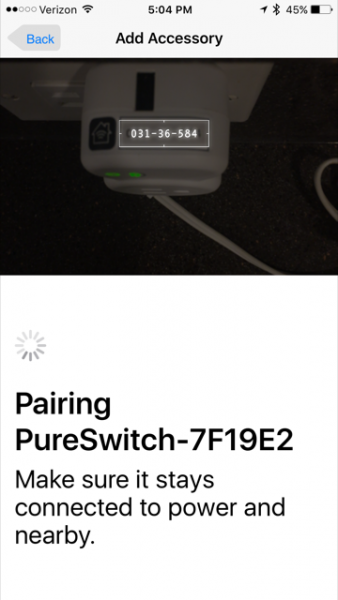
There are all sorts of things you can do with HomeKit and I’ll try and limit this review to the PureSwitch Smart Plug and not make this a tutorial for using HomeKit. The app walks you through step by step how to add the accessory by adding a room and then it will ask you to add an accessory to the room. The room I added the smart plug to is called “Em” which is my daughter’s name. When I tapped “new accessory” it began to browse for new accessories. PureSwitch popped up and the app instructed me to hold the viewfinder up to the six-digit code located on the plug.

The below pic is what it looks like when pairing. You can also type in these numbers manually if the light is too low or it’s at an angle that’s hard to get to.


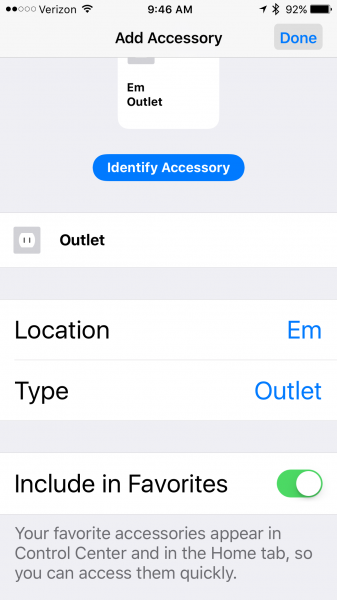
The pic above instructs you to make sure you keep the plug connected to power and stay near it so your device can connect. Now the plug is paired to my network and the fun can begin! You can choose to turn on “Include in Favorites” if you’d like to be able to access the outlet quickly in the Home app that controls your other Homekit accessories.


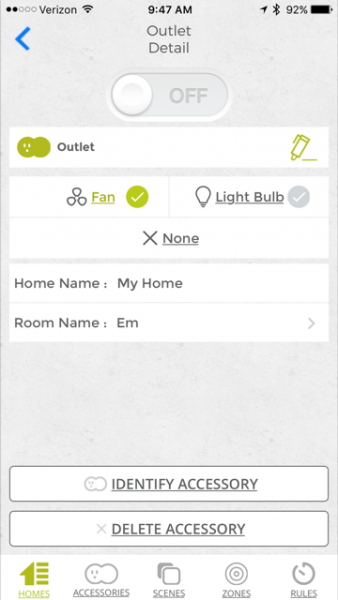
This screen in the app shows the outlet detail, what home and room it is located in, and you can switch the outlet on and off from here as well.

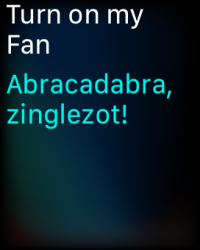
My favorite way to turn the fan off and on is to use Siri on my Apple Watch. I instructed Siri to “Turn on my fan” and this is her response. Siri always makes me smile.  🙂

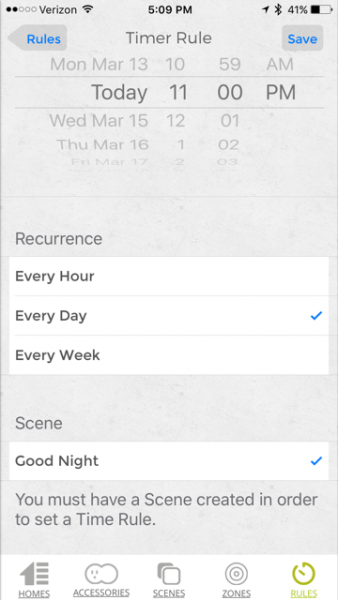
Another fun thing to do is to make scenes. If you make a scene, you can add a timer to it so that it will turn off or on at whatever time you specify. I set scenes called “Good Morning” and “Good Night.” You can see the menu along the bottom of the screen where you can choose to add a scene, set zones and make rules for the scenes.

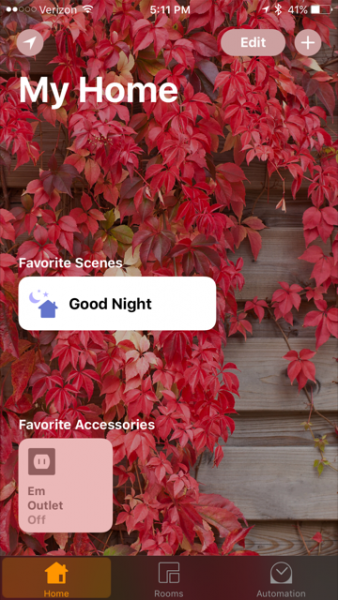
So now I have the fan all set to turn on at 11PM and to turn off at 8:30AM every day. I don’t have to do or say anything now that this is set up and it just turns on and off like I intended. I can still override these setting by either going into the app and turning it on or off, or asking Siri to do it for me. After the scene is set up, and you’re using it in your Home app with Homekit, you can simply say the name of the scene, like “Good Night” to Siri and she will do whatever is detailed in that scene. The below pic is the Home app, not the PureSwitch app, which shows my favorite scene and favorite accessory.

Summing it up

All in all, this is a great little plug. There are so many things that you can do with this smart plug because of its integration with Apple’s HomeKit. You certainly don’t need to use Apple HomeKit if you don’t want to, but if you do and you have the Apple TV (3rd Gen running Apple TV software 7.0 or later) then you can control your appliances even when you are not home. You can even set scenes so that they will turn on when you get home or when you leave home which really has me thinking I need to get and Apple TV! I liked how easy the plug was to set up and how useful the app was in helping to set up the scenes and set a timer. Having the added USB port is a nice little extra too. I thought the price was a bit high for this product as there are others on the market that are cheaper, but I haven’t reviewed all of them either to know if they work as well.

Source: The sample for this review was provided by PureGear, please visit their site for more information and Amazon to order.


Product Information

Price: $49.99
Manufacturer: PureGear
Retailer: Amazon
Requirements:
  • A place to plug it in
  • An appliance to plug into it
Pros:
  • Ability to control your electronics using Siri
  • Ability to control your electronics while you are away
  • Works with Apple's Homekit
  • Has a USB port for charging other accessories
Cons:
  • Only compatible with Apple products
  • A bit pricey for just one plug

Filed in categories: iOS, Reviews

Tagged: ,

PureSwitch Wireless Smart Plug review originally appeared on on March 22, 2017 at 8:08 am.

Note: If you are subscribed to this feed through FeedBurner, please switch to our native feed URL http://the-gadgeteer.com/feed/ in order to ensure continuous delivery.