Miggo Pictar Plus iPhone camera grip review


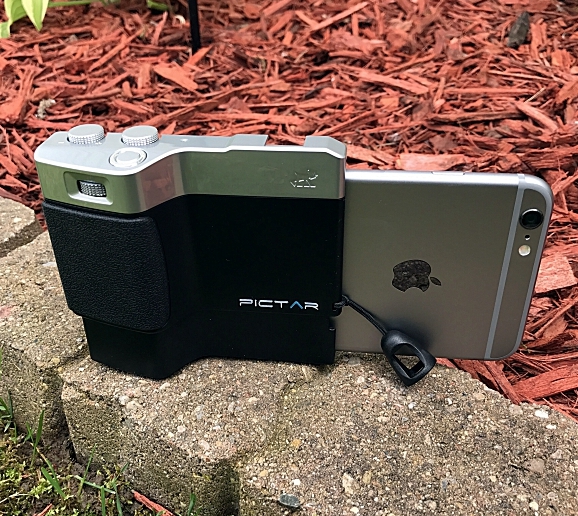
I fashion myself as somewhat of an amateur photographer. I’ve been fascinated with photography ever since I took Mr. Bunton’s “Intro to Photography” class way back in the ninth grade. And like a lot of people I love taking photos with my iPhone. Apple forever changed the way we take photographs when they introduced the first iPhone 10 years ago. With each iteration, the iPhones camera gets better and better. It takes amazing photos, but taking them has always presented different issues. The fact is the iPhone isn’t a camera, it’s a phone, and holding it with one hand to take a photo can be tricky. And if you want to use a tripod you have to buy special cases and or mounts made specifically for the iPhone. Miggo has changed all of that with the Pictar and Pictar Plus. Pictar is a camera grip that claims to turn your iPhone into a DSLR camera. Since I love taking pictures with my iPhone both recreationally and for my product reviews for the-gadgeteer, I jumped at the chance to review the Pictar Plus. Does it really turn the iPhone into a DSLR camera? Let’s take some photos and find out.

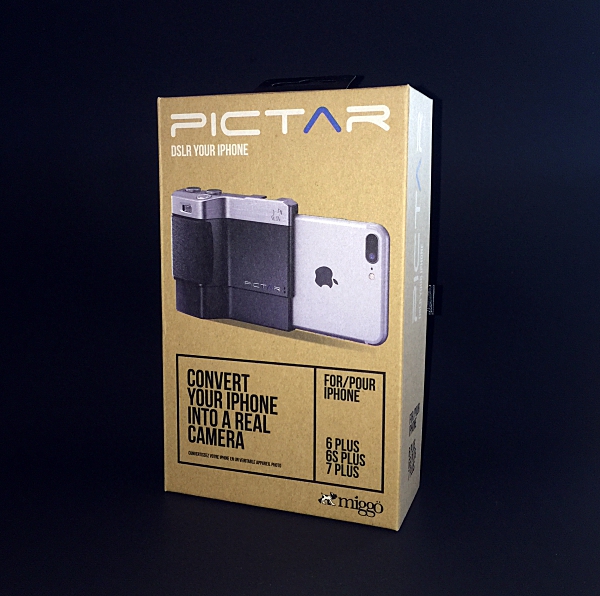
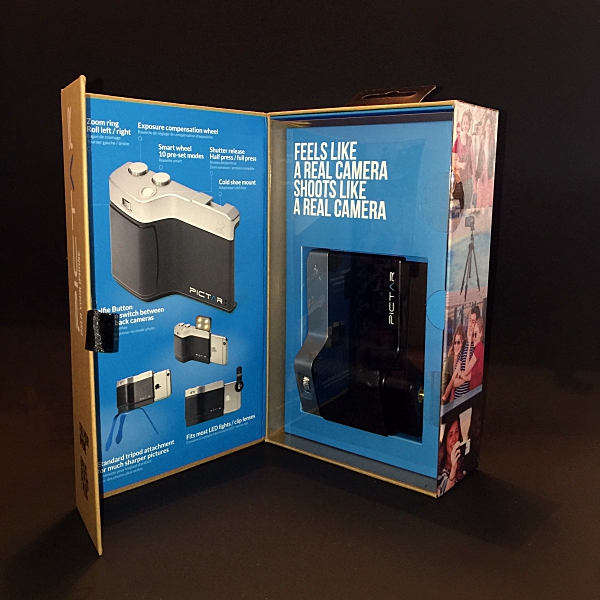
I don’t usually start off a review by talking about the product’s packaging, but when I received the Pictar Plus from Miggo I was really impressed. I thought to myself “Wow if they put this much thought and innovation into the packaging I can’t wait to try out the actual product”. The box opens like a book (the front flap is held closed by a magnet) and the Pictar Plus is displayed behind a plastic window. The box itself is covered with lots of information about the Pictar Plus. A real nice presentation that I thought was worthy of a mention.

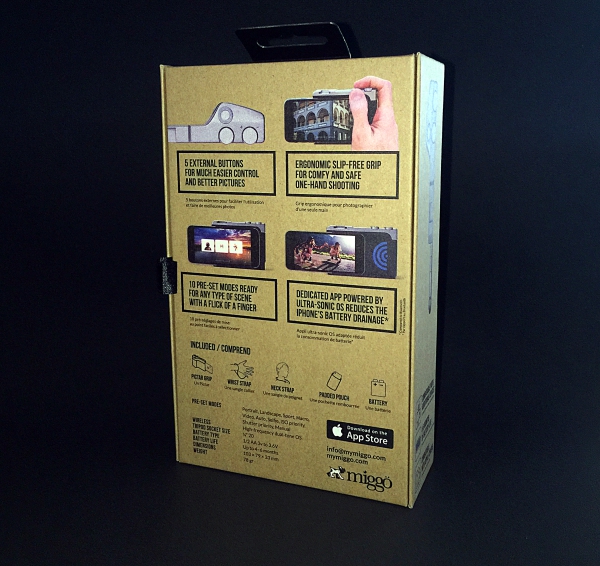
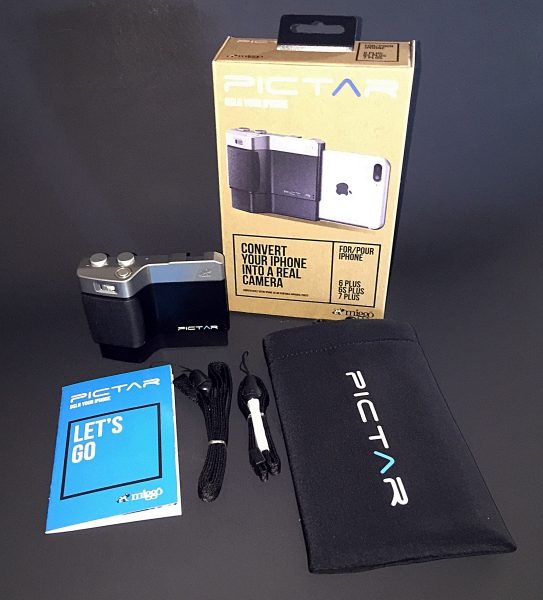
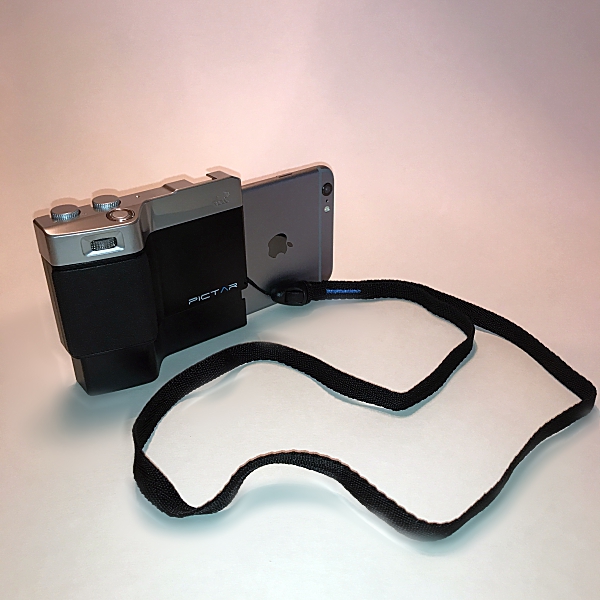
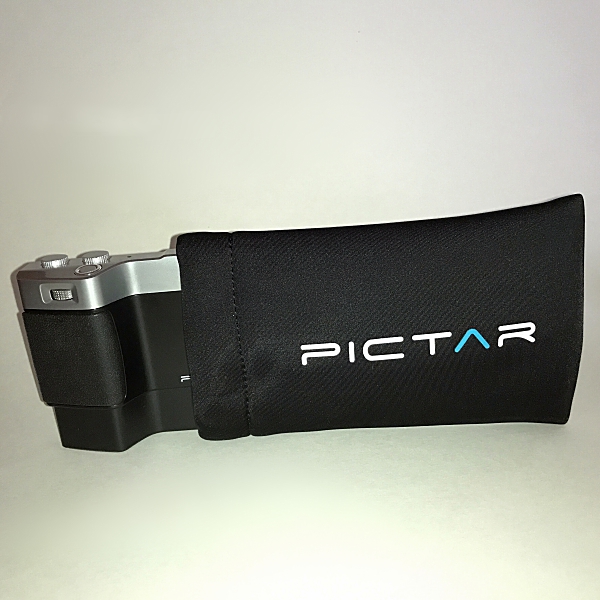
Inside the box, you get the Pictar Plus, wrist strap, neck strap, neoprene padded carrying case and Users Manual.

The Pictar comes with a CR1/2AA battery already installed. To activate the battery, first, open the battery compartment by pushing in the release catch and removing the battery cover. Then pull out and discard the pull tab at the bottom of the battery. This will then allow the battery to connect fully with Pictar. Then click the battery cover back in place. According to Miggo, the battery should last up to 6 months with normal use.

Installing my iPhone into Pictar was easy. After taking it out of its case (you can use Pictar with some very slim-fitting silicone bumper cases) I slid it into the spring loaded bottom of the Pictar, with the back of the phone facing in. Then pressed down until the top of the iPhone clicked into place. Removing it was just as easy.

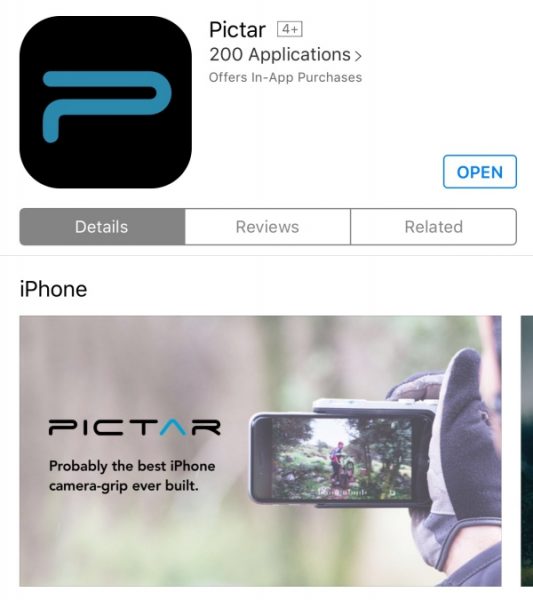
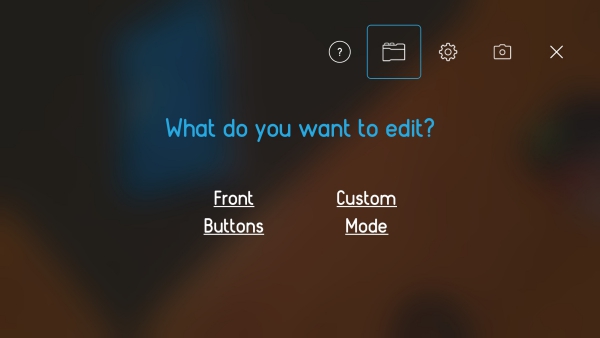
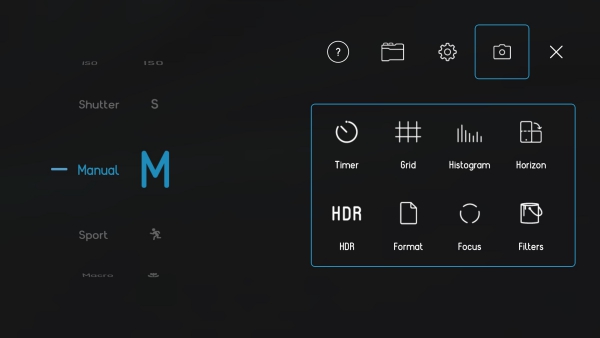
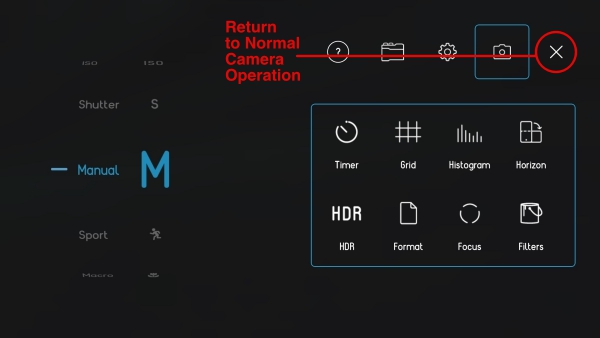
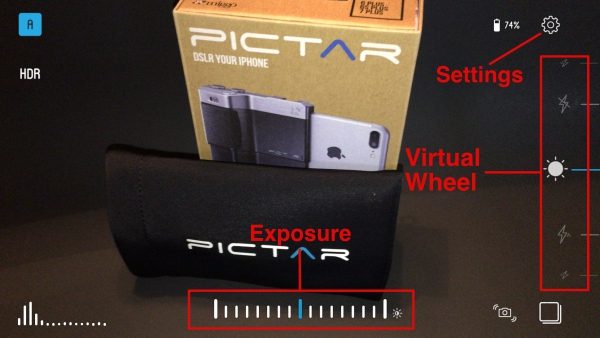
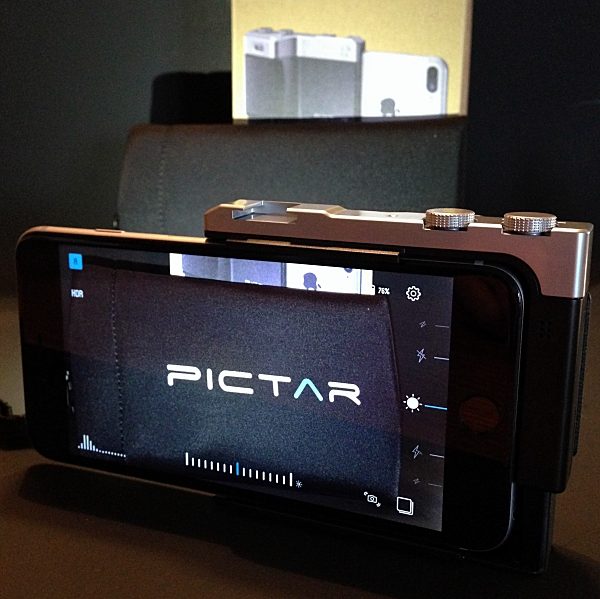
Before you can use Pictar you have to download their free app from the app store. The app is really the brains of the whole operation. Pictar’s Camera app unlocks key features that are inaccessible on iPhone’s native camera app. It connects with the iPhone using a high-frequency dual tone that is inaudible to the human ear. When used, each dial and button emit a unique tone that is detected by the app generating a corresponding action. This also significantly increases the battery life when compared to Bluetooth connectivity. The app itself is easy to use. The first time you launch it there is a short tutorial that prompts you to use each different dial and button, showing in real time what function each performs. The app has nine different built-in modes, Auto, Sports, Macro, Shutter priority, ISO priority, Manual, Selfie, Movie, and Filter. A note about the Filter mode. There are 38 different filters that can be applied before taking a picture which is really cool. However, only 2 of them are free to use. If you want to use any of the other 36 you have to purchase them. Separately each is a $1, or you can buy the bundle for $10. All things considered, that’s not bad, but it would have been nice to include more than 2 free filters. Clicking on the gear icon in the upper-right corner of the Home screen allows you to change and customize lots of settings. There are five main icons at the top right of the settings screen. The question mark icon takes you to the Tutorial / User Guide menu, the Pictar icon to the customization of buttons menu, the Gear icon to Sound, Geotagging, Purchase Restore and Reset menu, the Camera icon to the camera settings menu and the X returns you to normal camera operation.

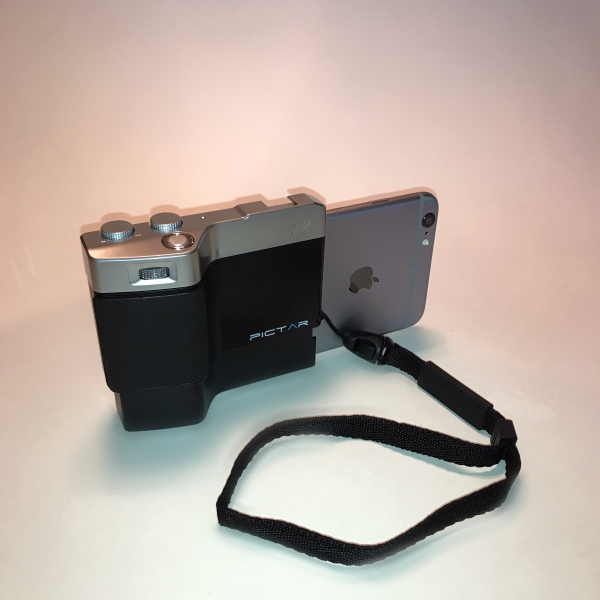
Much like a DSLR camera, Pictar Plus offers five external control buttons. This allows you to easily change settings and take pictures with one hand. No more tapping your iPhone’s screen to set focus, exposure, etc.

The Smart wheel allows you to choose between Pictar Plus’s 9 different modes. The Exposure compensation wheel allows you to control brightness levels even before shooting. And just like with an advanced camera, the exposure compensation wheel changes the exposure in steps of 1/3 aperture, and the clear display appears at the bottom of the iPhone screen. The Shutter release has two functions. A half-press locks focus and exposure for easy tracking of a moving object and a full-press for immediate shutter release. The shutter button also allows you to take pictures while wearing gloves during the cold weather. The Zoom Ring allows you to zoom in on a subject without having to touch the screen to pinch-and-zoom. It also doubles as a Selfie button. Clicking the Zoom ring will switch between the iPhone’s front and back camera for easy “selfie” shots. The Virtual Wheel is located on the right side of the Camera app screen and allows you to control different modes such as Flash modes, Shutter speed, ISO and more – simply by using your thumb.

The dials can all be reprogrammed to do different things. For example, you can have the Zoom Ring control the flash, white balance, etc. In that case, zoom in and out would be done by “pinching” the iPhone’s screen, like before. All of this can be done in the settings menu I mentioned earlier.

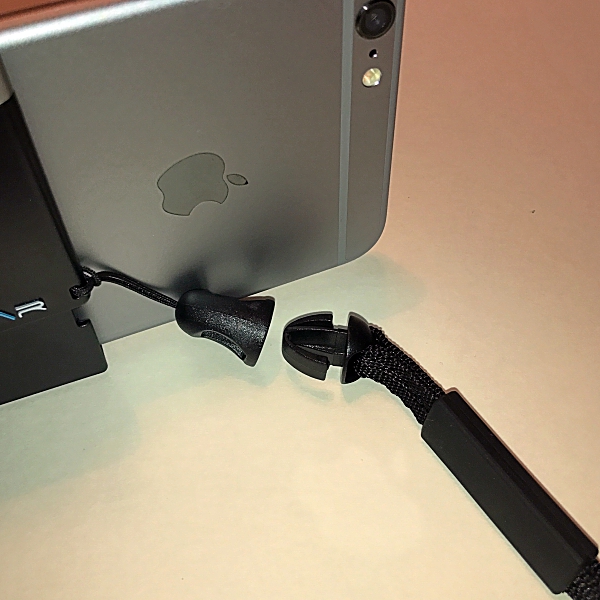
The Pictar Plus also comes with wrist and neck straps. This is nice because if you’re like me you’ve dropped your iPhone more than once trying to get that perfect shot. Once you attach the connector to the Pictar Plus you can easily change between the two straps with just a snap.

There’s also a nice neoprene padded carrying case for the Pictar Plus. It comes with the added feature of a small metal carabiner that can be attached to a bag or belt loop.

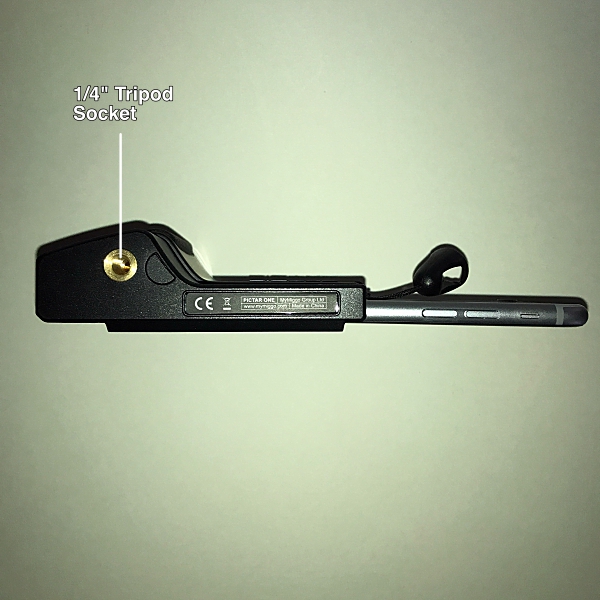
Just like a real camera, Pictar has a standard 1/4” thread tripod socket on the bottom. This is ideal to attach a tripod or other stabilization device and is great for selfies or night time shots, that require long exposure times where the camera needs to be steady.

The top of the Pictar has a standard-size cold shoe mount to allow you to attach many full-size camera accessories, such as LED lights or microphones. I also like that the iPhone’s lens is open when attached to Pictar, giving you the ability to attach most ‘clip on lenses’.

I really loved using the Pictar Plus. It turned taking pictures with my iPhone into a more camera-like experience. It’s really light weight coming in at .17 lbs. so it doesn’t add any extra weight to the iPhone. I like how it’s designed to be held and operated with one hand. And the non-slip grip and wrist strap gave me a real sense of security. I took Pictar Plus along with me while walking my dog and took some photographs using some of the different functions and modes. I was very impressed with how much easier the Pictar Plus made taking photographs. I took a selfie with my dog Zoey and liked being able to switch cameras from back to front simply by pressing the Zoom Ring.

Using the Action Mode I took pictures of the flags that were flying above the local High School football field. It was really windy, but with the Action Mode I was able to capture the flags with no blur, and the images came out sharp and clear. With the Zoom Ring, I was even able to get a close up of Old Glory.

Miggo even provides a link to a Mobile Photography Workshop that has videos on how to use Pictar to capture better pictures in different scenarios. Definitely worth checking out before using Pictar. I look forward to using these tips on my next photography adventure with the Pictar Plus.

Does the Pictar Plus turn your iPhone into a DSLR camera? I might not go that far, but it’s pretty darn close. All and all I think it’s a great product. It makes taking photographs with your iPhone fun and easy, whether you’re an amateur like me or a seasoned photographer. And with all of the Pictar Camera apps built-in features, the photo possibilities are endless. I know it got me excited about taking pictures with my iPhone and I’m sure it will do the same for you.

Pictar comes in 2 models, Pictar, for iPhone sizes, 4s / 5 / 5s / 6 / 6s / SE and 7 and, Pictar Plus, for iPhone, 6 Plus / 6s Plus and 7 Plus. They’re priced at $99.99 and $109.99 respectively.

Source: The sample for this review was provided by Miggo. Please visit their website for more info, or Amazon to purchase.


Product Information

Price: $109.99
Manufacturer: Miggo
Retailer: Amazon
Pros:
  • Easy to use
  • Can operate with one hand
  • Lightweight
  • Wrist and neck straps
  • Multiple modes and settings
  • Neoprene carrying case
Cons:
  • Not enough included free filters in Camera app

Filed in categories: Reviews

Tagged: , ,

Miggo Pictar Plus iPhone camera grip review originally appeared on on June 23, 2017 at 8:46 am.

Note: If you are subscribed to this feed through FeedBurner, please switch to our native feed URL http://the-gadgeteer.com/feed/ in order to ensure continuous delivery.

Nikon announces new Nikon D7500 DX-Format DSLR

Nikon, who is celebrating 100 years in business this year, have just announced a new advanced level DSLR. The D7500 features a 20.9-megapixel image sensor, EXPEED 5 processor, tilting 3.2” 922K-dot touch screen LCD, 4K UHD video capture, wide ISO range from 100-51,200, 51 point autofocus system, built-in Bluetooth and Wi-Fi technology for auto image transfer and remote shooting, and more.

Smartphone photography is great for selfies and food snaps, but for the photography enthusiasts, a DSLR is a must have.

“The Nikon D7500 was engineered to be as versatile as the photographer using it, and excels whether shooting fast-action sports, stunning low-light landscapes, distant wildlife, glamorous portraits or multimedia content,” said Kosuke Kawaura, Director of Marketing and Planning, Nikon Inc. “This is a camera for the photographers who are serious about their passion, infatuated with the next frame and above all else, want speed, small size and an excellent value.”

The expanded ISO range allows for up to a 1.64 million equivalent, for low light image and video shooting with minimal noise.

The Nikon D7500 will be available this Summer for $1,249.95 (body only) or with an AF-S DX NIKKOR 18-140mm f/3.5-5.6G ED VR lens for $1,749.95. For more information on the Nikon D7500, visit www.nikonusa.com.

Filed in categories: Camera Gear, News

Tagged:

Nikon announces new Nikon D7500 DX-Format DSLR originally appeared on on April 12, 2017 at 10:44 am.

Note: If you are subscribed to this feed through FeedBurner, please switch to our native feed URL http://the-gadgeteer.com/feed/ in order to ensure continuous delivery.

Monster Vision 1080p+ action cam review

The Monster Vision 1080p+ is an action / sports camera that can capture video at 1080P resolution. I recently reviewed my first action cam (the Andoer 4K action camera) and wasn’t overly impressed. When I was offered the chance to review another camera by a well-known name, I was happy to check it out. Let’s take a look.

What is it?

The Monster Vision 1080p+ action cam is a 1080P camera that can capture video with audio, and images. This camera can also be used as a dashcam.

What’s in the box?

Monster Vision 1080p+ action cam
16GB micro SD flash card
micro USB charging cable
Waterproof housing
Variety of mounting hardware for handle bars, tripod, window and more.
Quick start guide

Hardware specifications

Optics: 8MP CMOS 170 degree wide angle lens
Video: 1440p 1920×1440 30fps, 1080p 1920×1080 6fps, 720p 1280×720 60fps & 120fps
Video Format: MOV (H.264)
Photo: 3,5,8,10 & 12MP
Photo Format: JPEG
WiFi control via mobile app
Memory: 16GB micro SD card is included
Battery: Li-ion 1200mAh

Design and features

The Monster Vision 1080p+ action cam looks very similar to the 100’s of other action cameras on the market. It’s a rectangular black plastic camera with a lens on the front. Also on the front in the lower right corner is a charging and recording status LED. It lights up in blue while charging and blinks red while recording.

On the left side of the camera is the WiFi toggle button which doubles as the down button when navigating through on-screen menus.

On the opposite side of the Monster Digital action camera, you will find a speaker at the top and a micro SD card slot below it. A 16GB card is included with the camera. There’s also a micro USB port for charging and a mini HDMI port if you want to connect the camera to a display. Note that a micro HDMI cable is NOT included with the camera.

On the back of the action camera is the 2-inch color LCD display. In the upper left corner is the Power / recording status LED which glows solid red with the camera is powered on, and blinks while recording. On the right side of the LCD display is the Display / Menu button. This button can be used to toggle the display off and on and brings up the camera’s settings menu when you’re not recording video.

The menus are pretty standard for an action camera. You can switch video modes, resolutions, tweak white balance, etc.

On the bottom of the camera is the battery compartment. Note that the battery is rated for only about 1 hr and 75 minutes of video capture per charge and it takes 2-4 hrs to recharge it.

And on top is the power / mode button and the OK button which is used to select items in the menus.


Operating the camera

Like most action cams, operating it is pretty simple. Just get in the mode you want and start recording. For the Monster Digital camera, you can switch modes just by pressing the power / mode button on the top of the camera. Holding down the button for a few seconds toggles power and when the camera is on, pressing the button will cycle through video, photo, dashcam and playback modes. The camera is supposed to remember which mode you were in and will start back in that mode upon cycling power. I found this to be true, but only for video and dashcam modes. If you turn off the camera in photo or playback mode, it starts back up in video mode.

Controlling the camera via WiFi and the Monster Digital mobile app


To control the camera remotely, you have to install the free Monster Digital mobile app, turn the camera on, press the WiFi button on the side, switch to that WiFi connection on the mobile device, type in the password and go back to the app. You’re then able to remotely change settings, see a live view of the camera, snap photos, capture video and even play back photos and video.

Playing back video is a little wonky though. Most of the time I could hear the audio, but the image remained black.

Sample images


The photo capturing capability of the Monster Digital 1080p+ is ok. I wouldn’t consider using it as my primary camera, but in a pinch, it’s better than no camera at all.

Close up images like the first image on the left will show some slight bulging due to the wide angle lens. You don’t notice this with longer range shots.

Sample videos

I think this camera’s video quality which I had set at 1080p 60fps is pretty good. I’m not going to say that it blew me away because I feel like my Nexus 6P smartphone does a much better job capturing super clear video. But for a $100 camera, it’s not bad.

There are a couple things to mention though. First of all, the camera has an image stabilization feature that can be toggled on and off in the menus. I captured video with it enabled and disabled and could not tell any real differences. In the video sample above, the feature was enabled as I was walking around in the woods with the camera attached to the IK Multimedia iKlip Grip Pro.  I was also not overly impressed with the audio capture quality as it sounds a bit fuzzy and muffled to me.

Final thoughts

Is the Monster Vision 1080p+ the best action camera on the market right now? I think it’s safe to say that it isn’t. But when it’s all said and done, I do think the Monster Vision 1080p+ action cam is a decent sports / action camera that is easy to use, captures good quality video and isn’t overly expensive.

Source: The sample for this review was provided by Monster Digital. Please visit their site for more info.


Product Information

Price: $99.99
Manufacturer: Monster Digital
Pros:
  • Easy to use
  • 16GB microSD card included
  • WiFi mobile control
Cons:
  • Built in image stabilization seems to have no effect
  • Audio quality is not the best

Filed in categories: Camera Gear, Reviews

Tagged:

Monster Vision 1080p+ action cam review originally appeared on on March 3, 2017 at 7:06 am.

Note: If you are subscribed to this feed through FeedBurner, please switch to our native feed URL http://the-gadgeteer.com/feed/ in order to ensure continuous delivery.

MGCOOL Cam 360 action camera review

Typically, the videos we capture stimulate our eyes and ears and that’s usually as far as it goes. But with cameras like the MGCOOL 360, watching videos captured with this camera can be an interactive activity rather than a passive one.

MGCOOL is Elephone’s newly-established sub-brand covering sports cameras, intelligent wearable devices, and other gadgets. Their flagship products are sports cameras and 360 degree cameras. The MGCOOL 360 is a camera equipped with two 220° panoramic lenses that record simultaneously capturing footage from both the front and rear of the camera. The aperture of the lenses are f/2.0 and the focal length of the lenses are 1.1mm. The physical dimensions are 2.36” x 1.93” x 1.26” inches (6.00 x 4.90 x 3.20 cm) and the camera weighs 0.120 kg or 4.23 oz.

On the top of the camera is a small LCD screen where you can read the status and Menu items. Along the edge of the LCD screen is the Power Button, the Wi-Fi Button, and Record Button, and also a pin hole for the Reset button.

On the side of the camera is a small flap which covers the MicroSD card slot as well the MicroUSB port. From the micro USB port, you can charge the batteries of the camera. The MGCOOL camera supports MicroSD cards up to 32gb. Make sure to use at least a Class 10 MicroSD card or you will not get the camera to read the MicroSD card properly. If you can afford a more expensive UHS (ultra high-speed) MicroSD card then go for it. When I first unboxed the camera, I had a Class 6 card laying around that I popped in the camera for a quick test but I couldn’t even get the camera to record with that card in it. So, then I switched to a Class 10 MicroSD card and it started recording as soon as I hit the Record button.

Overall, this is a set it and shoot camera. Just attach it to your tripod, mount, or whatever you want to use with it and start recording. Naturally, you can hand hold this camera but I find that having the camera mounted securely makes for better viewing footage. On the bottom of the camera is a threaded screw mount for tripods, extension poles, or selfie sticks. This is a nice feature to have in case you don’t have or want to use one of the included mounts to secure this camera down.

There aren’t any manual settings to change such as exposure, ISO, or frame rate like on other action cameras such as a GoPro or a SJCAM cameras. However, there is a setting on the app to change the white balance. The recorded image was pretty good in bright sunlight as well as a cloudy day. I haven’t had a chance to record anything at night yet so I can’t comment on the low light factor.

The MGCOOL camera has a built-in 1500 mAh Lithium-ion battery with an average battery life of an hour. This is about the same as other action cameras I have used but the thing about this camera is that you can’t swap out batteries. However, I have read that the company has plans in the future to have a removable battery. 

Since having two camera lenses doesn’t leave any room for a monitor, the only way to frame or review your footage is through the camera’s app on your smartphone. I didn’t have any issues of installing the app nor did I have any problems using the app. The app worked just fine for me and I was able to use it right after the install on my phone. You connect to the MGCOOL camera via Wi-Fi. And on top of the camera is the Wi-Fi On and Off button.

The camera and my smartphone synced and communicated with one another flawlessly. I was happy that I wasn’t spending a lot of time trying to connect the two so I got to test out the camera right from the start. Right away you can rotate the view on your phone and experience the camera’s ability to capture the 360 footage around you.

Capturing footage on the MGCOOL camera is only half the battle because there is going to be a point where you want to share your video and have others see and experience your video too. Unfortunately, you are not able to just share a video by uploading it to YouTube or anywhere else. You have to convert your video first and then upload to YouTube. That’s fine for me since I like to edit and tweak my footage before I upload it but the majority of people probably would rather just want an easy Share button. However, for quick and easy videos I wouldn’t mind having a convenient Share button that could just upload to YouTube but at this time there isn’t one.

You can download the smartphone app as well a player for your PC or Mac here: App and Player

Also, when you take photo with this camera you will get an image with two spheres.  Unfortunately, there is no photo editor provided with the camera so you will need to get a software to stitch the image. If you want to share photos to sites like Facebook then you will have to inject the metadata into the photo as well for Facebook to identify the photo as a 360° image. You can’t just upload photos from the app to Facebook or other sites. You will only upload an image like the one above. The MGCOOL camera takes photos at a 3008 x 1504 resolution.

Since the manual doesn’t go into detail on how to get your footage uploaded correctly to YouTube I will share the method the was easiest for me through research on the internet. First and foremost you need to download and install the 360 Converter app or get it here at EnterVRWorld .

And you also have to also download and install the 360 Video Metadata app for YouTube. This Metadata app creates a 360 enabled video file and lets YouTube know that your footage is a 360 type video.

The first thing was to copy the footage I recorded from the MicroSD card onto a folder on my computer. Then you have run the footage through the 360 Converter. Once that is done, you take your newly converted footage and run it through the 360 Metadata app. There are instructions on the YouTube site for the settings that you need when you run your footage through the 360 Video Metadata app. It’s basically making sure that one of the check boxes is checked only.

I trimmed my footage in Premiere Pro and exported the video using the YouTube export settings. After the export, I ran that footage through the 360 Converter. Then when the 360 conversion was done, the last step before I uploaded the video to YouTube was to run converted footage through the 360 Video Metadata app. It seemed like this was a lot to go through to upload the captured footage to YouTube.  I think since the camera only records at 1080 x 960 (@30fps) the was a black circle at the top and bottom of converted footage where the footage was stitched.

I was concerned about the clip I uploaded to YouTube since the video seemed softer and not as sharp as the video clip on my computer. This is weird because the clip I exported from Premiere Pro was significantly sharp but when I view it on YouTube the footage to me isn’t very desirable. See for yourself below.

The MGCOOL 360 camera comes with a manual, Reset pin, MicroUSB cable, bike mount, and a couple of other mounts. I do wish that it came with a few more mounts like SJCAM provides with their cameras such as the SJCAM X1000. At least the X1000 includes a waterproof housing, whereas this MGCOOL 360 camera has their waterproof housing sold separately.  You can read my review on the SJCAM camera here: SJCAM X1000.

To learn more about the MGCOOL 360 camera, you can go to these sites: MGCOOL Site and MGCOOL Facebook.

Source: The sample for this review was provided by MGCOOL. Please visit their site for more info and order one at Amazon.


Product Information

Price: $99.99
Manufacturer: MGCOOL
Retailer: Amazon
Pros:
  • 360 degree footage capture.
  • Includes several mounts.
  • Ease of use.
  • Dual lenses.
Cons:
  • No manual settings.
  • No photo editing software included.
  • No video or photo share option.
  • Waterproof housing not included.

Filed in categories: Camera Gear, Reviews

Tagged:

MGCOOL Cam 360 action camera review originally appeared on on February 28, 2017 at 8:45 am.

Note: If you are subscribed to this feed through FeedBurner, please switch to our native feed URL http://the-gadgeteer.com/feed/ in order to ensure continuous delivery.