ZAGG’s new Flex universal keyboard will work with phones, tablets and smart TVs

NEWS – Darnit, I was all excited when I first saw the pictures of ZAGG’s new Flex universal Bluetooth keyboard for iOS and Android devices. Can you guess from the picture above and the one below why I was excited about a Bluetooth keyboard that can be used with smartphones, tablets, and some smart TVs? No, it’s not the built-in stand, and no it’s not the backlit keys, which is actually a pretty nice feature.

The reason why I was excited is because the images of the Flex make the keyboard look like there’s a solid platform on the bottom of the keyboard and the stand. Why is that so exciting to me? Because a solid platform would mean that you could use the keyboard and your favorite device on your lap like a laptop which feeds into my long time unrealized dream of forcing an iOS or Android tablet to work as a pseudo-laptop – on my lap.

But then my dreams were shattered when I saw another image and realized that the ZAGG Flex keyboard is actually comprised of two separate parts. The keyboard and the stand. It even comes with an ultra-slim protective cover so you can store it in your bag or purse. Sniff… It still looks like a nice little keyboard. The ZAGG Flex universal keyboard is available now at ZAGG.com and select Verizon stores nationwide for a suggested retail price of $79.99. For more information, visit ZAGG.com.

Filed in categories: News

Tagged:

ZAGG’s new Flex universal keyboard will work with phones, tablets and smart TVs originally appeared on The Gadgeteer on September 1, 2018 at 10:00 am.

Note: If you are subscribed to this feed through FeedBurner, please switch to our native feed URL http://the-gadgeteer.com/feed/ in order to ensure continuous delivery.

Potensic T25 Drone with 1080P HD Camera review

REVIEWS – Potensic’s new T25 drone has a lot of features, almost too many to grasp. Want to know more? Read on.

What is it?

The T25 is a small to mid-size drone with a full suite of capabilities including takeoff and landing assist, return to home, full 1080P recording and much more. Are you looking for your first drone or an upgrade from a low-cost mini-drone? Let’s take a look at the T25 and see if their feature set and performance are right for you.

Hardware specs

Drone GPS and specs
– Follow Me, GPS return home, GPS positioning and hold, Geo-Fencing, and Low Battery Return
Drone inflight features
– Headless mode, Auto Takeoff / Landing / Hover, 9-Axis gyroscope, Color-coded dual LED lights, 2.4G technology
– Range: Up to 300m (Image range up to 100-150m)
– Max Height: Up to 120m, Max Speed: Up to 25km/h
Camera
– HD Wifi Camera with 75º articulating 120º wide-angle lens
– Optional SD card (sold separately)
Battery
– 3.7v 1000mAh lithium ion
– Micro-USB port allows for charging in or outside drone
– LED lights for battery level indication
Controller
– Internal lithium polymer battery
– Micro-USB port for charging

What’s in the box?

  • (1) T25 Drone
  • (1) 1080P HD camera module
  • (1) Transmitter w/ mobile phone cradle
  • (1)  3.7V 1000mAH Battery
  • (1) User Manual & Quickstart Guides
  • (1) USB Battery Charger
  • (1) Screwdriver, (1) Wrench
  • (4) Propeller Protection Guards
  • Spare Parts
  • (2) Landing Leg pairs
  • (4) Propeller Blades (2 each rotational direction)
  • (2) Propeller gears, (2) Propeller caps, (4) Propeller screws

Here’s a better look at those parts removed from the packaging.

Design and features

Functionally, the design of the T25 is well done. The landing legs are replaceable as are the propellers and the propeller guards. The will hold most (if not all) smartphones and the app works well during use. From an aesthetic standpoint, there is little here that stands out as being unique to this drone so I would forgive almost anyone for mistaking it for a drone from the market leader. Maybe that’s the point, but in the end, while you are watching the drone as you fly, you quickly start to go heads down and watch your phone where the camera feeds a live view. As bland as the exterior may be, you’ll want to avoid putting stickers on or painting it as even adding the 4 propeller guards changes flight characteristics and a medium gust of wind definitely does. Let’s move on to set up and performance.

Setup

If you’ve had a drone before, none of the following is likely to surprise you. If not, let’s just say that setup isn’t hard, it’s just not fast nor straightforward if you’re expecting something similar to an RC car. The T25 is relatively assembled in the box, but as you saw in the photos above, there are so many additional small parts, both required and spares that it still feels like a kit instead of a finished product. That’s actually part of the charm in some respects.

If we boil it down, the setup process is as follows…

  1. Charge the batteries
  2. Install a microSD card (not included) into the camera
  3. Press the propeller guards into place
  4. Install batteries in the controller
  5. Install the phone cradle into the controller
  6. Download and launch the Potensic-G App

Here’s a shot of the propeller guard posts and the press-in receivers on the drone. It literally is a press-fit.

Right about here is where you think you’re ready to fly, and you kind of are. As a drone novice, I underestimated the amount of time the next steps would take including getting comfortable piloting the drone. While awaiting the review sample to arrive I did happen to notice that the battery provides about 8 minutes of flight time, so I ordered a spare battery from Amazon so that I’d have double the flight time between charging sessions. All that out of the way, here’s the next set of setup instructions. (Feel free to skip this if you’re familiar with drone calibrations)…

  1. Turn on the drone and set it down on a level surface, and all lights should be blinking red (This is an important step as the drone will use this as its perception of flat – You should also be in a wide open space, and the lights can be hard to see in strong sunlight)
  2. Turn on the controller (Here’s where it gets all secret game code-like)
    1. Press UP then DOWN on the left joystick
    2. Front lights will flash WHITE, rear BLUE
    3. On your phone hop into settings and connect to WiFi broadcast by the drone (Potensic-xxx) then jump back to the app
    4. Calibrate the gyro by pressing each joystick to the forward and outward corners (left @ 11, right @ 1) – lights should blink rapidly
    5. Calibrate the compass by pressing each joystick to the forward and inward corners (left @ 1, right @ 11) – lights should now add a red between the flashes (white/red in front, blue/red in rear)
    6. Pick up the drone and in one smooth motion turn your body in a circle keeping the drone level in front of you – rear lights should go solid blue
    7. Now tip the drone face down (propellers forward) and do the same thing keeping the drone in this position – front lights should go solid white
    8. The app should confirm calibration okay and you will set the drone back on the level surface where the lights will return to respective white/blue flashing while the drone is ‘Waiting for GPS signal’.  [NOTE: If you happen to be somewhere where you cannot get a GPS lock (large indoor area?), you can press and hold the right joystick for 2 seconds to disable GPS. Keep in mind that will also disable any of the features reliant on GPS like return home and follow me.]
    9. When the lights return to all solid you’re ready to fly and the app should say so.
    10. Last thing that was not mentioned anywhere that I could find is that in the app, you need to click on ‘CONTROLS’ to get to the flying screen.

Performance

There are a lot of controls on the controller (which makes sense), but it makes for a learning curve that’s as steep as your familiarity with this kind of setup. If you play any kind of modern gaming system you’ll already be more likely to jump in. Let’s take a look at all those controls quickly…

Above you see the trigger controls for [follow me], [camera/video] and on the left hand [angle up] and [angle down] adjustments

Here are the [return to home] , [power] and [takeoff/landing] buttons along with a whole lot of indicators above which help to communicate which settings the drone has active. These are lit well during use and hard to confuse.

When it comes to actually flying the drone, Potensic has done a few things that aid a new pilot significantly. The first is a one button take off which literally works as advertised. Press that button and the propellers whirr to life lifting the drone to about 5 feet off the ground at which point it just unnaturally maintains its position. Auto land is another that just takes a huge headache away by just landing for you.

A unique feature is “headless” mode which basically translates to the controls never switching orientation. This means that forward is always forward based on the starting position of your controller and left is always left of that forward motion. This is super useful if you’re thinking grid style, but if you turn around because you flew the drone behind you, you’ll need to mentally remap the controls to have the drone do what you want it to do.

Follow me is a feature that got me really excited and in my first attempts also concerned me the most. I don’t trust the GPS on my phone to be accurate to within 10 feet. When experimenting, the drone does what it’s supposed to do and if you back up, it advances. The problem is that with some GPS drift, sometimes it would get a little closer than I expected which resulted in me stepping back and it continuing to advance. Comical right? Also scary.

So as a new pilot, the reality is that it learning to fly is a bit stressful and just when you think you’ve got it, something changes and your gut reaction ends up causing a problem. It’s also a bit frustrating to see all these beautiful drone-shot videos on youtube and other media outlets, only to realize that it’s not quite that easy to get that beautiful shot without a lot of practice. So here are a couple of reference comments for you to consider.

I only had one real ‘crash’. It was before I discovered headless mode and I ended up sending the drone into the side of our car. The propeller guards did what they were supposed to do and kept both the car and the drone uninjured, but one propeller guard snapped. It would be nice to have some spares in the box as it seems like these are more likely to be needed than spare landing gear, but then again who’s really to say.

The on-board video camera is why I think drones intrigue most of us, and the T25 boasts 1080P. Note that both the below videos are posted here at 720. On a recent family vacation, we were filming a sequel to an ongoing saga of movies with our kids as action heroes. There was a scene with my older kids running towards the beach and it seemed like the perfect opportunity for a drone shot. In the video below you’ll see that while it worked, I didn’t account for the amount of wind and controlling the drone was quite difficult. I will say that it was impressive to see the T25 tilted at almost a 25º angle and just holding its position which was right at the beginning of this video.

Here’s another video of one of the earlier flights just getting the hang of the controls and even just comfort level of having it head back towards me. The camera does a pretty good job, but it can be a bit jumpy and the clarity isn’t quite as good as I was hoping.

A couple of things to note about the way the camera works. You see exactly what you’re shooting on your controller display (iPhone in my case). Any photos or videos are recorded directly to your phone as well as an SD card if you have it installed. Videos record in .avi format on the SD card while .mov on the iPhone. That’s helpful as macs don’t read .avi natively so you’ll need to grab VLC or some other player/editor. I did not see resolution differences between the SD card recordings or the iPhone recordings.

When initially setting the drone up and looking over all the parts I took off the legs and inadvertently pushed one of the release buttons too far where it pushed inside the drone and the spring was rattling around. In retrospect, this is why their wrench has a small extended section with physical stops. Regardless, it resulted in taking the drone apart to rescue the button and I got to look at some of the inner workings. You can see in the second shot where the button arm is keeping it trapped against the assembly post. Overall an easy fix, albeit with a lot of screws.

What I like

  • Small and compact without being diminutive
  • Learning aids are great for new pilots
  • Spare parts included for some key items

What needs to be improved

  • Battery life/flying time – and/or – 2nd battery in the box would help
  • Propeller guards are more fragile than they should be
  • Add a learning mode where certain features can only be unlocked if you’ve passed ‘flight school’ levels
  • Battery swap requires redoing all the calibration steps

Final thoughts

I’ve flown a couple of drones before, but it was quick flights with the drone’s owner right there. When it’s your own and you’re doing all the setup, the “am I doing this right?” weighs on you quite a bit and I can only imagine that ratcheting up a lot if you’ve dropped your own dollars to purchase it. The more time you can spend flying, the more efficient you’ll be and the better results you’ll get out of video and photos. The main complaint from any user will be flight time. I’d recommend a minimum of one extra battery and likely two as if you’re headed out to fly, you’ll want a good 30 minutes and 3 won’t quite get you there. Also once the controller battery is depleted you’re done as it takes an hour to charge even if you brought a power bank. Overall the T25 is a good value, not too light, not too heavy and sits in a pretty good spot as far as not being too expensive while having an impressive feature set.

Price: $189.99
Where to buy: Amazon
Source: The sample of this product was provided by Potensic.

Filed in categories: Reviews

Tagged:

Potensic T25 Drone with 1080P HD Camera review originally appeared on The Gadgeteer on September 1, 2018 at 9:00 am.

Note: If you are subscribed to this feed through FeedBurner, please switch to our native feed URL http://the-gadgeteer.com/feed/ in order to ensure continuous delivery.

Keep your coffee in a Coffee Vault for freshness

NEWS – Coffee is expensive, so you want to make sure you get the most of the beans you buy.  There’s a lot of information about how you should store coffee until you brew it – keep it in the freezer, keep it in jars of various kinds, seal it in plastic bags, etc, etc.  The Coffee Vault folks offer a storage solution that is designed to protect coffee from flavor loss until you’re ready to use it.

There are two containers in this kit.  The bigger container can store 16 ounces of beans.  When you grind some of the coffee, store the grounds in the smaller container until you need it.  Each metal canister has a custom-sized scoop that stores right on the side of the canister.  The canisters are square, so they’ll fit together to save space on your counters.

Once coffee is roasted to release those flavorful sugars and essential oils in the beans, the environment starts robbing coffee of its flavor.  There are four factors that are the enemies of roasted coffee.

  • Light – Glass jars let light in, harming the flavor of your beans.
  • Air – Bags or non-airtight canisters let in flavor-diminishing air.
  • Moisture – Outside air lets moisture build up, weakening the flavor.
  • CO2 – Fresh beans release CO2, which must be vented.

Coffee Vault canisters block out light, air, and moisture.  Plus, the lids have patent-pending vents to release the carbon dioxide.  

The Coffee Vault Compact Coffee Canister Set is available at Amazon for $23.77.  Visit the Coffee Vault website and you can get a 60%-off coupon to use to purchase the canister set from Amazon.

Filed in categories: News

Tagged:

Keep your coffee in a Coffee Vault for freshness originally appeared on The Gadgeteer on September 1, 2018 at 8:00 am.

Note: If you are subscribed to this feed through FeedBurner, please switch to our native feed URL http://the-gadgeteer.com/feed/ in order to ensure continuous delivery.

GE WiFi Connected Appliances will now work directly with Google Assistant

NEWS – GE has announced that the will be the first appliance manufacturer to work directly with Google Assistant. That means that instead of saying, “Hey Google, ask Geneva Home to preheat the oven to 425 degrees,” you’ll now be able to say to your GE WiFi Connected appliance, “Hey Google, preheat the oven to 425 degrees.” Yes, you will now be able to bypass GE’s Geneva Home Action assistant altogether, saving time and awkwardness speaking lengthy commands.

GE offers a variety of WiFi Connected appliances that include ovens, microwaves, dishwashers, washers, dryers, refrigerators, and air conditioners. A software update will add the new Google Assistant capability.

You can shop GE WiFi Connected Appliances by visiting geappliances.com

Filed in categories: News

Tagged: ,

GE WiFi Connected Appliances will now work directly with Google Assistant originally appeared on The Gadgeteer on August 31, 2018 at 12:00 pm.

Note: If you are subscribed to this feed through FeedBurner, please switch to our native feed URL http://the-gadgeteer.com/feed/ in order to ensure continuous delivery.

SpotCam video AI service review

REVIEW – SpotCam, purveyors of Wi-Fi video camera solutions for indoors, outdoors, and doorbell applications is an industry leader for innovative design,  free 24-hour cloud video recording, and connectivity with IFTTT and Conrad Connect. The cloud platform now features optional SpotCam video AI services that actively detect specified events and provide instant notification of the occurrence on your mobile or email. Read on to see what I think!

What is it?

The SpotCam video AI service has six different subscription-based components that can be added to a user’s account in order to increase the automated surveillance capabilities of the camera.  The plans reviewed in this post include Missing Object Detection, Virtual Fence, Human Detection, and Vehicle Detection. There are also Pet Detection and Fall Detection components available that are not reviewed. All of these solutions are cloud-based. No change to the installed hardware is required to enable these features.

Design and features

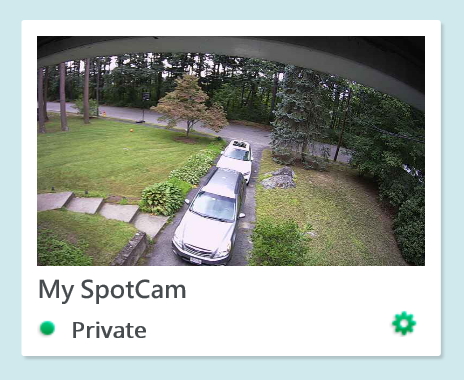
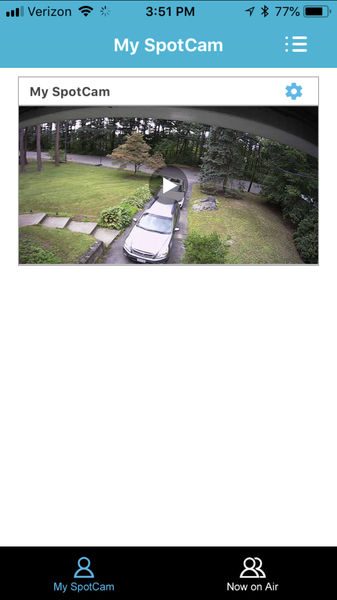
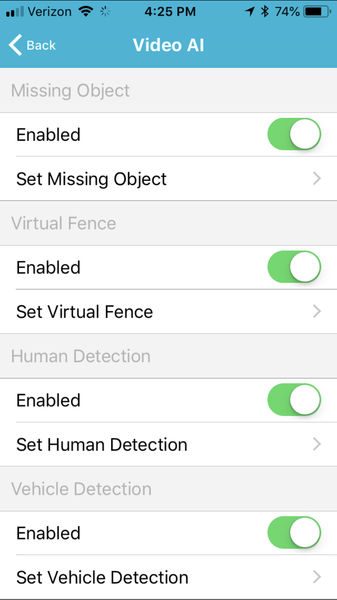
Each of the video AI components is configured independently. The Video AI system is configured on the web by clicking on the green gear icon below the subscribed SpotCam preview image on the My SpotCam tab of the My Account menu.

The web browser must support javascript, but since all configuration is on a static image, flash is not required (as it is in order to view movies).

If configuring this using the mobile app, click the gear icon on the subscribed SpotCam preview image and scroll to the bottom of the screen.

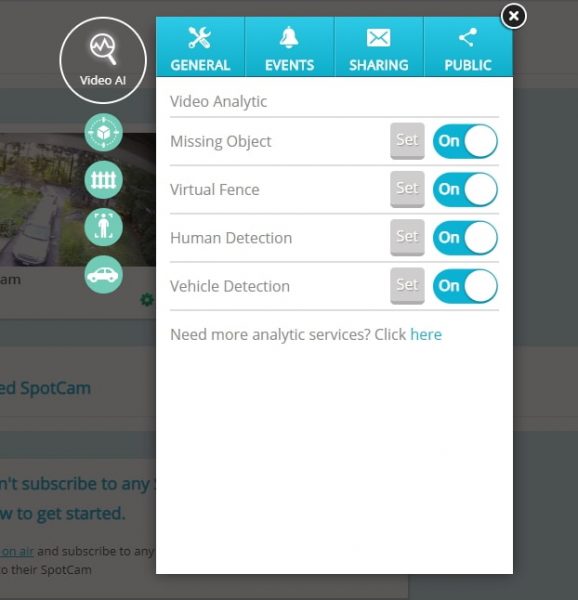
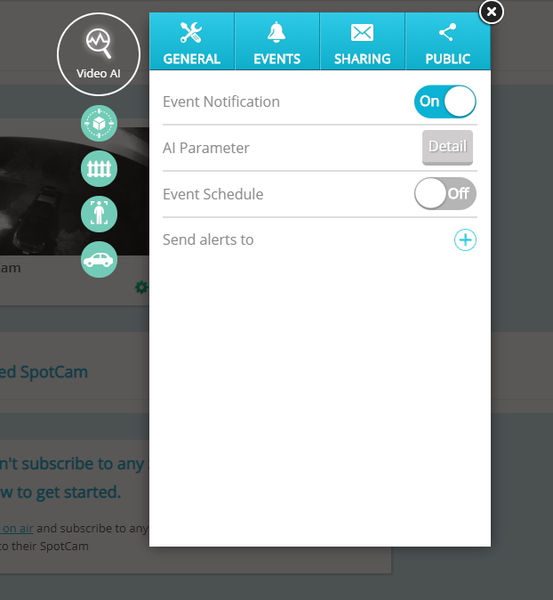
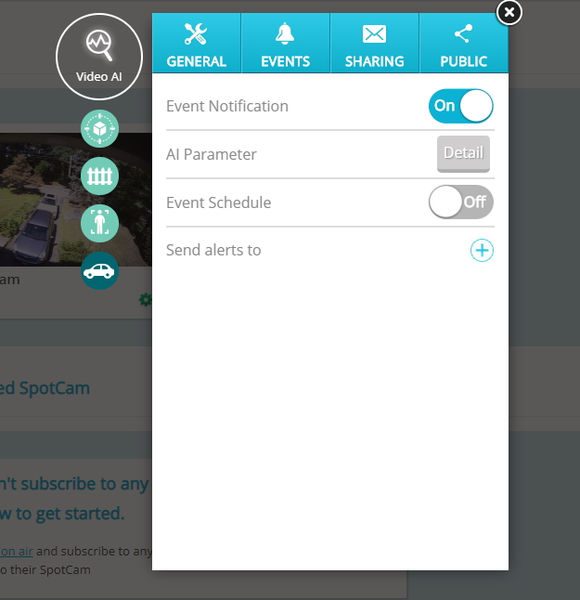
Once you click the Video AI item the following menu appears

Each type of detection includes an AI parameter menu. The AI parameters include setting if the camera is mounted inside or outside, indicating if the camera is mounted horizontally, vertically, or slanted, and, in some cases, setting the minimum and maximum object size that can be interpreted.

When the Video AI registers a detection it lists it in the events tab and it places a marker on the timeline of the subscribed camera.

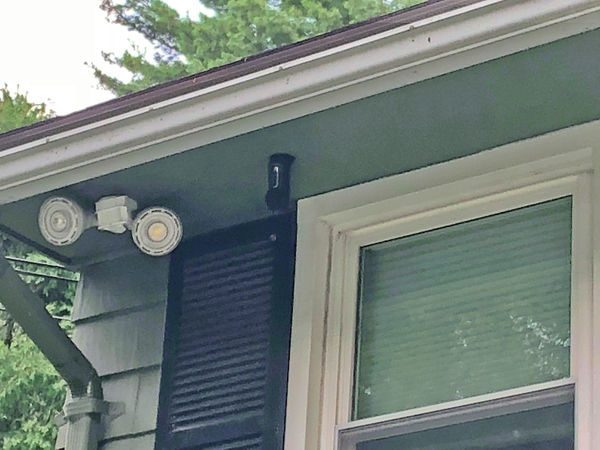
The image below is the “Human Detection” of me taking a picture of the camera for this post.

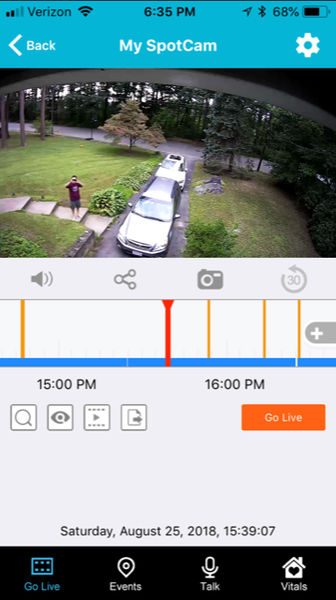
On the web, the AI markers sit above the audio and motion event markers on the video timeline.

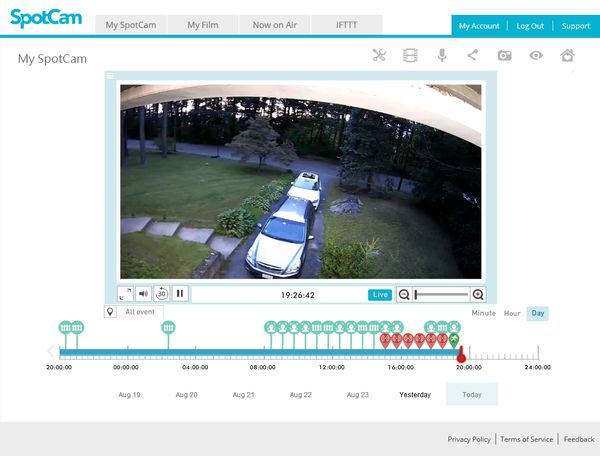
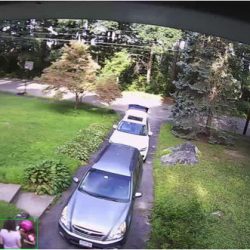
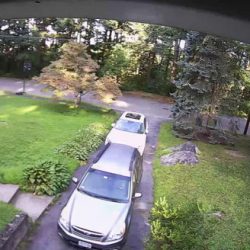
The review is based on a SpotCam that I have mounted outside in my front yard. The camera is mounted upside-down below the front soffit of my roof and faces almost exactly due west. For several days of the review, the family was on vacation so the cars in the driveway didn’t move at all.

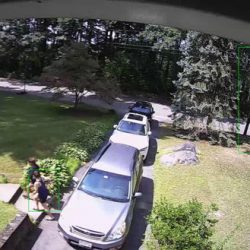
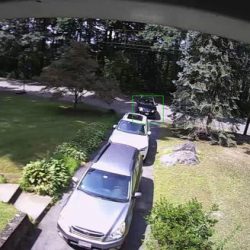
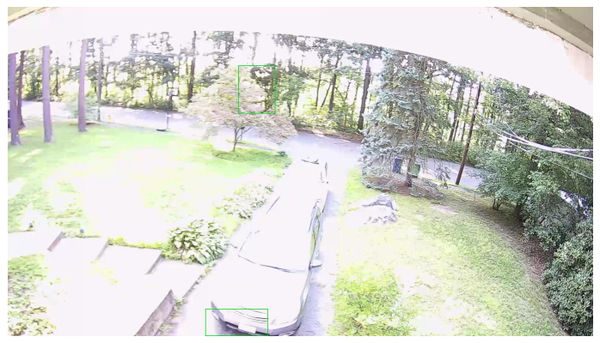
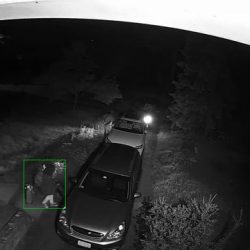
In addition to making a notification in the timeline of the subscribed camera video record, the Video AI can be configured to send an email with a link to an image that corresponds to the detected event. A green box indicates the area that triggered the event in the image.  You can see a green box surrounding me walking towards my car.

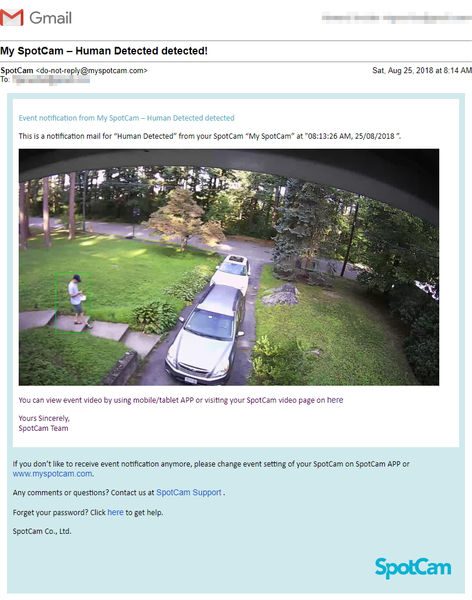
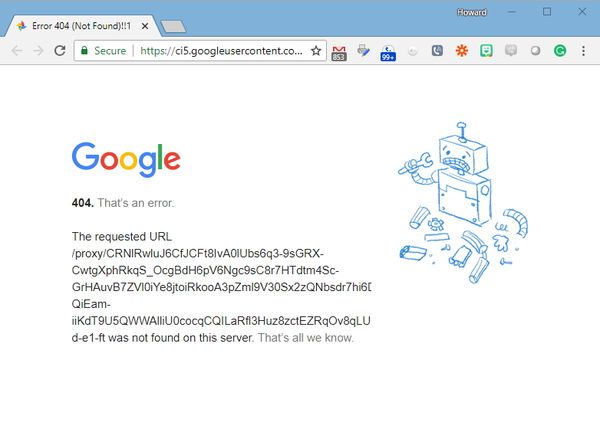
The image is unfortunately only a link to an image on a google server and not an attachment. The image expires as soon as the subscribed network video recording period expires.

The latency for the emails varied considerably. For example, The Human detection emails I received on one day (my son was having friends over so there was above average traffic) were received within minutes or hours later. Also, for what it is worth, I do not believe there is a way to Americanize the date format.

received at 9:13 AM (10 hours ago), “Human Detected” at "09:05:26 AM, 25/08/2018 ”.
received at 9:27 AM (10 hours ago), “Human Detected” at "09:07:08 AM, 25/08/2018 ”.
received at 9:31 AM (10 hours ago), “Human Detected” at "08:13:26 AM, 25/08/2018 ”.
received at 9:32 AM (10 hours ago), “Human Detected” at "09:14:17 AM, 25/08/2018 ”.
received at 10:18 AM (9 hours ago), "Human Detected” at "10:16:44 AM, 25/08/2018 ”.
received at 10:42 AM (9 hours ago), “Human Detected” at "10:03:56 AM, 25/08/2018 ”.
received at 11:02 AM (8 hours ago), “Human Detected” at "10:22:54 AM, 25/08/2018 ”.
received at 11:35 AM (8 hours ago), “Human Detected” at "11:32:10 AM, 25/08/2018 ”.
received at 12:40 PM (7 hours ago), “Human Detected” at "12:39:48 PM, 25/08/2018 ”.
received at 12:42 PM (7 hours ago), “Human Detected” at "12:32:03 PM, 25/08/2018 ”.
received at 12:47 PM (7 hours ago), “Human Detected” at "12:38:05 PM, 25/08/2018 ”.
received at 1:00 PM (6 hours ago), “Human Detected” at "12:59:39 PM, 25/08/2018 ”.
received at 2:36 PM (5 hours ago), “Human Detected” at "01:17:02 PM, 25/08/2018 ”.
received at 2:46 PM (5 hours ago), "Human Detected” at "09:59:18 AM, 25/08/2018 ”.
received at 3:32 PM (4 hours ago), "Human Detected” at "02:10:06 PM, 25/08/2018 ”.
received at 4:07 PM (3 hours ago), “Human Detected” at "08:59:03 AM, 25/08/2018 ”.
received at 4:07 PM (3 hours ago), “Human Detected” at "09:00:52 AM, 25/08/2018 ”.
received at 6:06 PM (1 hour ago), “Human Detected” at "08:37:51 AM, 25/08/2018 ”.
received at 6:37 PM (1 hour ago), “Human Detected” at "09:09:47 AM, 25/08/2018 ”.

Missing Object

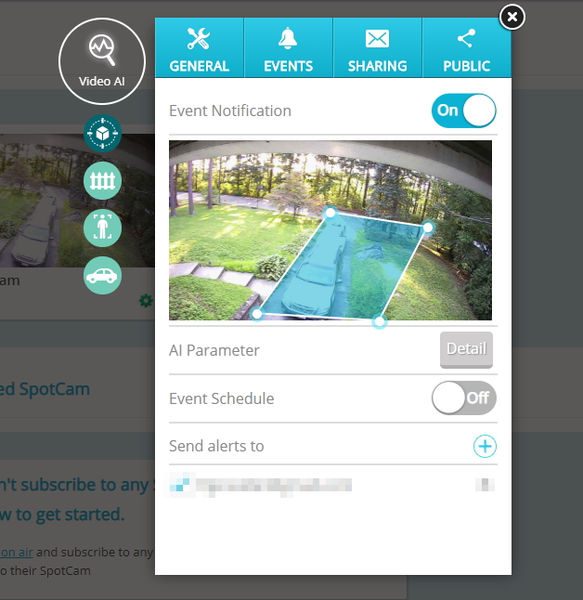
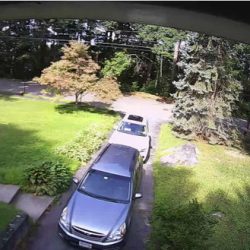
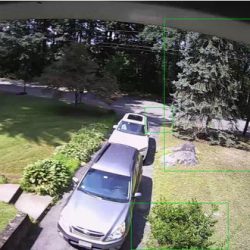
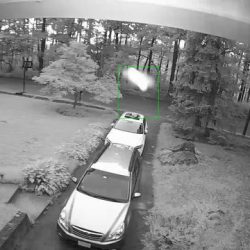
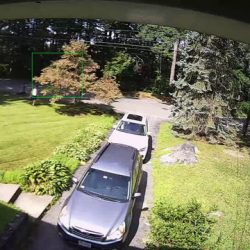
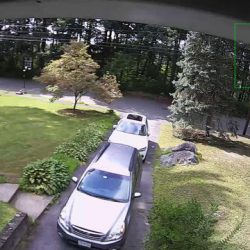
The Missing Object component is designed to determine if objects within a specified region of the image change over time. Only one region can be configured for a missing object detection and the region must be a simple quadrilateral. (Actually, the program will allow drawing a “bowtie” shape but I did not test how this performs.) For this review, I selected the region of the driveway to test if the camera can correctly determine that the cars have moved. During the five vacation days, I received nine notifications that the cars have moved, all (thankfully) false positives. Most of the detections were based on the changing reflection of the sky on the chrome and windshield of the cars, or sunlight variations on the yard. One of the notifications, at 3 AM, was because a moth flew in front of the camera. Unfortunately, when I finally did move one of the cars at 8:14 am, no missing object event was triggered. The image below illustrates that the Video AI thought that the top of a tree and the bumper of the car had gone missing.

Virtual Fence

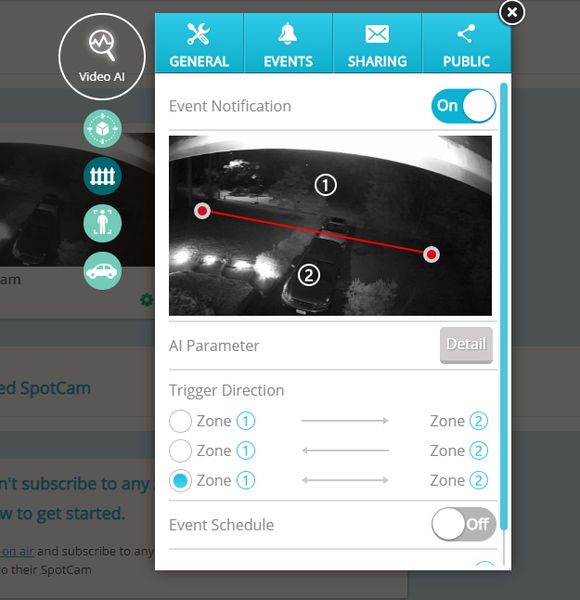
The virtual fence allows the user to draw a line separating two areas on the image and designate the AI to monitor and detect any objects that cross the line.  Only one fence can be created for the virtual fence detection. The AI can determine in which direction the travel across the virtual fence occurs; therefore, the virtual fence can provide notification of traffic in the forward, reverse, or both directions across the fence. When I enabled the virtual fence, I received 143 notifications within 9 days. Many of the notifications were for trees or bugs at night. Like the human detection example above, some detections came in very quickly while others took hours to appear in my email.


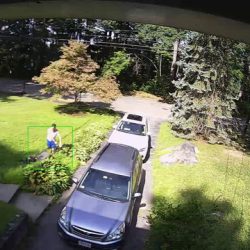
The system did correctly determine I was cutting the lawn and walking up the driveway late at night. The virtual fence does not have a parameter to limit the size of the detected image, so there doesn’t seem to be a way to lower the number of false-positives.

Human Detection

The purpose of the human detection component, as described by SpotCam, is to identify only those motion activities that are based on the presence of human beings. The AI parameter of this component includes a relative size selection for both height and width. It should be possible to detect people near or far in a scene based on their size and the perspective of the camera but I didn’t test this out. The Video AI did a good job of identifying people in the scenes; only one scene identified a tree as a person. As discussed before, the latency on receiving notifications varied considerably. The Human Detection component doesn’t have a mask to exclude detection within certain areas; if it did then some of the detections that occur high in the trees could be avoided.


Vehicle Detection

The purpose of the Vehicle Detection component, as described by SpotCam, is to notify the user when a vehicle is detected in the video image.  The AI parameter of this component includes a relative size selection for both height and width. It’s unclear if this parameter can be used to detect near and far vehicles based on perspective, or the relative size of the vehicle (say a Smart car versus a garbage truck.)  The Video AI did a good job of identifying vehicles in the scenes; only one scene identified a tree as a vehicle. As discussed before, the latency on receiving notifications varied considerably. Like the Human Detection component, the Vehicle detection doesn’t have a mask which will exclude detection from certain areas; if it did then some of the detections that occur high in the trees could be avoided. SpotCam warns that the accuracy of this detection might be affected by the headlights of the vehicle during night-time. To ensure proper identification the camera should be placed to avoid being aimed at headlights to improve the accuracy in the night. I did see one capture of path light illumination that was mistakenly interpreted as headlights.


What I like

  • Good highlighting of a video stream
  • green boxes identify the image that triggers AI

What needs to be improved

  • Images are links, not attachments.
  • would be beneficial to “train” the system to recognize “missing objects”
  • not more than one “missing object” area per camera
  • should have video masking on multiple Video AI components.
  • virtual fence size would help eliminate false-positives
  • the latency of email alerts is inconsistent

Final thoughts

The SpotCam Video AI service is groundbreaking in its scope but still has a few bugs to figure out. The number of false-positives is too large to reliably use as an email alert system. I can see that this product may become more robust as computing power, programming, and usage increases.

Price: $3.95/mo, $39/year for “missing object”; $9.95/mo, $99/year for “fall detection”; $5.95/mo, $59/year for other plans
Where to buySpotCam
Source: The sample for this review was provided by SpotCam.

Filed in categories: Reviews

Tagged:

SpotCam video AI service review originally appeared on The Gadgeteer on August 31, 2018 at 11:00 am.

Note: If you are subscribed to this feed through FeedBurner, please switch to our native feed URL http://the-gadgeteer.com/feed/ in order to ensure continuous delivery.