Plott Cubit review

REVIEW – Redecorating generally means there will be math to do.  Making sure pictures are hung at the right height is made that much more difficult if there are multiple pieces competing for attention on the same wall.  And if you are anything like me, then you revel in OCD, which means you will end up patching holes in the wall as you move things around to get them in the right spot.  The Cubit from Plott wants to help you solve this problem so you “hang once and done”.  How well does it deliver on this promise?  Read on to find out…

What is it?

The Plott Cubit is self-described as the “Ultimate Home Improvement Tool”.  Pairing up with an augmented reality application on your phone, the Cubit is a connected two-dimensional laser (and analog) measuring tool.

What’s in the box?

  • The Cubit measuring tool
  • A USB charging cable (you will need a wall transformer if you do not have an open USB port somewhere)
  • Some basic instructions

Design and Features

The Cubit has X and Y axis lasers to handle the measuring backed up by an analog roller. Here is the bottom of the device:

The charging port, the Y axis laser and the analog roller balls are on the bottom of the Cubit.  The black wheel on the right side is there as a guide and does not actively measure anything.

The left side of the Cubit has the X axis laser.  As you can see in the first picture above, the Cubit has an LCD screen that shows you the battery state, the level state of the device (to help you move in straight lines – good to have when rolling along the wall, but a traditional level works better when trying to plumb a picture), a unit of measure indicator (so you can tell whether you are using Imperial or Metric measurements), the direction of measurement (up/down/side-to-side) and, of course, the actual measurement.  When placing objects in the AR app, the Cubit will also display a directional arrow that helps you get to the nail placement and other real-world locations referenced in your AR design.  More on how that works in a moment.

The front also has the main button where you can turn the Cubit on or off, clear the current measurements and change the Guide mode.  Non-Guide mode allows you to measure independent of the app and Guide mode helps the app figure out where the device is on the AR surface (aka, your wall).  Communication between the device and the app is through Bluetooth, but you pair with the Cubit in the app and not through your Bluetooth connections.  That seems to indicate to me it is a Bluetooth Low Energy device, but nothing in the instructions specifically say it is.  If you have an older device or one that does not support this standard, this might not work for you.

The screen can be a little difficult to read – it is a black and white LCD with pretty low contrast, so if you have a bright room (or use it outdoors), it is hard to see.  Also, I often found that I had to move my hand around on the device in order to let the lasers do their work, and sometimes that meant covering the display.

Finally, on top of the Cubit there is a “mark” button used to capture a reading – think of it as a shutter button on your camera that captures a point in time for your measurement.

How it works

After you open the box and plug the Cubit in to charge, head to the Google or Apple app store to download the Plott app.  Although there are some measurements you can take using the device without the app, you need the app to fully appreciate the things Cubit can do.  Thankfully Plott does not make you sign up for an account – everything happens locally on your phone.

With the app installed and the Cubit charged, we are ready to start.  Open the app and select Let’s Plott to begin a project – this button in the app essentially creates a virtual folder on your phone to group the items you create.  This is a high-level grouping, though, and not an actual project.  Once the container is created, you can start an actual project.  If you are a professional interior designer, for example, this could correspond to a client with multiple projects clustered inside for that client.  Once you’ve given your container a name, you can start your first project.  You are prompted to select an outdoor project where you can use the Carta (a wheeled companion device from Plott that lets you measure and plan walkways, decks, etc.) or an indoor project using the Cubit.  Select indoor, give the project a name, and you are ready to start.

The first step is to take a picture of the wall to use as a background for the augmented reality work – and this is where I had my first problem.  We have an open floor plan house with 12 foot ceilings, which means our walls are both long and high.  There does not appear to be a way in the app itself to stitch together multiple pictures, so at best I can only get a small portion of a wall.  This screenshot does not do complete justice to the issue.  The picture I took to get here was in landscape mode, and properly cropped before being accepted as the background.  In the image below the background is scrollable right and left, so you can see the entire background – but the main work in the app is done in portrait.

Back to my issue, though.  The wall where this is taken is 12 feet high, but I am only able to get back far enough to capture about 6.5 feet.  And the entirety of the wall is 21 feet. but I can only grab about 10 feet successfully.  There is no ability within the app to take multiple pictures and stitch them together into a complete background.  There is an AR mode for setting a background image that could theoretically work, but I could never get it to capture the entire wall.  Whether that is because of lighting or something else in the app, every time the app would stop scanning the surface of the wall and just take what it had up to that point.  And without an ability to import a self-stitched photo into the project, I ended up having to break up the wall into multiple projects.

And that’s where I encountered the second issue.  Because I did not have a solid endpoint (like a corner or doorway) I had to either “eyeball” the reference point where the Cubit could begin measurement of the horizontal and vertical axis’s, or I had to get out a tape measure to figure out where the background edge should start in the real world.  Both methods lead to a slight deviation in actual size, so measurements will not be as precise as if you could position the Cubit at an aforementioned origin point like a corner or doorway.

Issues aside, once you have your background selected, the app will ask you for the dimensions of the background, and this is the first place where the Cubit comes into play.  You place the Cubit at an appropriate X-Y intersection (like the wall edge and the ceiling) and let the dual lasers measure to the opposite side of the space.  Pressing the mark button on top sends the measurement back to the app.  Because I was working with segments of my wall, in order to get accurate measurements I had to tape pieces of cardboard at the end of the space in the background image so the lasers would not project to the next wall end.

With the wall now measured, you are ready to add an object like a picture.  Press the Object button in the app and add your object – in my case, a framed piece of art.  Again, you go back to the camera (or add from the library if you have previously used the app).  Once you’ve taken the picture and cropped it, you can roll the Cubit across the edge to capture the height and width of the picture.  That information is stored with the image so you can import it into future projects.  Next, you have to “flip” the object so you can take a picture of the back.  This picture allows you to select the place where you will hang the picture – the wire or sawtooth hardware that the hook rests on.

And your object now shows up on your background.  Move it around as you like until you find the place that works for you.  Tap the “Change Reality” button once to set the picture where you want it, and in an odd choice, tap the nail indicator on the object and tap the “Change Reality” button a second time.  The object is now set in the room, and you can use the Cubit from the X-Y origin point to move to where you will insert the nail.

The final problem – if you use a wire on the back of your picture and a standard picture hook, the app does not compensate for the arc the wire will create, so depending on how much excess wire you have, the picture could end up 1-3 inches lower than expected, perhaps more.

What I like

  • The combination roller and laser systems seems suited to measuring physical objects very well – wish the app supported that outside of the auspices of a “project”
  • If you are a professional designer and use this often, it could be a great tool with some changes

What needs to be improved

  • The app is not very intuitive to use and does not allow common functions like importing existing objects or images
  • It is far too easy to have measurements that do not match the real world, making the entire point of the device somewhat moot – you can get measurements with a photo that are sufficient to have custom clothing made, so why can’t this be more accurate without workarounds?
  • When used for the primary purpose – hanging a picture – there is no way to adjust for the method in which you hang the picture accurately, so your results may not end up as intended – again, you can’t devise workarounds, but it sort of defeats the point for ease of use
  • Even if you are willing to work within these issues, it can be hard finding a retailer who has the Cubit in stock

Final thoughts

I think with some work on the app this could be a very useful device for the professional designer.  To me, though, it is a LOT of work over a more manual approach to accomplish what should be a reasonably simple and straight-forward task.  If Plott can overcome some of the issues I encountered, this could become a very interesting tool.  As it stands now, however, the app and device combination will end up making more work with less desirable results.

Price: $109.99
Where to buy: NewEgg
Source: The sample of this product was supplied by Plott.

Filed in categories: Reviews

Tagged: ,

Plott Cubit review originally appeared on The Gadgeteer on May 30, 2019 at 10:00 am.

Note: If you are subscribed to this feed through FeedBurner, please switch to our native feed URL http://the-gadgeteer.com/feed/ in order to ensure continuous delivery.

Akaso Trace 1 dash cam review


REVIEW – I have tested several dash cams lately. Most have been OK, but cameras in general are improving at quite a clip. Witness the current dash cam under review, the Akaso Trace 1.

What is it?

A small box with both a front- and rear-facing camera that takes high-quality videos, with time stamping, and fantastic low-light resolution.

What’s in the box?

  • Camera unit
  • Suction mount
  • Power plug with captive miniUSB plug and pass-thru jack
  • Mounting clips and tool
  • Quick start guide

Hardware specs

(From company website)

  • FRONT AND INSIDE RECORDING: Trace1 dual dash cam is equipped with dual lenses to capture exterior and interior of the car simultaneously at 1080p30 (340-degree field of view combined). When inside recording is not needed and turned off, the front lens records 1080p60 for crisper and smoother image.
  • UNPARALLELED NIGHT VISION: Thanks to the state-of-art Sony STARVIS at both lenses, which extends the sensitivity of sensor beyond visible light to near-infrared range, and WDR technology, Trace 1 dash cam excels capturing every detail of your surroundings regardless of lighting conditions.
  • G-SENSOR & PARKING MONITOR: Loop recording comes standard, and built-in G-sensor locks the recording clip to ensure data integrity when collision gets sensed. Parking monitor protects your vehicle even when parked – it enables the car dash cam to turn on if any impact is detected, record for 30 seconds and turn off again.
  • OTHER FEATURES: Trace 1 dash camera supports up to 128GB of mircoSD storage (class 10 or above and at least 16GB recommended, memory card NOT included); efficient heat dissipation design; internal microphone with on/off option; auto LCD off to save power.
  • PERFECT DASHCAM FOR EVERYONE: With so many tech and safety features packed into an affordable package, this dash cam front and rear is a perfect option to everyone – beginners and seasoned taxi and rideshare (Uber, Lyft) drivers alike. All AKASO car camera – dash cam comes with 30-day hassle free return and 1-year limited warranty.

Design and features

The Trace 1 is small, even by today’s miniaturized standards. At 3” x 1.75” x 1”, it’s barely as large as an action camera. There’s a 2” (diagonal) screen on the rear side, and an f1.8 camera with a .5” diameter lens pointing out both sides. On the rear, there’s a 4-element IR light that allows for great night-time video of the car interior, as well as your blind spots to either side. Both cameras sport a 170º field of view.


The suction mount has a sticky silicone gripper 2.25” in diameter, with a quarter-turn locking mechanism. I only had it fall off once, after sitting out in the sun all weekend. When I brought it in for this review, however, I noticed that I had left the protective film on the silicone! It wouldn’t have slipped at all if I’d removed that film and actually stuck the bare gripper to the glass.


There are four function buttons across the bottom, as well as an on-off button above the card slot on one end. The miniUSB power port is on the top, and there’s a pin-hole mic between the card slot and the power button.


There are various protected grills/vents on several sides, at least some of which is for sound. For a tiny little unit, it’s easy for me to review my last drive home, with a podcast playing, over the noise of lawnmowers and kids that I’m hearing on my back deck writing spot.
The default setting for the firmware is for English, with no parking mode, incident mode (where the clip being recorded will be locked if a jolt or collision is detected based on the motion sensor), with a time-stamp on the videos. This is pretty standard. The four buttons across the bottom of the unit change function when you press them. They are used to replay captured video, format the data card, change the date, turn off the beeping sound, etc.

Setup

Setup of the Trace 1 was minimal. Other than installing a TF storage card (not included), affixing the suction cup mount to the windshield and routing the wire and attaching it to a power plug, there’s really nothing to it. (I didn’t set the time/date at this point, which shows in the video clips.) By default, it’s set to turn on when it has power and stay in “park” mode as long as the battery lasts. Park mode can be set to three levels of sensitivity (as can the normal “incident” mode). This will start recording video and audio if there is a jolt or crash to the vehicle. You can select the length of videos, and in Park mode, the camera will record video until there is no more motion, and then finish the clip. This will allow you to view what happened in case of a parking lot crash where someone hits your car, then drives off.

Here’s a short clip from my exciting commute into work. Note the car passing me on the left at about 7 seconds, which shows in the front camera after the view transitions from rear to front view.

Performance

What I like

  • Single unit takes front and rear-facing video
  • 170º coverage on both front- and rear-facing cameras totals 340º of coverage
  • Both cameras capture high-def video
  • Light and small
  • Runs on battery power for a good while.

What needs to be improved

  • I can’t think of anything.

Final thoughts

As noted in previous dash cam reviews, I have a very short commute and most drivers obey the rules of the road and tend to not try to make me hit them for insurance fraud like in some countries. But, given the nature of changes in our society, there seem to be increasingly many incidents that could be helped by having a video camera on and running all the time. If you’re feeling that vibe, this is a pretty nice little unit to consider.

Price: $99.99
Where to buy: Amazon
Source: The sample of this product was provided by Akaso.

Filed in categories: Reviews

Tagged: ,

Akaso Trace 1 dash cam review originally appeared on The Gadgeteer on May 30, 2019 at 9:00 am.

Note: If you are subscribed to this feed through FeedBurner, please switch to our native feed URL http://the-gadgeteer.com/feed/ in order to ensure continuous delivery.

Say no to styrofoam this summer with the Ohana 100% recyclable and biodegradable cooler

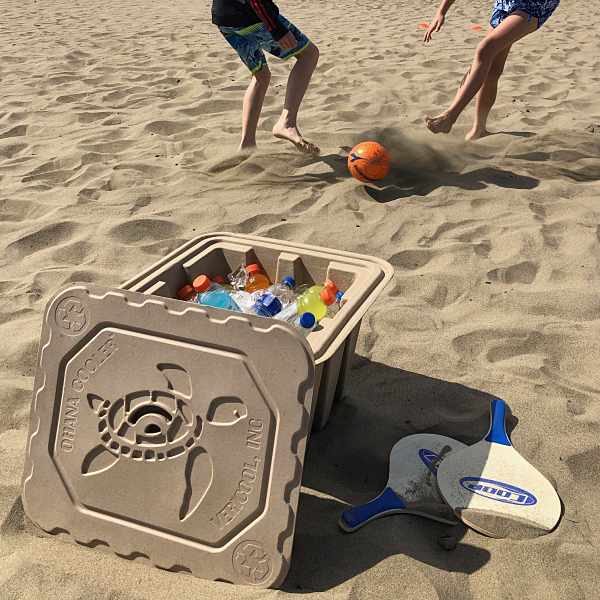
NEWS – Summer is almost here, time to head out to the beach or your favorite picnic spot. This year instead of grabbing for that old styrofoam cooler, load your fave beverages into the world’s first 100% Recyclable and Biodegradable cooler.

The Ohana Cooler is made from 100% post-consumer paper waste. It’s environmentally-friendly and eliminates the harmful impact of foam on our marine wildlife and the environment.

The cooler has multiple uses and is totally reusable. Ohana, which means family in Hawaiian can hold water for up to 30 plus days. And the largest cooler can hold up to 100 lbs.

Not only is the Ohana environmentally friendly, but it’s also pretty wallet friendly. Prices start at $4.99 for the 18-quart size and go to $7.99 for the large 42-quart cooler. You can even purchase them in bulk to save. Both sizes can be purchased in packs of 3 for $13.99 and $22.99 respectively.

So Think Green this summer and head over to Vericool and pick up an Ohana for your Ohana.

Filed in categories: News

Tagged:

Say no to styrofoam this summer with the Ohana 100% recyclable and biodegradable cooler originally appeared on The Gadgeteer on May 30, 2019 at 8:00 am.

Note: If you are subscribed to this feed through FeedBurner, please switch to our native feed URL http://the-gadgeteer.com/feed/ in order to ensure continuous delivery.

Artificial Intelligence Can Use Your Voice to Guess What You Look Like with Accuracy

Artificial intelligence just gets smarter and smarter. At a certain point it seems like there’s no limit to what it can do. It continues to be more and more useful while at the same time being more and more awe-inspiring The most recent advancement in artificial intelligence technology is that it can guess what you look like with accuracy. It’s not perfect, but the results are still stunning with the knowledge it is only based on your voice. Speech2Face AI Guesses What You Look Like Based on Your Voice Researchers at the Massachusetts Institute of Technology created Speech2Face, artificial intelligence that analyzes a short sample… Read more

Posted by / May 30, 2019 / Posted in News

How to Create an Event Registration Form with Google Forms

There are plenty of ways to make good use of Google Forms. You can set up a quiz, or if you are having an event and need a quick, free way to register your attendees, Google Forms provides an easy way to make a customized registration form. Follow along and learn how you can create an event registration form with Google Forms. To create a Registration form in Google Forms, visit the Google Forms site and click on the “Event Registration” template. They give some suggested questions you may want to ask on the template. Editing the Questions You may find some or all of… Read more