4 of the Best Cell Signal Boosters for Your Phone

It’s one of the big frustrations of the modern age when you find yourself in an area or region where your cell signal just isn’t strong enough for either making calls or getting those sweet 4G waves. Whether you’re in a rural area or in an inexplicable cell signal dead zone in an otherwise strong-signal area, you may need a cell signal booster to get a stable connection. Here we’ve listed the best cell signal boosters you can buy today – whether you need one at home or on the go. Related: Everything You Need to Know About Fake Cell Towers 1. weBoost Connect 4G-X… Read more

NITECORE TIP2 Rechargeable Keychain Flashlight review

REVIEW – If I were browsing the Personal Ads for the perfect flashlight, I’d look for the following qualities: small, rechargeable, bright, rugged and loves long walks on the beach. Well, maybe not that last part. Is NITECORE’s TIP2 Keychain Flashlight a perfect match? Read on!

What is it?

The TIP2 is a small, rechargeable LED flashlight with a surprisingly powerful maximum output of 720 lumens. Its rugged design and diminutive size, along with a magnetic tail and multipurpose clip, makes it highly versatile.

What’s in the box?

  • NITECORE TIP2
  • Removable pocket clip
  • Keychain clasp
  • User manual
  • Warranty card

Hardware specs

  • Max output of 720 lumens with over 100 yards of throw
  • 4 levels of brightness with direct access to turbo
  • 1m impact resistance
  • L-2.46″xW-1.06″xH-0.53″
  • 1.35oz
  • Separated magnetic tail cap for hands-free use & quick detachment
  • USB rechargeable, built-in Li-ion battery
  • Detachable multipurpose clip ideal for carrying in a pocket, backpack and more

Design and features

I don’t know if it’s just a geek thing, or a guy thing, or just a me thing, but the first thing I always have to do whenever I get a new flashlight is to turn it on, at its highest setting, directly into my face. Most of the time, I think, “Ooh, that’s pretty bright.” And then you pick up a little keychain light like the TIP2, turn it on Turbo brightness, get blinded for a good 60 seconds and think, “Okay, now that’s bright.”

NITECORE’s TIP2, the sequel product to their TIP keychain LED flashlight, is compact, rugged, and all the brightness you’ll likely need out of something this small.

The buttons and the clip.

Sporting a max brightness of 720 lumens, twice as bright as their previous model, the TIP2 provides almost too much brightness for such a small flashlight. What I mean by that is that yes, you can generate that might light, but only for about 15 minutes until the battery straight up dies.

I’ve been carrying this small torch around for a few weeks, now, primarily keeping it attached to the magnetic key ring attachment on my keychain. It’s no larger than the key fob for my Mazda. Having a flashlight within the same proximity as my car keys makes it indispensable.

There is a row of tiny LEDs in between the buttons that acts as a battery power indicator.

Holding the TIP2 in your hand, it does feel about the size and weight of an average modern car key fob, maybe a couple ounces heavier. There are two buttons on the side of the flashlight, a power button and a mode selection button, with a row of 3 tiny LEDs in between. Pressing the mode button quickly flashes the small LEDs, which display the amount of battery power. By holding down the power button for a few seconds, the light turns on at whatever the last setting was: low, medium or high.

It does take about 4 seconds to power on, preventing from accidental lighting in your pocket or pack. Pressing the power button while it’s on turns the light off immediately. While lit, the mode selection button cycles from low to medium to high and back to low again.

Two CREE XP-G3 S3 LEDs in the front of this flashlight.

While the TIP2 does offer a lighting power of 720 lumens, it’s a limited feature in that the battery will only supply, at most, 15 minutes of juice in this maximum “Turbo” mode. To access this mode, you must hold down the tiny mode select button, the entire time you want it to shine that brightly. So the 720 lumens Turbo mode is really meant for very short bursts when you need a lot of extra light, like a during a quick sweep of a darkened field or trail.

Below is the approximate amount of time you can use each of the levels of lightning per charge:

This is a pretty rudimentary way of showing the brightness settings, since the camera’s own settings — shutter speed, ISO and aperture — changed a bit in between shots.

Turbo • 720 lumens • 15 min
High • 200 lumens • 1 hr 15 min
Mid • 30 lumens • 8 hr
Low • 1 lumen • 55 hr

Mid power is pretty much what you would expect from a typical LED keychain light, and that’s what I’d recommend using in most cases. High is quite bright. I think in most use cases, like a darkened room or parking lot, high would only be needed if you wanted to see far off into the darkness.

I really like the inclusion of a Low power. One lumen sounds paltry compared to the super-bright maximum of 720, but in an absolutely dark room or tent, it’s perfect. Just enough to see where you’re going without ruining your night vision, or to just leave on, clipped to a backpack or hat brim. And since a full batter lasts for around 55 hours at this level, it’s sort of nice to have a light you can stick virtually anywhere for the entire evening, if needed.

The “tail” end of the TIP2 contains a powerful magnet, which keeps it firmly attached to the metal keyring cap, but also detaches with a quick tug. This also allows the TIP2 to be placed on any metal steel surface, such as a car hood. This cap also shields the micro-USB port, keeping out water and dust.

The exposed magnets and micro-USB port.

The TIP2 also comes with a handy pocket clip, which can be attached to, obviously, a pocket, or even something as thick as the brim of a hat. You can essentially turn any ball cap into a mining helmet using this clip… it’s such an easy and useful hack.

Check it out, and instant mining cap.

All in all, NITECORE put a lot of thought into refining their TIP light to create the quintessential keychain flashlight. It’s waterproof, shock-resistant, super-bright, pocketable and rechargeable, which ticks off all the requirements for a truly essential flashlight in my book.

What I like

  • Very small and very bright
  • Rechargeable battery
  • Clip/magnet combo make it extremely versatile

What I’d change

  • Make the buttons larger
  • A better way to activate TURBO brightness

Final thoughts

The TIP2 is a great addition to any everyday-carry fan’s arsenal. Not only is it only the size of your car’s key fob, it’s powerful enough to light almost any situation you’d find yourself in, save for needing an extremely bright light for extended periods of time.

Price: $44.99
Where to buy: You can pick up your own NITECORE TIP2 directly from the NITECORE Store website.
Source: The sample of this product was provided by NITECORE.

Filed in categories: Reviews

Tagged:

NITECORE TIP2 Rechargeable Keychain Flashlight review originally appeared on The Gadgeteer on June 23, 2019 at 12:50 pm.

Note: If you are subscribed to this feed through FeedBurner, please switch to our native feed URL http://the-gadgeteer.com/feed/ in order to ensure continuous delivery.

How to Unpair and Restore Your Apple Watch

There are many reasons why you might want to unpair your Apple Watch from your iPhone. You may have upgraded your iPhone, you may want to erase your watch before you sell it to a new owner, or you may be having a technical problem and need to restore your watch to factory settings. Unpairing your Apple Watch is a relatively painless process. You can do it either through the Watch app on your iPhone or directly on the Apple Watch itself. Let’s run through how. Related: How to Make Custom Watch Faces for Apple Watch Unpairing from Your iPhone In order to unpair your… Read more

Firewalla review


REVIEW – By now, almost everyone who uses an internet connected device knows something about the dangers that lurk online. For those of us that have children, there is or should be a greater sense of awareness and desire to monitor and control what content they are exposed to, at least when they are home in an environment that we can control. I have tried a couple of firewall devices in the past, but they required major configuration and they came preset to block traffic that actually was required for some online college portals and other needed websites. The process of reconfiguring them was very tedious and ultimately, I unplugged them. I just got an opportunity to test and review a similar device called Firewalla. Let’s see if it is more of the same or a more user-friendly yet effective device and experience.

What is it?

The Firewalla Red is a Cyber Security Firewall device that is designed mostly for home use. Its features include network protection from Viruses & Malware, Parental Control, the blocking of unwanted Ads, and a free VPN Server. It connects directly to your router via its 100Mbs Ethernet port and there is no associated monthly fee. There is also a Firewalla Blue device that offers additional features and is designed with business users as its focus.

What’s in the box


1 x Firewalla Red
1 x Ethernet Cable
1 x Micro USB Cable and AC Adapter
1 x Information Card

Design and features

Specifications
Dedicated hardware for cybersecurity at 100 Mbit
Quad-Core 32bit 1.0 GHz CPU, 512MB RAM, 16GB SD Storage

Features

    • Auto-blocking: automatically block malicious sites
    • Device Management: manage who can get on the network, and what they can do when on the network.
    • Multiple apps manage one Firewalla: allow you to manage firewalla from anywhere in the world
    • Bandwidth Usage: prevent internet over usage, know your bandwidth usage from minutes to days to a month
    • Internal and External vulnerability scans: allow you to manage “open doors” in your network
    • Dynamic DNS: allows you to safely expose certain internet services
    • Alarm Management: easily view, allow, block, and archive alarms
    • Content Filtering and activity detection: always know what each device is doing

COMPLETE CYBERSECURITY PROTECTION – “Firewalla’s unique intrusion prevention system (IDS and IPS) protects all of your home wire and wireless internet of things devices from threats like viruses, malware, hacking, phishing, and unwanted data theft when you’re using public WiFi.”

One one side of the Firewalla, there is a USB port and an Ethernet port. The ethernet port connects to your router.

The micro USB port seen below is used for power via the micro USB cable and the provided wall adapter or you can also connect Firewalla Box to any power source that has 2A current. To the right of the power port, there is the installed SD storage.

There are air vents on the other 2 sides of the device.

At the bottom of the device, there is a QR Code that you scan via the Firewalla app to initiate the setup process.

Performance

This device is very easy to set up and use. I simply downloaded and installed the app from the IOS app store. Android is also supported. I then plugged in the device and scanned the QR code on the bottom of the device from within the app. The rest of the setup was automatic, and with a few selections like the mode option, in my case, I chose the Enhanced Mode (Beta), everything was operational. The operation and features of this device are better showcased via the following screenshots from the app:


Important note: COMPATIBILITY: This is * Firewalla RED * (NOT THE FIREWALLA BLUE), The IPS functionality is limited to 100 Mbits. The manufacturer suggests that not all routers are compatible with Firewalla. Click here to view the router compatibility list. You msy be required to log in to your router to do the basic configuration.

What I like

  • Compact size
  • Ease of installation
  • Ease of use
  • Performance

What I’d change

  • I would prefer an included hard copy basic user guide

Final thoughts

The Firewall was very easy to install, and so far I like it much better than other similar devices that I have tried. It is set up wide-open in its initial state, so you get to observe and make choices as you go as opposed to others that have preset values that can be a headache to configure if the setup is complicated. I have read reviews that suggest that this device slows down the network, but I have not experienced that, and it has been simple and easy to use. I would prefer that a hard copy manual is included as opposed to having to look for the desired info on their website, but so far it is doing a good job and in my opinion, it gets a thumbs up!!

Price: $119
Where to buy: Amazon
Sample: The sample for this review was provided by Firewalla

Filed in categories: Reviews

Tagged: ,

Firewalla review originally appeared on The Gadgeteer on June 23, 2019 at 10:00 am.

Note: If you are subscribed to this feed through FeedBurner, please switch to our native feed URL http://the-gadgeteer.com/feed/ in order to ensure continuous delivery.

Letscom Fitness Tracker (ID115PlusHR) review

REVIEW – The Centers for Disease Control and Prevention (CDC) recommend that American adults engage in at least 150 minutes of moderate exercise each week.  This roughly translates into taking 10,000 steps a day.  The Mayo Clinic, however, estimates that the average American only walks 3,000 to 4,000 steps a day, far short of what is healthy.  My wife agreed to test Letscom’s Fitness Tracker as part of her efforts to get to that 10,000-step level.  Is this the right gadget for the job?  Read on to find out.

What is it?

It is a fitness gadget worn on the wrist that tracks exercise and sleep patterns, monitors heart rate, and provides alerts and alarms.

What’s in the box?

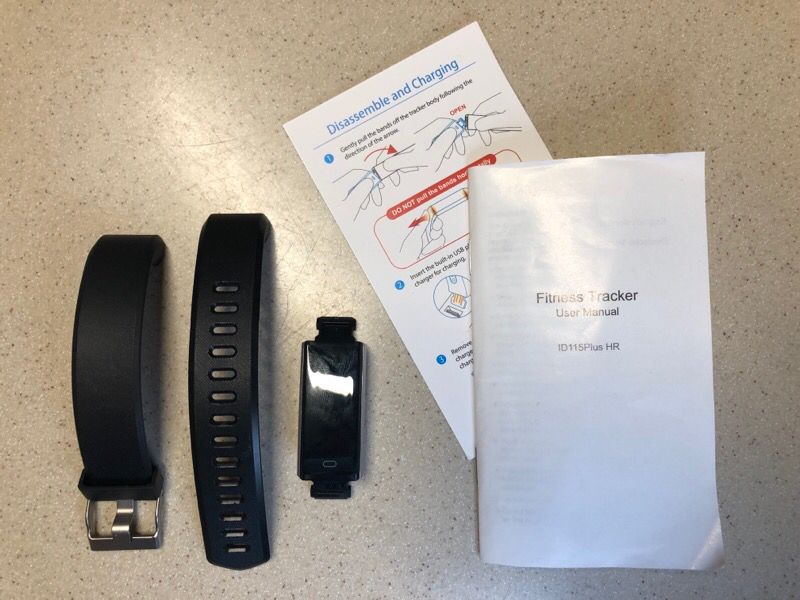
  • The tracker with associated wrist band
  • A quick start guide
  • A manual with 18 pages of English instruction (in a very, very small font)

Hardware specs

  • IP67
  • GPS connection for tracking exercise routes and locations
  • Bluetooth 4.0 for connecting to mobile app
  • OLED screen (not a touch screen)
  • USB charging
  • Lithium battery that should run 5 to 10 days on a charge
  • Charging time is 1-2 hours

Design and features

My wife has been wearing this gadget for 3 weeks non-stop, except when she showers or when it needs charging.  She’s utilized the majority of its features and has a good appreciation of its capabilities.  Here’s what she found.

Installation and setup

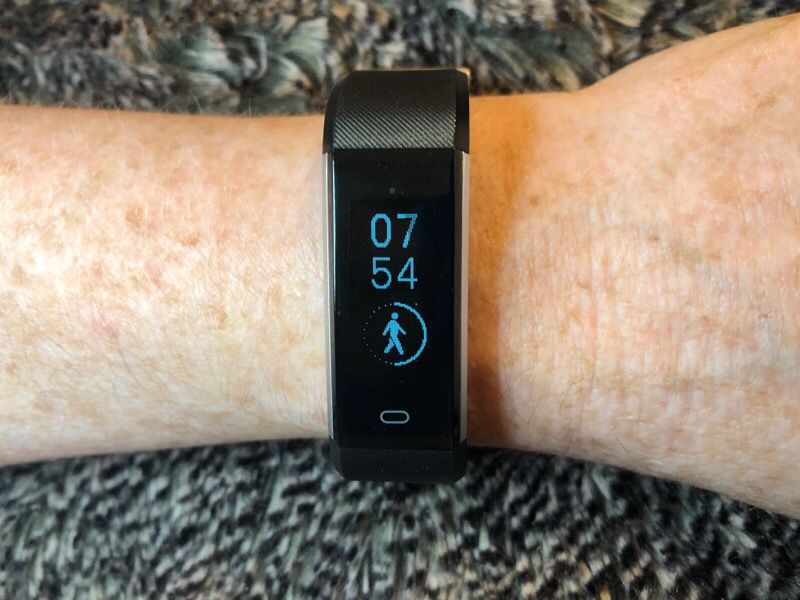
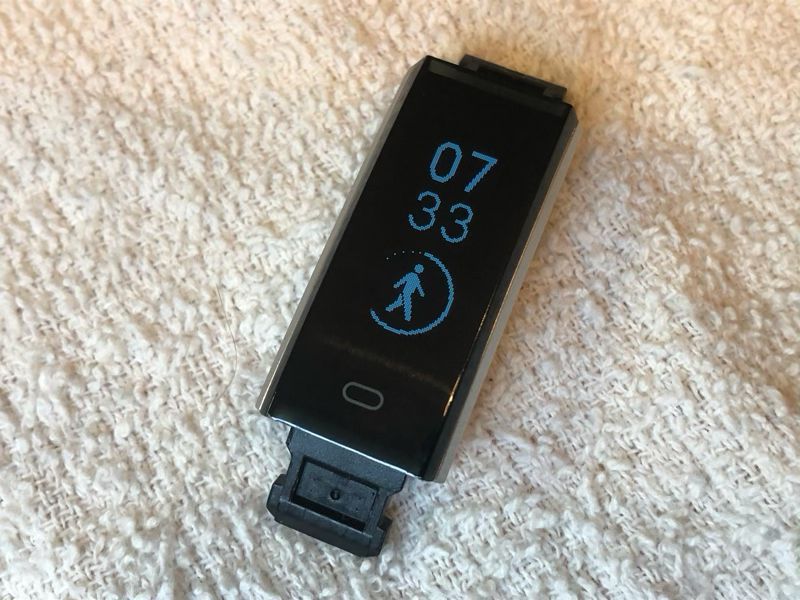
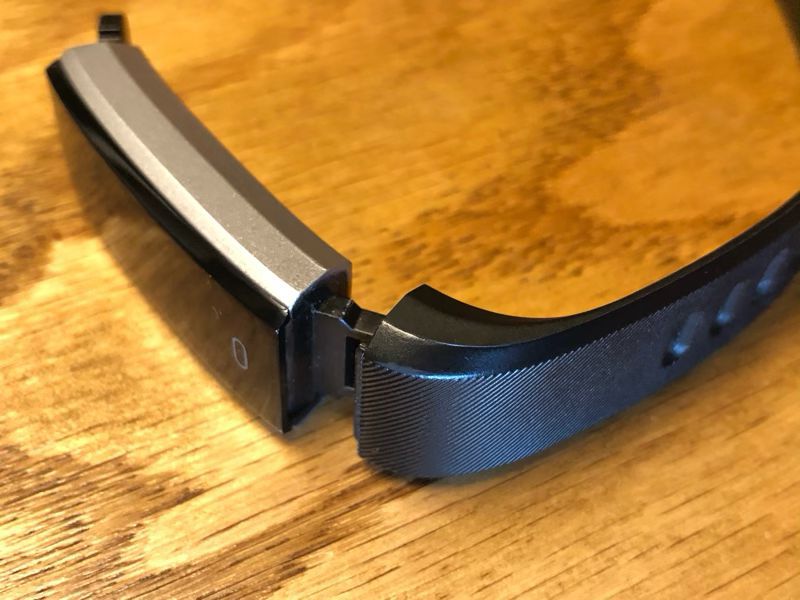
The fitness tracker comes in three pieces:  The tracker itself and the 2 halves of the watch band.  The tracker is approximately 1.5 inches long and ¾ of an inch wide and has connectors for the wrist band on the top and the bottom.

When flipped over, you can see that one of the connectors is used for charging, and that there’s a monitor that will be against the skin.

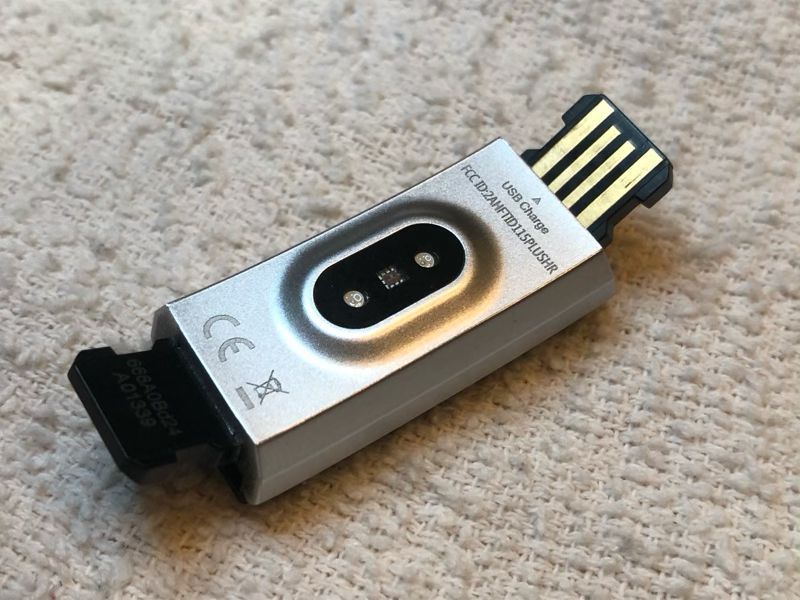
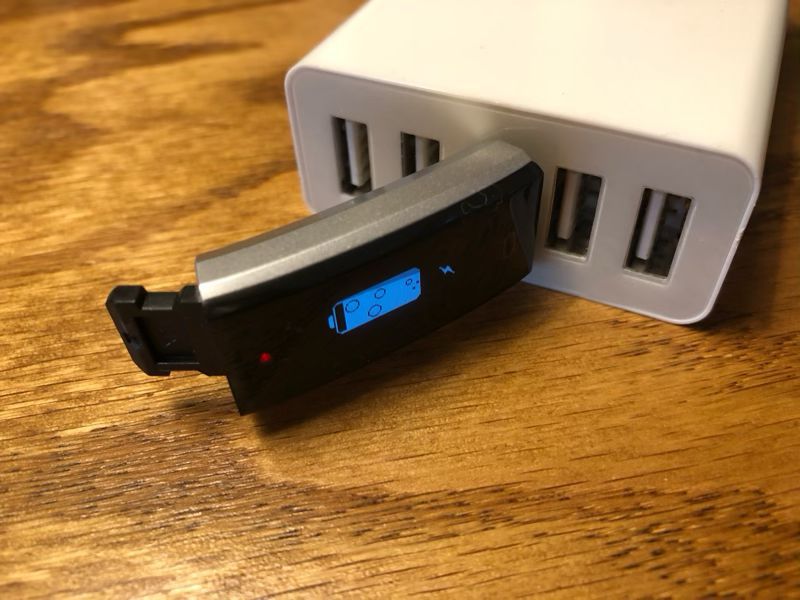
The first step in the installation process is to charge the tracker for at least 2 hours, which my wife did by connecting it to our Anker USB charging station.  When you plug it in, you have to make sure that the little red light comes on, otherwise, it won’t actually charge.

The second step is to attach the watch band.  Make sure that “bottom” side, the one with the little button, connects to the band with the holes and the “top” side connects to the band with the buckle.

The third and final step is to download the mobile app.  There are a pair of QR codes in the manual, one for iOS and one for Android.  For iOS, this takes you to the VeryFitPro app, which is a free download.

Fitness Tracker Modes

The fitness tracker has 7 modes, each with its own unique screen.  You can cycle through the modes by pressing the button.  The screen is not a touch screen, so the only interaction is via the one button.

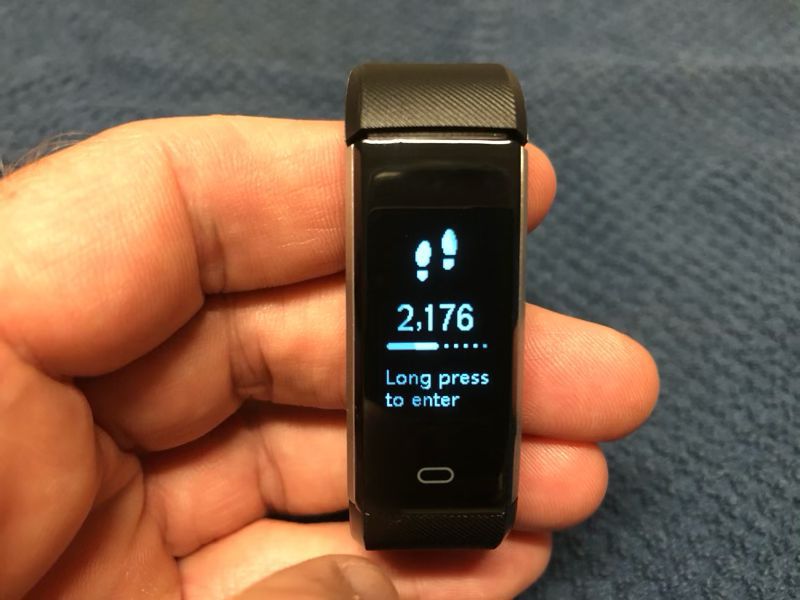
The main screen shows the time, like a watch.  It can be configured to show the date, battery status, Bluetooth status, or the steps taken today.

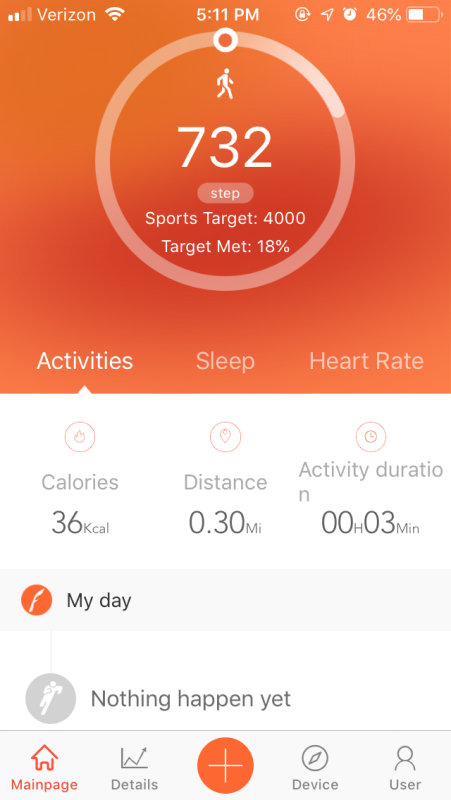
Step mode shows how many steps have been taken today, how many miles have been walked, how many minutes have been active (including walking), and how many calories have been consumed.

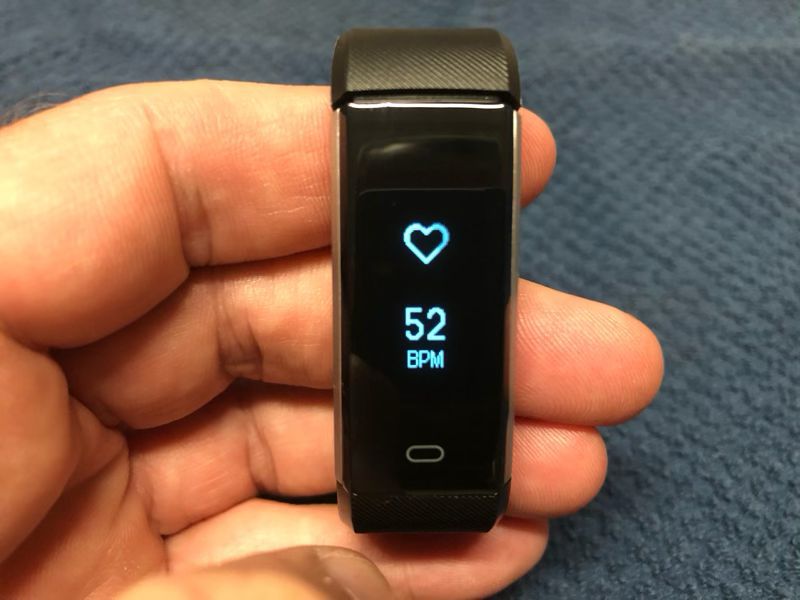
Heart rate mode measures the current beats per minute (BPM).

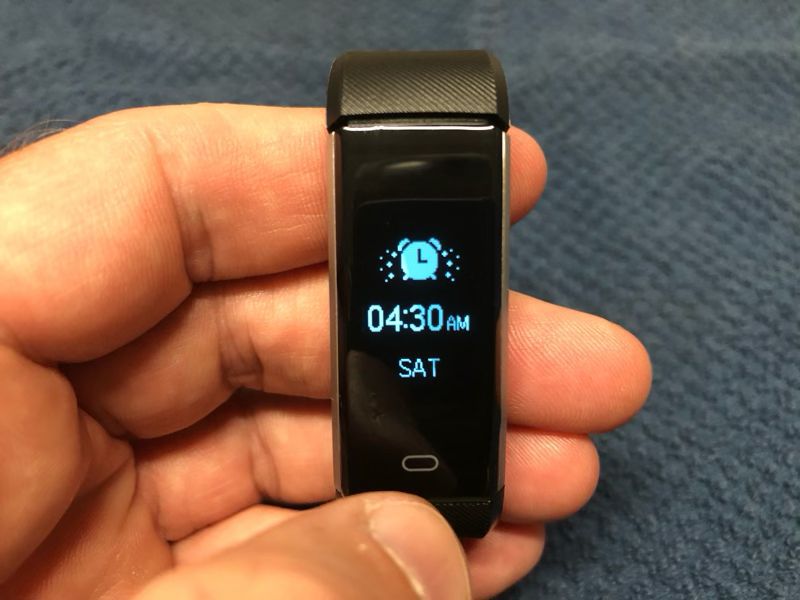
Alarm mode displays your next alarm and allows you to disable it.  New alarms can only be set via the mobile app.  (And yes, my wife’s next alarm is for 4:30am.  She gets up way too early to teach ESL to international students.)

Walk mode allows you to track the steps taken and time spent on a specific walk.  You use the button to tell the tracker when you stop and start your walk.  It will also monitor your heart rate while walking.  Although my wife didn’t test the run and bike modes, she assumes they offer similar capabilities to the walk mode.

The tracker’s interface is as simple as it gets.  This makes it easy to move between the modes and use them as necessary.  The more advanced functionality comes through the tracker’s interaction with the mobile app.

The only downside to the tracker is that the process of monitoring the heart rate involves the use of a rather bright green strobing light.  During the day, this is not noticeable; but if you’re a light sleeper, as I am, this can wake you up at night.

VeryFitPro mobile app

Letscom has created a mobile app that works with the fitness tracker by providing better visualization and long-term storage of the fitness data.  To use the mobile app, my wife first paired it with the tracker.  She made sure Bluetooth was enabled on her phone, then she opened the app, selected the Device button, chose Bind Device, and then selected “ID115Plus HR” from the list of devices.  Whenever she wants to sync the data in the tracker with the app, she simply has to “swipe down” on the main page when her phone is near the tracker.

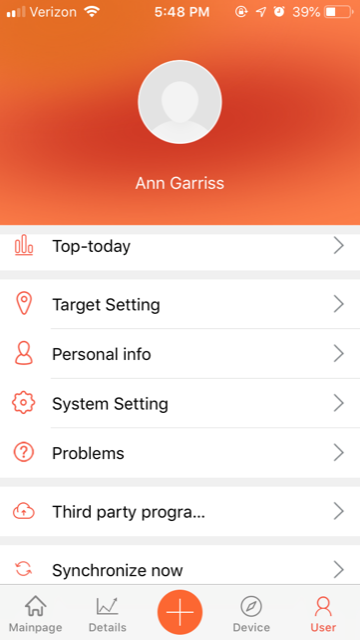
The bottom of the mobile app has 5 buttons:  Mainpage, Details, Device, User, and a giant orange plus.  The Mainpage button shows the main page, which is a fairly detailed visualization of all activities that have been completed so far today.  For example, it lists the steps taken, calories burned, and time spent in an activity.

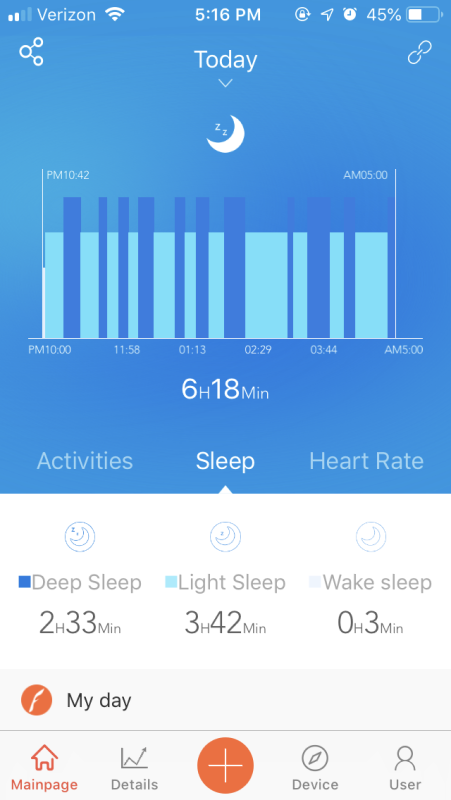
If you click on the Sleep tab, it shows how long you slept, and if you touch the number of hours, then it shows your sleep patterns for the previous night.

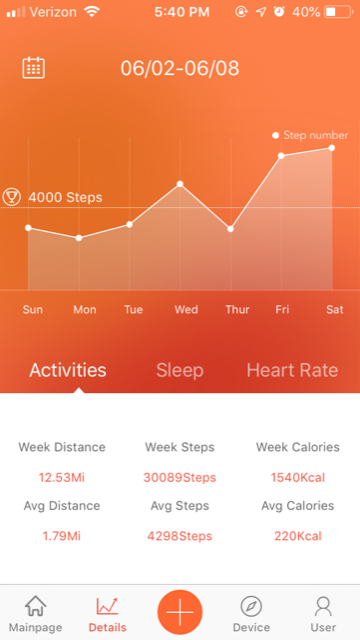
The Details button depicts overviews for today, this week, this month, and this year.  If you swipe to the right on any of these screens, you can see previous days, weeks, months, and years.

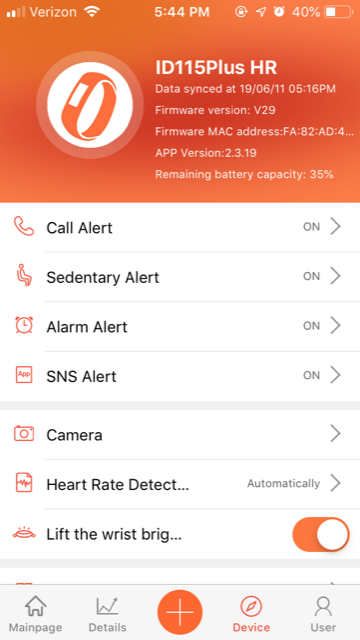
The Device button specifies how the mobile app interacts with the fitness tracker.  For example, it can set alerts when your phone gets a call or a text or when you’ve been stationary too long.  When your phone receives a call, it briefly displays the phone number or contact name on the trackers.  When it receives a text (or a private message from apps like Facebook, Instagram, and WeChat), it briefly displays the text on the tracker.

The User button sets a variety of information about you, the user of the tracker, such as the number of steps you hope to walk in a day, and your preferences, such as imperial vs metric units.  It’s worth noting that the Third Party Program features allows you to send information to the Apple Health app on your iPhone, if you have one.

The giant orange plus button functions like a pop-up menu that brings up three more menu choices.  The first choice is used to record runs, walks, hikes, and rides, if you don’t have your fitness tracker with you.  The second choice is used to record a variety of different activities, such as yoga, badminton, and mountain climbing.  The third choice is used to record your weight.

In general, my wife really likes the mobile app.  She finds that the main screen is helpful for getting a quick overview about how she’s progressing during the day.  She also finds the various charts and graphs to be informative.

She also discovered three problems.  One, the sedentary alert sometimes goes off right after she finishes walking.  Two, the sleep monitor doesn’t record afternoon naps as sleeping.  Three, messages from her phone are displayed too briefly, and there’s no way to go back and read them again.  In general, these are fairly minor problems that don’t detract much from the quality of the mobile app.  (Although it did leave her wondering if it’s worth paying more for a more powerful gadget, like an Apple Watch.)

Extra Features

To recharge the battery, my wife has to pull off the lower half of the band.  The first time she tried to pull it off, she couldn’t, as it was so tight.  She asked for me to help, and it still took me over 2 minutes to get it off.  Over time, however, this has become easier, as the band has loosened up.  I am concerned that if this process continues, it will eventually become so loose that it won’t stay on the tracker.  I wish that Letscom has designed an alternate mechanism for attaching and detaching the band or a completely different mechanism for charging.  Although the battery is rechargeable, the manual notes that it is not replaceable.

The tracker that my wife tested was black, but it also comes in blue, purple, red, green, and pink.

Warnings

While reading the manual, I came across several scary (and slightly humorous) statements:

  • “The device, accessories, heart rate monitor, and related data are intended only to be used for recreational purposes and not for medical purposes.”
  • “The heart rate readings are for reference only, and no responsibility is accepted for the consequences of any erroneous readings.”
  • “While the optical write heart rate monitor technology typically provides the best estimate of a user’s heart rate, there are inherent limitations with the technology that may cause some of the heart rate reading to be inaccurate.”

When considering fitness trackers, including Letscom’s, keep in mind that these devices typically are not considered to be medical devices, as they are not approved by the FDA.  They can be helpful in estimating your health, but they are not guaranteed to be accurate.  If you have a medical or heart condition, you will probably want to look at a different category of gadgets.

What I like

  • Price is right
  • Easy to use
  • Successfully keeps my wife more aware of her activities (or lack thereof)
  • Mobile app is easy to use and does a great job of keeping and displaying data

What I’d change

  • Better charging mechanism
  • More options for viewing alerts/alarms

Final thoughts

While there may be fancier fitness trackers on the market, Letscom’s Fitness Tracker is perfect for health-conscious people who are either trying out their first tracker or who don’t want to pay premium prices.  It does everything that a fitness tracker needs to do (and more), and its mobile app provides lots of extra functionality.  If you are in the market for a tracker, my wife recommends that you take a look at this one (and so do I).

Price: $28.99
Where to buy:  Amazon
Source: The sample for this review was provided by Letscom.

Filed in categories: Reviews

Tagged: ,

Letscom Fitness Tracker (ID115PlusHR) review originally appeared on The Gadgeteer on June 23, 2019 at 8:41 am.

Note: If you are subscribed to this feed through FeedBurner, please switch to our native feed URL http://the-gadgeteer.com/feed/ in order to ensure continuous delivery.