ShiftCam Aspherical Ultra Wide Angle Lens review

REVIEW – Let me state up front: I am not a photographer—pro or serious amateur. My camera is my iPhone XS Max. I once desired a DSLR camera, but as smartphones have gotten ridiculously good at photos and videos, I gave up on that expensive quest. Which brings us to the ShiftCam Aspherical Ultra Wide Angle mobile phone lens (say that fast five times). Can a high-quality lens improve on a photo taken with a smartphone? Well …

What is it?

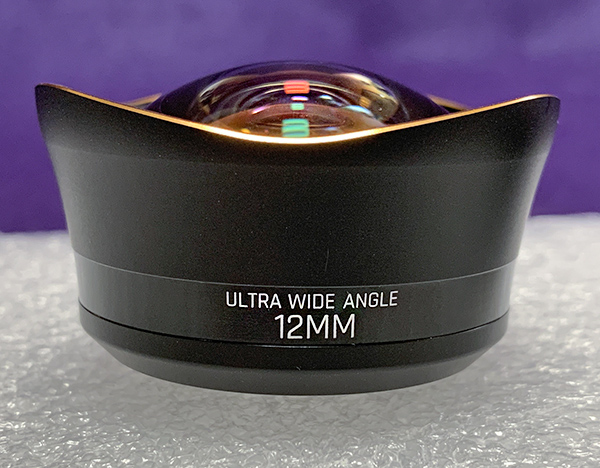
The ShiftCam aspherical ultra wide-angle lens is an aspherical lens with zero distortion at a 122º wide viewing angle. A nano-coated lens reduces flares. The lens is good for close-ups or long shots, indoors or outdoors. It attaches via an optional and proprietary iPhone case. Note: There is a universal lens mount available for other non-Apple smartphones.

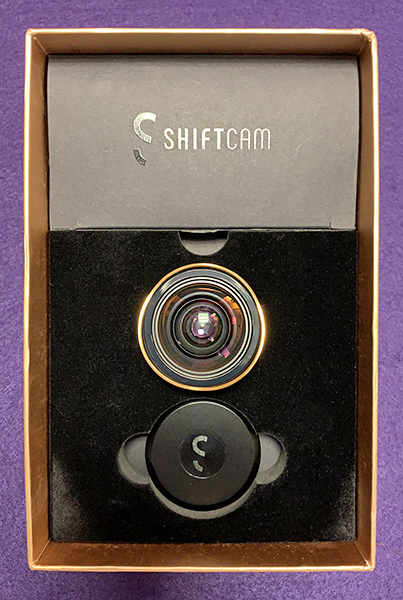
In the box

  • 12mm ultra wide-angle lens
  • Magnetic lid
  • Prolens adapters for iPhone 7/8, 7/8 Plus/ X, XR, XS/Max
  • Microfiber lens bag

Design and features

ShiftCam makes many camera-enhancing lenses for Apple iPhones. The aspherical ultra wide-angle lens is the latest addition. It’s currently on Kickstarter and Indiegogo with way over the amount of funds needed to produce the lens.  Delivery is set for August 2019. The fact that I have a fully functioning lens and that ShiftCam already makes many other lenses helps me feel certain that they will meet the August deadline.

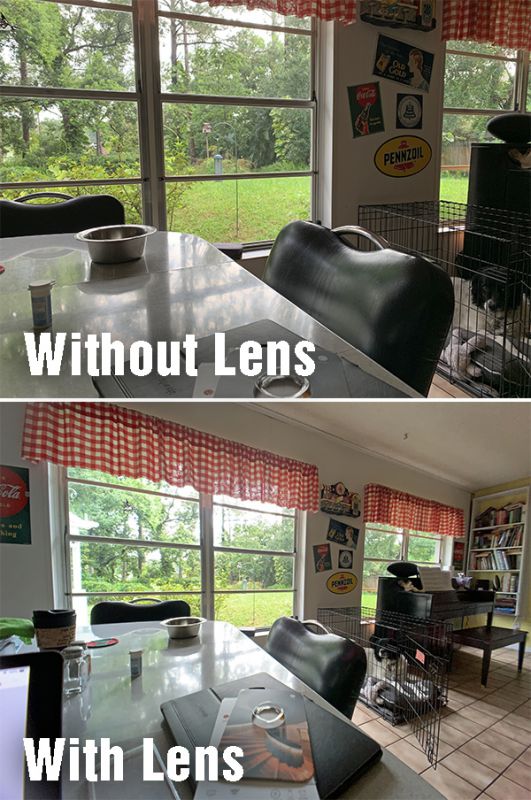
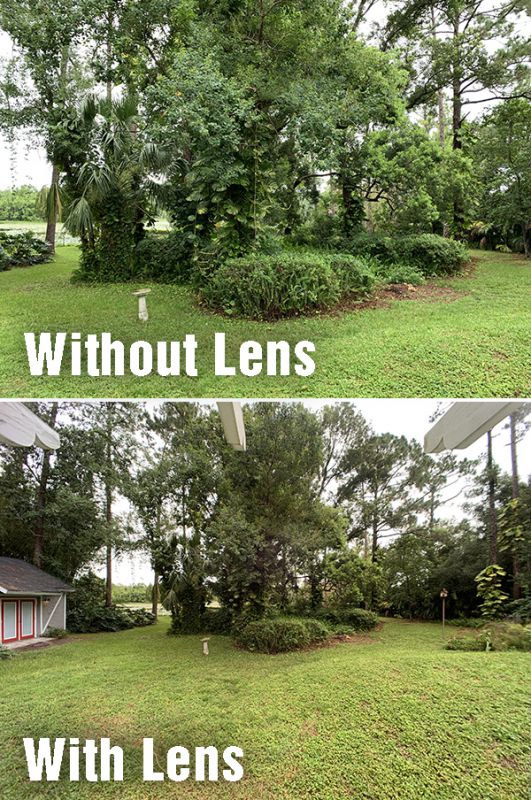
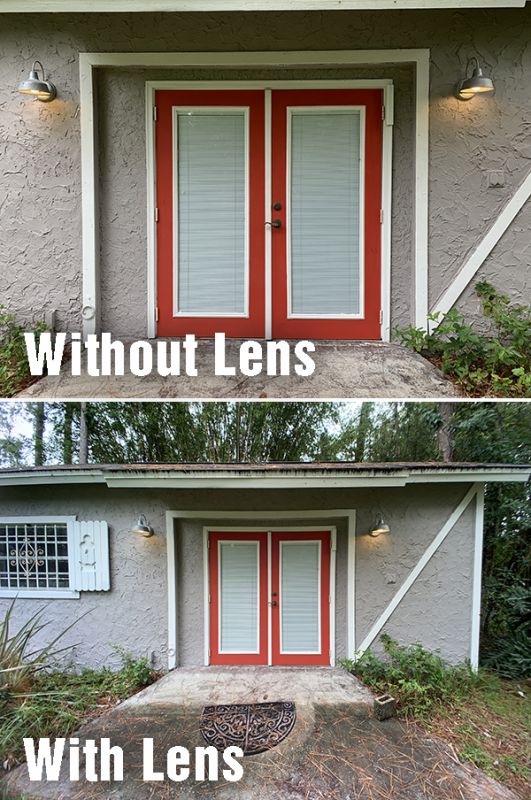
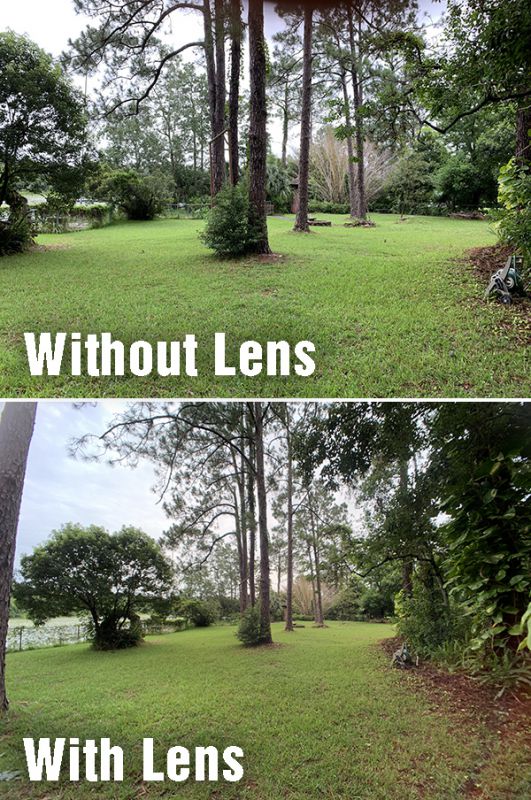
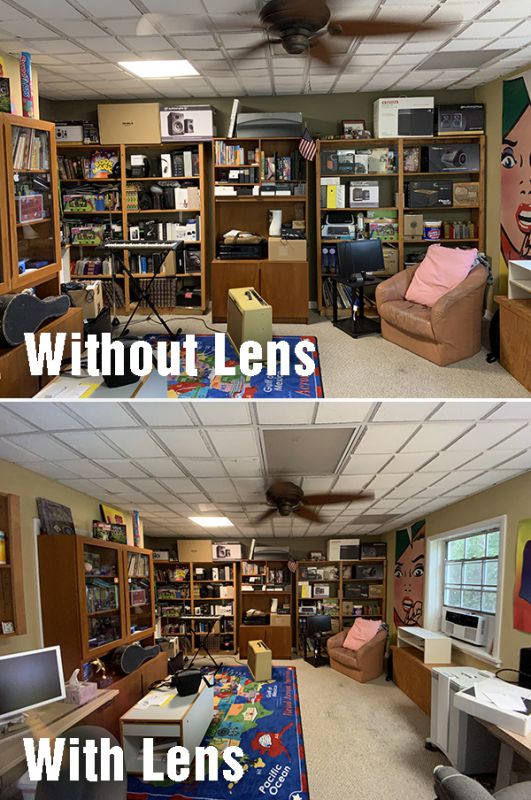
When talking about lenses, what does ultra wide-angle mean? It simply means that there is more peripheral image captured in the photo—or more stuff in the photo than you would see in a regular photo. 

When you take a photo with your iPhone (not zoomed), it has what is called a focal length of 4.25mm which is close to a 26mm lens on a “normal” camera. Your eyesight field of view is the equivalent of a 50mm camera lens. So basically, the iPhone in regular mode is already taking a wide-angle photo showing you more than you see looking straight ahead. So the 12mm ShiftCam lens when mounted on an iPhone becomes an “ultra” wide-angle lens. Get it? It captures more in the photo than the iPhone’s already wide lens. 

However, that’s not the tricky part. It’s not hard to make a lens that is wide-angle. The hard part is doing so without distorting the edges—especially noticeable when straight lines are in the photo—such as shots of buildings. The lines become curved, sometimes severely in cheaper lenses. Keep in mind that some distortion will always be there. The trick is minimizing it as much as possible—which ShiftCam is good at with this ultra wide-angle lens. With the right photo app, some of this distortion can be adjusted on-the-fly.

An ultra wide-angle lens is great for those shots involving a group of people where you’re always yelling, “Move closer together!”

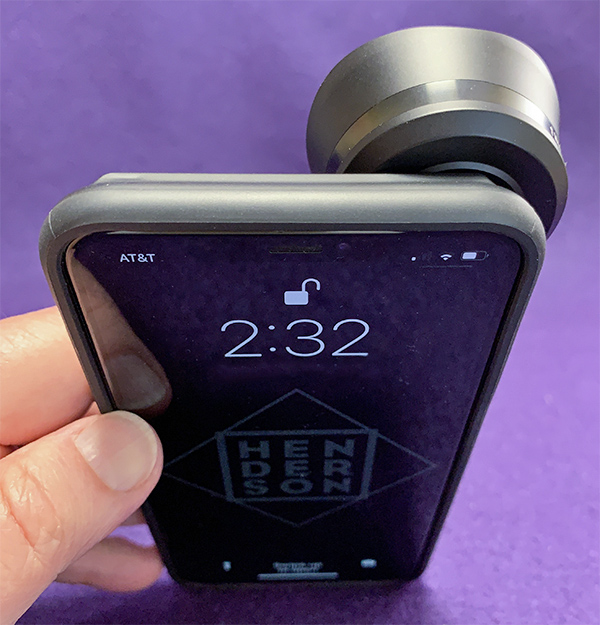
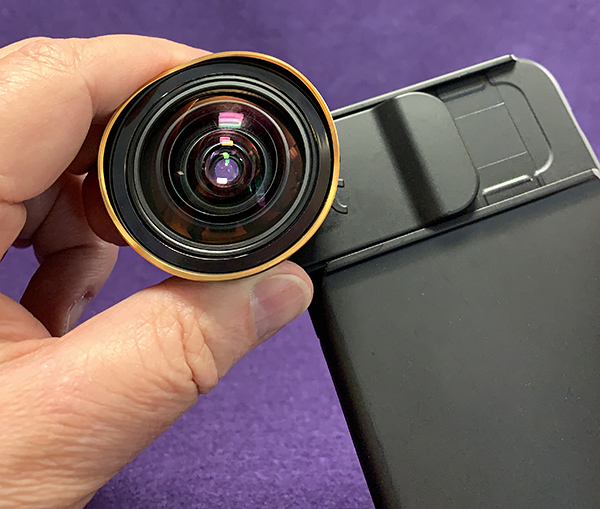
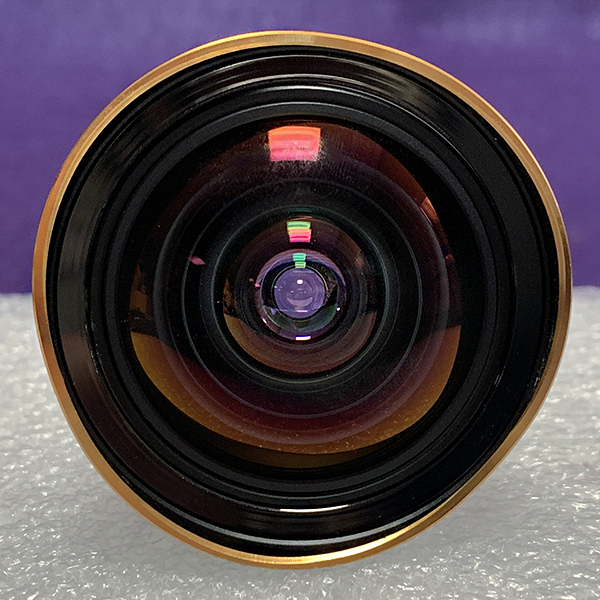
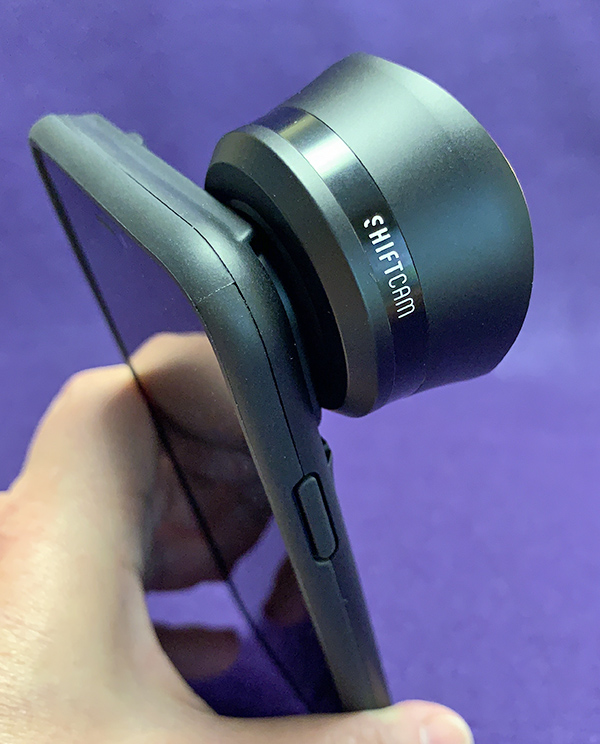
The Aspherical ultra wide-angle lens is made as well as any lens I’ve owned from my days of SLR photography (remember film?). It’s a coated glass lens in a metal enclosure. And it’s heavy. An iPhone XS Max (what I use) weighs 177 grams sans case. The lens weighs 96.7 grams, yet when I hold them, the lens feels like it weighs as much as the iPhone itself. However, when attached, the weight of the lens makes the iPhone quite top-heavy. So, be careful when carrying around. The weight distribution can make things a bit unwieldy.

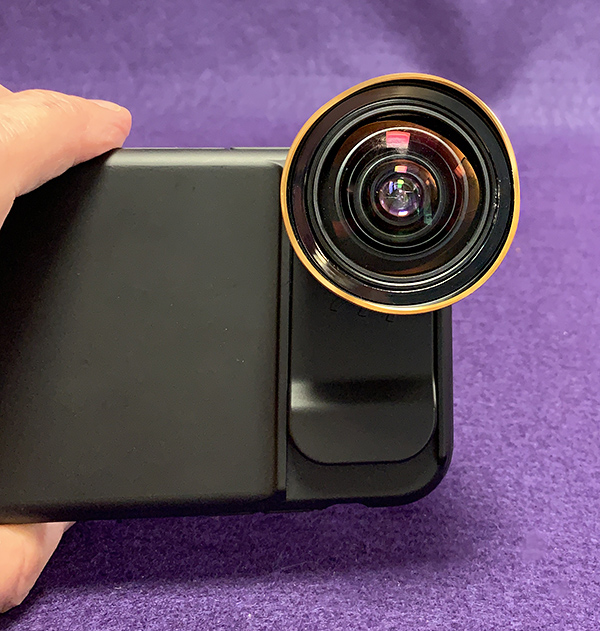
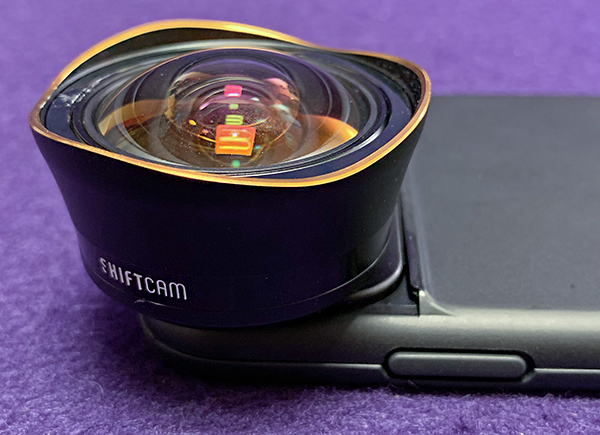
The lens comes in piano black with a nice, tasteful brass-colored band around the housing. A magnetic lens cap helps protect the bulbous lens from dirt and scratches. Needless to say, keep the cap on when not in use.

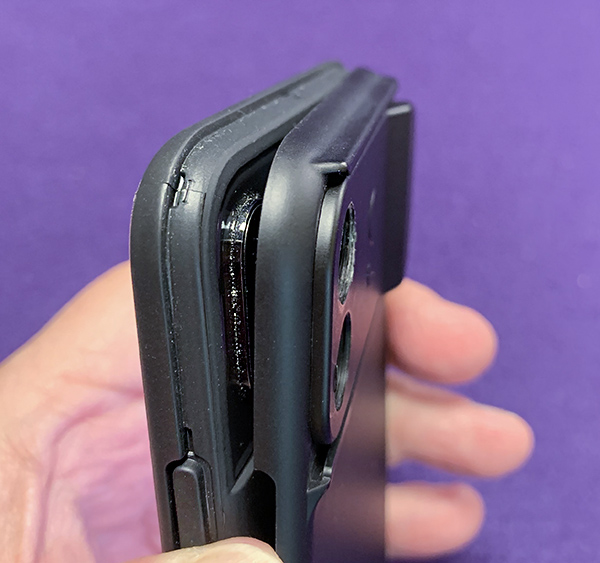
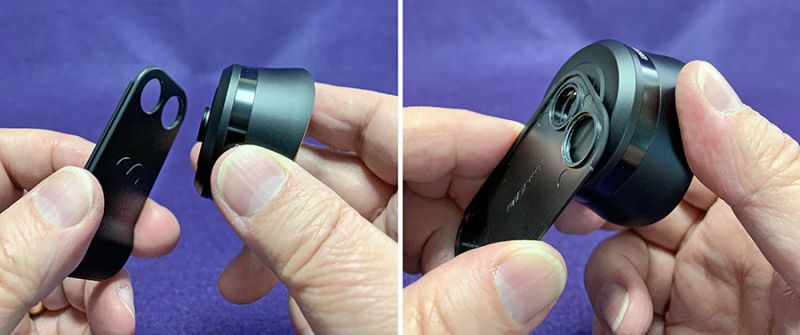
The lens case is a light-weight plastic with what ShiftCam calls the S-mount system—an adapter for screwing the lens into place. Once the lens is secured, it stays in place, but the screw threads are so fine that many times, I had to try and try again to get the threads to match so I could tighten the lens. It quickly became apparent that you have to be absolutely sure that the lens is secure. If you don’t, the lens may not be properly screwed into place and fall from the case mount. That could be disastrous. Also, the S-mount on the case is plastic. After a few uses, the plastic threads were already showing signs of wear. The case also separated at one of the seams which blurred and distorted one of the corners in the photo window. Time will tell if the case will hold up under more repeated tightening and loosening. It’s too bad the case doesn’t have the same build quality as the lens.

The case only provides basic protection to the iPhone itself. It will help keep the iPhone free from dirt and if dropped, but don’t mistake it for a specialized case that offers great drop protection.

The S-mount system included with the lens comes with many different slide-in adapters—depending on which iPhone you have as early as the iPhone 7. These adapters slide in easily and snap into proper alignment with the iPhone lens. Once in place, the aspherical ultra wide-angle lens can be attached. Or the lens can be attached to the adapter first and then slid into place.

Taking photos with the aspherical ultra wide-angle lens is no similar to just taking a photo with the iPhone—with one important difference: The dedicated zoom lens on the XS and XS Max does not work with this lens. Not surprising, because why would you want to combine a zoom with wide-angle anyway?

When comparing photos with and without the lens, I couldn’t tell any difference in focus or digital grain quality between the two. Note that the wide-angle lens will not improve the quality of a photo taken with just the iPhone’s lens. It can’t. The photo will only be as good as the weakest link in the lens chain—so to speak. What the lens will do is add a wide-angle feature you can’t get with just the iPhone. ShiftCam’s other lenses will add other features, depending on the lens’ function.

The aspherical ultra wide-angle lens comes in Piano black. There is a Limited Edition Vintage Brass version depending on the Kickstarter backer level.

What I like

  • Build quality
  • Solid feel
  • Quality of photo taken with lens 

What I’d change

  • Case could be more durable
  • Lens weight makes iPhone quite top-heavy
  • S-mount system requires attention for a secure connection

Final thoughts

If you’re looking to add a bit of variety to standard iPhone photography, the ShiftCam aspherical ultra wide-angle lens offers a great way to give those vacation or group shots an added flair. There is so much more information you can capture with this lens attached—without sacrificing image quality in any way. Just attach the lens and start shooting. It’s that easy.

Price: $99 for lens and mount
Where to buy: Indiegogo
Source: The sample of this product was provided by ShiftCam.

Filed in categories: Reviews

Tagged: ,

ShiftCam Aspherical Ultra Wide Angle Lens review originally appeared on The Gadgeteer on July 14, 2019 at 8:49 am.

Note: If you are subscribed to this feed through FeedBurner, please switch to our native feed URL http://the-gadgeteer.com/feed/ in order to ensure continuous delivery.

OLFA Professional 18mm Heavy-Duty Aluminum Utility Knife (MXP-AL) review

REVIEW – If you are like me, you are always looking for the utility knife that you just saw yesterday, and then when you find it, the knife blade is dull. Sometimes I end up just hunting down one of the snap-blade knives that I keep in my junk drawer for emergencies and half the time the plastic blade holder is structurally unsound, the latching mechanism doesn’t work, or the blade just isn’t strong enough to do the job at hand. The OLFA Professional MXP-AL Heavy Duty Aluminum Utility Knife can come to your rescue.  It has performed every task I’ve thrown at it in the past month, with one exception (see below).

What is it?

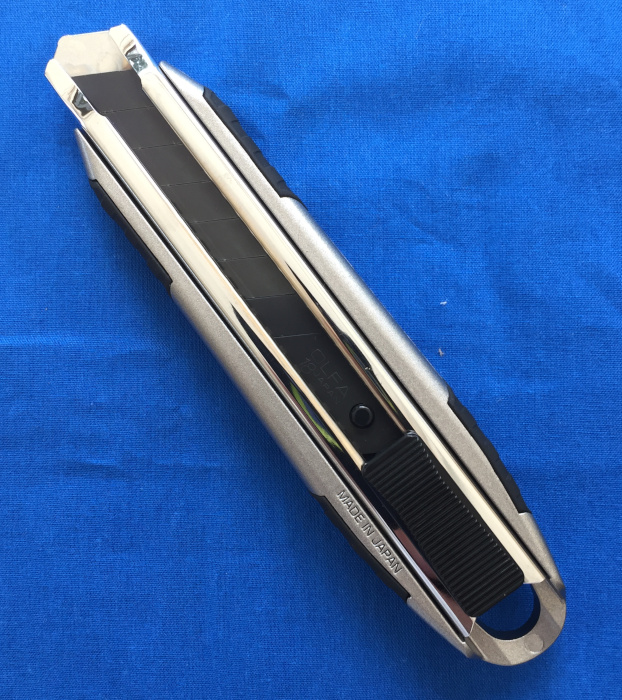
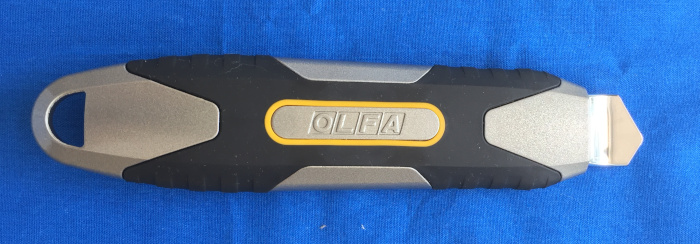
The OLFA Professional MXP-AL Heavy Duty Aluminum Utility Knife is the ultimate evolution of the snap-blade utility knife. It is made from die-cast / machined aluminum with non-slip inserts and uses generously-sized 18mm coated blades that cut smoothly through most materials with minimal friction.

What’s in the box?

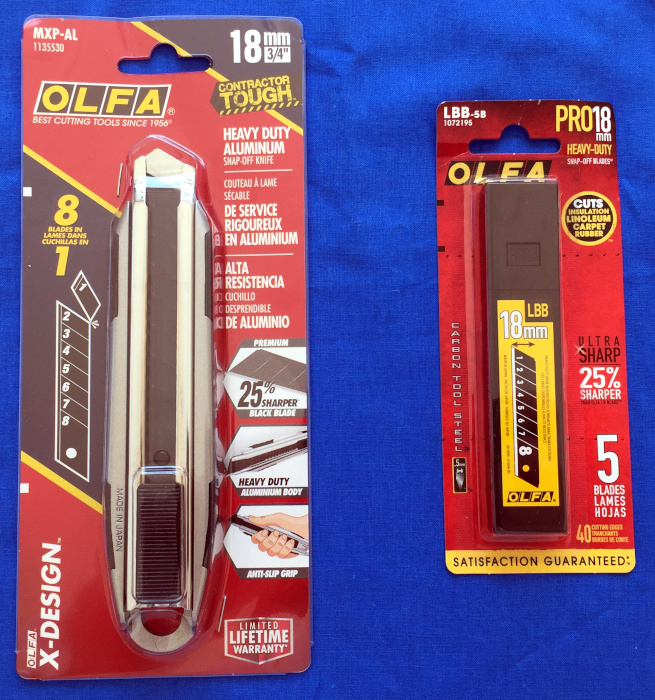
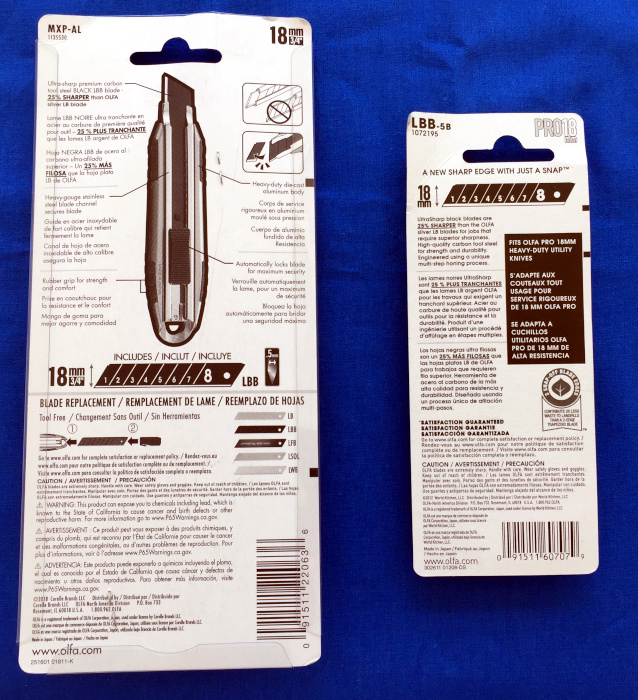
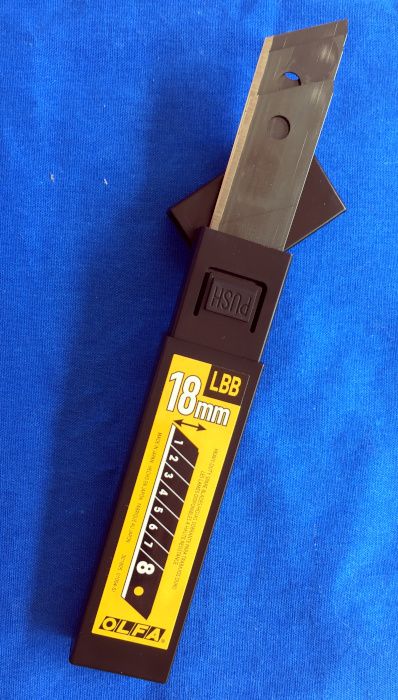
I was sent one OLFA Professional Heavy Duty Aluminum Utility Knife (auto-lock version) and one spare pack (5) heavy-duty blades. The knife is packaged in vacuum-formed sleeve with a cardboard backing. The package is closed with staples. The blades arrived in a plastic box with lid. The box of blades was in a similar sleeve / card package.

Hardware specs

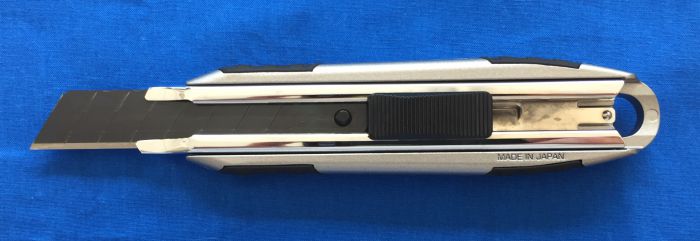
The knife is 165 mm long and 33 mm wide. The main body of the knife is 17 mm thick with the thumb-activated slider that extends / retracts the blade extending another 7 mm above the body. The knife weighs in at a study 123 grams, making it as heavy as many traditional utility knifes that use the single-edge trapezoidal blades.

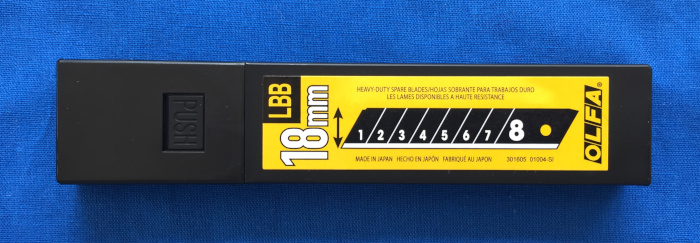
Each of the replaceable blades has 8 sections with the first 7 being removable. Replacement blades come in a medium-duty plastic case that has a good latch and friction holding the lid on.

Both the knife and the blades are manufactured in Japan.

Design and features

Setup

The knife came preloaded with a blade so there was no set up needed, other than removing the knife from the package. However when it is time to reload the knife, it is simply a matter of sliding the thumb lever out the back of the knife and nesting a new blade on the stud and inserting the blade and lever back into the knife.

Performance

I put my test knife through a battery of real-world tests during the past month. I carried it in my day bag as a tool knife, I used it around the house and garage, and I even took it out to summer camp with my scout troop.

During these adventures, I did not test the knife on any of the substrates listed on the packaging (linoleum, carpet, or rubber), however I used the knife for a variety of other activities which included

  • opening boxes by cutting packing tape, fiber-embedded paper tape, fiber-embedded strapping tape, industrial plastic strapping, cutting through multi-layered cardboard
  • cutting industrial plastic pallet wrapping
  • cutting batt insulation
  • stripping Romex wire (not cutting the wire to length, though)
  • cutting vines
  • scraping liquid masking from the corners of window panes
  • sharpening carpenters’ pencils
  • cutting rope and paracord
  • cleaning up rough edges / beveling sawed PVC pipe
  • smoothing / beveling holes drilled through wood
  • cutting dispensing tips on glue and caulk
  • cutting and shaping saddle leather (cutting pieces from a full-thickness shoulder)–this was about as close as I came to cutting linoleum or carpet

The knife performed most of these tasks with ease.

As you might expect, many of these operations took a toll on the first and second exposed blade sections. I ended up using 6 of the 8 sections on the first blade. Cutting leather definitely required a new blade section.

Breaking off the worn section of the blade simply required the precision use of a pair of pliers (my Leatherman Free P2). Like most heavy snap-blade refills, you need to precise when lining up the edge of the pliers, otherwise the worn section may not come off cleanly, and you will need to make a second snap to remove the remainder of the old blade section. This is both a minor annoyance and a testament to the strength of the blades.

The only problems I had were when trying to bevel thick PVC pipes and wood. When beveling the PVC pipe, I felt that the amount of torsional force that I was applying to the blade was probably going to exceed the breaking strength of the score lines on the blade, so I did switch to a traditional single-piece blade utility knife. When beveling wood I hit a knot, and the blade embed itself in the knot and the blade broke off at the score line. This may have been due to the stress I put on the blade when attempting to bevel the PVC weakening the score line, or it may have simply been operator error (I’m going to go with the latter being the main culprit). This type of cutting is not something that snap-blade knives are designed to do, so it was really a torture test for the blade. I was wearing cut-resistant gloves and proper eye protections when performing these more adventurous cuts and the blade that broke did so cleanly and remained embedded in the wood. No catastrophic failure of the blade occurred.

In addition to the standard and heavy-duty single-edge snap blades, a single piece serrated-edge knife refill is available. This blade is designed for cutting foam board and insulation. A second model of this knife is also available with a manual ratcheting lock, rather than the auto-locking thumb lever.

What I like

  • Robust-feeling knife
  • Feels good in your hand — good gripping surfaces
  • Blades are long lasting and snap away cleanly

What I’d change

  • It would be nice to have a dedicated blade snap off tool either on the knife or the blade case

Final thoughts

This OLFA Professional Heavy Duty Utility Knife has outperformed every snap-blade knife that I’ve ever owned. It has also outperformed many of the traditional utility knives that I’ve used over the years. It will take a lot of effort to wear out the blade holder and the blades have lasted longer than any other snap-knife blades that I have used. Just use the knife for the type of cutting that snap-blade knives are intended and don’t try carving wood.

Price: $ 16.49
Where to buy: OFLA Professional US retailers include Amazon (only one with the knives listed as in-stock)FastenalHome Depot, Lowes, Grainger, ULINE, and MSC Industrial Supply
Source: The sample of this product was provided by OLFA.

Filed in categories: Reviews

Tagged: ,

OLFA Professional 18mm Heavy-Duty Aluminum Utility Knife (MXP-AL) review originally appeared on The Gadgeteer on July 13, 2019 at 11:30 am.

Note: If you are subscribed to this feed through FeedBurner, please switch to our native feed URL http://the-gadgeteer.com/feed/ in order to ensure continuous delivery.
Technaxx TX-100 Car Alarm review

REVIEW – I recently moved to a city that has a very high incidence of vehicle break-ins, and while my 2007 Toyota FJ Cruiser isn’t exactly showroom quality, I do worry about its well-being each night. I don’t worry so much that I’d be willing to spend very much money to address the situation though. Enter the very affordable, $49.99 Technaxx TX-100 Car Alarm.

What is it?

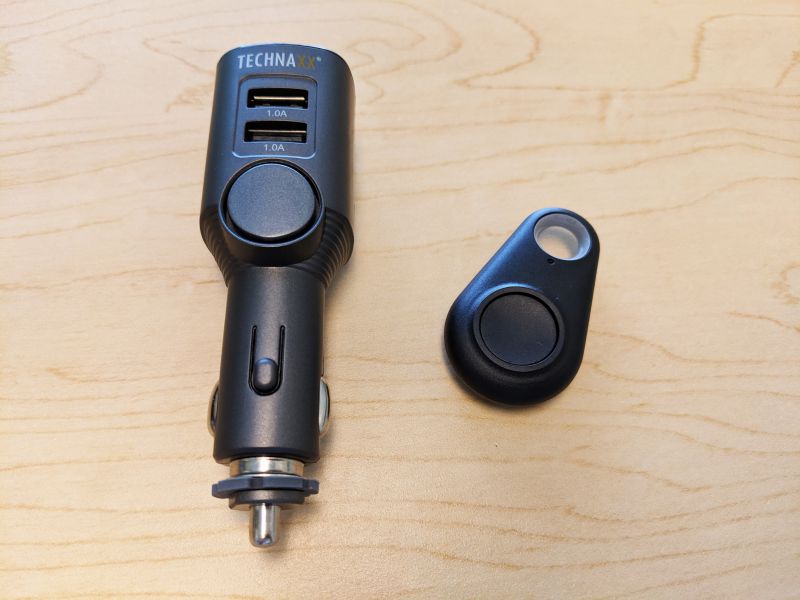
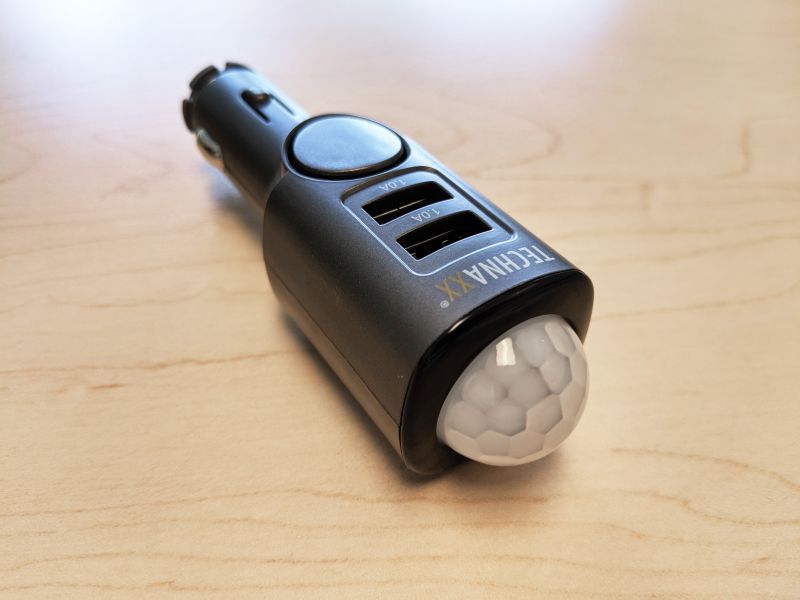
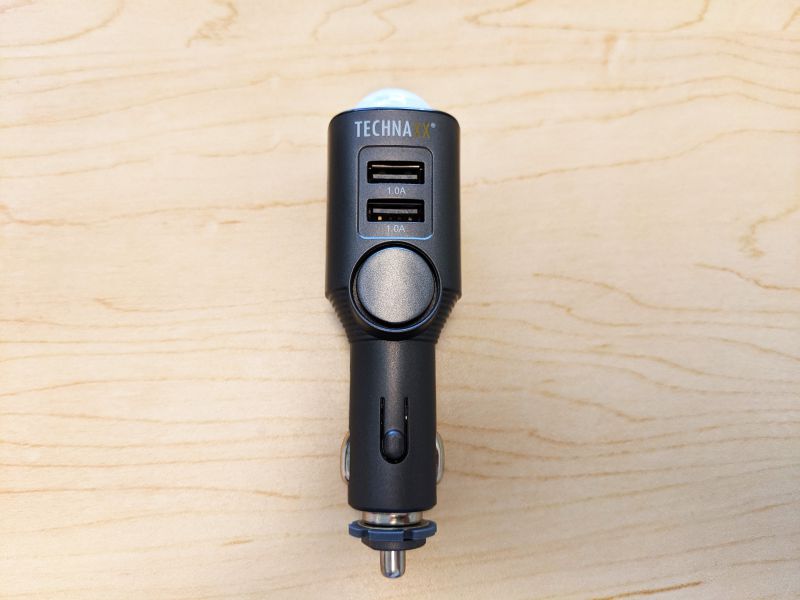
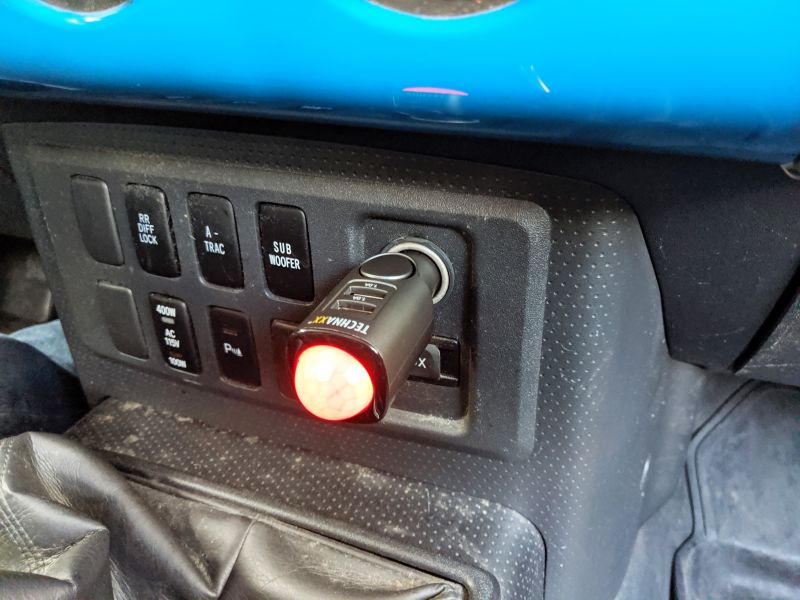
The Technaxx TX-100 Car Alarm is basically a two-port USB car charger that has a passive infrared (PIR) motion detector, 110dB siren, and rechargeable battery all built in. While you drive, the Technaxx charges itself via your car’s cigarette lighter and works as a standard USB car charger. Once your car is turned off though, the TX-100 is powered by an internal battery and you can activate its alarm functions with a paired remote control. Any motion within the car, such as a door opening or window breaking, triggers an ear-piercing siren.

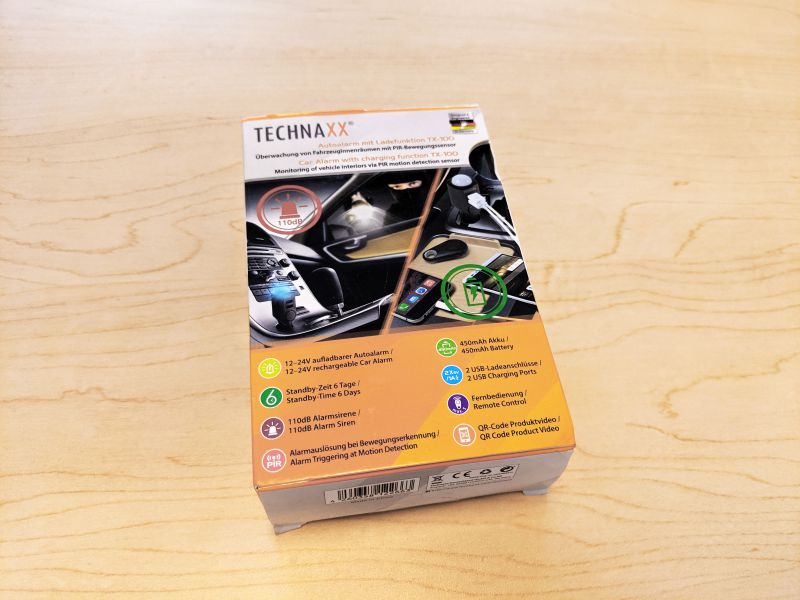
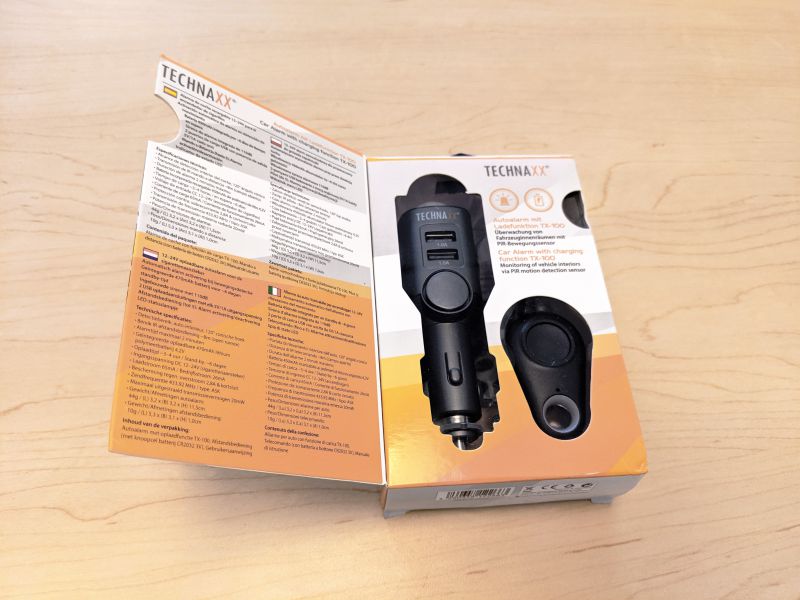
The Technaxx TX-100 comes in a small box with details listed in both English and German. The box has a cutaway view so you can examine the unit, and the interior flap lists the device specs in four more languages.

What’s in the box?

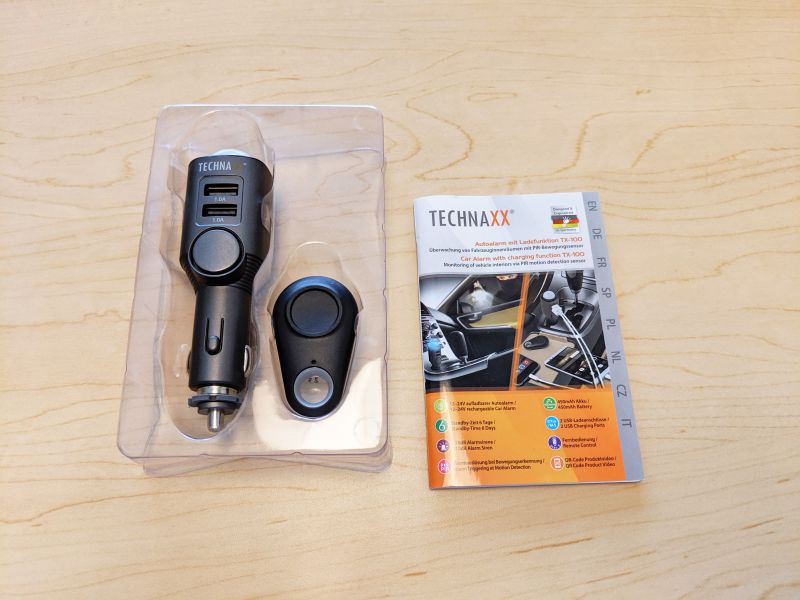
  • 1 Technaxx TX-100 Car Alarm
  • 1 Remote control with CR2032 battery
  • 1 User manual

Hardware specs

  • Detection range: Car interior, 120° cone angle
  • Remote control distance: 8m (open areas)
  • Alarm time: 2 minutes maximum
  • Alarm loudness: 110dB
  • USB charging ports: 2 5V/1A ports
  • TX-100 battery: Built-in rechargeable 450mAh lithium polymer battery
  • Remote control battery: Included CR2032 battery
  • Charging time: 3–4 hours
  • Battery standby: 6 days
  • Input voltage: DC 12–24V (cigarette lighter socket)
  • Charging current: 65mA
  • Operating current: 26mA
  • Over current protection: 2.8A
  • Maximum transmission power: 20mW
  • Transmission frequency: 433,92 MHz
  • Dimensions:
    • TX-100: 1.25 in (L) x 1.25 in (W) x 4.52 in (H)
    • Remote control: 2 in (L) x 1.22 in (W) x .4 in (H)

Design and features

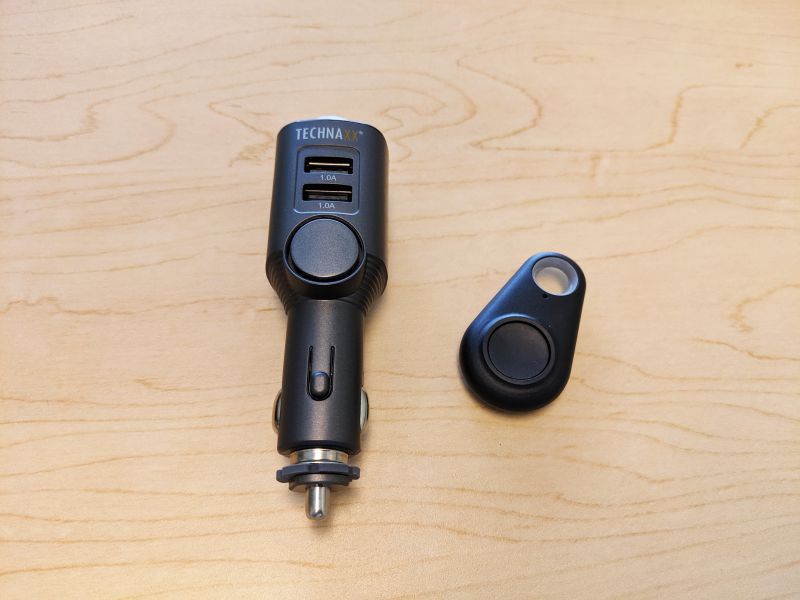
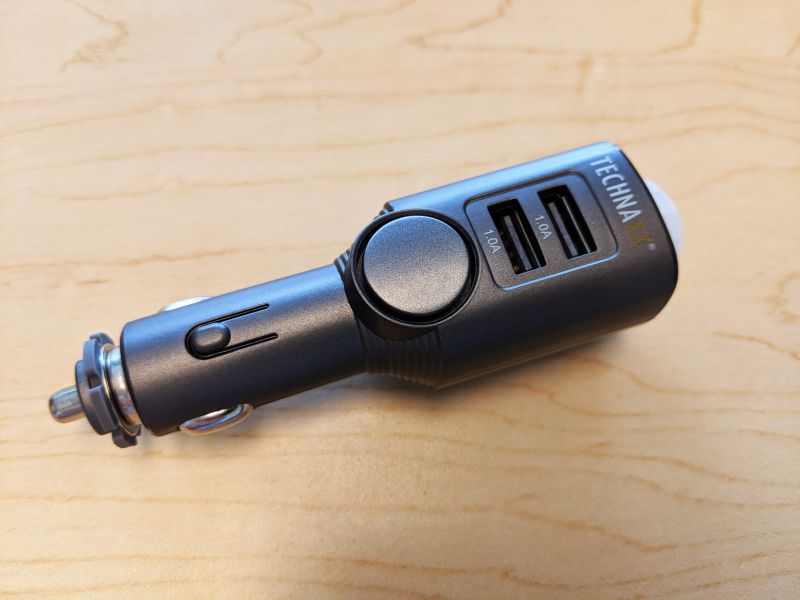
The TX-100 doesn’t have a very sturdy build quality, both the unit and the remote control feel very light and quite breakable. Both are made of lightweight ABS plastic and are gray in color.

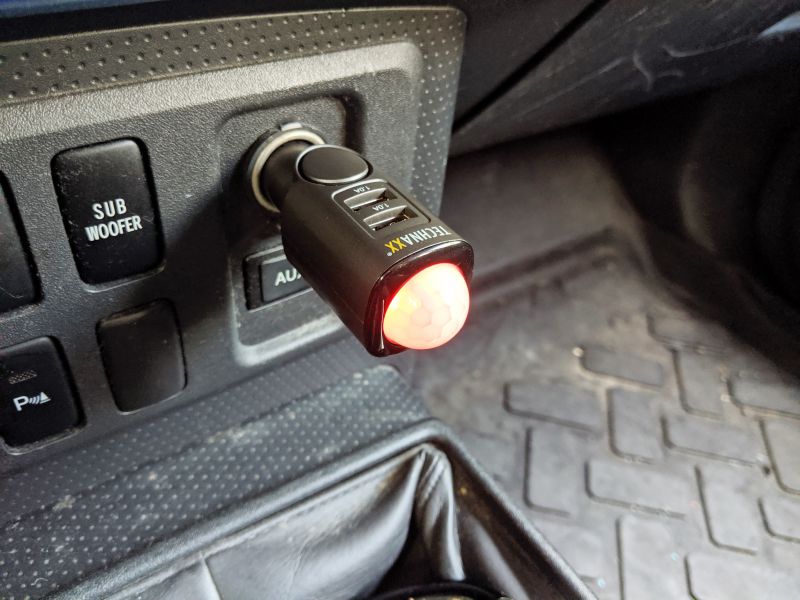
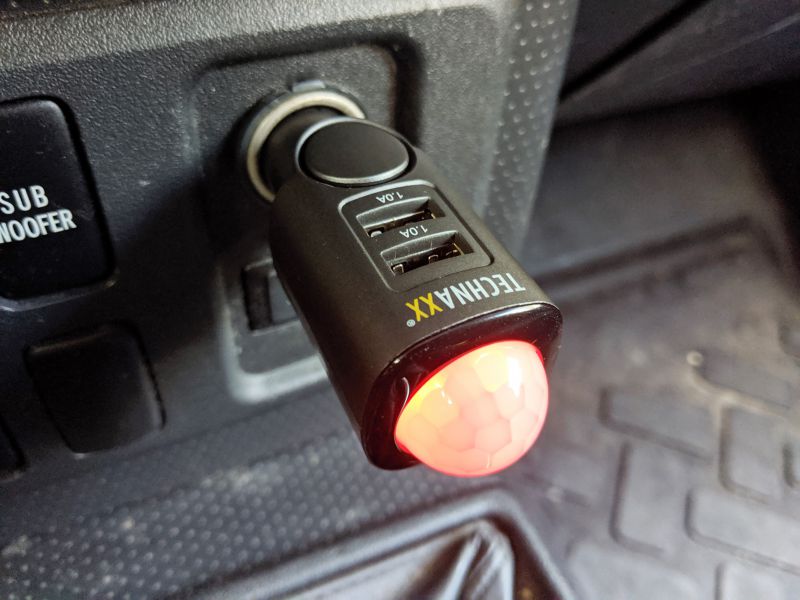
One clear indication that this isn’t a normal everyday USB car charger is the large shiny plastic PIR dome on the end of the unit.

The other tip-off is the round siren slot located just below the 1A USB charging ports.

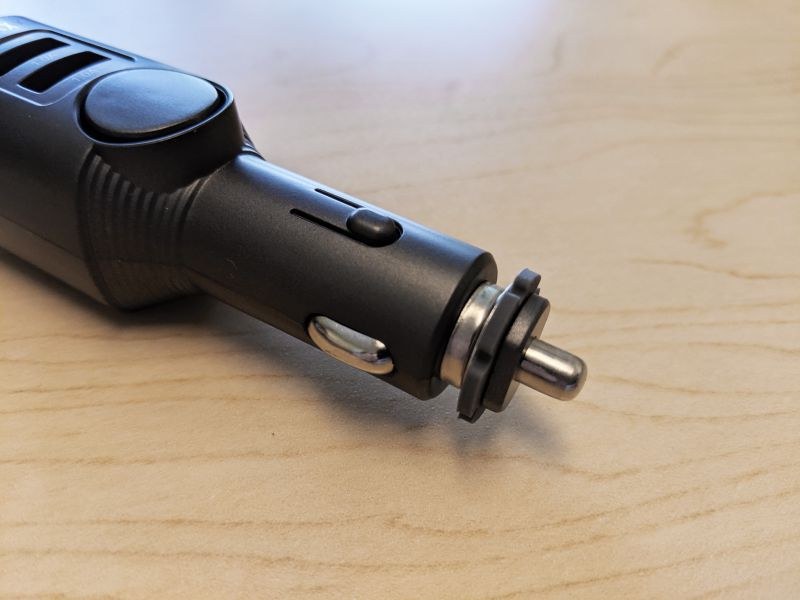
The only metal on the device is the charging tip which is inserted into your car’s cigarette lighter socket.

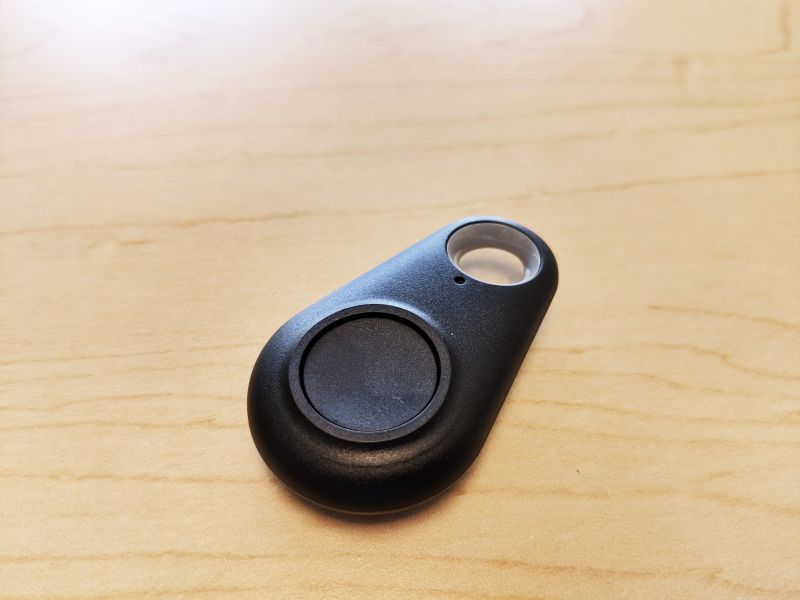
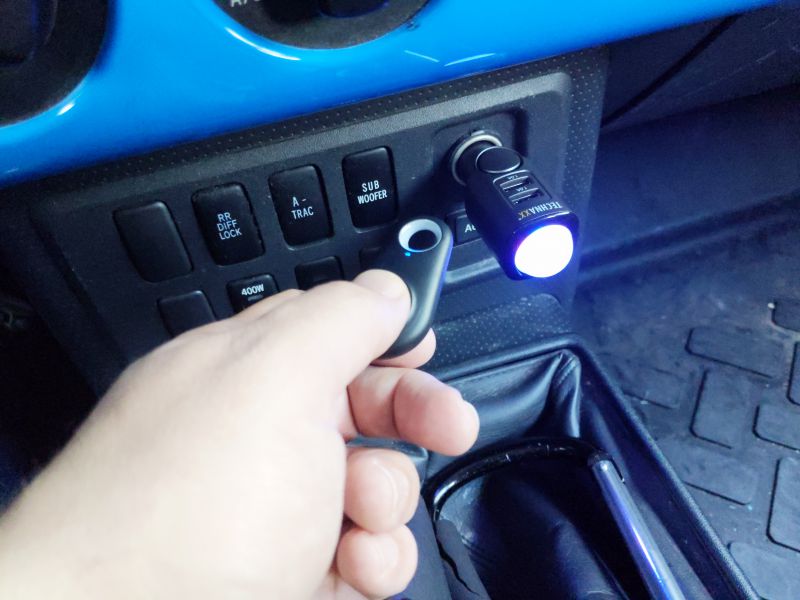
The remote for the TX-100 resembles a typical car alarm fob, just a bit smaller and lighter and with only one button.

The remote comes with a CR2032 battery already installed, to activate the battery you need to pull out a thin plastic tab.

The remote also has a small status indicator light at the top. The light blinks each time the remote button is pressed.

Setup

The initial setup instructions require you to charge the TX-100 fully before its first use, and this was my biggest problem with the unit.

See, the TX-100 take 3-4 hours to fully charge and the ONLY way to charge the unit is via your car’s cigarette lighter or an external cigarette lighter power adapter. And since I, like most people, don’t have an external cigarette lighter adapter, it took me about five days of commuting with the TX-100 plugged in before it was fully charged and ready to use.

There’s no reason why this unit couldn’t be designed with a micro USB charging port or the ability to take a charge via one of the USB ports. It was extremely frustrating to have the TX-100 plugged in and glowing red, indicating that it was still charging, for close to a week before I was able to properly test it. I have about a 35 minute commute to work each way, so depending on the length of your daily commute, the TX-100 will charge faster or slower.

Once the TX-100 is finally fully charged, the red light will shut off and the first thing to do is pair the remote. Pairing is only possible in the first five seconds after you plug the fully charged TX-100 into the cigarette lighter socket. Press and hold the button on the remote until you hear four beeps. The light will blink blue and after you hear the beeps, the remote will be paired with your car alarm. If you want to, you can pair one remote control with more than one TX-100.

Performance

In my testing, the two USB 1A charging ports proved pretty inefficient for charging iPhones or Android Pixels. I’m not sure if this was because newer phones require more than 1A to charge effectively or if charging the internal battery of the TX-100 simultaneously affected the ports’ ability to provide power.

The TX-100 did work great as a car alarm though. Granted, there were no attempts to break into my car during my testing, as far as I know, but each time I opened my car door while the TX-100 was activated, the siren was triggered immediately. I was worried that the TX-100 might get triggered by movement outside of the car windows, but despite my best efforts, I couldn’t trip it without opening the car doors.

It was also easy to activate the alarm once I left my car because the TX-100 provides an audible confirmation beep and a five second activation window. I did occasionally forget to deactivate the alarm before I got into my car each morning because I’m used to just using the car’s key fob to unlock it and having to remember to then hit the car alarm fob as well was too much for my sleep deprived brain to handle.

When the TX-100 is armed, the blue light flashes every five seconds. If activity is detected, blue light flashes quickly and the siren sounds continuously for about two minutes. In theory, a thief could immediately snatch a triggered, screaming TX-100 from the cigarette lighter socket, throw it to the ground, and smash it pretty quickly. But for the price point, that’s a chance you need to be willing to take.

Since the unit runs off the internal battery while the car is off, the battery needs to recharge. My daily commute time proved just enough to top the battery off each day for it to be able work overnight. To conserve battery power or to store, it is possible to completely shut the unit off by pressing and holding the remote button for four seconds.

What I like

  • Affordable alarm for late model cars
  • Easy to operate
  • Works reliably

What I’d change

  • Takes way too long to charge initially via cigarette lighter, should be able to charge with a USB cable as well
  • Poor build quality
  • Charging ports are low-powered and inefficient

Final thoughts

The Technaxx TX-100 Car Alarm is an ingenious, affordable, and reliable way to secure your car and possibly prevent theft. Although, the small size of the unit and the fact that can be easily spotted and removed has me questioning its ultimate practicality. An additional charging option would be useful and the construction of the unit is a bit lacking. But, at $49.99 this item might be a good preventative measure for those who have late model cars and live in areas where car break-ins are common.

Price: $49.99
Where to buy: Amazon
Source: The sample of this product was provided by Technaxx.

Filed in categories: Reviews

Tagged: ,

Technaxx TX-100 Car Alarm review originally appeared on The Gadgeteer on July 13, 2019 at 10:30 am.

Note: If you are subscribed to this feed through FeedBurner, please switch to our native feed URL http://the-gadgeteer.com/feed/ in order to ensure continuous delivery.

RHA adds personal Bluetooth to older aircraft … and more

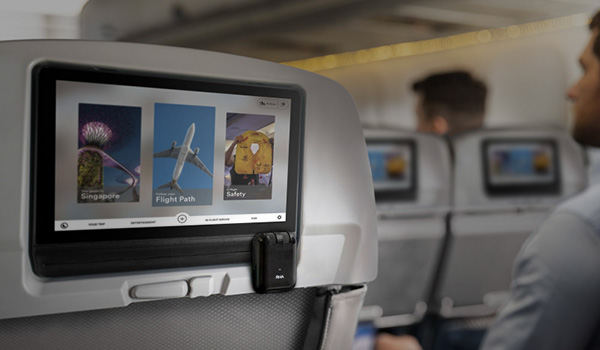
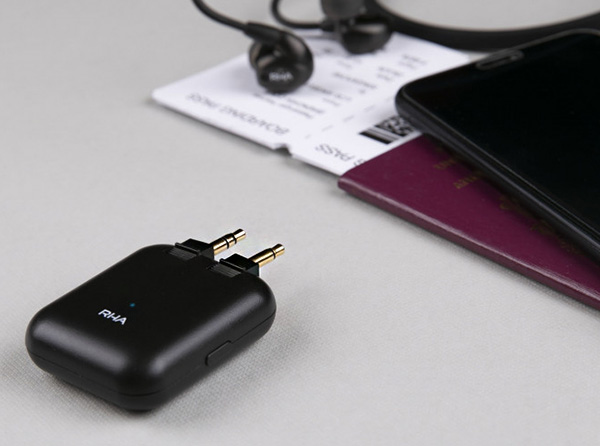
NEWS – Here’s the scenario: You’re going on a business trip and have brought along your trusty noise-canceling Bluetooth headphones. You’re situated in your seat and realize you forgot your charger and your smartphone’s battery won’t last the length of the trip. Plus, you’re in an older aircraft that only has those proprietary dual-jack headphone ports and has no wi-fi. Ugh! Now what? RHA may have a solution: the RHA Wireless Flight Adapter.

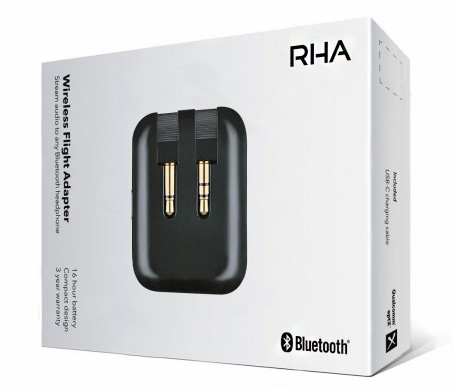
The Wireless Flight Adapter is a Bluetooth device that plugs into those outdated in-flight entertainment system ports. You can pair (Bluetooth 5.0 with aptX) to your headphones and enjoy whatever the airline is offering via its entertainment system. 16 hour battery life with USB-C charging ensures that you’re covered for those long-haul flights as long as your headphone batteries hold out. It will also broadcast to two headphones simultaneously.

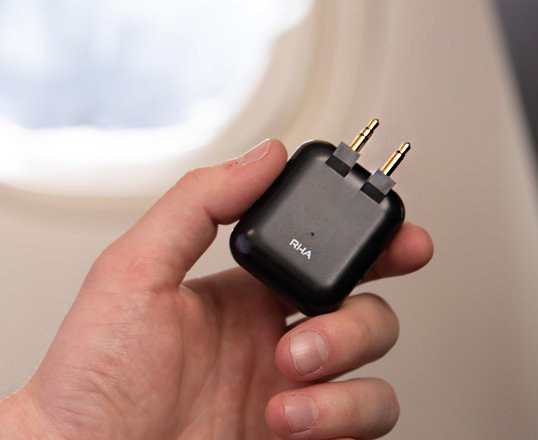
The small, easy-to-hold adapter has stereo mini plugs set on rotating pins, allowing them to sit in an optimal position for any airline seat or device, while folding away easily for safe storage. The Wireless Flight Adapter can also be used with any device with a single 3.5 mm audio port, mono or stereo, which means that it will work with portable gaming consoles.

The RHA Wireless Flight Adapter sells for $49.95 US with a 3-year warranty and is available now. Visit RHA and Amazon for more information.

Filed in categories: Reviews

Tagged:

RHA adds personal Bluetooth to older aircraft … and more originally appeared on The Gadgeteer on July 13, 2019 at 9:30 am.

Note: If you are subscribed to this feed through FeedBurner, please switch to our native feed URL http://the-gadgeteer.com/feed/ in order to ensure continuous delivery.
Hudway Cast heads-up car display review


REVIEW – Over the past year, I have reviewed a few smartphone dash mounts that are used to hold your mobile phone and keep it in a position so that you can glance over and look at it for navigation, etc. While this method may seem convenient, it still requires you to turn your head and depending on what information you are looking for, you may turn your eyes away from the road and the traffic ahead. Even with built-in navigation in my truck, I still have to turn my head. These days, there has been a huge increase in accidents and fatalities from being distracted by a mobile phone, including people trying to pick up dropped phones from the floor of their cars while driving. The Hudway Cast offers what seems like a great solution by mirroring certain information from your phone right on to a heads-up display that is directly in front of your normal viewing position while driving. And, since the display is transparent, it does not distract or block your view.

What is it?

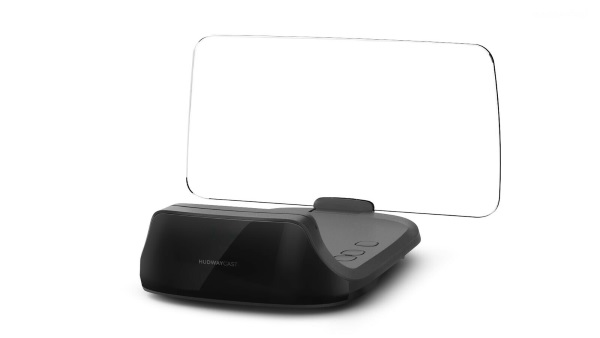
The HUDWAY Cast is a portable heads-up display that can be installed in any vehicle. It uses a wireless connection and/or a hard-wired connection to your smartphone to mirror your smartphone screen keeping the display directly in front of your eyes. You can launch the most common navigation apps on your smartphone, and then select mirroring to stream it to the HUDWAY Cast.

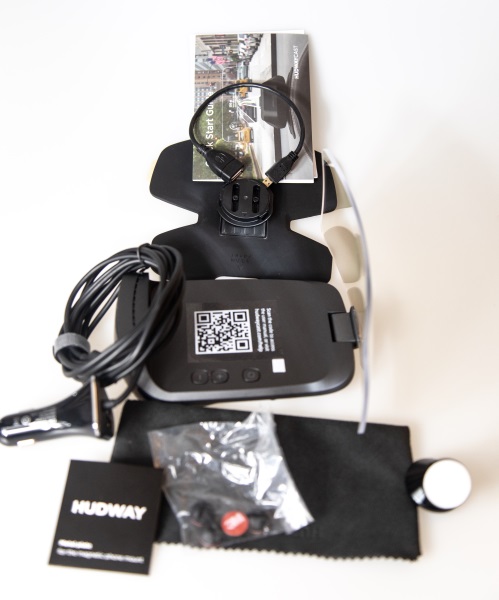
What’s in the box


1 x Hudway Cast
1 x Hudway Cast Dashboard Mount with Adhesive Back
1 x Felt Protective Cover
1 x Pack of Cable Clips
1 x Quick Setup Guide
1 x DC Power Cable and Adapter
1 x USB-A Connection Cable
1 x Magnetic Phone Mount and Cell Phone adhesive Back Plate

Design and features

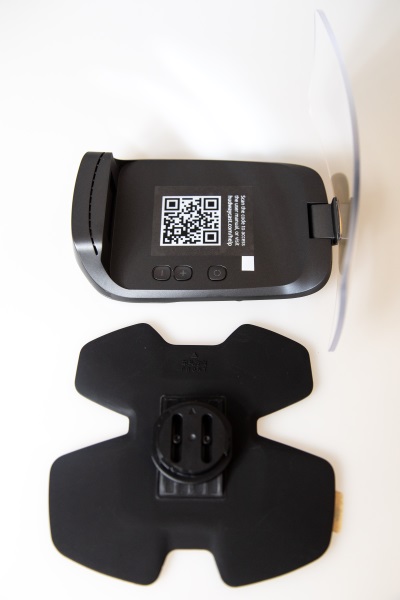
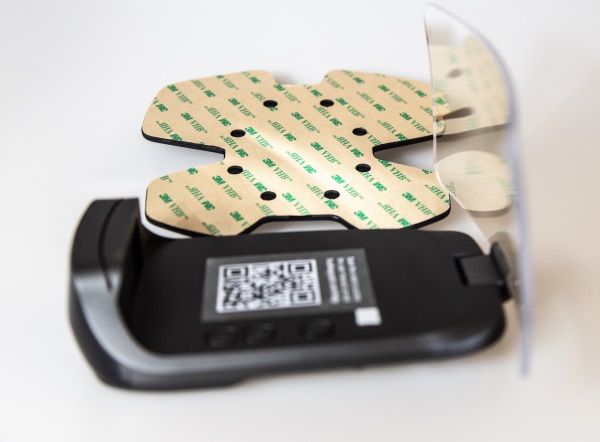
The Hudway cast is made up of a flexible base plate that has a built-in mount for the Cast on one side, and adhesive on the opposite side that allows it to adhere to your dashboard. The Cast itself is made up of a display screen that can be kept folded down when not in use and flipped up when in use. On the body of the Cast, there is an OS (IOS/Android) selection button and +/- volume buttons.

The picture below shows the Cast with the display screen flipped open, and the baseplate with the adhesive backing side facing up.
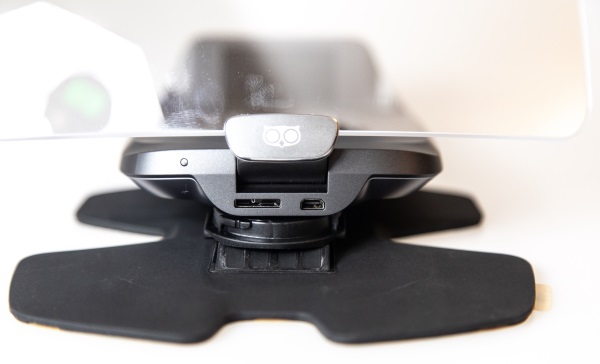
On the front of the base of the Cast (This side faces the windshield), there is a power port and a connector port that is used with the included adapter to connect to with either your Android or iPhone. The power port can also be connected to an ODB connector cable if you have one. The OBD connector cable provides both power and data (Not included with the Cast).

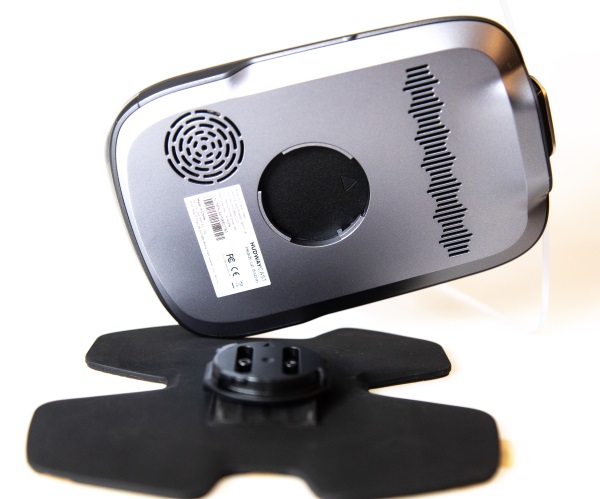
The following picture gives you a better view and understanding of the base of the Cast and how it connects to the dashboard mount.

Performance

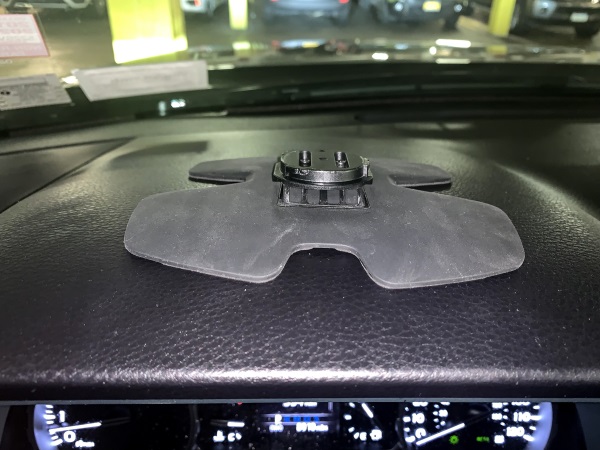
The first thing that you want to do is install the dashboard mount for the Cast. You have to figure out the best placement so that when you flip open the display for use, it is in the correct viewing position for you to see the display and for it not to obstruct or distract from your view. This is not the easiest process, but for my testing, I placed the Cast with the dash mount attached on my dashboard without removing the adhesive cover. Once I figured out the best placement, I marked the location with a sticker at one edge and then installed the dash mount by removing the adhesive protector and sticking it to my dashboard. I actually wiped off the dashboard first with alcohol cleaning pads to remove any debris and/or residue, but I soon found out that much like 3M double-sided tape, the best way to ensure that it sticks is to heat the adhesive surface with a heat gun. Since I did not have one handy, I stuck the mount on knowing that it was not sticking to the dashboard very well and drove to the railroad station as I do every day and caught my train. I figured that with my truck parked in the sun all day, that the adhesive would heat up and adhere properly. I was right, and it worked. My process is obviously not recommended but I would recommend using a heat gun to heat up the adhesive to ensure that the mount sticks properly to the dashboard.
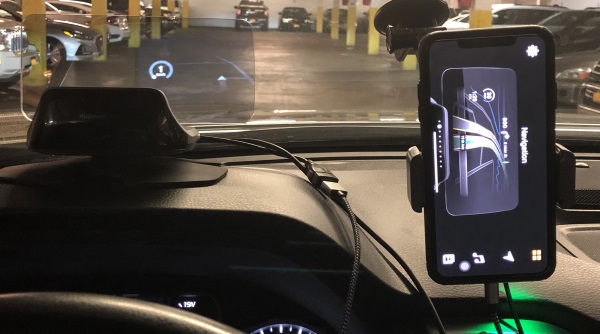
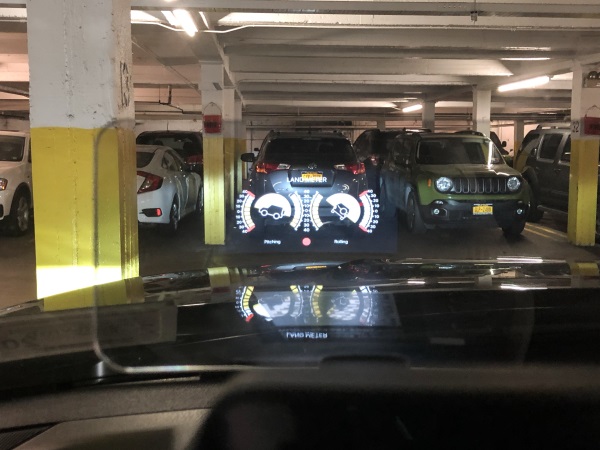
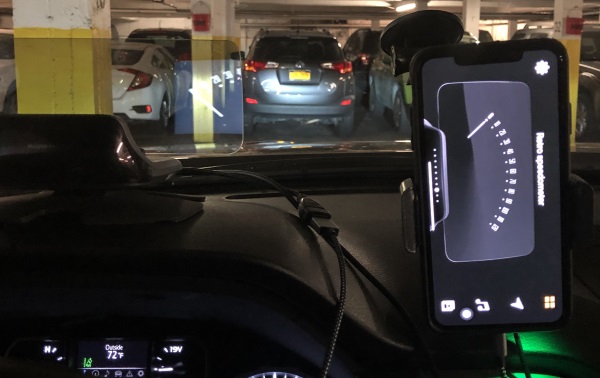
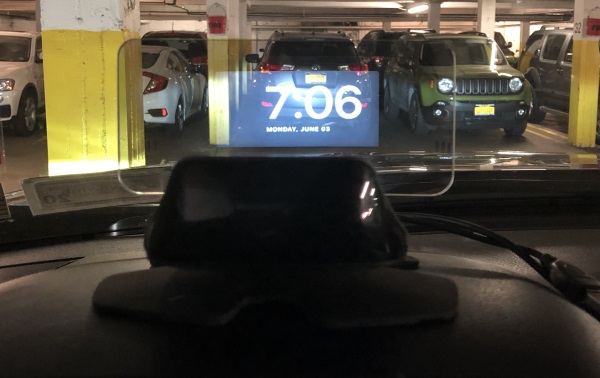
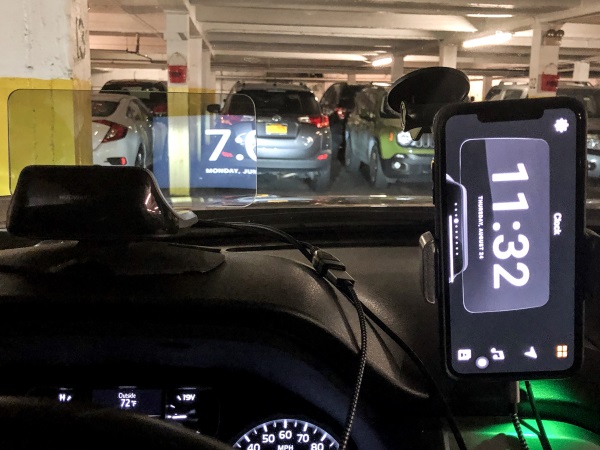
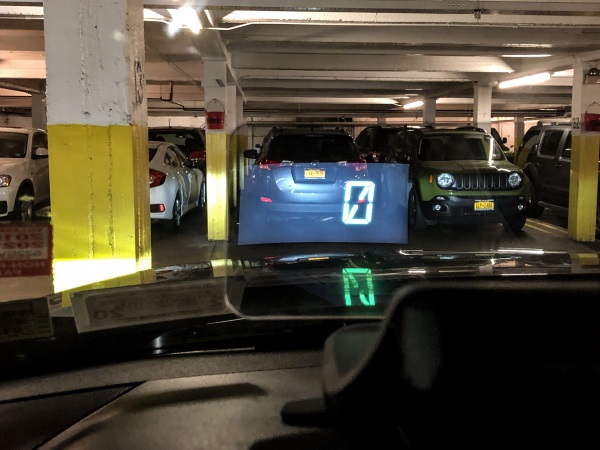
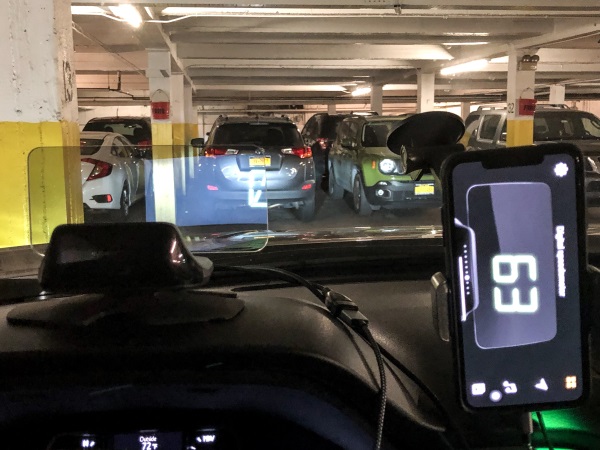
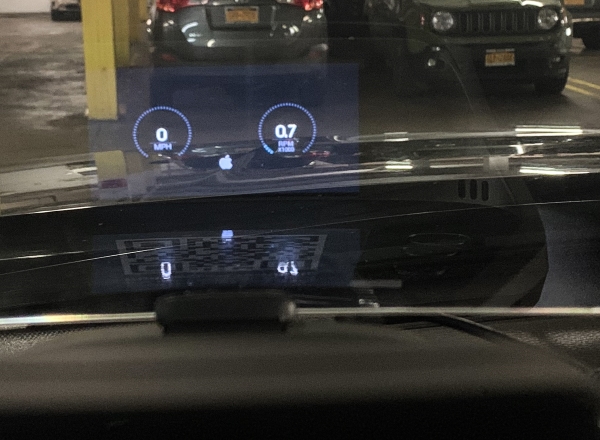
Taking pictures of the display screen in normal light is tricky so I decided to take the pictures while parked in my underground parking. The next set of pictures show various screens on the Cast along with what is shown on the connected phone. It is important to note that while the display shows real-time information, the app on the phone shows the concept of the corresponding display information. I have also provided examples of the real-time comparison between the phone and the display in the last 2 sets of pictures below.


Corresponding screens below between my iPhone and the actual display information.


Corresponding screens below between my iPhone and the actual display information.


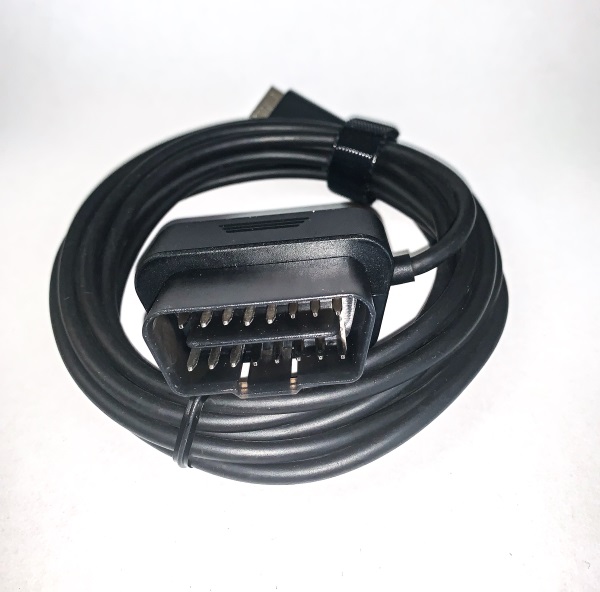
All of the testing information displayed above was conducted with the Cast receiving data via my cell phone. I did notice that for instance, the MPH on the cast differed quite a bit from the MPH displayed on the vehicle’s digital speedometer. Since I knew that Hudway also makes an ODB connector cable that attaches to the vehicle’s ODB connector, I decided to request one from them so I could compare the information from the speedometer to that on the Cast’s display once it was receiving data directly from the car. I also felt that such a connection would influence other data such as mileage, etc. Hudway readily agreed, and promptly sent the ODB connector cable.

So with the connectivity using the OBD connector cable, it supplies both power and data to the Cast. There is also still the app that connects to your phone. The test results with the OBD connector cable yields more accurate results when viewing constantly changing MPH, but there is always still a +/- 2 to 3 MPH difference between the car’s speedometer and the Cast. In addition, for some reason when using the cable, the display would go to a default screen if I minimize the app, which is unlike when using the cable connected to the phone. In the latter case, the display goes blank.

The Cast also allows you to use other navigation apps like Maps, Waze, Google maps, etc by using screen mirroring to the Cast. It has built-in speakers that allow it to give audible navigation directions as well.

What I like

  • The concept
  • The display and the infinite possibilities
  • The information options
  • The build quality

What I’d change

  • Design the mount with all connectivity built-in to the mount and not the device so that it easy to attach and detach the device
  • Include OBD Connector Cable
  • Reduce the overall size of the device so that it will fit cars with windshields that have a lower degree of slope.

Final thoughts

After testing the Hudway Cast quite a bit, I have mixed feelings. I love the concept and the capabilities, but in my opinion, the design is flawed. The fact that there is no base that houses the electronics and connectivity makes the process of connecting and disconnecting the device quite cumbersome and tedious, with what seems like wires everywhere to be managed each time. Since common sense suggests that the device should be removed if the car is parked in direct sunlight especially on a hot day and also for security reasons, this cumbersome process cannot be avoided. However, I do believe that with a few improvements, this is a gadget that I would love to always have in my car. I am aware that Hudway has a new and improved device called the Drive, which by its stated features, will likely address most if not all of my concerns and therefore make it the perfect on-the-road companion. Given the impending release of the Drive, I would wait for it and pass on the Cast.

Price: $189
Where to buy: Hudway website
Source: The sample for this review was provided by Hudway.

Filed in categories: Reviews

Tagged:

Hudway Cast heads-up car display review originally appeared on The Gadgeteer on July 13, 2019 at 8:43 am.

Note: If you are subscribed to this feed through FeedBurner, please switch to our native feed URL http://the-gadgeteer.com/feed/ in order to ensure continuous delivery.