Stormtroopers may be bad, but this glass looks so good

Star Wars memorabilia fans will want this ultra cool 5-ounce Stormtrooper double-walled borosilicate glass that been made based on the original movie helmet molds designed by Andrew Ainsworth in 1976.

The Stormtrooper glass looks awesome empty, but add 5 ounces of liquid, especially milk and it turns into a floating helmet that will turn heads.

You can buy one glass for $15.05 or $27.60 for a pair of Stormtrooper glasses. Visit The Fowndry for more info.

Filed in categories: Home and Kitchen, News

Tagged:

Stormtroopers may be bad, but this glass looks so good originally appeared on on April 14, 2017 at 8:00 am.

Note: If you are subscribed to this feed through FeedBurner, please switch to our native feed URL http://the-gadgeteer.com/feed/ in order to ensure continuous delivery.

Netatmo Welcome Indoor Security Camera review

I reviewed the Netatmo Presence Outdoor Security camera a few months ago and really, REALLY enjoy using it because it uses deep learning to tell the differences between people, animals, cars, and other motions thus virtually eliminating unnecessary motion detection alerts. In addition, there are no subscription fees because all the video is stored locally and copied to Dropbox or your personal FTP server (if you set these up). Now I have the opportunity to review the Netatmo Welcome Indoor Security camera which has the ability to tell the difference between individual people with facial recognition. After having used it for a few weeks, I find that I like this camera too. It is able to tell the difference between individuals in our household and will alert you to an unfamiliar face or tell you that motion was detected if it can’t see the face of the individual. Like the Presence, the Welcome camera also records videos locally and will save them in your Dropbox account or personal FTP server thus eliminating subscription fees.
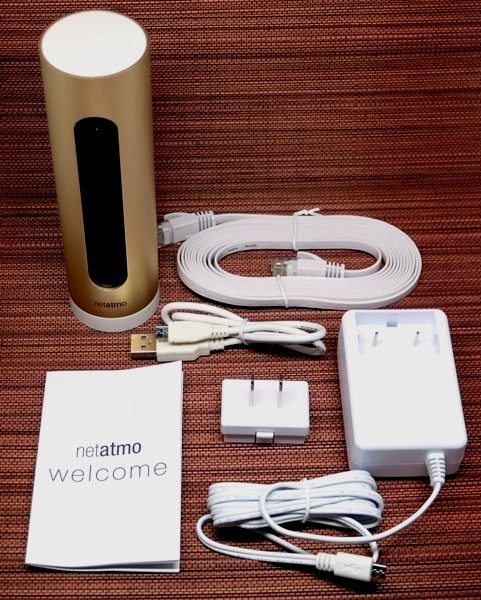
Package Contents

  • Netatmo Welcome Indoor Security camera with 8 GB micro-SD card
  • Ethernet cable
  • Micro-USB cable
  • AC power adapter
  • Welcome guide

Technical Specifications

  • SIZE: 45 x 45 x 155 mm / 1.8 x 1.8 x 6 inches
  • MECHANICS & DESIGN: Single piece durable anodized aluminum shell
  • CAMERA:
    • Video sensor: 4MP
    • Resolution: Up to 1920×1080
    • 130° field of view
  • CONNECTIVITY SPECIFICATIONS:
    • Ethernet RJ-45 port: 10/100 Mbits
    • Wireless: Wi-Fi 802.11 b/g/n (2.4G)
  • DATA STORAGE: MicroSD card up to 32GB (8GB class 10 MicroSD card included)
  • IPHONE AND IPAD COMPATIBILITY: iOS 9 minimum required
  • ANDROID COMPATIBILITY: Android 4.3 minimum required
  • BROWSER SUPPORT: Webapp available for the two latest versions of Chrome, Safari, Firefox, Internet Explorer
  • No subscription fees

Design & Build Quality
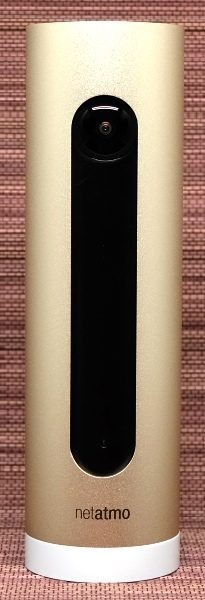


The Netatmo Welcome camera is actually a small camera measuring 6″ tall (15.3 cm) and 1.75″ in diameter (4.5 cm). It is encased in a very nice gold-colored aluminum cylinder housing and the camera, nighttime infrared LED, and motion sensor are contained behind black plastic. The back of the camera contains a micro-SD card slot (the camera comes with an 8 GB card), a micro-USB port, and an Ethernet port.

Setup

When setting up the Welcome camera, I decided to connect it to my network via WiFi rather than Ethernet cable, thus I only needed to plug the camera into an outlet for power. I placed the camera on a table facing the front door.
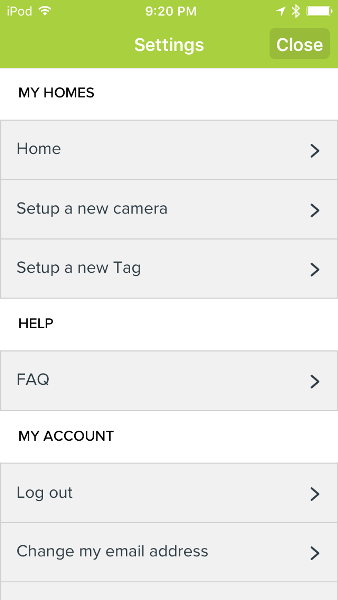
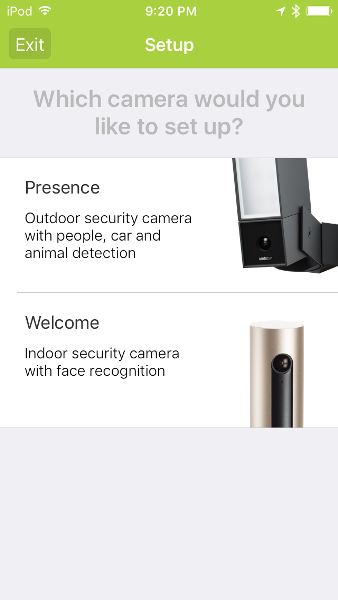
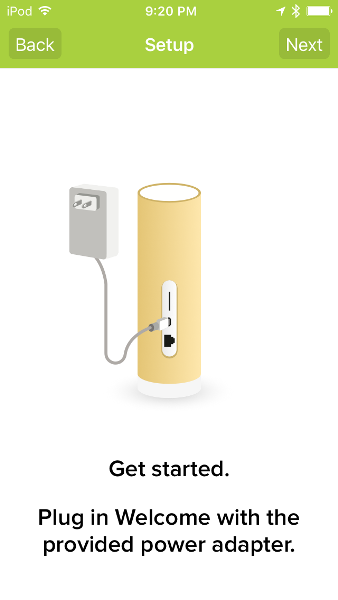
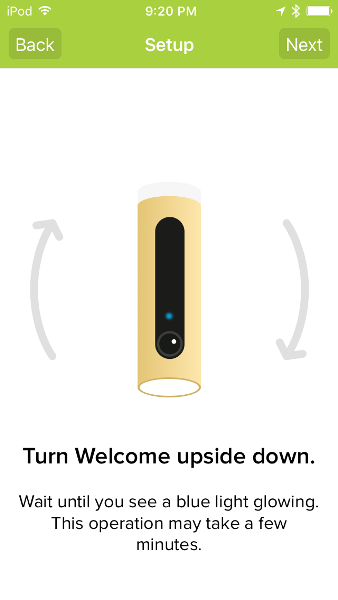
My camera did not come with a user guide, but the Netatmo Security app instructs you how to setup your camera. The above screenshots are taken from my iPod Touch 6G. If you do not have the Security app, you’d have to download it and create an account. Since I already use the app on my iPod and my Nexus 6 phone with the Netatmo Presence Outdoor Security camera, I needed to tap on the Menu icon located in the upper left of the Security app home screen, select “Setup a new camera”, then tap on the image of the Welcome camera in the app settings. I plugged the camera in, then turned it upside down. I needed to keep the camera oriented upside down during the setup process (I made the mistake the first couple of times of not keeping it that way and thus the app had trouble detecting the camera).
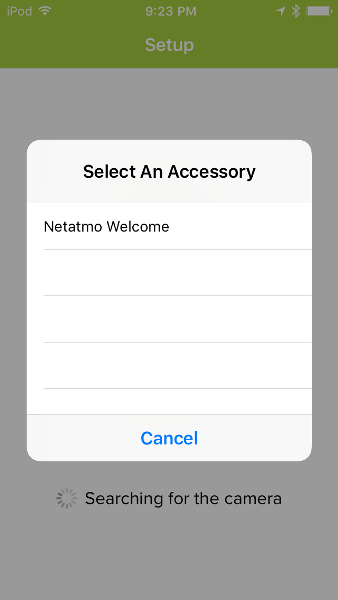
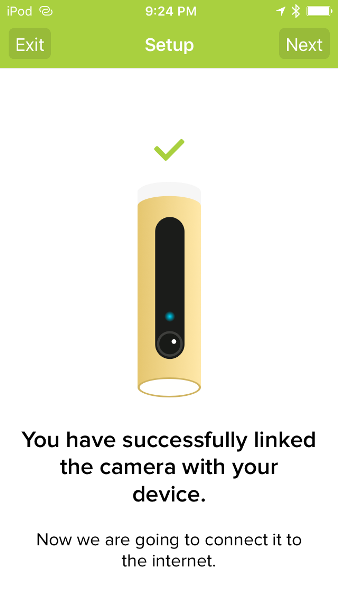
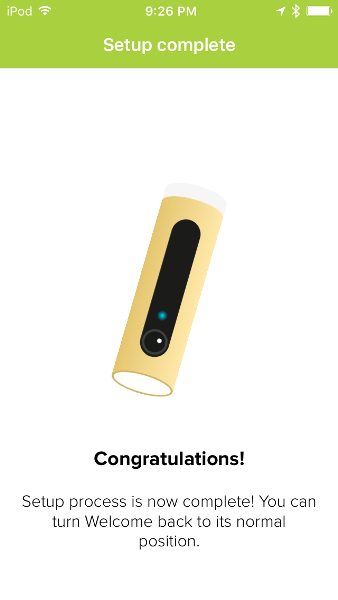
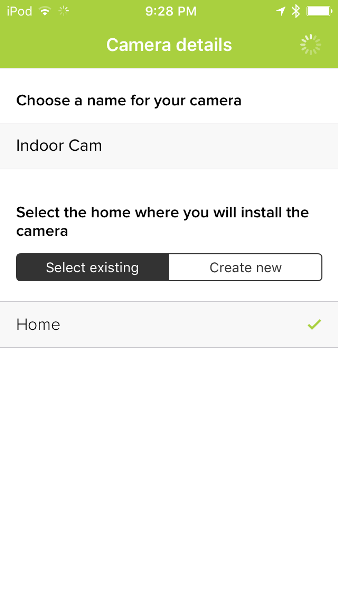
Once the app detected the camera, I selected it from a list (first screenshot) and was then connected. After that, I needed to name the camera (I named my Welcome camera “Indoor Cam” as shown in the last screenshot) and select the geographic location where the camera was installed (e.g. home, vacation home, business, etc.) – in my case, I selected my home (aptly named “Home”) which is the same place my outdoor security camera is installed.
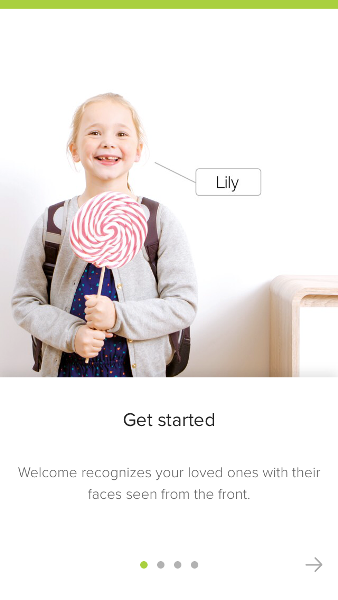
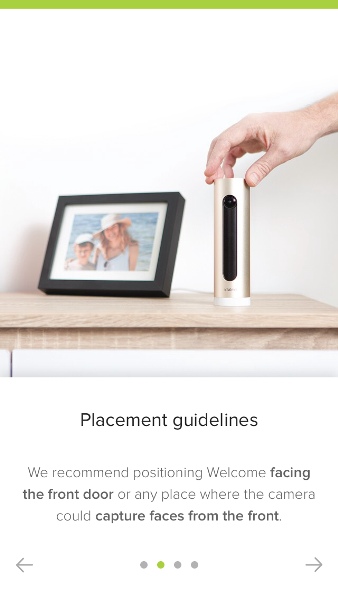
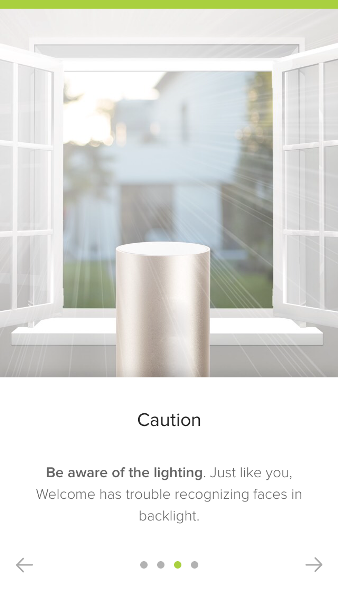
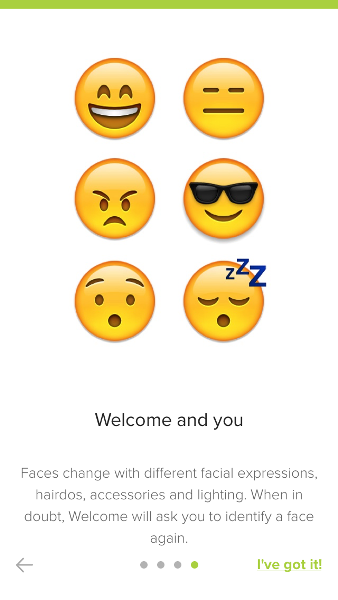
At this point, the app informs you that the Welcome camera can recognize your loved ones from each other and from strangers after training the camera to recognize all the different faces captured of each of the residents. The app also suggests where to place the camera while warning you to be aware of backlighting.
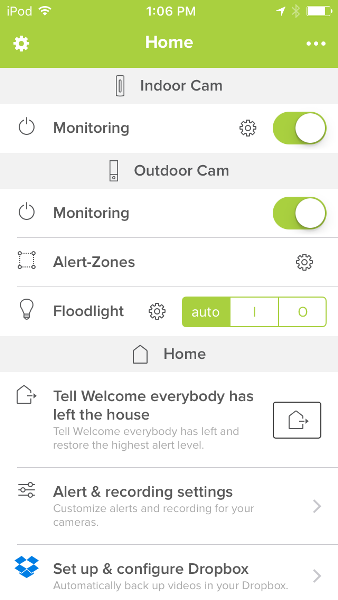
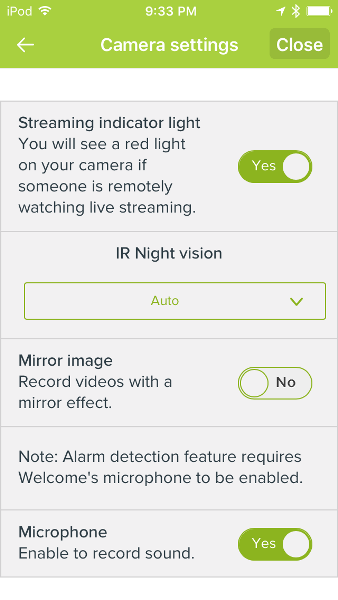
You can adjust the camera settings by tapping on the ellipsis (three dots in the upper right of the Security app home screen) then tapping on the gear icon located under the name of your Welcome camera (“Indoor Cam”).
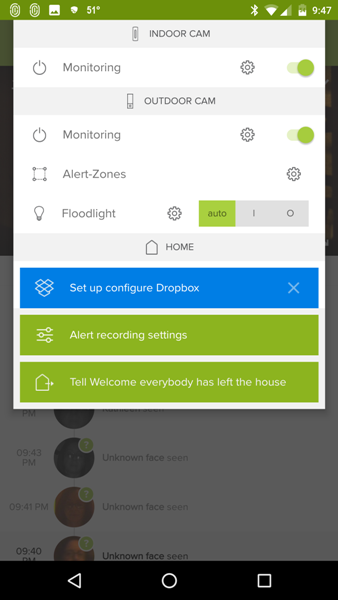
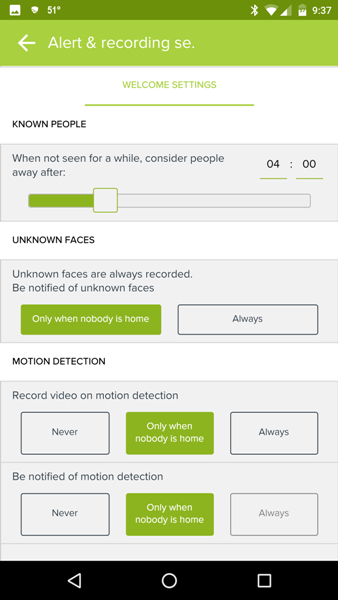
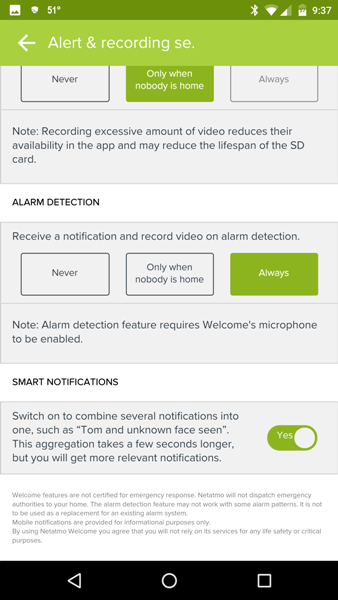
Welcome Camera Settings: The above screenshots were taken from my Nexus 6 phone. By tapping on the vertical ellipsis, you can also access the Alert Recording Settings on the Welcome camera or you can tap on “Tell Welcome everybody has left the house” (left screenshot). In the middle screenshot, there is a setting that allows you to set a time that if the identified individuals are not detected for that amount of time, they will be considered “Away” instead of at “Home”. The middle screenshot also shows how you may also set up whether or not the camera should record video and send a notification when it detects motion (“Never”, “Only when nobody is home”, or “Always”). The last screenshot shows additional camera settings.
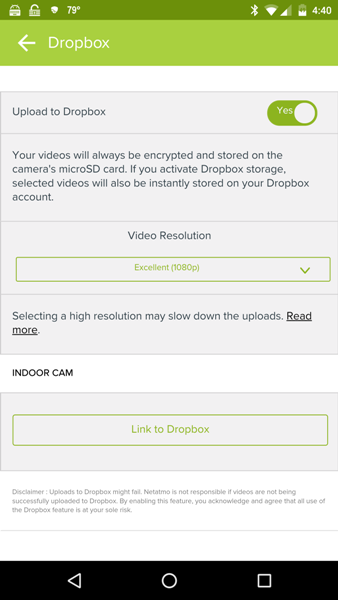
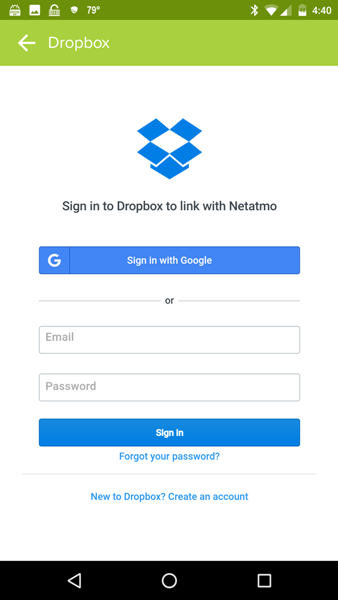
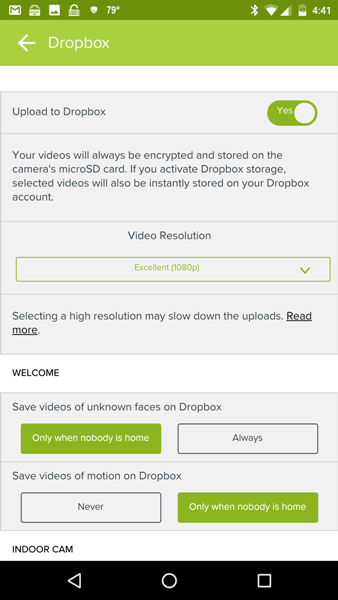
Linking Dropbox to the Welcome Camera: The Welcome camera records all videos locally on a micro-SD card (the camera comes with an 8 GB card) and does not require any ongoing subscription fees like other security cameras. You can also set up your Welcome camera to upload a video of the events it detects to your Dropbox account or your personal FTP server. I chose to link the Welcome camera to my Dropbox account. After doing so, I was able to select things like whether or not to “Save videos of unknown faces on Dropbox” or “Save videos of motion on Dropbox”. I personally really like the fact that there are no subscription fees.
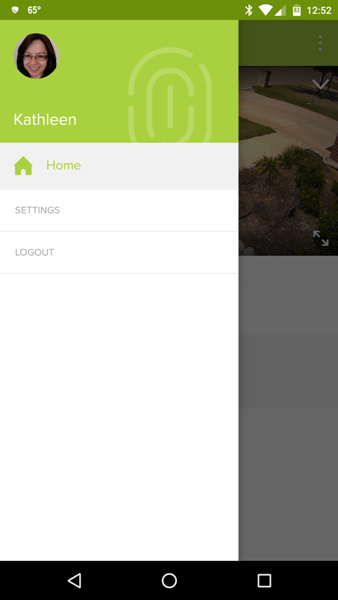
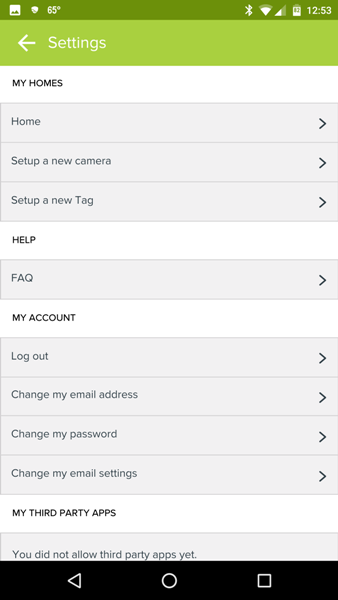
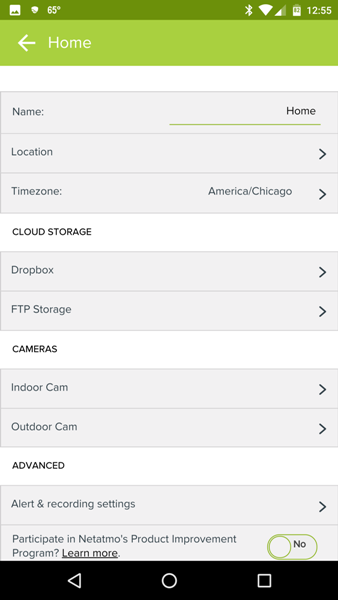
Security App Settings: By tapping on the Menu icon located in the upper left corner of the home screen, you can access other settings. From here you can add a new camera, change your email address or password, or tap on Home (or Vacation Home, Business, etc. – wherever you installed your camera) to view all of your connected cameras. After tapping on Home, you will be able to set up your camera(s) to upload to Dropbox or your private FTP server (middle screenshot). When you tap on each of your connected cameras (last screenshot), the app will show you the strength of the WiFi signal, it’s MAC address and the current firmware being used.

Use
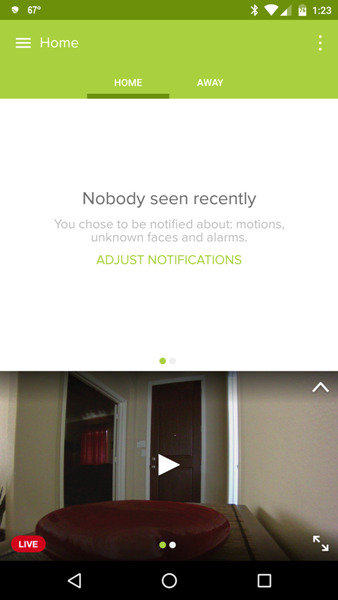


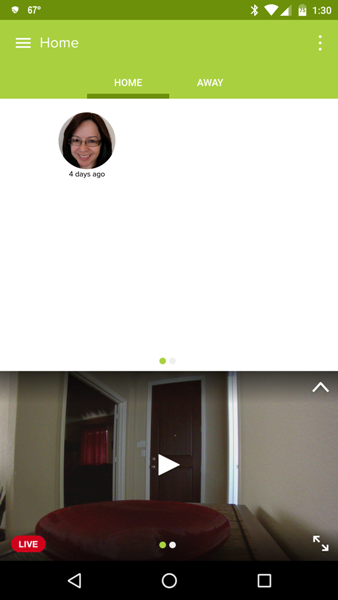
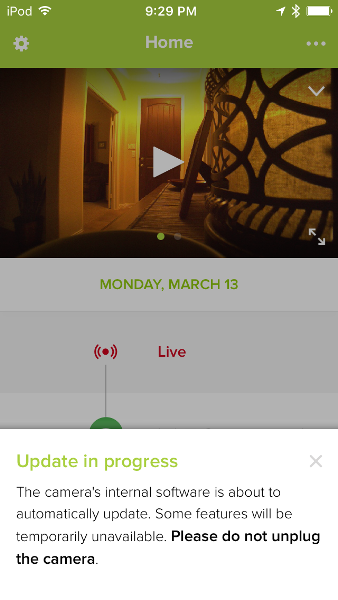
Security App Home Screen: When you launch the Security app, the home screen will display whether or not any faces have been detected by the Welcome camera. Once the camera has been trained to recognize each of the residents of your home, it will show you if it has detected them. If it has not detected anyone in a certain amount of time, it will flag them as being “Away” from home. Swiping up (or tapping on the “Up” arrow located in the upper right of the video display) will hide the “faces detected” screen.

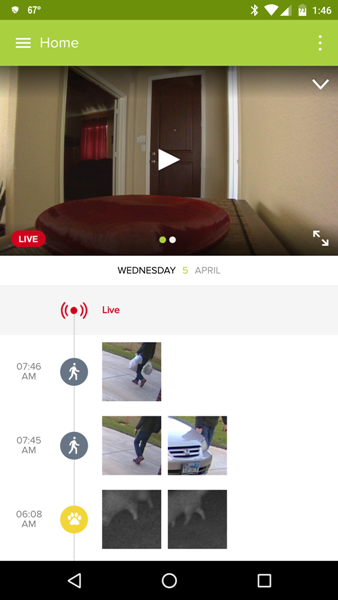
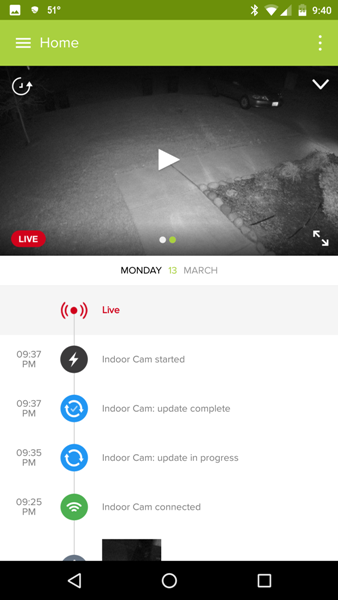
Viewing Live Video: By tapping on the Live icon just below the video, you can swipe left or right on the video display to view the view from your different cameras. The third screenshot shows the view from the indoor Welcome camera and the last screenshot shows the view from our outdoor Presence camera. To view the live video streaming of the indoor camera, you must tap on the Play button in the middle of the video display.

When viewing any live activity going on in front of the camera, there is a few second delay in the live feed and also when a motion is detected. This happens with the Netatmo Presence Outdoor Security Camera as well which according to the Netatmo website, “Presence uses http Live Streaming protocol. Experiencing a slight lag time of a few seconds is normal, as live stream is sent through an encrypted connection from Presence to your device.” This may also be the case with the Welcome camera.
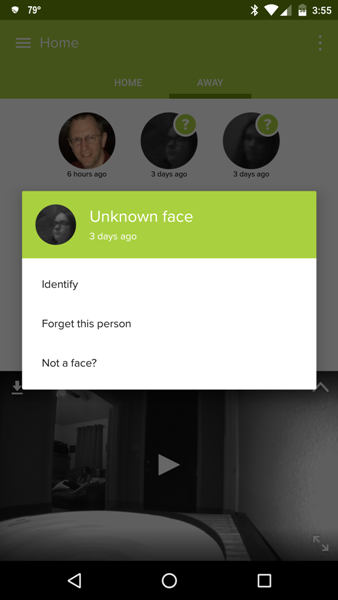
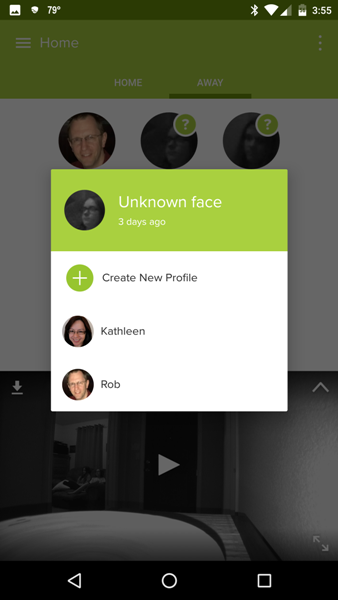
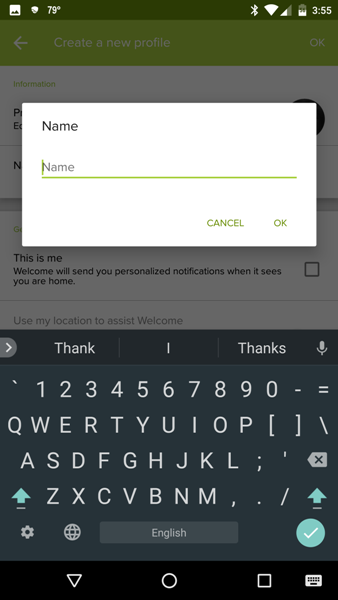
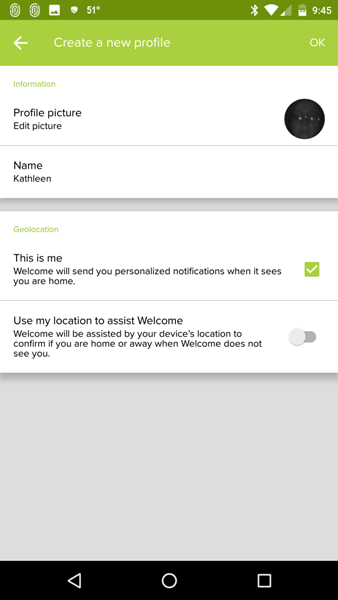
Setting Up Facial Recognition Profiles: When the Welcome camera captures the face of someone it doesn’t recognize, it will display that face on the home screen of the app above the video display. Long pressing on the image in this “faces detected” screen will allow you to identify the person, forget the person, or tell the app that the image is not a face. When you are identifying the person for the first time, you will set up a profile for that person by giving them a name, uploading a profile picture if desired, and flagging the image as yourself or someone else and using your phone’s location to assist Welcome in determining whether or not you are home.
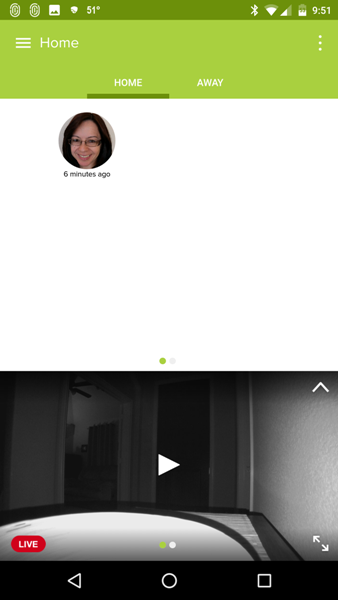
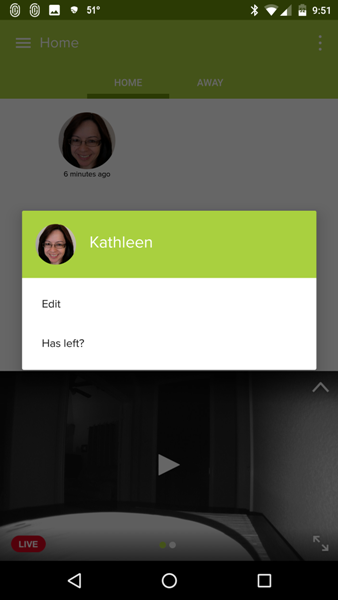
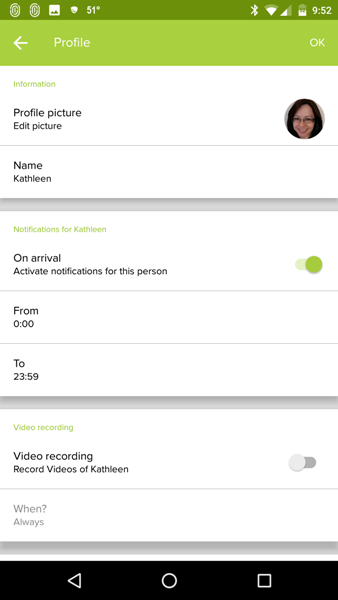
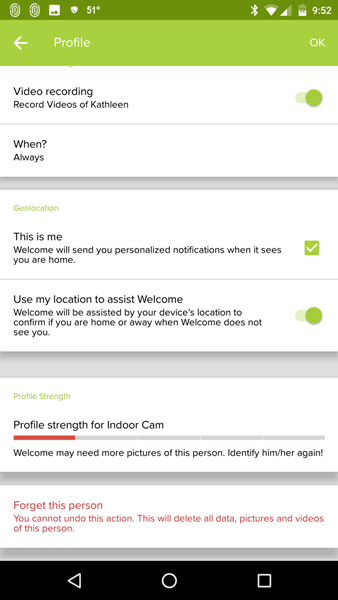
When the Welcome camera detects my face, it identifies that I am at “Home” versus “Away”. Long pressing on my image in the “faces detected” area, allows me access to my profile to change the settings. I can tell the camera to record videos of myself or not during the time that I designate.

I would have preferred to see the setting that allows me to set a time interval to tell the Welcome camera whether I am “Away” or at “Home” here in the Profile settings right under the “Use my location to assist Welcome”. As it is, that setting is located under the “Alert recording settings” for the Welcome camera.
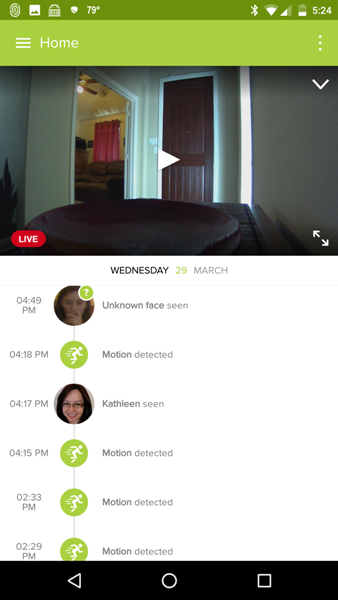
If the Welcome camera can see your face, it will flag it as an identified person or unidentified person. If it cannot see your face, it will notify you that a motion has been detected.

Alarm Detection: If the camera detects an alarm of any kind (smoke alarm, CO alarm, etc.) it will also notify you of this alarm if you set the camera up to do so in the “Alert recording settings”. The Welcome camera did give me a couple of alarm notifications but none of our alarms went off (I was home at the time and did not hear anything). Curious.
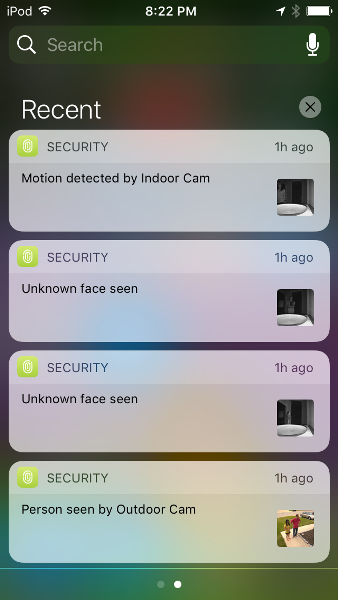
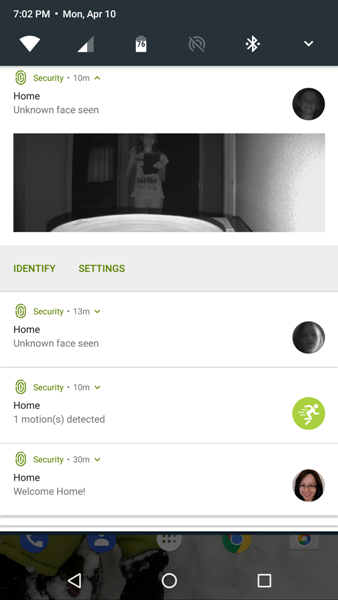
Notifications: Whenever you receive a notification about a motion, if a face is detected, it will identify the person as a known or unknown individual, otherwise it will identify it as a motion. The screenshot on the above left illustrates the iOS notifications and the right screenshot is that from my Android device (Nexus 6 phone).

Facial Recognition Accuracy and Sensitivity: I found that Welcome camera detected almost all motions or faces that passed by the camera. It was fairly accurate in discerning the faces of the individuals in our house. However, it did not always send a notification that one of us had passed in front of the camera even though I set up the camera to always send notifications when motion is detected.

Resolution: The clarity of the videos was a high-quality 1080p resolution with clear sound (when sound was detected). However, in a few instances when viewing the videos, the resolution was lower. I think this is a function of the strength and quality of my WiFi. Here is a video captured of motion that was detected by the camera during the day.

One-Way Audio: The camera also picks up sound very well but it is only one-way audio. It is not possible to speak to your invited and uninvited guests when they approach the camera.

Here is another video of motion that was detected at night. I was pleased with the quality.
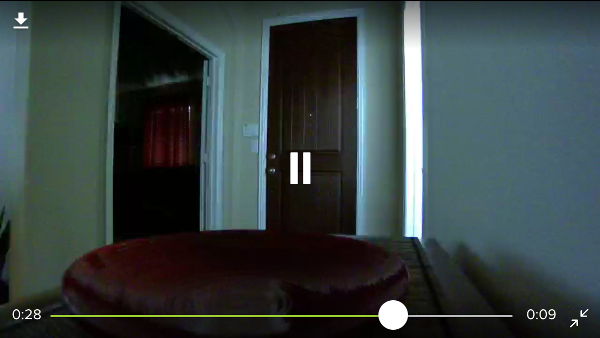
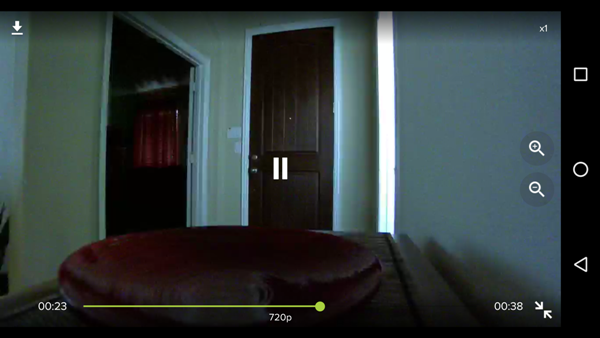
Android vs. iOS App (Zoom features): Just like the Presence Outdoor Security camera allows you to zoom in and out of live or recorded video (when playing them), you can do the same for the Welcome Indoor Security camera videos. There were only a couple of differences between the Android app and the iOS app that I have noticed. The iOS app (top screenshot) allows you to zoom into a specific area of the video using the pinching gesture, while the Android app (bottom screenshot) requires you to tap on the magnifying glass zoom icons located along the right side of the video screen. I found that after tapping on the zoom icons, I then needed to reposition the video thus I really appreciate the “pinch” zoom feature of the iOS app – with it, I could zoom in on the specific area that I was curious about quickly and efficiently.

Resolution Information: I also noticed that when you tap on any area of the live video feed within the Android app, the information displayed included the resolution of the video which isn’t included in the iOS app.

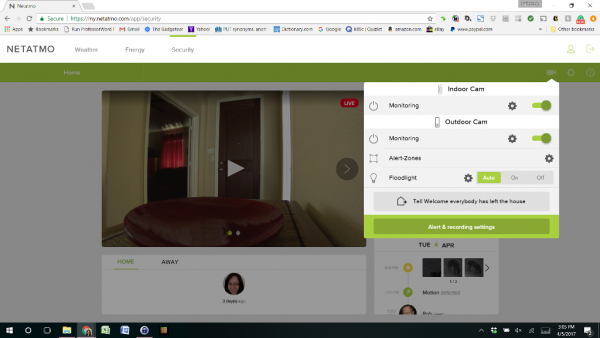
Web Access: Netatmo also allows you web access to your Netatmo energy, weather, or security products. I have both the Welcome Indoor Security camera and the Presence Outdoor Security camera. The web interface does not appear to provide any additional features than that provided by the iOS or Android apps, which I appreciate because then I can see and alter any settings that I want to from any device, not just my computer.

Final Thoughts

I liked using the Netatmo Welcome Indoor Security camera. Setup was straightforward, it recorded identified faces, unidentified faces, and motion in 1080p (most of the time) whether it was daytime or nighttime. It has a 130° viewing angle and it records videos locally and to your Dropbox account or personal FTP server thus avoiding subscription fees. It is important to consider backlighting issues when placing your camera in a spot in the house.  Just the fact that it can tell the differences between the inhabitants of the house and unidentified faces is a wonderful feature, thus allowing us to ignore those individuals that are known and to tell us when someone else is in the house.

There are a couple of things to consider before you purchase. The camera did miss us a few times when we passed in front of it (perhaps because we had passed in front of it a little earlier?), I received a couple of alarm notifications when no alarms had gone off (smoke alarms, security system alarms, etc.), and the camera has only one-way audio. However, for the most part, the camera worked well for me.

Source: The sample used in this review was provided by Netatmo. Please visit their website for more information or visit Amazon to purchase.


Product Information

Price: $159.90
Manufacturer: Netatmo
Retailer: Amazon
Requirements:
  • High-speed Internet connection needed
  • Public hotspots not supported
  • iOS 9 minimum required
  • Android 4.3 minimum required
Pros:
  • Recordings are 1080p
  • Facial recognition fairly accurate
  • Records only videos we deem important
  • No subscription fees – records videos locally and to my Dropbox account (or personal FTP server if I had one)
Cons:
  • Did not always send notifications when one of us passed in front of the camera
  • One-way audio

Filed in categories: Home and Kitchen, Reviews

Tagged:

Netatmo Welcome Indoor Security Camera review originally appeared on on April 12, 2017 at 7:38 am.

Note: If you are subscribed to this feed through FeedBurner, please switch to our native feed URL http://the-gadgeteer.com/feed/ in order to ensure continuous delivery.


Fellowes Powershred 12Cs Cross-Cut Shredder review

Spring is here! The flowers are budding and the birds are singing. Unfortunately its also tax season, and time to clean out that mountain of forms, papers and receipts you have been hoarding all winter long! We like to have a paper shredder here in the House of Bob, but our last shredder met a horrible end due to overexertion. Fortunately, Fellowes was kind enough to send me their Powershred 12Cs Cross-Cut Shredder to evaluate as part of the annual office Spring cleanup. How does it handle the job? Let’s shred! 

First Impressions

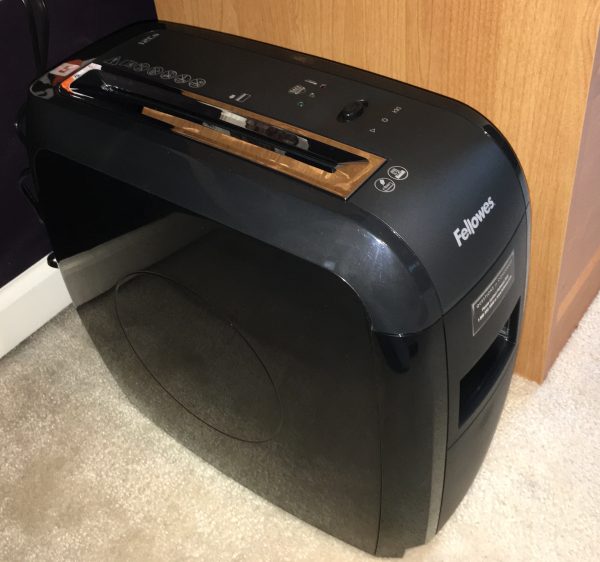
The Powershred 12Cs Cross-Cut Shredder is a heavy-duty shredder designed for household use. Measuring in at 15″ tall by 9″ wide by 17″ deep and nearly 16 pounds, it’s a small beast. But it’s a nice looking beast! The form factor is streamlined and professional looking. The unit is all black with a combination of shiny and matte surfaces. You’ll want to find a permanent spot in the office for this one, but it will look good occupying that floor space or nested under a table or desk.

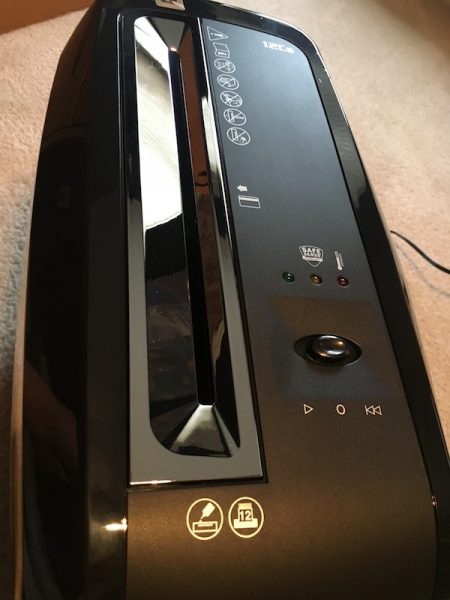
Construction is solid. It’s a heavy-duty plastic two-piece assembly, with a massive 4-gallon catch bin that slides out of the front of the unit. The bin also has a small window so you can see when you’re hitting maximum capacity, which is a nice touch. There’s a single beefy control slider on the top of the unit, and the power switch is on the back. The feeder is silver and beveled to guide the materials into the shredder. I’ve killed shredders before that don’t feel like their built to handle the weight of the shredding motor & mechanism; that’s not the case here.

Operation and Use

Preparation for battle is simple. You plug the unit in and turn on the power switch on in the back. The control slide has three positions: center is the off position (when not in use), left is the on position (for munching), and right is a reverse mode (for “I shouldn’t have tried to fit that in there…”). There are three LED lights above the slider to indicate operation (green), overheating (red), and activation of the SafeSense safety feature (yellow). The shredder is motion activated, and starts grinding when it senses that material has been inserted in the feeder.

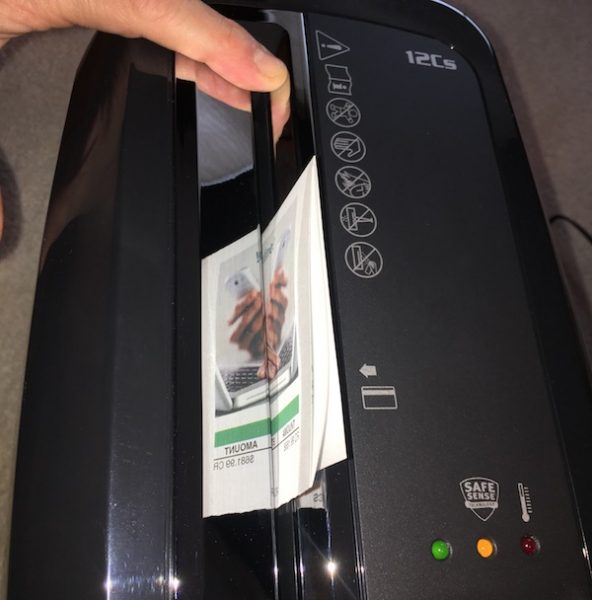
As far as shredding goes, the feeder can take a stack of up to 12 sheets at a time as well as paper clips, staples, plastic credit cards, and the assorted extras you might find in junk mail. All material is shredded into 5/32″ by 2″ cross-cut particles. The shredder can run continuously for about 5 minutes before overheating, at which point it requires 15-20 minutes to cool down before continuing. 

Another feature is what Fellowes calls its SafeSense technology. It’s activated by your hand or finger touching the feeder, at which point the shredder stops running. It’s a nice safety feature, especially if you forget that you have left the shredder in the on position.

The Test Case(s) 

Enough with the specifications; it’s time to see if the Powershred lives up to its name. Here in Bob’s house, we keep the paperwork flotsam and jetsam in a box (or two) in the closet until Spring cleaning time arrives. You’re looking at 25 pounds of receipts, papers, junk mail and assorted plastic credit cards that have been waiting for this moment to meet their shredding demise.

Let the Destruction Commence!

As we worked our way through the collection, I found that thePowershred 12Cs Cross-Cut Shredder did an excellent job with most tasks. Papers (alone or in stacks) flew through the beastie as it chuckled and begged for a real challenge. I had a stack of expired credit cards and used gift cards that it chewed up with equal zeal. Staples and paper clips didn’t even phase it. The feeder is 9 inches long, but even when I fed 8-1/2 by 11 sheets in lengthwise, the shredder sucked it all in.

Junk mail, however, did pose some challenges. You know those thicker mailings you get with brochures or little sticker books in the package? I’m happy to report that, while operation slowed a bit with these heftier feedings, the shredder chugged through them without too much trouble. There was one extra-thick mailer, however, that did slow it to a stop. We had to use the reverse switch a couple of times to back the envelope out and refeed it to chew it through. It got there eventually, but I admit that I was pushing the max capacity of the device. You’d probably want to break down bigger items like this (or old checkbooks, for example) to make sure they go through.

The SafeSense technology works well. If you even brush it with your finger anywhere on the metal feeder, the unit will stop and alert you that the safety feature has been triggered. I tested this a couple of different ways, and it works consistently once contact is made.

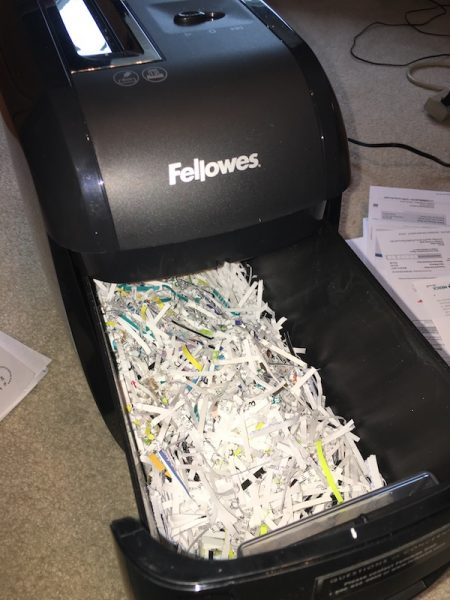
The collection bin does a nice job of trapping all the shredded bits, including paper dust. I did notice that it was easy to overload the bin unless you are paying attention to the window, however. Sliding the bin out is easy, and it locks firmly in place when you put it back in.

As far as negatives go: removal of the bin can get messy if you overload it before removal. There are also stray shredded bits that get knocked loose from the shredding mechanism when you remove the bin that requires cleanup. This unit is a lot cleaner than others I have owned. The good news is that the bin area is spacious and clear of obstructions, so it’s easy to run a vacuum nozzle through occasionally for quick cleanup. It should also be noted that the bin is flush with the bottom of the unit. I had it set up on a carpet, so the bin would catch occasionally when sliding it out. I believe that this would work better on a smooth surface, but I consider this a minor issue in practice.

In our test of the Spring cleanout boxes, we found that the 5 minute continuous run time is pretty accurate before it overheats, and we were able to go farther with brief breaks. We ran it as fast and far as it would go, and it took about 90 minutes total to get through the 25 pounds of test material. For an occasional-use home shredder, I think this a pretty good expectation for that amount of material all at once. If I were keeping up on my regular cleanup, I would expect that I would not see it overheat very often.

Conclusions and Pricing

Not everyone needs (or wants) a home shredder. We like to have one handy because we seem to collect a lot of printed material with personal information on it. If you decide you need one for your house, it should really do three things well:

  • Shred your papers, documents, and cards into consistently small and unrecognizable bits;
  • Minimize the mess from paper dust and flying particles in regular use; and
  • Show enough durability that you don’t need to buy a new one every couple of years.

Retailing at about $125, the Fellowes Powershred 12Cs Cross-Cut Shredder meets all of these requirements and meets them well. It performs better than the cheaper models I have killed over the years, and it looks nice in the office. I’d recommend it as a solution if you are looking for a new paper shredder in your home office. 

Source: The sample for this review was provided by Fellowes, and is available at Amazon and other retailers. For more info visit their site.


Product Information

Price: $125.00
Manufacturer: Fellowes
Retailer: Amazon
Pros:
  • Handles up to 12 sheets of paper, paper clips, plastic cards, and staples easily.
  • Sleek profile for the office (despite the size and weight).
  • Large collection bin for easy cleanup.
Cons:
  • Bin can get stuck on thicker carpeted floors.

Filed in categories: Home and Kitchen, Reviews

Tagged: ,

Fellowes Powershred 12Cs Cross-Cut Shredder review originally appeared on on April 5, 2017 at 7:11 am.

Note: If you are subscribed to this feed through FeedBurner, please switch to our native feed URL http://the-gadgeteer.com/feed/ in order to ensure continuous delivery.

Fellowes Powershred 12Cs Cross-Cut Shredder review

Spring is here! The flowers are budding and the birds are singing. Unfortunately its also tax season, and time to clean out that mountain of forms, papers and receipts you have been hoarding all winter long! We like to have a paper shredder here in the House of Bob, but our last shredder met a horrible end due to overexertion. Fortunately, Fellowes was kind enough to send me their Powershred 12Cs Cross-Cut Shredder to evaluate as part of the annual office Spring cleanup. How does it handle the job? Let’s shred! 

First Impressions

The Powershred 12Cs Cross-Cut Shredder is a heavy-duty shredder designed for household use. Measuring in at 15″ tall by 9″ wide by 17″ deep and nearly 16 pounds, it’s a small beast. But it’s a nice looking beast! The form factor is streamlined and professional looking. The unit is all black with a combination of shiny and matte surfaces. You’ll want to find a permanent spot in the office for this one, but it will look good occupying that floor space or nested under a table or desk.

Construction is solid. It’s a heavy-duty plastic two-piece assembly, with a massive 4-gallon catch bin that slides out of the front of the unit. The bin also has a small window so you can see when you’re hitting maximum capacity, which is a nice touch. There’s a single beefy control slider on the top of the unit, and the power switch is on the back. The feeder is silver and beveled to guide the materials into the shredder. I’ve killed shredders before that don’t feel like their built to handle the weight of the shredding motor & mechanism; that’s not the case here.

Operation and Use

Preparation for battle is simple. You plug the unit in and turn on the power switch on in the back. The control slide has three positions: center is the off position (when not in use), left is the on position (for munching), and right is a reverse mode (for “I shouldn’t have tried to fit that in there…”). There are three LED lights above the slider to indicate operation (green), overheating (red), and activation of the SafeSense safety feature (yellow). The shredder is motion activated, and starts grinding when it senses that material has been inserted in the feeder.

As far as shredding goes, the feeder can take a stack of up to 12 sheets at a time as well as paper clips, staples, plastic credit cards, and the assorted extras you might find in junk mail. All material is shredded into 5/32″ by 2″ cross-cut particles. The shredder can run continuously for about 5 minutes before overheating, at which point it requires 15-20 minutes to cool down before continuing. 

Another feature is what Fellowes calls its SafeSense technology. It’s activated by your hand or finger touching the feeder, at which point the shredder stops running. It’s a nice safety feature, especially if you forget that you have left the shredder in the on position.

The Test Case(s) 

Enough with the specifications; it’s time to see if the Powershred lives up to its name. Here in Bob’s house, we keep the paperwork flotsam and jetsam in a box (or two) in the closet until Spring cleaning time arrives. You’re looking at 25 pounds of receipts, papers, junk mail and assorted plastic credit cards that have been waiting for this moment to meet their shredding demise.

Let the Destruction Commence!

As we worked our way through the collection, I found that thePowershred 12Cs Cross-Cut Shredder did an excellent job with most tasks. Papers (alone or in stacks) flew through the beastie as it chuckled and begged for a real challenge. I had a stack of expired credit cards and used gift cards that it chewed up with equal zeal. Staples and paper clips didn’t even phase it. The feeder is 9 inches long, but even when I fed 8-1/2 by 11 sheets in lengthwise, the shredder sucked it all in.

Junk mail, however, did pose some challenges. You know those thicker mailings you get with brochures or little sticker books in the package? I’m happy to report that, while operation slowed a bit with these heftier feedings, the shredder chugged through them without too much trouble. There was one extra-thick mailer, however, that did slow it to a stop. We had to use the reverse switch a couple of times to back the envelope out and refeed it to chew it through. It got there eventually, but I admit that I was pushing the max capacity of the device. You’d probably want to break down bigger items like this (or old checkbooks, for example) to make sure they go through.

The SafeSense technology works well. If you even brush it with your finger anywhere on the metal feeder, the unit will stop and alert you that the safety feature has been triggered. I tested this a couple of different ways, and it works consistently once contact is made.

The collection bin does a nice job of trapping all the shredded bits, including paper dust. I did notice that it was easy to overload the bin unless you are paying attention to the window, however. Sliding the bin out is easy, and it locks firmly in place when you put it back in.

As far as negatives go: removal of the bin can get messy if you overload it before removal. There are also stray shredded bits that get knocked loose from the shredding mechanism when you remove the bin that requires cleanup. This unit is a lot cleaner than others I have owned. The good news is that the bin area is spacious and clear of obstructions, so it’s easy to run a vacuum nozzle through occasionally for quick cleanup. It should also be noted that the bin is flush with the bottom of the unit. I had it set up on a carpet, so the bin would catch occasionally when sliding it out. I believe that this would work better on a smooth surface, but I consider this a minor issue in practice.

In our test of the Spring cleanout boxes, we found that the 5 minute continuous run time is pretty accurate before it overheats, and we were able to go farther with brief breaks. We ran it as fast and far as it would go, and it took about 90 minutes total to get through the 25 pounds of test material. For an occasional-use home shredder, I think this a pretty good expectation for that amount of material all at once. If I were keeping up on my regular cleanup, I would expect that I would not see it overheat very often.

Conclusions and Pricing

Not everyone needs (or wants) a home shredder. We like to have one handy because we seem to collect a lot of printed material with personal information on it. If you decide you need one for your house, it should really do three things well:

  • Shred your papers, documents, and cards into consistently small and unrecognizable bits;
  • Minimize the mess from paper dust and flying particles in regular use; and
  • Show enough durability that you don’t need to buy a new one every couple of years.

Retailing at about $125, the Fellowes Powershred 12Cs Cross-Cut Shredder meets all of these requirements and meets them well. It performs better than the cheaper models I have killed over the years, and it looks nice in the office. I’d recommend it as a solution if you are looking for a new paper shredder in your home office. 

Source: The sample for this review was provided by Fellowes, and is available at Amazon and other retailers. For more info visit their site.


Product Information

Price: $125.00
Manufacturer: Fellowes
Retailer: Amazon
Pros:
  • Handles up to 12 sheets of paper, paper clips, plastic cards, and staples easily.
  • Sleek profile for the office (despite the size and weight).
  • Large collection bin for easy cleanup.
Cons:
  • Bin can get stuck on thicker carpeted floors.

Filed in categories: Home and Kitchen, Reviews

Tagged: ,

Fellowes Powershred 12Cs Cross-Cut Shredder review originally appeared on on April 5, 2017 at 7:11 am.

Note: If you are subscribed to this feed through FeedBurner, please switch to our native feed URL http://the-gadgeteer.com/feed/ in order to ensure continuous delivery.

LEDVANCE’s Sylvania Lightify Gateway review

The LEDVANCE Gateway is a smart hub that interprets commands from a Wi-Fi network and transmits them to devices on its ZigBee network, and also monitors the status of those devices and reports it to authorized users. It is metaphorically the jam that holds all of the intelligent LEDVANCE products together. But, like the jam that holds your sandwich together, there are competing brands to choose from and different qualities of each. What you choose depends on your preferences and, to some extent, budget. Ok, enough of this metaphor, I’m getting hungry and want to check out this hub. Let’s see how it works and what it has to offer.

You may have noticed that the manufacturer listed in the title of this post is LEDVANCE but the device is branded with the Osram trademark. This is because in January 2016, Osram GmbH spun-out some of its business units into a new company named LEDVANCE. The portfolio of the new company includes, amongst other units, connected and intelligent lighting solutions for smart homes and smart buildings. The app on the iTunes store and the Google Play site are still branded as Osram, even though the iTunes app has been revised 6 times and the Android app 7 times since the rebranding.

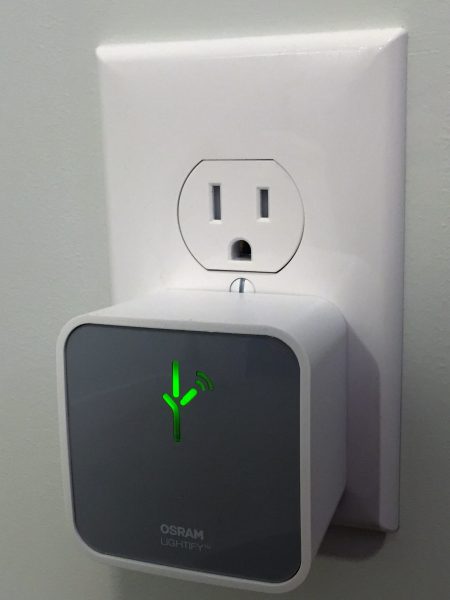
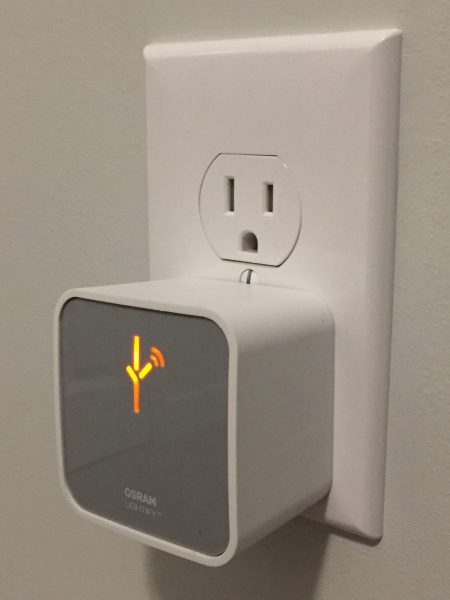
The actual product is a 60 mm wide, 60 mm high, and 41 mm deep (not including the outlet prong) box. The plug is a 15 amp non-polarized design so it permits the most flexibility when installing it into your chosen receptacle. When installed and configured correctly the symbol on the front (which I think looks like the alphabet used by the Predator) glows green with just enough brightness that it is easy to tell it is functioning during the day but isn’t obtrusive at night. When the hub is offline the symbol glows orange/amber and when it is logging into the WI-FI it blinks orange/amber. The gateway requires 5 watts, so that’s 3.65kWh/month, or less than a dollar.

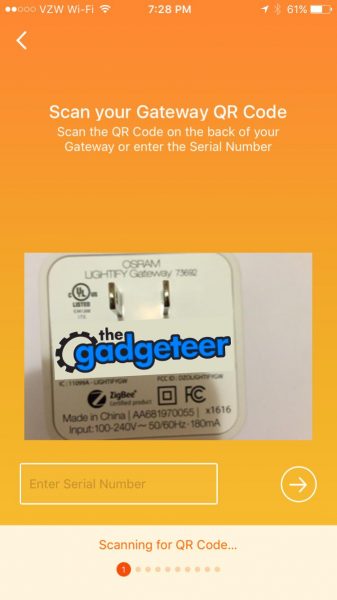
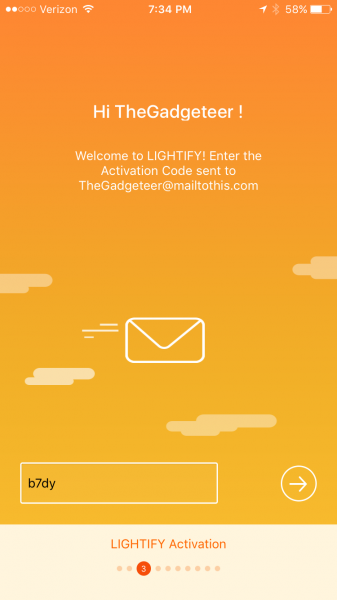
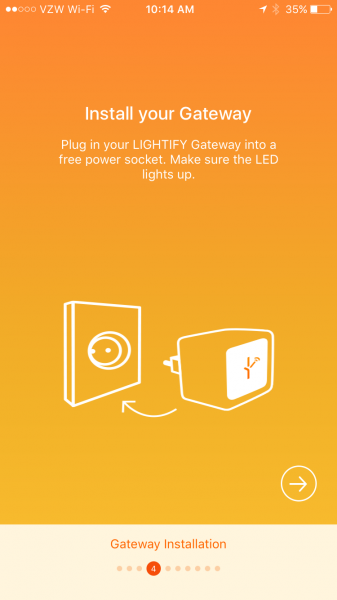
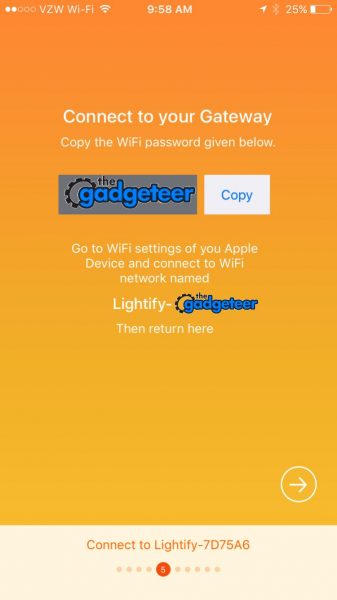
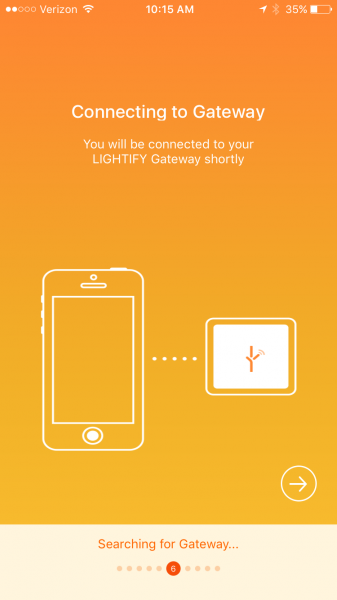
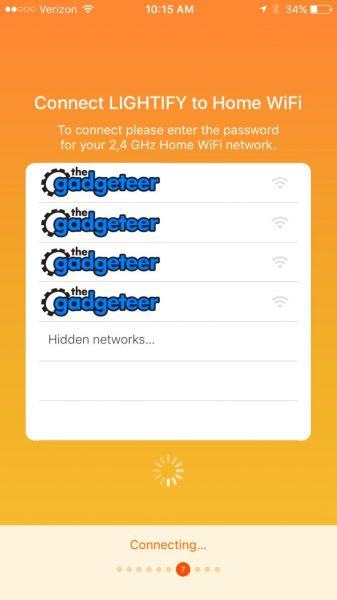
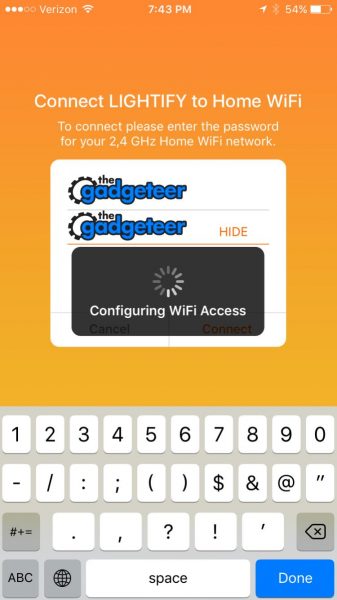
The set up process is easy but sort of lengthy, the video that they send to you in the sign-up email is not found on YouTube, and the only other YouTube videos are in German. So, I’ll describe the setup here and provide some pictures to go along with it for those of you who don’t sprechen Deutsch. These are iPhone screenshots but the process on the iPhone and Android is very similar. I’ve covered the MAC addresses, SSID’s and passwords used with The Gadgeteer logo for security. Download and install the companion app before plugging in the hub. Current versions are 32 MB for iOS and 27 MB for Android. The first step is to scan a QR code on the back of the hub. This allows the app to look up the SSID and password of the hub’s built in ad hoc Wi-Fi network. Alternatively, you can type in the 13 character alphanumeric serial number. (If you plan to integrate this into Amazon Alexa, write down the serial number; you’ll need it later, but you’ll also need to keep the hub plugged into the wall.)

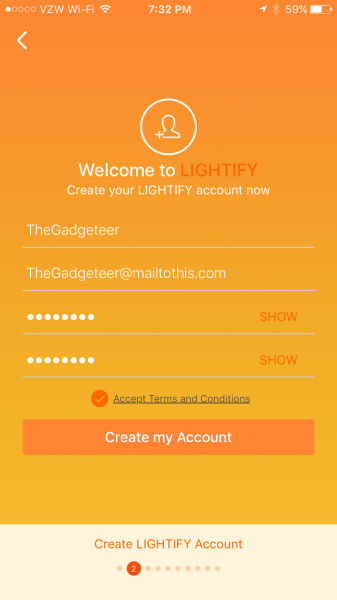
Assuming you don’t have an existing account you must create an account here and verify that it is a real account. I just used a throw-away Mailinator account for this demo. The account will be verified so you need to use an account that you can actually access. You may share this account login information with up to four other devices to permit shared operation of the hub. App settings will be synchronized across each device through the internet.

 After creating the account you can finally install your hub. The unit will power up and start an ad-hoc Wi-Fi network. The app will conveniently display the password to the network and display the name of the SSID you need to join. Task switch to the settings screen and join the provisional Wi-Fi network.

  After task switching back to the app, and after the phone is connected to the hub, it will search for 2.4 GHz Wi-Fi hotspots (or 2,4 GHz in Europe) and display the detected SSID’s on the next screen. If you don’t broadcast your SSID you can still type it in by selecting “Hidden Networks”.

Here you will provide the password to your SSID and the hub will associate itself with your home Wi-Fi network. Mid last year, this article was published on how there were security flaws in the Osram app and how the home Wi-Fi password was not encrypted in the app. The app has since been patched and this security flaw has been fixed. Also, unlike SmartThings, there is no option to run the hub off of a wired connection and there doesn’t appear to be a battery backup to the AC power.

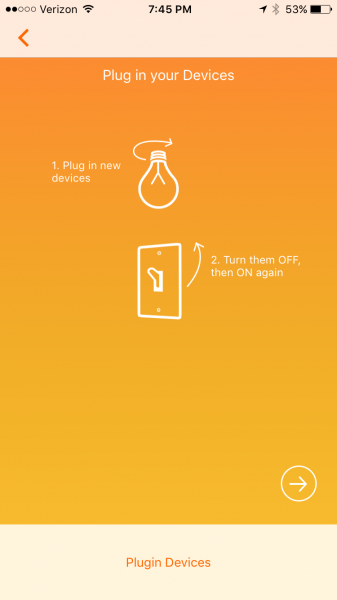
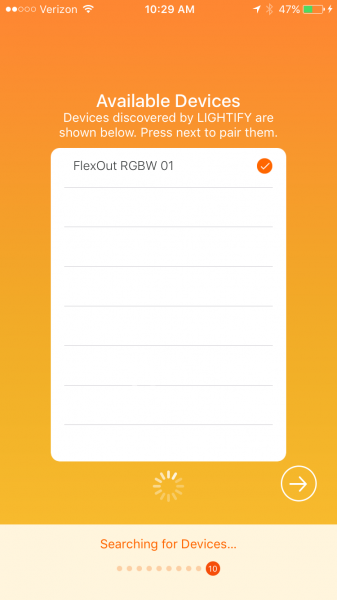
Once the hub has associated itself with your network it will ask you to plug in your devices. Turning them on, off, and on again should signal the controller within each to join the newly established network. ZigBee devices can only be part of one network at a time. If the lamp is not responding then you may need to turn it on for 5 seconds and off for 1 second 6 times in order to reset the controller. Other devices may have a hard reset button.


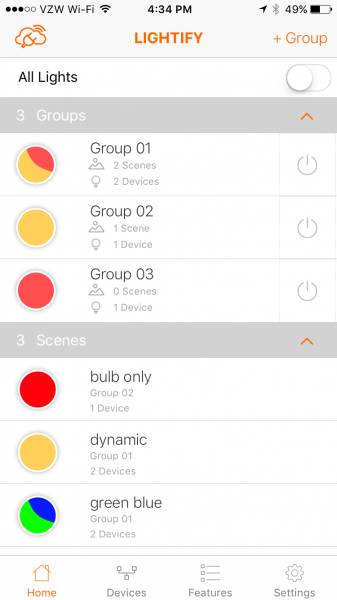
After the devices are found you are brought to the home screen.  This will show two empty categories: group and scene. Groups are collections of devices that you can turn on or off at the same time and apply dynamic lighting presets to all at once (more about this later). Scenes are groups of devices that have preset settings, but not each device in a scene has to have the same settings. Each device in a scene may have independent or shared correlated color temperature, brightness, or hue. Think of a scene in a theatrical production: there may be some bright lamps with red filters and some dim lamps with blue filters. This arrangement could be set by selecting one scene button on the Lightify app.

The cloud with a plug on top of it means that the hub is communicating with the smartphone/tablet using a local Wi-Fi router and also an internet connection. If the smartphone/tablet is not using the same router (if Wi-Fi is turned off on the phone) then the plug disappears. In this case there is about a 0.2 sec delay between pressing the on button on the phone and the light turning on/off. If communication through the router is used then the response time to the button press is almost instantaneous.

To create a group press the + group in the upper right. it will take you to a screen where you can enter an group name and select which device, from amongst all the devices on the network, belong to the group. Once the group is created return to the Home screen. On the home screen the switch to the right of each group looks like a Decora switch that is pressed in when active and flat when switched off. Pressing the circle to the left of the group name will take you to a device settings screen where the settings for each or every device in the group may be set. (More about this in the next paragraph).   On the device setting screen there will be a + Scene button on the top left which you may use to save the current condition of the devices within the group. Pressing the name on the home screen will allow you change the name and set the members of the group. Once a scene is created the color of the button on the home screen will roughly match the colors of the devices in the scene.

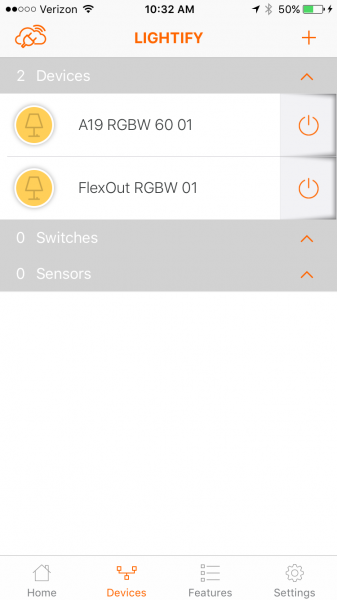
On the devices screen, each device is listed in a separate category. The color of the icon roughly matches the selected hue of the bulb. Pushing either the icon or the name brings you to the device settings screen.

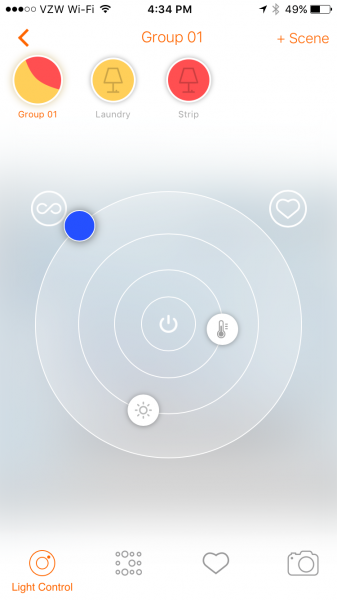
The device settings screen has a main light control wheel that features rotary sliders around a central on/off pushbutton. Adjusting the correlated color temperature sets the hue to the correct color, from cool blue to warm orange. The intensity may be adjusted independently of the hue. Using the outermost slider turns the display into a color wheel which allows the user to specify the hue and saturation. If the Lightify lamp is lit while you are adjusting these settings it changes color according to your selection. The lamp is very responsive to your color and brightness selections which makes finding a lamp color an easy experience. Unfortunately, there is no record of actual RGBW values. Pressing the device name at the top of the screen allows the user to edit the name of the device. Pushing the rocker switch icon at the top left allows the user to change the default appearance of the device. There are three more buttons at the bottom of the screen: Presets, Favorites, and Camera.

The presets screen shows 14 different color presets. There are three presets that are static color settings: plant light, active, and relax. There are two long-period dynamic lighting presets called day light and good night light. The good night light will fade to off in a user-set amount of time and the day light will simulate the color of sunlight throughout the day. The other light patterns are short-period dynamic lighting presets and include Fireplace, Ocean, Evening, LIGHTIFY Loop, Candy, Polar light, White and White, Activate, and Chill Down. The speed of the color change may be set for each dynamic preset and the brightness may be changed for all of these except for Activate and Chill Down.

The color loops and the dynamic lighting are unique features of the Lightify gateway. I was unable to create this with the SmartThings hub CoRE programming, but it may be duplicated if the actual header information is programmed into a SmartThings program. Still, this would take some above average programming knowledge. The main differentiator is the speed at which colors may change. Note that the presets may not be saved as favorites, may not be saved as scenes, and will not resume if the bulb is turned off. They may only be set from the device screen or the group screen.

The favorites button lists the 16 favorite user settings for each device. The favorites may be saved by pressing the circle inscribed heart to the top right of the setting wheel. Note that when I added my Android phone account to the iPhone account that the existing favorites disappeared. The favorites show the approximate hue and brightness, but there is no way to name the favorite.

The camera icon allows the user to match the hue of the light to a grouping of pixels in a stored image or a captured photo. This is a neat trick but I believe it is mostly a tool to demonstrate the range of the RGBW lighting capabilities.

There are six more capabilities of the gateway. Four of them are under the Features menu: Scheduler, Wake-up light, Vacation Modes, TV Simulation. The scheduler will simply turn on the light for a predetermined period every weekday the scheduler is selected. Any number of schedules may be set, so more than one on-off cycle may be scheduled per day. The wake up alarm will dim the selected light from a low brightness to bright daylight and then switch off at a desired time. The smartphone/tablet that created the wake-up event will signal an alarm (alarm and tickling [sic], digital alarm clock, fog horn, old alarm clock and ringing, seagulls on beach, whistle, or wild birds). The acoustic alarm won’t sound if the smartphone/tablet is in silent mode. The vacation mode will turn on and off the lights between every 5 minutes and every 2 hours (user-selectable) in the time period selected. Finally, there is a TV simulator that uses the color loops to simulate a TV being watched within a user-selected time period.

The settings menu allows the lights to work with Nest home and away profiles so that different lighting can be set to each mode. The settings screen on the iPhone allows customization of the today screen widget, and a widget is also available on Android, that allows the user to set group and scene lighting from outside of the app.

Lastly, the gateway can be integrated with Amazon Alexa smart home automation to permit devices to be turned on and off and set to a percent intensity. Sadly, Alexa doesn’t allow the setting of color or correlated color temperature. Alexa only controls devices through the gateway; if you want to control groups you need to define them within the Amazon smart home settings. Also, since you will have to speak the name of your device, make sure it is one that you will be able to roll off your tongue. In the images above I have FlexOut RGBW 01 listed as a device but I renamed this to Strip for use with Alexa.

In conclusion, the LEDVANCE Lightify Gateway provides flexibility and creativity in the operation of lights and plugs. The gateway provides limited automation in the form of turning on and off lights and plugs using ZigBee switches and sensors, programming lights and plugs using timers and alarms, and coordinating modes with a Nest thermostat.  The gateway also allows limited control with Amazon Alexa. More advanced automation, such as integration with IFTTT, Stringify, or other home automation devices is not supported. However, this gateway is available for $32.59 alone, and is often packaged with LEDVANCE lamps for even larger savings. If you want to explore home automation without breaking the bank, and if you want flexible, responsive, and creative lighting capabilities from the palm of your hand, then the LEDVANCE Lightify Gateway may be just what you’re looking for.

Source: The sample for this review was provided by LEDVANCE Sylvania. Please visit their site for more info and Amazon to order.


Product Information

Price: $32.59
Manufacturer: LEDVANCE Sylvania
Retailer: Amazon
Requirements:
  • Requires active WiFi Network and LIGHTIFY Compatible ZigBee Products
  • Free LIGHTIFY App runs on Apple iOS7 or above and Android 4.1 or above
Pros:
  • Inexpensive
  • saves favorite settings
  • color looping
  • scheduler
  • Nest and Amazon Alexa enabled
Cons:
  • No IFTTT or Stringify

Filed in categories: Home and Kitchen, Reviews

Tagged: ,

LEDVANCE’s Sylvania Lightify Gateway review originally appeared on on April 3, 2017 at 10:03 am.

Note: If you are subscribed to this feed through FeedBurner, please switch to our native feed URL http://the-gadgeteer.com/feed/ in order to ensure continuous delivery.