Get ready for spring with the FlipFork BOSS – the only grilling tool you’ll ever need

NEWS – Let me ask you a question. How many bbq tools do you have in your grilling arsenal? Think about it I’ll wait… If you’re like me, your answer was probably too many.

What if you only needed one?

The FlipFork BOSS is a 5-in-1 grilling tool. The BOSS takes five essential grilling utensils and puts them in one heavy-duty multitasking tool.

The sturdy stainless steel design has an extra long Acacia wood handle that’s both moisture resistant and antibacterial. It also sports a wide spatula (for flipping and holding burgers), a fork (for picking up and moving steak, d handle.sausage, or chicken), knife edge (for cutting meat or veggies), and serrated edge (for tenderizing meat).

Most importantly, there’s a bottle opener for popping the top on your favorite adult beverage.

No more clutter from multiple utensils or trips in and out of the house. And cleanup is a breeze because the BOSS is dishwasher safe.

Finally, you can focus on what’s important – GRILLING! The FlipFork BOSS sells for $26.99 and is available from Amazon.

Filed in categories: News

Tagged: , ,

Get ready for spring with the FlipFork BOSS – the only grilling tool you’ll ever need originally appeared on The Gadgeteer on March 11, 2019 at 10:00 am.

Note: If you are subscribed to this feed through FeedBurner, please switch to our native feed URL http://the-gadgeteer.com/feed/ in order to ensure continuous delivery.

Cuisinart GR-5B Series Griddler FIVE tabletop grill and panini press review

REVIEW – I don’t consider myself a cook as much as I consider myself an eater. I like to eat but to do that I have to cook. The best thing about cooking is the eating part. The worst thing about cooking is the cleanup. For that reason, I’m always looking for shortcuts and ways that can make cooking quicker and easier without sacrificing taste. I’m already a huge fan of the Instant Pot, and now I have another favorite kitchen helper. It’s the Cuisinart GR-5B Series Griddler FIVE tabletop grill and panini press. Let’s get cooking and check it out!

What is it?

The Cuisinart GR-5B Series Griddler FIVE tabletop grill and panini press is a small tabletop 5-in-1 cooking appliance. It’s a contact grill, panini press, full grill, full griddle, and half grill/half griddle.

Specifications

Adjustable temperatures from 175-450 degrees
Weight: 12lbs
Dimensions: 8.75″ x 16.00″ x 13.75″

What’s in the box?

  • Cuisinart GR-5B
  • Scraper
  • Instruction/recipe book

Design and features

The Cuisinart GR-5B is a compact tabletop appliance that has a stainless steel exterior with a large handle on top and a small backlit LCD on the front.

Attached to the back of the unit is the non-replaceable power cord which felt a bit too short to me at 36 inches.

The right side of the unit has a sliding latch on the side of the handle that allows you to open the lid 180 degrees if you want to use the cooker as a griddle.

Without unlocking the handle, the lid opens as you see in the image above. It opens far enough that it will rest in this position without needing to manually hold it open.

Unlocking the handle will allow the lid to swing open and then rest on the handle to create a full cooking surface.

As mentioned, this is a 5-in-1 cooking appliance. You can use it as grill like you see above…

Or you can press the black button on the side which allows you to remove the non-stick cooking plates which are reversible.

Just press the button on either side and lift out the dishwasher safe plates.

Then you can flip one or both over to the flat griddle cooking surface shown above. This will give you the ability to cook different foods on either side like pancakes or fried eggs on the flat side and bacon or sausages on the grilled side that has the ridges that keep the food out of the grease/oils.

If there is any excess grease, oils, or juices, they will run off into the built-in collecting tray that can be removed for cleaning.

Let’s get cooking!

The first step to using the Cuisinart GR-5B Series Griddler FIVE is to plug it in and press the on/off button. When you do this, the LCD will light up and will show the default temperature of 400 degrees. You can use the knob on the right to change the temp from 175-450 degrees in 25-degree increments and switch between grill and griddle modes.  When the mode and temperature are set, the grill will preheat and then beep when it is ready to be used.

The first cooking test I did with the GR-5B was to make some toasted meatloaf sandwiches. I love using leftovers and toasted meatloaf is one of my all-time favorites. I also decided to split some leftover baked potatoes and put them on the grill too.

The GR-5B’s cooking surface is roomy enough for two standard sized sandwiches when using it as a panini press.

With the sandwiches in place, you can close the top. When I say “close”, that doesn’t mean that the lid will lock in place. The lid floats, so it presses the food between the two cooking plates but does not latch shut. The lid is heavy enough to keep everything in place and cooks from both sides so don’t have to manually flip the sandwich mid-way through which in the past usually meant losing some of the meat and other toppings in the process.

Besides the mode and temperature, you can also set a timer to count down or count up to a certain length of time so you won’t overcook your food.

For toasted sandwiches, I just opened the cover after 5 minutes to check to see if the bread was toasted to my liking and adjusted from there. Timing will be dependant on the type of bread and the selected temperature. I will say that at 375 degrees, the sandwiches toasted much quicker than my usual stovetop frying pan method and the meat inside was perfectly heated.

It was definitely love at first bite!

And the clean up was crazy easy too. I just waited for the grill to cool down and then wiped the plates with a paper towel since there wasn’t any residue left on the plates other than a little bit of grease from the butter.

A few days later I grilled up some smoked sausages.

Sausages don’t squish like sandwiches when you cook them with the cover closed, so the cover didn’t want to float too well at first.

Jiggling the handle and opening and closing the cover a couple of times fixed that and the back tilted so it would be flat against the sausages. Now I always look at the grill from the side to make sure the lid is positioned correctly for optimal cooking.

Almost done! Yum, another winner winner not a chicken dinner. 🙂

What I like

  • Easy to use
  • Easy cleanup
  • Faster than using a frying pan to grill/fry meat and toast sandwiches

What needs to be improved

  • A longer power cord would be nice

Final thoughts

The Cuisinart GR-5B Series Griddler FIVE tabletop grill and panini press has become a regularly used cooking appliance in my home. My favorite use for it is to make toasted sandwiches because it makes them quick and perfectly. I also like to use it grill up chicken breasts, sausages, pork cutlets, etc. I prefer to use the GR-5B with the cover in the closed position because it keeps grease spatters to a minimum which means less clean up for me. And speaking of clean up, popping the plates off and throwing them and the drip tray in the dishwasher is about as easy as it gets. The Cuisinart GR-5B Series Griddler FIVE tabletop grill and panini press gets two thumbs up and a happy tummy from me.

Price: $99.95
Where to buy: Cuisinart.com and Amazon
Source: The sample for this review was provided by Cuisinart.

Filed in categories: Reviews

Tagged: , ,

Cuisinart GR-5B Series Griddler FIVE tabletop grill and panini press review originally appeared on The Gadgeteer on March 1, 2019 at 8:00 am.

Note: If you are subscribed to this feed through FeedBurner, please switch to our native feed URL http://the-gadgeteer.com/feed/ in order to ensure continuous delivery.

Tenergy Indoor Grill review

REVIEW – I am a huge fan (no pun intended!) of grilling. I tend to cook that way on any temperate afternoon or evening, if I have the time and ingredients. When the Gadgeteers were offered a chance to try the Tenergy Indoor Electric Grill, I spent several milliseconds before responding with a huge “Me! Me! Me!” I was chosen and it arrived a week or so later and I’ve been forced to grill food on it for several meals. See what lengths the Gadgeteer team will go to for our readers?

Note: Photos may be tapped or clicked for a larger image.

What is it?

The Tenergy Electric Indoor grill is just that: an electric grill that can be used indoors for smokeless grilling of meats, veggies, or kabobs that you’d normally take out to your patio to grill over charcoal or a gas flame. Like an animal.

Specs

  • SMOKE-LESS TECHNOLOGY – Creates 80% less smoke than other indoor electric grills. The infrared heat is only directed at the grill rack’s surface and the cooling tray catches grease and oils before they get the chance to become smoke.
  • Advanced Infrared Heating Technology – 1660W powerful heating element cooks meats, fish, poultry, and vegetables perfectly. The unique infrared heating technology evenly spreads heat on the grill top. Food is guaranteed to cook uniformly, no cold zones or weak spots.
  • GRILL LIKE A PROFESSIONAL – Quickly heats up to an ideal grilling temperature of 446°F within 6 minutes. Enjoy searing meats and vegetables with steakhouse like quality diamond grill marks.
  • Easy Clean Non-Stick Surfaces: non-stick grid, dishwasher safe removable parts, makes cleaning easier than ever.

What’s in the box?

  • Grill box with captive power cable
  • Non-stick Grilling surface
  • Stainless steel removable drip pan
  • Instruction booklet
  • Warranty card

Design and features

The Tenergy indoor grill is a compact 19.5″ (including the grill’s handles) x 13.5″ x 7″. The grill area is 12″ x 8″. This means that you can’t put some larger items on it, and there’s no cover for smoking or holding in the heat to cook around the entire surface of the food. The heat only comes up from below.


The standard 3-prong plug fits most modern US electrical sockets and pulls no more power than a toaster oven or a waffle iron.
Before we get into the use and performance, let me give you an overview of the grill and how it works. First off, they spare no quarter in reminding you that this is an indoor grill, only, not for outdoor use, even on your deck, even under an overhang. Indoors only. OK, got it.


It is smokeless because the drippings from your grilled products do not touch the heat source, which is the usual source of smokey flare-ups. The infrared radiation comes from the two long inner walls, through clear glass panels that protect radiant foil reflectors that focus the heat from the lamps up to the surface of the grill.

Anything that falls through hits the much cooler drip tray and can be washed off easily in your dishwasher. The non-stick grill can also be put in the dishwasher, but in use, I found that it usually needed some soaking and non-abrasive elbow grease to clean, especially if fatty foods were involved.


There is no temperature control. It’s Off, WarmUp, and On – period. This means you’re going to have to monitor your foods more than you may be used to with a covered grill that has an adjustable flame, or a charcoal grill with a variable rack level. I found it also meant I turned some items more, in order to keep from burning.


The smaller size will mean you may have to cook in waves or shifts, rather than tossing on the entire meal. This only became a problem when I was trying to bulk grill food for lunches or larger groups. Normal cooking was fine.
Total run time may also present a problem. You should not run the grill longer than one hour at a time, and then it needs an hour rest.

Setup

Other than washing the pan and grill and wiping down the inner surfaces with a damp cloth to remove manufacturing detritus, there’s no real setup. You do need to place it on a flat, heat-proof surface (We use our glass cooktop because the Lovely Bride will have my head if I mess up her new countertops. Plus, this puts the grill under the range hood, should something start to smoke.)
Read the instruction manual. It’s only 8 large print pages of bullet points, and it’s going to prevent you from doing things that experienced grillers may take for granted. Like grilling frozen foods.

Performance

Our first use was for two fairly lean NY Strip steaks. They were at room temperature and took only 4-6 minutes per side to be perfectly medium rare. Drippage was minimal. Cleanup was a breeze.


The second outing, I got more adventurous. I usually grill about half of a 6.5-pound bag of frozen chicken thighs from Costco for a week of lunches and salads at a time. On my gas grill, they go on the grill frozen and take about 30 minutes from lighting the grill to bringing them inside. With the Tenergy, you cannot grill frozen foods, so I had to thaw them out in the fridge for a day or so. Then, I could only fit 4-6 on the small grill (versus 8-10 on my gas grill). They cooked nicely and turned out much more evenly cooked than on the gas grill, where rendering fat drips down onto the heat plates (the angled metal panels that cover the actual burners), burns, smokes, and flames up. This can sometimes overcook some parts of the food if you aren’t keeping an eye on it, but it also imparts a taste that was missing from my indoor-grilled foods.
My Lovely Bride volunteered for clean-up duty that night and reported that it was a horrendous ordeal to clean out the drip pan, the grilling grate, and the side panels. With the fatty thighs (half of which I had marinated in white wine and spices before cooking), they dripped and spattered in all directions, which made for a huge mess inside the heat box. “If you’d have cooked those outside on the gas grill, I wouldn’t have had to clean up anything!”

What I Like

  • Non-stick grilling surface.
  • Fast heat-up and use.
  • Smokeless cooking really works, if you follow directions.

What needs to be improved

  • I find it to be great, for what it is. Nothing to change for me.

Final thoughts

This will not replace a “real” grill if you’re someone who loves to release your inner hunter-gatherer. There will still be a need to fill the grill for a group, cook multiple courses for an afternoon or evening of many items, or to put on a large roast or pig butt. But as Punxsutawney Phil’s lies have become more apparent this February, I’ve enjoyed having a grilled steak in the evening without having to endure the cold, dark drizzle of a 35º “Early Spring” evening on the deck. And I’m sure there will be hot, miserable Dog Days of summer that I’ll want a steak or a grilled burger without the misery of standing outside with the humidity and the bugs. And for these occasions, Tenergy has provided a well-designed tech fix.

It’s not a small unit, but I don’t think it could really be made any smaller and be effective. We keep it in a lower shelf in the hall linen closet, where it’s just a few steps from the kitchen.

Price: $179.00
Where to buy: Amazon
Source: The sample of this product was provided by Tenergy.

Filed in categories: Reviews

Tagged: , ,

Tenergy Indoor Grill review originally appeared on The Gadgeteer on February 26, 2019 at 10:00 am.

Note: If you are subscribed to this feed through FeedBurner, please switch to our native feed URL http://the-gadgeteer.com/feed/ in order to ensure continuous delivery.

Cuisinart 30″ Electric Smoker review

REVIEW – I used to have an offset barrel smoker, and I just couldn’t get the hang of it. Managing the fuel was a pain, and temperature control was difficult. The Cuisinart 30″ Electric Smoker offers an experience for those who are new to the meat smoking game, or those (like me) who just want an easy plug-and-play solution. How did it do in my tests? Let’s cook!

What is it?

It’s a vertical smoker that uses an electric heating element. It also works nicely as an outdoor oven.

Hardware specs

  • 22″ wide by 19″ deep by 37.5″ tall
  • 51.5 pounds
  • 584 square inches of cooking space
  • 1500 watt heating element with a heat range from 100 to 400 degrees

What’s in the box?

The package contains the smoker, 3 cooking racks, a water pan, a drip pan, a wood chip box, and the power unit. Some assembly is required.

Design and features

The Cuisinart 30″ Electric Smoker utilizes a simple, no-fuss design that can not both smoke meats & vegetables and do double-duty as an outdoor oven. After several cooking sessions during my test, I can attest to the convenience and ease-of-use. Let’s explore the details.

Setup

Before we start, know that the Cuisinart 30″ Electric Smoker is a big beastie. Cuisinart claims to use some lightweight materials in the construction, but it still weighs about 50 pounds. You may want to recruit a friend to help with assembly if you’re not accustomed to maneuvering big items by yourself.

Cracking the box reveals all of the components needed for assembly. I had read some reviews that indicated problems with damage during shipping, but my box came in perfect shape, with everything well-packed:

There are a handful of parts that you need to install that take just a few minutes with a screwdriver. The door and heating element are already set up. You’ll attach the legs, the side handles, and the thermometer. Once that’s done, she’s all ready to go. Here are some shots of the finished assembly. Note that this will be the first and last time you’ll see this unit in shiny, pristine condition:

Before we start, it’s important to note that Cuisinart recommends that you season the unit before first cooking. You’ll want to give the interior (except the burner coil) a wipe down with oil, or a coating of cooking spray. You’ll then close the unit and crank the heat up to 275 degrees, and let it run for about three hours. That seasons the interior and burns off any oils or dust that could have accumulated in the manufacturing/shipping process.

Key features & design details

The Cuisinart 30″ Electric Smoker feels like a solid build for the price point. The walls of the unit are insulated and about 3/4″ thick, and all the hardware looks pretty durable. It’s nice and stable when set up, which is critical for safety.

The heating element is an electric element at the base of the box. Immediately above that burner is the rack for the wood chips and water pan, followed by three cooking racks spaced 5″ apart. You’ve got 10″ of space above the top rack for large hunks of protein (like a turkey), but you can certainly adjust or remove the middle rack if you were going big (like a couple of pork shoulders). Options for hooks at the top could be nice for hanging ribs, but I wouldn’t expect that in a basic unit like this.

Here’s a closeup of the lower pan rig. The pan on the left is for water, which is essential for long slow cooking. The pan on the right is for your wood chips, and sits *just* above the burner to get those chips roasting. It’s also got a lid, which can be used to control the flow of smoke. Both the pans are stainless steel, and look like they will Stan up to long-term use.

Speaking of smoke… see that tiny little port up in the corner? That’s your smoke exhaust. The unit is well-sealed, so this little port allows you to concentrate the smoke in the firebox. We’ll talk more about that in a minute.

Exterior hardware is all good. It’s got a nice burly grab handle for opening the unit, and the lock uses a clever reverse-pivot system that unlocks and opens (or closes) in one motion. This is very handy for keeping your fingers from getting singed when the unit heats up:

Side handles allow you to lift & move the unit about. They’re just fine given the weight of the smoker. It is 50 pounds, so keep that in mind if you have back issues. Wheels might be more convenient, but I’ll trade them for the stability the solid legs offer.

There’s a drip tray that slides under the unit in premade slots. It’s also a solid piece of metal, which I think will last a long time.

And last but not least, the power element and control. This plugs into the unit, allowing you to store it (and the chord) elsewhere. I like that quite a bit. You’ll set the coil to heat with a dial. That light-up arrow to the left is the measuring point. The light will be on when the burner is in operation.

How do you control the temperature, you ask? Well…

Performance

Let’s start by talking about temperature control. You’ll start by adjusting the burner to get the hot box to the desired temperature. Close the unit, fire up the burners, and let it run for 10 minutes or so (without opening the box!) to get it to temperature. Check the built-in thermometer to see where the heat is sitting, and adjust until you get it where you want it:

For my first cook, I was doing barbecue chicken rubbed with my own dry rub (salt, brown sugar, paprika, and spices). I set the internal temperature at 250 degrees, expecting a 2-3 hour roast time. Mesquite smoke was the wood chip choice, soaked in water for 30 minutes and drained prior to roasting. I also threw in a pan of salt to smoke while I was at it. Here’s all the product going in:

And here’s the cook at about the two hour mark:

I flipped the chicken at the 75 minute mark, and added another handful of chips to the smoker box. It does take a while to get the wood chips burning at low temperatures, so that extra round of wood chips was important to getting the smoke flavor. It also seems that the hotbox might run a bit hotter than the thermometer indicates, as I was done the whole cook in just over two hours. The finished results were amazing, however. Good smoke flavor, and a nice even cook. Check out the crust on these samples:

For my next cook I was going for a longer, slower cook time to smoke some fresh sausage. I set the hotbox to 225 degrees, and tested dry apple wood chips to see what the difference would be. I also added some chicken breasts done up with a dry cajun rub at the halfway point. Here’s a shot at the 90 minute point of cooking. Note that the sausage is just starting to brown up here:

At three hours of cooking all told, we’ve got nicely done sausage and chicken breasts. The smoke flavor was much less apparent in the final product, however. I suspect that the lower cooking temp has something to do with this. In future tests, I’ll probably start the unit at higher temperature for the first thirty minutes to get the smoke going, then dial it back for low & slow cooking. I’ll also test out some alternatives like smaller wood chips to see if that makes a difference.

In both cases, the smoker did a great job of maintaining a consistent temperature despite some cold, windy, and wet December days. Even if I wasn’t smoking my meats, I believe that the Cuisinart 30″ Electric Smoker is ideal for use as an outdoor oven given the consistency in heat control. I’d happily roast vegetables or just about anything else in this unit while hosting a deck party.

If there’s a downside to the design, it’s in cleanliness. There’s no mechanism in the design to collect drippings and/or fat runoff, so most of that stuff just splatters and collects wherever it falls. Check out the bottom of the unit after two cooking sessions:

With no system for collecting runoff, the drip pan underneath really doesn’t do much good. It does catch some drippings, but only once it gets past the water tray and smoker box. I’ve noticed that grease and oils collect all around the base, and even run down the legs. I’ll probably buy a pad to put under the smoker to avoid a greasy deck, and play around with some different tin foil options to solve the drip problem. Either way, cleaning will be a challenge in the long run.

So… would I recommend the Cuisinart 30″ Electric Smoker? It depends on what you’re looking for. Compared to my old barrel smoker, it’s far easier to use and manage. I do smoke meats on my trusty Weber charcoal kettle grill as well. And there are more expensive dedicated smokers out there that include more well-rounded designs, digital temperature management, and bonus items like feeder chutes for your wood chips or pellets. But if you’re new to smoking meats and/or want something a bit simpler to use that also offers some additional versatility, the Cuisinart offers a great option at a sub $200 price point. It also adds some great convenience for those with limited space who want to do outdoor cooking, but don’t want to have a propane tank or bags of charcoal lying around (you can buy a small bag of wood chips at most hardware stores). I’ll be putting this baby to good use over the next year, and I’ll keep you updated on my discoveries.

What I like

  • Easy to operate
  • Consistent heat control
  • Well built for a smoker at this price point

What needs to be improved

  • Smoker box not as effective at lower temperatures
  • A bit messy, and difficult to clean

Final thoughts

Smoking meats can be intimidating for those that are new to the process. The Cuisinart 30″ Electric Smoker offers a great & easy-to-use option for those that want to try smoking, but don’t want to invest in a more expensive piece of equipment. The additional versatility as an outdoor oven is an extra bonus. It’s also great for those that want an outdoor cooking solution but have limited space to work with or can’t have propane or charcoal grills (like apartment balconies). And at a price point under $200, I think it’s a good buy for the quality.

Price: $149.99
Where to buy: Available at multiple retailers. Visit the Cuisinart product page for a full list of buying options..
Source: The sample of this product was provided by Cuisinart.

More from The Gadgeteer

Filed in categories: Reviews

Tagged: , , ,

Cuisinart 30″ Electric Smoker review originally appeared on The Gadgeteer on December 23, 2018 at 11:00 am.

Note: If you are subscribed to this feed through FeedBurner, please switch to our native feed URL http://the-gadgeteer.com/feed/ in order to ensure continuous delivery.

MEATER+ wireless meat thermometer review

REVIEW – In January, I reviewed the MEATER wireless cooking thermometer that I continue to use regularly to this day. Over the passed year, it has helped barbecue/cook perfect slabs of meats for me and my guests. I liked it so much, I have given several as gifts to friends and family members. The MEATER’s only limitation or weakness was its wireless range; that did not allow me to travel far from the probe without losing connectivity. Well, the MEATER folks have addressed this issue and recently released an updated version of their wireless thermometer, the MEATER+ with nearly five (5) times the range…let’s see if it works as advertised.

Since the MEATER+ is nearly identical to the original, I will be plagiarizing from my original review (so you do not have to backtrack) and focusing on the PLUS’ longer range.

What is it?

Like the original MEATER, the MEATER+ is a truly wireless, dual sensor probe created with the sole job of helping you cook your food to perfection. Not only is the hardware very well done but so is the MEATER app and ecosystem, all working together to cook your meal with much less worry or guessing.

Design and features

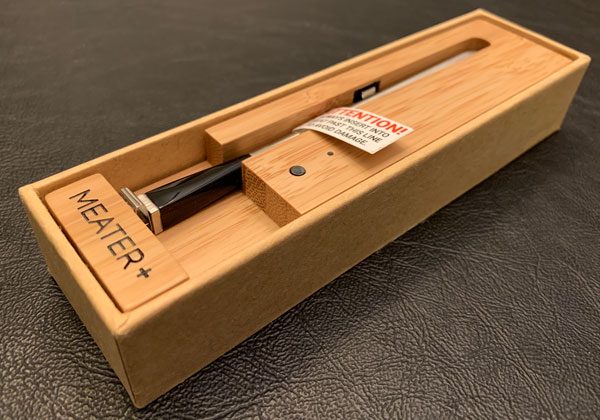
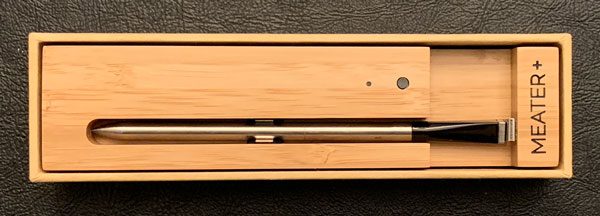
As you can see, they are visibly (and come to find out internally) identical. So much so, I had to keep track of them during my testing so I did not get them confused. I learned during the course of this review, the MEATER probe has not changed/been modified.

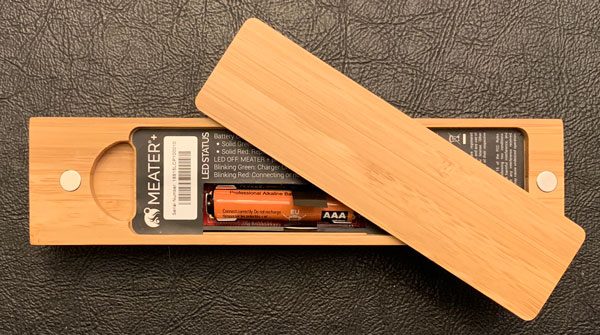
The part of the equation that has changed/been improved is the bamboo charger also acts as a repeater to boost the signal from the probe and thus the overall range.

Probe Specs

  • Stainless steel, water resistant and easy to clean
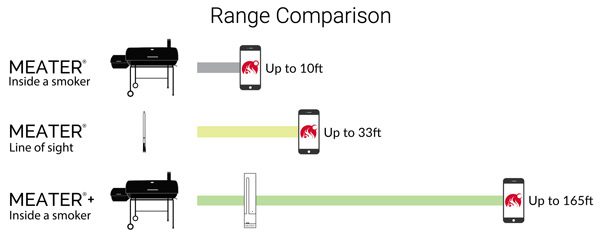
  • Wireless up to 165 feet (50 meters)
  • Bluetooth 4.0 wireless connection
  • MEATER Sense™: 2 temperature sensors in 1 probe
  • Maximum internal temperature: 212°F (meat)
  • Maximum ambient temperature: 527°F (cooker)
  • Rechargeable: Over 24 hours of continuous cooking
  • Dimensions: 130mm length and 6mm diameter

In addition to boosting its wireless range, the MEATER+’s bamboo holder securely keeps and recharges the wireless (easily misplaced) probe. There is a battery power level LED & button located on the front of the wooden holder.

Charger Specs

  • Store and charge your MEATER+ probe
  • Internal Bluetooth booster/repeater
  • Magnetic backing: Attach anywhere
  • Charges MEATER+ up to 100 times with one AAA battery
  • Real wood to match any kitchen or outdoor decor
  • LED indicator to show battery state
  • Dimensions: 157mm L x 37mm W x 28mm H

The MEATER+ is powered by a single AAA battery and can charge the probe up to 100 times before needing to be replaced. The back cover is also held in place by two small embedded magnets.

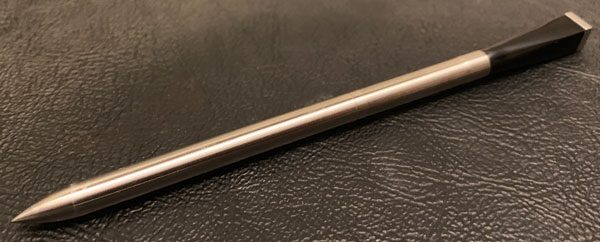
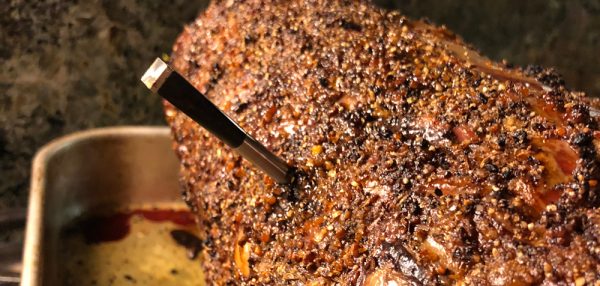
The MEATER+ probe has to be inserted into the meat beyond the line machined into the metal casing to protect the main sensor from damage due to high temperatures.

The ambient sensor is meant to monitor the cooking temperature of the oven or BBQ. It is located in the black plastic end of the probe.

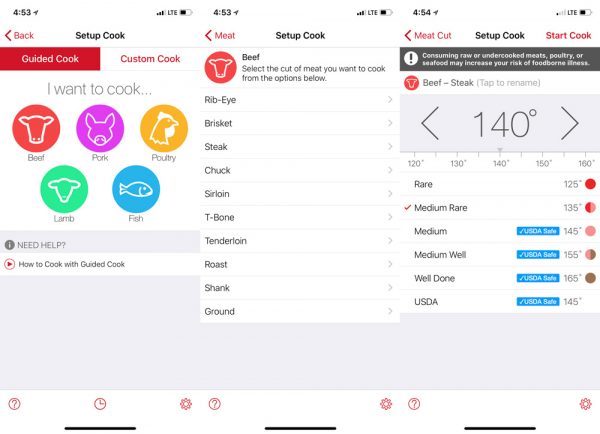
Along with creating a very easy to use, high quality device, the folks @MEATER have developed a very polished ecosystem/app to make cooking with either MEATER(+) probe nearly foolproof. The MEATER’s Smart Guided Cook system walks you through every step of the cooking processThe app guides you thru the type, cut, and doneness of the meat.

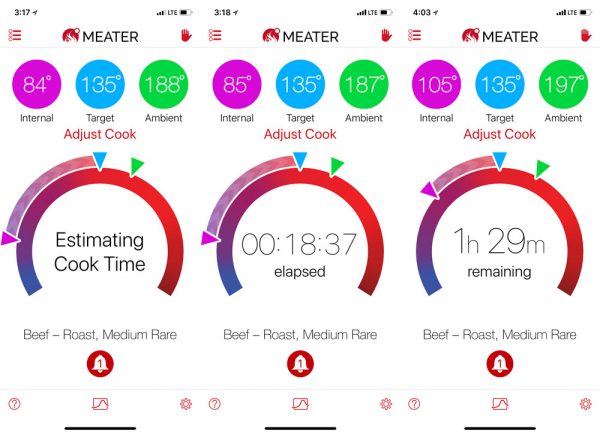
The MEATER+’s dual sensors continuously monitor internal and ambient temperatures concurrently. The app also gives you elapsed cooking time and estimated time remaining until your meal is ready to serve.

The app let’s you know when to pull the meat from the cooker, finish its internal cooking (aka letting it rest), and when its ready to eat. The estimated cook time has been spot on…within 5 minutes or so. Not bad considering the roast took nearly two plus hours to cook.

Overall, the whole system is brilliant and has only gotten better. I used the MEATER+ several times over the past few weeks. And for the most part, had zero functional or connectivity issues.

Here was my only issue with the original MEATER:

The only real limitation of the MEATER is it’s range and lost connectivity. I wouldn’t even consider it a true negative just a known issue that needs to be worked around. You’re sticking a small under powered Bluetooth device into a metal box, it’s range is going to be pretty limited. I found both in the BBQ and oven, the range of the MEATER was approximately 10 feet but would quickly reconnect once back in range.

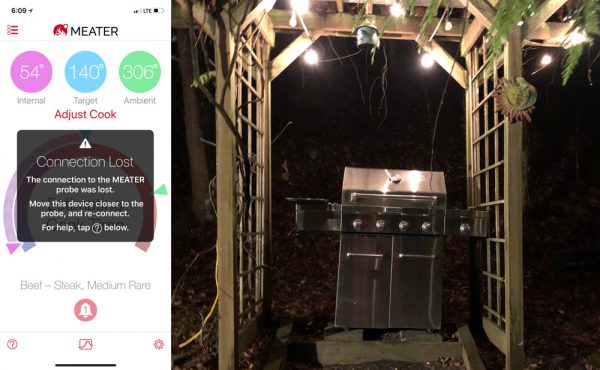
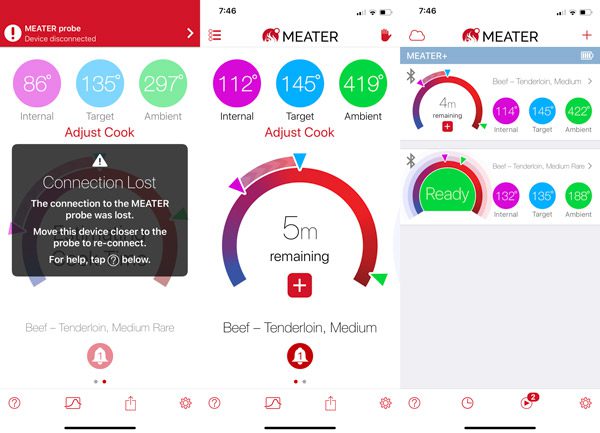
Given the same BBQ, distances, wall thicknesses, etc…the MEATER+ worked as promised/designed. During my testing, I had both the original MEATER and MEATER+ working at the same time and the PLUS’ range was excellent. I was able to leave the BBQ, come inside and sit at our kitchen bar some 40 feet away from the probe with the signal penetrating not only the metal of the BBQ but several walls too. The original MEATER lost its Bluetooth connection (left screen capture) just like before, where the MEATER+ did not blink an eye (center screen capture).

The MEATER and now the MEATER+ have yet to let me down. Every piece of meat I have cooked using these wireless probes has been spot on.

What I like

  • Well made, thought out design
  • Truly wireless
  • Excellent range (improvement over the original)
  • Water resistant, dust-proof, easy to clean
  • Built-in dual sensors
  • Excellent app/ecosystem

What needs to be improved

  • None

Final thoughts

The new and improved MEATER+ is an excellent upgrade from the original. The added Bluetooth range definitely makes using the wireless probe and its ecosystem a seamless experience. During my testing, my smartphone and MEATER+ only had a few hiccups but that easily could have been my iPhone or the new iOS. If you’ve been considering the MEATER, I would pay the extra $30 and go for the MEATER+ ($99). If you have the MEATER and been having connectivity issues, upgrading is worth considering as well. Either way, the MEATER+ would make for an excellent stocking stuffer for the cook in your family even if it’s yourself 😉 .

Price: $99.99
Where to buy: The MEATER+ is available on their website.
Source: The sample of this product was provided by meater.com.

Filed in categories: Reviews

Tagged: , ,

MEATER+ wireless meat thermometer review originally appeared on The Gadgeteer on October 18, 2018 at 10:00 am.

Note: If you are subscribed to this feed through FeedBurner, please switch to our native feed URL http://the-gadgeteer.com/feed/ in order to ensure continuous delivery.