Taking Rover for a ride? Check out BWOGUE safety harness.

NEWS – Dog is often my copilot. And we’ve tried various ways of strapping her in. I didn’t know canines could get carsick, but my mutt becomes one sick puppy if you put her in a crate or even the backseat of a moving vehicle.

Her favorite place is riding shotgun, so we’ve previously used harnesses that clip into the passenger-side seatbelt. However, that presents another problem: What if we need that seatbelt?

I have a five-seater car, and if I’m toting my two sons plus any school buddies or random neighbor kids, those seatbelts are at a premium.

My teen likes to ride shotgun with puppy on his lap. But one day he jumped out at the school car line, and his best friend tried to chase after him!

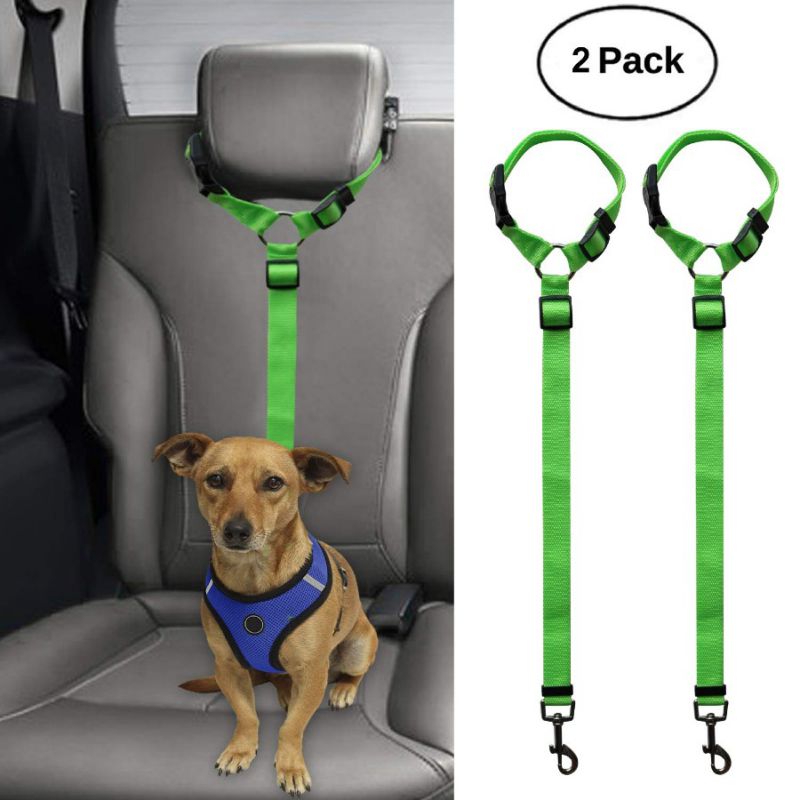
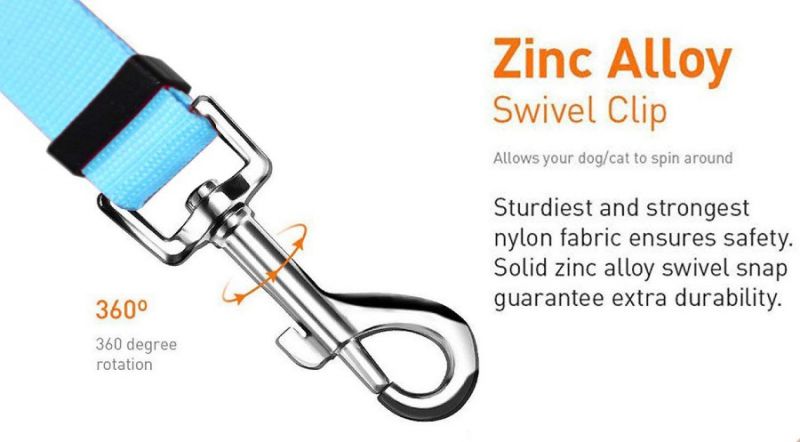
That’s when, after some searching, I found the BWOGUE safety belt for pets, which fastens securely around the headrest on one end and on the other it clips into your furry friend’s harness just like you’d attach a leash. BWOGUE emphasizes that the design is meant to attach to a pet harness, never directly into a dog or cat’s collar.

They’re nylon and highly adjustable to fit all sizes of pets and vehicles. You can even pick from safety straps in black, blue, dark blue, green, yellow, orange, pink, purple or red.

Two-packs are convenient for two-vehicle homes like mine. And the loop design and quick-release fastener easily convert from a seatbelt to a back-up leash if needed. In fact, just keep one of these in your car, and you’re all set for outings with your four-legged friend.

Find a two-pack on Amazon with Prime shipping for $10.49.

Filed in categories: News

Tagged: ,

Taking Rover for a ride? Check out BWOGUE safety harness. originally appeared on The Gadgeteer on May 10, 2019 at 2:00 pm.

Note: If you are subscribed to this feed through FeedBurner, please switch to our native feed URL http://the-gadgeteer.com/feed/ in order to ensure continuous delivery.

VicTsing 10W Qi Wireless Fast Charger Car Mount review

REVIEW – One of the joys of getting to review gadgets is being introduced to obscure brands. Sometimes, they really do surprise you — in a good way — like this little Qi Wireless Fast Charger Car Mount (which is the official product name I believe) from a heretofore unknown manufacturer, VicTsing.

What is it?

VicTsing’s Wireless Charger Car Mount is a phone holder with an embedded Qi-enabled wireless charging pad. It can be easily mounted to any flat surface or securely clipped to a vent.

What’s in the box?

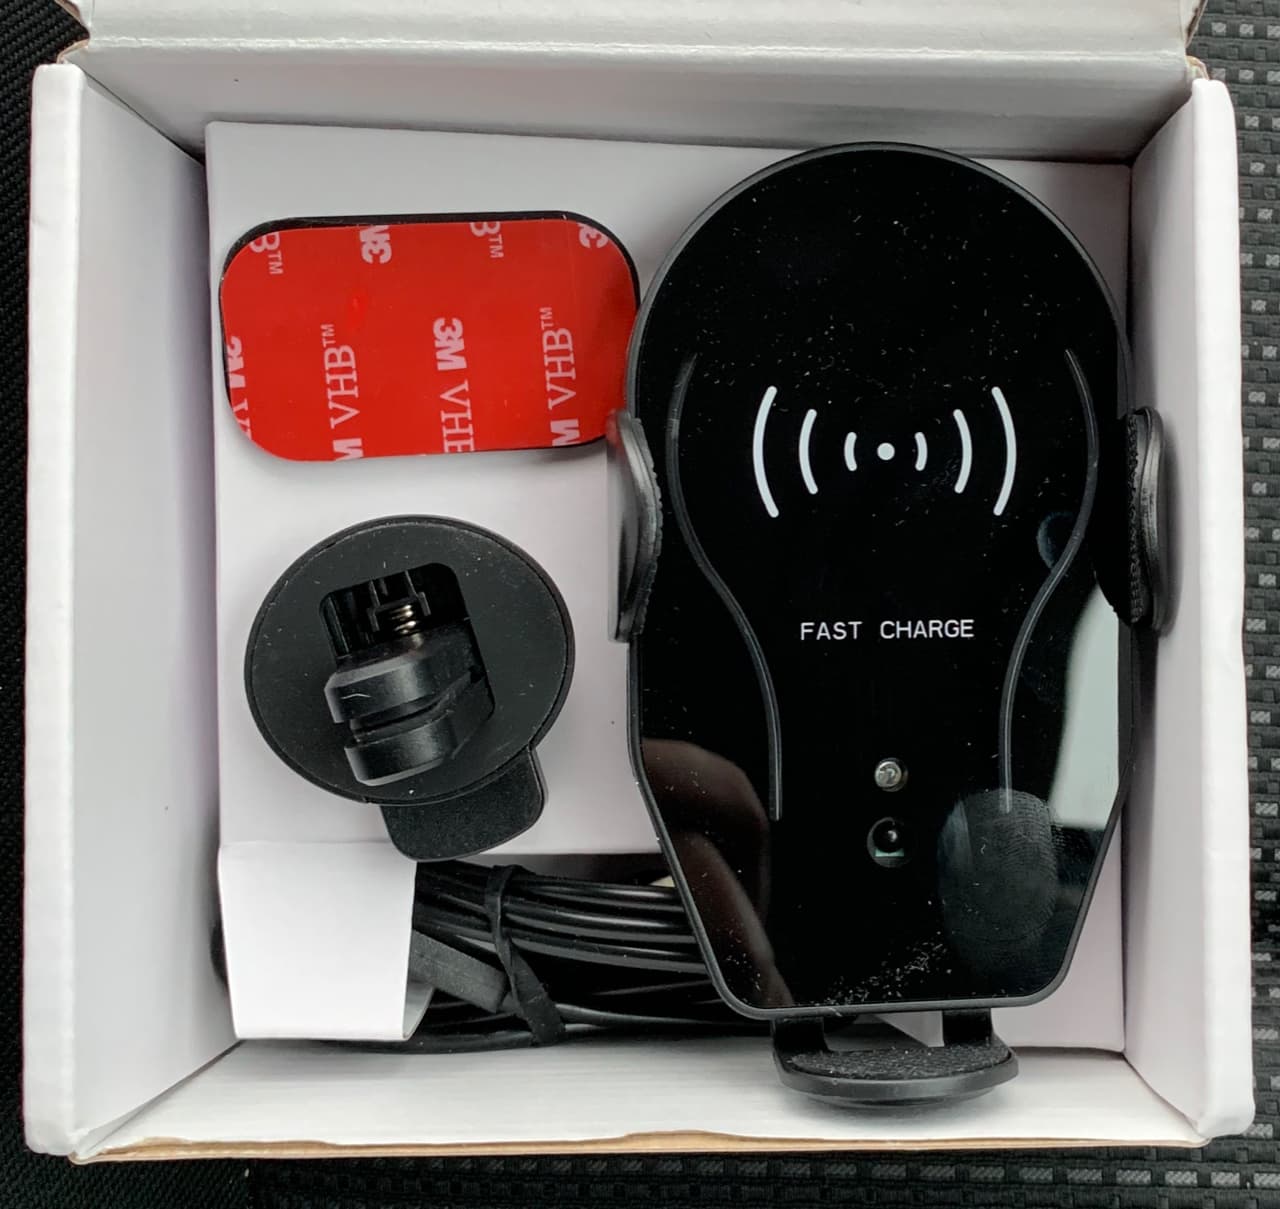
  • wireless charging bracket
  • air vent clip
  • 3M adhesive surface mount
  • user manual
  • USB-C cable and adapter
Also comes with some mild amounts of dust.

Hardware specs

  • Latest Qi Standard Tech
  • Material: ABS+PP mirror + silicone
  • Compatible with 7.5W and 5W
  • Input: 5V/2A 9V/1.67A
  • Compatible devices: iPhone Xs Max/Xs/XR/X/8P/8,Galaxy S9/S9 Plus/Note 8/9/S8+/S8/Note 5/S7 edge/S7 and other Qi enabled devices
  • Automatically adjusts to hold phones of size from 4.0”-6.0”
  • Charging distance: <= 8mm
  • Charging efficiency: >=82%
  • Product size: 11.3 x 6.8 x 4.5 mm
  • Color: Black

Design and features

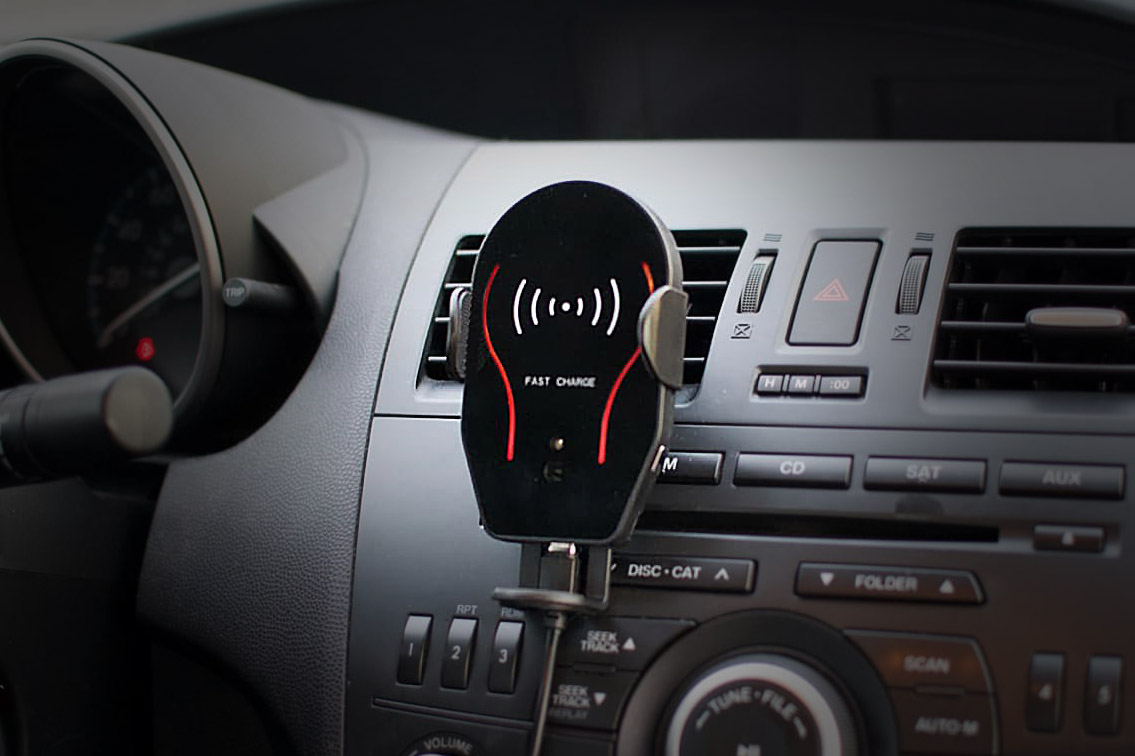
VicTsing’s iteration of the simple car mounted charger looks very much like many other phone mounts you may have seen. It’s a basic side-arm mount with an adjustable support foot that the bottom of the phone rests on.

The red strips on the charging surface gently glow and turn blue when charging. You can see the white lens of the IR sensor as well.

However, one unique feature of this phone mount is the IR-activated arms that extend out when an object is placed near the sensor, and automatically “hugs” the phone to form a solid grip. It’s a cute feature that never fails to make me smile, seeing this small charging pad’s arms extend out and grab on to the edges of my phone like a warm embrace.

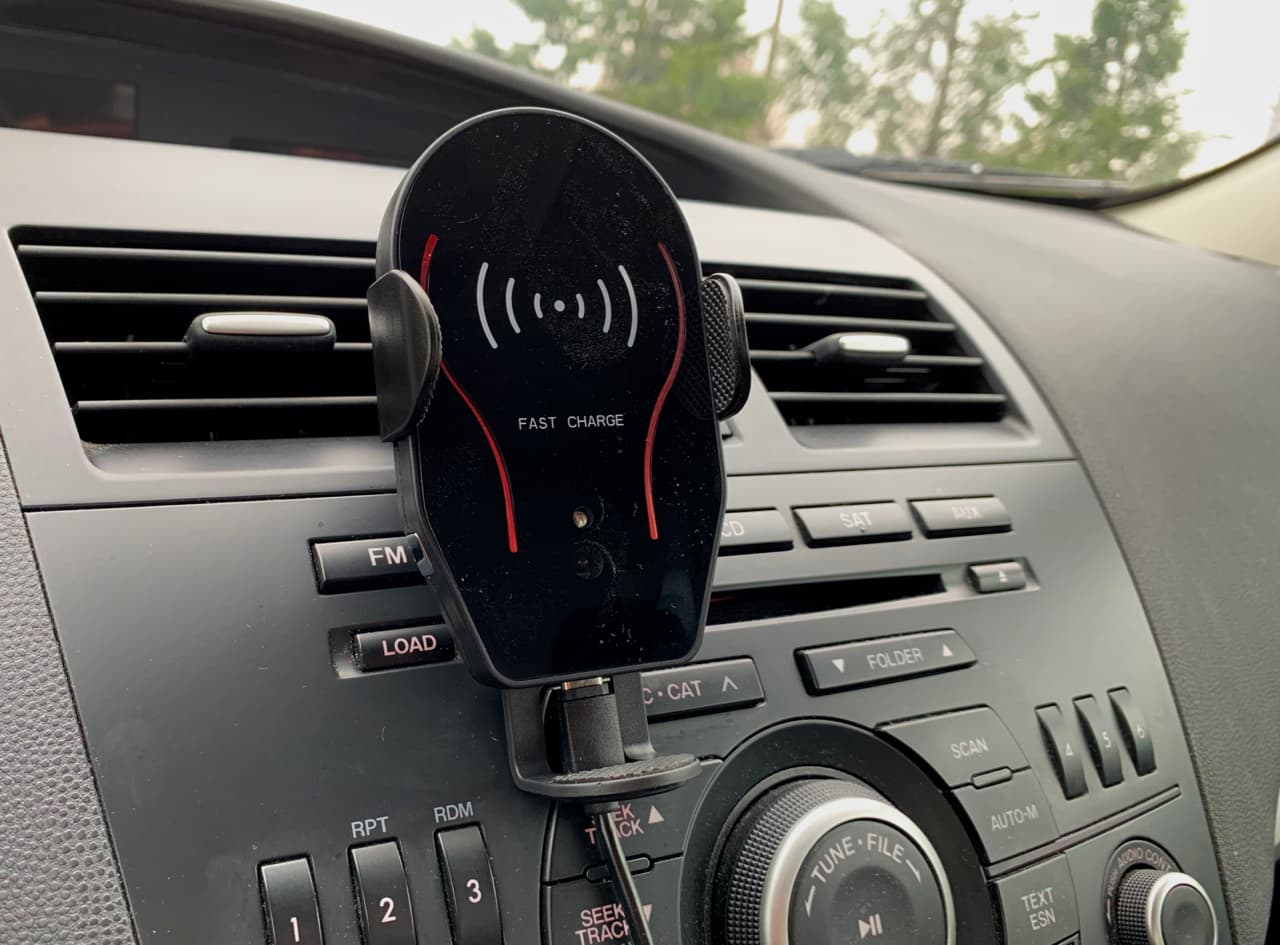
Initial setup is easy, but your mileage will definitely vary on where the mount itself can be positioned. My car, thanks to Japanese efficiency, has no flat surface to spare, so I had to opt for a vent-clip mount approach.

Might as well just turn that vent off.

I can’t say I’m a fan of having to block an entire vent, of which there are only four, effectively decreasing cabin air conditioning by 25%. I’m even less than a fan of the charging pad and USB cable covering up the stereo system buttons. The overall effect is ugly, as you can see.

I had tried mounting the charger a little to the left of the wide vent, but that resulted in activating the “hug” every time my hand veered too close to the sensor when my phone was undocked. After several times of hearing that sad little robotic embrace, I had to move the charger back to its original place over the stereo buttons.

I should mention that this isn’t a knock against this mount in particular. I’d have the same issue with any vent-clip design. It’s, unfortunately, the most universal approach to making a phone mount work with as many vehicles as possible.

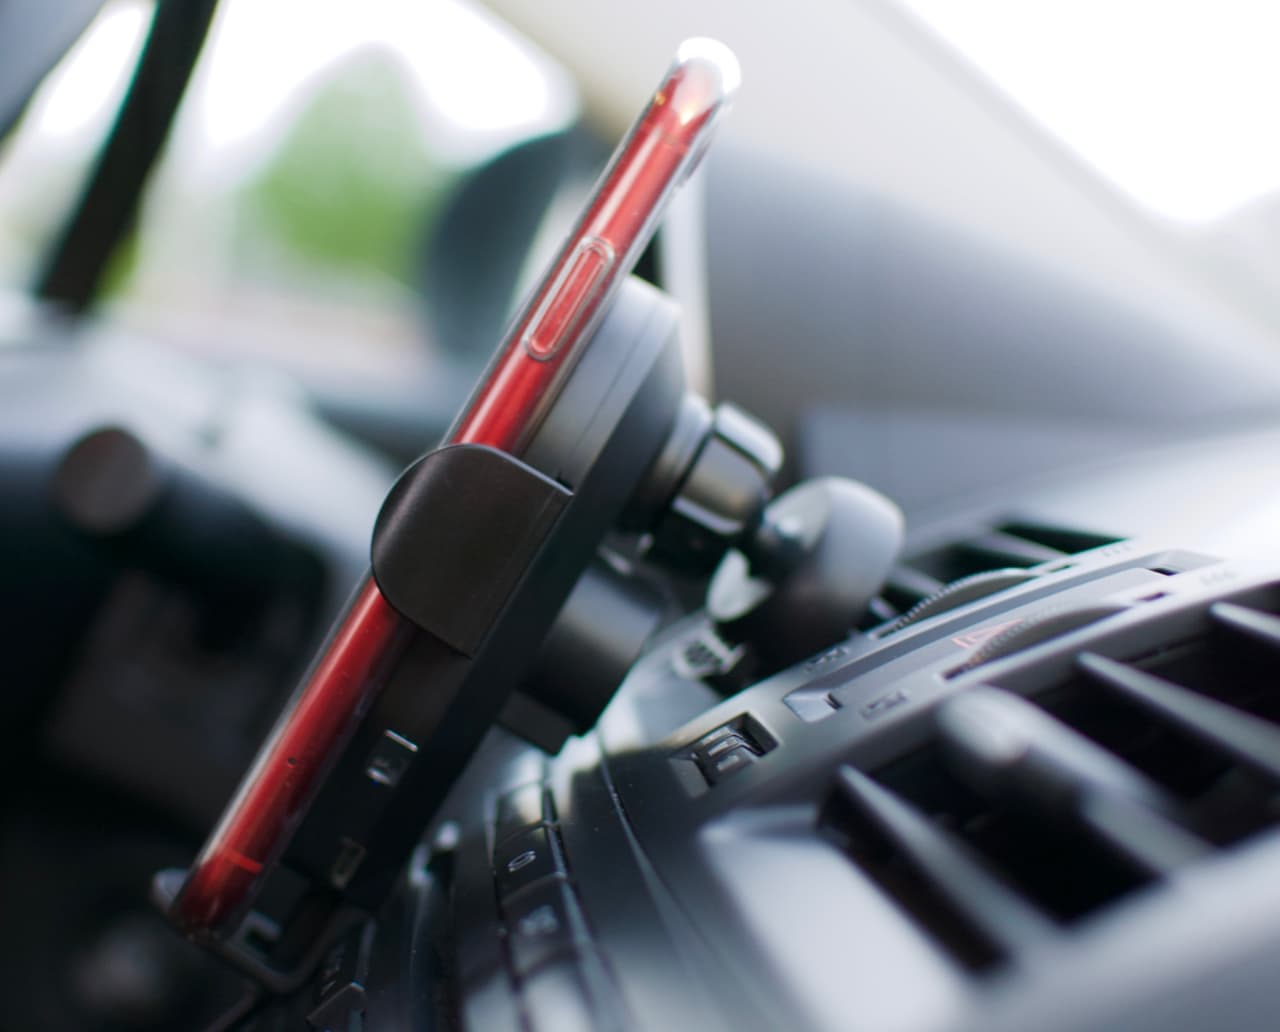
However, the clip was quite secure. Once I got the 360º knob tightened and the clip positioned as deep as it would go into the vent, my phone didn’t go anywhere, even around sharp corners.

The functionality of the charger is great. It’s a standard 7.5W fast charger, so you can expect it to juice up your phone as quickly as one would expect, if your device supports it. I’d say it was a pretty consistent 4-5% per 10 minutes for my iPhone XR, but that would depend on the total capacity of your battery. No issues here.

It takes a little bit of practice to center your phone in the charger while placing it in the holder. Once your phone is about 3” away from the charger, the IR sensor triggers and the arms extend to their maximum width of about 6”. Then, after a 2-second delay, they close. That’s about the time you get to try to center the phone in the charger, place it flat against the charging pad, and make sure the bottom of your phone is nestled against the “foot” of the harness. Then the little arms hug that phone and sort of lock into place.

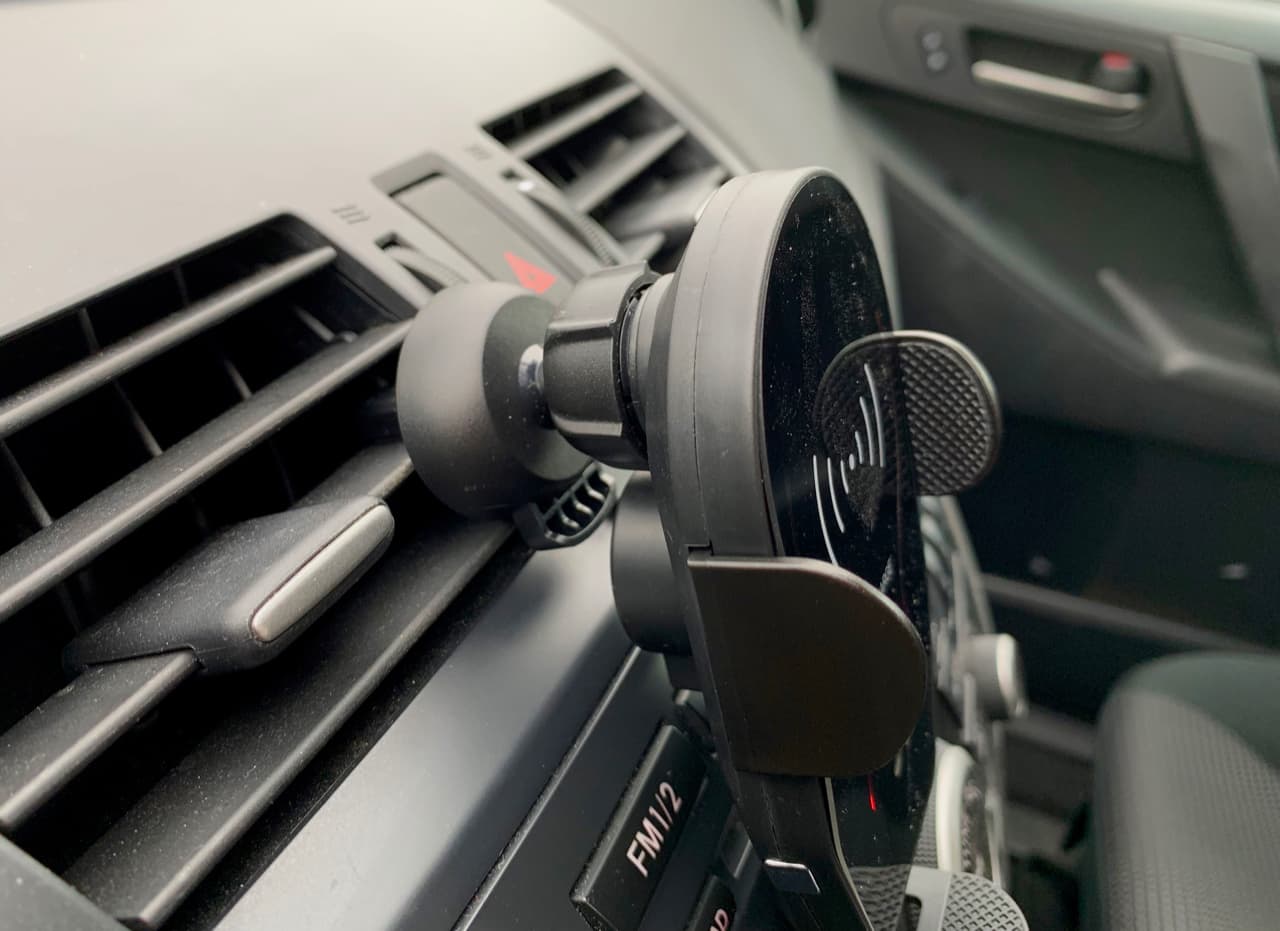
A profile shot of the phone resting in the grips.

If you’re a little bit too far to the right or left, it doesn’t create as good of a grip, so you sort of have to give your phone a little wiggle to get it into place. It might have to do with the silicone case that I have on my phone, it might be gripping the rubber on the foot a little too much to allow it to easily center. But I’ve gotten used to it, and you really only have to mount it once before you start driving.

To detach your phone, there are two silver capacitive buttons near the bottom of the charging pad. Simply brushing one of them with your finger is enough to trigger the arms to open again, and you can lift your phone out. You could try to lift it out without engaging the opening action, but you’d probably pull the entire charging pad and vent clip out before removing just your phone. That happened to me at least twice before I got the hang of the whole operation.

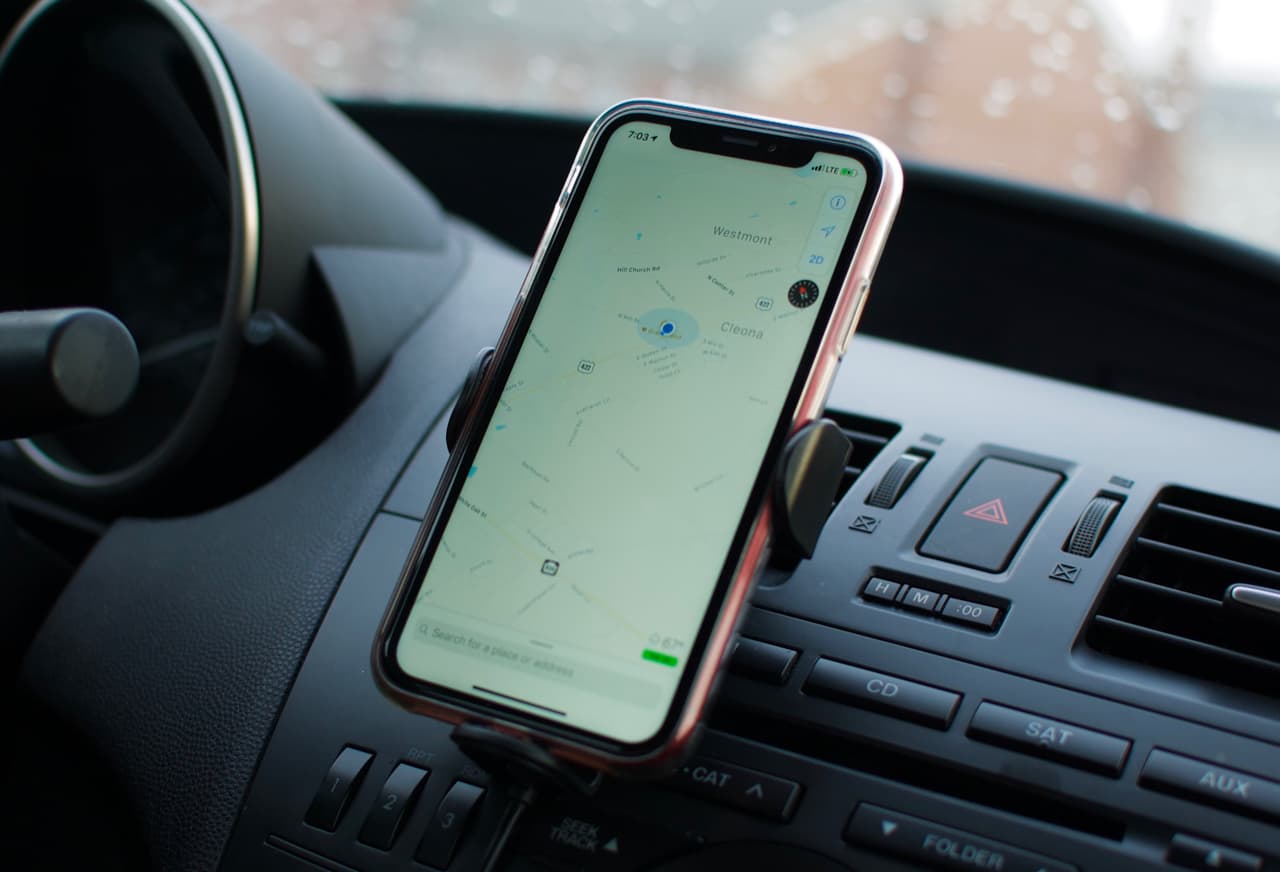
It’s a nice way of having access to a map if your car doesn’t already have GPS or CarPlay built into the console.

But once I figured out how to play nice with this little charger, I liked having my phone in a spot where I could fast-forward a podcast or check out a map without palming my phone.

I imagine anyone with a CarPlay system wouldn’t have much use for a charging mount, however, or anyone with a newer car that have Qi wireless charging pads in the console somewhere.

For $22 (yes, just 22 bones) you get a no-fuss phone mount, wireless charger, and friendly little hug-bot all in one. That’s pretty hard to beat.

What I like

  • IR sensor auto-opens to give your phone a little hug
  • Excellent value for the price

What needs to be “improved”

  • Blocks vent air flow
  • Potentially blocks other buttons due to cable

Final thoughts

I feel any of the negative thoughts I could have about this charger are more of an indictment of any vent clip or suction mounted holder, and aren’t specific to this particular device. This is a great little charger mount, especially for the very low asking price of $22.

Price: $21.99
Where to buy: WalMart.com
Source: The sample of this product was provided by VicTsing.

Filed in categories: Reviews

Tagged: ,

VicTsing 10W Qi Wireless Fast Charger Car Mount review originally appeared on The Gadgeteer on May 6, 2019 at 9:00 am.

Note: If you are subscribed to this feed through FeedBurner, please switch to our native feed URL http://the-gadgeteer.com/feed/ in order to ensure continuous delivery.

Z-Edge Z3Pro Dual Lens Car Camera review

REVIEW – Dash cameras have almost reached “necessity” level these days. I won’t be surprised to see them become standard equipment much the way back up cameras have in the past couple of years. They provide security and protect you in case of an accident or even provide a little entertainment should something odd happen while out on the road. Last Christmas, my mom got me a camera for my truck and it’s been very useful so I jumped at the chance to review the Z-Edge Z3 Pro dual lens car camera to use in my wife’s car.

What is it?

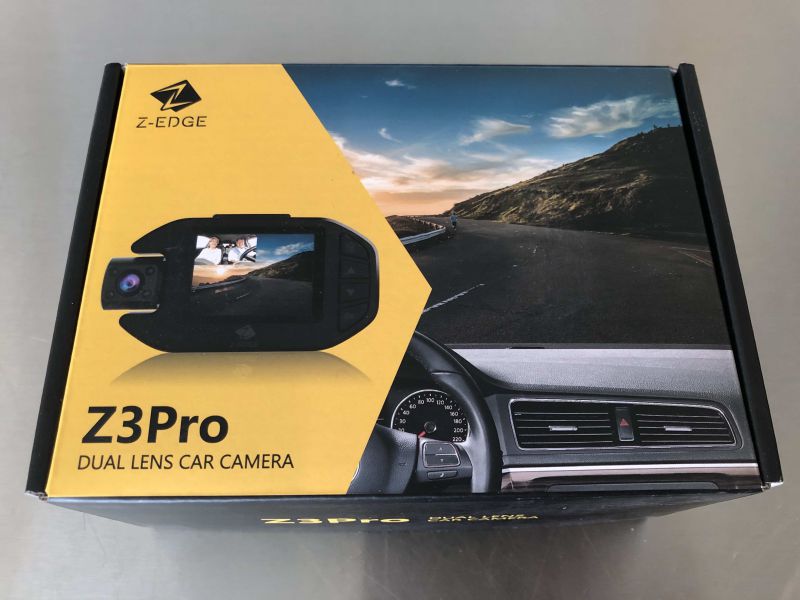
The Z3Pro is a windshield mount car camera that has a forward and rear facing camera to capture both the road in front of you and the view of the interior of the vehicle.

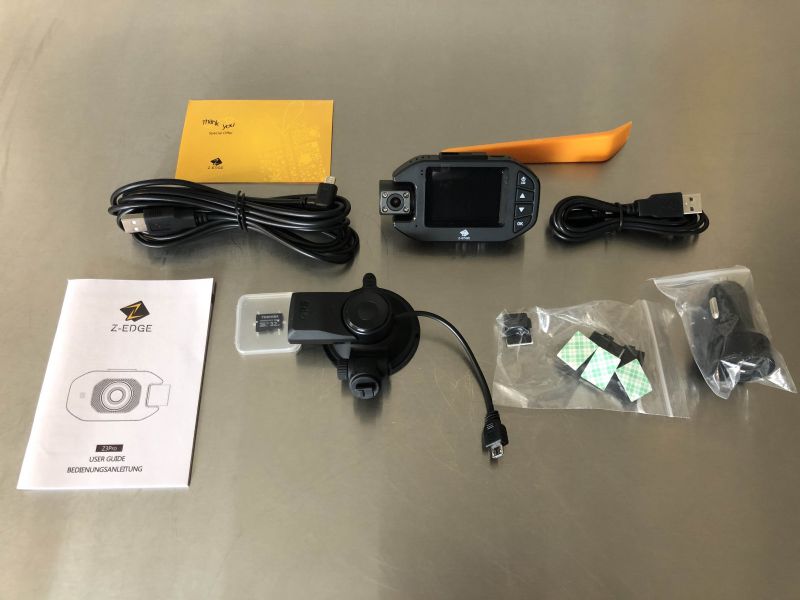
What’s in the box?

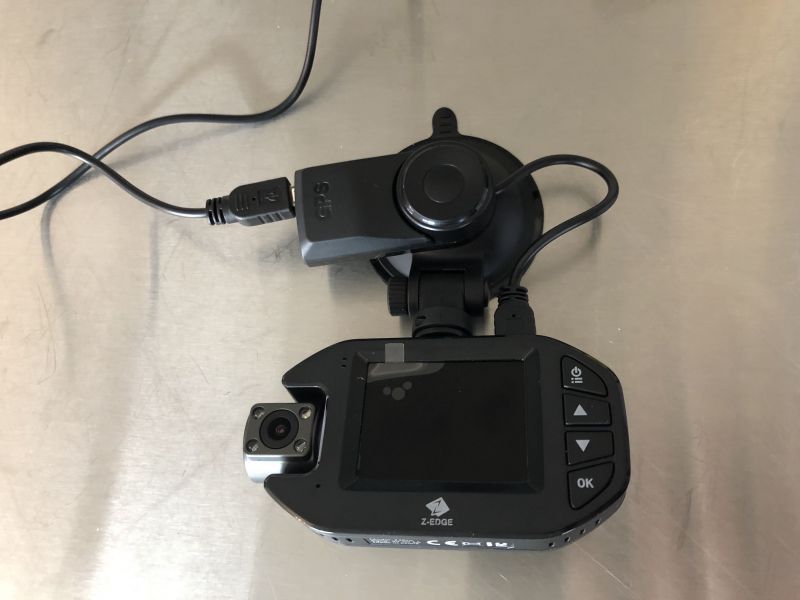
  • Z-Edge dash cam
  • User Guide
  • USB Data Cord for downloading from mount to PC
  • USB Power Cord
  • Warranty Offer
  • Micro SD Card 32 GB
  • Windshield Mount
  • Power Adapter
  • Sticker Clips for power cord
  • Removal Tool
  • Camara

Hardware specs

The camara is a full HD 1920 x 1080P WDR (wide dynamic range) with a 150 degree field of view. The display is 2″ diagonal measurement LED screen. The camera also has a microphone that will record the audio if you choose.

Design and features

The Z3Pro provides an advanced camera for both the front and rear facing lenses, providing full HD in both directions. There are a few optional features to deactivate or adjust if you prefer: Motion Detection, Vibration Detection and Loop Recording. As is fairly standard these days, the loop recording uses the 32GB of available memory to record and then re-record continuously over the oldest unprotected data. Therefore, if you have something that you want to keep, you’ll need to either “protect” the file or download the file to a PC somewhat quickly. You can adjust the settings to record in 1, 3 or 5 minute segments. Motion Detection will activate the camera, even while the vehicle isn’t in use, to record motion detected outside the car. Vibration Detection will also record a snippet if the camera picks up the vehicle/camera being moved or shaken while not in motion – for instance, if someone is trying to break into your car or if your car is hit while parked.

As you start and turn off your car, the camera powers on and off as it’s provided power. Additionally, the default settings have the display showing the front view and then a picture-in-picture style display showing the rear facing camera. You do have the option to show only the front facing camera on the display, however, it will still record both cameras while in use. It does save each file as a FRONT and BACK recording. Even while recording, the display will turn itself off to conserve energy but can be woken up with the touch of one of the buttons.

The camera has 4 IR LED lights and supports night vision recording as well, so even in low light or night time driving, you’ll still get a quality recording. Additionally, the camera records GPS data so when you playback the videos on a Mac or Windows PC, it will display the data as well as your location on Google Maps. I would love to be able to show you this, however, after downloading the software on multiple computers, I could not get the software to open any of the files.

Finally, the rear interior view is ideal for those who use their vehicles as a ride-share vehicle – however, I don’t know the ethical ramifications of recording passengers with or without their permission so I won’t get into this topic in this review.

Setup

The initial set up involves taking the product components from the box and assembling the camera, mounting hardware and cord to prepare the camera to be mounted in the car via the simple suction cup mount common to GPS and dash cameras.

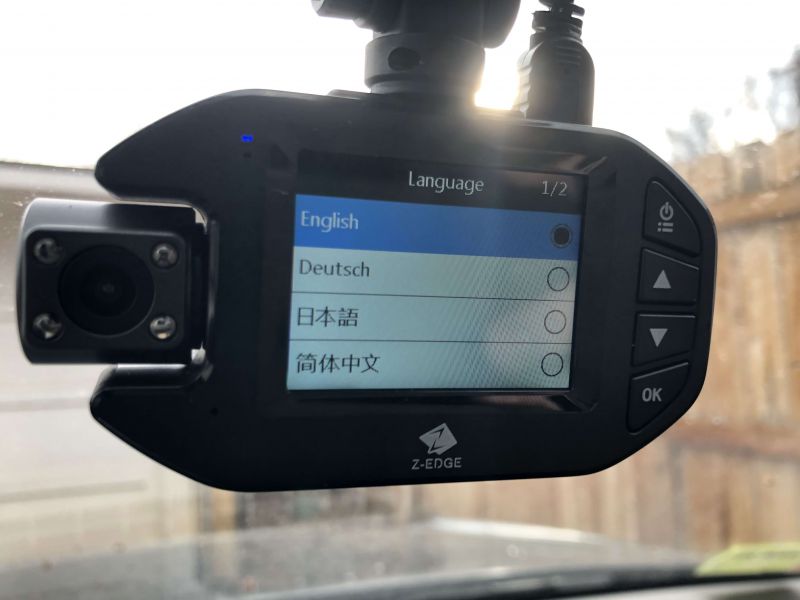
Then you follow a simple menu to set up the language, date and time settings.

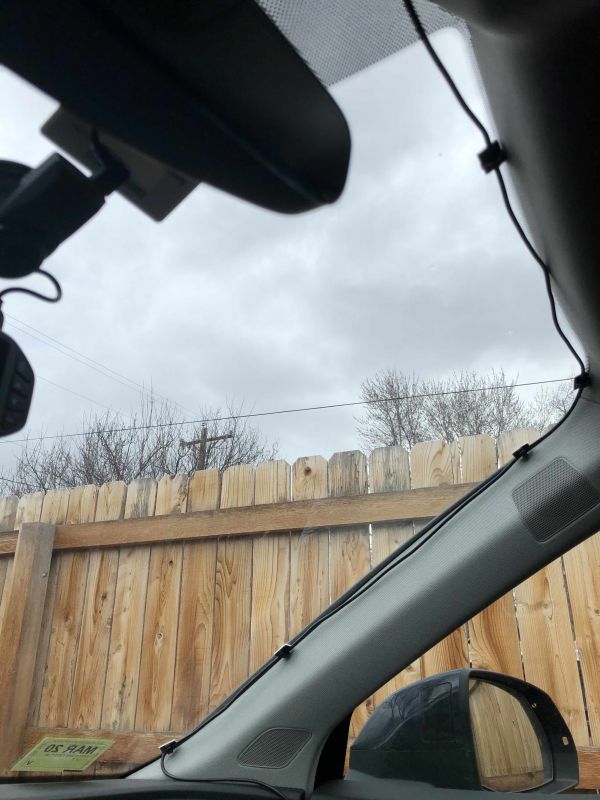
Finally, you run the power cable up and around the windshield in the path you desire to get the power cord to the USB power port on the provided power adapter that you plug into your standard vehicle power port.

Performance

The camera has performed as expected throughout the three weeks it has been in use. It provides recordings of our trips throughout the city and occasionally picks up on movements while parked in our driveway or in parking lots – typically someone walking to their vehicle along side or in front of our car.

Unlike the camera I have in my truck, this camera does not have wifi or an app to access the videos. This then requires you to either remove the micro SD card and use an adapter to plug into your PC or take the entire camera off the windshield mount and plug into your PC via the provided USB data cable. If you find yourself in an accident or witness to an accident, you do end up then trying to show anyone the video on a small 2″ screen rather than being able to immediately download to your phone and share with officials or others involved in the accident.

The menu buttons take some getting used to as well. On many occasions, while simply trying to navigate the various menus we took unintentional selfies, which while hilarious was also rather frustrating. It would be highly advisable to keep the user guide in the vehicle, as there are also many different symbols that pop up on the status bar across the top of the display.

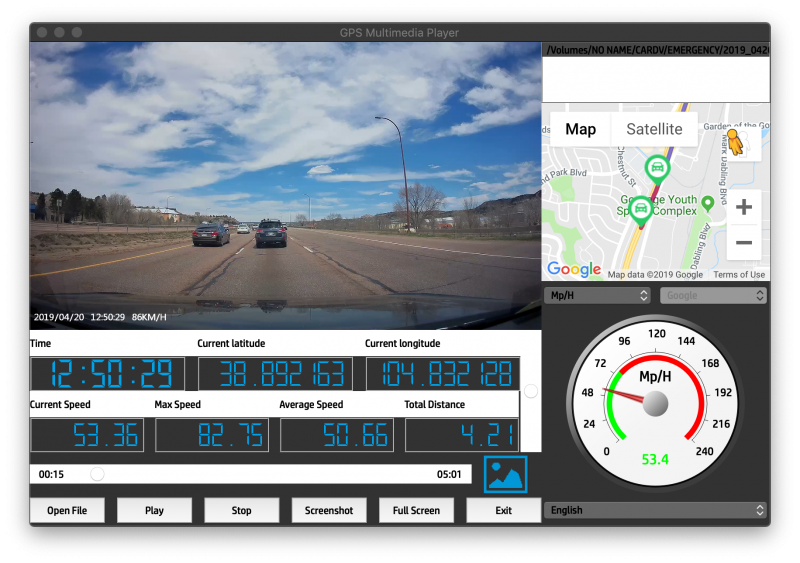
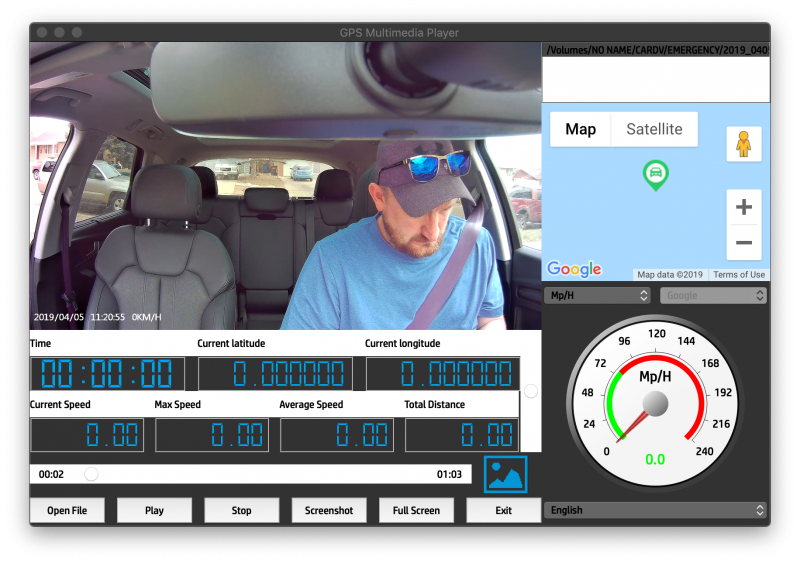
Finally, the performance of the software and interface with the camera unit is not the greatest. My first attempt at downloading videos involved using the provided USB cable to plug the camera unit directly into my laptop and desktop, neither would work properly and I had to go out and buy a MicroSD card reader to get the application to recognize the video and play them. However, taking the MicroSD card out of the camera is actually easier than taking the camera out of the car and plugging it in via the USB cable. Here is a screenshot of the software with a video loaded:

As you can see, it provides quite a bit of data: date & time stamp, speed, longitude & latitude along the route, current speed, max speed on the recording, average speed on the recording, & total distance for the recording. Additionally, it provides a google map overlay in the upper right corner that shows the start and tracks the route along the recording. The audio is very clear, picking up any conversation, noise or music playing within the cabin.

And here is an example showing the rear facing camera:

So, I’m not sure why but it does seem that some times the camera doesn’t get all the data points, map and speed info loaded when you open the video as you can see above. This could be a problem if you’re trying to prove something to an officer or otherwise and that data would support your claim. There is what looks to be a data file created with each recording so perhaps the data is still there, just doesn’t get picked up by the software when opening the file for some reason or another. That starts getting into technical info that I’m not educated enough to deduce.

I was able to upload the video directly from the MicroSD to YouTube. For this exercise, I selected a video where we had turned the audio off on a trip to the north side of town:

Finally, here is a look at the night time recording – which I was very surprised to find was extremely clear and well defined.

Not too bad for a trip to the store, I left the audio on this time to give an impression of the audio quality.

What I like

  • Full HD video
  • Rear Facing Camera providing additional video coverage in cabin
  • Protection of videos to keep from being recorded over
  • Easy physical setup
  • IR LED lights and night time recording

What needs to be improved

  • Access to videos – it would be great to have an app with wifi access to the videos instantly.
  • Menu navigation – the software takes some getting used to and could be clarified with clearer details in the user manual.
  • Power Cord – as with any of these cameras, having to route the cord and clip it around the edges of the windshield isn’t very aesthetically pleasing – not sure what the remedy would be outside of long life rechargeable batteries but until these style cameras are intrinsic to new vehicles, this is a problem we’ll all face.

Final thoughts

While we enjoy having this camera for the added security and safety features, I do not find that it provides enough value for the price point. There are equal quality cameras on the market at a lower price that provide much more efficient and convenient wifi data downloading and reviewing of video. For the price of this unit, I could buy two units like the one I have in my other vehicle & face one to the front and one to the rear, then download the footage to my phone without getting out of the car – and have some money left over. While originally struggling with the software, I did end up finding it easier to use once I got the MicroSD card reader – and the data it provides would be highly useful in any kind of investigation should it be needed. If you have no basis of comparison, I would imagine a buyer would be pretty impressed with the results of this camera, especially if they were unaware that wifi capable models are available. But again, you’re limited by having to wait until you get to a laptop or device to download/upload the content for whoever may need it. Overall, I think it’s a good camera system with great features, at just a bit too high of a price. So, if you see a price drop or see it go on sale, jump on it.

Price: $199.99
Where to buy: Amazon
Source: The sample of this product was provided by Z-Edge.

Filed in categories: Reviews

Tagged: ,

Z-Edge Z3Pro Dual Lens Car Camera review originally appeared on The Gadgeteer on May 1, 2019 at 4:46 pm.

Note: If you are subscribed to this feed through FeedBurner, please switch to our native feed URL http://the-gadgeteer.com/feed/ in order to ensure continuous delivery.

WeBoost Drive Sleek cellular signal booster review

REVIEW – Remember phone calls? With so much email, text and work messaging, many of us make far fewer calls than we used to. If you’re a car commuter however, you likely take a few conference calls while driving or even just rely on one of the hands-free assistants who all require connectivity for responding to your every whim. I’m in that camp and also have a couple of major reception trouble spots that routinely cause me consternation. Enter Drive Sleek from WeBoost with a solution that claims to work with all carriers and solve that exact problem with a complete system universally designed to fit most vehicles. Needless to say, something I was keen to check out.

What is it?

Drive Sleek is a complete signal booster kit for vehicles designed to increase reception to and from your mobile phones.

What’s in the box?
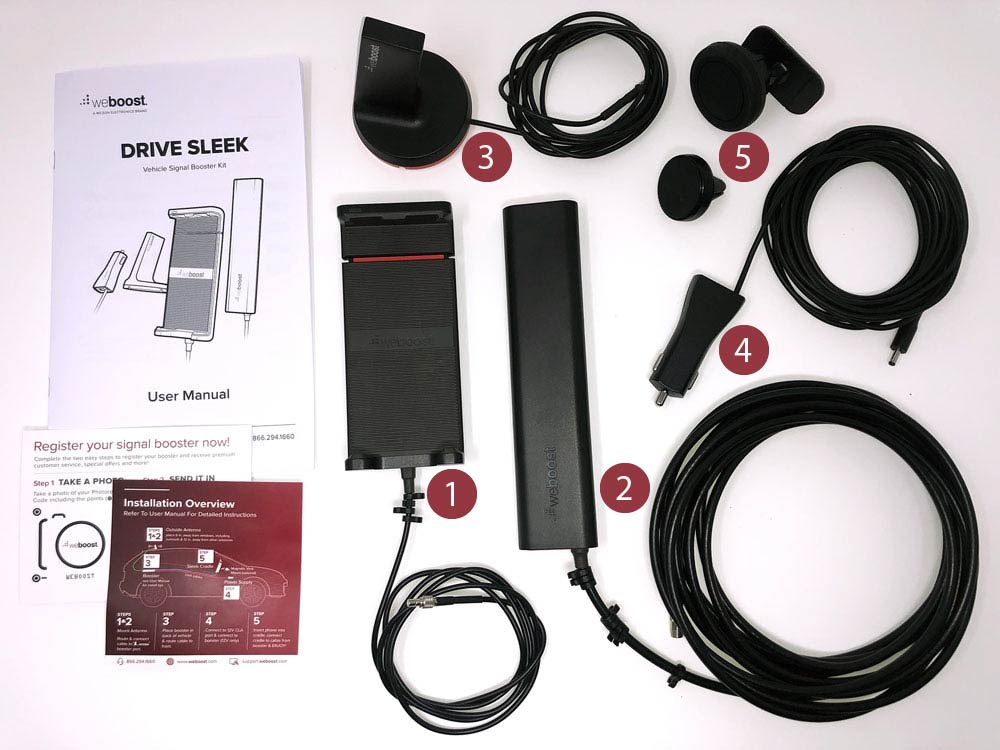
  • (1) Sleek cradle
  • (2) Signal booster
  • (3) Sleek outside antenna
  • (4) Power supply
  • (5) Cradle mount adapters
  • Instruction manual, Overview and registration cards
  • Adhesive mount disc for external antenna, velcro mount for signal booster (these not shown)

Hardware specs

  • Supported frequencies: 700 MHz (bands 12/17 or 13), 850 MHz (band 5), 1700/2100 MHZ (band 4), 1900MHz (band 2)
  • Impedance: 50 Ohm
  • Max gain: 23dB
  • Connectors: SMB
  • Cradle fit: Mobile phones 5.1 – 7.5″ tall

Design and features

As mentioned above, the Drive Sleek is a complete signal booster kit designed to fit as many vehicles and mobile phones as possible. Not the easiest task, but WeBoost has done a commendable good job of covering the bases.

The antenna is magnetic and gently but securely holds fast to most car bodies. They’ve included an adhesive disc should you need to mount to glass or something more exotic that’s not metal.
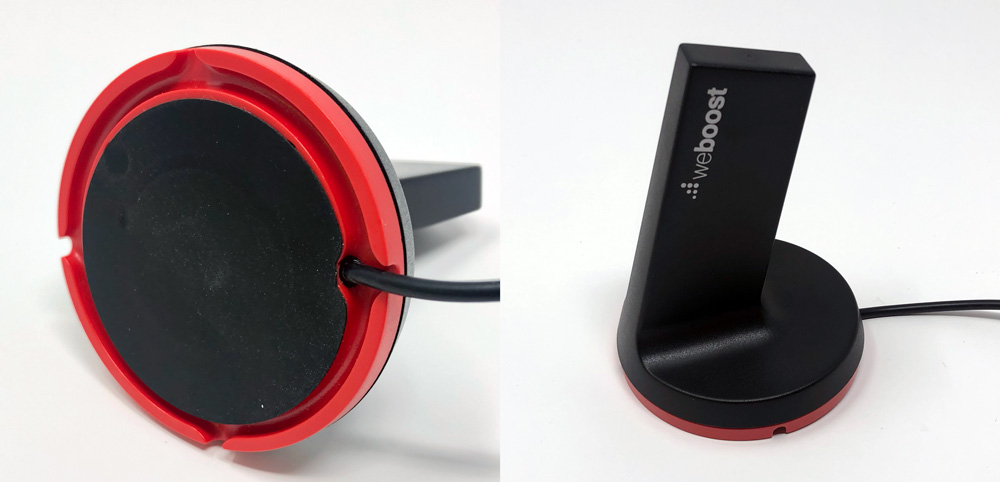
The antenna has a circular perimeter recess on the underside with exits at the compass points allowing you to orient the cable for as little cable showing as possible. Just choose your direction before you place it on the roof.

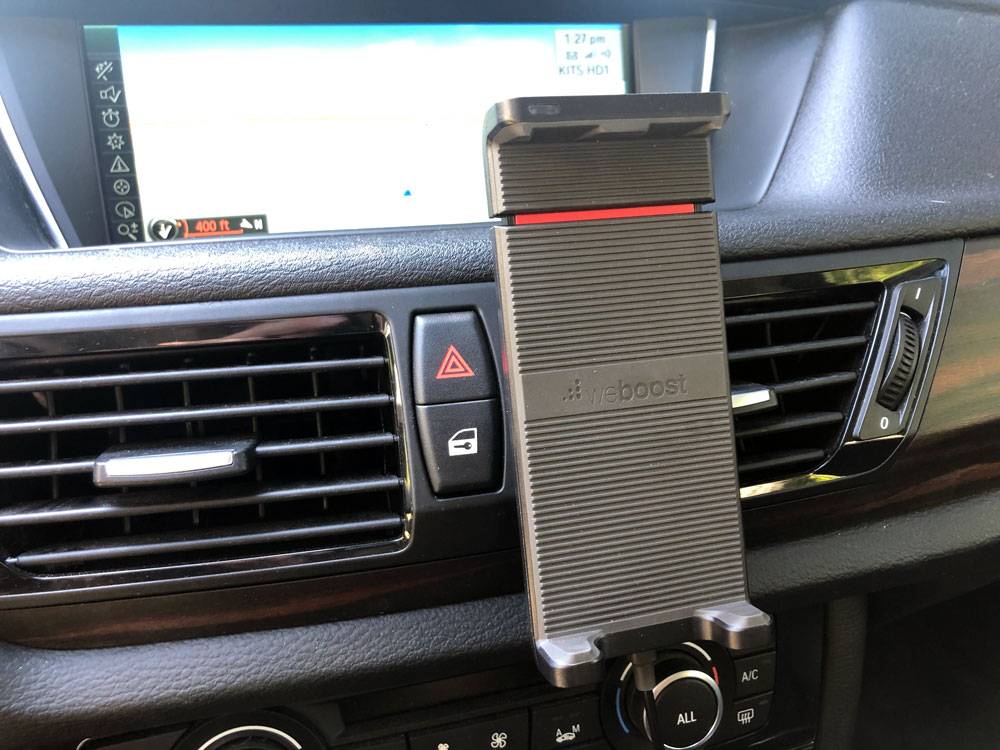
The cradle also mounts magnetically to a vent or adhesive mount to solve for most dash scenarios.
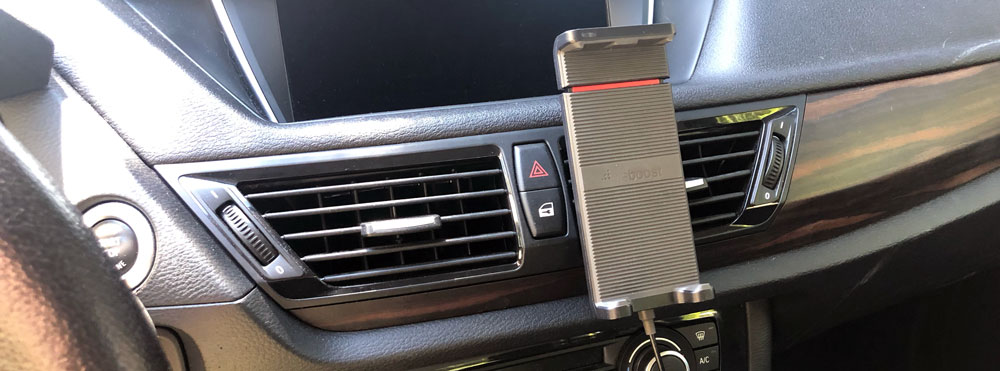
The ability to quickly disconnect the cradle from the mount and stash it when parking is pretty cool. Love the red hit showing you where the expansion section is before you start to slide it.

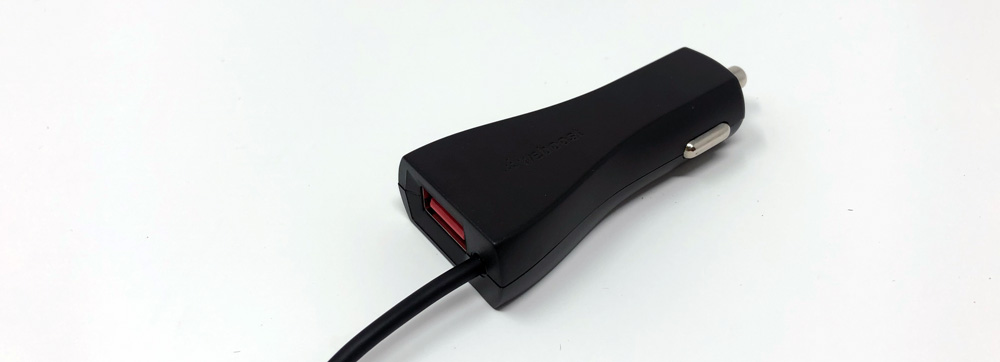
The power supply is a typical CLA (Cigarette Lighter Adapter), but with a flattened design and a really long cable in case you need to make a run from a 12V outlet at the front of your car. The built-in USB port may come in quite handy if that’s the setup you need.
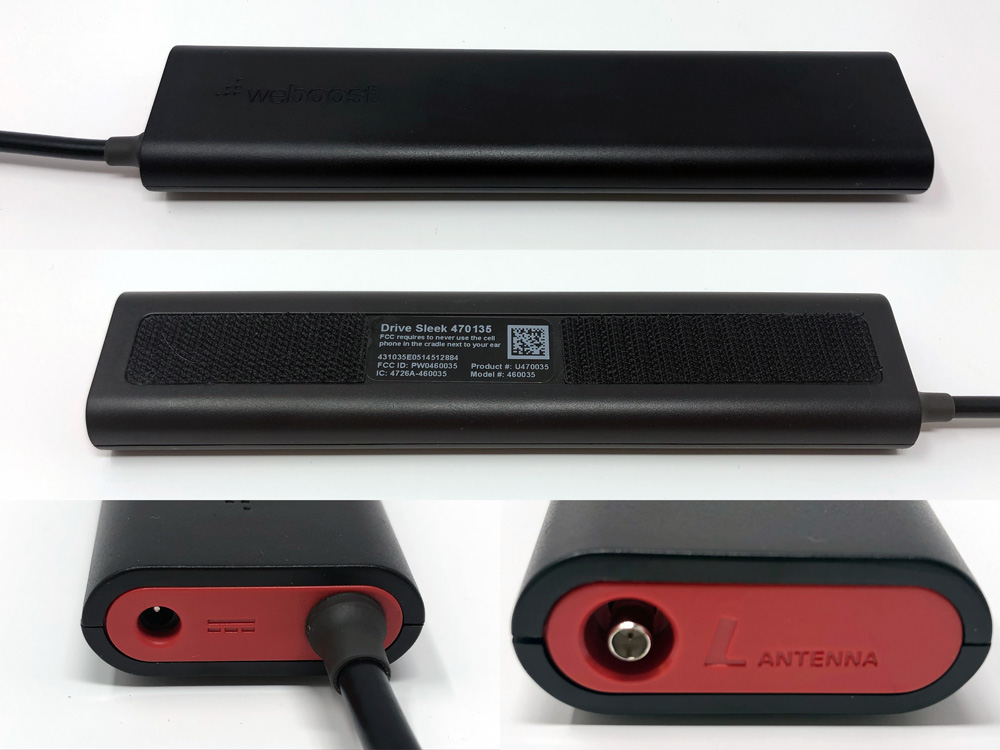
The signal booster module has a long tethered cord with a port to connect the power supply on one end and the roof antenna on the other. All the cables are designed to be tucked away and out of sight.
Possibly the best feature is one that I can’t show visually. It’s that once everything is plugged in, it’s just on and working whenever your car is running.

Setup

Installing Drive Sleek can be very easy and quick if you’re installing the system temporarily or take a good deal longer if you’re trying to install it more permanently and want to be meticulous.

Here are the basics… Mount the antenna on the roof and route the cord inside through a trunk or door to the signal booster. Connect the power supply to a 12V CLA and the other end to the signal booster. Finally, run the long signal booster cable up to the cradle for your dash. If you’ve done this quickly for a road trip in a rental car (my first couple days of use), you likely have cables draped everywhere and will need to tuck a few of them out of the way.

As for installing more permanently, the order doesn’t change a whole lot other than taking stock of what makes the most sense for your particular car. Here’s how that worked for installing on my mine.

I placed the antenna on the right rear of the roof for a couple of reasons.
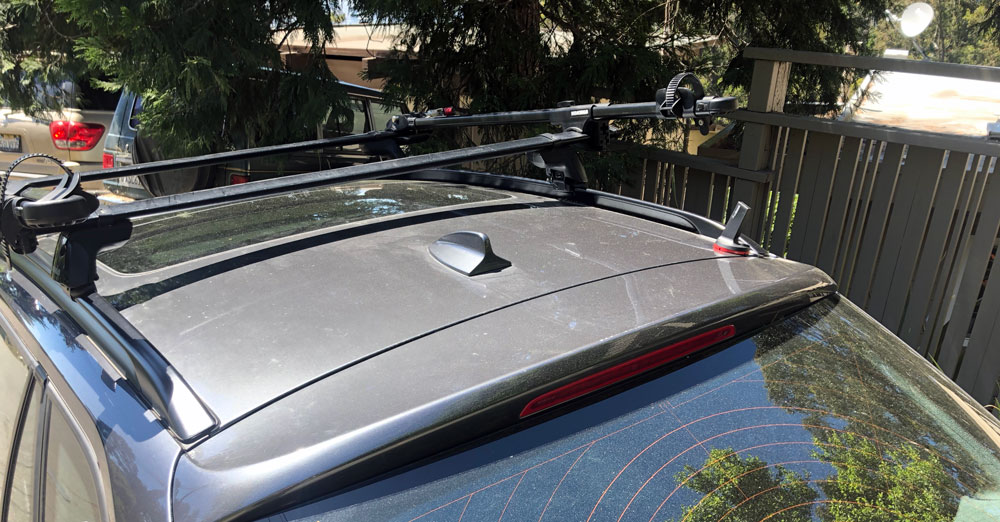
The antenna has a 6′ cable needs to be at least 12 inches away from any other antennas. My car already has the antenna in the center rear where I probably would have put the Sleek antenna, so I needed to find a different location. Putting it in the right rear allowed almost no visible cable and also helped add some visual camouflage the antenna near the end of the built-in luggage rack.
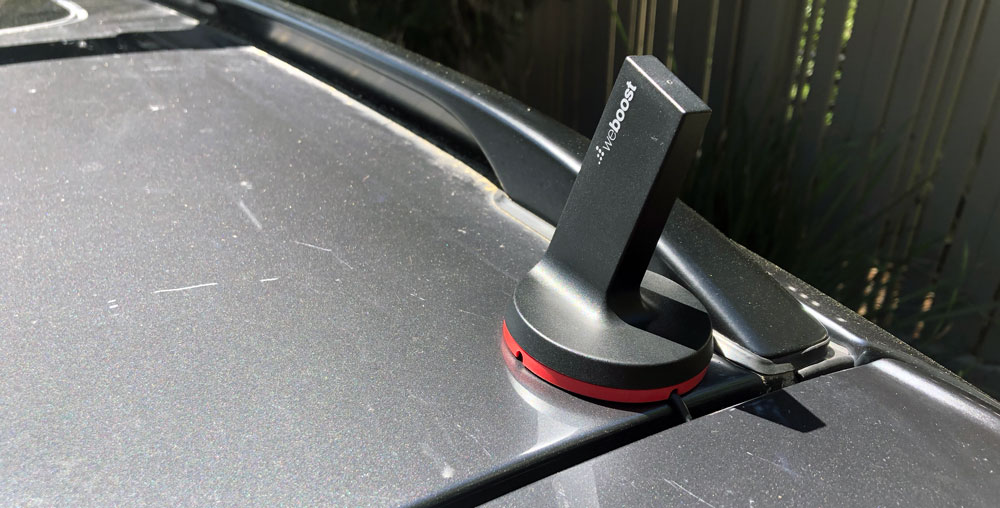
It would have also fit on the left, but there’s an accessory 12V outlet in the right rear. Easy peasy.

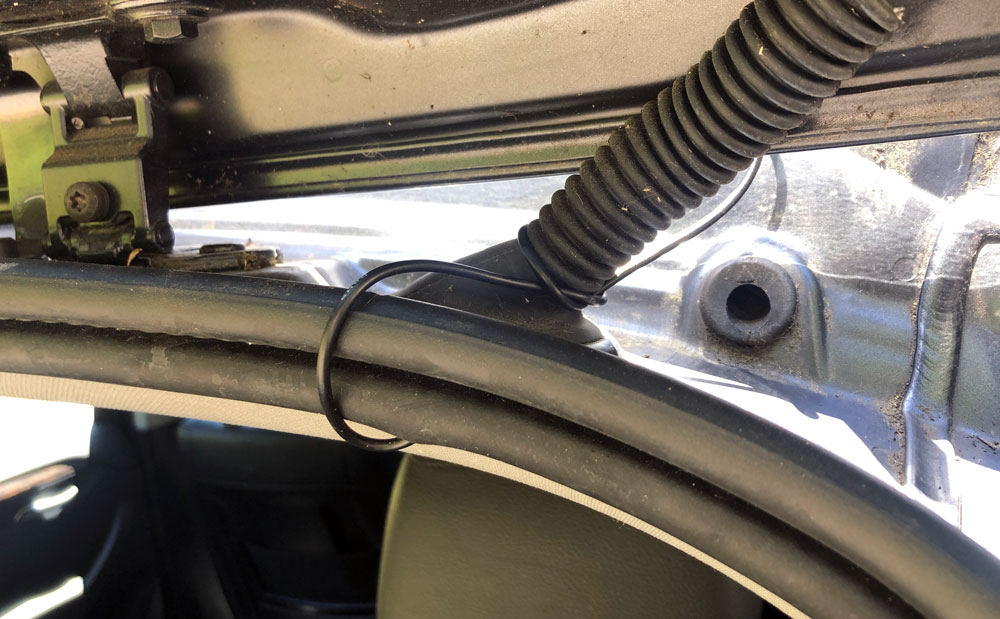
I looped the cord around the electrical for the rear window so that opening and closing the hatch wouldn’t tug on the antenna cord and then tucked it inside the roof lining before running over to the right side.
The signal booster is pretty slender, lightweight and already has hook velcro adhered to the back. The mating velcro with adhesive is included in the box if you need it. I found that the hook side actually gripped to the lining material of the trunk as is, so just found a spot up and under to keep this one out of sight for the nefarious types that like to peer into parked cars.
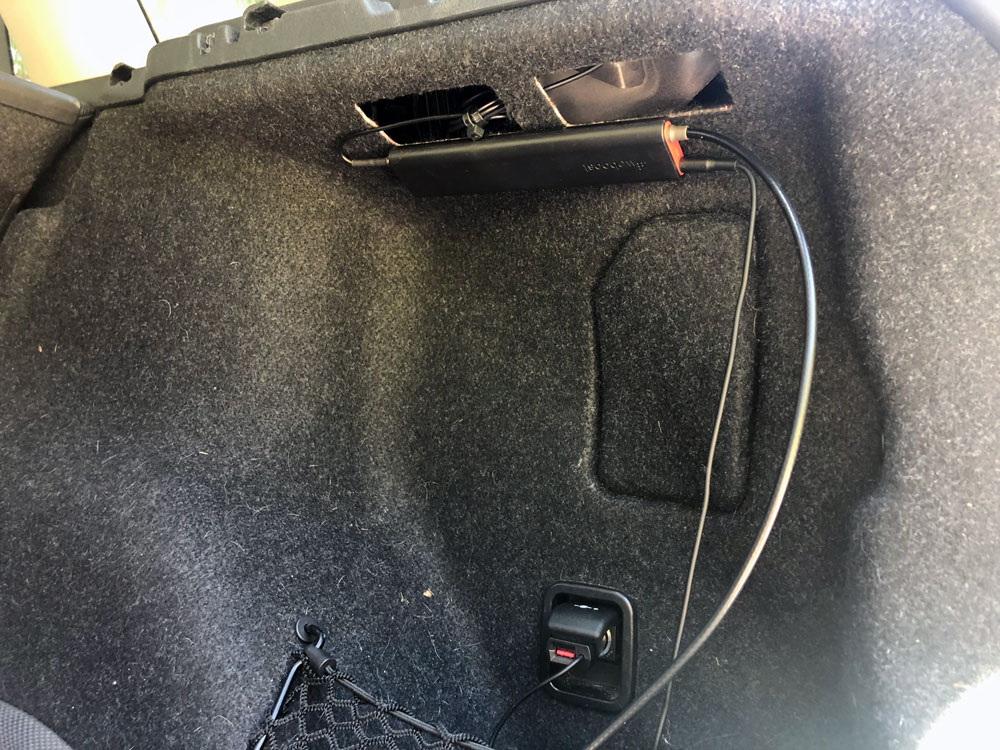
I used some zip-ties to secure extra cable lengths and then connected the antenna cord to the front of the signal booster. I only needed about a foot of cable to make the jump from the outlet to the signal booster. All good.

Next, you’ll want to figure out where you’re placing your cradle.  They include two magnetic adapters for finding a good location in your car. One is a vent mount which has the now-typical 4 finger claw that pushes into place.
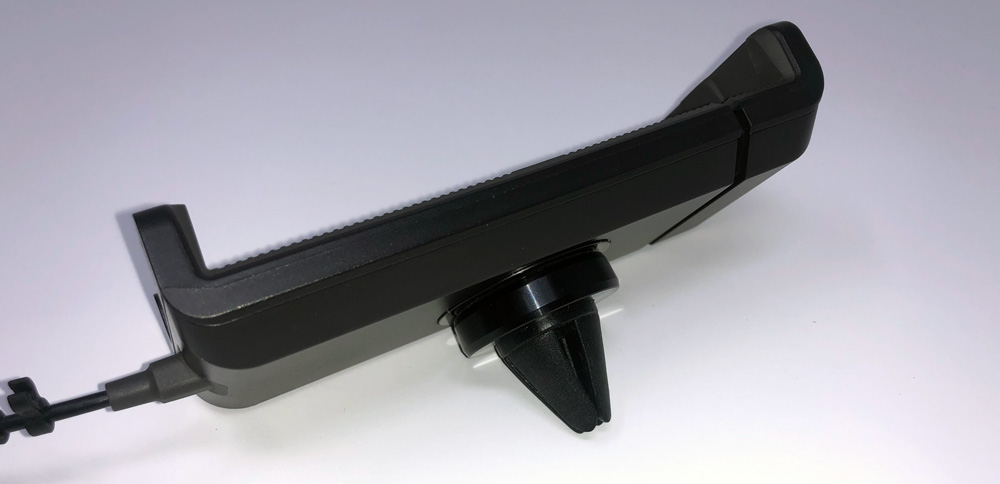
The second is a ball-joint mount with peel-and-stick adhesive you can secure to a clean, smooth surface on your dash.
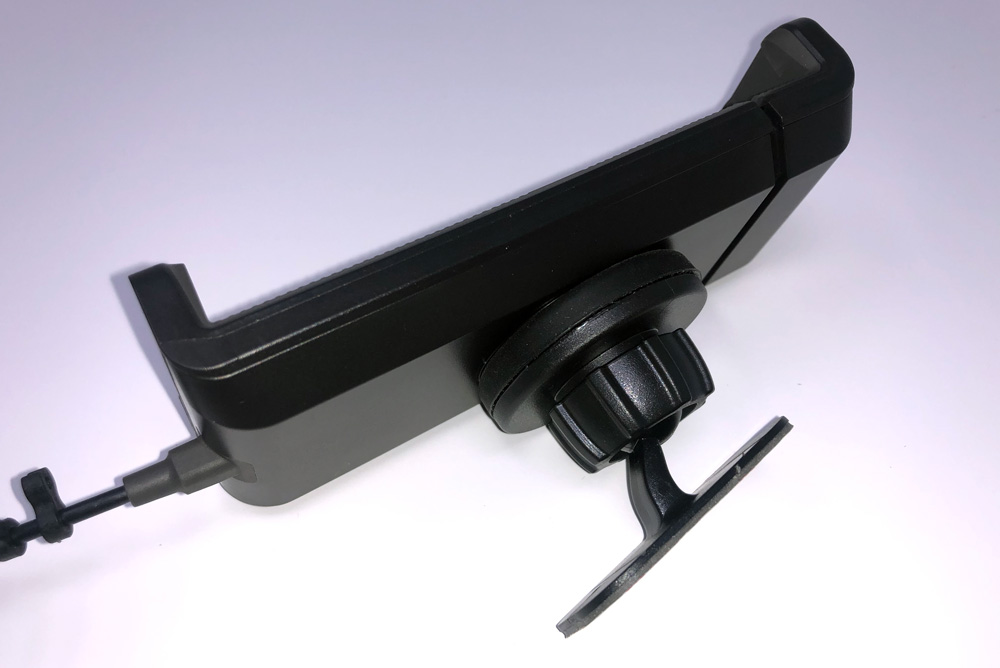
I opted for the dash mount. (Tip: Try to find a location that helps lock the vent into a position that prevents vertical motion and then allows the cradle to rest against the bottom).

The cradle’s cable is only about 4′ long which is long enough to get the connector end down between your seat and console, so you’ll need to run the signal booster’s long cable up to meet it with a connection that looks like this.

I was able to run mine underneath the rear trunk cover, under the back rest of the right rear seat and then down under the door step covers. I didn’t need to actually pry anything up, just kinda wedge the cables under and tuck them out of sight. I then connected the two cables under the front passenger seat.

Performance

A couple of weeks ago my son and I flew up for an Oregon/Washington college visit weekend that was going to have us clocking in some pretty significant miles and some good stretches of what was likely to be spotty cellular coverage. I brought Drive Sleek along to use in the rental car as I knew we’d be on the phone multiple times to relay new college info and answer lots of questions. The rental car was a Ford Explorer and I had Drive Sleek installed in about 5 minutes as we headed out far too early in the morning.

The phone goes into the cradle easily by placing the top edge of your phone under the top lip and sliding up until the bottom clears and enters the lower edge of the cradle. (This is an iPhone 6+ in the photo to show capability for larger phones and it easily had another 1.5″ of motion available.)
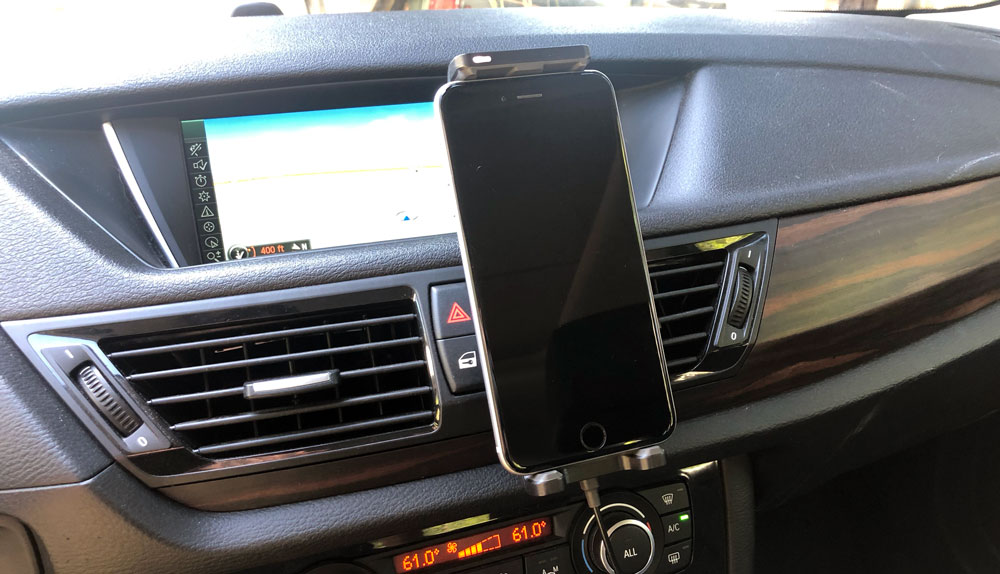
Adjustment is automatic with a super smooth slide and as long as your vent isn’t pivoting on you, it’s a one-handed operation. There are two recessed areas under the top cradle edge if your phone has a power button up top (nice touch). A little (but very bright) white light resides in the top left corner of the cradle to let you know the system is functioning properly and is at maximum gain.

So, how did it work for me? I use an iPhone X and my son has an iPhone 8. The reception indicators are shown as 4 bars where zero is no reception and 4 is all good. That said, these indicators are much more FYI and not great at actually showing what is really happening. In our case (having different model phones) I didn’t want to add any additional variables to the mix so the real test came down to making calls.

Throughout the trip, I was able to make and receive calls without trouble as well as ask Siri whatever it was I needed to ask. I did all the driving so my phone stayed in the cradle and I’d ask my son to look for restaurants and gas stops on his phone. We definitely hit a few areas where I would have 2-3 bars when he had 1. Again this isn’t conclusive, just anecdotal. We had a good 60+ minute phone call through a long, less populated stretch where my phone was showing a single bar a few times. This phone call never dropped, got fuzzy or hard to hear and I do feel that Drive Sleek was part of why.

We also drove through some pretty nasty rain conditions, as is common in the northwest from time to time. We did not see any issues with the external antenna or reception of my cloud-based music library. Nor was there any leakage past the trunk seal where the cable was routed. We finished the trip up with the feeling that Drive Sleek may actually live up to WeBoost’s claims.

Back home, there are two specific spots which have repeatable coverage issues and would help to prove that out. One is on the bay bridge on the way to SF, just before Yerba Buena Island. The second is at my kid’s high school in Oakland which somehow is an AT&T black hole.

For the bay bridge issue, I was able to make and finish phone calls through the trouble zone without dropouts. This is pretty impressive as phone calls typically just abruptly end where even the built-in streaming of our car’s entertainment system blacks out for this one 500 ft section. Similarly, at the high school, I was able to drive within the troubled area and have an uninterrupted phone call without any signs of audio trouble.

Overall, very positive results, but there are a few things to nitpick as I tend to do.

  • The white light on the cradle is fine during the day, but for night time driving it is very bright. There’s no control to knock it down or toggle a “night mode” so I’ll probably end up fashioning a little gaffer’s tape hood, or use some tinted transparent tape to knock it down a bit.
  • Would love to see wireless charging on the cradle. Phone calls and GPS apps kill batteries. Wireless charging here would just be the icing on the cake for the new crop of phones.
  • I’d also like to see the cable on the cradle be detachable. I would prefer to fully wedge the cable behind some panels on my dash and have it pop out just below to connect. This would also allow for someone to purchase a longer or shorter cable if needed.

What I like

  • Improved reception
  • Simplicity of the system
  • Design and function of the cradle
  • Magnetic attachment style of antenna and cradle

What needs to be improved

  • White cradle light is very bright at night
  • Wireless charging please (feature request, not a con)
  • Detachable cable on the cradle would be useful

Final thoughts

Drive Sleek is aimed at personal vehicles where one’s phone is mounted while driving. It’s well built, looks good and solves for most common mounting scenarios. The cradle itself is great and outperforms a lot of vent mounts I’ve used. As a system, it’s not inexpensive, but if you rely on your phone while driving for directions or work calls it may pay for itself quickly. It’s definitely worth a shot as WeBoost offers a 30-day money-back guarantee. Good luck!

Price: $199
Where to buy: WeBoost and Amazon
Source: The sample of this product was provided by WeBoost.

Filed in categories: Reviews

Tagged:

WeBoost Drive Sleek cellular signal booster review originally appeared on The Gadgeteer on April 27, 2019 at 11:00 am.

Note: If you are subscribed to this feed through FeedBurner, please switch to our native feed URL http://the-gadgeteer.com/feed/ in order to ensure continuous delivery.
ROBOQI Self Gripping Fast Wireless Car Charger review


REVIEW – Late last year, I tested and reviewed a car cell phone mount with wireless charging, and I was very happy with the functionality and the with the product overall. That device remained in my truck and was used daily, but about a month ago it just stopped charging and the clamping arms no longer open and close. I still very much like and need this type of device and accepted the opportunity to test and review the Roboqi Self Gripping Fast Wireless Car Charger. Will I be disappointed? Let’s see!!

What is it?

The Roboqi Self Gripping Fast Wireless Car Charger is a dashboard/windshield/vent mount for your cell phone that offers easy access to your phone and wireless charging while it is in the mount.

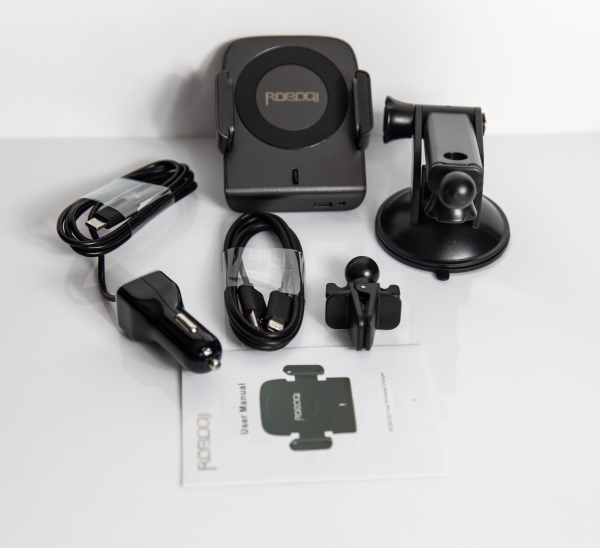
What’s in the box


1 x Roboqi Self Gripping Fast Wireless Car Charger
1 x QC 3.0 DC Power Adapter
1 x USB-C cable
1 x Dash Mount
1 x Vent Mount
1 x Instruction Manual

Design and features

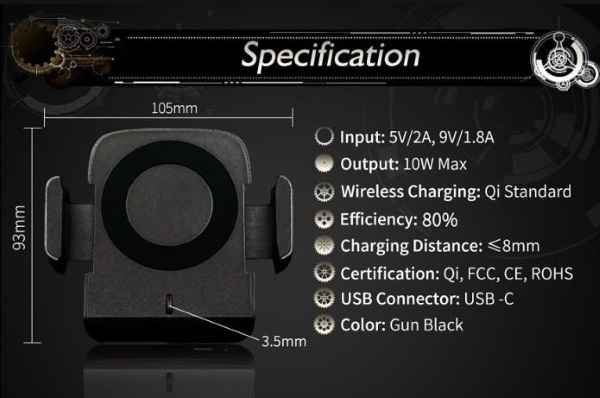
Specifications:


Features:

One Hand Operation:
Take out and put in your phone in 1 second. Automatic wireless car charger with a unique sensor. No button needed.

Fast Wireless Charge:
iCarQi supports Qi fast wireless charging 7.5W compatible for iPhone XS/Max/XR/X/8 8plus & 10W compatible for Android Samsung Galaxy S9/S9+/S8/S8+/S7/Note 8 and 5W other Qi-enabled phone (QC 3.0 adapter included).

Three Mounting Ways:
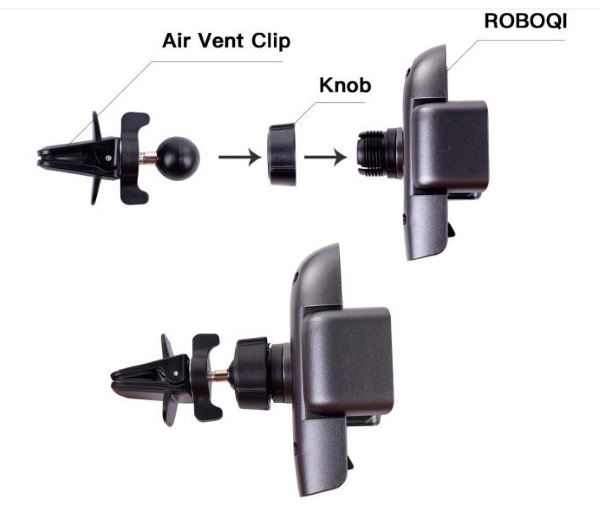
Two kinds of car mount are provided, and they can be stalled in three different ways: windshield installation, driving-platform installation, air outlet installation. The universal rotary ball, with360 degree of freedom rotation. It can be used at any angle, which brings a flexible range of viewing angle.

5 Reliable methods of Protection:
The iCarQi wireless car charger can detect the voltage of your devices intelligently so as to apply different wireless charging speeds, up to 90% charging conversion. Also includes built-in Over-Temperature Protection, Over-Voltage Protection, Over-Current Protection, and Short-circuit protection keeps your smartphone safe comprehensively.
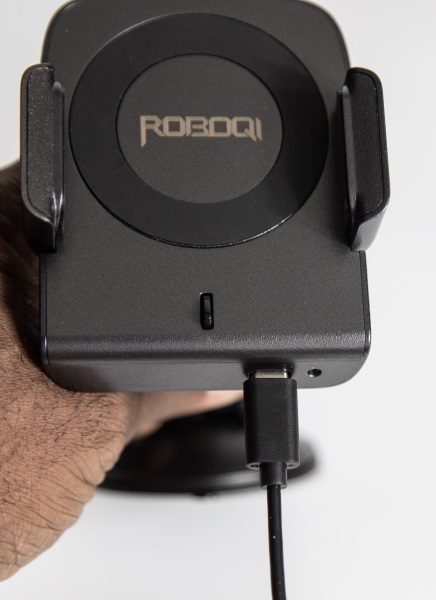
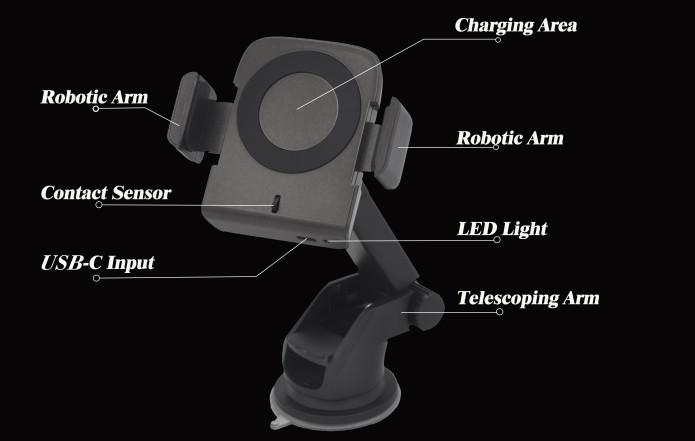
The charging base has the wireless charger in the center that touches the back of your cell when it is placed in the mount. The clamping arms on each side are controlled by the small protruding button/contact sensor in the lower center of the base.

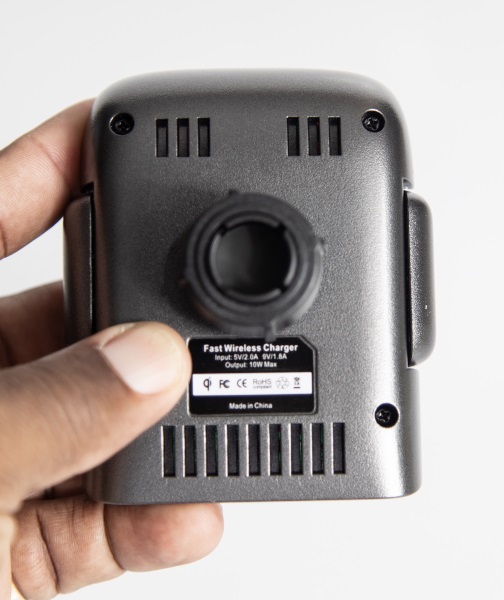
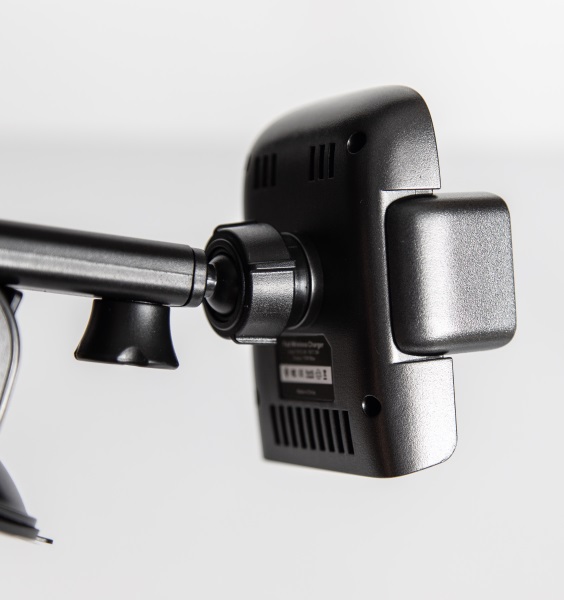
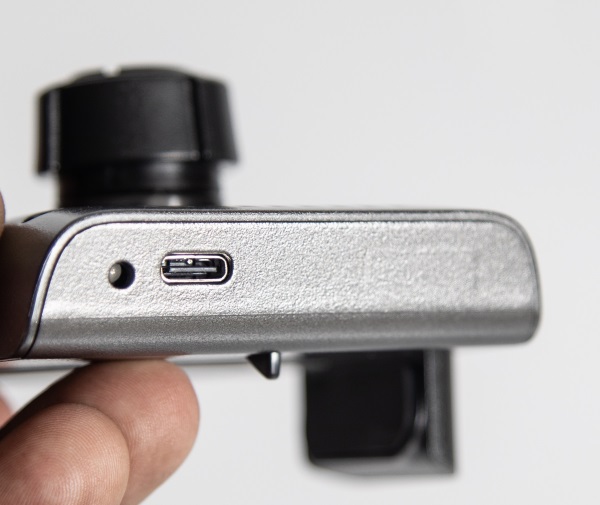
On the back of the charging base, there is the receptacle for the dash or vent mount. There are also some air vents on the back.

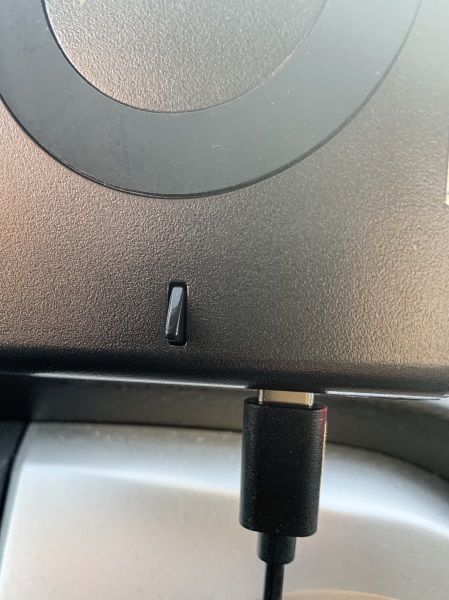
On the bottom of the charger, there is a LED status light and a USB-C port.
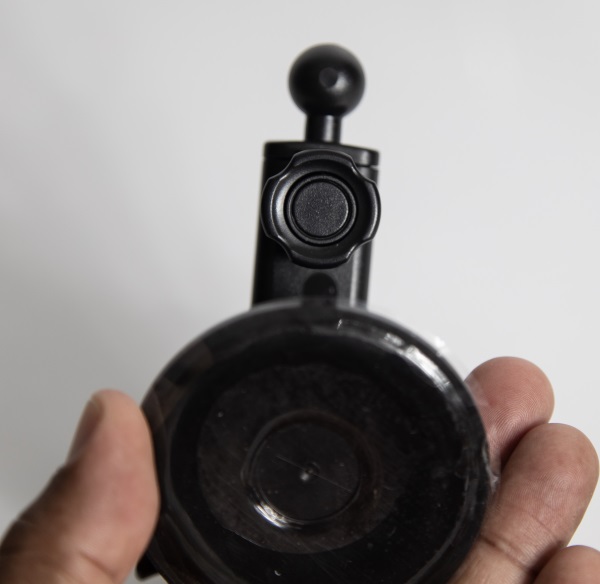
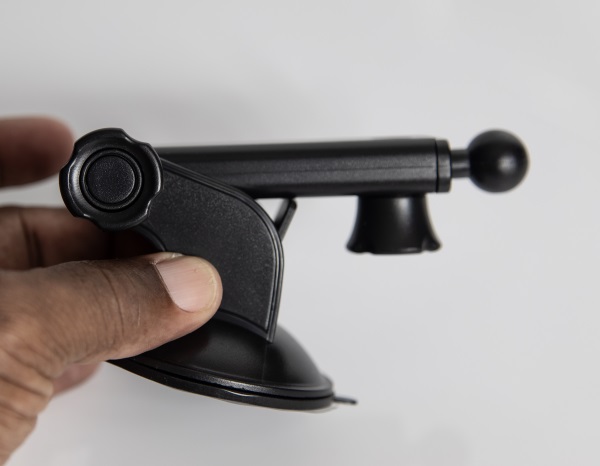
The dash mount has two thumb screws that allow you to adjust the mount up/down and to extend the mount in/out.


At the bottom of the dash mount, there is the suction cup that is used to attach the mount to the windshield or dashboard.
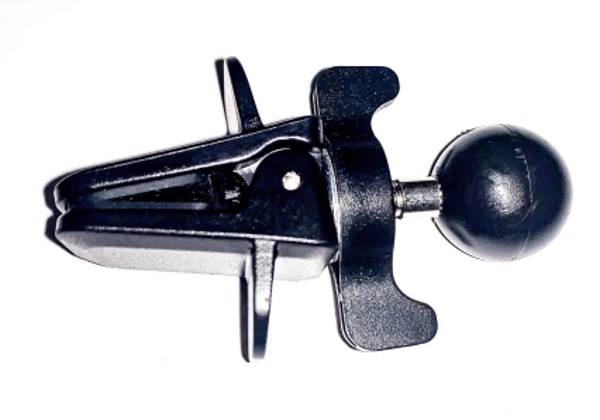
A vent mount clip is also included for mounting the charging base to the air vent.

Performance

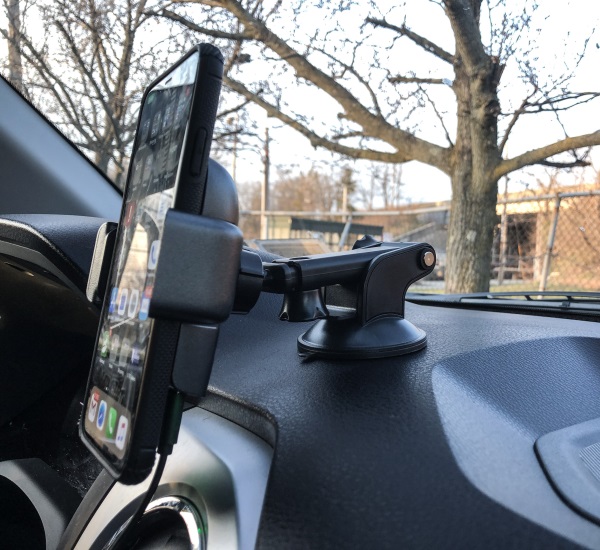
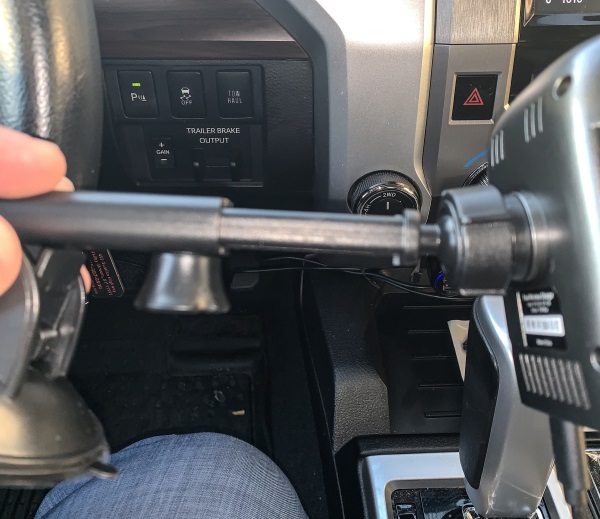
The dash mount is easily adjustable to extend some distance out from the dash and easily attaches to the dashboard via the built-in suction cup. I do not like to attach phone mounts to my windshield or my air vents. In my opinion, the mount is most stable when mounted on the dashboard. It is very steady despite the roughness of the roads and the potholes that I encounter every day when driving.

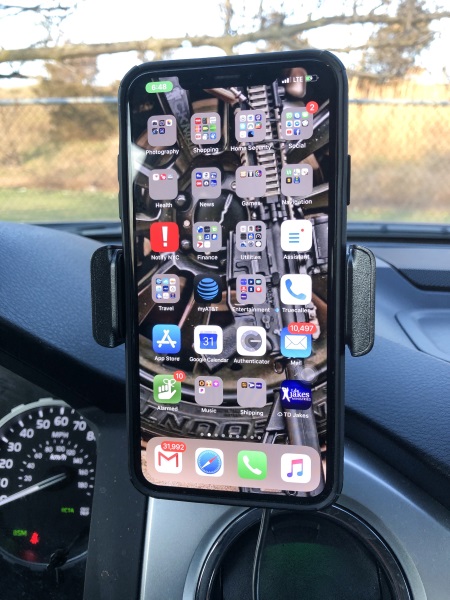
The pictures below show the phone in the dash mount. The top left-hand corner of the phone screen shows the charging icon that confirms that the phone is being charged.


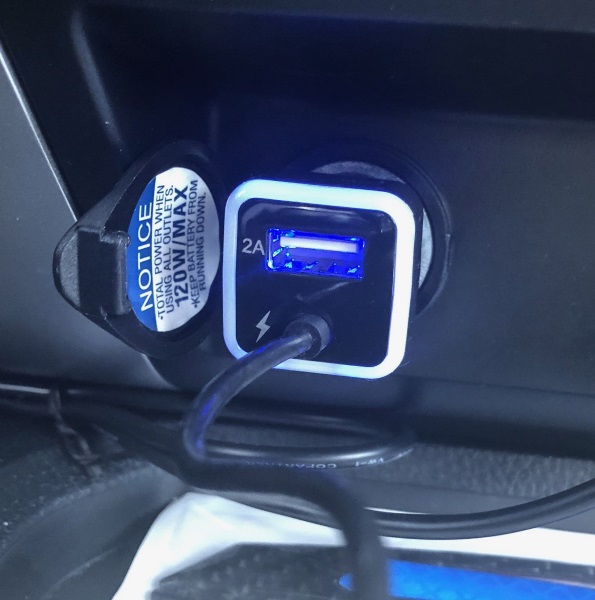
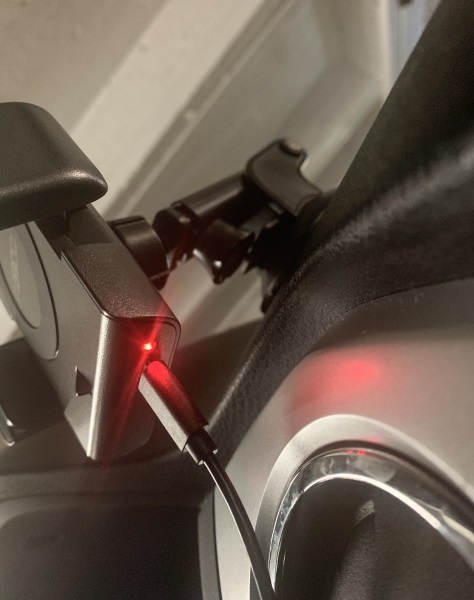
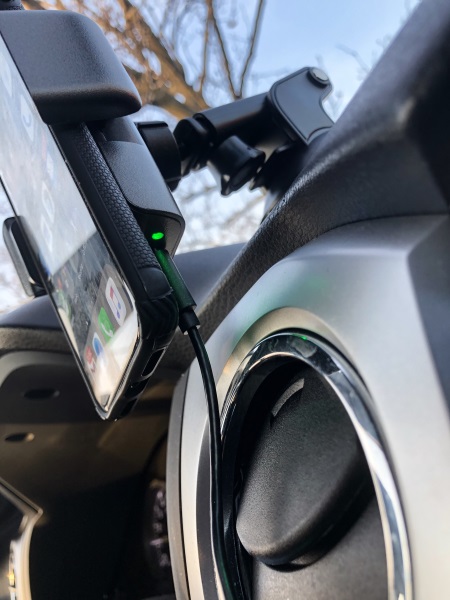
The DC power adapter plugs in the vehicle DC port. In addition to the connected charging cable, it has a second USB jack that allows you to charge/power an additional device. The port is backlit by a blue LED. The status LED on the charging base lights red when there is no phone being charged in the base and green when your phone is connected to the wireless charger.


Below is a view of the USB-C power cable connected to the charging base. To remove the phone from the charging base, you simply start to pull it out from the bottom of the phone which disengages the contact sensor seen below and opens the clamping arms. When you place the phone into the charging base and it presses the contact sensor, the clamping arms close.

I am very dependent on my cell phone and my frequent use of it does not allow me to drain the battery to test the charging time from drained to full. However, I will say that whenever I place my phone in the charging base, it is very noticeable that it charges very quickly. For the record, I am using the iPhone 10X Max.

What I like

  • The secure way that the arms hold the phone and how they are activated via the contact sensor
  • The mounting options
  • The wireless charging feature

What can be improved

  • Nothing so far

Final thoughts

This is the second wireless dash mount phone charger that I am testing that is around $50. The previous one started out great but died in less than 3 months. That one had an IR sensor that controlled the clamping arms. This one uses a contact sensor that may prove to be more durable than the previous model. Only time will tell. Otherwise, it works well and does exactly what it is intended to do including providing a fast charge. For now, I will give it two thumbs up!!

Price: $49.99
Where to buy: The Micro Novelty website
Sample: The sample for this review was provided by Micro Novelty

Filed in categories: Reviews

Tagged: , ,

ROBOQI Self Gripping Fast Wireless Car Charger review originally appeared on The Gadgeteer on April 18, 2019 at 9:15 am.

Note: If you are subscribed to this feed through FeedBurner, please switch to our native feed URL http://the-gadgeteer.com/feed/ in order to ensure continuous delivery.