Bitplay SNAP! 7 camera case and lenses for iPhone 7 Plus review


There is no question that I, and probably many of you readers, take a lot of photographs on a cell phone. It is always on you, and the cameras on them are getting better and better. I purchased the iPhone 7 Plus because of the camera, and I was intrigued to find out that there are cases and lenses to try to make that camera better. One of them is the Bitplay Snap! 7 and their differing lenses, and I was given an opportunity to try a few out.
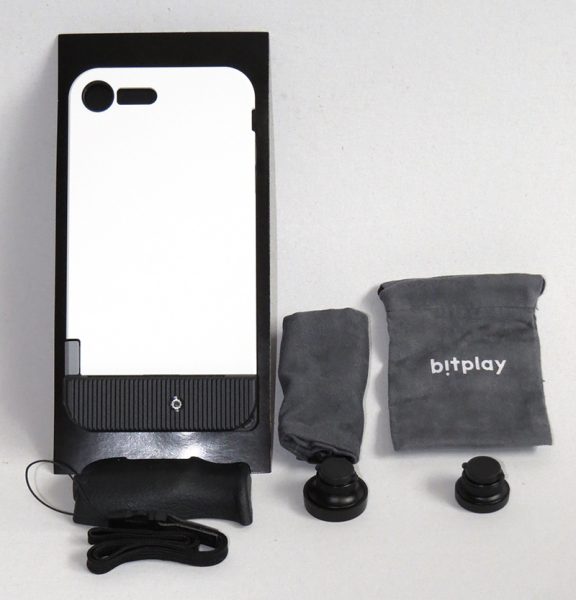

I was sent the Bitplay Snap! 7 case which includes the case, a hand grip, thumb rest, wrist strap, and user manual. Along with the case, I was sent two different lens sets to try out. Each lens had a macro lens included, as well as a cinch top bag to store them in. I ended up using one bag to store the accessories in the case and the other to store the lenses.
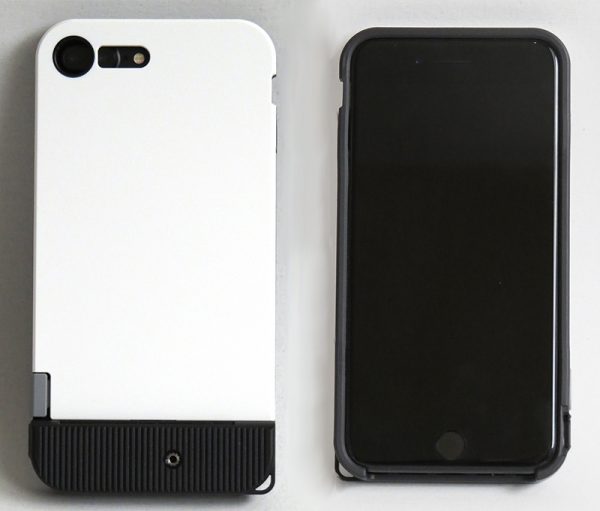

The case slips on like most standard cases, and it fit snugly on my phone. There is a lip on the front of the case to protect your screen, which is a must in my opinion, and the case itself is sturdy and I felt comfortable that it would protect my phone if dropped. The cutout for the camera does not interfere at all with taking pictures.
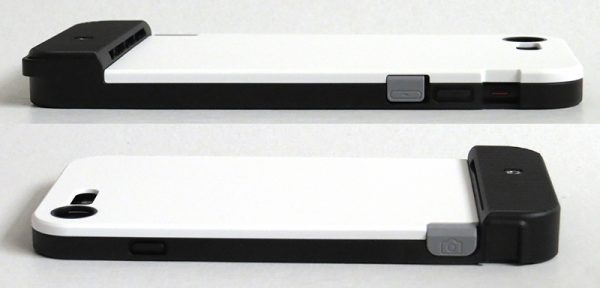

One of the things that make this a camera case is the extra button on the bottom right side to be used as a shutter button. Basically, it is a volume down switch moved to a new position. I used this when taking pictures, but after a few weeks of use, I still hit it accidentally when I am holding my phone and turn the volume down. It did work very well for taking pictures, however.
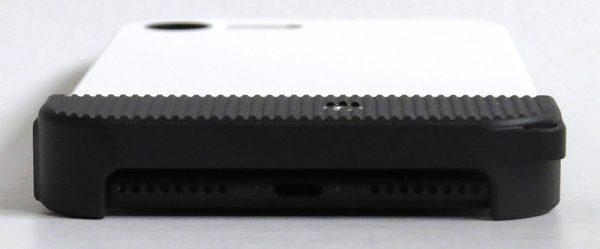

The bottom is left open, and I was able to plug in different sizes of Lightning cables without any problem at all. I prefer it this way, since my previous case only allowed for the official Apple cable to fit.
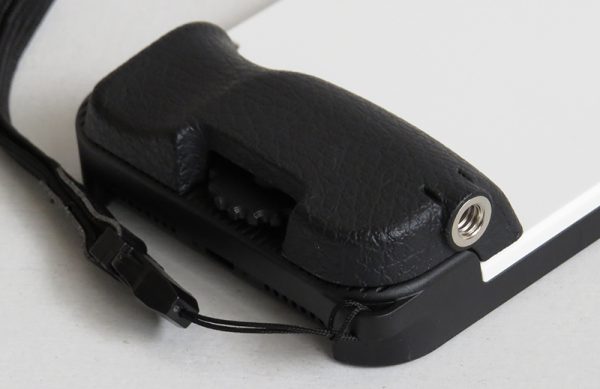

With the cutouts and holes for the camera accessories, the case itself is not the most aesthetically pleasing, but it performs its function well. It also is a little bulky, and I had a hard time fitting the already big phone into a few of my jacket pockets with the case on. Due to this, I don’t think I would use this daily, but instead, have it for vacations where I am going to use the camera features frequently.
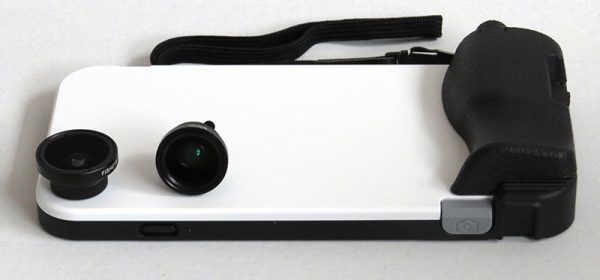

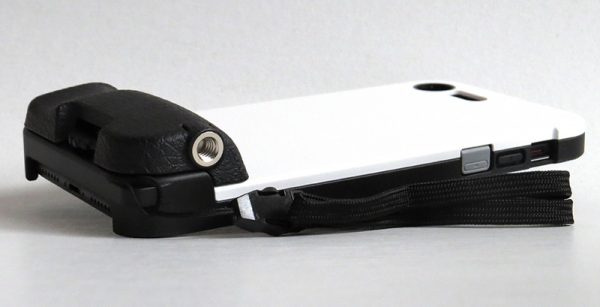
Now let’s move on to the included accessories. A thumb rest and hand grip are included with the case, and they are definitely not for daily use. However, taking pictures using both of these with the case was very comfortable. The hand grip can easily be screwed and unscrewed with a built-in dial. Not once did it unscrew on its own, which was one thing I worried about.

I was sent two lens kits; a wide angle with a 1.5x macro lens, and a fisheye with a 5x macro lens. Both included a carry bag. These lenses are sold separately, and there are also other variations of lenses available on their website.


The macro lenses were similar, so I will lump them in together. Both took good pictures, but it was very hard to keep the phone in focus when taking such close-up photos. Also, you had to be VERY close to the object to get a good picture, which meant I could only photograph tiny flowers, rather than a tulip or daisy. I can’t see myself using the macro lenses terribly often.


It was both fun and interesting to use the fisheye lens. When testing it out, my cat took a closer look at the lens and I shot a perfect picture of her nose. I would include it here, but it is just barely out of focus, so I took another of a flower bush to better show off the fisheye effect. Keep reading if you want to take a look at the fisheye picture of my cat. The iPhone camera adapted very well to the lens, focusing like it wasn’t there and also providing clear pictures. The lens quality seems pretty good. It’s not cheapo plastic feeling, and the included covers protected both sides of the lens to keep scratches from appearing on the glass.


The lens that I would use most out of all that I tried, however, is the wide-angle lens. I was floored when I saw the difference between a wide-angle and regular iPhone picture, so much that I did my best to take a picture at the same place with and without the lens to show it off. The above picture is just a regular iPhone picture, no lens attached. The below picture is the field of view when I added the lens on. I was able to see the entire bush, and not only that, there isn’t much in the way of distortion around the edges of the picture. I would have loved to have this in Yellowstone, to get an even greater view of the grand prismatic spring. The quality is just as good as I mentioned with the fisheye lens as well. If you picked up one lens for this case, this would be the one I would recommend.


Fisheye, macro, wide-angle, they all have their uses depending on their situation. If you are someone who loves an extreme fisheye look like my cat above, then the fisheye may work for you. They also have another style of fisheye on their website that doesn’t seem so extreme as well. I’d have loved to get a look at that one, but the standard fisheye was fun to use nonetheless.


Overall, I really liked the case and wide-angle lens, and will definitely include them on my next trip. For daily use, I reverted back to my previous case, since it is just too bulky to use all the time. The case and lenses may be a little pricey if you are used to cheap cases, but the quality is definitely there. If you are looking for a daily use case, I would probably not even look at a camera case, but if you are looking specifically for a case and lenses, take a look at the Bitplay Snap! 7.

Source: The sample for this review was provided by Bitplay. Please visit their site for more information and visit Amazon to order.


Product Information

Price: $49.99 (Case) – $34.99 (Fisheye + 5X macro lenses) – $24.99 (Wide angle + 1.5X macro lenses)
Manufacturer: Bitplay
Retailer: Amazon
Pros:
  • – Good photo quality with the lenses
  • – Easy to put on and take off
  • – Comfortable to take pictures with
Cons:
  • – Adds some bulk to the phone
  • – Have to remember to keep the lenses with you

Filed in categories: Reviews

Tagged: ,

Bitplay SNAP! 7 camera case and lenses for iPhone 7 Plus review originally appeared on on May 19, 2017 at 7:30 am.

Note: If you are subscribed to this feed through FeedBurner, please switch to our native feed URL http://the-gadgeteer.com/feed/ in order to ensure continuous delivery.


Good “Things” come to those who wait


I’ll admit it, I’m a productivity and to-do app junkie. I’ve used nearly every major to-do and task manager available and followed them through their development and new versions. But none so closely as Culture Code’s Things.

Finally, after literally years in a tight-lipped closed beta, Things 3 is now available on the iOS and Mac app stores. 

Things has been the one task app I kept coming back to after trying out dozens of other apps and systems because of its beauty and simplicity. And the newest version doesn’t disappoint, even after waiting for what felt like an eternity.

Things 3 is available today on iPhone ($9.99), iPad ($19.99) and Mac OS ($49.99). Be warned, it is a paid upgrade, even for those who have already purchased a previous version. To ease the pain, they’re offering a 20% discount on all versions through May 25th. If you liked Things 2, there’s plenty more to love, so jump on that discount while you can.

Check out their site for more information and to download a free 15-day trial version of the Mac OS version.

Filed in categories: News

Tagged:

Good “Things” come to those who wait originally appeared on on May 19, 2017 at 6:23 am.

Note: If you are subscribed to this feed through FeedBurner, please switch to our native feed URL http://the-gadgeteer.com/feed/ in order to ensure continuous delivery.
Posted by / May 19, 2017 / Tagged with / Posted in News

TYLT FLIPSTICK Portable Power Pack review


What’s the worst tech catastrophe that is only a few minutes or hours away from occurring to you every single day? A dead smartphone battery! If you’re not near an outlet, the threat of no juice is a real nightmare. Am I being melodramatic? Only barely. We count on our phones for so many reasons that backup battery power is a very important commodity. Just like we might carry snacks with us in our gear bag, we should also carry extra power with us for those times when we are away from the power grid and see the dreaded low battery notification. One potential solution is the TYLT FLIPSTICK Portable Power Pack. Let’s check it out.

What is it?

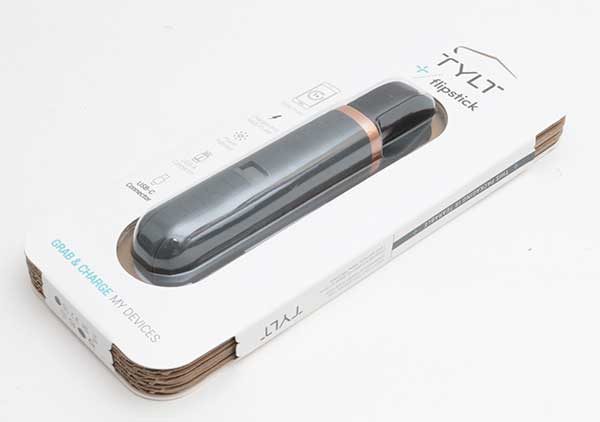
The TYLT FLIPSTICK is a 3,350 mAh portable power supply that is available with a USB Type-C connector, micro-USB connector, or a Lightning connector (for $10 extra).

Design and features

The FLIPSTICK is a 5.25-inch long tube shaped backup battery with a soft touch rubber covering.

Available in gray or blue, the FLIPSTICK has a built-in USB cable that plugs into the top of the FLIPSTICK to create a loop that you can use to attach the FLIPSTICK to a strap on your bag, your belt loop, or something else.

The cable is about 4 inches long on a flexible, soft cable.

In the image above you can also see a + etched into the rubber covering. Below the + is a line of 4 LEDs that light up to show the FLIPSTICK’s battery capacity while charging your device and while the FLIPSTICK itself is charging. Below the bank of status LEDs is a slight divot that is a button that you click to see the current battery capacity status.

On the other end of the FLIPSTICK is the cable that you plug in to your USB Type-C device, micro USB device, or Lightning connector device.

Putting the FLIPSTICK to use

Using the TYLT FLIPSTICK is very easy. First, you plug the black USB cable into a USB port on your computer or a USB AC adapter to charge the FLIPSTICK. You’ll know when it’s finished charging by keeping an eye on the status LEDs. When all 4 LEDs light up, it’s fully charged.

TYLT sent me the USB Type-C version of the FLIPSTICK which I tested with my Nexus 6P which has a 3450mAh battery. Remember that the FLIPSTICK has a battery capacity of 3350 mAh.

Test 1: 6:10 am, the Nexus 6P was at 12% battery when I plugged in the TYLT FLIPSTICK.
The FLIPSTICK ran out of juice at 7:47 am when the Nexus 6P had been recharged to 77%.

7:47 am, plugged the FLIPSTICK into a USB port on a Dell laptop to recharge. The FLIPSTICK was fully recharged at 10:30 am.

… the next day…

Test 2: 7:36 am, the Nexus 6P was at 8% battery capacity when I plugged in the fully charged FLIPSTICK.
The FLIPSTICK ran out of juice at 9:00 am when the Nexus 6P was recharged back up to 73%.

4:07 pm, plugged the FLIPSTICK into a USB AC adapter to recharge. The FLIPSTICK was fully recharged at 7:00 pm.

Final thoughts

Does the TYLT FLIPSTICK provide auxiliary power to USB TYPE-C, micro USB, or Lightning connector capable devices? Yes.

Does the TYLT FLIPSTICK have fast charging capabilities? No.

Can the TYLT FLIPSTICK completely recharge a device’s battery? That depends on the battery capacity of the device and herein lies my main issue with the TYLT FLIPSTICK. It just doesn’t offer enough juice for the price. I can find a huge assortment of backup batteries for $30 that have 2 even 5 times the battery capacity of the 3350 mAh FLIPSTICK.

While the TYLT FLIPSTICK is well made and easy to use, it doesn’t offer enough bang for your buck. My advice is to keep shopping.

Source: The sample for this review was provided by TYLT. Please visit their site for more info and Amazon to order.


Product Information

Price: $29.99
Manufacturer: TYLT
Retailer: Amazon
Pros:
  • Easy to use
  • Small
Cons:
  • Small power capacity means you probably won't fully charge your device without draining the FLIPSTICK

Filed in categories: Reviews

Tagged:

TYLT FLIPSTICK Portable Power Pack review originally appeared on on May 18, 2017 at 11:00 am.

Note: If you are subscribed to this feed through FeedBurner, please switch to our native feed URL http://the-gadgeteer.com/feed/ in order to ensure continuous delivery.

Julie’s favorite gear, Echo Dot, Casio G-Shock watch, Timbuk2 messenger bag, and more – Review updates


It’s time for another round of quick updates to some of our past reviews. We like to revisit reviews days, weeks, months, and even years later to let you know how the product stands the test of time. This round of updates includes a review from over 8 years ago. Click through to see the list of updated reviews and then scroll to the bottom of each review to see the latest update.

Julie’s favorite gear page

Timbuk2 Custom Laptop Messenger Bag Review by Julie Strietelmeier

Amazon Echo Dot 2nd generation review by Michael Strange

Fenix FD40 LED flashlight review by Andy Chen

Casio G-Shock GW9200-1 “Riseman” Review by Andy Chen


Product Information

Price:

Filed in categories: Reviews

Tagged:

Julie’s favorite gear, Echo Dot, Casio G-Shock watch, Timbuk2 messenger bag, and more – Review updates originally appeared on on May 18, 2017 at 9:00 am.

Note: If you are subscribed to this feed through FeedBurner, please switch to our native feed URL http://the-gadgeteer.com/feed/ in order to ensure continuous delivery.

Jabra Speak 710 Bluetooth speakerphone review


The first phone earpiece I got was from a company called Jabra. I thought it a funny name, but due to the build quality and excellent functionality, I came to trust that name. I was recently sent my third product from the company, the Jabra Speak 710. It’s in a crowded category, but, to me, at least, it brings some important innovations. This model is an upgrade from their 410 and 510 models that were only for phones. This unit, as we shall see, works with computers and tablets as well.

Note: Photos may be tapped or clicked for a larger image.

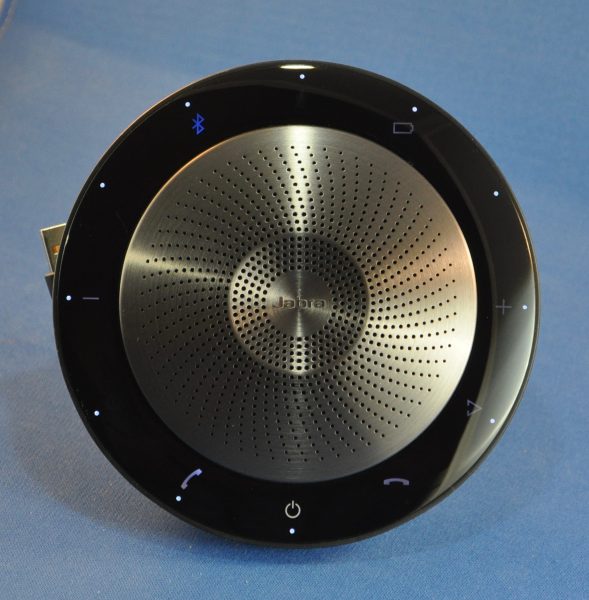
The first thing you think seeing the Jabra Speak 710 is “Space Ship.” It looks, for all the world, like the proverbial flying saucer. The full diameter is just over 5″ (13 cm) and the smaller, inner speaker grille is 3.75″ (9.5 cm). The whole unit is less than 1.5″ (3.4 cm) thick.

The main face has the gray metal speaker grille, with holes drilled in a swirling pattern around a chromed Jabra logo. Outside of that, the larger disc is set off less than half an inch (1 cm) lower and made from a smooth, shiny plastic. At the 6 o’clock position (Kids, ask your parents what “o-clock” means!), there is a single visible white on-off button. Holding that lights up all 12 clock points with various symbols and a dot on the perimeter of each. The dots are indicative of volume level: starting at 6 and going around clockwise, you have a 12-point visual division of muted to full volume. In other words, this one goes to 12!

Inside the volume pips, there are various symbols on most of the clock points. To the left and right of power (7 and 5 o’clock) are the off-hook/on-hook phone functions. At 4 o’clock, there is a sideways V that brings up Siri, or whatever vocal assistant your paired device uses. At 3 and 9, the “+” and “-” control volume. At 11 o’clock, there is a BlueTooth indicator that glows blue when paired, flashes when searching or discoverable, and white when not connected. At one o’clock, there is a battery-life symbol, which turns red when the battery needs attention.

On the back is a fold-out stand, which sets the unit on a level surface to 56º. There is also something that most Mac users will not recognize: a Bluetooth dongle. This is for folks using devices that don’t have Bluetooth built-in but have a full-sized USB port. Plugging this puppy in (and downloading your OS’s drivers for it) will give your hardware the same capabilities that most modern computers have from the factory. If you’re using an older computer without BT 4, you’ll probably want to turn off your built-in Bluetooth radio and enable this one instead.

Under the outer rim, slightly to the rear, is the full-duplex mic. (You can see it in the photo below.) Full Duplex means that you can both talk and hear at the same time. (Phone-arguing mode, FTW!) The mic is omnidirectional, so that as many as 6 people can be around it easily. (I did not test this feature, but I did wander around the room while on several calls, and the caller never said my sound was garbled or hard to understand.)

The last physical feature of the Jabra Speak 710 is the captive USB connect/charging cable wrapped around the outer edge, just behind the control ring. It has a generous 3 foot-plus (1 meter) cable and is permanently attached. Using this, you can connect it to any computer that supports USB audio. Connecting it in this way will also charge the battery as you’re using it, if the port supports charging through USB. Having the cable be captive also prevents two irritatingly common happenings – forgetting your charge cable, or inserting it incorrectly and breaking off the charging port inside the device. While it’s certainly irritating to have the cable wrapped around the speaker, it is fairly well out of sight, unless you’re needing a charge. You can even charge while using the speaker, which may prove to be of benefit. (Note that there is no AUX-type connection.)

Included with the package is a black neoprene case that holds the unit easily, and zips closed to protect it. In a nice design touch, the pull for the zipper echoes the Eiffel Tower-esque profile of the rear stand. Style points, Jabra.

So, with the ease of set-up, clear indications of power, volume, and connectivity, how does the Jabra Speak 710 actually sound? In a word, marvelous. I get quite a few devices like this to review, and I was in the kitchen with the Lovely Bride while unpackaging this one. She rolled her eyes at the saucer shape, but I powered it up and paired it with my phone in about 15 seconds. We had to call someone right then, so I asked Siri to dial the number and we talked over the speaker. Once the call was over, I asked her opinion. “That’s the first one you’ve had that I’d actually consider using.” High praise, indeed!

Speakers that work with your smartphone have been around for several years now. The first one I remember that made any mass-market difference was the JamBox, during the 2010 holiday season. Since then, they have exploded, covering every size, shape, and level of sound. They are a major category on the store shelves of Best Buy, Fry’s, Target, Walmart, and even the difficult-to-enter Apple, as well as review websites like The Gadgeteer. This offering from Jabra, to me, is one of the most pleasant-sounding and -looking one in quite a while. With the captive USB cable and clear function indicators, I can’t say enough about the thought and attention to detail that went into this unit. Bravo, Jabra.

Source: The sample for this review was provided by Jabra. Please their site for more info and Amazon to order.


Product Information

Price: $299.00
Manufacturer: Jabra, Inc.
Retailer: Amazon
Requirements:
  • Audio source
Pros:
  • Well-modulated sound
  • Striking looks
  • Visual indicators for settings
Cons:
  • None, really

Filed in categories: Reviews

Tagged:

Jabra Speak 710 Bluetooth speakerphone review originally appeared on on May 18, 2017 at 7:32 am.

Note: If you are subscribed to this feed through FeedBurner, please switch to our native feed URL http://the-gadgeteer.com/feed/ in order to ensure continuous delivery.