Off Grid Tools Survival Axe Elite review


Survival tools run the gamut from a pocket knife to axes and even beyond. I don’t know if there is any real definition of what a survival tool is, so I guess it comes down to what an individual would consider to be a survival tool. With that in mind Off Grid Tools has offered up for review their version of a survival tool, the Survival Axe Elite.

Note: Images can be clicked to view a larger size.

Although not all survival tools will have multiple useful features, to me the most effective ones will. The Survival Axe Elite delivers on the multiple use aspect being advertised as having 30 features. Now, just for clarification, features may not mean tools or uses depending on your definition. As you can see by the picture below from the Off Grid Tools website all the features are shown and listed.

Again, you would need to decide and define what you consider a feature.

I will break this review down by the axe head section and the handle section. Before I go too far into this review I want to address the “hatchet” in the room. I know some of you may look at the Survival Axe Elite and say, “isn’t that a hatchet?” And by many definitions, the tool could be considered a hatchet, but hatchets are also known as hand axes so by accepted terms the Survival Axe Elite is an axe.

The head of the axe contains the majority of the Survival Axe Elites tools the main two to me being the hatchet edge and the hammer head. Although the other tools can be useful, those two are the workhorses of this section of the tool. I don’t want to discount the other features here like the pry bar and gas valve shut off, or even the built-in sockets, but I consider those to be ancillary items.

The handle of the Survival Axe Elite covers the full tang of the axe. The rubberized 33% glass filled nylon handle has some interesting feature including a six-inch reciprocating saw blade and a hardened glass breaker.

There is a locking mechanism at the bottom of the axe that keeps the reciprocating blade lock in place when in and outside of the handle. I will say that when the blade is deployed the locking mechanism does not hold the blade locked in place on my Survival Axe Elite. The blade lock is low enough on the handle that it should not interfere with your use of the Survival Axe Elite.

I mentioned the glass breaker before, but the handle also has a seatbelt cutter built into it. Both would seem to function well, but I must admit I did not try out the glass breaker. As with the blade lock both of these items are low enough on the handle so they should not interfere with normal use.

I mainly tested the Survival Axe Elite by using the hatchet, hammer and saw blade. The hatchet blade is good for chopping, I wish that the blade was sharpened a little better, I believe this would make chopping wood easier. The hammer was also good at what it does, hammer. The grip was comfortable for both chopping and hammering. I did try out the nail puller and it also performed well. That brings me to the saw feature. First, let me say I love the fact that the saw feature is included on this tool, that being said I think the tool would benefit from a redesign of the locking mechanism. I am just scared that I will hit the back of the blade making it close on my fingers. The blade did cut well and the way the system is designed makes it a little more ergonomic when cutting.

So, what’s my bottom line here? The Off Grid Tools Survival Axe Elite is good. From what I did it functions well. The features have been well thought out but, I would honestly only use some of the features in an emergency (mainly the hex sockets). The build is solid and the materials seem to be first rate. The oxide coating has held up so far and will help protect the Survival Axe Elite while it waits to be used. Even with the minor issues I have had with this tool, I would still recommend it to someone that was looking for a tool of this type. The Survival Axe Elite is available on the Off Grid Tools website for $89.99.

Source: The sample for this review was provided by Off Grid Tools. Please visit their site for more info and Amazon to order one.


Product Information

Price: $89.99
Manufacturer: Off Grid Tools
Retailer: Amazon
Pros:
  • Well built
  • Built in tools
Cons:
  • No axe head cover or case

Filed in categories: Reviews

Tagged: , ,

Off Grid Tools Survival Axe Elite review originally appeared on on July 2, 2017 at 9:45 am.

Note: If you are subscribed to this feed through FeedBurner, please switch to our native feed URL http://the-gadgeteer.com/feed/ in order to ensure continuous delivery.

Tacklife IT-T05 Dual Laser Infrared Thermometer review


I used to have one of these infrared thermometers, but it’s since gone missing.  I suspect it was stolen in the Great Garage Robbery of 2015.  I recently had a chance to test out another infrared thermometer, but with not one laser, but two!  Let’s check out this laser-y goodness.

Specifications :

● Temperature: -50°C~550°C (-58°F~1022°F)
● Accuracy Resolution: ≥100°C±2% / ≤100°C±2°C
● Response Time: ≤0.5S
● Emissivity: Adjustable (0.1-1.0)
● Distance to Spot Ratio: 12: 1
● Storage Temperature: -20 to 50°C (-4 to 122°F)
● Operating Temperature: 0 to 50°C(32 to 122°F)
● Power/ Power Life: 9V / about 12 hours

Included In The Package:

1 X Tacklife T05 Pro infrared thermometer
1 X 9V battery
1 X User Manual
1 X Carrying Case
1 X 24 Months Warranty

To be honest, this looks similar to every other infrared thermometer you’d find on Amazon.  I suspect a handful are made by a few companies, then rebranded across many, many different names.

The model T05 comes with a carrying case and a 9V battery.

What I did not expect was a belt loop in the back.  Not bad!

Look familiar?  If you’ve ever owned an inexpensive infrared thermometer, there’s not a whole lot of difference other than cosmetics.

It’s feeding time!  The T-05 takes a single 9 V battery (included).

One thing about the T-05 that stands out:  Dual laser pointer.  The space between the two dots indicates the approximate “circle” you’re measuring.  To me, this is a must-have feature.

Don’t forget to peel off the plastic film!  The LCD display can be backlit.  There are four buttons that let you toggle the backlight or laser on or off, set degrees C or F, and change emissivity (0.1 to 1.0).  The default emissivity is 0.95 out of the box.

Let’s go measure things! This block of reusable “ice” measured a frosty 7.6°F  Note the two laser dots.

For something warm, I measured a cup of warm water.  (The red laser dot on the edge of the cup is actually a reflection).  Both the T-05 and my trusted Thermoworks Thermapen Mk4  measured about the same at the surface of the water.  Of course, one thing the infrared thermometer can’t do is measure temperatures BELOW the surface.

Is the Tacklife IT-T05 useful?  Sure it is.  Keep in mind that I consider this a strictly non-scientific instrument that’s really only good for “how much hotter/colder is this thing vs. ___?”   However, the addition of two laser “dots” indicating the area measured makes this a far more useful thermometer than those without.

Source: The sample for this review was provided by Tacklife. Please visit their site for more info and Amazon to order.


Product Information

Price: MSRP $49.99 ($24.97 at the time of this review)
Manufacturer: Tacklife
Retailer: Amazon
Requirements:
  • 9V battery (included)
Pros:
  • Dual laser pointers makes remote measuring a snap
  • Carry case and batteries included
Cons:
  • Only takes surface measurements

Filed in categories: Reviews

Tagged:

Tacklife IT-T05 Dual Laser Infrared Thermometer review originally appeared on on June 15, 2017 at 7:32 am.

Note: If you are subscribed to this feed through FeedBurner, please switch to our native feed URL http://the-gadgeteer.com/feed/ in order to ensure continuous delivery.

Loftek 15W Portable Floodlight review


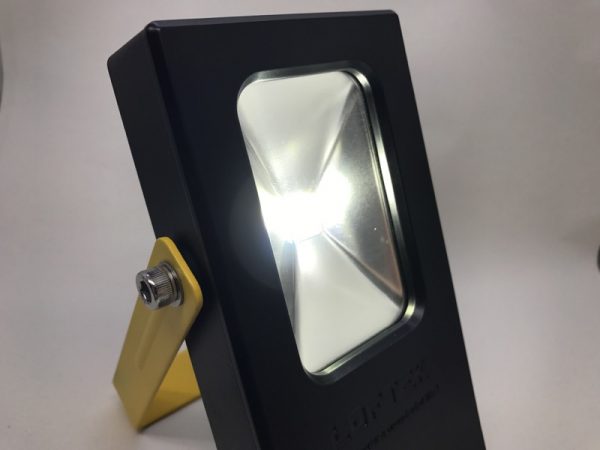
I’ve got quite a few flashlights, but I don’t really have a portable “floodlight” when I need to light up a large area.  This time I got to try out something different. It’s not quite a flashlight, and it’s not really a camping lantern.  It’s the Loftek 15W Portable Floodlight.

Specification

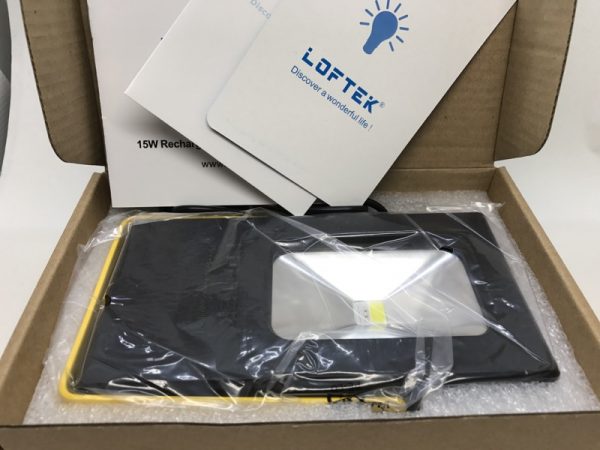
Includes: 1xUSB cable, 1x 15W floodlight, 1xuser guide
Power: 11 watts (white light); 2 watts (blue light); 2 watts (red light)
Input: 5V DC (0.5-2A)
Output: 5V DC (2.1A)
Lumen value: 650lm (maximum brightness mode); 380lm (power saving mode)
Shoot Distance: 20m
Beam Angle: >120 degree
CCT (Correlated Color Temperature): 5500K-6000K
CRI (Color Rendering Index): Ra>70
Battery capacity: 6600mAh
Working time: More than 4 hours; Charging time: 6 hours
IEC rating: IP65—Dust tight and Protected against low-pressure water jets (do not submerge in water)
Warranty: 12 months, unlimited when purchased from LOFTEK. Contact us for additional support if needed

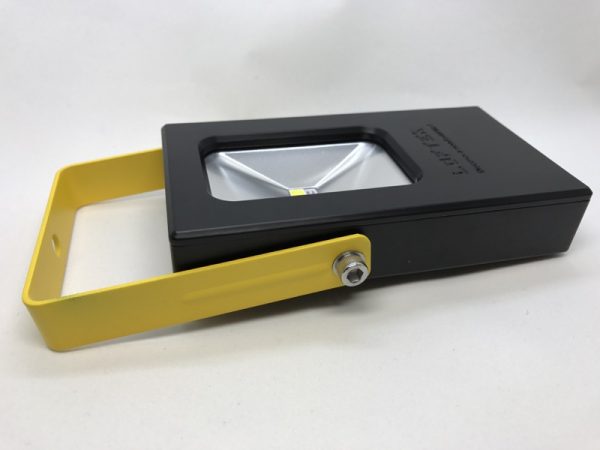
The very first thing I realized was that the handle is attached by two screws that would require a hex key to adjust.  I didn’t see one in the package.  If you’re not careful, the stand won’t keep the light upright.

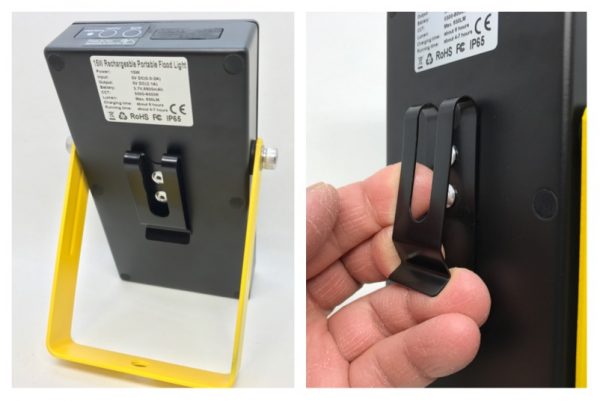
On the back is a fairly sturdy metal clip.  That could come in handy.

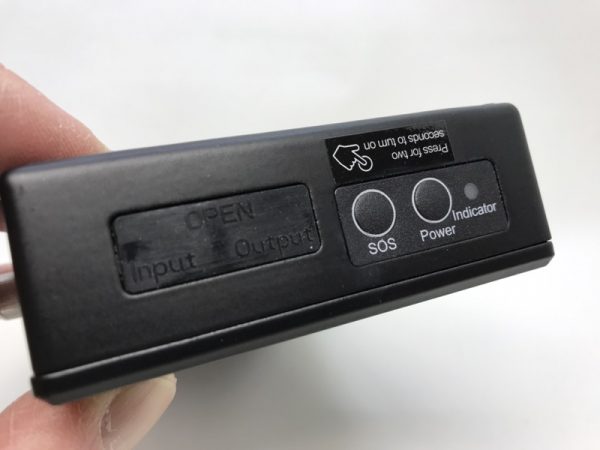
Here you can see the SOS and Power buttons.  The SOS button makes the light flash red and blue.  The power button select from a high and a low light setting.  In practice, I found these two buttons very difficult to tell apart in the dark.  That “indicator” is a LED that glows red when recharging, and green when fully charged.

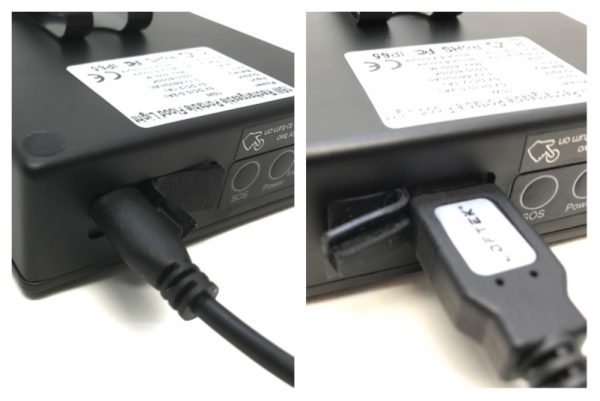
There’s also a rubber flap covering the microUSB charging port, and a “normal” USB port to turn the lamp into a 6600mAh battery pack to charge your accessories (5V, 2A).

Speaking of SOS, the light alternates between red and blue.  While it would get your attention, the color pattern is somewhat similar to what emergency vehicles might use.  I also noticed in the specifications that the colored lights are rated at 2W each, and the white light at 11W, totaling 15W.  I was led to believe that the main white light was rated at 15W, but I’m not so sure.

The light really produces a very wide flood beam.  In this example, the photo in the upper left is of my son’s room with a regular table lamp.

The upper right was taken with just the iPhone LED.

The two bottom photos were taken with the flood lamp at the high and low settings (left, right).  The difference is a little hard to photograph.  Note the “whiteness” of the flood light is a much cooler white.  It’s rated at 5500K-6000K.

How long does the battery last?  The listed working time is stated at “more than 4 hours.  Here’s what I found:

High setting:  5.5 hours
Low setting:  9 hours

I noticed that after a while, the LED brightness does seem to taper down quite a bit, so it doesn’t maintain even light output throughout the burn time.

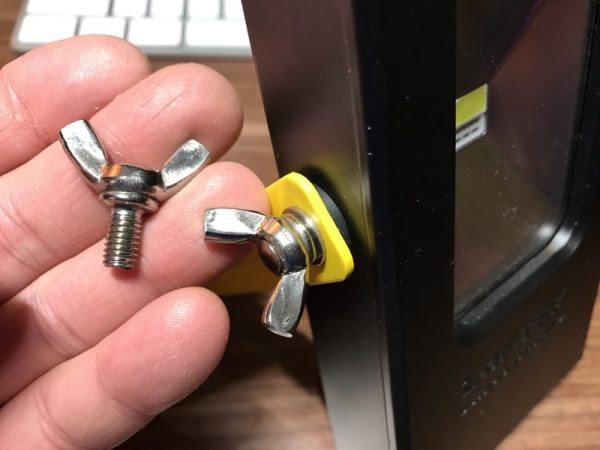
I do like the light, but it’s missing a few things.  First of all, I replaced the screws with matching ones with wings to make it easier to adjust.  The difference is night and day.  In case you want to try this yourself (or if Loftek wants to start including these), I used an M6 x 10mm, 1mm pitch stainless steel wing bolt.

Next, I’m thinking about adding a hook or a magnet to the yellow handle to make the Loftek 15W portable floodlight even more useful.  Now if they could only make the buttons a little easier to use.

Source: The sample for this review was provided by Loftek. Please visit their site for more info and Amazon to order.


Product Information

Price: $59.99 MSRP
Manufacturer: Loftek
Retailer: Amazon
Requirements:
  • MicroUSB to charge (cable included), charger not included
Pros:
  • Bright, wide flood light with even coverage.
  • Lasts up to 9 hours on the low setting.
Cons:
  • Stand adjustment needs work to be useful.
  • Controls can be tricky to use in the dark or by touch.

Filed in categories: Reviews

Tagged: ,

Loftek 15W Portable Floodlight review originally appeared on on May 20, 2017 at 10:00 am.

Note: If you are subscribed to this feed through FeedBurner, please switch to our native feed URL http://the-gadgeteer.com/feed/ in order to ensure continuous delivery.

Tacklife HD60 laser distance measurer review


Normally, picking up a laser measure for the first time is accompanied by the thought or statement, “how far away is that [object]?” Then after a quick press of a button and flash of red light, a result is displayed that is usually accompanied by the thought or statement, “Cool!” The novelty and simplicity of these devices is underscored by two very cool operating principles: the speed of light and laser frequency is measured in order to calculate the measured distance, and accurate measurements require the optics and circuitry to function at MHz frequencies. The Gadgeteer was presented a Tacklife HD-60 to review. Beyond providing an accurate distance, the Tacklife has some neat features to simplify taking measurements without tape or an assistant. Read on to see what I think! 

The Tacklife HD-60 comes in an easy to open, environmentally friendly and lightweight cardboard box. Inside is the laser distance measure, two AAA batteries, a nylon belt case, a lanyard an instruction booklet and a 24 month warranty.

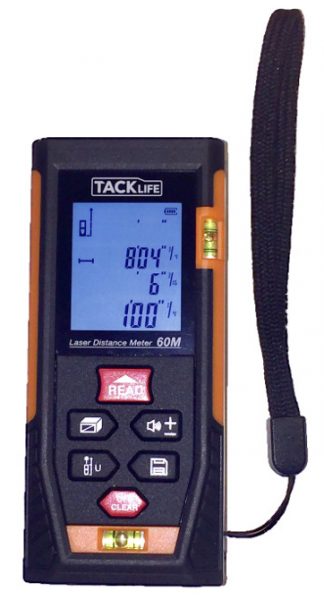
The unit is about 2.4” wide, 1” tall, and 4.3” long and weighs 4 oz with batteries installed. The exterior of the unit is a composite bi-injection rubber and plastic. The rubber will absorb hits more than a completely plastic case and provides a better gripping surface to prevent drops in the first place. The fact that this is bi-injection molded should provide enhanced durability over a plastic case with a rubber boot. One thing that would potentially make this more usable is a tripod mount. The buttons are soft silicone and laid out in a hexagon on the bottom half of the topside. In fact, the entire bottom half of the unit is uniform rubber membrane which will prevent dirt and liquid from getting inside to the circuit board better than individually seated buttons. Most of the buttons are multi-functional, but after a short amount of practice using the unit, pressing the correct button for each feature is easy to remember or easily determined by a quick glance at the icons on the button face. The topside of the unit also includes a horizontal and vertical spirit bubble to help ensure that the measurements between the measurer and the target are not at an angle. (A deviation of little more than 5° will change the measured distance by a foot at 196 ft.)

The unit is powered by 2 AAA batteries which were easy to install and, when the time comes, should be easy to replace because they are readily available. If the unit is not operated for more than 150 seconds it shuts off automatically to conserve the battery power. A fresh set of batteries can take 8000 single measurements.

The unit is powered on by a quick press of the read button. The display is back-lit in a cool white hue that makes the LCD numbers and icons on the screen easy to read in low light conditions. All of the LCD display segments are displayed on startup to enable the user to verify the display is fully functional. At its most basic level the display shows an icon depicting if the point of reference for the measurement is the front or rear face of the unit, battery strength, 3 memory registers of the previous three readings, the current reading, units for each of the readings, and an icon to show if the mode of operation is linear distance, area, volume, or distance determined by one of three Pythagorean constructions. The keypad is not back-lit, but it makes sense that the keys will be easy enough to see in the conditions that allow you to see where you are measuring from and to.

The manual is well written and is available here.  But just to summarize on the mail features, I’ll describe how to take a measurement. To take a reading the read button is pressed. The laser is lit to allow the user to target the measurement. Once the measurement is aligned the read button is pressed again. The laser flashes twice and then the result is displayed. A long press of the read button will cause the laser to remain illuminated and the measured result to be updated 80 times a second until the read button is pressed again, locking the result onto the screen. In the constant read mode, the maximum and minimum results obtained are also updated, and these are also saved once the constant read mode is exited. Depending on the situation, the operation of the measurer may be improved by using the audio function. Holding the button marked with a speaker will toggle the beeps associated with a keypress and with the conclusion of a measurement. Results may be saved by holding the save button until a number is displayed at the top of the screen. Saving has a 30 result memory, which may be accessed by hitting the save button and scrolling through with the Pythagorean button (forward) and the audio/+- button (backward).

The Pythagorean constructions can be quite useful, especially for measuring halfway up a tall wall, or a segment of a long corridor, where a laser target would be required to demarcate the extents of the desired measurement. Before getting to the Pythagorean modes there are two other calculators built into the unit: area and volume. Pressing the calculator button once brings you to the area calculator. to perform a calculation ensure that you read the measure of the length that is blinking on the picture on the display. Pressing the calculator button again allows you to calculate volume. Note that for area the shape must be a parallelogram, rectangle or square and for volume, the floor and ceiling must be parallel. Pressing the calculator button a third time brings you this calculation:

Enter the distance a and then b by pushing the read button (the user manual says to push off/clear, but this is incorrect). Make sure that the base of the measurer doesn’t move so that the measurements are all taken from the same location. I measured my wall and later confirmed the length by measuring from the floor the ceiling and the measurements were within an 1/8 inch.  This won’t work if x is not perpendicular to b, but will work even if the measurement is not vertical. Pressing the calculator button a fourth time brings you this calculation:

Enter the distance a and then b by pushing the read button (the user manual says to push off/clear, but this is incorrect). Make sure that the base of the measurer doesn’t move so that the measurements are all taken from the same location and that the measurement a and b are perpendicular to each other. Pressing the calculator button a fifth time brings you this calculation:

This mode is great if want to measure a section of wall but don’t have access to an area perpendicular to the area you want to measure. For instance, this is useful to measure the height of a flag at the top of a flagpole. In order for this calculation to produce correct results, the measurement of C must be perpendicular to the length measured. Again, the manual states to use the off/clear button to take measurements but the read button is the correct one to press. The final press of the calculator mode will calculate this construction:

In this construction, b should be perpendicular to x, and the length measured will be most accurate if the targets of a, b, and c are linear.

I had the opportunity to compare the results of the Tacklife with the results obtained by a Jetery laser distance measurer and a Bosch Laser Distance measurer. Both comparisons yielded excellent agreement of the measured distances.


I also verified the result of the distance meter with a tape measure and found that the laser distance results agree with the distance indicated by the tape over 24 feet. On short lengths of a foot or shorter there is some disagreement, so measuring with these distances are best accomplished with a ruler.

In conclusion, the laser distance measure should be one of the basic tools that every gadget lover has in their arsenal. The price of these units has absolutely crashed from a few years ago and is now low enough that most people can afford to have it around the house for those jobs where a tape measure is too short or unwieldy. Yet, the construction of the HD60 is top-notch and is very similar to the Bosch unit that I tested it against. I recommend you pick one up today.

Source: The sample for this review was provided by Tacklife. Please visit their site for more info and Amazon to order.


Product Information

Price: $75.99 (on sale for $36.97)
Manufacturer: Tacklife
Retailer: Amazon
Requirements:
  • 2 x AAA batteries
Pros:
  • easy to use
  • accurate
  • inexpensive
Cons:
  • no tripod mount

Filed in categories: Reviews

Tagged:

Tacklife HD60 laser distance measurer review originally appeared on on May 7, 2017 at 10:00 am.

Note: If you are subscribed to this feed through FeedBurner, please switch to our native feed URL http://the-gadgeteer.com/feed/ in order to ensure continuous delivery.