Thyrm CellVault and CellVault XL waterproof attachable gear storage review

REVIEW – As most active outdoor enthusiasts know, many of our personal lighting solutions still rely on replaceable or swappable batteries. These battery-hungry lights always seem to run out of power at the most inopportune times. The Thyrm CellVault and CellVault XL offer a solution to carrying and keeping your batteries dry. After having my headlamp die on a recent camping trip, I ordered two CellVault XL (one rescue orange and one clear) and one CellVault (flat dark earth) to hold batteries and supplies for my camping backpack and my EDC bag / day pack.

What is it?

The Thyrm CellVault line of attachable gear storage designed to provide a safe and convenient way of storing batteries. The CellVault is design to store CR123 / AA (LR06) / AAA (LR03) batteries. The CellVault XL will also store 18650 rechargeable batteries.

What’s in the box?

The CellVault and CellVault XL arrived attached to descriptive hang cards. The CellVaults are easily removed from the hang cards by simply releasing the clip / clasp and sliding the vaults loose from the cards.

Hardware specs

CellVault

  • 5.25″ long
  • 1″ wide
  • 1.25″ deep (front-to-back)
  • 1 oz weight

CellVaultXL

  • 5.25″ long
  • 1.875″ wide
  • 1.25″ deep (front-to-back)
  • 2.05 oz weight

Design and features

The CellVault has an oval cross-section with a hinged lid and integral clip. The CellVault XL has a figure-8 cross section with a removable divider (with convenient markings to show you which way to reinstall the divider).  The vaults taper slightly from top to bottom (more on that later). When attached to gear, the lid hinge faces out. The integrated clip also serves as the latch for the lid. The length of the vaults allows the clip to slip through 3 rows of MOLLE webbing (so, two loops on your vest / bag). In addition to the clip, there are lanyard loops on the top and bottom of the vaults that provide locations to attach additional gear and to give additional carry options (you can also attach dummy cords to them if you are prone to dropping things–I have not had to add them to mine, yet).


The CellVault and CellVault XL were designed around the 3V CR123  battery commonly used for tactical lights such as those from Streamlight, Surefire, and Inova. The slight taper the vaults is a very clever design feature. This keeps the CR123 batteries from falling out when the vaults are inverted (which is the normal method of opening the vaults when attached to MOLLE panels. A slight squeeze on the narrow sides of a vault releases the batteries. CellVault / CellVault XL is also compatible with AAA (LR03) and AA (LR06) battery sizes. However, the smaller diameter of these other battery types means that the positive retention system does not work for these battery types. Two AA batteries will stack in the CellVault, and four AAA batteries sit comfortably stacked side-by-side two high.

The CellVault will securely hold up to 3 CR123 batteries. Alternately, up to 4 AAA (LR03) batteries or 2 AA (LR06) batteries may be stored in a CellVault instead of the CR123 batteries. The CellVault may als be used to store fire lighting or survival supplies or medications. Small cigars may also fit.

The CellVault XL doubles the storage capacities for the aforementioned battery types and adds the option of storing up to two 18650 batteries. The center divider of the CellVault XL may easily be removed to allow bulkier items, such as keys, memory cards, or first aid / survival supplies (see below) to be stored in the vault.

I have allocated my trio of vaults as both battery carriers and an EDC first aid kit (see below). One CellVault XL is attached to my Mystery Ranch Komodo Dragon pack (to the side MOLLE loops) that I use when camping. It carries AA and CR123 batteries for my headlamp and my Streamlight Polytac 90 flashlight.

Alternate use

I removed the center divider from my second CellVault XL and converted it into my EDC first aid kit (see below). The CellVault currently carries AA batteries as spares for my wireless mouse and my small EDC flashlight. The first aid kit and CellVault are clipped into the MOLLE loops on the side of my Mystery Ranch ASAP which is my EDC / day pack. To attach a CellVault to a strap or to MOLLE webbing, just release the clip / latch by pulling the lower tab away from the lower lanyard hole and slide the clip over the strap / down through the webbing and then clip to re-latch and secure the vault.

The contents of my first aid kit are shown below. I ended up taking the tweezers out of their tube and used the tube to store a combination of acetaminophen, ibuprofen, and naproxen tablets, but I didn’t photograph the new contents.

Performance

I have found that the CellVault and CellVault XL work very well for carrying CR123 batteries. They also do a respectable job of carrying AA and AAA batteries, but I need to do a little shock packaging to keep the smaller batteries from rattling around. I don’t carry these in tactical situations (I’m an idea rat and computer jockey), but the rattling is bothering me with just daily carrying between my truck and desk. The first aid kit has proved useful several times and has been restocked with bandages once (I had an accident involving a bagel and a Leatherman Wave)

What I like

  • MOLLE-compatible clip
  • CR123 batteries can be removed easily one at a time without the remaining batteries falling out
  • Fits multiple types of cylindrical batteries: CR123, 18650, AAA (LR03) and AA (LR06)
  • Can be used to store items other than just batteries.

What needs to be improved

  • Non-CR123 sized batteries rattle around and are not held in when a CellVault is inverted
  • CellVault cannot be removed from gear without opening the vault (this can also be viewed as a benefit)

Final thoughts

The CellVault and CellVault XL are excellent CR123 battery holders / carriers with many ingenious design features that enhance their function. The CellVault XL also makes an excellent EDC first aid kit, but don’t expect it to serve as your only kit for more than hikes on prepared surfaces. With a few modifications, such as adding a bit of foam padding, the CellVault works well as a AA / AAA battery carrier.

If you are looking for an elegant way to keep your lights supplied with batteries, you would be hard pressed to find a more elegant solution than the Thyrm CellVault / CellVault XL.

Price: CellVault $19.99 / CellVault XL $29.99
Where to buy: Thyrm LLC website and Amazon
Source: The samples of these products were purchased with personal funds.

Filed in categories: Reviews

Tagged: , ,

Thyrm CellVault and CellVault XL waterproof attachable gear storage review originally appeared on The Gadgeteer on March 11, 2019 at 11:00 am.

Note: If you are subscribed to this feed through FeedBurner, please switch to our native feed URL http://the-gadgeteer.com/feed/ in order to ensure continuous delivery.

Fillit Pocket is a stick-on, reusable pocket for tablets, laptops or just about any smooth surface

NEWS – Does anyone else wish they had a way to carry or store just a small item or two on their oft-used devices?  Then have a look at Fillit Pocket.  It’s a reusable, adhesive-backed storage pocket that can be attached to laptops, tablets, or just about any flat, dust-free, lint-free, smooth surface to give you just a bit more storage space.  It can be attached to metal, glass, laminated wood, and many other surfaces and can accommodate items up to 7” x 3.5” x 1” and 1 lb in weight.  Toss in an external drive, some cables, pen, USB drive, or just about anything.  The reusable, semi-permanent adhesive can be washed to restore it to its original strength, so you can remove it and re-attach it to something else if you like.  Fillit Pocket is currently available at Amazon for $15.99, at eBay for $19.99 and at Newegg for $19.99.

Filed in categories: News

Tagged:

Fillit Pocket is a stick-on, reusable pocket for tablets, laptops or just about any smooth surface originally appeared on The Gadgeteer on January 10, 2019 at 8:00 am.

Note: If you are subscribed to this feed through FeedBurner, please switch to our native feed URL http://the-gadgeteer.com/feed/ in order to ensure continuous delivery.

Botto storage containers expand and shrink as needed

NEWS – It’s about time that food storage containers evolved. Botto containers are the first adjustable storage containers that expand and shrink to hold a little or a lot. Made of food-safe materials that are BPA, and phthalate-free, Botto containers come in two styles. There’s the clear variety that you see pictured here and a UV-blocking version that is harder to see through.

Each Botto air-tight container is designed to hold a little or a lot. It starts out as 16 oz (470 ml) and can grow to hold as much as 32 oz (960 ml). A special airlock inside the container pushes the air out as you compress the size. I thought the idea was terrific until I saw the price. Each standard (clear) container is $14.95 and if you want the Pro version which is darker plastic, the price jumps up to $22.95 each. YIKES! If the price doesn’t scare you away, you can read more about Botto containers by visiting thebotto.com and The Grommet.

Filed in categories: News

Tagged: , ,

Botto storage containers expand and shrink as needed originally appeared on The Gadgeteer on January 8, 2019 at 12:00 pm.

Note: If you are subscribed to this feed through FeedBurner, please switch to our native feed URL http://the-gadgeteer.com/feed/ in order to ensure continuous delivery.

Yuema Biometric Handgun Safe review

REVIEW – If you are going to keep a handgun in your house, and you have kids, it is essential to keep the gun safely locked away. This is also important to prevent theft. However, many handgun owners have a gun for personal protection, and therefore want to also have quick access in case of emergencies. There are numerous gun safes on the market that provide both secure storage and quick access for personal protection, and most of these use some kind of electronic access. I keep my Glock 22 in a GunVault Mini-Vault safe that has a four button code to open, but the electronic access quit working a while back (my fault …. I let the batteries stay in too long and they corroded and leaked) forcing me to rely on the key. When the Yuema gun safe with biometric fingerprint sensor technology was offered to the Gadgeteer to review, I was eager to see how the fingerprint sensor worked compared to my GunVault safe and if it would be a good replacement and possibly an upgrade.

After using this safe, I think that it is a fairly well made safe with adequate performance. The biometric fingerprint scanner worked in terms of preventing access but was not reliable enough for me to want to use it for quick access (I would use the keypad to enter the code instead). Also, the internal space was constricted due to the electronics in the top so it is important to note that this may not work as well for a larger gun and it was harder to get access to the gun without scraping your knuckles.

What is It?

The Yuema gun safe is a locked steel box designed to safely store and prevent access to handguns or other small valuable items. It provides electronic access using a biometric fingerprint scanner as well as a four button keypad used to enter a four digit code. The electronic access can be set up to allow access with either the fingerprint scanner or the keypad, or it can be set to require both the fingerprint scanner and the keypad.

Specs

  • External Dimensions: 12″ L x 9″ W x 5.3″ H
  • Internal Dimensions: 11″ L x 7.8″ W x 3″ H
  • Weight: 9.8 lbs
  • Material of Construction: Welded cold rolled steel (Q235A)
  • Material Thickness: 16 gauge
  • Access Methods:

    • Biometric Fingerprint Scanner
    • Four digit code
    • Both fingerprint scanner and four digit code
    • Manual Key
  • Biometric scanner can be programmed for up to 30 different fingerprints
  • Power: 4 x 1.5V AA (Mfr does not recommend rechargeable or lithium batteries)
  • Spring loaded door
  • Interior sides and bottom covered with PPS foam
  • Internal LED for illumination
  • Six mounting holes for permanent attachment

What’s in the Box

  • Yuema Gun Safe Model SZ-01
  • Two masonry anchors
  • Two coach screws with washers
  • Two access keys
  • Wrench
  • Accessories bag
  • Four anti-slip stickers
  • Instruction Manual
  • Biometric scanner “Attention” card
  • Free target offer card

Design and Features

The Yuema SZ-01 safe is quite rugged and is made of coated carbon steel with welded joints, which is typical for any well-made gun safe. The steel used is Q235A (a Chinese specification roughly equivalent to ASTM A36 structural steel – the kind of steel used in bridges and buildings). The electronic access pad is located on the top of the safe and contains a fingerprint scanner, four buttons (numbered 1 through 4) that are used to enter a four-digit access code and to set other options, two LED indicator lights (green and red), and a covered manual lock for key access.

The safe is coated with a black “electrostatic” coating on all exterior surfaces.

The hinged door is spring loaded so it will open with the safe in any orientation.

The interior is lined on the sides and bottom with foam (made from PPS). The top surface is not lined with foam and contains the reset button, an LED for interior illumination, and the battery compartment which holds 4 AA batteries.

The bottom of the safe contains several holes that can be used with the provided hardware to permanently attach the safe to a wall or a piece of furniture.

One item to note is that with the safe closed, there is a gap between the door and the side, as can be seen in the photo above with the internal LED illuminated. Most safes are designed with a lip inside the safe at the opening to prevent any access to the internal contents with the door closed.

Use

It is necessary to program the safe to choose a four-digit access code and to record fingerprints for any individuals who are to have access to the safe.

Programming fingerprints is quite simple. First, you press and release the reset button inside the safe. The green LED on the top of the safe will flash and a short beep will be heard. You then place your finger on the scanner four times in succession, with a green LED flash and short beep after each press. After the fourth press, the green LED will flash with a long beep, which confirms that the fingerprint has been successfully programmed. Up to 30 fingerprints can be stored.

To open the safe with the fingerprint scanner, all that is required is to touch your finger to the scanner, after which the green LED will flash followed by a short beep to indicate that your fingerprint is being scanned. If the fingerprint scan is successfully registered, after holding your finger there for about 2 seconds, you will then get a long beep and a green LED flash to indicate that it recognized the fingerprint. Otherwise, you will get three short beeps and both green and red LEDs will flash which means that it did not recognize the fingerprint. If it recognizes your fingerprint, the door will automatically spring open. And if it doesn’t, it won’t, obviously. Also, note that the door takes about two seconds to open.

Programming the four-digit code is also very simple. First, you long press the “1” button until the green LED comes on. Then you enter the previous four-digit access code, after which you will get a green LED light and a long beep. Then you enter your chosen new four-digit code twice, after which you get a green LED light and a long beep, indicating the code was successfully changed. The system is only capable of remembering one four-digit code. One minor hitch … when you do this for the first time, you might wonder what the factory original four-digit code is since manual does not tell you this. I played a hunch and used 1-2-3-4, and it worked.

To open the safe using the code, simply enter the code and the safe will give you a green light and long beep and the door will open. If you enter the wrong code, you will get a red LED and five short beeps and the door will not open. Also, the user manual states that the system will lock for one minute after a failed attempt and will not allow you to open the safe. However, I was able to enter the wrong code and then enter the correct code right away and the safe opened. I even tried entering ten incorrect codes in succession, and I was able to still open the safe on the eleventh try with the correct code.

The Yuema safe has two modes of operation. The default mode is to allow the safe to be opened using either a fingerprint sensor or the four-digit code. However, additional security can be provided by setting the safe to double-open mode which requires both a fingerprint and a four-digit code to gain access. Simply pushing the “4” button twice and then short pressing the reset button sets double-open mode. Repeating this turns the mode off and restores operation to the default mode.

It is also possible to mute the beeps by long pressing the “2” button for five seconds. Repeating this will restore the sounds.

When the batteries get low, the red LED will illuminate constantly. This is an indicator that it is time to replace the batteries. If the batteries get too low, it will not be possible to open the safe using either the fingerprint scanner or the four-digit code. It will be necessary to use the manual key access in this case, which is why it is very important not to lose the keys (or store them inside the safe).

If necessary, the factory default settings can be restored and all programmed fingerprints and the access code erased by long pressing the reset button inside the safe until the green light stops flashing and a long beep occurs.

The internal LED will illuminate for approximately 15 seconds after the correct code and/or fingerprint is entered. The LED is actually white, not blue as it appears in the photo above.

Performance

For the most part, the electronic access functioned exactly as described in the user manual, with a couple of notable exceptions.

First, it was a common occurrence for the biometric sensor to not recognize the fingerprint. It seemed like this happened more often than not for the first fingerprint I programmed (my right index finger). However, it seemed a little less frequent for other fingers and after I reprogrammed my right index finger. It seemed to depend somewhat on which finger I used and where the safe was located. It was easier to use the biometric sensor if the safe was on a table and I was standing above it.  However, if the safe was under our bed (as shown in the photo above), it was much more difficult to find the safe’s biometric sensor, place my finger on it, and then get the sensor to successfully recognize my fingerprint. Is this a bad thing? I guess it depends. I was not able to open the safe with any fingerprint that was not programmed, so this isn’t a security issue. However, if I had to get access to my gun in a hurry while the safe was under the bed, I probably would just enter the code before even trying the biometric sensor.

Secondly, as stated above, the electronics are supposed to lock out (temporarily) if an incorrect code is entered. That might have been a useful safety feature if it worked, but it didn’t. Maybe this wouldn’t be a desirable feature for someone who is more concerned about quick access. However, with a four-digit code and four buttons, there are only 256 possible combinations, so it isn’t beyond the realm of possibility for a persistent youngster to try every code to get it to open.

In terms of space and access, the Yuema has more internal space than the GunVault, which didn’t matter to me because my Glock easily fit in either safe. Of greater concern is the smaller internal height in the Yuema compared to the GunVault. The Yuema specifications state that the internal height is 3″, but you actually have less than that at the opening due to the location of the door hinges (it is more like 2-5/8″). The smaller GunVault safe actually has more height above the door (about 2-13/16″), plus the top is covered with foam. The loss of this 3/16″ and the fact that there isn’t any foam on the top of the Yuema means that you’ll be scraping your knuckles on the top when you put your hand in the safe. I have averaged sized hands which scraped the top of the safe, so if your hands are larger, you’ll have an even more difficult time accessing your gun. And if the gun itself is larger, it would be even worse.

Also, the Yuema has a larger latch on the door than the GunVault. I found that every time I pulled my gun out of the safe, in addition to scraping my knuckles on the top, my thumb would hit the latch. If I was careful and removed the gun slowly, I could avoid this. However, if I was in a hurry, my hand would likely get a little scraped and banged up.

What I like

  • Very rugged / all welded steel construction
  • Biometric fingerprint access for added security
  • Ability to use biometric + keypad access for even more security

What needs to be improved

  • Fingerprint access was not reliable enough to rely on for quick access
  • Opening was too small and the internal top surface was not padded
  • Door latch was too large and it was difficult to maneuver the gun around it
  • Gaps on the sides of the door need to be closed up
  • Lockout (when incorrect code is entered) didn’t work

Final Thoughts

The  Yuema model SZ-01 Biometric Gun Safe performed well and works as advertised for the most part. It is well built and very rugged and will provide adequate protection for your handgun or other valuables. The electronics worked pretty well and I am convinced that it would provide adequate security to keep valuables safe and prevent access to a handgun. However, compared to other brands on the market, it doesn’t outshine them, especially in the area that is important to many gun owners – quick access. The biometric fingerprint scanner was not reliable enough for me to want to use it if there was an emergency. Also, the opening is too small and the latch is too large meaning that hand scrapes are inevitable.

Price: $79.99
Where to buy: Amazon
Source: The sample for this review was provided by Yuema Lock.

Filed in categories: Reviews

Tagged: , ,

Yuema Biometric Handgun Safe review originally appeared on The Gadgeteer on November 26, 2018 at 8:00 am.

Note: If you are subscribed to this feed through FeedBurner, please switch to our native feed URL http://the-gadgeteer.com/feed/ in order to ensure continuous delivery.

iStorage DiskAshur Pro2 portable encrypted hard drive review


REVIEW – Whenever I use any device that is connected to any computer or in any way to the internet, security is always on my mind. Whether I am trying to keep data confidential or to prevent the erroneous deletion or editing of records, I have always wanted a simple control methodology and device all incorporated into one portable component. Finally, I have my hands on the iStorage DiskAshur Pro2 which promises to make all of these dreams come true.

What is it?

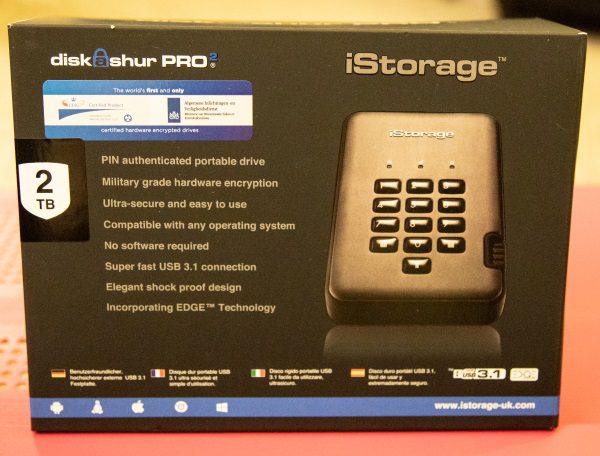
The iStorage DiskAshur Pro2 is a hardware encrypted drive, that utilizes secure pin authentication access via a keypad, works independently of any Operating System, and does not require any software installation.

What’s in the box


1 x iStorage DiskAshur Pro2
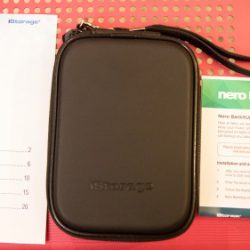
1 x Carry Case/Protection Case
1 x Quick Start Guide
1 x Information Sheet on available backup and security software

Design and features

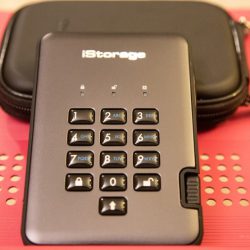
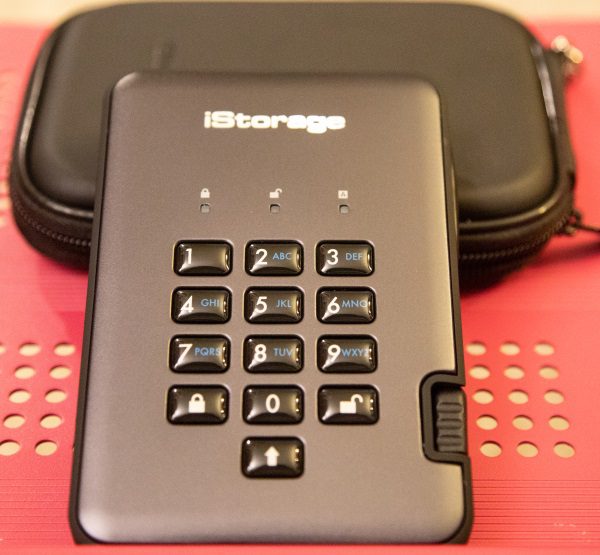
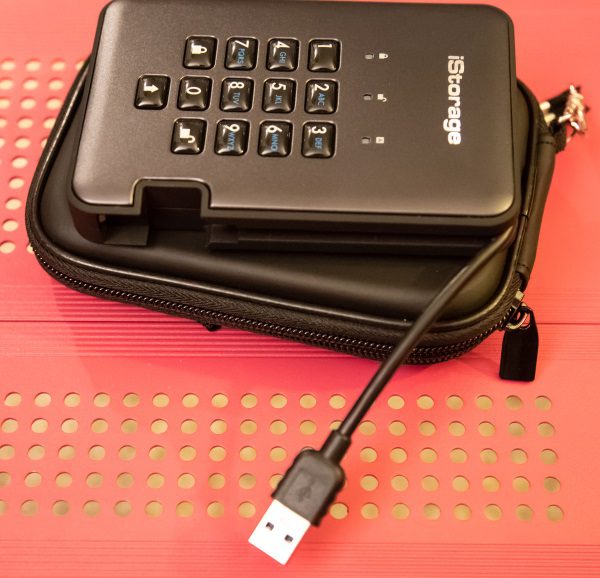
On the front of the drive, there is a keypad and three status lights that represent from left to right: Standby State/Locked (red), User Mode/Unlocked (Green), Admin Mode (Blue).  iStorage also provides a nice carry case/protection pouch that securely houses the drive, and as far as I can tell, will provide some limited protected from bumps and drops.

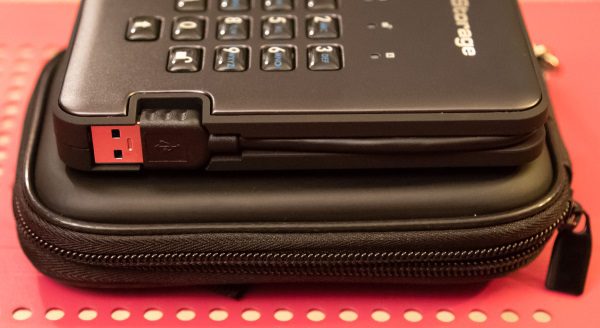
On the side of the drive, there is a built-in USB cable that tucks away neatly into the side of the device.


Performance


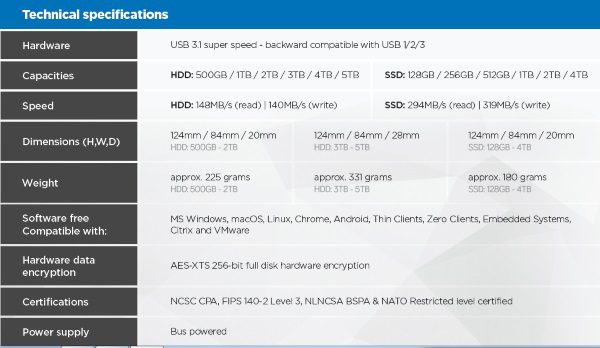
NCSC CPA (UK) – Certified: FIPS 140-2 Level 3 (US) – Certified
NLNCSA BSPA (NL) – Certified: NATO Restricted Level – Certified
GDPR Compliant: Common Criteria EAL4+ ready on-board secure microprocessor
Real-time military grade AES 256-bit XTS Full-Disk Hardware Encryption
No software or drivers required: 100% Hardware Encryption

This drive is ready to go right out of the case. The setup instructions are simple and the connection is easy using the built-in USB cable and the default pin. I did follow the instructions to immediately change the pin. The short video below show me utilizing the default pin to connect the drive to my laptop, and the lights that confirm connectivity and status. In the background, you can also hear when the drive connects to the computer.

The iStorage drive immediately connects each time you enter your unlock pin and immediately locks when you press the lock button on the keypad. Any time you walk away from your computer, you can simply press the lock button without removing the drive and the drive locks and disconnects from the computer. When you enter your unlock pin and press the unlock button, it immediately reconnects. This drives it great for data privacy and also for ensuring that if someone else uses your computer, that they do not delete or overwrite your files whether intentionally or not. If you lose the drive, no one can access your data.

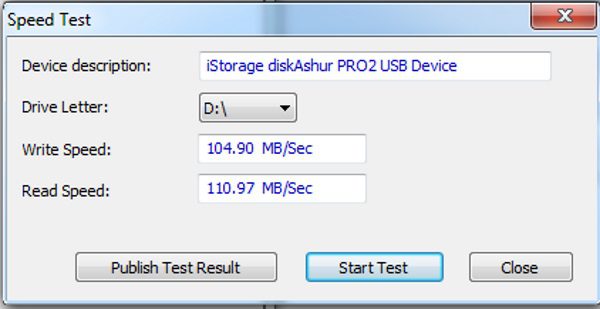
The read and write speeds are decent and more than adequate for my needs.

Since I am not an expert on technology that is employed with this device, I am including the following facts/features directly from the manufacturer’s website:

FIPS PUB 197 Validated Encryption Algorithm
Employing AES-XTS 256 bit hardware encryption, the iStorage diskAshur PRO2 seamlessly encrypts all data on the drive in real-time, keeping your data safe even if the hard drive is removed from its enclosure.

Brute Force Hack Defence Mechanism
The iStorage diskAshur PRO2 is intelligently programmed to protect against all forms of Brute Force attacks. After five consecutive incorrect PIN entries, the drive will freeze, requiring the drive to be disconnected and reconnected to the USB port to get a further five PIN entry attempts. If a further five (10 in total) consecutive incorrect PIN attempts are entered again, the diskAshur PRO2 will freeze again. To get a further and final five PIN attempts (15 in total), the “shift” button must be pressed whilst inserting the USB cable to the USB port and then an iStorage preset PIN will need to be entered. On the fifteenth consecutive incorrect PIN entry, the diskAshur PRO2 assumes it is being attacked and will delete the encryption key and lock itself, rendering all data previously stored on the drive as lost forever. At this point, the drive can be reset to factory default settings and redeployed.

Self Destruct Feature
You can pre-program the diskAshur PRO2 with your own unique Self Destruct PIN which, once implemented, instantly deletes the encryption key, all PINs, data and then creates a new encryption key.

Unattended Auto-Lock Feature
Set the unattended diskAshur PRO2 to automatically lock after a pre-determined amount of time where the drive has not been used.

Drive Reset Feature
The iStorage diskAshur PRO2 also employs a useful drive reset feature, which can be implemented with a unique command. This clears all PINs and data, and creates a new randomly generated encryption key, enabling the drive to be reset and redeployed as many times as needed.

Tamper Proof and Tamper Evident Design
In addition to incorporating a secure microprocessor, encrypting the data and the encryption key, the diskAshur PRO2 adds another barrier between your data and a hacker. All the components of the diskAshur PRO2 are completely covered by a layer of super tough epoxy resin, which is virtually impossible to remove without causing permanent damage to the components. This barrier prevents a potential hacker from accessing the critical components and launching a variety of futile attacks. Furthermore, the tamper evident design of the diskAshur PRO2 if breached, will provide visible evidence that tampering has occurred.

Data at rest protection
The iStorage diskAshur PRO2 also employs a useful drive reset feature, which can be implemented with a unique command. This clears all PINs and data, and creates a new randomly generated encryption key, enabling the drive to be reset and redeployed as many times as needed.

Wear Resistant Epoxy Coated Keypad
Designed with protection in mind, the diskAshur PRO2 wear resistant epoxy coated keypad hides key usage to avoid tipping off a potential hacker to commonly used keys.

iStorage also includes a lifetime license to Nero BackItUp software to securely backup the drive, and a free 1-year license to iStorage DriveSecurity Antivirus software.

What I like

  • The portability
  • The data encryption
  • The security provided by the keypad
  • The functionality

What can be improved

  • Maybe all of the drives should be SSD to further safeguard data by reducing the likelihood of the effect of minor bumps and drops that can easily damage the conventional hard drive

Final thoughts

This iStorage is a great asset for me. I am now able to save all of the files I need protected and walk away from my desk without worry about what will happen if someone else uses my PC. In addition, when I am in the field on a photo or video shoot, I can copy my footage or pictures to the iStorage drive and lock it, while leaving the PC on and available for use by others on my team. I never have to worry about any accidental deletion, or in some weird cases, any theft of my photos or footage. While I do understand that it is relatively expensive, it is obvious that a lot of thought has been put into the design and purpose. In today’s world when security breaches are of such concern and when data theft is prevalent, this drive protects your data and privacy in several ways. While some may debate function vs. cost, for me, the iStorage DiskAshur Pro2 gets two thumbs way up!!!

Price: 500GB version $250.40 with free shipping. 2TB version (Tested in this review) $450 + $6.99 shipping
Where to buy: Amazon
Source: The sample for this review was provided by iStorage.

Filed in categories: Reviews

Tagged: ,

iStorage DiskAshur Pro2 portable encrypted hard drive review originally appeared on The Gadgeteer on October 24, 2018 at 9:00 am.

Note: If you are subscribed to this feed through FeedBurner, please switch to our native feed URL http://the-gadgeteer.com/feed/ in order to ensure continuous delivery.