AOMAIS Go Bluetooth Speaker review

REVIEW – We have all seen countless Bluetooth speakers reviewed on sites like The-Gadgeteer.com. Most are boxy or have clips or loops to hang them from. Few have an actual handle. Not so the AOMAIS Go Bluetooth Speaker.

What is it?

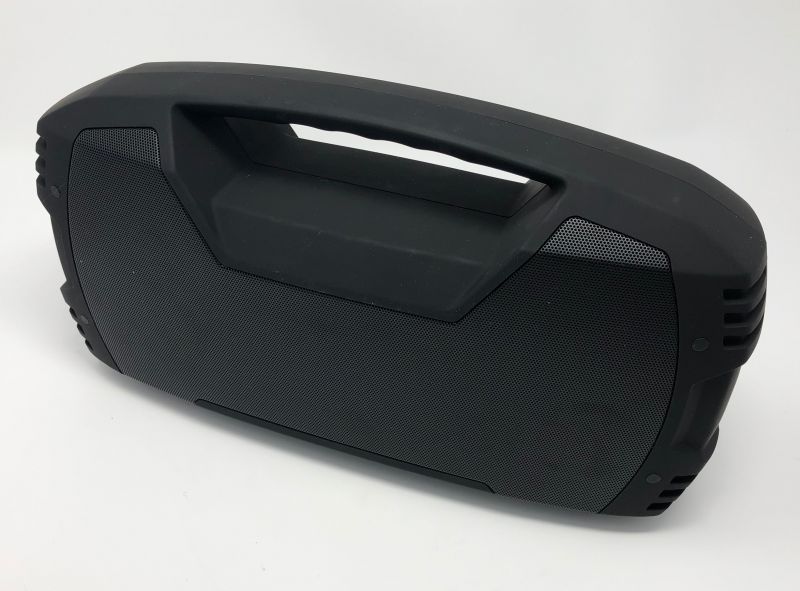
A basic speaker/speakerphone that has an integrated handle that allows you to tote this along like the boom-boxes of yore. It’s sleek, with a slightly nappy grip, and has IP-x7 weatherproofing, so your trip to the beach or out on the boat may not end in musical disaster. (We have no control over your relationships, Gary. If she doesn’t like that Alt-Country playlist you chose, that’s on you!) I was sent the Black model, but it’s also available in Blue and Red.

Hardware specs

From the company website
  • Booming Bass and Full Volume – Get 30W sound with AOMAIS Go’s two 15 watt full-range drivers and two passive radiators. TWS function lets you pair two speakers for a powerful 60W stereo surround sound. Super bass booms with less than 1% total harmonic distortion.
  • Long Play Time, Fast Charge – Get the play time you want with an 8800mAh rechargeable battery that can go for up to 30-Hour (At 50% volume, playtime varies according to volume level and audio content).
  • IPX7 Waterproof – top-level waterproof able to withstand full immersion of up to 33 feet for 30 minutes. it’s dustproof, snowproof, mudproof, waterproof or even being dropped.
  • Support hands-free calling, Tablets, cellphones sync in a snap with Bluetooth 4.2 – Works great with mobile phones, Wired connection with PC, TV and other non-Bluetooth devices with a 3.5mm audio jack.
  • Clear, rich sound that fills the room indoors and performs outdoors – Easily connect any device with a playlist to have continuous sound for any occasion.

Design and features

The sound from this unit seemed fine with just one unit. (Apparently, with two, you can pair them for twice the watts per channel, or to fill a larger space. We were not sent a second unit with which to test this.) There are two front-facing speakers with rear- and front-facing passive vents to equalize pressure and give more space to the sound.
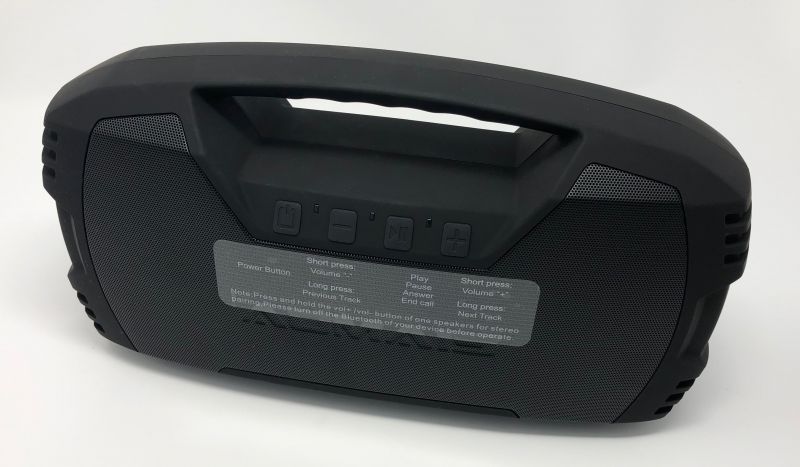
With the buttons right under the study, built-in handle, you can easily power on/off, lower volume, pause playback or answer a call, and increase volume. Pairing with another AOMAIS Go requires holding the vol + and vol – together. At 13″ x 7″ x 3″, this is not a huge package to tote along.

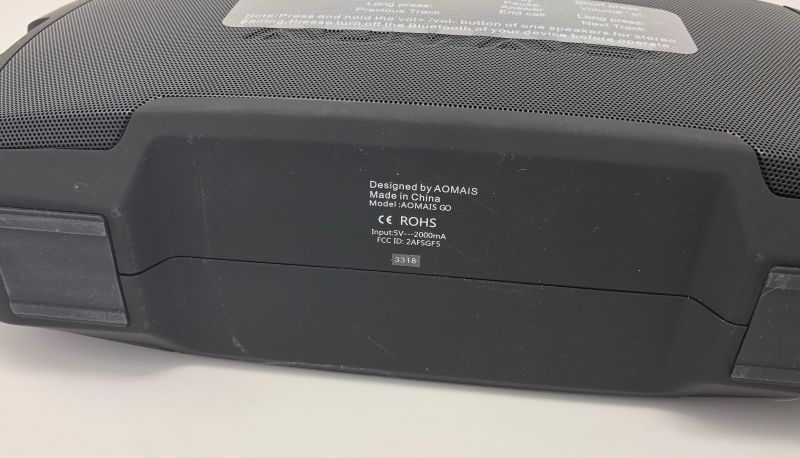
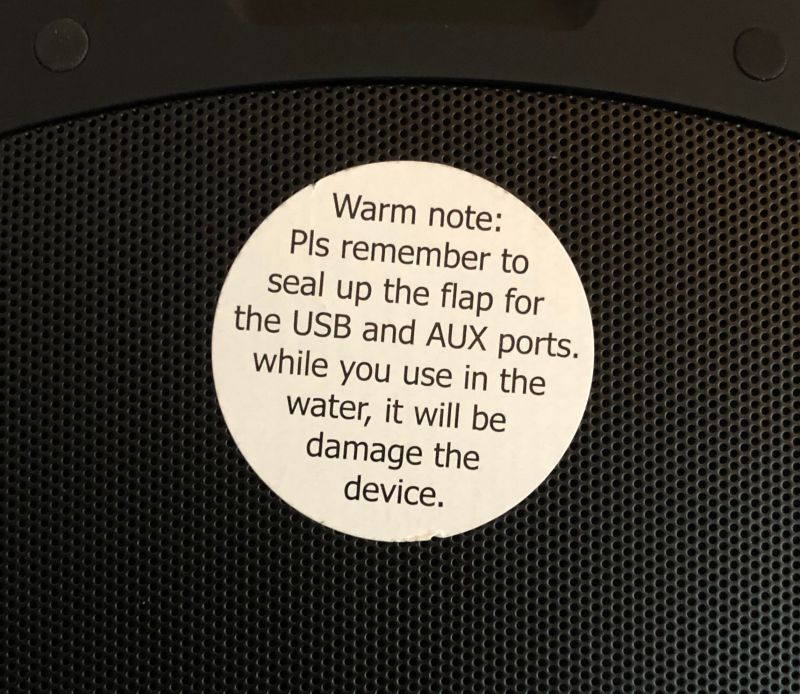
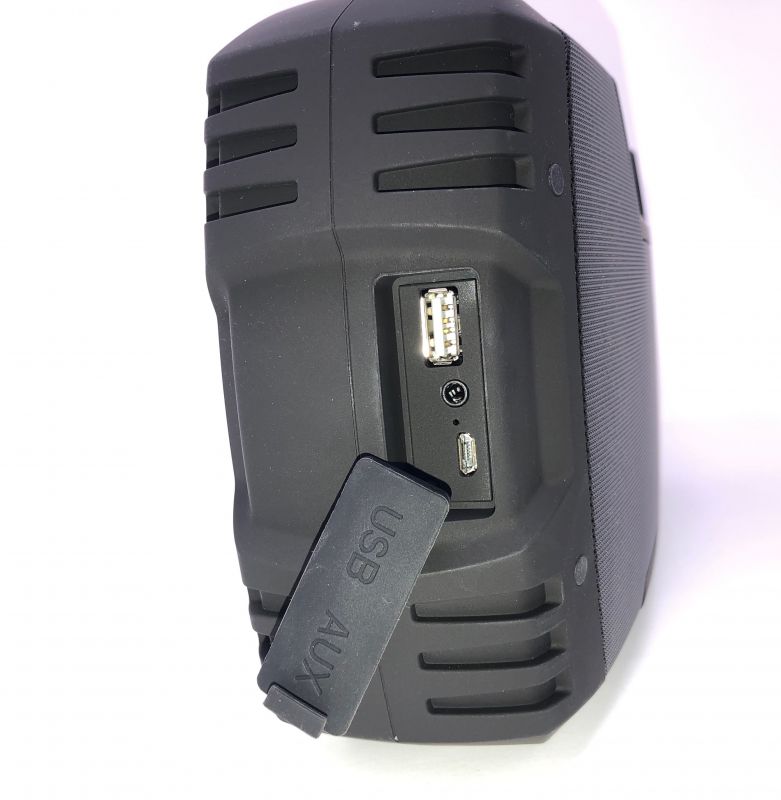
Under a water-resistant side panel, there is a microUSB charging port, a USB-A output port to charge your device and an AUX input port. I was never able to run the unit down to where it would not play or charge my iPhone. This makes the AOMAIS Go a great companion on a multi-day trip to the beach or day-long bike ride where you’d like some music and a good source of power at hand.

Setup

Standard Bluetooth pairing. If you don’t know how to do this in 2019, turn in your Gadgeteer membership card.

What I like

  • Good grippy handle
  • Buttons are easy to see and find
  • IPx7 means freedom from worry about splashes and sudden showers
  • Can charge your device from the USB out port if needed

What needs to be improved

  • Can’t really think of anything

Final thoughts

The Bluetooth speaker market is a crowded place. The AOMAIS Go brings clear advantages with IP-X7 weatherproofing, 30-hour battery life, and the ability to charge your phones or tablets from its 8800 mAh battery. If you have a large group, having someone else get a second one will enable the whole group to enjoy the same jams together. But there are always warnings to heed:

Price: $69.99
Where to buy: Amazon
Source: The sample of this product was provided by AOMAIS.

Filed in categories: Reviews

Tagged:

AOMAIS Go Bluetooth Speaker review originally appeared on The Gadgeteer on April 7, 2019 at 11:00 am.

Note: If you are subscribed to this feed through FeedBurner, please switch to our native feed URL http://the-gadgeteer.com/feed/ in order to ensure continuous delivery.

Saddleback Leather Drawstring Leather Backpack review

REVIEWI’ve found my new favorite backpack! It’s the new Saddleback Leather Drawstring Leather Backpack. It is simple in design, carries all that I need to carry, and is made with the highest quality materials and craftsmanship. Read on for all the wonderful details.

What is it?

The Saddleback Leather Drawstring Leather Backpack is a bag made out of full-grain leather which is the strongest grade of leather available. This backpack will carry your laptop (exterior dimensions up to 15” L x 10” W x 1” D or 381 mm L x 254 mm W x 25 mm D) in its interior floppy pigskin pocket and lots of other materials in the main compartment while you are out-and-about.

What’s in the box?
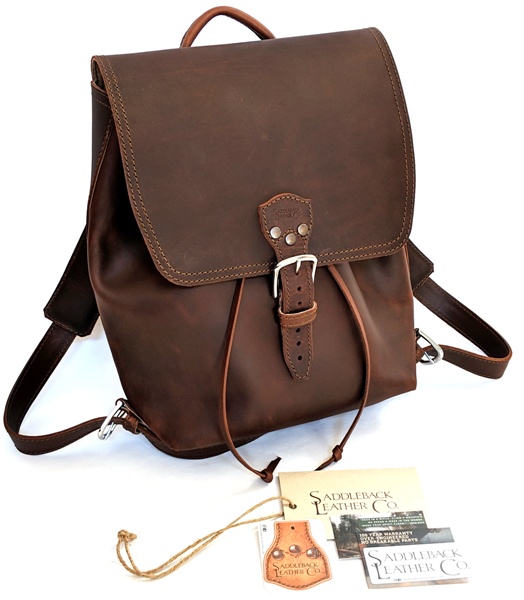
The Saddleback Leather Drawstring Leather Backpack comes with two information cards and two Saddleback stickers (do people ever use the stickers?).

Hardware specs

  • 100-Year Warranty
  • Materials: full-grain leather, pigskin lining, industrial-grade UV resistant polyester thread (or marine-grade thread – the kind used in shipping sails), and heavy-duty 316 stainless steel hardware
  • 1 large interior floppy pigskin pocket (12” H x 10.5” L or 305 mm H x 267 mm L)
  • Interior key clip strap to keep your keys easily accessible
  • Dimensions (approximate size):
    Exterior: roughly 14.25″ H x 11″ W x 6.5″ D (362 mm H x 279 mm W x 165 mm D)
    Interior: roughly 14″ H x 10.5” W x 6″ D (356 mm H x 267 mm W x 152 mm D)
  • Weight: 3.7 pounds (1.7 kg)

Design and features

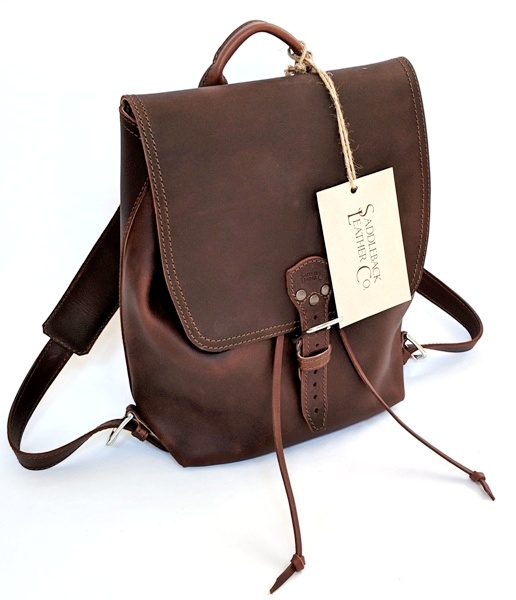
The Saddleback Leather Drawstring Leather Backpack is beautiful in its design simplicity. There are no outer pockets, just a front buckle closure and the leather drawstrings used to cinch the main compartment closed.

The entire backpack is made using ~2 mm (5 oz) full-grain leather except for the pigskin lining (which is about 1 mm thick) and the floppy pigskin pocket. The bag is stitched using industrial-grade UV resistant polyester thread and the heavy-duty hardware is made from 316 stainless steel. All hardware (buckles and D-rings) are attached to the backpack using thick leather pieces that are looped through the hardware then sewn and riveted onto the bag. Places where the leather might stretch, have polyester straps sewn in between the layers of leather to prevent that from happening (Saddleback Craftmanship and Quality).

This premium backpack feels wonderfully thick, rugged, and durable; yet, the leather is supple. My bag weighs about 3.4 lbs. (1.5 kg) when empty and is one of Saddleback’s lightest bags. 

My backpack came in the beautifully rich Dark Coffee Brown color but it also comes in other colors as well (Tobacco, Chestnut, and Black). And it has that wonderful leather smell.
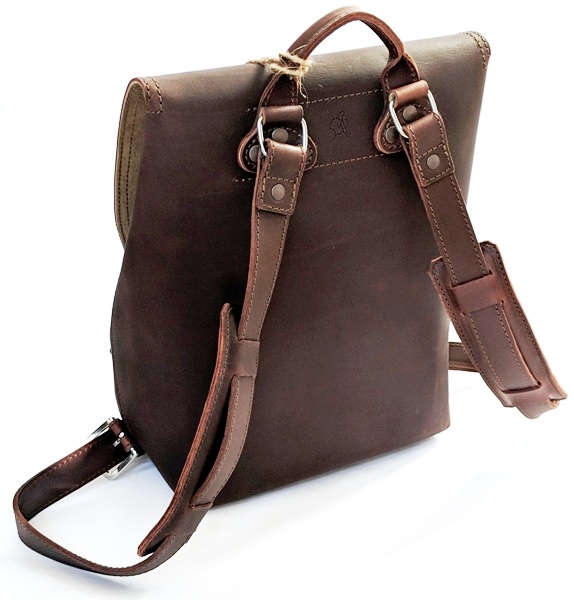
The back of the backpack shows that it is made out of one continuous piece of 2 mm full-grain leather.

The photo above also shows the quick-grab handle and shoulder straps. Saddleback provides removable leather shoulder pads to help make the straps more comfortable.
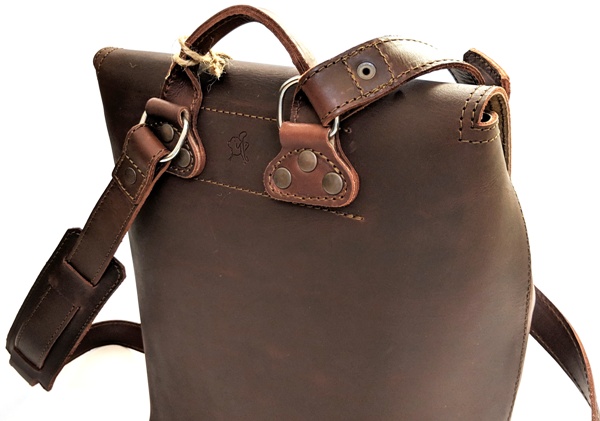
The shoulder straps are looped through and riveted onto a D-ring located at the top of the bag. The shoulder straps’ D-rings and the handle are anchored to the top of the backpack using three rivets per strap. 
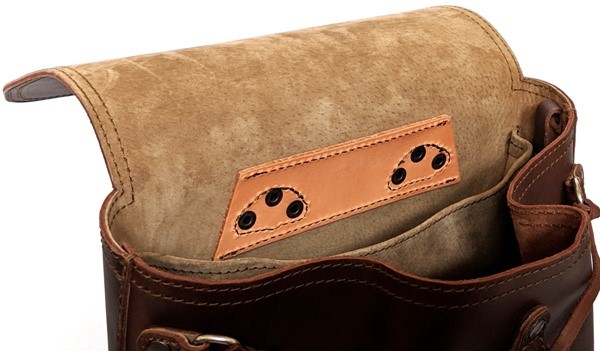
Inside the backpack, you can also see the thick piece of leather on the backside of the bag where the handle and shoulder straps attach. That’s a total of 15 mm of leather (5/8″) to sew and rivet through. It’s mind-boggling that they are able to sew through that much leather. The handle and shoulder straps aren’t going anywhere. Period.
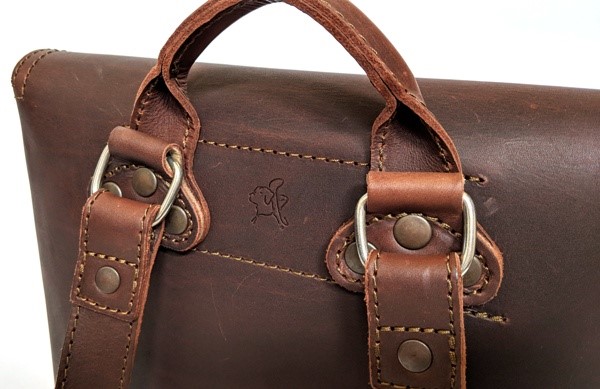
If you look between the leather attachment points of the shoulder straps on the outside of the bag, you’ll see an homage to Dave Munson’s (the president and founder of Saddleback) former dog Blue embossed on the leather. You can read more about Dave’s touching story of him and Blue here.
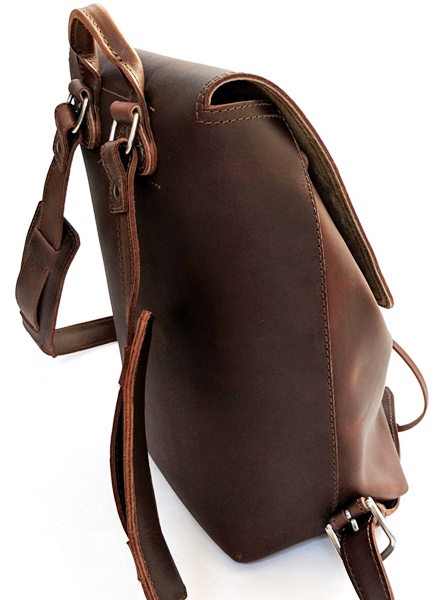
The above photo illustrates how thick the leather straps are. They are made using two layers of 2 mm thick leather sewn together, thus making the total thickness of each strap about 4 mm. 

The photo also shows how the sides of the drawstring backpack are single stitched using that awesome industrial-grade polyester thread.

Here is a close up of the stitching inside the bag. You can also see the thickness of the leather used. That thread and leather are thick! Whenever I review a Saddleback bag, I marvel at the quality of the materials and craftsmanship. All other leather bags I’ve seen pale in comparison.
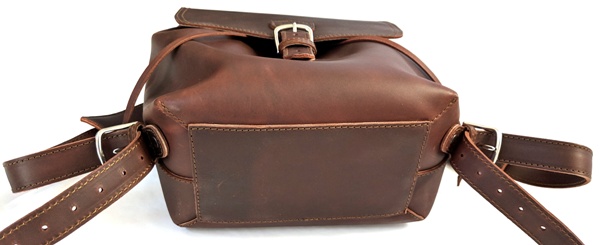
The bottom of the backpack has a thick rectangular piece of leather sewn onto it.
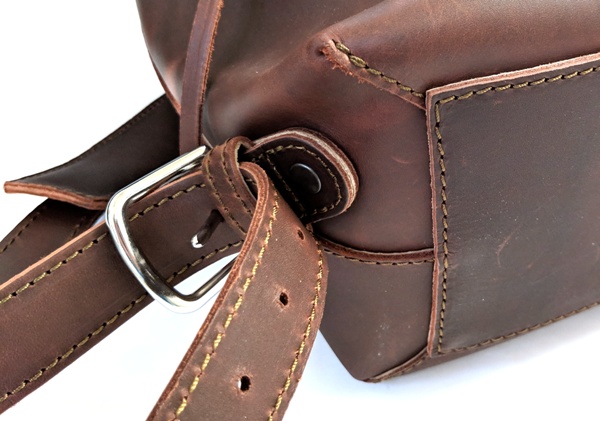
Also at the bottom of the backpack, the shoulder straps are attached to the sides using heavy-duty metal buckles which are riveted and sewn onto the bag. You’ll also notice that the bobbin thread (as shown on the underside of the shoulder strap above) is the same thick polyester thread used for the topstitching of this bag, thus ensuring the longevity of the backpack. The front of the backpack, like the back of the backpack, is also made using one continuous piece of 2 mm full grain leather.
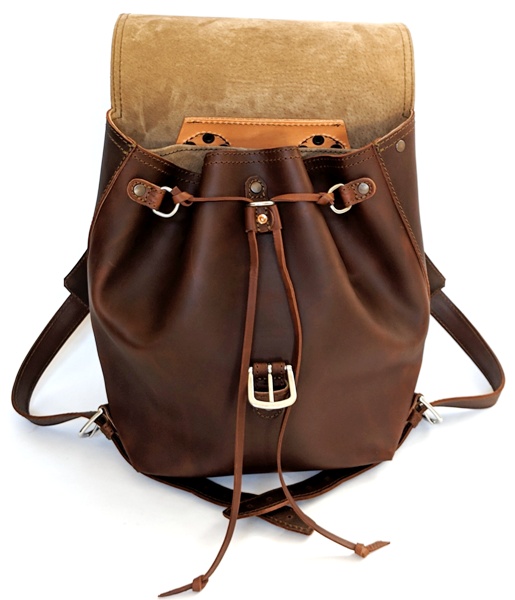
Opening the main compartment flap reveals the drawstrings (2 mm leather) used to cinch the bag closed. The drawstrings are tied to two D-rings that are sewn and riveted onto the sides of the bag. The other ends of the drawstrings come together through another D-ring and are fed through a leather cinch which slides up and down. The cinch works well keeping the bag closed. The above photo shows the drawstrings more closely.
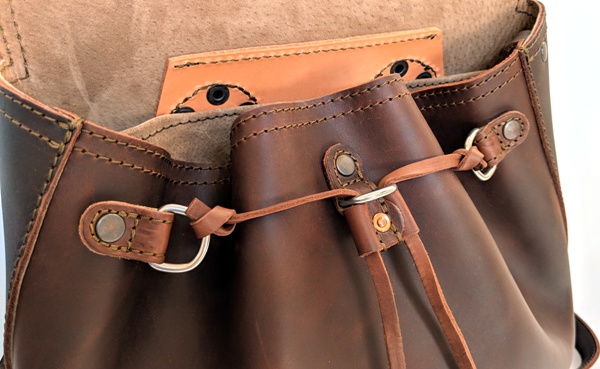
Opening the backpack, you’ll notice that the back part of the bag is lined with pigskin lining which is stronger than cow leather. I really like this lining. It’s so much more durable than the cotton lining found in other bags. Additionally, using pigskin maintains the rugged style and design of the bag.

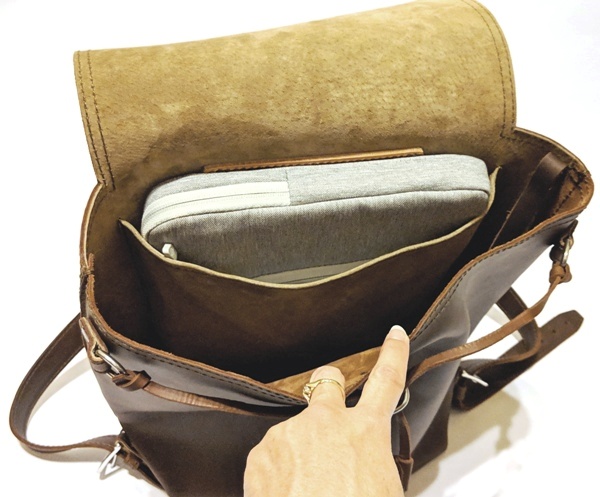
The inside of the bag is wonderfully spacious. Sewn into the back of the bag is a floppy pigskin pocket to store a laptop. This pocket measures 12” H x 10.5” L (305 mm H x 267 mm L) and does not have any padding to protect a laptop. The rest of the bag is wide open space – there are no other pockets or slots. There is, however, a key clip strap to hold your keys in place so they don’t wander around in the bag.
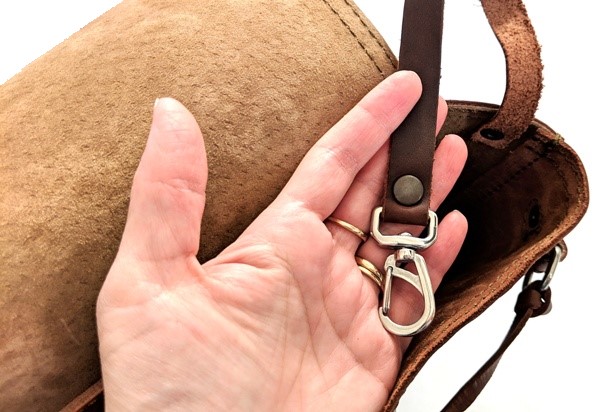
Here you can see the key clip strap and the metal claw hook used for your keys.

Performance
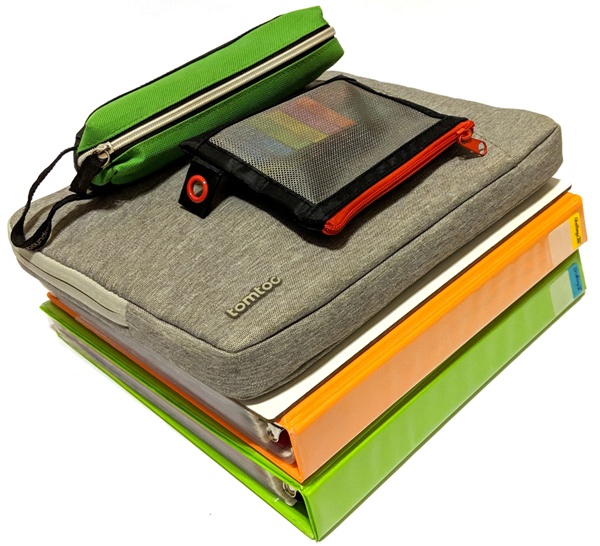
These are all the materials I was able to fit into the Saddleback Leather Drawstring Leather Backpack. They include the following:

  • Pencil case
  • Zipper pouch (contains sticky labels, eraser, small ruler)
  • Padded laptop case (contains my 13” Lenovo Yoga 730 laptop, my mouse, my charging cable and USB-C wall charger, and my Satechi multiport adapter)
  • A whiteboard
  • Two full 1” binders

My padded laptop case fit perfectly inside the floppy pigskin pocket. This pocket will even accommodate a laptop with outer dimensions of up to 15” L x 10” W  x 1” D (381 mm L x 254 mm W x 25 mm D). All of the rest of my materials fit well inside the main compartment.

The backpack was pretty full with all of my materials in it and so it didn’t need a lot of cinching to close the main compartment.

With all of my stuff in the backpack, it weighed 15.4 lbs (7.0 kg).
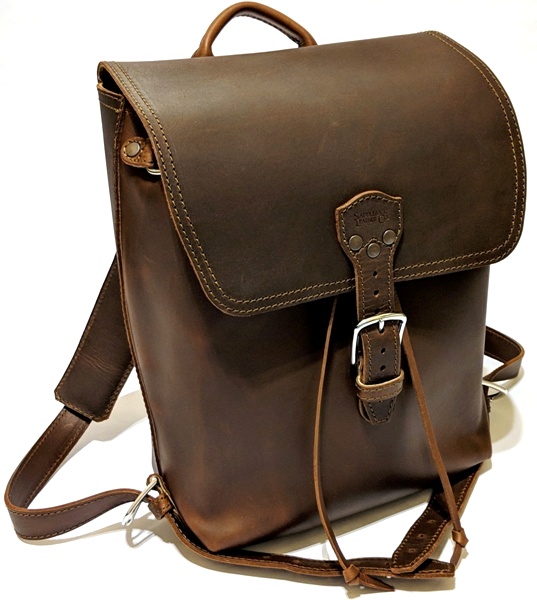
The flap has enough adjustment to close the bag when it is full.
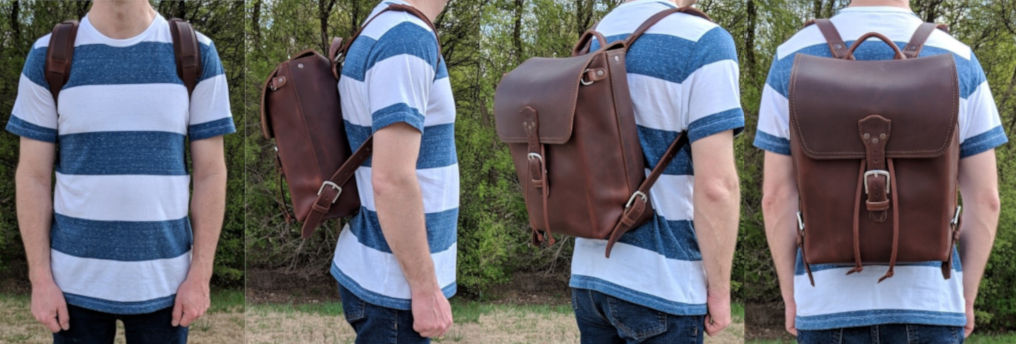
The Saddleback Drawstring Leather Backpack is pretty comfortable when carrying it around town in my opinion, although I have not carried it around for a long duration. It lies flat against my back (and my husband’s back as shown above) and the leather shoulder pads do help to make the shoulder straps more comfortable, especially when carrying a lot of weight.

What I like

  • Made of the highest quality materials: full-grain leather, pigskin lining, industrial-grade UV resistant polyester thread, and heavy-duty 316 stainless steel hardware
  • All stress points are reinforced with rivets
  • In areas where leather may stretch, they sew in hidden polyester straps between the leather layers to prevent that from happening
  • Simple design (I didn’t use the exterior side pockets much on the other Saddleback backpack I reviewed)
  • It carries a lot of materials and yet seems small and portable, even for someone my size (5 ft tall)

What needs to be improved

  • I do wish there was one small front exterior pocket to stick my phone or other small items into it
  • Its rugged good looks may not suit your particular style
  • It’s expensive

Final thoughts

The Saddleback Leather Drawstring Leather Backpack is now, hands down, my favorite backpack. I love the simple design with its spacious main compartment and the floppy pigskin pocket that holds my 13” laptop (Lenovo Yoga 730) with its bulky padded laptop case. This pocket will even accommodate a larger laptop with outer dimensions of up to 15” L x 10” W  x 1” D (381 mm L x 254 mm W x 25 mm D).

In addition, every time I review a Saddleback product I am truly amazed by the high quality durable heavy-duty materials that they use as well as how well each bag is designed and assembled. You just can’t question the quality of their bags, which are second to none. They use full-grain leather, pigskin lining, industrial-grade UV resistant polyester thread, heavy-duty 316 stainless steel, all stress points are reinforced with rivets, and they sew in hidden polyester straps between the leather layers to prevent leather from stretching. I love knowing that I won’t ever have to replace this bag.

The only things that I can think of that might not be to your liking is the price and the style. However, I have come to understand that if you want a really well-made leather product that will last you a lifetime, you will have to pay this kind of a price tag.

Price: $399.00
Where to buy: Saddleback Leather
Source: The sample of this product was provided by Saddleback Leather.

Filed in categories: Reviews

Tagged: ,

Saddleback Leather Drawstring Leather Backpack review originally appeared on The Gadgeteer on April 7, 2019 at 9:00 am.

Note: If you are subscribed to this feed through FeedBurner, please switch to our native feed URL http://the-gadgeteer.com/feed/ in order to ensure continuous delivery.

Logitech Z606 5.1 Surround Speaker System Review

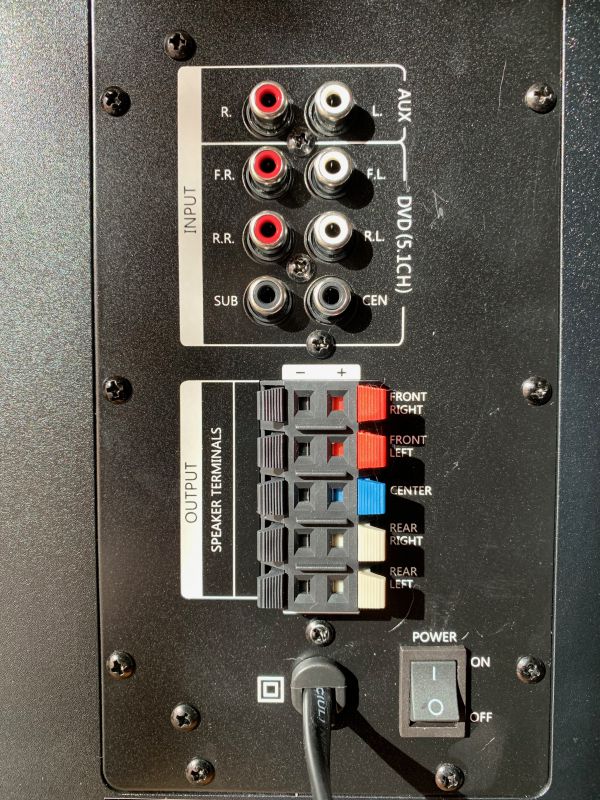
REVIEW – The Z606 is Logitech’s latest entry into the surround sound speaker market. This low-cost system has five wired speakers and a bass unit containing an amplifier, speaker connections, and RCA inputs. AV connections are sparse and while the power won’t rattle your windows, it should prove to be more than enough for most listening applications.

What is it?

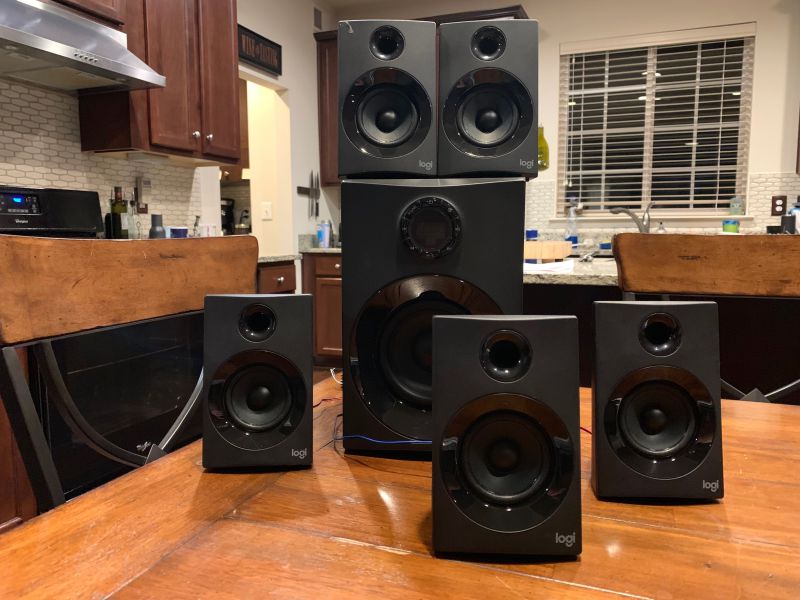
This 5.1 system is designed around five identical satellites that serve as three front and two surround speakers, and a powered subwoofer. Audio connections are made to the system through Bluetooth and two or five channel RCA cables.

What’s in the box?

  • Subwoofer module
  • 5 satellite speakers
  • 3.5mm aux RCA cable
  • Remote control

Hardware specs

  • Subwoofer dimensions (H x W X D inches): 11.69 x 7.60 x 11
  • Subwoofer weight: 7.7 lbs
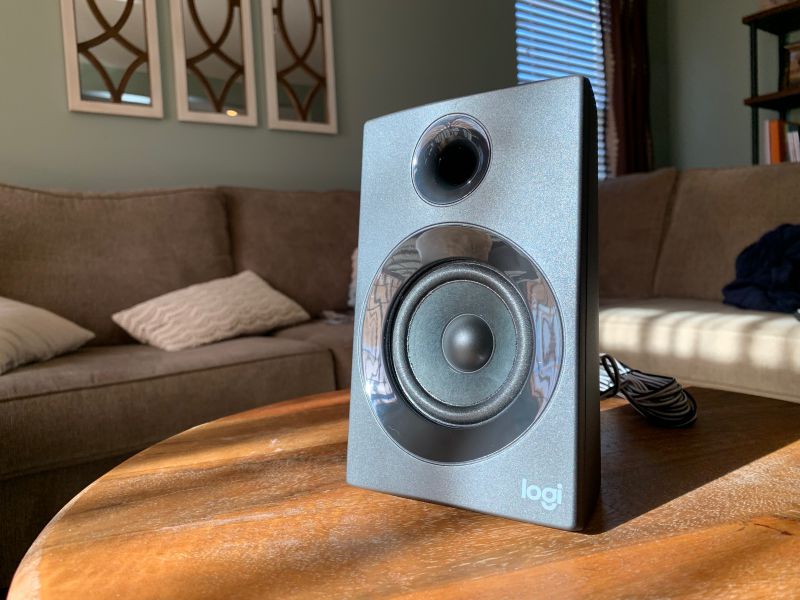
  • Satellite Speakers dimensions (H x W X D inches): 7.01 x 4.33 x 3.42
  • Satellite Speakers weight: 1.0 lbs
  • Remote Control dimensions (H x W X D inches): 3.39 x 1.57 x 0.27
  • Remote control weight: .60 oz
  • Rear Satellite cable length: 6.2m
  • Front & Center cable length: 2.2m
  • Power cable length: 1.6m

The z606 system puts out 160 peak watts with 80 watts RMS. The subwoofer is rated for 25 watts while the satellite speakers push out 55 watts in total. The Bluetooth connection is 4.2 and has a 15-meter range.

Design and features

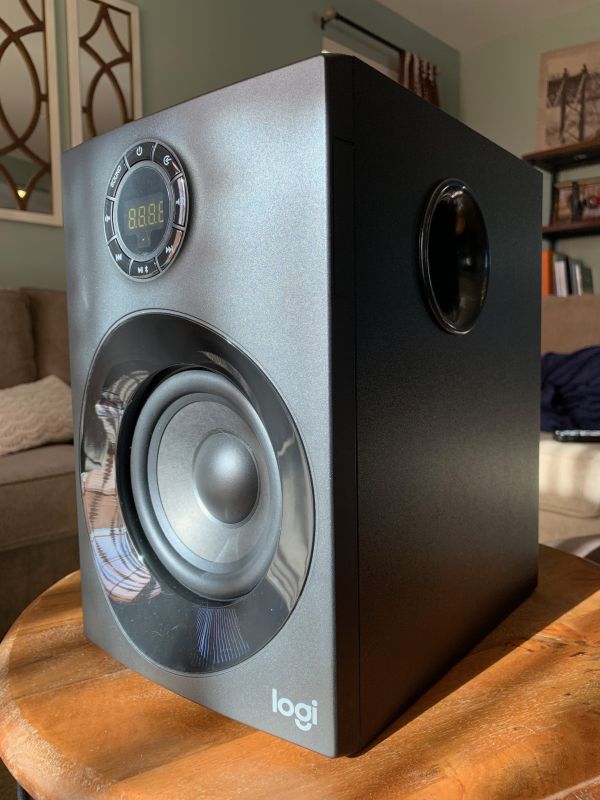
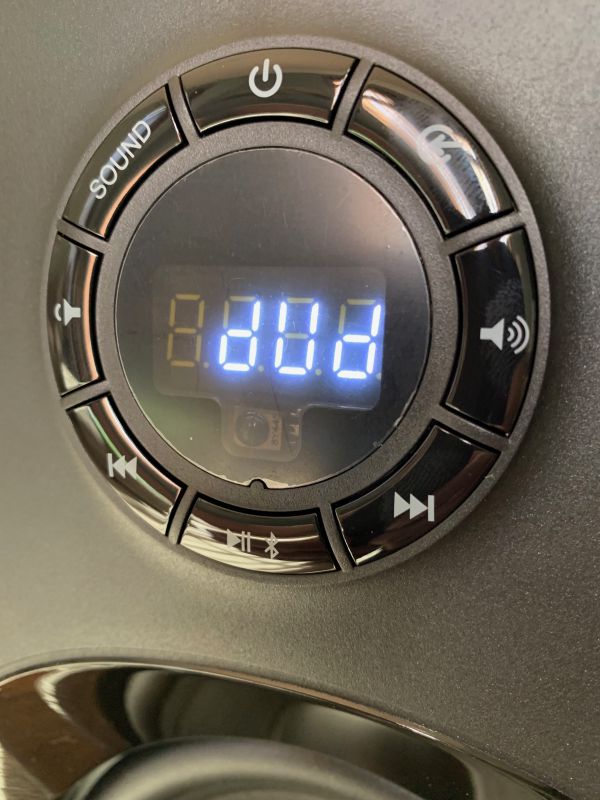
As previously mentioned, the satellite speakers are identical to one another, differentiated only by the color of the non-detachable speaker wiring. Each satellite is ported and has a full range, 2.5-inch driver. On the back is a keyhole, allowing you to hang the speaker from the wall. The sub has a 5.25-inch driver. In addition to the aforementioned connections on the back, the front has a round display surrounded by buttons for power, sound and Bluetooth connections. You can also change the output from 2.1 to 5.1 and select simulated 5.1 surround for two-channel sources. The small, card-sized remote has all of the same controls as the front panel on the bass unit.

Setup

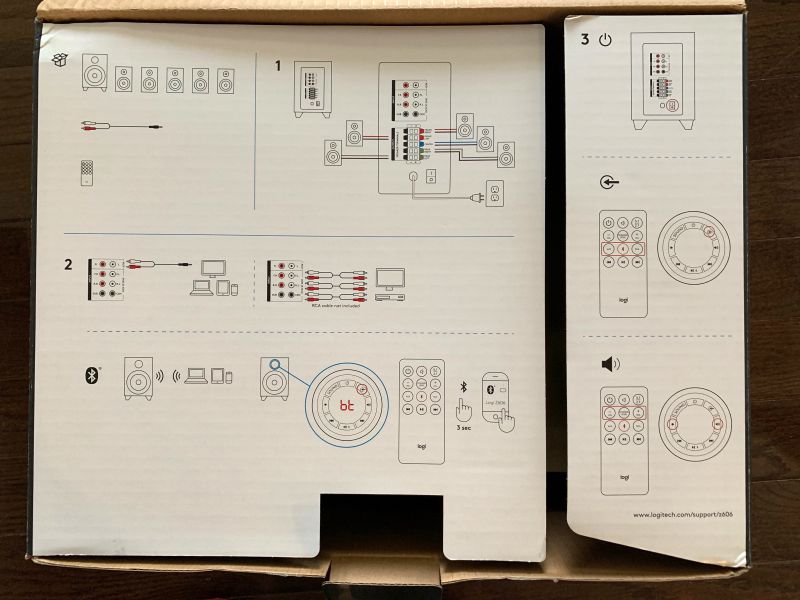
Color-coded speaker wires are provided to make set-up easier: red for the left and right fronts, blue for the center and gray for the surrounds. The bass unit can be connected to any Bluetooth device or directly to AV equipment (TV, receiver, etc.) with RCA cables. Although no documentation, save for an FCC statement, is included in the box, Logitech helpfully printed a connection diagram on the box itself.

Performance

I set the system up in my living room with the front three speakers below and just in front of my TV. The bass unit was placed on the floor next to my AV cabinet. The surrounds were placed to the left and right of my couch, just behind my seating position. My listening tests were comprised of music, podcasts, and movies from Netflix.

As far as music was concerned, the sound quality from the Z606 was about what I expected. The bass was a tad boomy with heavier rock tracks and slightly muddy. I didn’t care for the simulated 5.1 surround sound with any of the music sources, but that has more to do with my preferences than the performance of this unit. After a few positioning changes and adjustments, I was able to get good separation and a decently wide sound stage between the front speakers when viewing movies on Netflix in the simulated surround mode. I should note that none of my AV sources (Roku, PS4, cable box, TV, etc.) have 5 channel RCA connections so I was not able to test the digital 5,1 surround capabilities of this unit.

What I like

  • Price
  • Decent sound quality
  • Easy set-up

What needs to be improved

  • Lack of connections for digital sources (e.g., HDMI, optical,)

Final thoughts

Overall, the Z606 is a decent surround system at its price point. It won’t blow your socks off and lacks advanced connectivity.  That said, if you’re looking for a surround source for a secondary viewing application, and aren’t too picky about sound quality, the Z606 might be a good bet.

Price: $129.99
Where to buy: Available on Amazon, and directly from Logitech
Source: The sample of this product was provided by Logitech.

Filed in categories: Reviews

Tagged:

Logitech Z606 5.1 Surround Speaker System Review originally appeared on The Gadgeteer on April 6, 2019 at 9:00 am.

Note: If you are subscribed to this feed through FeedBurner, please switch to our native feed URL http://the-gadgeteer.com/feed/ in order to ensure continuous delivery.
Udoq Docking System review

REVIEW – We have so many mobile devices that it is a challenge to charge them in an organized fashion. I’m always on the lookout for interesting ways to accomplish this task. When the Udoq Docking System was offered to the Gadgeteer for review I was struck by its clean lines and simplicity and so I jumped at the chance to review it. I gave it a try and found that it is indeed beautiful, but it is expensive and my USB-C phones didn’t always charge.

What is it?

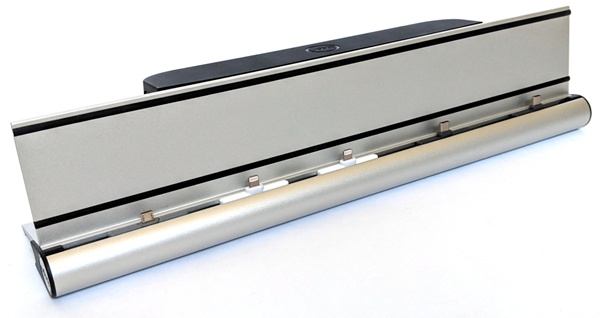
The Udoq Docking System is a charging docking station for mobile devices (including phones, tablets, and Apple watches) that will keep your devices and charging cables tidy. The height of the cables’ connectors is adjustable and thus will work with many cases on your devices.

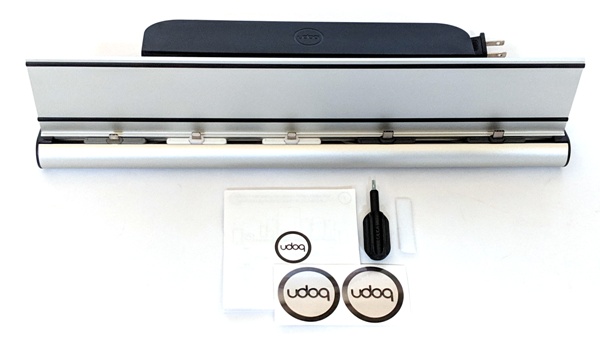
What’s in the box?

The Udoq Docking System shown above contains all of the following items which are sold separately:

  1. Udoc 400 rail (universal aluminum docking station for Apple and Android mobile devices) – $115
    • User Manual
    • Udoc tool
    • White hook-and-loop cable ties
    • Udoc stickers
  2. Cable Box S – $10.90
  3. 5-port Charger – $24.90
  4. C Cable (USB-C cable) – two for $31.80 ($15.90 each)
  5. L Cable (Lightning cable) – two for $35.80 ($17.90 each)
  6. M Cable (micro USB cable) – one for $10.90

Hardware Specs

  1. Udoc 400 rail (universal aluminum docking station for Apple and Android mobile devices)
    • made of aluminum
    • 400 mm long (15.75″)
    • two black silicone strips that run the length of the back of the docking station to prevent devices from slipping or getting scratched
  2. Cable Box S
    • offers space for cables and the 5-port charger (Does NOT fit the 6-port charger!)
    • compatible with wall mount and Apple Watch Adapter
    • is snapped into the cable opening at the backside of the Udoq rail
    • a large lid gives easy access to cables and charger
    • offers three large openings to route cables outside the back
    • made from heat resistant ABS
    • compatible with all Udoqs
    • Inner dimensions: ca. 200 x 42 x 65 mm
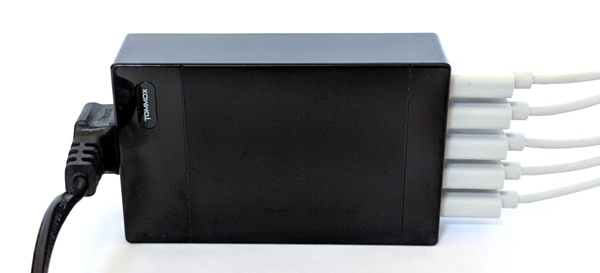
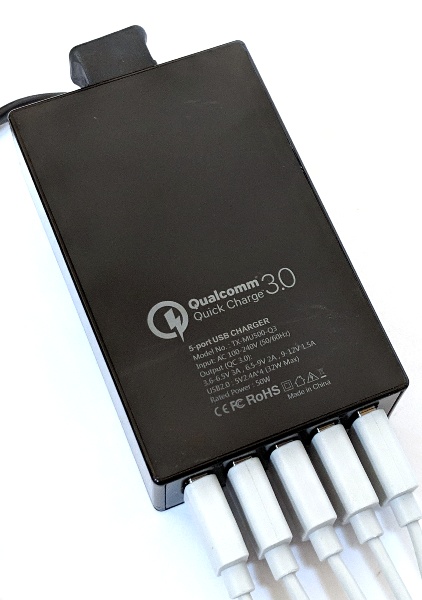
  3. 5-port Charger
    • Advanced Charging Technology: Overload protection, overcharging protection, overcurrent protection, over temperature protection, shortcut protection.
    • Solid black plastic housing
    • 5ft (150 cm) detachable power cord
    • AC 100-240 V input for worldwide use
    • 4 USB 2.0 ports with 5 V, 2.4 A per port, enabling fast and simultaneous multi-device charging
    • 1 extra USB port with Qualcomm Quick Charge 3.0 Output: 3.6 V – 6.5 V/3 A, 6.5 V – 9 V/2 A, 9 V – 12 V/1.5 A
    • Compact size: 2.4 x 3.5 x 1.2 in, (6 x 9 x 3 cm)
  4. C Cable (USB-C cable)
    • USB Type-C 3.1 to USB-A (Standard USB Connector)
    • Cable length: 150 cm (5 ft.)
    • Color of cable: white
    • Color of adapter: dark gray
  5. L Cable (Lightning cable)
    • Certification Apple MFI
    • Cable length: 150 cm (5 ft.)
    • Color of cable: white
    • Color of adapter: white
  6. M Cable (micro USB cable)
    • Micro USB 2.0 to USB-A (Standard USB Connector)
    • Cable length: 150 cm (5 ft.)
    • Color of cable: white
    • Color of adapter: middle gray

Design and features

Udoq provided me with the above pre-assembled docking station to review. It includes the Udoq 400 rail, Cable Box S, 5-port charger, two USB-C cables, two Lightning cables, and a micro USB cable. Each of these items is sold separately. Cha-ching. Udoq also has accessories that allow for wireless charging and allow you to charge your Apple Watch (see Udoq accessories).

The Udoq 400 rail measures 400 mm (15.75″) and is made of a nice matte aluminum – not plastic. It has two black silicone strips that run the length of the back of the rail to prevent devices from slipping or getting scratched.
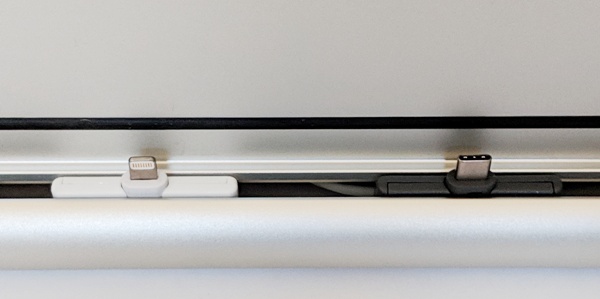
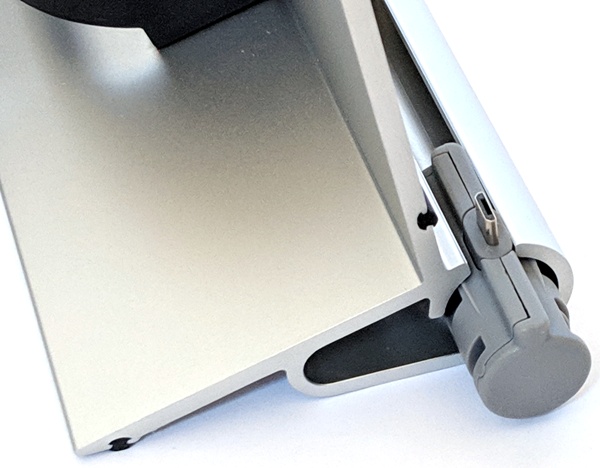
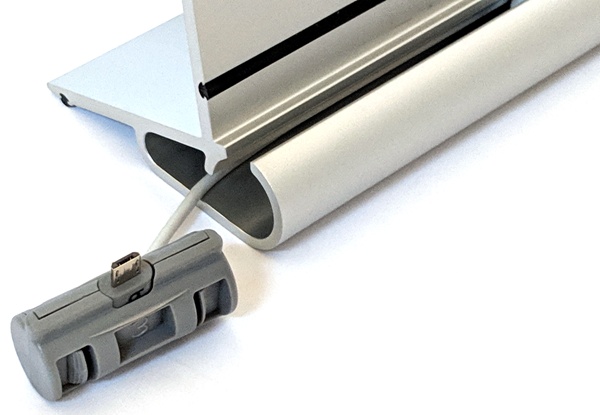
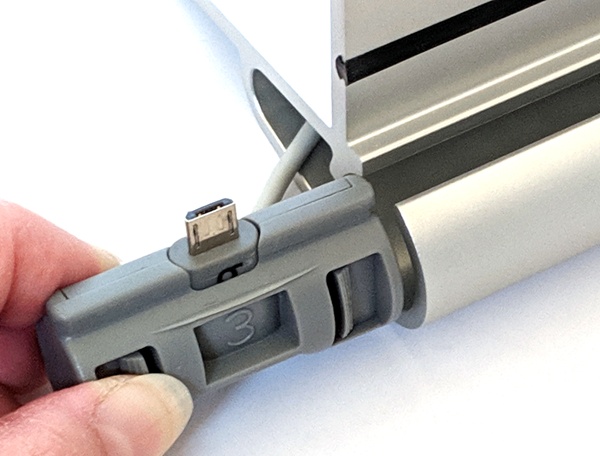
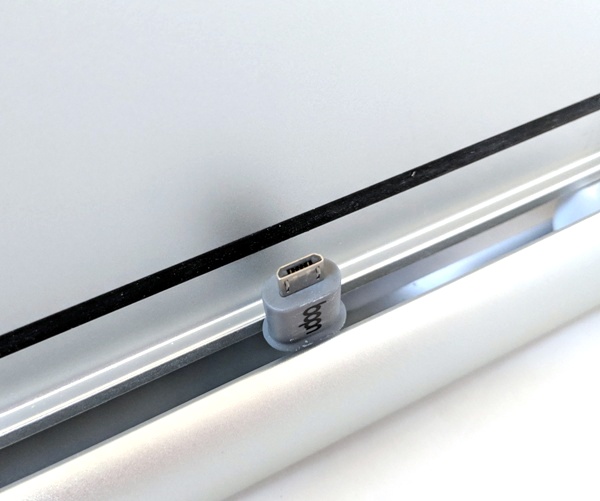
Each of the cables sits in a track and can slide along the length of the track to accommodate your devices.
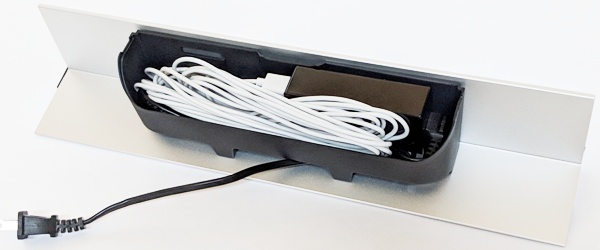
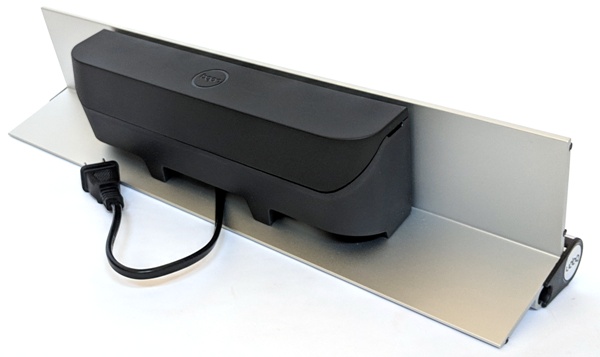
The Cable Box S is made of matte black plastic and is attached to the rear of the docking station. It sits just below the level of the Udoq rail.

Setup

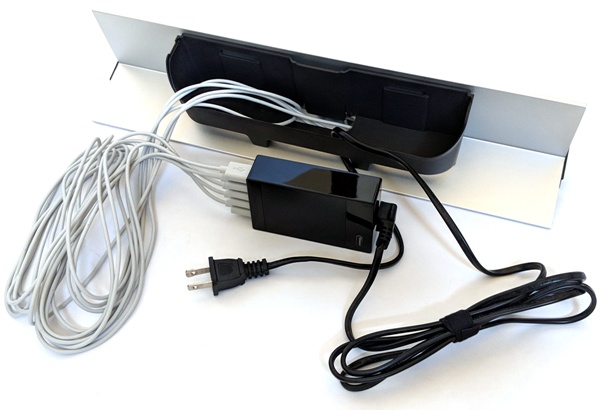
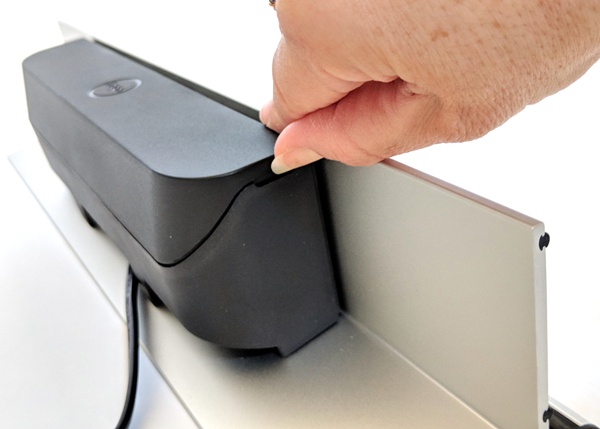
The lid of the cable box is easily removed by using the notches on the side of the box.   The box accommodates quite a lot. My box was full with the charger and all of the cables (shown above). The Udoq charging cables are all 5 ft. long (150 cm) as is the multiport charger’s power cord. 
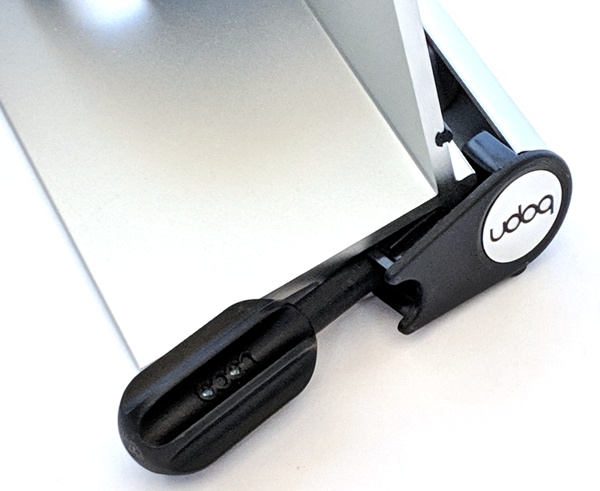
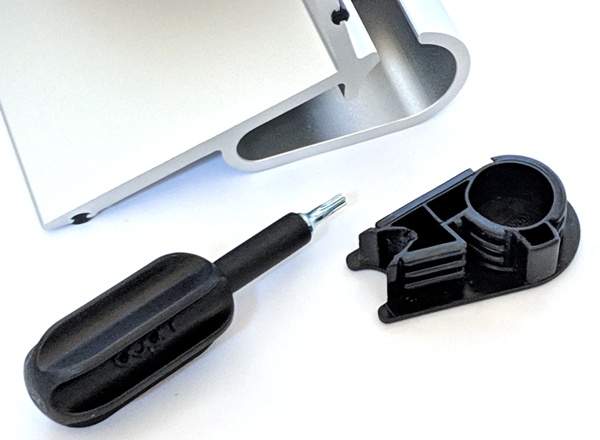
To gain a better understanding of how the Udoq charging station was put together, I pried the endcaps off the of the rail using the tool that Udoq provided.
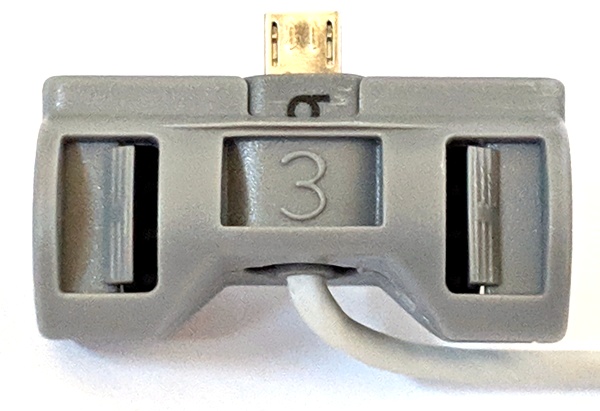
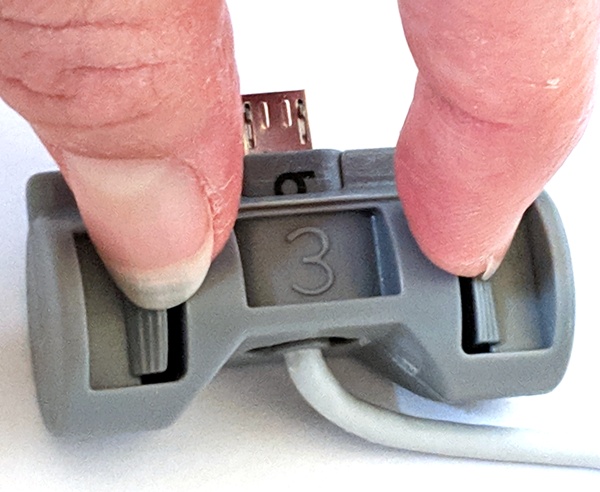
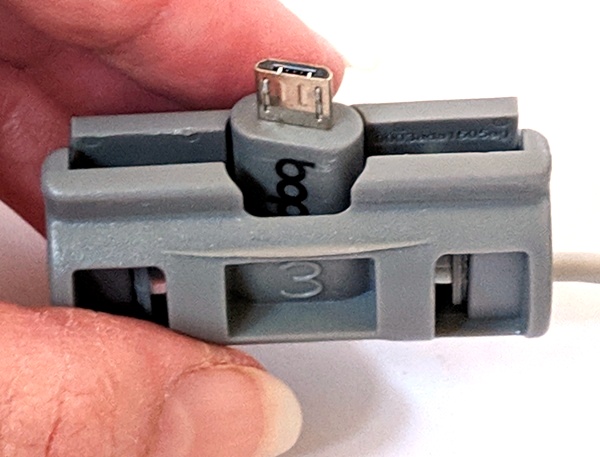
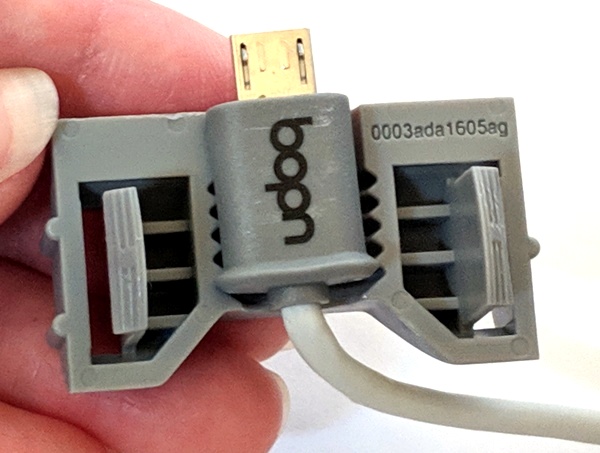
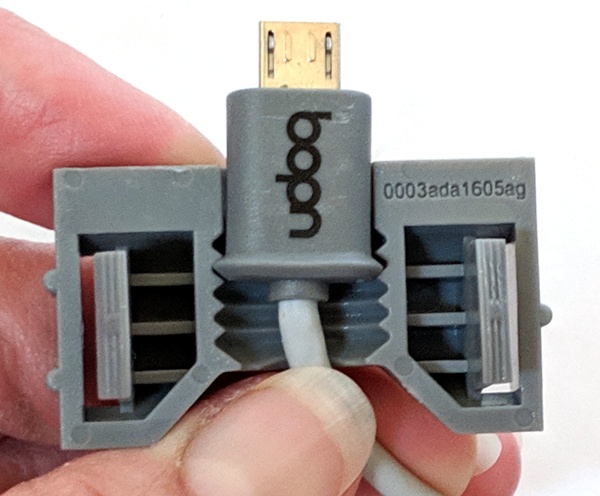
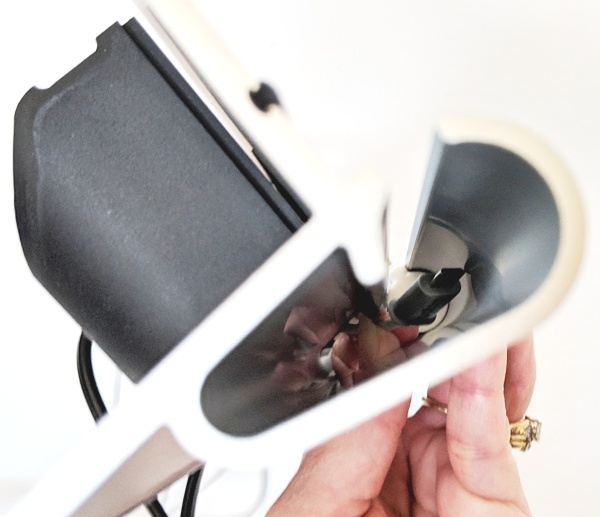
The end caps fit snugly but were easy enough to pry off with the tool. Each charging cable was mounted in a plastic adapter that allowed it to fit snugly and slide inside the track of Udoq rail. Each adapter can be taken out of the Udoq rail. Each plastic adapter has two tabs on it. The adapter may be opened by squeezing the tabs together……then prying it apart. In the above photo, you can see that the charging cables’ connectors can be inserted into the adapter at different heights. You can move the charging cable up in the adapter to get past a thick case on your device if needed. When you are finished with adjusting the height of the charging cable inside the adapter, you just replace the adapter’s cover and snap the pieces together. I received the 5-port charger from Udoq. It measures 3.75″ L x 2.32″ W x 1″ D (95 mm L x 59 mm W x 25 mm D). This ensured that the charger would fit inside the Udoq cable box (NOTE: the 6-port charger that Udoq sells does NOT fit inside the Udoq cable box). The 5-port charger has one port that provides Qualcomm Quick Charge 3.0 speeds: 3.6 V – 6.5 V/3 A, 6.5 V – 9 V/2 A, 9 V – 12 V/1.5 A. The other four ports provide 5 V 2.4 A.
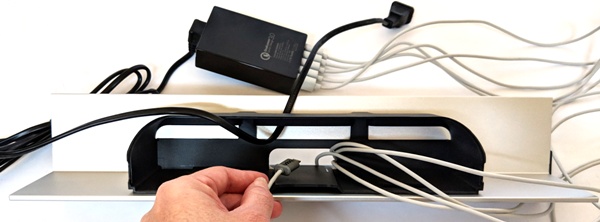
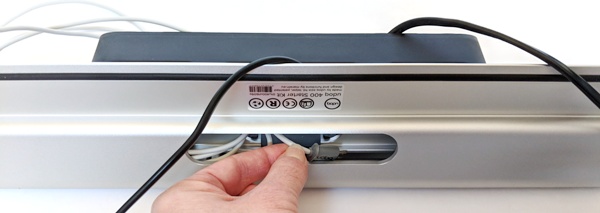
If you should need to assemble the Udoq Docking System on your own, you would simply insert all the USB-A ends of your Udoq charging cables into the 5-port charger and then feed the other ends of the cables in through the top of the cable box, then through the center opening located at the bottom of the cable box as shown above. You would then grab each cable from the underside of the Udoq rail and feed it into the Udoq rail’s track as shown above. The above photo shows the cable in the Udoq track. You would then need to pull the charging cable up and out of the rail’s track. And once it’s out of the track, you can insert the cable’s connector into its plastic adapter and slide it into the Udoq rail’s track.

After all of the charging cables are inserted into the Udoq rail’s track, you can then reduce any of the charging cables’ slack in the track by pulling the excess cable length through the cable box. I then placed the 5-port charger into the cable box and coiled up all cables neatly to fit them into the box. This was a tight fit. Finally, I replaced the box’s lid.

Performance

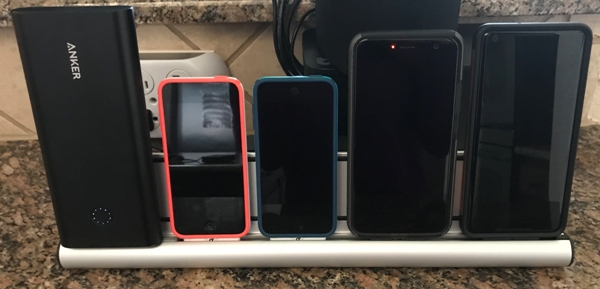
I really like how sleek and neat the Udoq Docking System is. However, I noticed that when I placed either of our USB-C phones into the charger using either USB-C cable, sometimes they would not charge even though the phones indicated that they were charging. I checked that the cables were inserted into the charger, that the charger was plugged in and receiving power (there is a small blue LED light on the 5-port charger indicating that it is powered on), and that the USB-C connector was seated high enough to be fully inserted into the USB-C port on my phone. Even after checking all of these things, I had to re-seat the phone on the USB-C connector before it would actually start to charge. When it did successfully charge, it did so more slowly than my phone’s OEM charger. All of the other devices charged just fine (iPod Touch 5G and 6G and an Anker portable battery).

There is one thing that I want to mention. I wanted to use the Udoq Docking System to charge my Anker portable battery and it just barely fit. There is only about 7 mm available between the charging cable connector and the back of the Udoq rail. In other words, if your device’s charging port is more than 7 mm from the edge of your device, it will not fit in this charging dock.

What I like

  • The Udoq Docking System is sleek looking and keeps my devices and charging cables tidy while charging
  • The Udoq rail is made of metal and not plastic
  • It’s easy to use
  • It accommodates devices with cases (the charging cable connector height is adjustable so that it can get past the thickness of the case)

What needs to be improved

  • Charging of USB-C devices was inconsistent
  • If your device’s charging port is more than 7 mm from the edge of your device, it will not fit in this charging dock
  • Charging cables are proprietary – they must be purchased from Udoq
  • Everything is sold separately, thus the Udoq Docking System is really expensive

Final thoughts

I really like the look of the Udoq Docking System. It keeps my devices and charging cables organized without taking up too much space. However, the Udoq rail, cable box, 5-port charger, and proprietary cables are all sold separately thus making this system very expensive. I also noticed that my USB-C devices sometimes did not charge. It was as though the device was not plugged in even though I checked my phone and it showed that it was connected and “charging”.

I really wanted this charging dock to work well because it looks so nice, but it wasn’t consistent in doing its job and it’s really expensive to boot. Thus my recommendation would be to pass on this charging docking station.

Price: $229.30 (includes: Udoq 400 rail, micro USB cable, two Lightning cables, two USB-C cables, cable box, and 5-port charger)
Where to buy: Udoq and Amazon
Source: The sample of this product was provided by Udoq

Filed in categories: Reviews

Tagged: ,

Udoq Docking System review originally appeared on The Gadgeteer on April 6, 2019 at 8:00 am.

Note: If you are subscribed to this feed through FeedBurner, please switch to our native feed URL http://the-gadgeteer.com/feed/ in order to ensure continuous delivery.
Fused Goods kangaroo leather wallets review

fused-7

REVIEW – Firstly an apology to Fused Good.  This review has taken me literally years.  After receiving the products and starting my draft review I moved to Vietnam for a couple of years and because of their cash economy and the size (both of the notes and the wad of money you need to take with you) and reliance on only cash, I had to retire the wallets until my return back to Australia 🙂 The longest time to test a product on The Gadgeteer?

Thinking about this review, it’s interesting that a site that reviews technology has so many posts about “old school” materials especially when it comes to wallets and bags.

Fused Goods is a small company run out of Brisbane, Australia hand making wallets.

How does this leather wallet differ from all the rest of the leather wallet reviews on The Gadgeteer? Because it uses good old Australian kangaroo leather. Does this make much difference to the wallet?

Why use kangaroo skin?  Because it has the highest tensile strength of all leathers.  This means that they don’t have to add a backing (like pigskin or material) for strength meaning their products can be thinner and lighter.  The vegetable tanned leather is sourced from a local tannery who supplies kangaroo leather for a majority of Australia’s football and cricket balls.

Bifold Wallet:

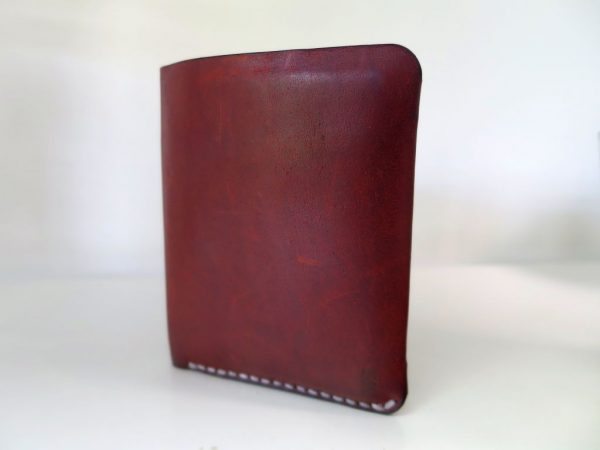
Fused Goods laser cut the leather and then hand stitch it, hence their name, a fusion of new and old technology. I was sent their bifold wallet in Burgundy.  Its got a nice “raw” look to it.
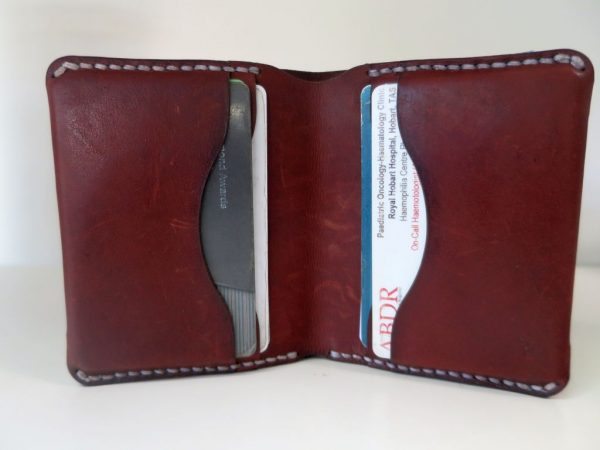
The wallet is 170mm x 120mm (open) and 102mm x 85mm (closed). It has 4 credit card pockets, each of which holds 1-4 cards.

fused-24

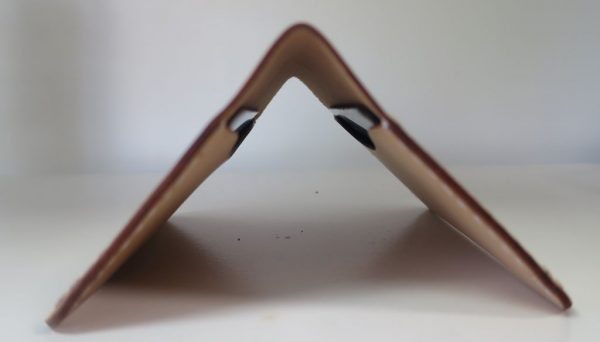
In the back is a slot for the notes. As a standard purchase, it holds AUD and USD but if your currency doesn’t fit you can get a custom size made up.  You can see here that the leather is much slimmer without having to have any sort of strengthening material attached.

fused-23

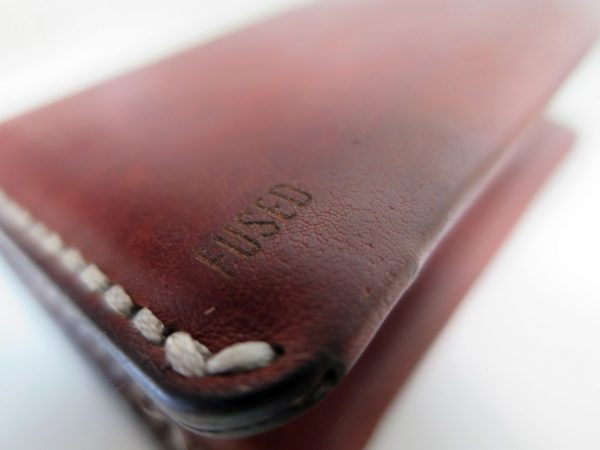
They can do custom laser engraving as well.  Here you can get a closer look at the hand stitching.

fused-26

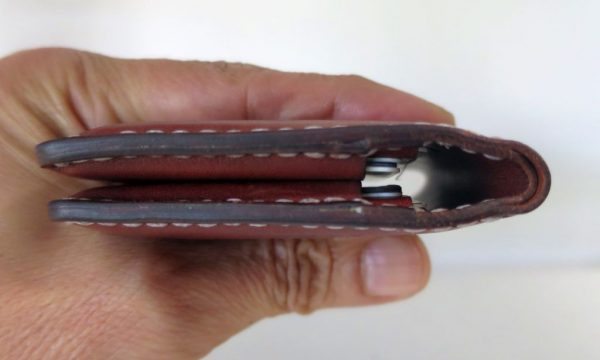
Here it is with 8 cards and a bit of cash. Not too thick and is a perfect front pocket wallet even full.

fused-28

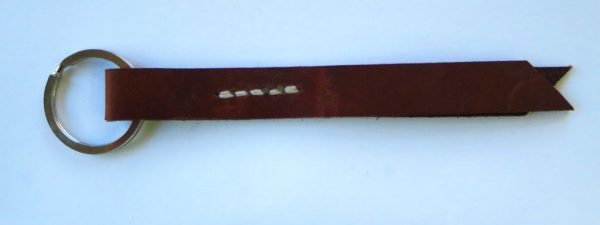
All the scraps aren’t wasted either, they’re made into keyrings. It’s always good to see minimal waste production.

Card wallet:

fused-31fused-20

They also make a nice double card wallet made out of a single piece of leather which reduces additional stitching and weak points. Each pocket holds 3-5 cards and it measures 150mm x 105mm (open) and 100mm x 75mm (closed) and is ideal when you only need to take minimal cards and cash out. These days, this is pretty much my EDC wallet: a few cards and a little bit of cash.

Patina:

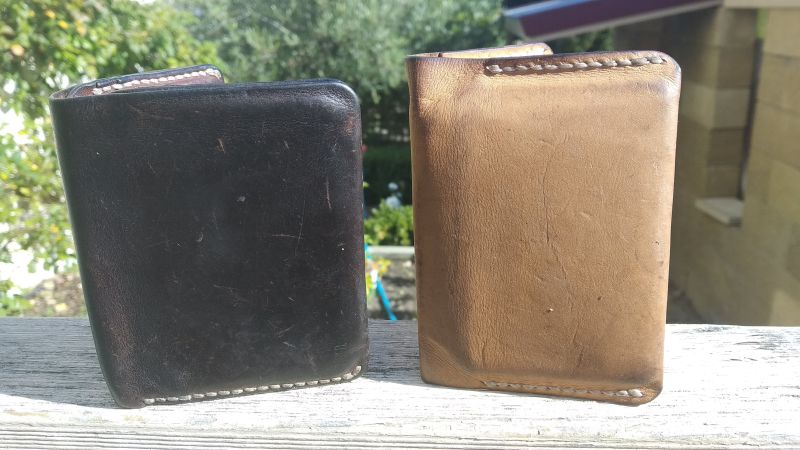
So after (cough,cough) years, here’s how the wallets look today. Worn and weathered and very used even after a bit of a hiatus 🙂

Final Thoughts

If you want a wallet made out of a “unique” material that’s only native to Australia, that looks and feels good and is slim and small enough as a front carry wallet then  Fused Goods products fits the bill. They’re not fancy but they do the job well and because it’s kangaroo leather it’s tough and should last you a long time and will develop a lovely patina with usage over time.

Note too that they make a Kangaroo leather Apple Watch strap as well.

Price: from $50.00 USD
Where to buy: Fused Goods
Source: The sample for this review was provided by Fused Goods.

Filed in categories: Reviews

Tagged:

Fused Goods kangaroo leather wallets review originally appeared on The Gadgeteer on April 5, 2019 at 12:45 pm.

Note: If you are subscribed to this feed through FeedBurner, please switch to our native feed URL http://the-gadgeteer.com/feed/ in order to ensure continuous delivery.