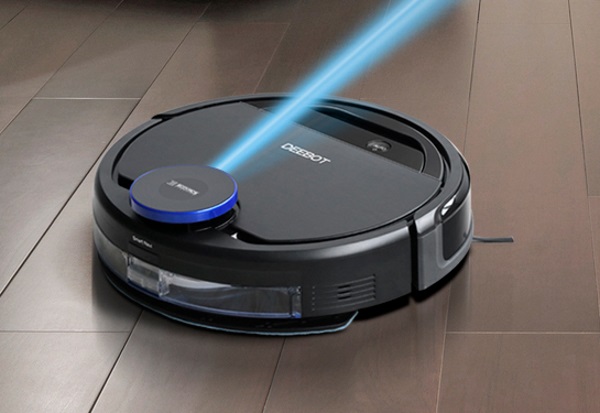
Ecovacs Robotics DEEBOT OZMO 930 Vacuum review


REVIEW – For those of you who read my previous review of a robot vacuum, you already know that the floors in my home are carpeted with Berber carpet with the exception of the kitchen and bathrooms which are tiled. With 2 young kids in my home who suffer from asthma and allergies, it is critical that we vacuum every day. The robot vacuum that I previously reviewed works well, but once I got a taste of this technology, I was eager to try the Deebot Ozmo 930 Robot Vacuum which from its specifications, seems like it will be able to do an even better job of removing dust from my carpet. Let’s see if its bark is worse than its bite or if it can live up to the hype.

What is it?

The Deebot Ozmo 930 Robot Vacuum is another efficient vacuum with built-in Artificial Intelligence. It is able to vacuum and mop and with the use of the relevant app it can be controlled to start, stop, schedule, customize, charge, spot clean, check accessory status, and control movement direction. It uses a laser to map the targeted cleaning area that is then saved in the app. It is able to automatically transition from wood floors to carpet, and if it runs low on power it returns to its dock to recharge then resumes where it left off. It communicates with the app via Wi-Fi and has a 3200mAh lithium battery for a long-lasting charge.

What’s in the box
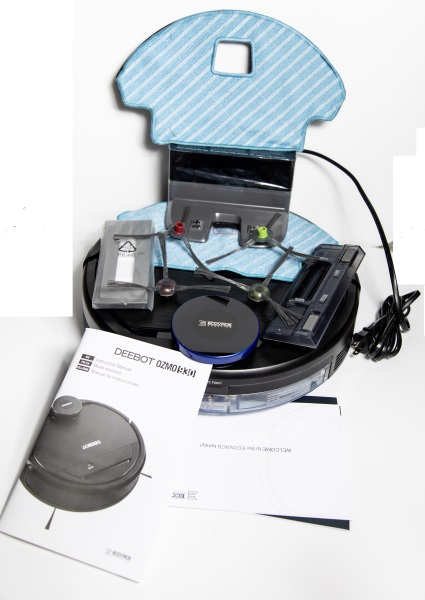

1 x Deebot Ozmo 930 Robot Vacuum
1 x Docking Station
4 x Side Brushes
1 x Main Brush Option
1 x Direct Suction Option
1 x Reservoir
2 x Reusable Microfiber Cleaning Cloths
1 x Cleaning Cloth Plate
1 x Sponge Filter
1 x High-Efficiency Filter
1 x Instruction Manual
1 x Warranty Leaflet

Design and features


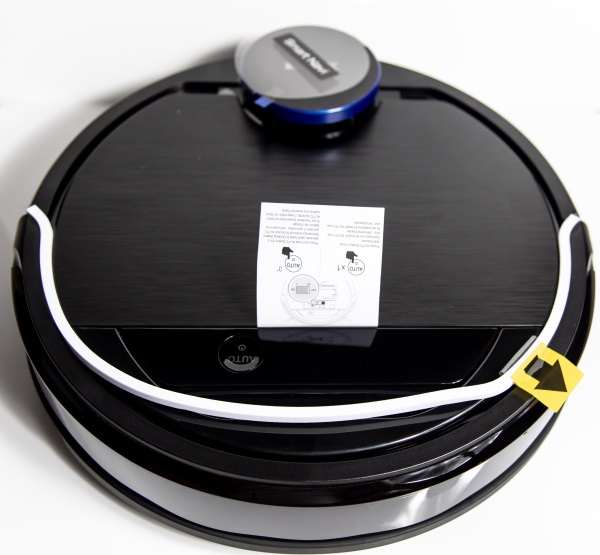
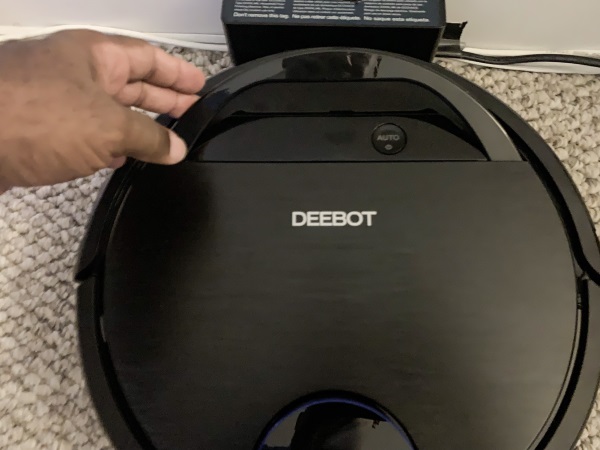
The vacuum arrives well protected with tape and foam inserts for additional protection. The laser mapping mechanism sits on top of the rest of the body of the vacuum. Opposite the laser sensor on the top of the vacuum, there is the control panel that includes the status indicator light, wifi indicator light, and the Auto mode button. Around the control panel, there is a carrying handle that makes it easy to pick up and move the Deebot. The illustration below the picture shows all of the parts to provide a better understanding of the device.
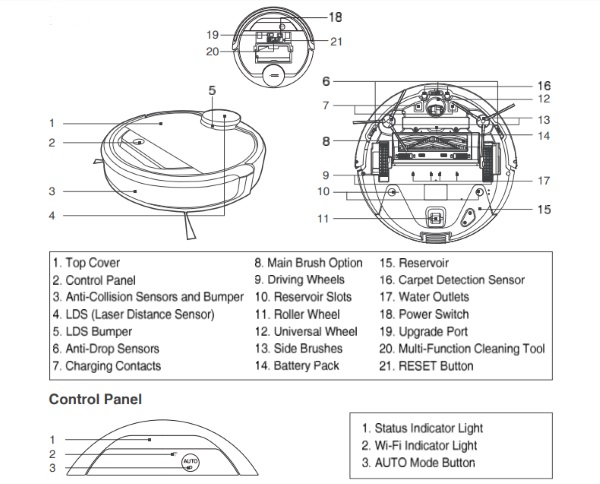
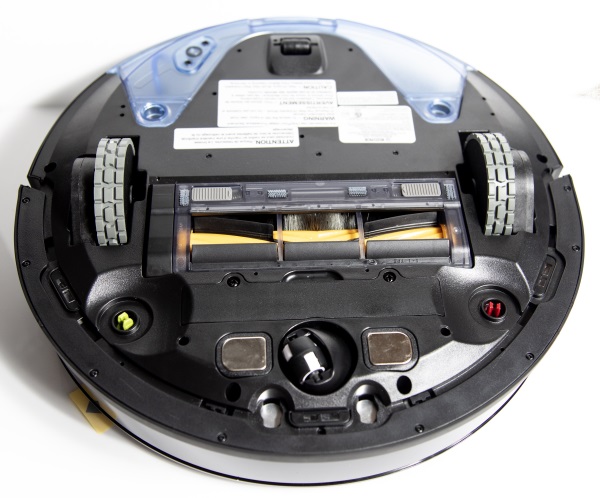
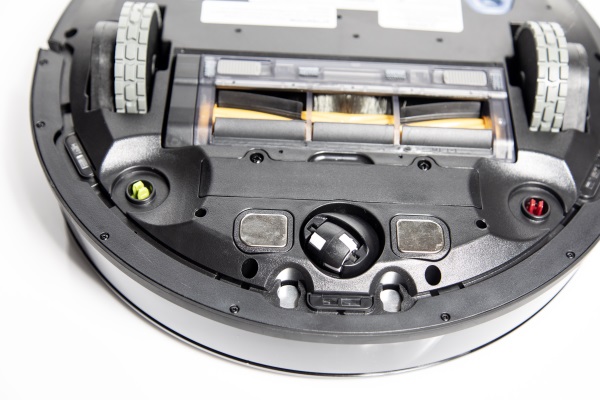
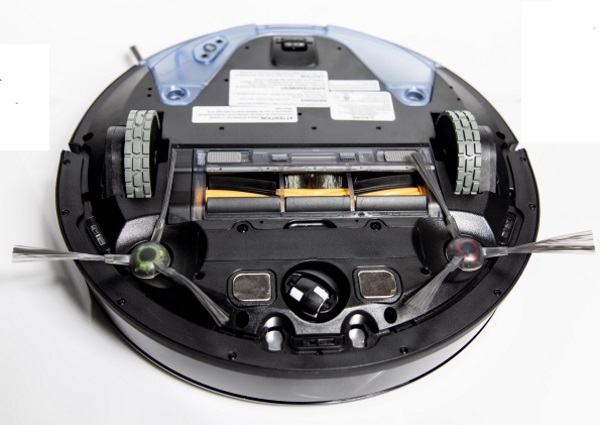
Underneath, there are 2 main wheels and a 3rd rotating wheel, the receptacle that allows you to insert the main brush option or the direct suction option, and the clips that hold the side brushes. At the bottom back of the vacuum, there is the water reservoir for the mopping function and that is also where the microfiber cleaning cloths attach.
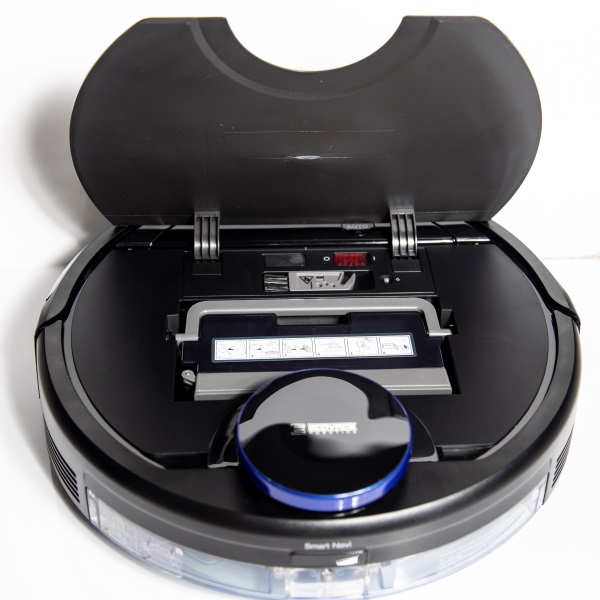
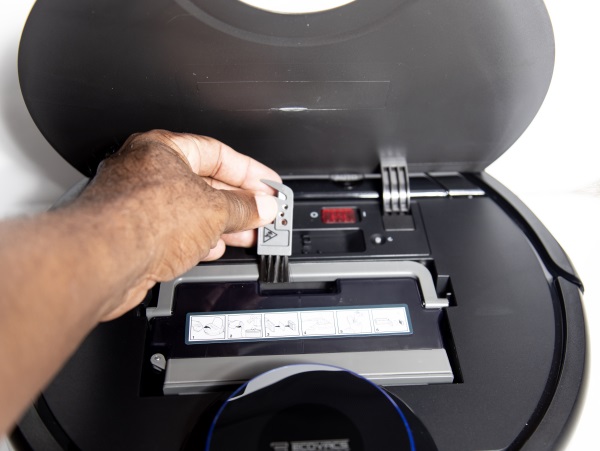
The top of the vacuum opens, revealing the dust canister and the power switch, the reset button and a cleaning brush.

Under the cover at the top right there is the on/off switch and the reset button.
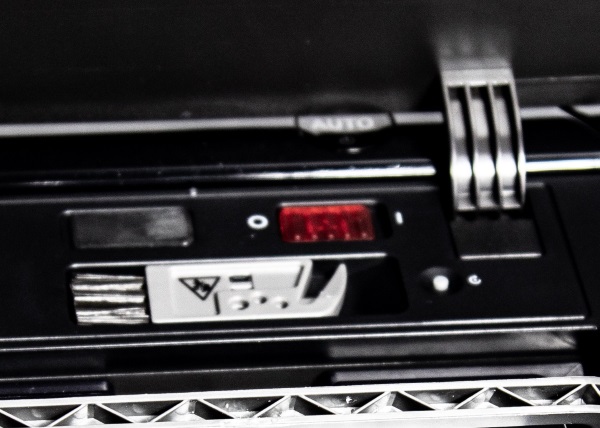

Below the on/off switch there is the multi-function cleaning tool/brush that is used to clean hair and other debris out of the side brushes, and the main suction brush, etc.

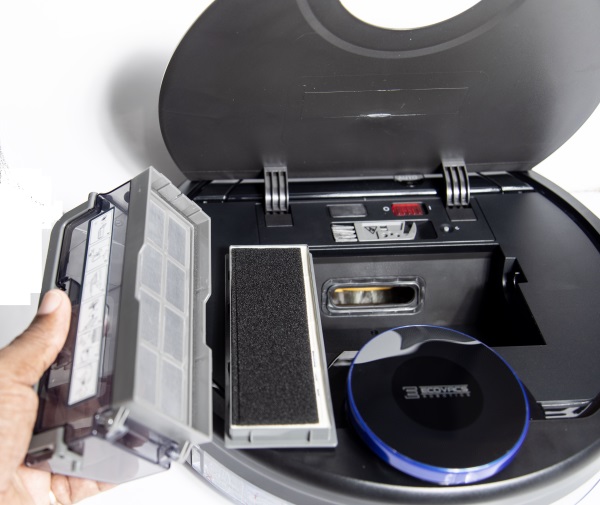
In the middle of the vacuum, there is the dust/debris canister. A handle is included for easy removal and replacement.
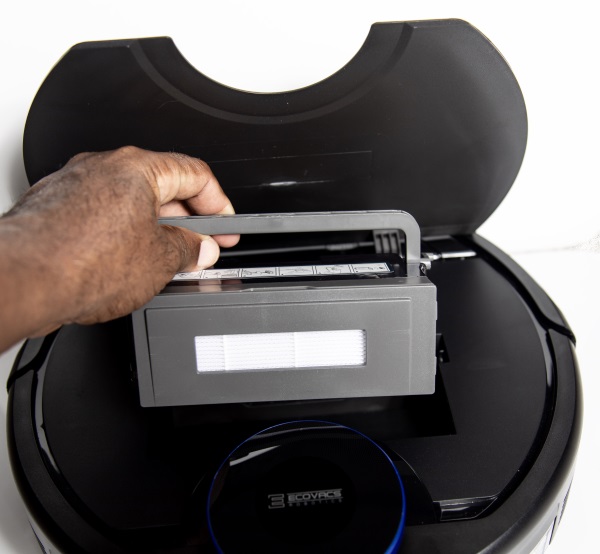
There is the filter on one side of the canister, and on one edge there is the latch to open the canister to empty the dust/debris.
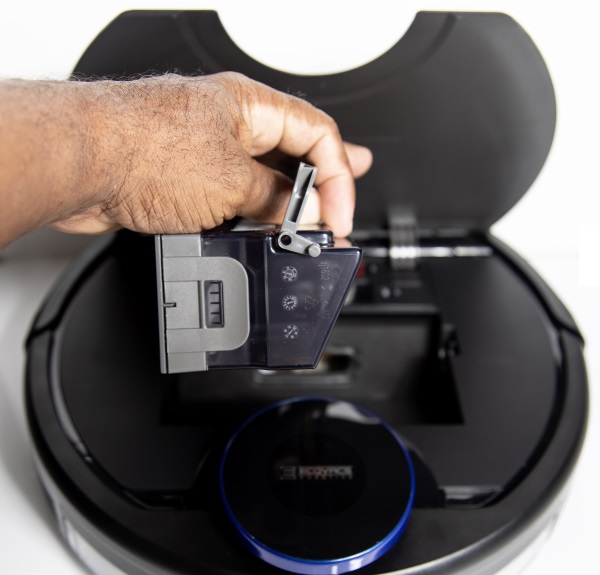
On the back side of the vacuum, there is a water reservoir that is used for mopping.
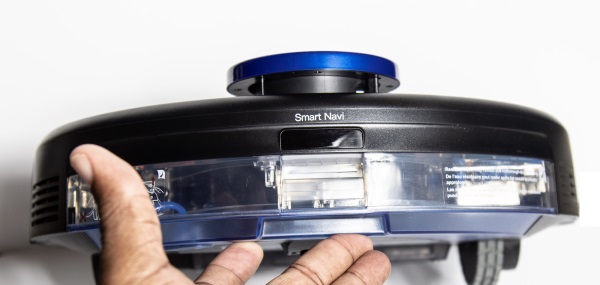
On either side of the water reservoir, there are vents.
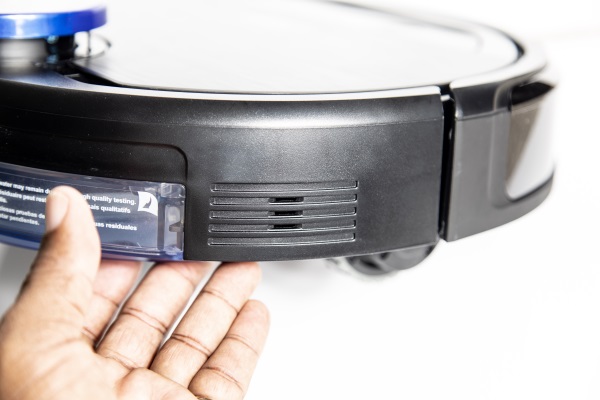
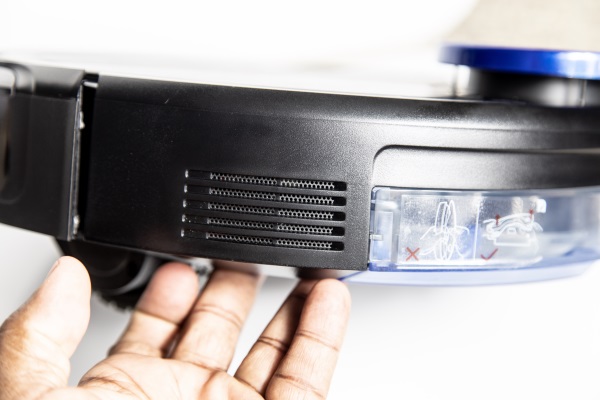
Underneath the vacuum near the front and on both sides there are the clips/slots to install the side cleaning brushes.
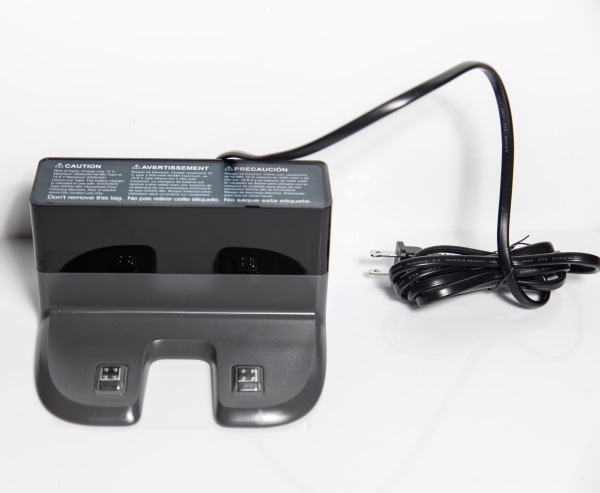
The picture below shows the docking station/charging station that is the “home” location for the vacuum.
Performance

This robot vacuum performs very well on the carpet in my home and has enough suction to pick up as much dust as my Dyson vacuum. When I compare it to another model robot vacuum that I previously tested, it vacuums the same space almost twice as fast and with better results which may have something to do with the 2 edge brushes as opposed to just one on the previous model. It also just moves faster and still operates at an acceptable noise level. Check it out:

The mopping feature also works well, but my OCD does not allow me to trust the task of mopping the kitchen floor that my two young kids may pick up something off of and put in their mouths, to the robot vacuum. However, it does work well just to perform light mopping duties between the regular manual thorough cleansing of the kitchen floor.

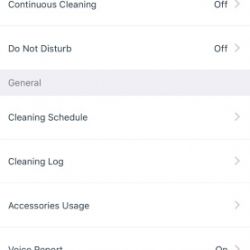
If you choose to control the vacuum via your mobile device, you can download the Ecovacs app and follow the instructions to connect to the vacuum. Connecting via the app is quite simple and straightforward. The following are screenshots of the app which works very well with the vacuum.


I use Alexa in my home for a lot of automation. Setting up the link between Alexa and the Deebot was really simple and there were no hiccups in the process. If you would like to see the instructions on how to connect this vacuum to Alexa, click here.
Like the other model, this vacuum communicates its status via audible voice communication.

What I like

  • Build quality
  • Control options via the app and Alexa
  • Speed of use

What can be improved

  • The price

Final thoughts

I really like this vacuum including its functionality and its ability to quickly and effectively vacuum my carpet. While the mopping feature works well, my primary use and need involve the several carpeted areas in my home. The fact that it works quickly means that it is very convenient even when I need to vacuum at the end of a long and tiring day. While it is quite expensive and more expensive than many of its counterparts, it also works much better than the model I previously tested that was half the price. Whether or not the price if prohibitive is a personal choice. However, for its build quality, effectiveness and efficiency, I give it two thumbs up!!

Price: $699.99
Where to buy: Walmart, Target, Lowe’s, Kohls, and Amazon
Source: The sample for this review was provided by Ecovacs

Filed in categories: Reviews

Tagged:

Ecovacs Robotics DEEBOT OZMO 930 Vacuum review originally appeared on The Gadgeteer on April 23, 2019 at 8:00 am.

Note: If you are subscribed to this feed through FeedBurner, please switch to our native feed URL http://the-gadgeteer.com/feed/ in order to ensure continuous delivery.

FOLOMOV Tactical Flashlight 18650S review

REVIEW – Lots of folks have an “every day carry” (EDC) kit – things that they take with every day so they are prepared for whatever the day may throw at them.  For many, a flashlight is one of those things that go in the kit. The Folomov 18650S is a new contender for an EDC flashlight.  Is it worth your consideration?  Read on!

What is it?

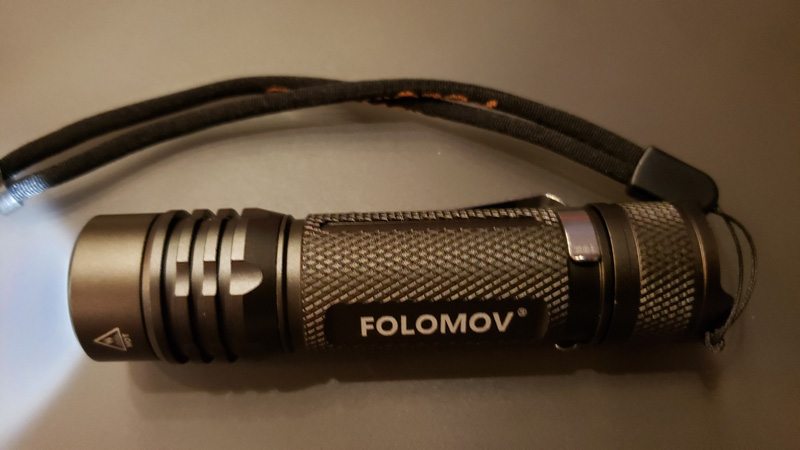
The Folomov 18650S is a compact flashlight with 15 operational modes.  It carries an IPX8 rating, so it should be impervious to everyday water risks.  With its belt clip and wrist strap, it offers a variety of carrying methods.

What’s in the box?

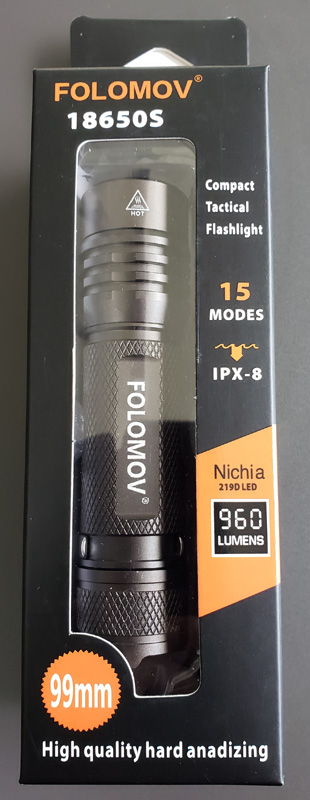
First, I’ll address what’s ON the box.  Right at the bottom, it touts “High quality hard anadizing [sic]”. I think they meant “anodizing” and their proofreader needs to find another daytime gig.

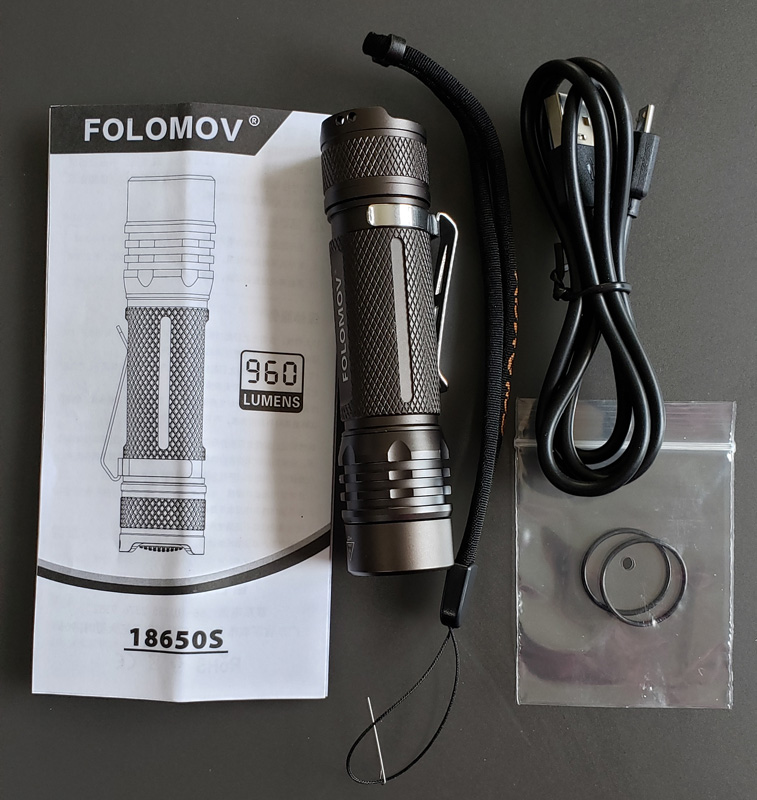
  • 18650S flashlight with battery installed and belt clip attached
  • Wrist strap with feed tool attached
  • Two spare o-rings
  • USB-A to micro USB charging cable
  • Instruction guide

Hardware specs

  • Item Weight: 3.5 ounces including battery
  • Product Dimensions: 3.9 x 0.9 x 0.9 inches
  • Finish: Military gray hard anodized with positive grip texture
  • LED: Nichia 219D
  • Waterproofing: IPX8 rating – full submersion more than one meter
  • Light output: 0.5lm (lumen) to 960lm
  • Control: single button on tail

Design and features

The flashlight is a well-made, lightweight unit. With light output from 0.5lm all the way up to 960lm, it offers the user a wide variety of lighting options.  A multi-function tail cap button provides access to multiple functions: illumination mode (6 brightness levels), tactical mode, SOS, strobe, beacon, countdown, and lockout.

Setup

There really isn’t any required setup, other than attaching the optional wrist strap. But, Folomov added a really nice touch.

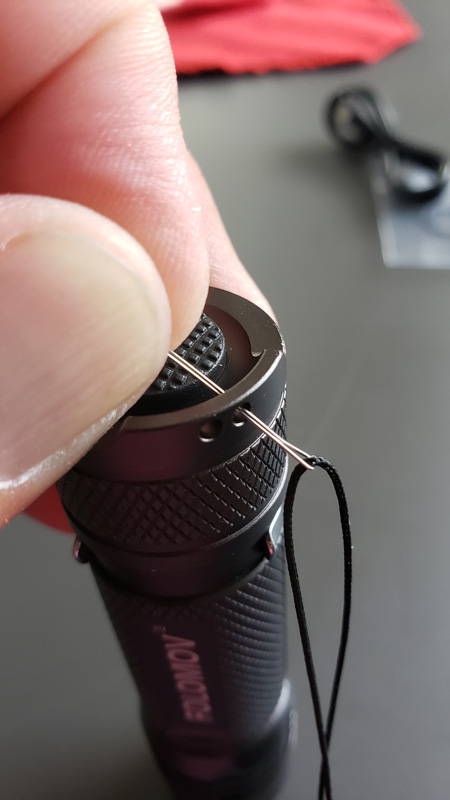
Attaching a wrist strap to most devices usually involves a lot of squinting, pinching, sometimes swearing, and frustration, trying to squeeze the strap into the incredibly small holes. Folomov solved that by attaching what essentially amounts to a very small cotter pin attached to the wrist strap.  This allowed me to easily thread the strap through the holes.  Very nice touch, Folomov!

So, after I attached the strap, I was all set up, or so I thought. I couldn’t get the flashlight to turn on.  I tried all the different button press combos that I will get into later, all to no avail.  I figured that the battery must have shipped dead, so I decided to charge it.  With an IPX8 rating, I guessed there would be a pretty beefy waterproof charge door.  I looked. And looked.  And looked.  I could not find a charge port anywhere.

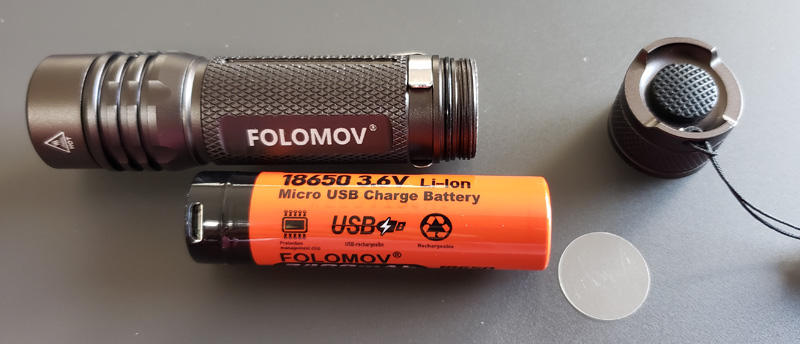
Finally, I unscrewed the button end of the flashlight.  It was then I learned the following two things.

First, the flashlight shipped with a clear plastic disc covering the bottom of the battery, preventing the flashlight from being turned on during shipping.  That explains why I couldn’t get it to work.  No word about that in the instructions.

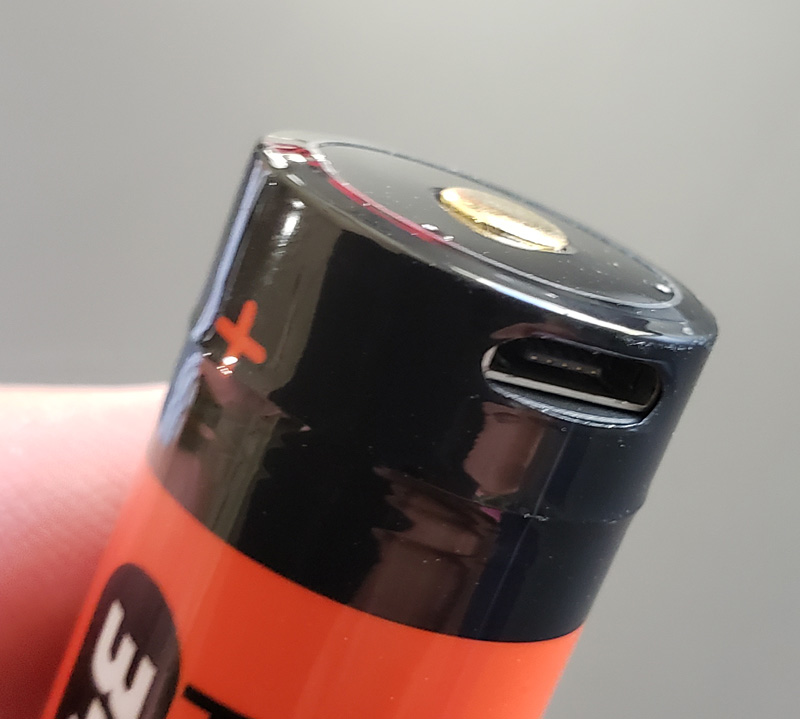
The second thing I learned was that the flashlight does not have a recharging port – the battery does.

I have never seen this before, but I guess it’s a thing. Since I had it all open, I elected to give the battery a full charge.

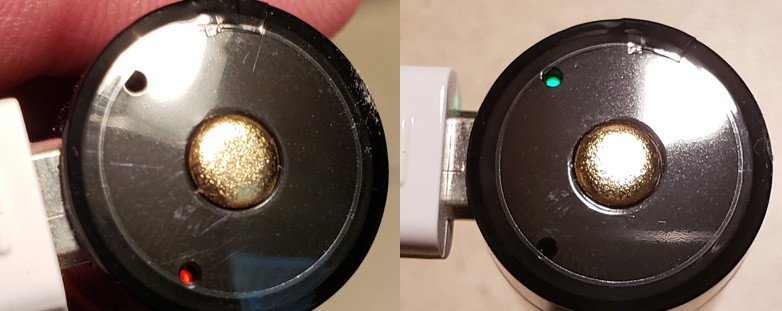
There are two LEDs on top of the battery itself.  The one to the right of the charge port glows red during charging.  Then, one to the left of the charge port glows green once the charge is complete.  Again, nothing in the instructions about any of this.

Performance

I took the flashlight out back at night to demonstrate the different lighting modes.

All photos were taken at f1.5, 0.3-second exposure, 400 ISO, to keep the photos consistent and show the relative difference in lighting. I took two photos at each lighting level, shining the light about 15 feet in front of me, and then at a magnolia tree about 40 feet away. For each mode, I will list the light output and the expected runtime with a full battery charge.

Lighting modes

The lowest mode is Moonlight mode. To access it, hold the button about 0.5 seconds.  The same to turn it off.

When in lighting mode, quick-pressing and releasing the button turns the light on to the last-used mode.  Repeated presses cycle up and down through the modes, lowest, low, medium, high and turbo. A 0.5-second press turns the light off again.

Moonlight mode (it didn’t light the tree enough to even show that photo)

  • 0.5lm
  • 350 hours

The light was visible at about 15 feet, but just a faint circle. Moonlight mode is essentially a night light.

Lowest mode

  • 10lm
  • 150 hours

The circle was clearly visible, and I could just make out the trunk of the tree.

Low mode

  • 50lm
  • 22 hours

This mode produced a bright circle and illuminated the area around it.  Shining at the tree illuminated branches.

Medium mode

  • 160lm
  • 10 hours

This mode provided good lighting in front of me, and could clearly illuminate the tree and its leaves.

High mode

  • 320lm
  • 4.5 hours

High mode illuminated the entire back yard and clearly lit the tree.

Turbo mode

  • 960lm
  • 4 hours

Turbo mode lit the back yard to a crazy bright level. When I shined it at the tree, it lit up the tree and the back yard.

One note – the LED end of the light has this symbol on it:

And it does get pretty warm.  I left the light on turbo mode for about ten minutes, and while it was pretty toasty, it didn’t feel dangerously hot, and the body of the light did a good job dissipating the heat.

Other modes

With the light off, a double-click of the button turns on strobe mode. The strobe flashes at the full 960lm brightness and is quite blinding.  This is a tactical mode and can be used to confuse an attacker.  When the strobe is flashing, a double-click flips to SOS mode, where the light pulses to produce an appropriate SOS emergency flash repeatedly.  Another double-click flips to beacon mode, where a 50lm light pulses every five seconds or so as an emergency locator.

Speaking of tactical…quick-clicking seven times toggles from lighting mode to tactical mode.  When you do that, the light flashes to confirm the change. When in tactical mode, the button can be held to for instant and temporary access to turbo mode.  When you release the button, it turns off.  A double-click turns on strobe mode. A long-press turns it back off again.  Seven more clicks flip back to lighting mode, again confirmed with a flash.

The light also supports a countdown timer. With the light on, three quick clicks enables a three-minute timer. The light flashes once to confirm. Once set, the light will turn off automatically at the end of the countdown. Once the timer is set, three more clicks add another three minutes.  You can do this for up to a 30-minute timer before the light automatically turns off.

Finally, with the light off, three quick clicks enables lockout mode, making it so the light cannot be turned on.  Three more quick clicks disables lockout mode, making the light usable again.

What I like

  • Well made and nicely finished
  • Excellent variety of lighting modes
  • Terrific light output for the size
  • Its design includes flat side area, preventing it from rolling away
  • Including the strap-threading tool is a really nice touch

What needs to be improved

  • The English instructions really need to be rewritten as they are a grammatic nightmare, and in some cases, just plain wrong or missing
  • Accessing the wide variety of modes through a single switch, via 1, 2, 3, or 7 clicks is a bit confusing

Final thoughts

In another nod to the proofreader needing to be let go, all the runtimes listed in the instructions showed “M”, not “H”, so if you believe the instructions, it will only run for four MINUTES on turbo. But in my testing, that is more of a typo than anything. The runtime specs on the box itself are correct, even though they differ from the same chart of runtimes in the instructions.

But, I can forgive typos and grammar if the product is good, and this product is good.  The wide variety of lighting levels make this a very flexible flashlight.  The tactical modes make it a good tool for personal protection or emergency use.  It’s light enough to carry every day but sturdy enough to stand up to rugged use.

With up to 960 lumens of blinding light, it’s a good deal at its price point.

Price: $27.65
Where to buy: Amazon
Source: The sample of this product was provided by Folomov.

Filed in categories: Reviews

Tagged:

FOLOMOV Tactical Flashlight 18650S review originally appeared on The Gadgeteer on April 22, 2019 at 10:00 am.

Note: If you are subscribed to this feed through FeedBurner, please switch to our native feed URL http://the-gadgeteer.com/feed/ in order to ensure continuous delivery.

Lefant T700 Robotic Vacuum Cleaner review

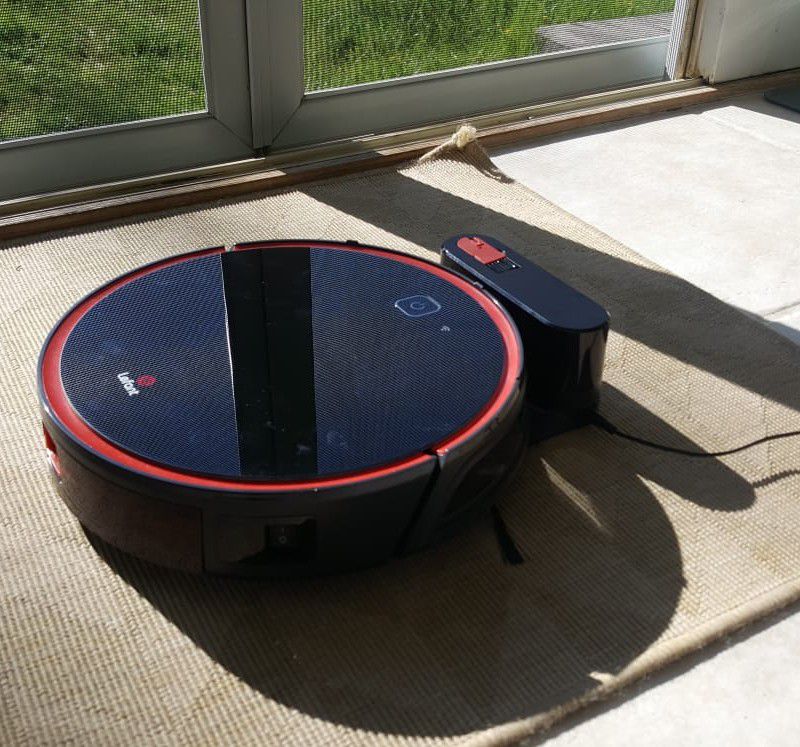
REVIEW – The Lefant Robotic Vacuum Cleaner (T700 1800Pa) lives up to its claim as a super quiet cleaning system, with good suction and sensors.

What is it?

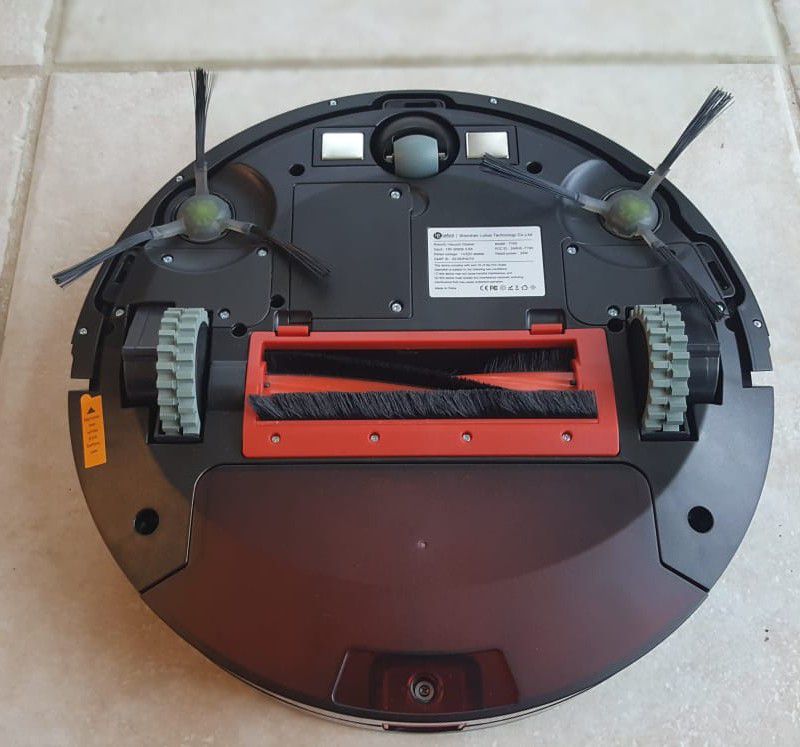
The Lefant T700 is a robotic vacuum and mop system.

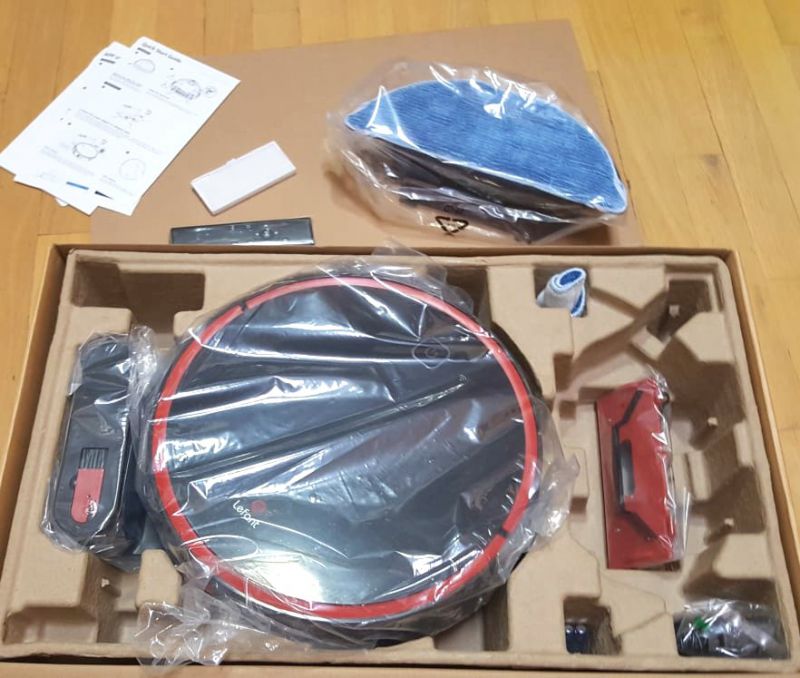
What’s in the box?

  • Vacuum
  • Charger with homing port and cleaning brush
  • 2 mop pads
  • Extra filter
  • 2 extra brushes
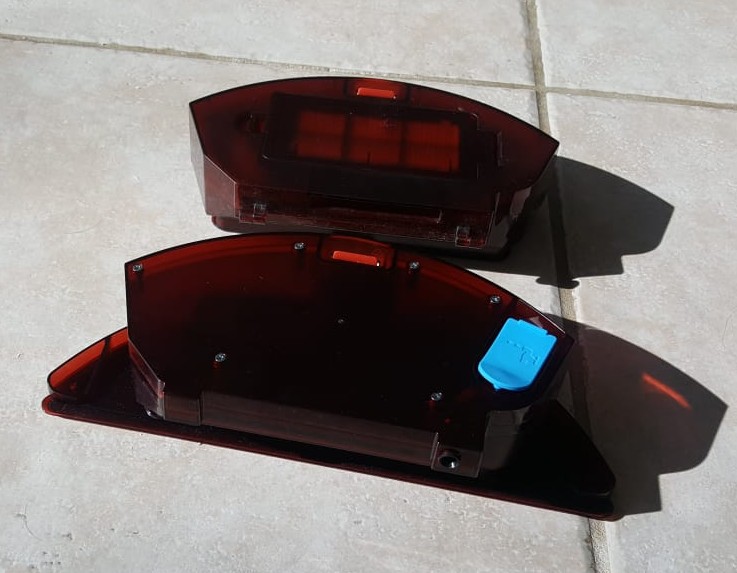
  • Removable dust bin
  • Removable mop pan
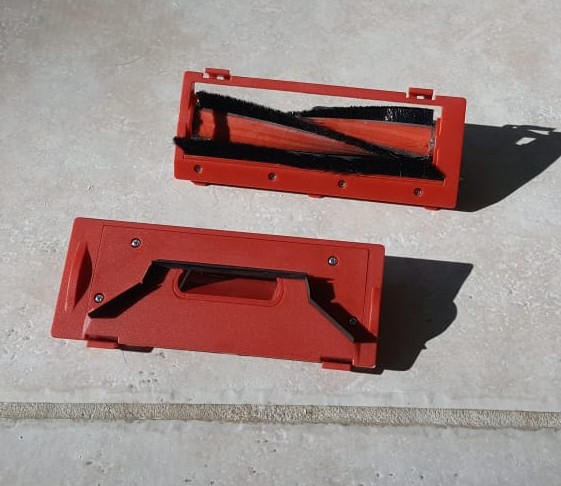
  • Interchangeable suction/roll-style vacuum
  • Quick-start and troubleshooting guide
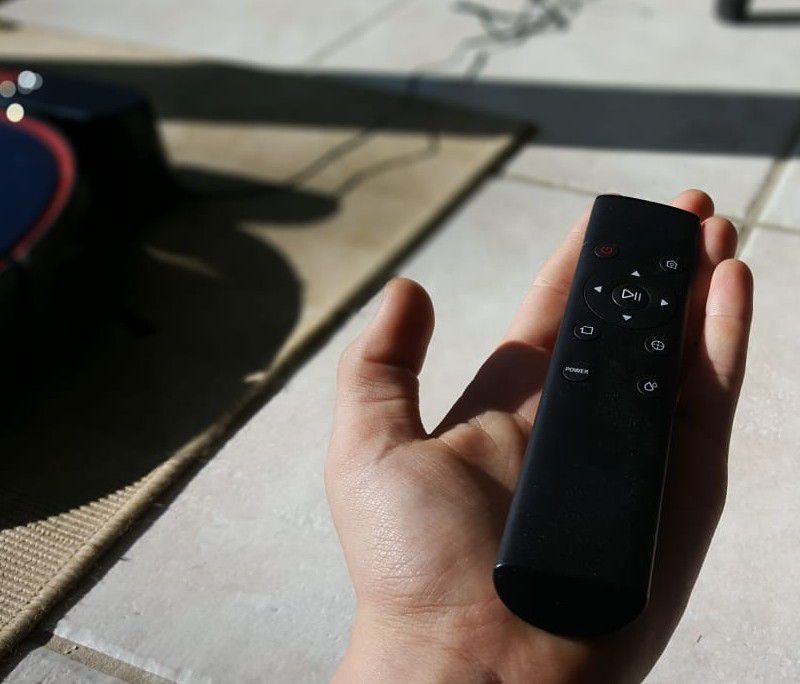
  • Remote control

Hardware specs

  • Product Dimensions: 12.6 x 12.6 x 3.2 inches
  • Item Weight: 6.17 pounds
  • Shipping Weight: 11.02 pounds
  • Batteries: 1 Lithium Polymer batteries required (included)

Design and features

Setup

Setup was very easy. The dust bin or mop tray pop right into place. You just need to charge it completely before the first use.

Similarly, it was quick and easy to pop open the dustbin to empty it. Or to change it to the roller-style vacuum attachment, which we only used for vacuuming carpet, and the suction-style attachment, which we used for tile and hardwood vacuuming, as well as mopping.

Performance

I despise vacuuming, and mopping is a close second. Our house is a tri-level, with a sunken sunroom, making for a fourth level. For me, traditional vacuuming involves moving a heavy canister model up and down lots of steps.

Since I was in a car accident 10 years, I suffer from back pain that’s often triggered by lugging the vacuum around and the vacuuming motion itself. I’ve been in the market for one of these for ages but always hesitant because of our multi-level home. Then again, we have white carpet and tile (not my choice) with two boys and a black dog. It was time to get a handle on my gross floors!

With the Lefant, I just carry it from floor to floor. At only 6 pounds, that’s really not a problem. Moving it wasn’t the hassle I anticipated.

We let it run until it ran out of batteries, which took nearly 2 hours on vacuum mode! Impressive.

For actual cleaning, my opinion gradually changed on this. At first, I was disappointed. However, in all fairness, my baseline was pretty low. Boys. Dog. A hate for vacuuming. Plus, knowing this was in the mail, I was admittedly slacking on housework, not that my house was a beacon of tidiness to begin with. I think if I would have done a big baseline clean first, with an old-school vac and mop, I would have been happier with the initial performance.

It took a few sessions to get my floors where I wanted them. And, of course, in this household, it’s a constantly moving target.

Now I’ve now set up a rotating schedule, where the Lefant hits at least one level of my house each day (with one round to vacuum and one round to mop in the kitchen and bathrooms). And I gotta admit, after seven days my floors are cleaner than ever. In fact, by comparison, my counters and windows are somehow looking dirtier!

Our house has a lot of weird ledges, and we were all set to create barricades. However, the sensors thoroughly impressed us, and worked almost every time! Now I just set up barricades between the carpet and hardwood, so that I don’t accidentally get my carpet mopped.

Note: Cardboard boxes might not be your best bet for barricades. I watched the Lefant bust right through one! It was the one and only time the sensor didn’t seem to work. Hand weights and cases of Gatorade worked a whole lot better as borders.

It did get caught in a few little spots: the carpeted top of our steps, the track of the sliding glass door, and under the lazy susan in our kitchen. So I’ve started blocking those off, so she doesn’t get stuck in an endless loop and burn out her batteries under the lazy susan.

She’s also extremely quiet. (Notice the female pronouns? We named her “Rosie.”) One morning, my son was finishing some homework over breakfast. He asked me to “turn it off” and I thought he meant the vacuum. He laughed and said, “No! The TV.” It’s true, you can barely hear the vacuum. Really, how often can you watch TV or talk on the phone and not even notice a vacuum running? Well, with the Lefant you can!

Programs

There are three choices for programs: spiral from the middle, start at the edges and work your way in, or press the power button for a basic back-and-forth pattern.

We didn’t have much use for the spiral or edge patterns. In fact, in our small square sunroom, we tried the spiral pattern and it basically cleaned a spot in the middle of the room and then decided it was done. The edge pattern left too much dog hair and dirt to be effective. But simply pressing the start button and letting it do its own thing, just a simple back and forth, worked by far the best.

App

We downloaded the app, which says it’s compatible with IOS and Android 4.0 or above. My son is the phone person in our family, and with his Android 7.0, he had trouble getting it to work. Even after deleting and redownloading it a few times, he kept getting the message: Sorry the program is abnormal and will be withdrawn. We’ll post an update if we get the app working.

What I like

  • Extremely quiet
  • Great sensors
  • Long battery life

What needs to be improved

  • App doesn’t work
  • More effective program mapping

Final thoughts

The Lefant Robotic Vacuum Cleaner (T700 1800Pa) may take a few sessions to clean the messiest of floors, but it’s very quiet and easy to use, has a long battery life and accurate sensors.

Price: $299.99
Where to buy: Amazon
Source: The sample of this product was provided by Lefant.

Filed in categories: Reviews

Tagged: , ,

Lefant T700 Robotic Vacuum Cleaner review originally appeared on The Gadgeteer on April 22, 2019 at 9:00 am.

Note: If you are subscribed to this feed through FeedBurner, please switch to our native feed URL http://the-gadgeteer.com/feed/ in order to ensure continuous delivery.

Origem HS-3 HDR Bluetooth Smart earphones review

REVIEW – The world of Bluetooth headphones/headsets/earphones is wide and varied, and grows every day.  Every shape and size conceivable is out there, to fit every lifestyle and circumstance.  I myself own just about every kind you can imagine… wireless earbuds, wired earbuds, over the ears, in the ears, around the back of the head, waterproof, not waterproof, and on and on.  Just about every pair I have ever owned has something that I like and something that I don’t like.  Enter the $99 Origem HS-3 HDR Bluetooth Smart earphones, fresh off a Kickstarter campaign.  It has some nice features that are worth considering, and 1 feature that is a game changer.  Let’s find out what it is!

What is it?

Bluetooth earphones that provide an over-the-ear fit, 6 hours of playtime, IPX5 waterproof ability, and built-in voice control.

What’s in the box?

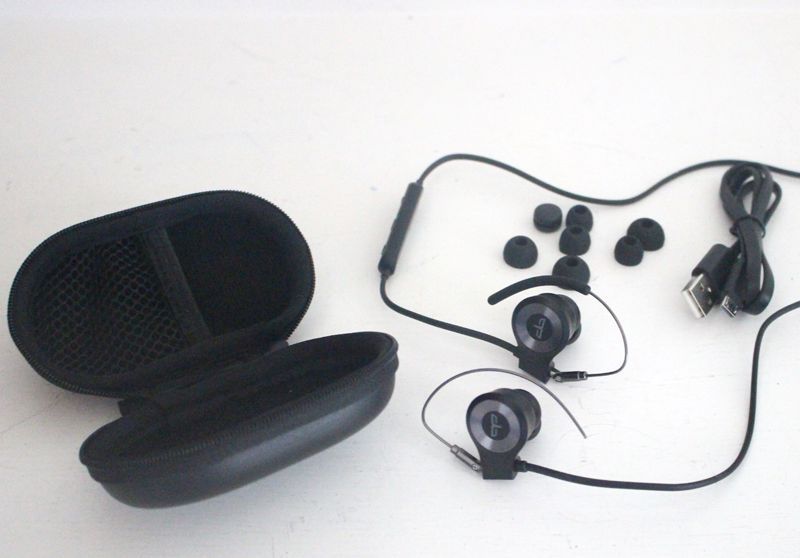
  • A padded zipper case to hold everything.
  • A Micro-USB cable for charging
  • Extra sets of earbuds to fit any size ear
  • The Origem HS-3 HDR Bluetooth earphones

Here are the specs from the manufacturer:

  • They are rated “IPX5 waterproof”, for intense exercise and bad weather, but can’t be submerged in water.
  • They have built-in fast charging and can be charged in 30 minutes to provide 6 hours of listening time.
  • They come with multiple sized earbuds to fit most ears.
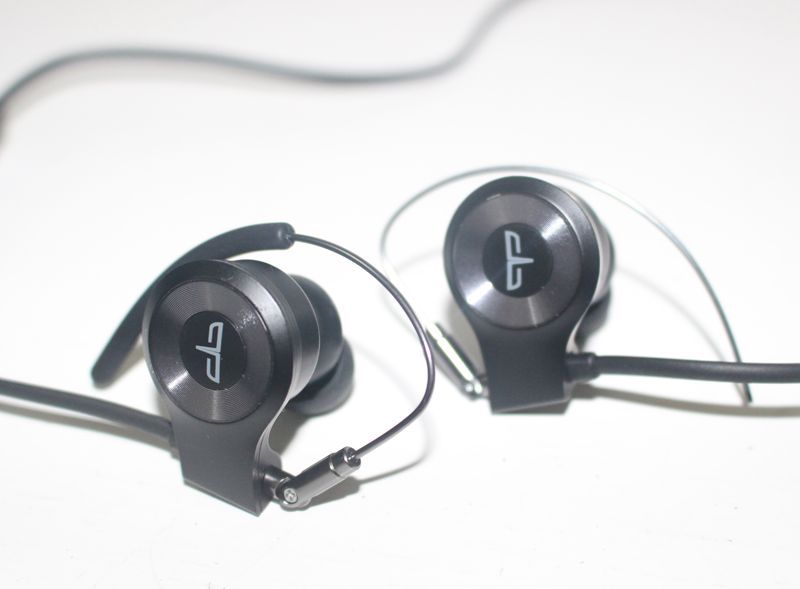
  • Each ear piece has hinged earhooks to provide a secure fit.
  • It comes with Bluetooth 5.0
  • HDR (high dynamic range) algorithm detects the sound pressure of the listening environment and volume of the sound to dynamically adjust loudness for all different frequency levels.
  • Built-in voice recognition provides no-hands control of the music and voice calls.
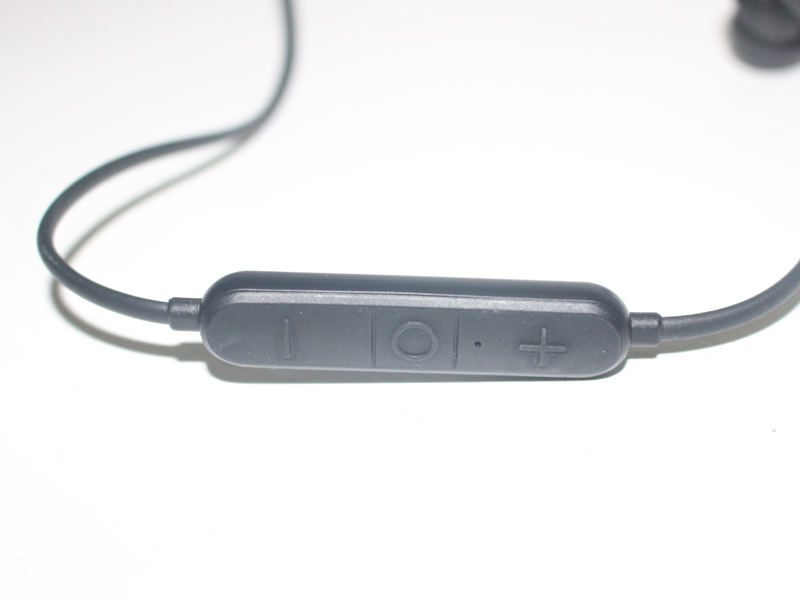
  • In-line controls provide physical touch controls.

Design and features

As mentioned in the specs above, there are some features that you might come to expect from a $99 headset.  IPX5 will allow you to have a heavy workout, in the rain, and keep on ticking.  6 hours of playtime, coupled with a 30 minute charge time, will keep you happy almost all day.  Multiple sized earbuds will mean every sized ear should be happy.  And an in-line physical button control is what most Bluetooth earphones have these days.

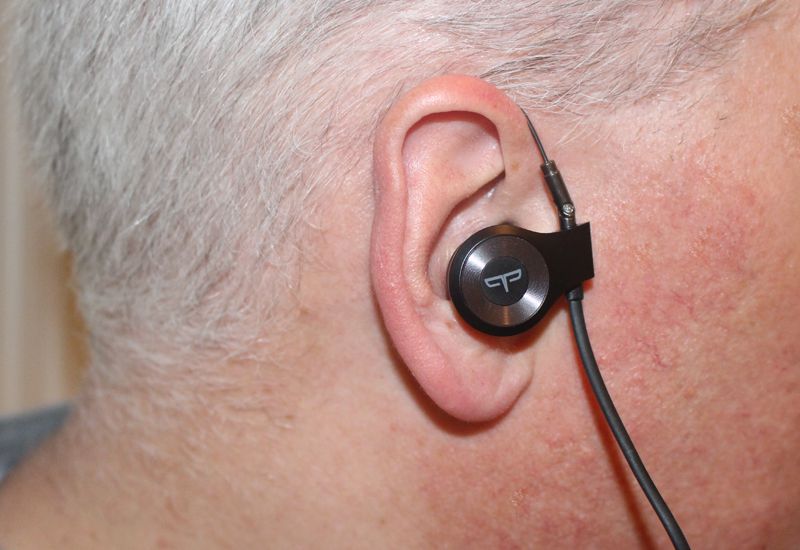
But now for the big differences.  The design of a hinged hook that goes over the top of your ear and rests snuggly behind it means that these earphones will never fall out, no matter what you are doing.  I have always hated those earbuds that you have to basically suction into your ears to keep them from falling out.  They always fall out.  But the Origem HS-3s will not.  No amount of running, rolling, jumping, shaking, etc, is going to dislodge these.  And honestly, after a short time you forget you have them on.  As you can see by the pictures, the wire that goes behind your ear has a cushioned covering on it to make for an even more comfortable fit.  Unfortunately, one of my earphones lost that cushioned covering at some point, and I never noticed it.  I still have no idea what happened because they are either on my ears or in the zippered case.  But anyway, even without the cushioned covering for my left earphone, I still think they are comfortable.

The second feature worth mentioning is the HDR sound.  I have come to expect crappy/so-so sound from most earphones/earbuds.  But I do think that the HDR feature actually works.  The sound I get through these earphones is very full.  I can hear very good highs and mid-tones.  You won’t get a very deep, rich, bass sound, but it isn’t bad at all.  I would call the sound just ‘very full’.  I can say that apart from my collection of more expensive headphones that have big cushions that completely cover my ears, these are the best earphones that I own, hands down.

Finally, the feature that is a game changer, in my opinion, is the built-in voice control, which is a feature I don’t have on any other headset/earphones that I own.  When a phone call is coming in you can simply say “Answer call” or “Reject call” and your phone responds accordingly.  When music is playing you can simply say “Play music” or “Pause Music” or “Next song” or “Previous song”, without ever touching the in-line physical controls.  You can even say “Hello VoiceQ” and your phone’s assistant (Google or Siri) will come to attention and provide you all the voice control features that those services provide.  And it works flawlessly every time I use it.

Now, before you object and say “But Steve, my Plantronics headset can do that!”, let me tell you more.  I used to own that Plantronics headset and used it daily before it died.  And yes, I could use hands-free voice controls through it as well, and answer and reject calls as well.  But here is the difference.  My Android phone’s screen has to be on before my phone will respond to direct voice commands to do something.  You know… “Hey Google”.  With the Origem HS-3 my phone can be sitting there with the screen completely off and I can tell the Origem “Hello VoiceQ” and it will awaken my phone so that it is ready to accept whatever voice command I give it. And it is over Bluetooth, which means I don’t have to be sitting right beside my phone to do it either.  I can be across the room.  I am telling you, this is a feature that other headsets are going to want to incorporate into their products because it makes life easier.  I have used it to initiate phone calls, start my music, set calendar items, ask for a ballgame score, ask about the weather, and many more things.

What I like

  • Great comfortable, stay-put, fit
  • Great overall sound quality
  • Amazing voice controls
  • Great price for the value you get

What needs to be improved

  • The zippered pouch is a little too cramped
  • The cushion on the wire that goes behind the ear needs to be more securely fashioned.  It can slide off too easily.

Final thoughts

The price of $99 for these earphones is well worth the price.  My dislikes are petty as well.  I wish the zipper cushioned case was slightly bigger because putting the HS-3s into the case is a bit cramped, and it takes a hot minute to unscramble the wires when you take them out.  I also wish the cushioned covering on the wire behind the ear was a bit tighter, which could have prevented me from letting one of them slip off undetected.  But those are minor squabbles.  I highly recommend these for the person who wants great sounding, great fitting, and highly useful earphones.

Price: $99.00
Where to buy: Origem.com or Amazon.
Source: The sample of this product was provided by Origem.

Filed in categories: Reviews

Tagged:

Origem HS-3 HDR Bluetooth Smart earphones review originally appeared on The Gadgeteer on April 21, 2019 at 2:30 pm.

Note: If you are subscribed to this feed through FeedBurner, please switch to our native feed URL http://the-gadgeteer.com/feed/ in order to ensure continuous delivery.

KLIP: Titanium Pocket Knife + EDC Suspension Hook review

REVIEW – I have a soft spot for gadgets that are multi-functional.  Any gadget that can perform multiple tasks helps me cut down on the number of EDC items I need to carry.  That’s what piqued my interest about the Dapper Design KLIP.  Let’s have a look!
What is it?

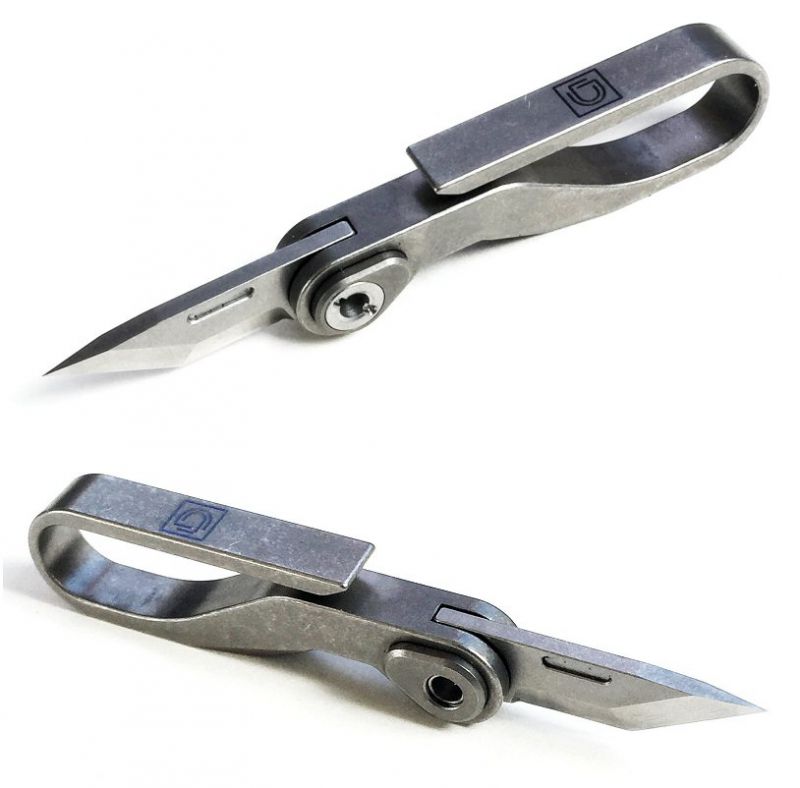
Made from lightweight Titanium, KLIP is a combination knife + pocket clip that is designed to suspend your keys or other items from your pocket while also giving you quick access to a small knife.  In fact, its very name, “KLIP,” is derived from a combination of the words “knife” and “clip.”

What’s in the box?

The KLIP comes in some very classy-looking packaging: a tin with top and bottom halves, and a clear window in the top half that allows the actual product to be seen, at least partially. I always appreciate when companies provide packing like this that.
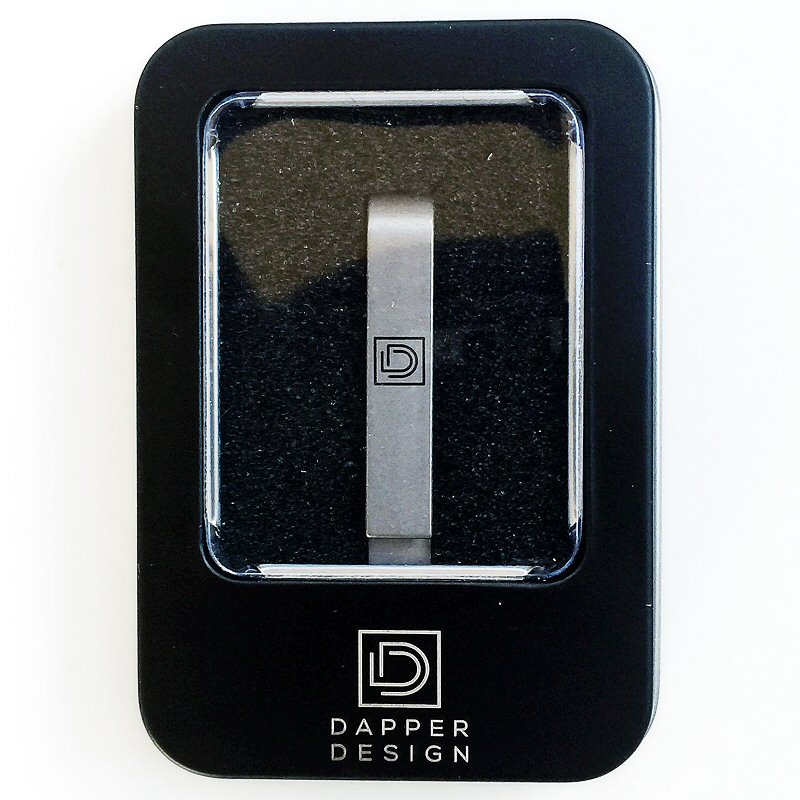
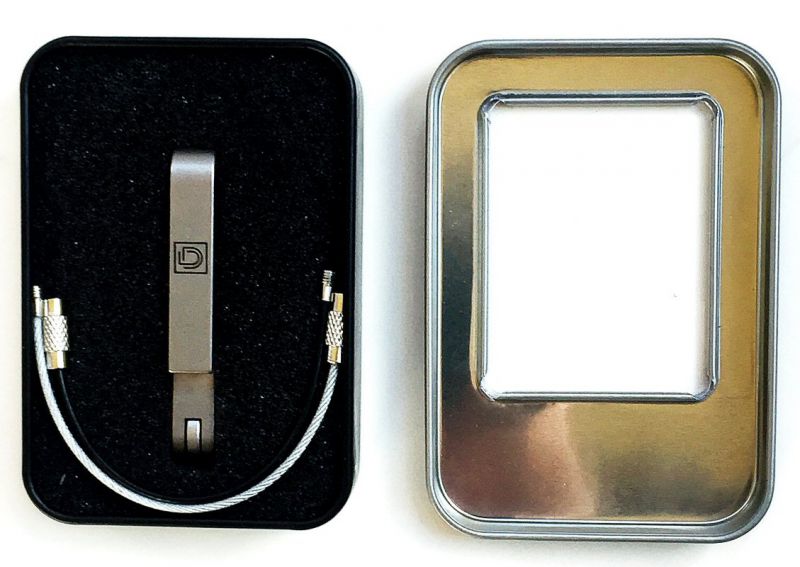

Inside the package itself are the following items:

  • KLIP
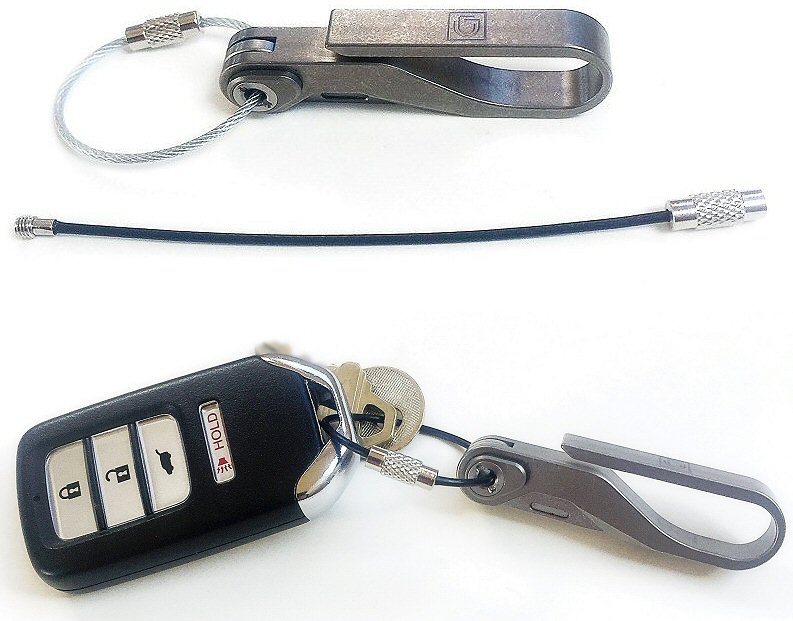
  • Silver twist-lock flexible steel cable ring
  • Black coated twist-lock flexible steel cable ring

Hardware specs

  • Main body: Stonewashed Grade 5 titanium
  • Blade: 440C steel blade
  • Smooth spring-loaded detent ball mechanism (provides satisfying “click” on blade open/close)
  • Adjustable pivot screw
  • Opened length: 85mm / 3.34″
  • Closed length: 60mm / 2.36″
  • Blade length: 27mm / 1.06″
  • Height: 16.25mm / 0.63″
  • Thickness: 8.15mm / 0.32″
  • Weight: 16 grams / 0.56 ounces

Design and features

I love combo items—items that can serve multiple functions.  The KLIP can be your key holder and you can hang them down into your pocket, or from your belt, or even from backpack webbing.  Plus, there’s a little knife hidden in there, in case you need to open a box, etc.  The KLIP is machined from durable, lightweight, stonewashed Grade 5 Titanium and it sports a super-sharp 440C steel blade which locks into position with a “click.”  Its deployment mechanism also features a ball detent and adjustable pivot screw.  KLIP has a lot packed into a small, functional package.

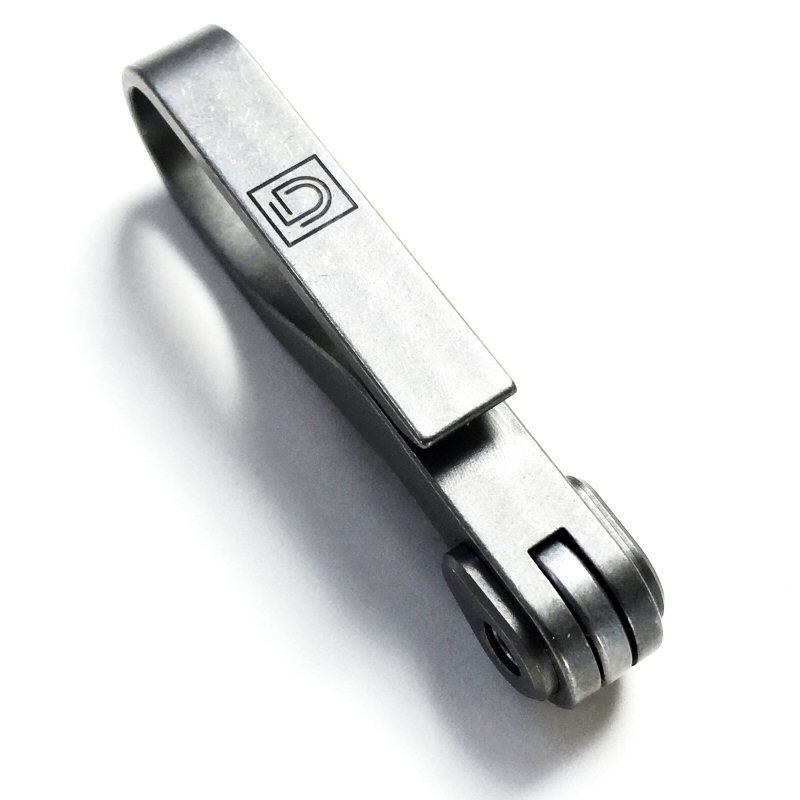
My initial impression of KLIP was that it was small, lightweight, and unobtrusive-looking.  In essence, it’s a relatively minimalistic-looking metal hook with a mechanism at the end.  Its body is made from “Grade 5” Titanium, so it is in fact very lightweight and very durable and should last a long time.  I also think the surface treatment, a light “stonewash” that results in a matte, slightly irregular appearance, is quite attractive.

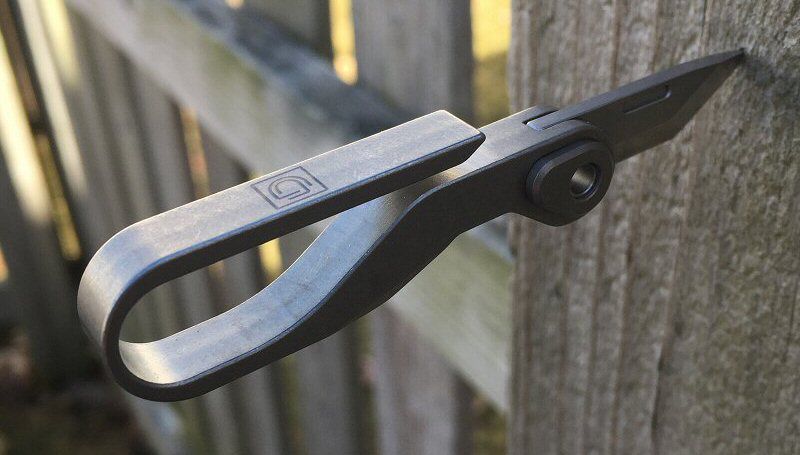
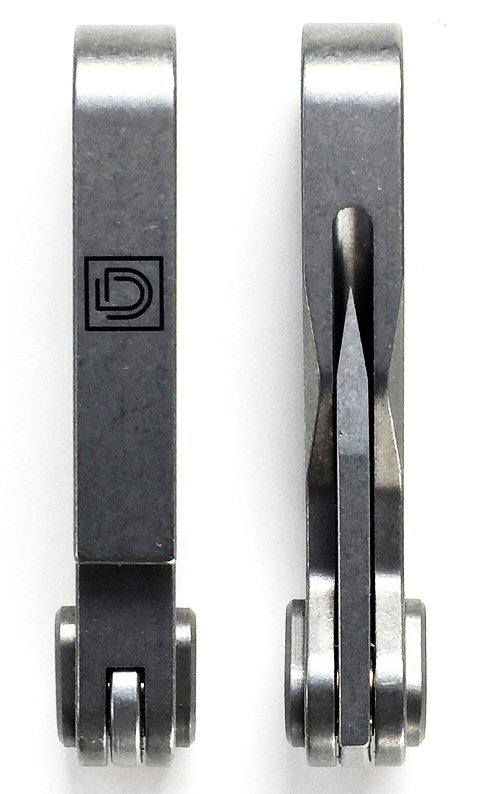
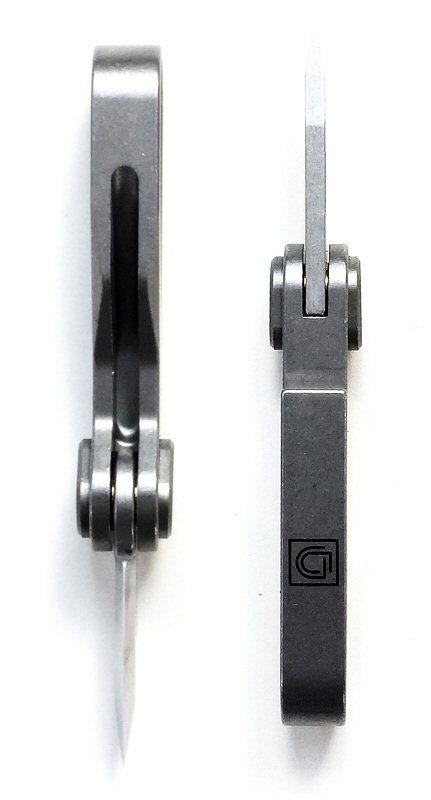
KLIP has a slim profile, as seen in the above pics, which helps it stay small and easily carried.

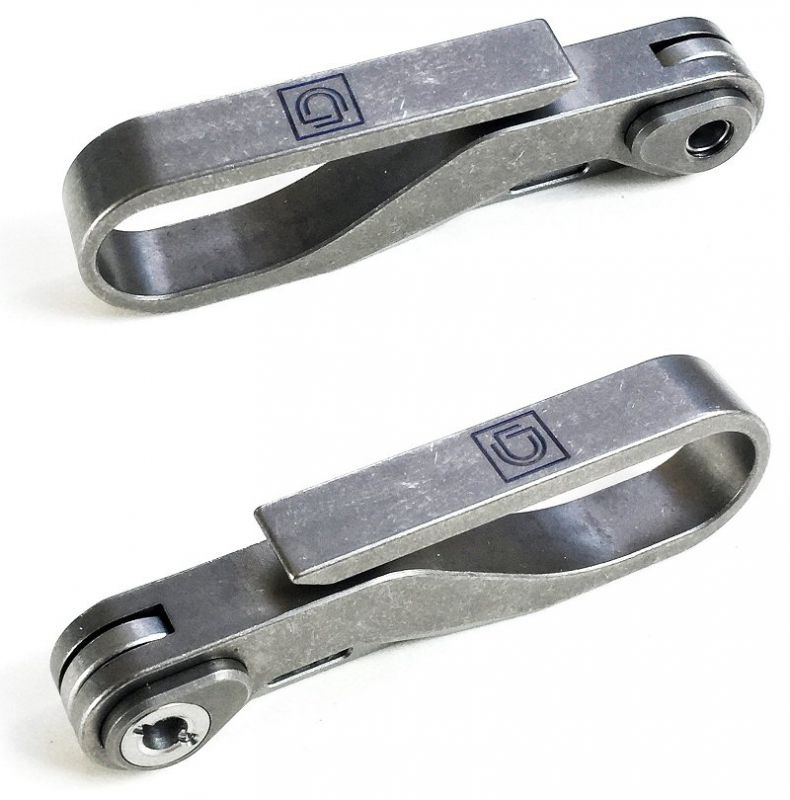
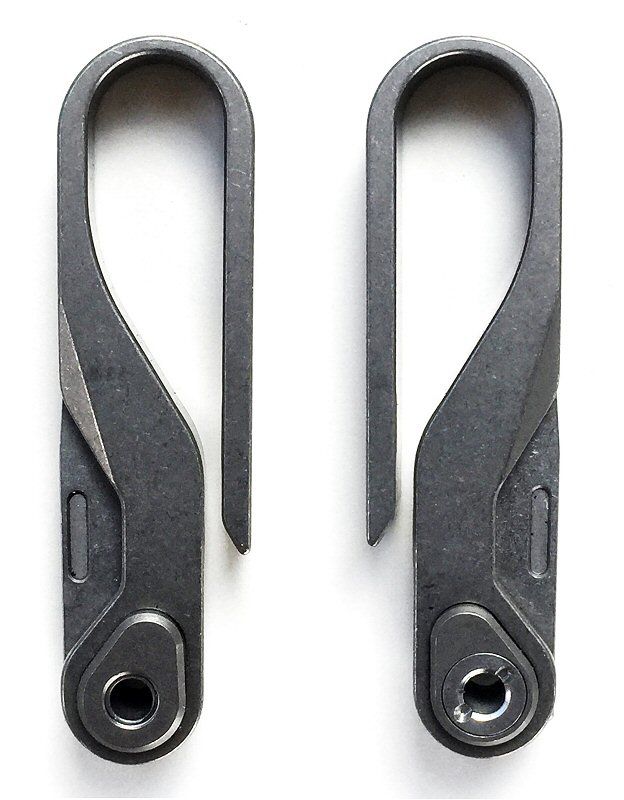
Further, in the photo above, you can see the hook, which is an open end that is about 4mm wide.  Overall, the hook has a sort of a “goose neck” shape.

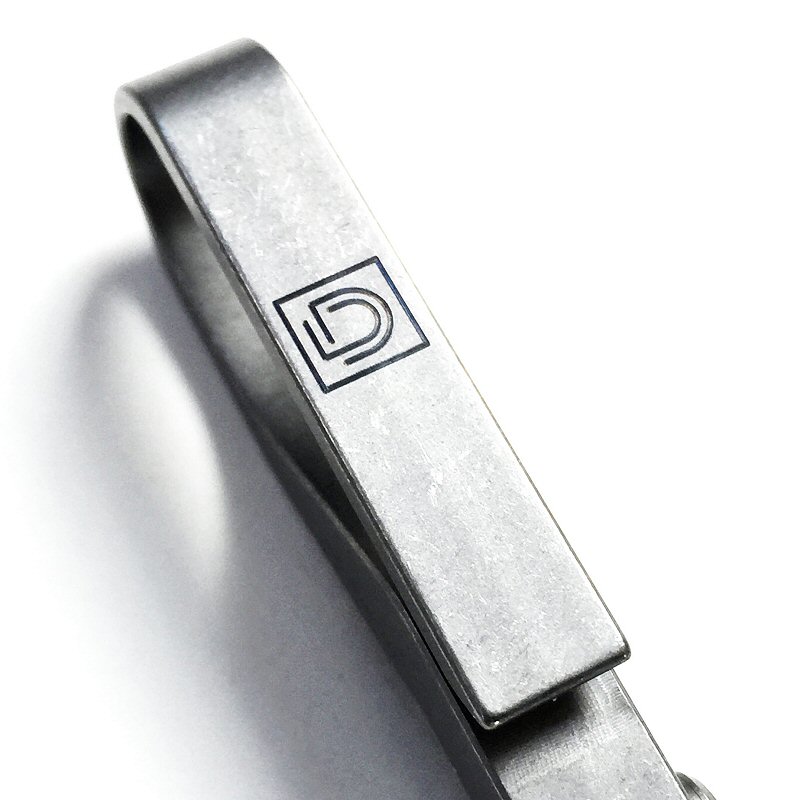
One of the aspects that I very much appreciate in product design is logo minimalism.  Dapper Design has done well with this—their simple, overlapping “D” logo is imprinted into the surface of KLIP, in what appears to be a laser-etching process, and if that is the case, then this logo should never wear off.

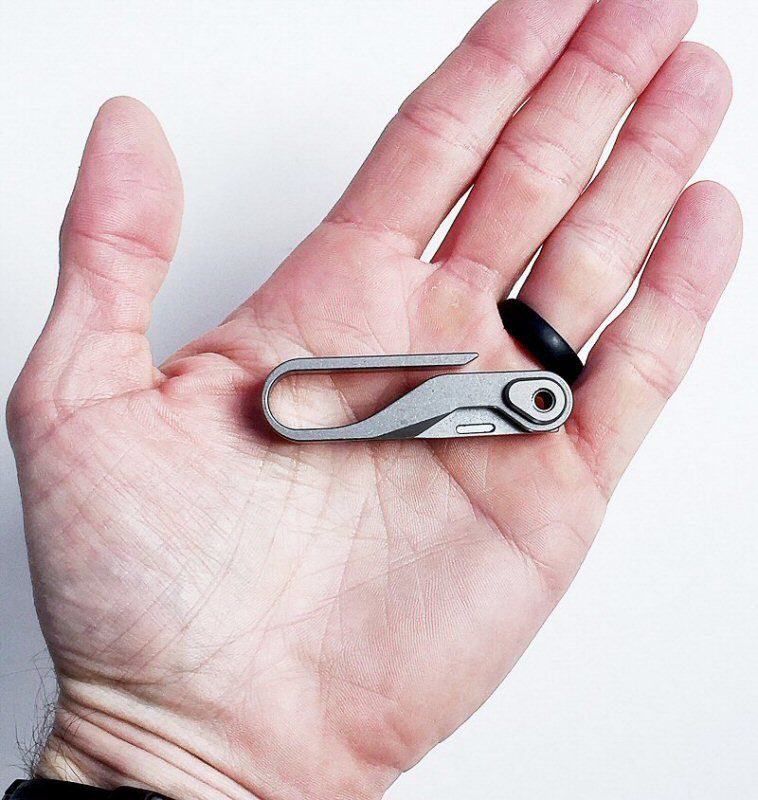
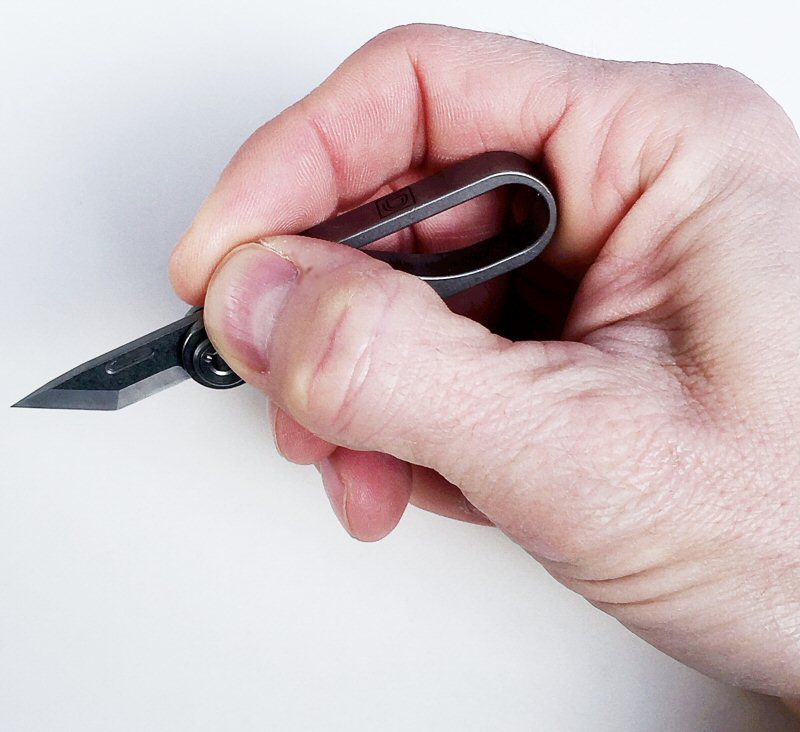
KLIP is small, as you can see from the photo above, which makes it quite easy to have on hand just about any time, should the need arise for a small knife.

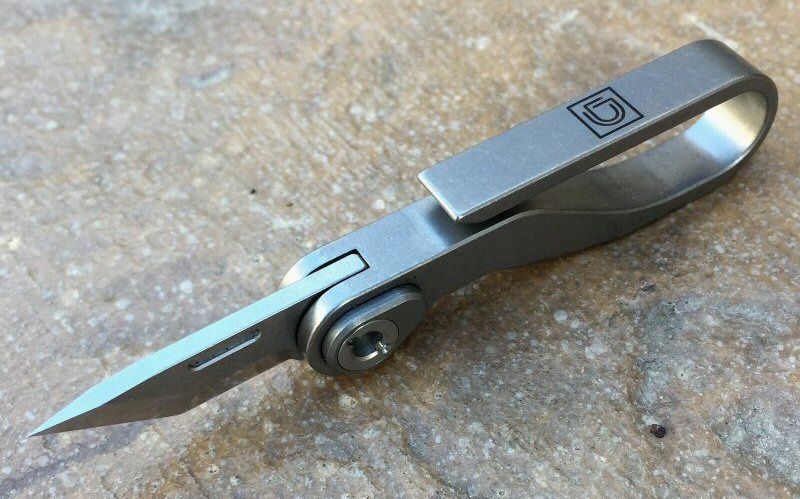
Besides the hook, which forms the main body of KLIP, its other main feature is the small knife concealed in its body, as seen in the images above.

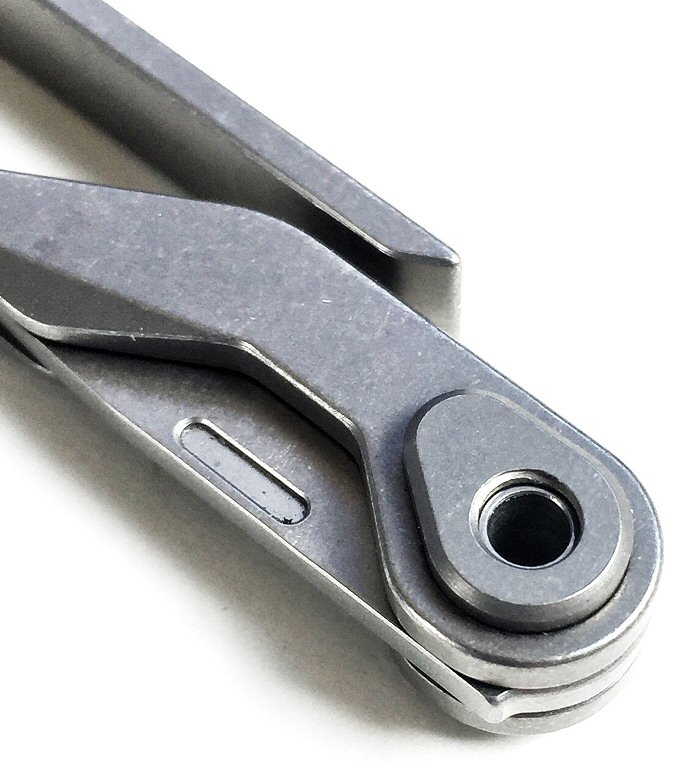
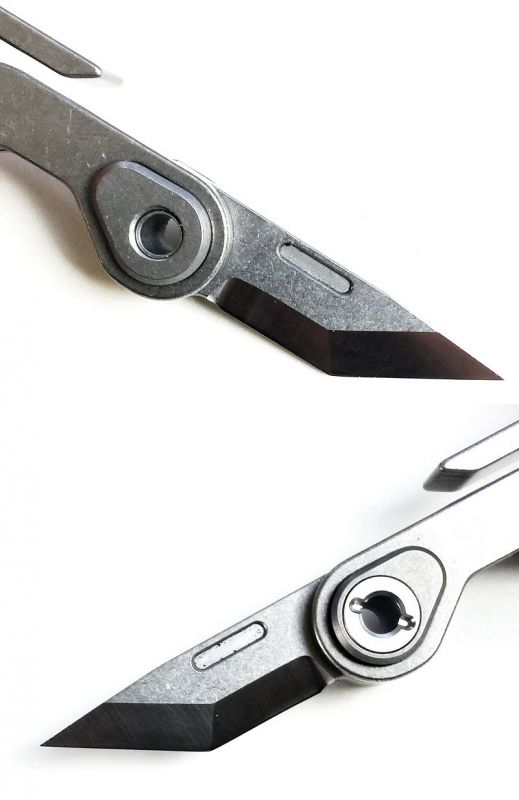
KLIP utilizes a cam-shaped component that secures a spring-actuated ball detent mechanism that helps secure (but not lock)  the blade in both its folded and extended positions.  It essentially provides a  satisfying “click” sound and feel upon blade opening or closing.   Also, note that the blade has a small channel cut into either side the allows the user to get a fingernail into it to help open the blade.

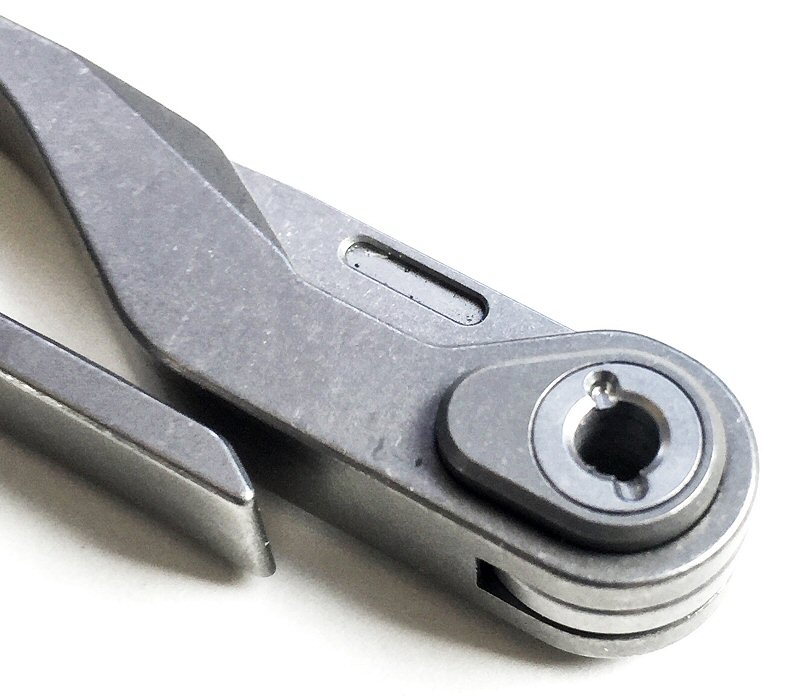
KLIP utilizes a cam-shaped component that secures a spring-actuated ball detent mechanism that helps secure (but not lock)  the blade in both its folded and extended positions.  It essentially provides a  satisfying “click” sound and feel on blade open/close. In the photo above, you can see that there is a small screw with a tiny slot on one side of the cam-shaped component.  What is its purpose?  Read on to find out.

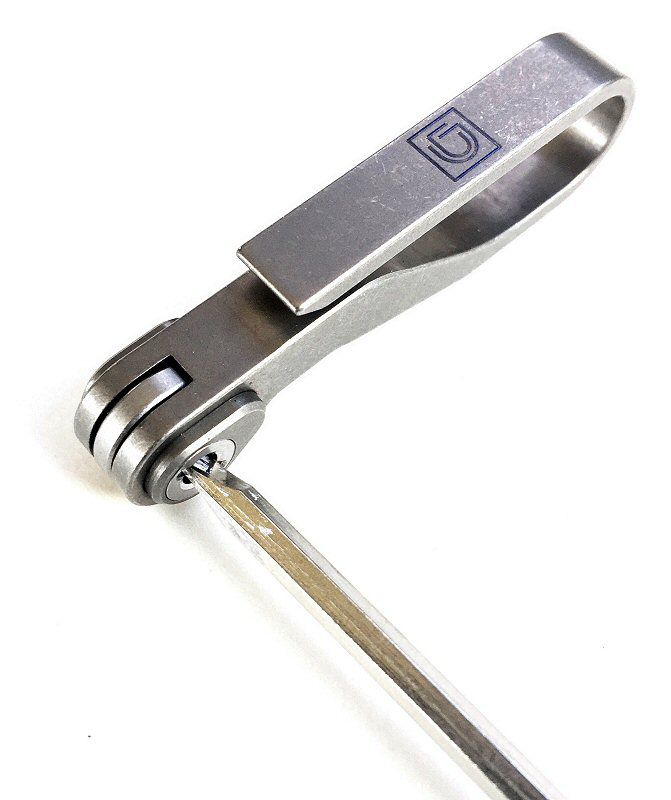
A small, flat head screwdriver (not included with KLIP) will fit into the slot and this allows KLIP’s detent mechanism to be loosened or tightened, which determines the amount of force required to snap the blade into an extended or folded position.  In fact, out the box, this small screw it tightened down such that the blade cannot be opened without the screw being loosened to some degree, which effectively “unlocks” the detent mechanics.


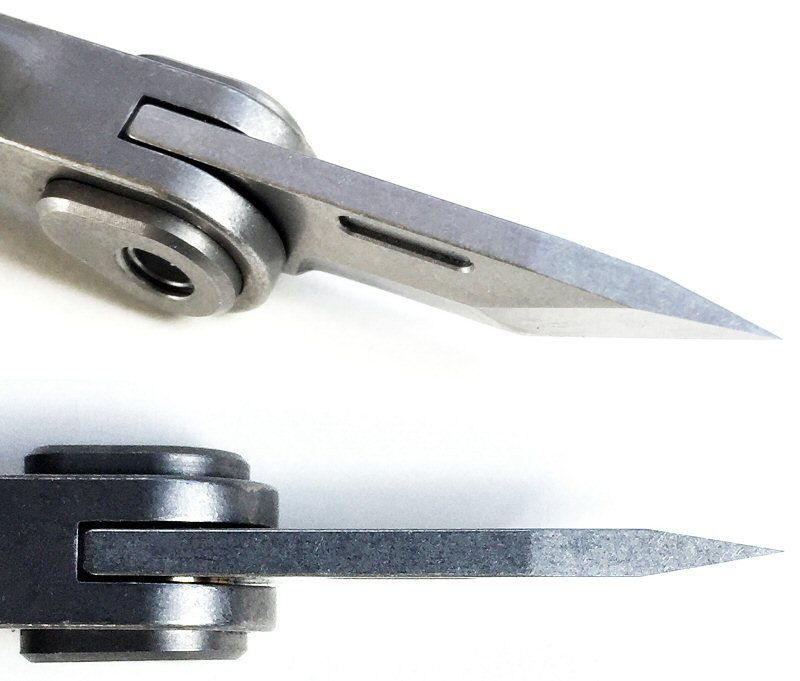
In the photo above, you can see the pocket into which KLIP’s blade fits when folded.


The blade itself is relatively small—you aren’t going to field dress an antelope with it, but it is a perfect size for cutting open boxes, cutting a loose thread, slicing open an envelope, or any number of light-duty, everyday tasks for which you might need a small knife blade.

The base of the blade is quite thick relative to the tip of the blade, which tapers to a sharp point in two planes, as seen in the views above.  This makes it excellent for piercing into things if necessary, and, though I didn’t have an opportunity to test this, it seems that a tip as pointed and sharp as this would be very useful for digging out splinters.

In the first week along that I carried KLIP as part of my EDC gear, I found myself using it daily.  I used it to cut through the tape on several boxes and also break down several others at work and to open mail envelopes at home.  KLIP’s blade opens easily and snaps in place thanks to the detent mechanism, and it is just the right length to hold for most quick jobs.

The only accessories that were included with KLIP were a pair of twist-lock flexible steel cable rings, one with a black coating, the other uncoated.  While KLIP could certainly be attached to a standard keyring, these cables are a quick and easy way to attach KLIP to a set of keys, as seen above.

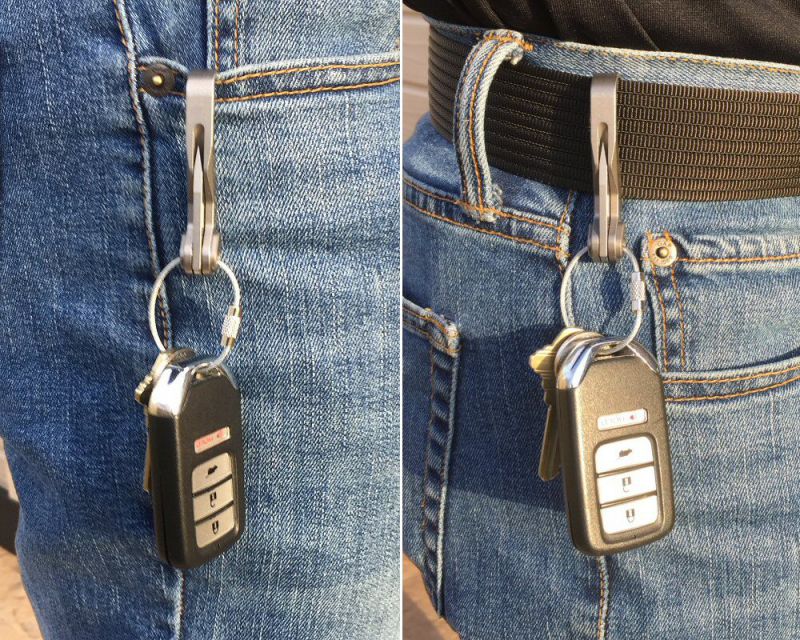
I evaluated a few different methods of carrying KLIP.  It excels when it is attached to a set of keys and carried such that it “hangs” inside your pocket, with KLIP hooked over the edge of your pocket and the keys hanging down inside your pocket, as shown in the phots above.

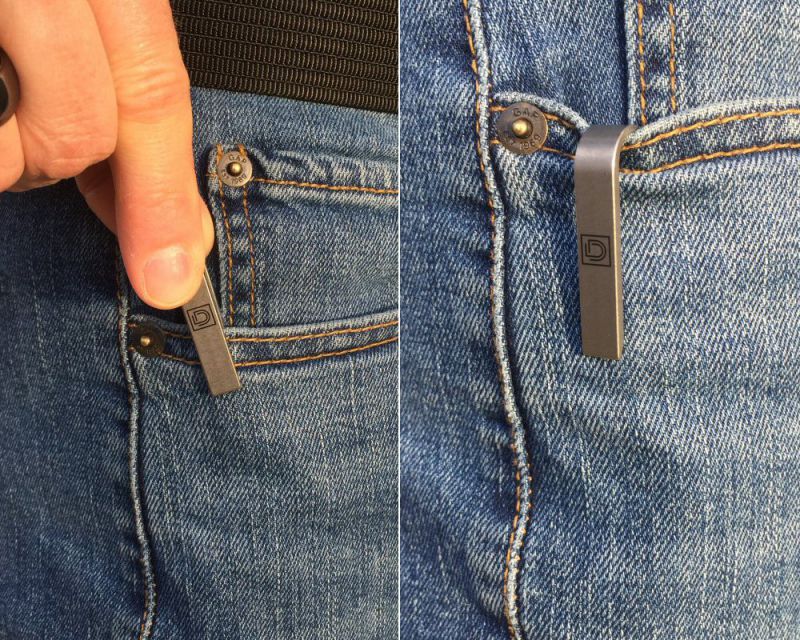
Alternatively, I tried hanging KLIP on the outside of my pocket, see above left, which was not nearly as secure as allowing the keys to hang inside the pocket.  And finally, I also hung KLIP’s hook over my belt, as see in the photo in the above right.  This is slightly more secure than the method shown in the photo in the above left, but still made me a bit nervous that KLIP—and my keys—-were going to get knocked off by something.

One last thought on KLIP: I am very tempted to put it on my keyring with the idea to leave it there indefinitely because it is just that unobtrusive and I think I would find uses for it nearly every day.  The only thing stopping me is that I suspect that KLIP is so unobtrusive that I myself would forget that it is on my keyring, and I’d forget to remove the next time I took an airline flight, and it would be confiscated by TSA.  Which would be a major bummer.

What I like

  • Small, compact, lightweight
  • Looks nice with matte Titanium finish
  • Includes two twist-lock flexible steel cable ring

What needs to be improved

  • The blade does not technically lock in either the extended or folded positions

Final thoughts

I really like KLIP.  Elegantly machined from Titanium alloy and with an attractive style and finish, it is durable, and its design is both aesthetically pleasing as well as useful: it combines a suspension/keychain hook and a small knife, which makes it a perfect item to add to your EDC gear for when you need quick access to a small knife for small tasks.  While KLIP had it’s very successful debut as a crowdfunded Kickstarter campaign (see here for more info), it is now available for pre-order from Dapper Design (see links below).

Price: $49.00
Where to buydapperdesign.com
Source: The sample of this product was provided by Dapper Design.

Filed in categories: Reviews

Tagged: ,

KLIP: Titanium Pocket Knife + EDC Suspension Hook review originally appeared on The Gadgeteer on April 21, 2019 at 9:30 am.

Note: If you are subscribed to this feed through FeedBurner, please switch to our native feed URL http://the-gadgeteer.com/feed/ in order to ensure continuous delivery.