Moshi 3-in-1 universal charging cable review

REVIEW – Let’s face it, USB cables aren’t exactly exciting to write about or read about. But sometimes a cable can be worth the effort for me to write about it and for you to read about it. Let’s see if the Moshi 3-in-1 universal charging cable ticks both of those boxes.

What is it?

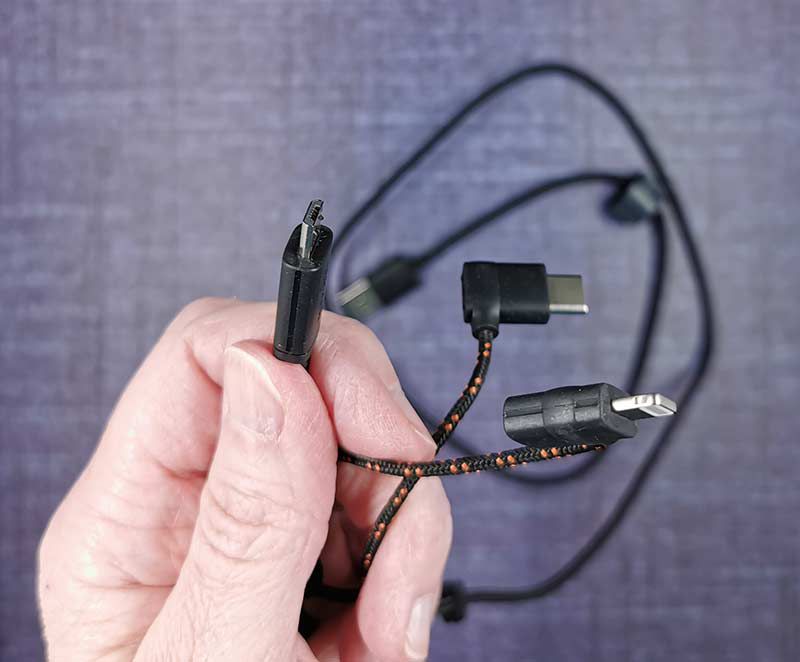
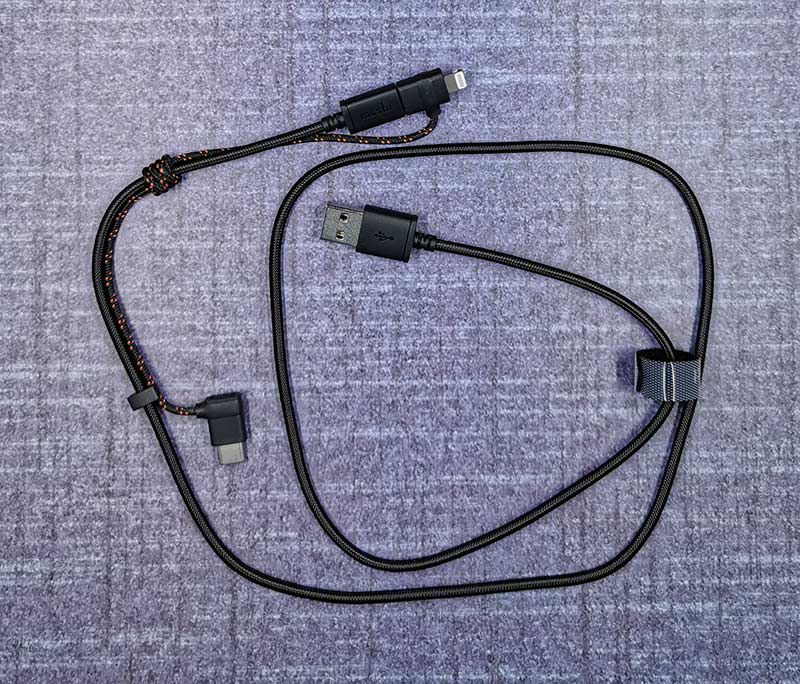
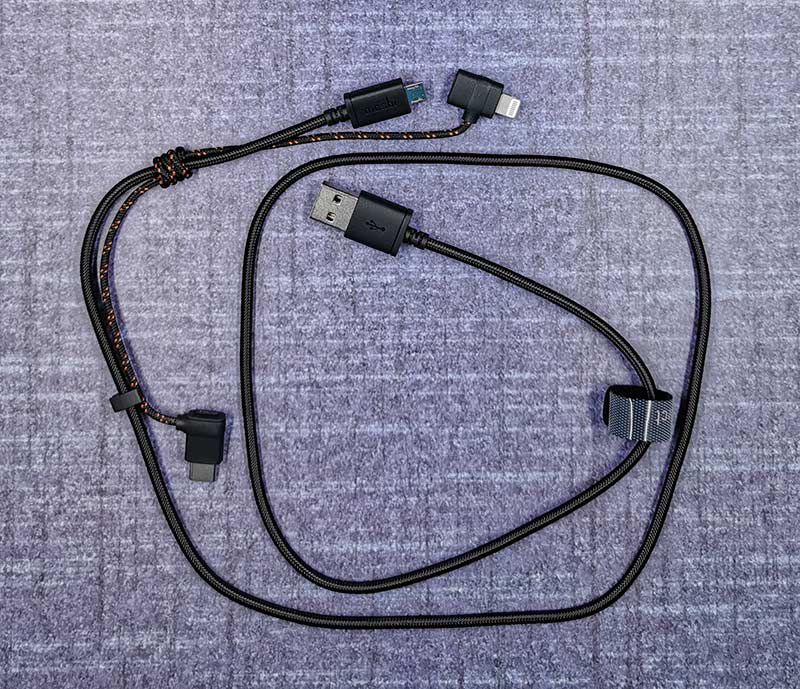
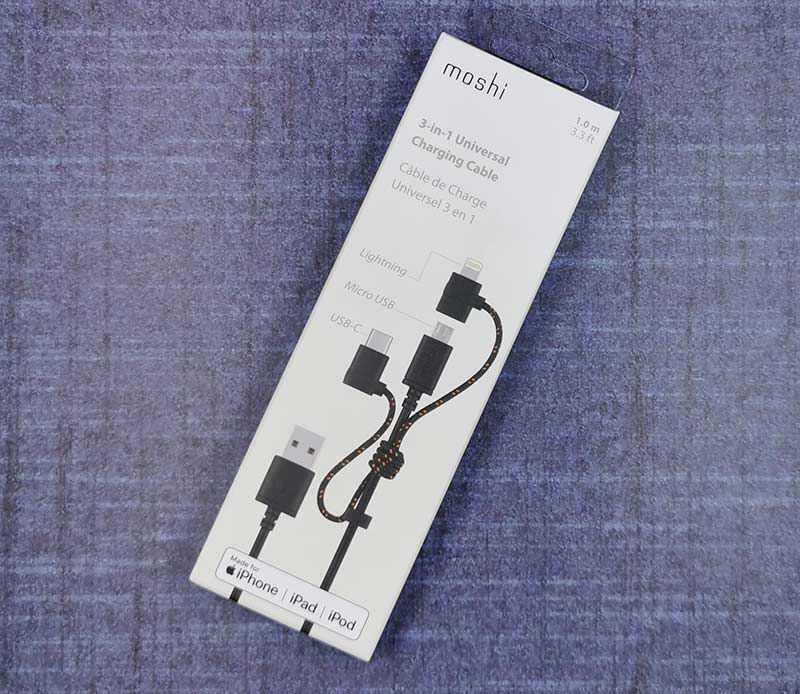
The Moshi 3-in-1 universal charging cable is a USB charging cable that offers a Lightning connector for Apple device fans, a USB-C connector, and a micro USB connector all in one cable.

Hardware specs

  • Apple MFi-certified
  • Supports power for iOS devices up to 12 W (5 V/2.4 A)
  • Supports USB 2.0 data transfer speeds up to 480 Mbps
  • Supports power for USB-C devices up to 3 A

What’s in the box?

  • Moshi 3-in-1 universal charging cable

Design and features

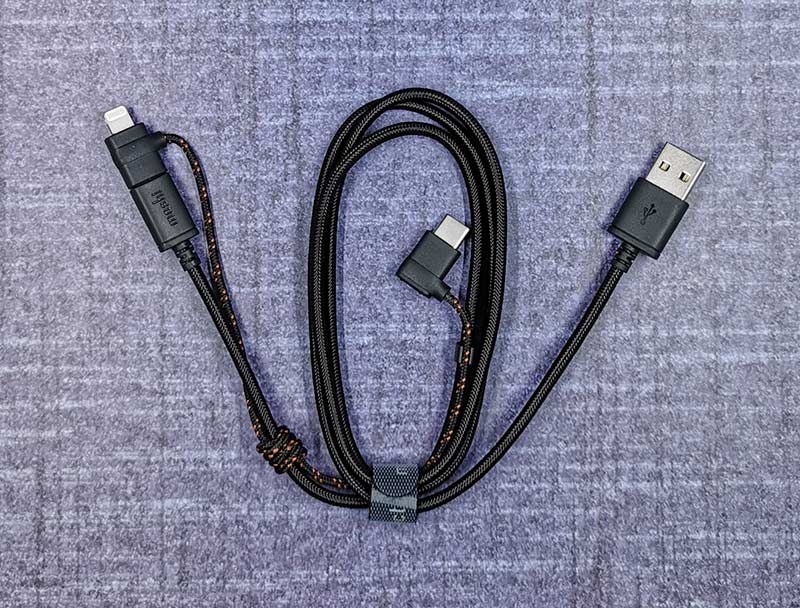
First of all, the cable has one of my favorite features when it comes to high-quality cables – a braided cover. The black Ballistic nylon braiding not only looks cool, but it prevents the cable from getting tangled which is always a good thing.

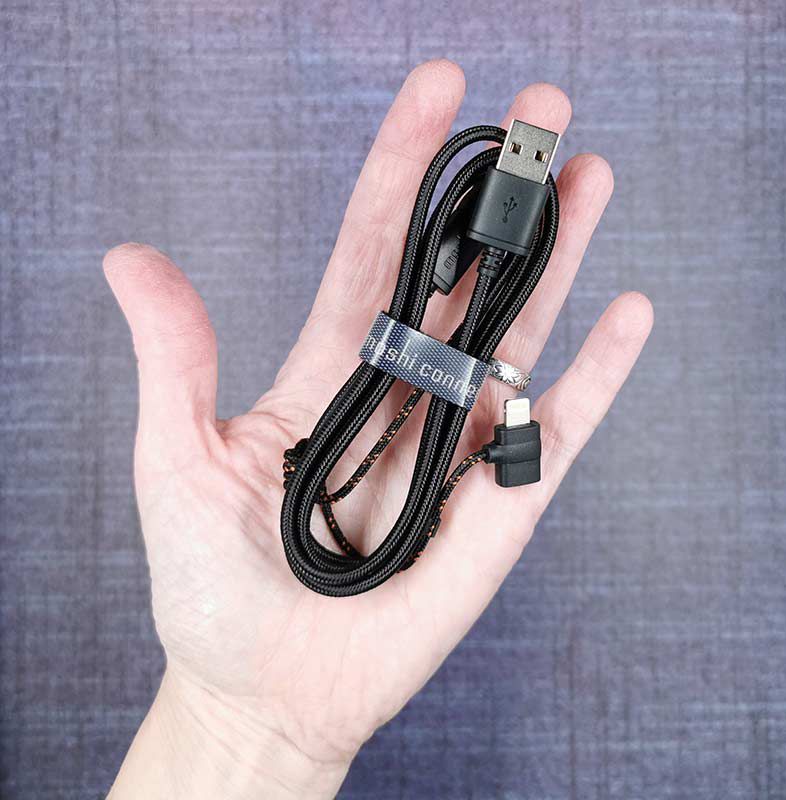
The cable also has a Velcro wrap that you can use to keep it neat and tidy when the cable isn’t being used.

The Moshi 3-in-1 Universal Charging Cable has a length of X inches from end to end.

The default end of the cable is a micro USB connector but tied to the cable are two adapters that turn the cable into a Lightning cable or a USB-C cable.

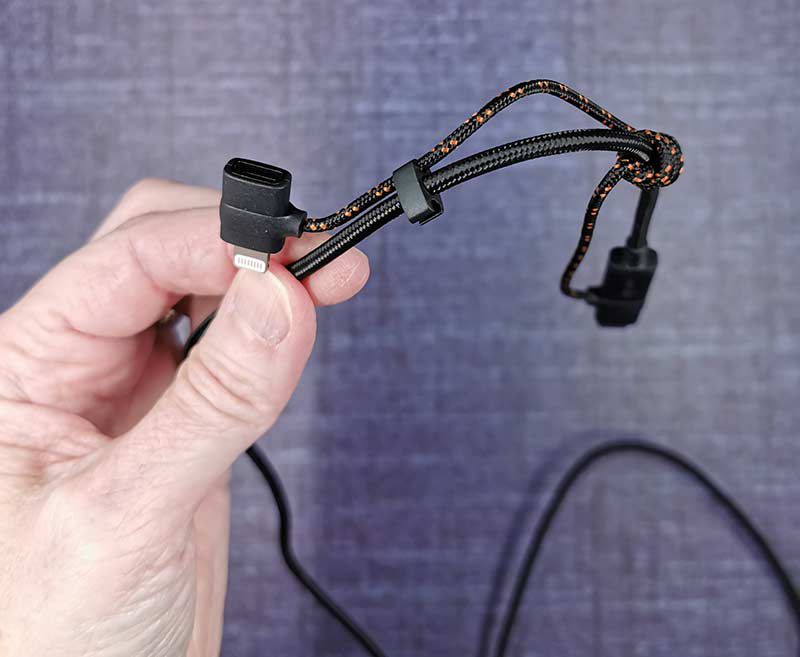
When you want to use the cable with your Apple devices, put the Lightning adapter at the end and snap unused adapters into the inline clip.

When you’re ready to use it as USB-C or micro USB cable, replace the Lightning adapter with the USB-C adapter or remove the adapter entirely to use it as a micro USB cable. Easy right?

What I like

  • One cable for 3 device types
  • Nylon braided covering
  • 3 year warranty

What needs to be improved

  • Price

Final thoughts

There isn’t a whole lot that one can say about a USB cable, but as far as cables go, the Moshi 3-in-1 Universal Charging cable does have some nice features going for it from the nylon braided exterior to the ability to be used with 3 different connector styles. The only downside to this cable is that it’s a little pricy. But if the price doesn’t scare you away, this cable is warrantied for 3 years so it’s been made to stand the test of time.

Price: $28.95
Where to buy: moshi
Source: The sample for this review was provided by moshi.

Filed in categories: Reviews

Tagged:

Moshi 3-in-1 universal charging cable review originally appeared on The Gadgeteer on June 2, 2019 at 11:00 am.

Note: If you are subscribed to this feed through FeedBurner, please switch to our native feed URL http://the-gadgeteer.com/feed/ in order to ensure continuous delivery.

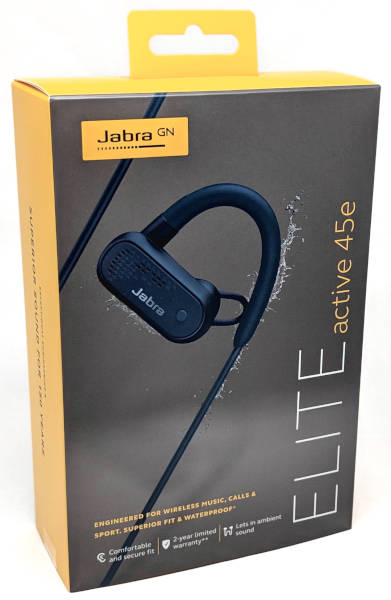
Jabra Elite Active 45e wireless in-ear sport headphones review

REVIEW – I use only earbuds when listening to my music and only those that are tethered together by a wire so that I don’t lose them. Jabra recently came out with their Elite Active 45e wireless in-ear sport headphones. When testing them, I discovered that they were way too loose in my ears, tended to fall out when moving around, and they started to really hurt my ears after just one hour of using them. The open design is meant to protect the user, but I didn’t like the fact that people around me could hear my music. Additionally, the audio quality was decent but lacked some of the deeper bass frequencies of my music because they didn’t seal in my ears. Despite these things, they maintain connectivity to my Pixel 2 XL throughout most of my home because of Bluetooth 5.0, have an adjustable equalizer in the Jabra Sound+ app, play for 9.5 hours, charge in 1.75 hours, and have basic calling features plus a mute/unmute feature.

What is it?

The Jabra Elite Active 45e are wireless (Bluetooth 5.0) in-ear sport headphones. They are IP67 rated and thus are dust-proof and can be submerged in 1 meter of water for 30 minutes.

What’s in the box?
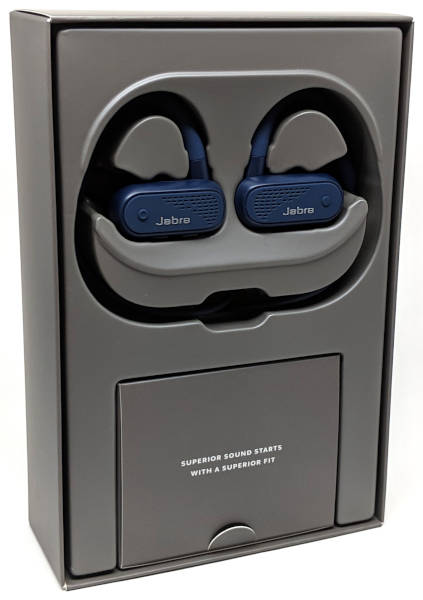

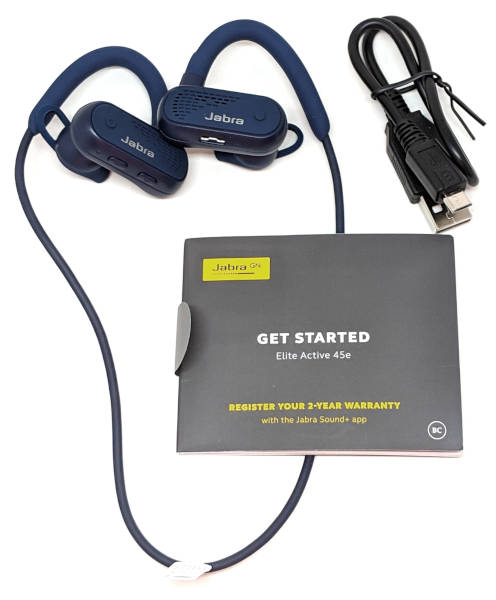
  • Jabra Elite Active 45e wireless in-ear headphones
  • micro-USB cable
  • Quick Start Guide

Hardware specs

Audio

  • Ambient and wind noise reduction for calls: Yes (2 microphone noise reduction technology)
  • Customized Call EQ: 3 default equalizer settings
  • Speaker size: φ12.0 x 4.7
  • Speaker sensitivity: 107dB±3dB
  • Speaker impedance: 16 ohm
  • Speaker max input power: 10mW
  • Speaker frequency range: 20Hz-14KHz
  • Speaker bandwidth: Music mode A2DP
  • Speaker bandwidth: Speak mode HFP
  • Microphone type: MEMS
  • Microphone sensitivity: -38 dBV (94 dB SPL @ 1 kHz)
  • Microphone frequency range: 20Hz-20KHz
  • Microphone bandwidth: 100Hz-8KHz (Wideband)
  • Headset bandwidth: 1M Hz

Fit & Comfort

  • Form factor: Wireless In-Ear
  • Secure fit: The adaptable Earhook and the Earwing make sure the headset stays fit and secure on the head
  • Earhooks: Yes, customizable for a perfect fit
  • Earwings: Yes
  • Eargels: Open design, keeps you aware of the surroundings
  • Multi-function button: Power on/off (hold), play/pause music, answer/end call, Bluetooth pair (hold)

Battery

  • Talk time: Up to 9 hours
  • Standby time: Auto-off after 15 min without connection, and 60 min without activity. >73hrs
  • Charging time: dedicated USB wall charger (500mA)
  • Full charge in 120 minutes
  • Quick charge: 15 minutes charging equals 1 hour of battery

Connectivity

  • Connectivity: Bluetooth (R)
  • Connection (mini jack, USB, etc): Micro USB (charging only)
  • Supported Bluetooth profiles: HSP/HFP/A2DP/AVRCP/PBAP/GATT
  • Bluetooth compliance: Bluetooth® 5.0
  • Bluetooth wireless technology: Bluetooth® 5.0
  • Operating range from the device: Up to 10m
  • Multiple device pairing: Up to 8, two devices can be connected simultaneously

General

  • What’s in the box: Earbuds, USB cable, and quick start guide
  • Operating temperature: 0°C – 45°C
  • Storage temperature: -20°C – 85°C
  • Features: IP67, 9 hours battery, Open acoustic design, Wind noise protection
  • Packaging dimensions (LxWxH mm): Case: 390 x 300 x 211, Unit:124 x 55 x 187.4
  • Main unit dimension (LxWxH mm): 40 x 10.5 x 12
  • Gross weight (with cable): 29g
  • Net weight (without cable): 23.4g
  • Materials used (outside): PC/ABS plastic. Silicon rubber. TPEE/TPE
  • Neckband material: TPE
  • Pairing PIN, if applicable 0000
  • Charging plug dimensions: micro-USB
  • Warranty: IP67-rated waterproof design, with a 2-year warranty against sweat and dust with registration through Sound+ app
  • Certifications: Bluetooth® 5.0, CE, FCC, IC, RoHS, REACH, TIA-810-B, TIA-920.130-A

Design and features
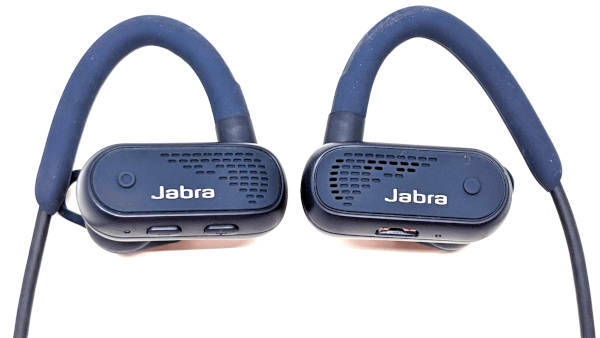
The Jabra Elite Active 45e wireless in-ear sport headphones that I received came in navy blue. There are two other colors available: Black and Mint.

The ear hooks and the wire connecting the earbuds together are coated in silicone. The control panels and earphones are made from hard plastic.

Each earphone has a control panel with one button on the face of it. The right earphone’s control panel (the earphone on the left in the photo above) contains the Multifunction button which allows you to perform the following controls: power on/off, Bluetooth pairing, play/pause music, and answer/end a phone call. The left earphone’s control panel (the earphone on the right in the photo above) has the Voice button that allows you to launch your voice assistant or mute/unmute a phone call. 
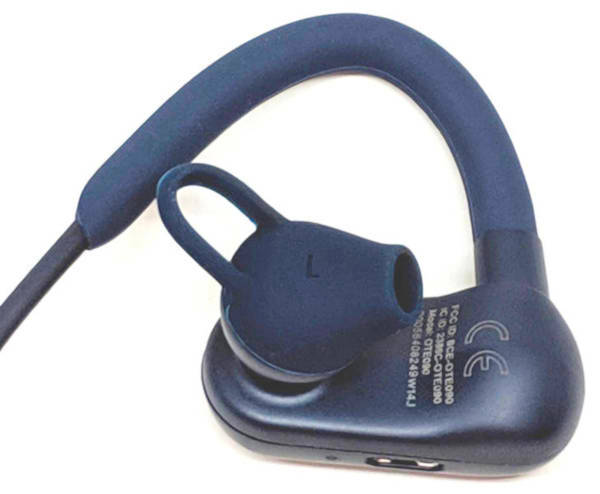
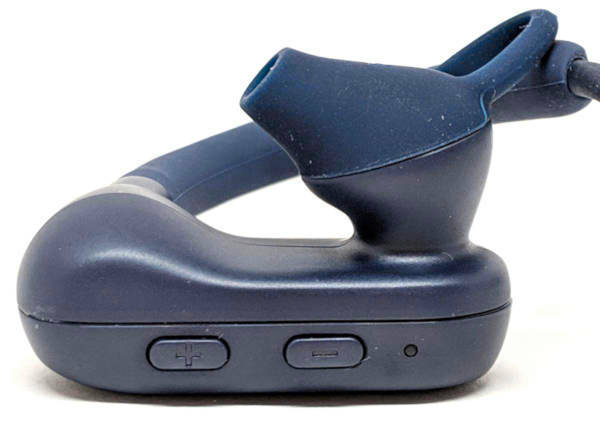
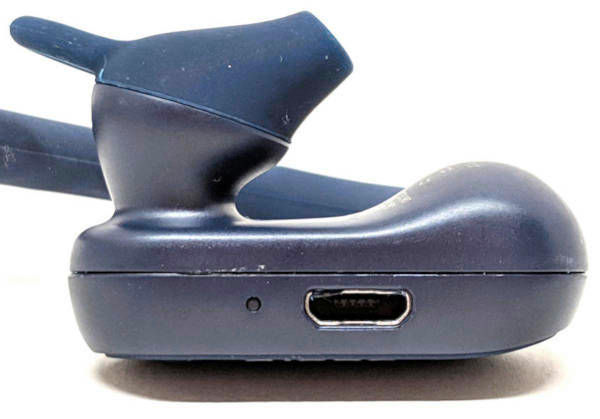
The tips of the earphones are coated in a thin layer of silicone and contain an earwing (or fin). There are no interchangeable silicone eartips for these headphones. The right earbud contains the volume up and volume down controls. There is also an LED which briefly flashes green when you turn the headphones on and red when you turn them off. It also very slowly flashes blue when the headphones are in pairing mode. The left earbud contains the micro-USB port and an LED that shines red when the headphones are charging and green when they are fully charged.
Setup

Powering on/off
To turn the headphones on, I long pressed the Multifunction button on the face of the right earphone’s control panel for about one second to power on the headphones, after which the LED flashed green and I heard the power-on tones. I then had to press the same button for about three seconds to power off the headphones, after which the LED flashed red and I heard the power-off tones.

Pairing
When I first turned on the headphones they were ready for pairing. If you need to put them into pairing mode, you must start with them turned off. You’ll then need to hold the Multifunction button on the face of the right earphone’s control panel for about four seconds to put the headphones into pairing mode at which time they will very slowly flash blue. You’ll then go into your Bluetooth settings and find and tap on the Jabra Elite Active 45e from the list of devices found to pair them. For Android 9 phones, go to phone settings>Connected devices>Connection preferences>Bluetooth (toggle it on)>Pair new device>tap on Jabra Elite Active 45e to pair.

Performance

Auto shut-off
The headphones are supposed to shut off after about 15 minutes when not connected to a device, but I could not determine when they shut off because there was no indication when shut off occurred. I knew that they had shut off because when I pressed the Multifunction button on the right control panel, the headphones turned on. In addition, the headphones are supposed to shut off after one hour of inactivity. And again, I could not tell when that happened.

Bluetooth connectivity
Bluetooth 5.0 is awesome. All the Bluetooth 5.0 earbuds that I have reviewed maintain connectivity up to 57 feet when in line-of-sight of my Pixel 2 XL. And I was able to listen to my earbuds with four walls separating me from my connected device without drops or interruptions. In addition, there were no connectivity issues when using the Jabra Elite Active 45e headphones.

Fit and Comfort
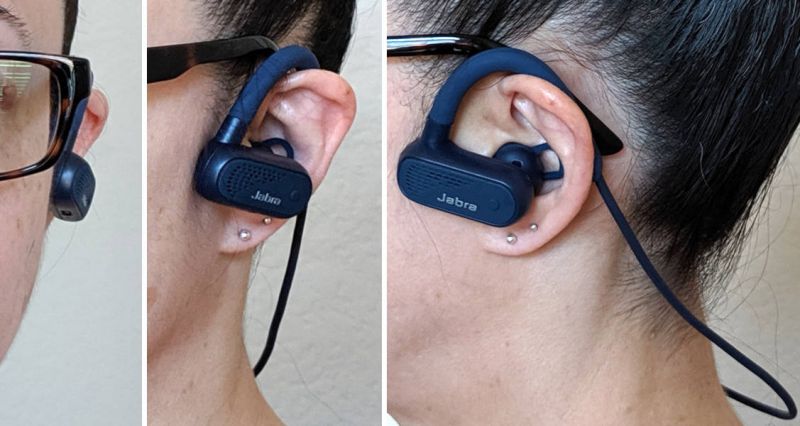
When it comes to earbuds, fit is everything. In this case, the Jabra headphones did not fit me at all even after adjusting the ear hooks with and without my glasses on. They were way too loose to stay in my ears when moving around, especially when exercising. I know that they were meant to have an open design in order to ensure user safety when running outside, but I only exercise inside my home so for me this is unnecessary. The design actually reminds me of Apple’s EarPods. However, my EarPods fit so much better and were much more comfortable than these.

On top of all that, they really started hurting my ears after only about an hour of wearing them. The ear hooks hurt behind my ears and the earphones hurt where they sit at the opening of my ear canal. These were horribly uncomfortable for me. But fit is different for each person and thus, these may work for some of you.

Jabra Sound+ app
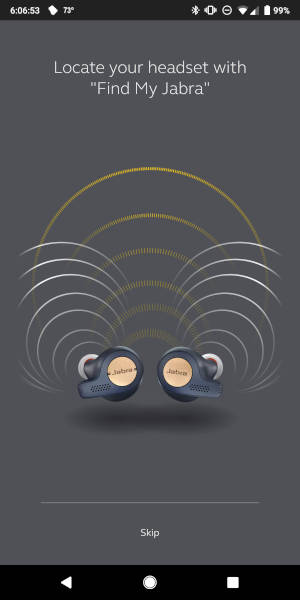


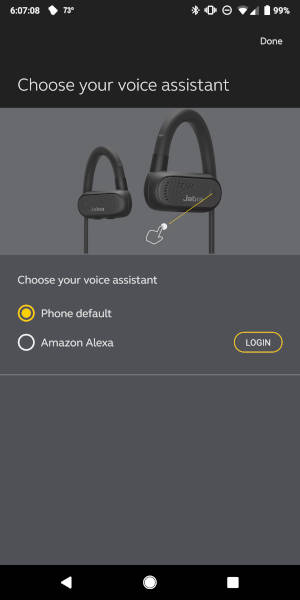
The Jabra Elite Active 45e headphones have an app that works with them – the Sound+ app. When the headphones are powered on, the Sound+ app detects them, after which I was able to customize them. I could turn on location settings so that the app would save the last known location of the headphones, I could select which voice assistant to use, and I could adjust the equalizer settings for the earbuds.

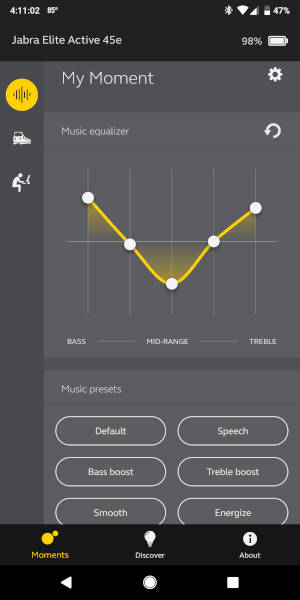
“Moments” bottom tab: The Sound+ app’s default home screen is the “Moments” tab which is the first tab located at the bottom of the screen. The “Moments” tab allows you to select one of three tabs located in the left sidebar of the app: the “My Moment” tab, the “Commute” tab, and the “Focus” tab.

The “My Moment” left sidebar tab: If you tap on the “My Moment” left sidebar tab, this screen shows your current equalizer settings. And if you wish to customize your equalizer settings, you may do so by adjusting the dots above each frequency. However, it is important to note that you cannot save this setting.

By tapping on the gear icon located in the upper right corner of the “My Moment” app screen, I could further personalize my earbud settings like…
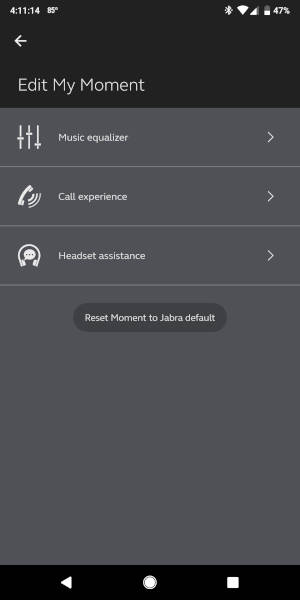
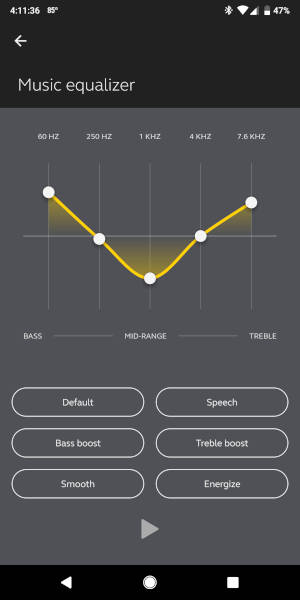
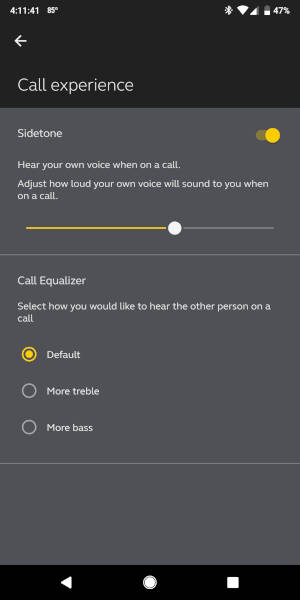
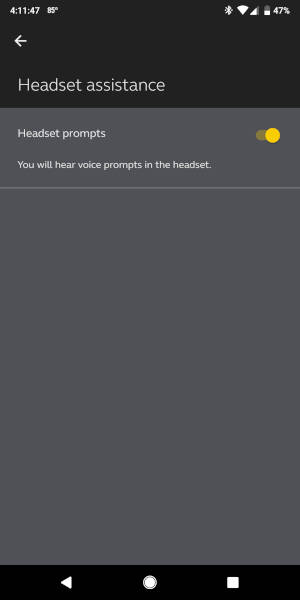
… adjusting the “Music equalizer” settings, “Call experience” settings, and “Headset assistance” settings (first screenshot above).

      • “Music equalizer” setting: This is the same as the equalizer settings in the “My Moment” app screen (second screenshot above).
      • “Call experience” settings: you can set whether you hear your own voice on a call or not. If you decide to toggle on this feature, you can adjust how loud your voice will be to you. You may also select whether to hear more treble or bass frequencies of your caller’s voice (third screenshot above). These are pretty cool features.
      • “Headset assistance” settings: allows you to turn on or off voice prompts in the headphones (last screenshot above).
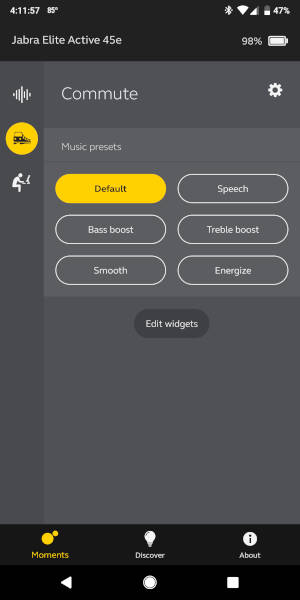
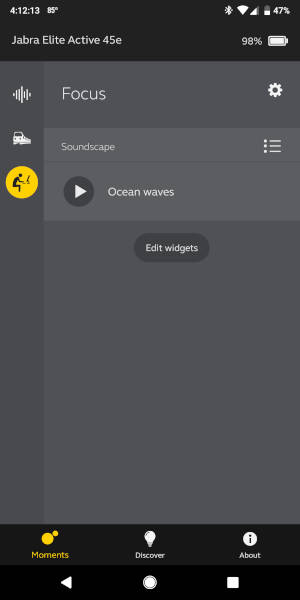
“Commute” left sidebar tab: If you tap on the “Commute” icon in the left sidebar of the Sound+ app home screen, you can select your preset equalizer settings for your drive around town.

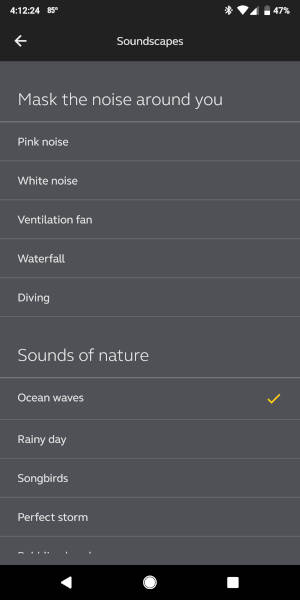
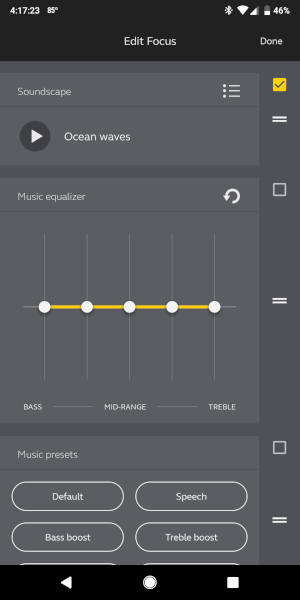
“Focus” left sidebar tab: And if you tap on the “Focus” icon (person sitting in front of a laptop) in the left sidebar of the Sound+ app home screen and then tap on the menu icon located just below the gear icon, you can select some “Soundscape” or background noise to help you to focus while you work. Some of the selections include Pink noise, Diving, Waterfall, Rainy day, Songbirds, Cavern, and Crowd. These are pretty cool features too.
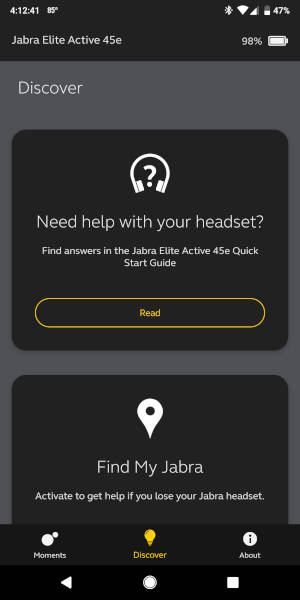
“Discover” bottom tab: If you tap on the “Discover” tab located at the bottom of the app home screen, you can get access to the Quick Start Guide for the headphones, register the headphones, share your opinion about the headphones and app, and see a pictorial overview of what each of the headphone buttons does.

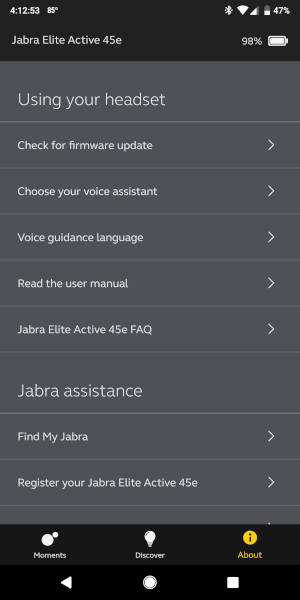
“About” bottom tab: The “About” tab located at the bottom of the app’s home screen is a surprisingly important tab. It allows you to do things like check for firmware updates, choose your voice assistant, change the language of the voice prompt, link to the headphone’s FAQ web page, locate your headphones, register the headphones, and rate them.

Music and Voice Assistant controls
I tested the music controls of the Jabra Elite Active 45e headphones. A one-second press of the Multifunction button located on the face of the right earphone’s control panel allowed me to play/pause music or videos on Pandora, Amazon Music, Google Play Music, Netflix, and YouTube. However, I was unable to play or pause Amazon Prime Video content when using the headphones which were connected to my Pixel 2 XL. I think this is an issue with my phone because I’ve had this very same problem with other in-ear headphones.

I was able to increase/decrease the volume levels with short presses of the Volume Up and Down buttons located at the bottom of the right earphone’s control panel. A two-second press of the Volume Up button skipped ahead a song and a two-second press of the Volume Down button skipped back a song.

To launch my voice assistant (when not on a call), I short pressed on the Voice button located on the face of the left earphone’s control panel. I was able to choose between my Google assistant or Alexa (it will work for Siri users too). I chose Google assistant. I was able to successfully use Google assistant to perform the actions I wanted it to.

Playing time
The Jabra website states that the headphones will play for about 9 hours on one full charge. In my tests, I was able to play the headphones for 9.5 hours on one full charge when they were set on a moderate volume level.

Charging
The Jabra Elite Active 45e documentation states that the headphones take two hours to fully charge. I was able to charge them in one hour and 45 minutes. Not bad.

Calling features and call quality
According to the Quick Start Guide, the headphones have the following calling features:

  • Answer/end a call – use a short press of the Multifunction button on the face of the right earphone’s control panel to answer the call; repeat to end the call. In addition, you can use a one-second press of the Multifunction button to put the current call on hold and answer an incoming call.
  • Switch between calls – use a one-second press of the Multifunction button to switch between callers
  • Reject a call – use a double press of the Multifunction button to reject a call
  • Mute/unmute – use a short press of the Voice button on the face of the left earphone’s control panel to turn on mute while you are on a call; repeat to turn off mute
  • Call volume controls – use a short press of the Volume Up and Down buttons on the bottom of the right side control panel to increase or decrease the volume while you are on a call

All of the above calling features worked well, however, there doesn’t seem to be a redial feature.

During my tests, both the caller and I noticed that the call audio quality was very nice on both ends.

Audio quality
The audio quality of the Jabra Elite Active 45e headphones was decent before adjusting the equalizer settings in the Sound+ app. I enjoyed the sound better after adjusting the equalizer settings. However, when listening to bass heavy music like “High Roller” by Crystal Method and “Salute” by Little Mix, I found that I was missing out on the deeper bass frequencies of the songs because the headphones do not seal in my ears. The headphones are better suited for classic rock music like Bob Seger’s “The Famous Final Scene”.

When contrasting the Jabra headphones to my Jaybird X3 headphones, my music sounded MUCH better when using the X3 headphones, which are comparable in price. In addition, the X3s seal in my ears, are MUCH more comfortable, and capture the deep bass of my favorite music.

What I like

  • You can adjust the equalizer settings for the Jabra Elite Active 45e headphones in the Jabra Sound+ app
  • Bluetooth 5.0 headphones like these have great connectivity – they maintain connection for 57 feet and go through four walls without drops
  • Playing time is about 9.5 hours on a moderate volume level
  • Charging time fast (1.75 hours to fully charge)
  • The call quality is nice and the headphones have a mute/unmute calling feature which some headphones don’t have
  • The Sound+ app has a setting that allows you to play background sound to help you focus while you work (waterfall, rain, pink noise sounds, etc.)

What needs to be improved

  • Fit, fit, FIT – they were too loose in my ears no matter how I adjusted them, they were terribly uncomfortable and holy cow, they really hurt my ears after about an hour of wearing them
  • Sound quality – this would be greatly improved if the earbuds sealed in the user’s ear canals
  • The Sound+ app should allow you to save your custom equalizer settings

Final thoughts

Honestly, I couldn’t stand using the Jabra Elite Active 45e headphones. They fit me poorly, fell out when exercising, lacked the bass frequencies of my favorite bass heavy music, and REALLY hurt my ears after wearing them for about an hour or less (note to self: don’t buy open-designed earphones or those with ear hooks). But they maintain connectivity to my Pixel 2 XL throughout most of my home because of Bluetooth 5.0, have an adjustable equalizer in the Jabra Sound+ app, play for 9.5 hours, charge in 1.75 hours, and have basic calling features plus a mute/unmute feature.

I don’t recommend these based on the fit, but if you like ear hooks on your in-ear headphones and like the open design, you may enjoy them.

Price: $99.99
Where to buy: Jabra or Amazon
Source: The sample of this product was provided by Jabra.

Filed in categories: Reviews

Tagged:

Jabra Elite Active 45e wireless in-ear sport headphones review originally appeared on The Gadgeteer on June 2, 2019 at 10:00 am.

Note: If you are subscribed to this feed through FeedBurner, please switch to our native feed URL http://the-gadgeteer.com/feed/ in order to ensure continuous delivery.
Auto-Vox X2 Streaming Media Mirror Dash Cam review

REVIEW – I’ve never reviewed a dash cam before. But with the terrible roads here in Michigan, and the increased number of distracted drivers on those roads, I thought it was time I did. Today I’ll be taking a look at the Auto-Vox X2 Streaming Media Mirror Dash Cam.

What is it?

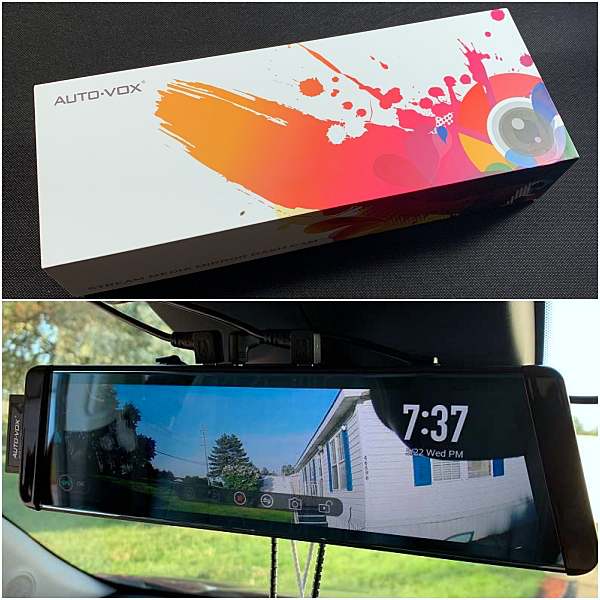
The Auto-Vox X2 is a touch-screen streaming media mirror with a built-in dash cam and rear backup camera.

What’s in the box?

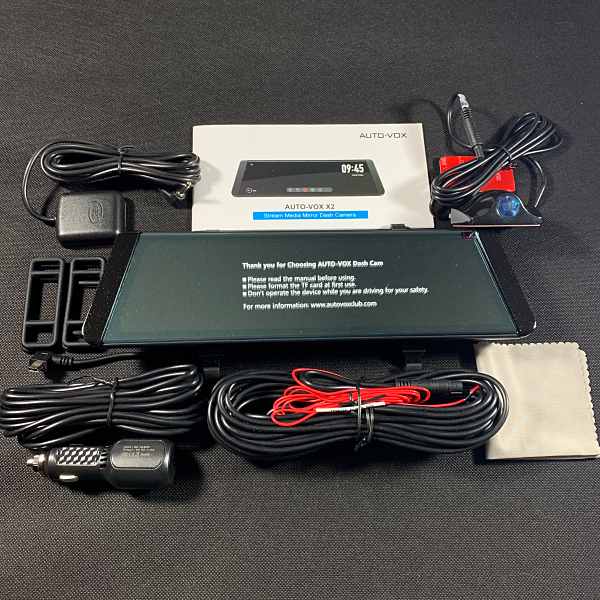
  • Auto-Vox X2 streaming media mirror
  • 2 sets of elastic attachment bands
  • Car charger
  • GPS antenna
  • Backup camera
  • Video cable
  • Lens cloth
  • Instruction manual

Hardware specs

Mirror:

  • Screen Size – 9.88-inches
  • Supply Voltage – DC 5-5.5V
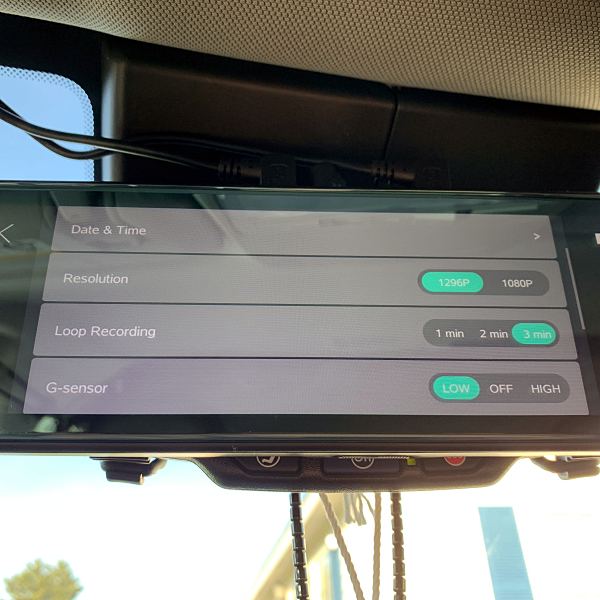
  • Resolution – 1080P,1296P
  • Video – H.264 1296P@30fps+720P@25fps
  • Battery – Polymer lithium ion battery
  • TF Card – 64GB-128GB,Class 10(not included)

Front view camera:

  • Viewing angle – 140 degrees
  • Aperture Size – F2.2
  • Len Focus Type – Adjustable
  • Processor – High-definition HD image processor

Backup camera:

  • Viewing Angle – 140 degrees
  • Water-Proof – IP68 waterproof
  • Resolution – 720P

Design and features

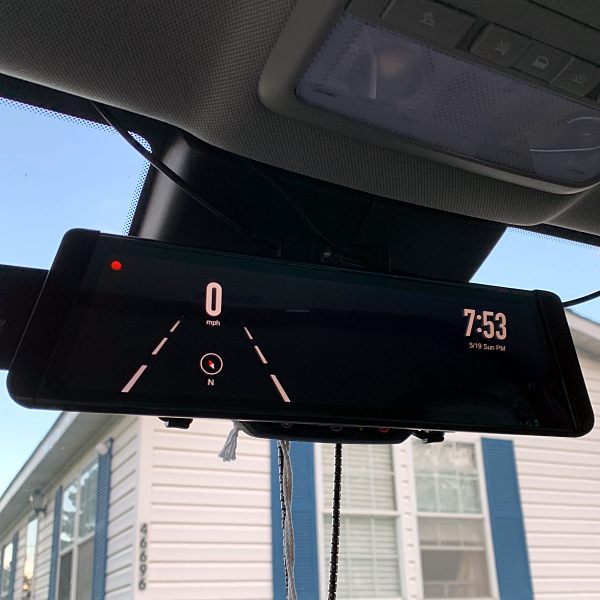
The X2 is designed to fit overtop your cars existing rearview mirror. The front of the unit contains a 9.88” LCD touch sensitive screen.

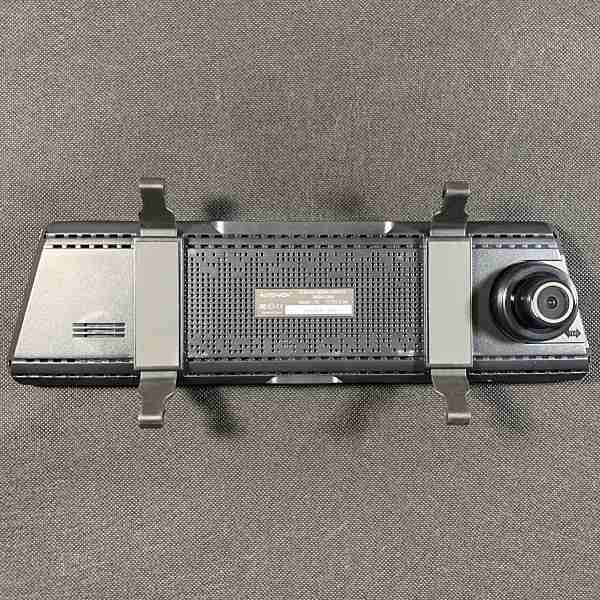
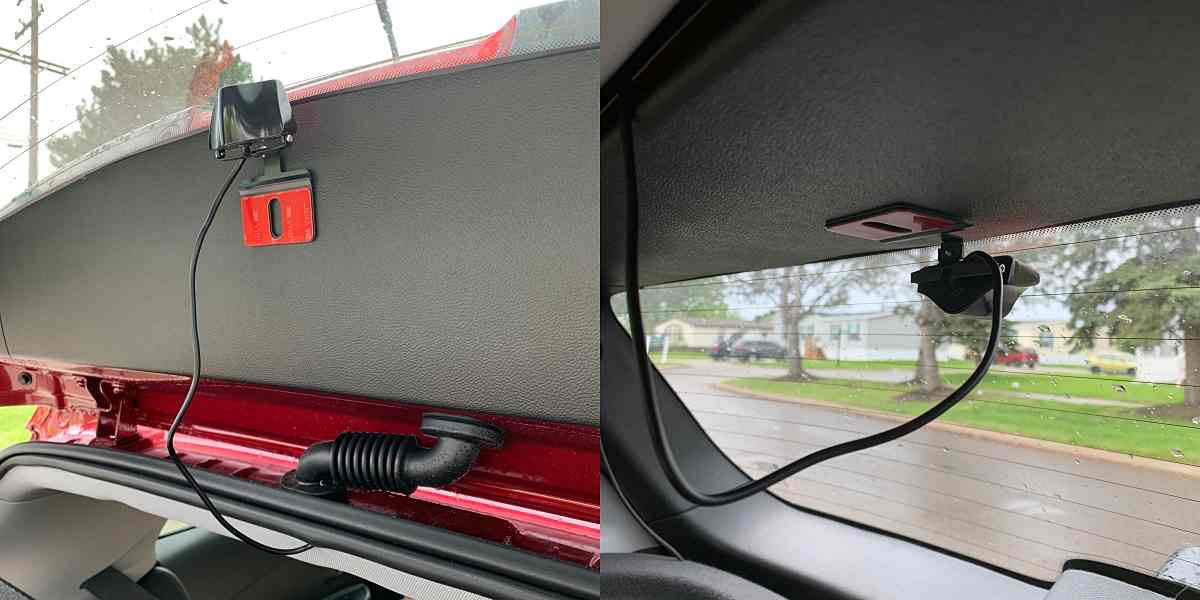
On the back, there are attachment clips along with the front view dash camera.

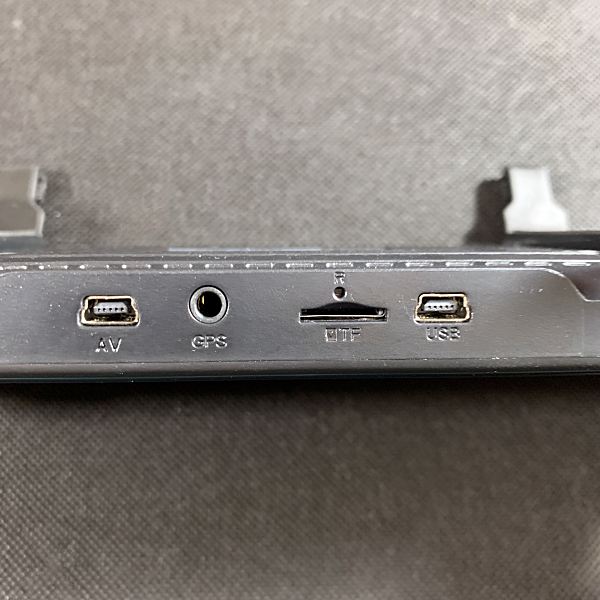
The USB power port, TF card slot, AV port for the backup cam, and the GPS port are all located along the top of the monitor.

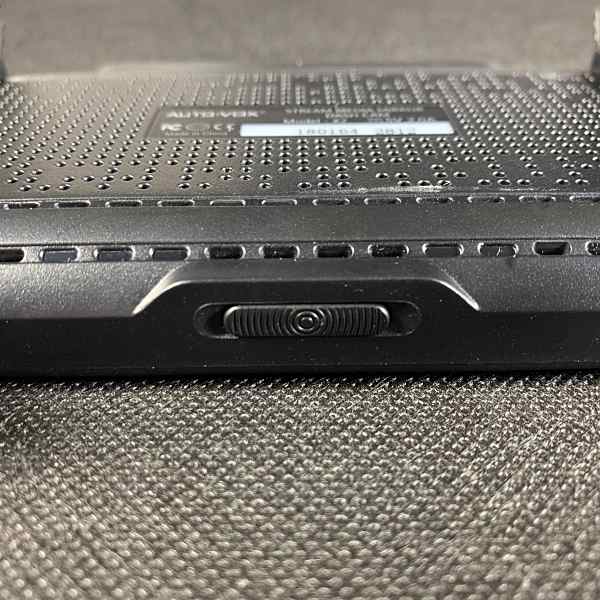
The power button is located in the center on the bottom.

The unit requires a MicroSD card (not included). It supports 64GB to 128GB. Note: make sure that you use a class 10 card which is meant for recording and playing back Full HD video.

Installation

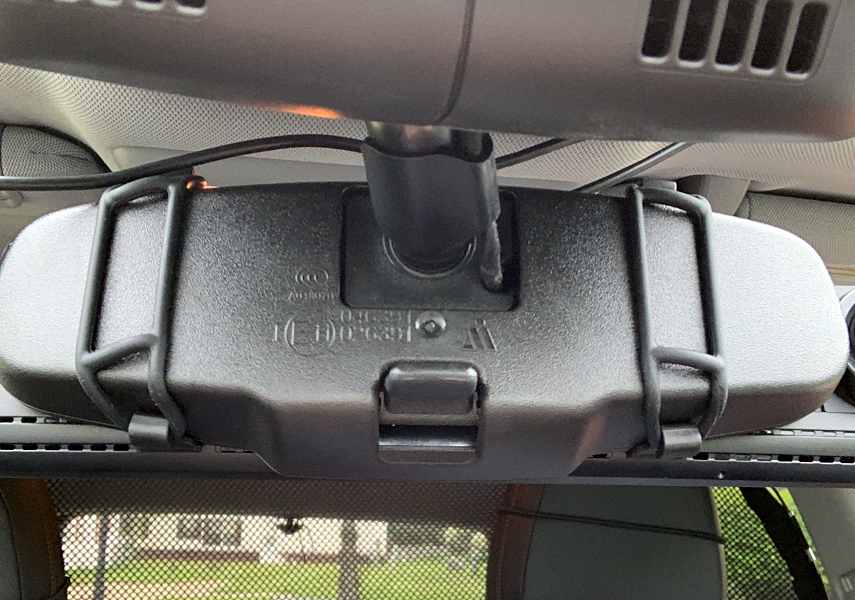
The X2 attaches over the top of your cars rearview mirror using to elastic bands. It only took me a couple of minutes to strap it onto the mirror.

The most challenging part was running the various cables. However, after a bit of planning and some trial and error, I was able to run all 3 cables without much problem. And if I do say so myself, did a great job of hiding them too. 

I have a 2019 Chevy Trax which already has a backup camera. My reason for installing the X2’s rear camera was to use it in lieu of the rearview mirror. So I just mounted it inside the car using the 3M adhesive on the base of the camera.

Overall installation from start to finish was under 2 hours.

Display

The X2’s display has a 9.88” LCD touch-sensitive screen. The unit automatically powers on when you start your car and powers down when your car is turned off. To manually power the unit off, press and hold the power button for 3-seconds.

Time and date are shown in the upper right-hand corner of the display. In the lower left corner, a small compass icon indicates your driving direction.

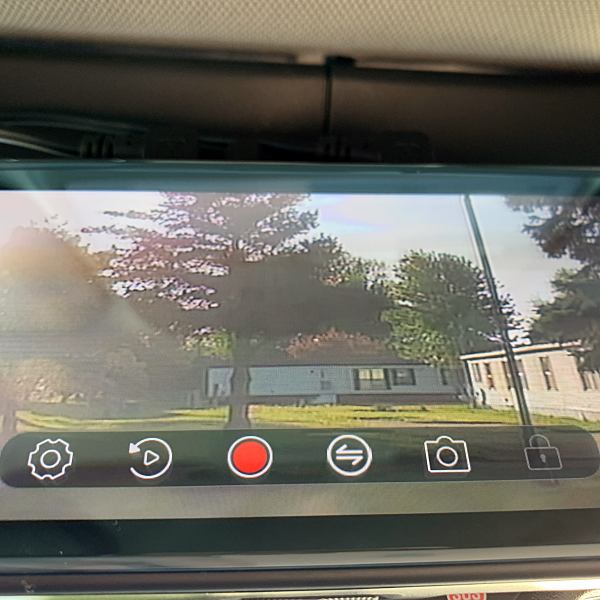
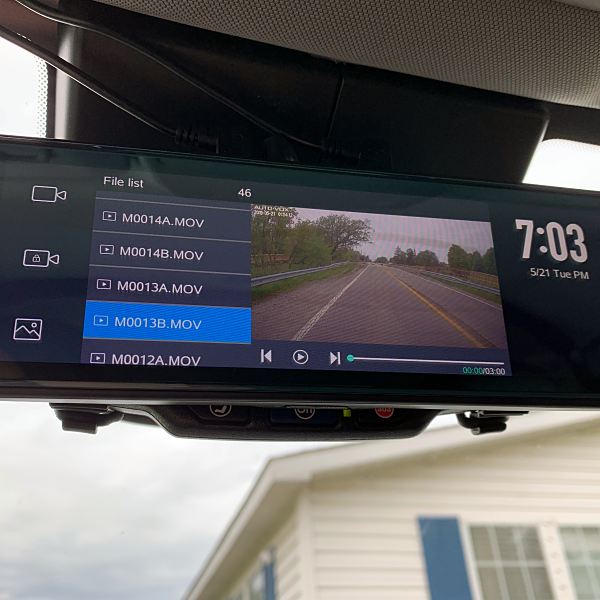
A tap anywhere the screen brings up the Touch Screen Interface. This brings up six different icons. The Settings Menu, DVR video playback, Start/Stop video, Camera switching front/back, Screenshot, and Emergency Lock – Lock the Video as SOS file (will not be covered by Loop-recording).

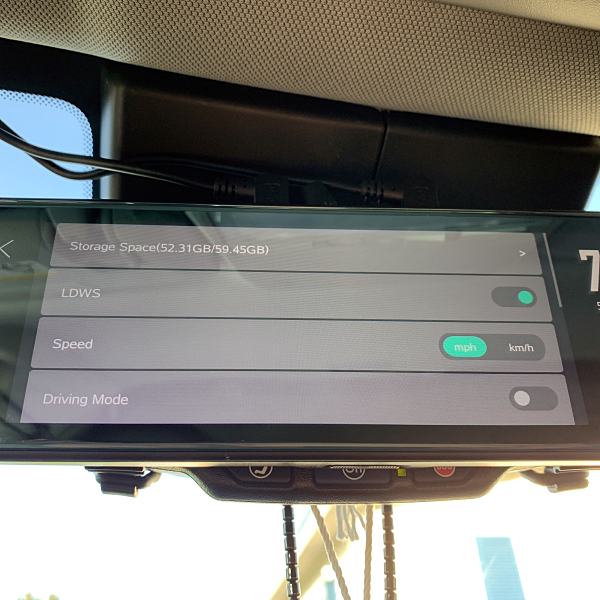
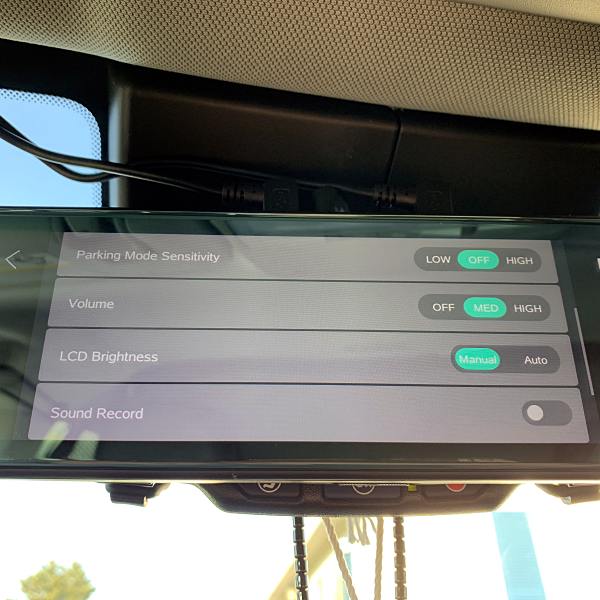
The Settings Menu allows you to select and customize all of the X2 features. (Note: You need to pause recording before entering into the menu.)

X2 can be used in two different ways while driving. In Driving Mode the camera display is turned off, and it functions as a standard analog mirror that displays speed and direction information. 

If you choose you, can have the screen display the image from the rear cam. I really like this feature, and I use it almost exclusively. Using the rear camera, you get a full 140º wide angle real-time image. It almost totally eliminates the cars blind spots. And you feel like you can see everything behind you. Much better than my cars rear view mirror.

You can also toggle between the two modes. When in Drive Mode tapping the screen will bring up the rear cam view. You can go back to DM by pressing the power button.

The Lane Departure Warning System(LDWS) will sound an alarm when your car is veering into another lane. You can enable this feature in Settings.

I found the LDWS to be hit or miss. Sometimes I got a warning others times I didn’t. So I just turned the feature off.

Overall the display is very nice. The image is clear and bright, and the touch-screen is very responsive. My only complaint, it picks up a lot of glare, especially on sunny days. However, I was able to alleviate some of the glare by tilting the mirror.

Cameras

The front camera is mounted on the front of the unit. The camera has two resolutions, 1080P, which is the default resolution & 1296P. I set it at 1296P, and the image is very good. It’s bright and crystal clear so you can see details like license plate numbers. It also gives you a nice wide 140º viewing angle.

The rear camera has the same 140º wide viewing angle. Unfortunately, it has a disappointing 720P resolution. The image quality is still good, but not anywhere near as clear as the front camera. The rear camera is also IP68 waterproof. You can see both cams in action in the videos below (Front cam top/Rear cam bottom).

Both cameras do a good job of recording at night. The only issue, there’s blooming around the headlights of approaching vehicles. See the video below (Front cam top/Rear cam bottom).

You can also tilt both cameras up or down by sliding your finger up or down on the screen.

Video recording features

Video recording automatically starts the moment the unit is powered on. The unit uses Loop recording, which can be set at 1,2 or 3 minutes. With Loop recording enabled, you never have to worry about buying additional SD cards when capacity is full.

Parking Mode protects your car when it’s parked. When the DVR detects any collision, it will start recording for a short period of time. I tested it by slamming my cars door. When I turned the unit back on and went to the DVR, there were 2 short videos saved in the Emergency Video section. One for each camera.

Auto-Vox does recommend to hardwire the unit if you want to use Parking Mode. Unfortunately, they don’t provide you with the Hardwire kit. They can be purchased on Amazon for $19.

If you get into a collision, the units G-sensor will automatically lock the video, which means the video can’t be overwritten. It’s saved as an Emergency Video on the SD card and the units DVR.

The DVR function allows you to view all recorded videos directly from the display. You can view regular, emergency videos and screenshots. My complaint with the DVR is the video files are not displayed by date or time, which makes it difficult if you’re looking for a specific clip.

You can also playback videos from the SD card on your computer. I was able to view them on my MacBook Pro. Unlike the built-in DVR, the files are listed with date and time. Note: If you want access to the videos GPS info you must be using a PC.

What I like

  • Touch Screen is easy to use / very responsive
  • Both cameras have a good picture
  • Being able to use the rear camera as the rearview mirror
  • Great wide angle view from the rear camera

What needs to be improved

  • LDWS doesn’t work properly
  • Blooming from headlights at night
  • Can’t access video GPS info on my MacBook Pro
  • SD card slot placement makes it hard to remove the SD card

Final thoughts

On the surface, the Auto-Vox X2 may seem a bit pricey. But you not only get a dash cam, but you also get a backup/rearview camera and a nearly 10″ touch-screen monitor. I feel safer just having it installed in my car.

Price: $259.99
Where to buy: Amazon
Source: The sample for this review was provided by Auto-Vox.

Filed in categories: Reviews

Tagged: ,

Auto-Vox X2 Streaming Media Mirror Dash Cam review originally appeared on The Gadgeteer on June 2, 2019 at 9:00 am.

Note: If you are subscribed to this feed through FeedBurner, please switch to our native feed URL http://the-gadgeteer.com/feed/ in order to ensure continuous delivery.
Speck Presidio Pro Folio 12.9-inch iPad Pro Case (2018) review

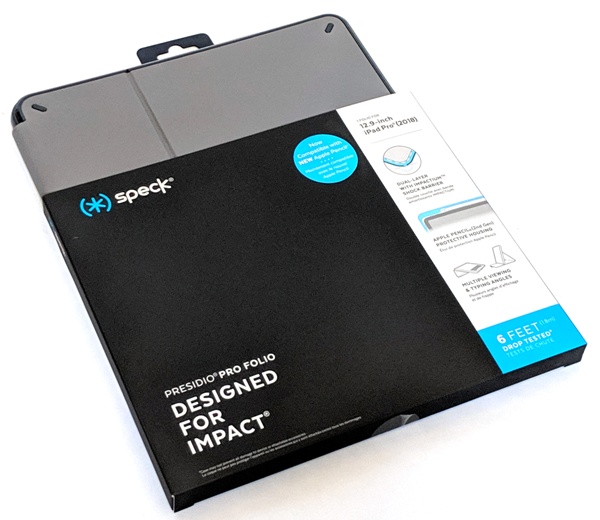
REVIEW – We have a 12.9-inch iPad Pro 3rd generation 2018 tablet (non-LTE version) and Apple Pencil 2 that we’ve been afraid to take with us anywhere for fear of dropping them. We wanted to get a case with drop protection, but most cases out there look way too bulky and have an “industrial” appearance. Fortunately, companies like Speck provide drop protection in slim and simple designs. Speck redesigned their latest Presidio Pro Folio 12.9-inch iPad Pro Case to accommodate the Apple Pencil 2 which charges by magnetically adhering to the iPad.

I was able to test the case and found that it seems to provide the protection that we need (we did not do any drop testing), but is a little heavy, has sharp edges along the front cover, and has a locking clasp instead of a magnetic closure. It does have magnets in the cover to put the tablet into sleep mode when the cover is closed.

What is it?

The Speck Presidio Pro Folio 12.9-inch iPad Pro Case (2018) is a drop-protective covering for the third generation 12.9-inch iPad Pro. The case also accommodates and protects the latest Apple Pencil (Apple Pencil 2).

Hardware specs

  • 6-foot drop-protection with IMPACTIUM layer: Dropped from 6 feet multiple times by independent labs to ensure superior protection.
  • Durable two-layer protection: A tough outer shell and soft IMPACTIUM™ layer with scientifically engineered crash zones provide two layers of protection in a slim, one-piece case. Rugged exterior resists scuffs and abrasions, and a polycarbonate perimeter prevents fraying.
  • Raised Bezel Screen Protection: Gives screen extra protection from scratching and shattering if your tablet falls and lands facedown.
  • Compatible with the NEW Apple Pencil®
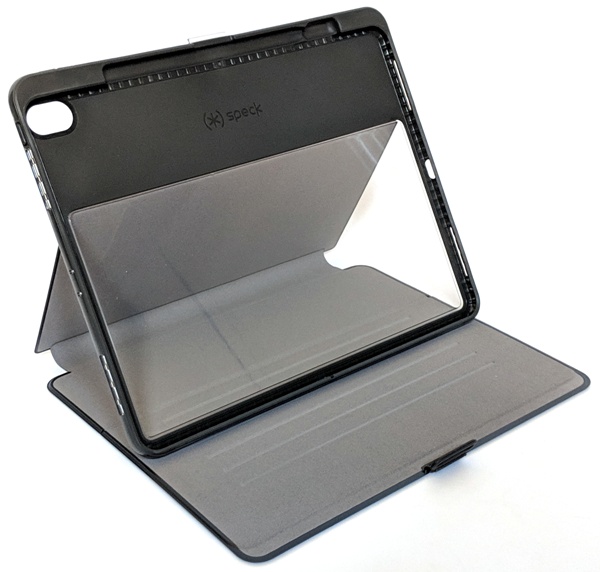
  • Multi-angle stand: Cover converts into a stand for typing and allows you to adjust the angle for viewing videos.
  • Secure closure clasp: Locking clasp ensures the cover stays securely closed to protect the screen in the event of a fall.
  • Supports asset tagging: Chassis has a clear section in the back that lets you see any asset tags.
  • Auto sleep/wake saves battery: Magnets in the cover extend your battery life by automatically putting your iPad to sleep when it’s not in use.
  • Thoroughly Tested for Durability: Speck® cases are independently lab-tested for multiple real-life situations, including extreme drops and temperatures, chemicals, antenna interference, cracks and abrasions, device bending, and more.
  • Lifetime Warranty: Speck® backs each Pro FOLIO case with a lifetime warranty.

Design and features

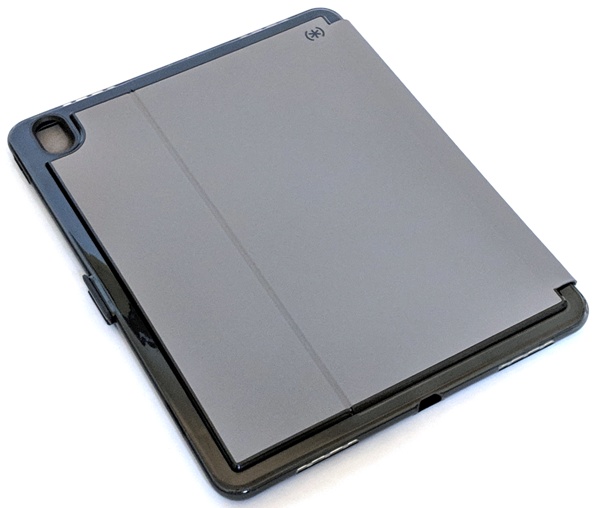
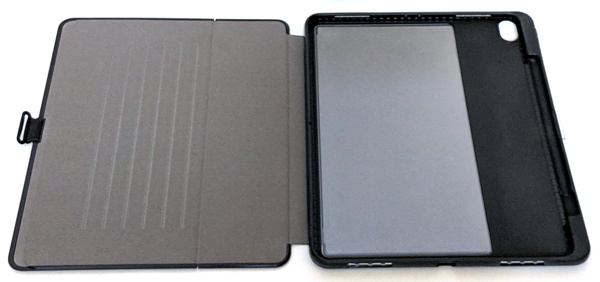
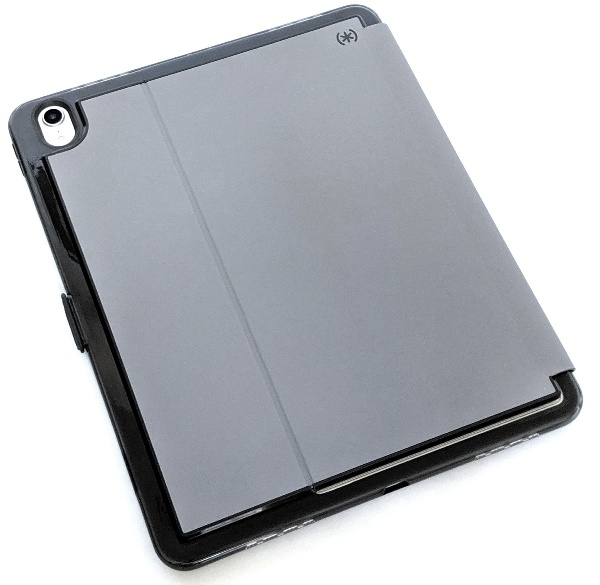
I received the Filigree Grey/Slate Grey Speck Presidio Pro Folio 12.9-inch iPad Pro Case (2018) to review. This case also comes in Black/Black and Argyle Purple/Eggplant Purple. The outer cover is a slightly textured matte grey material that covers a hard outer shell which, in turn, covers a soft impact resistant inner shell (two-layer protection). The back of the case has a cutout to accommodate the iPad Pro’s camera. The side of the case shown above has the volume up and down buttons as well as a locking clasp instead of a magnetic closure. According to Speck, this helps to keep the case closed and therefore protects the tablet’s screen in the event of a fall.

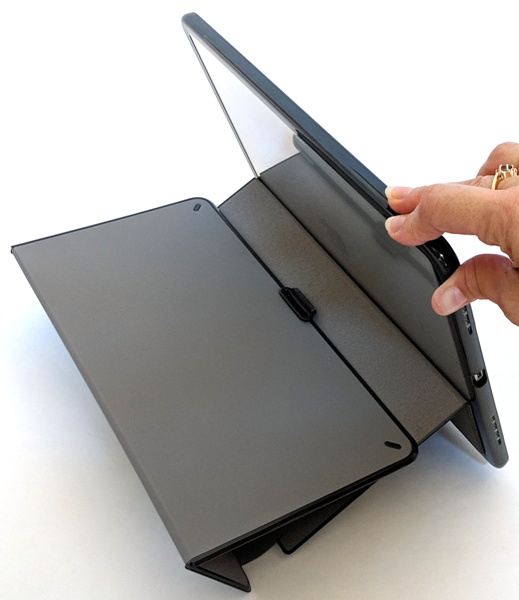
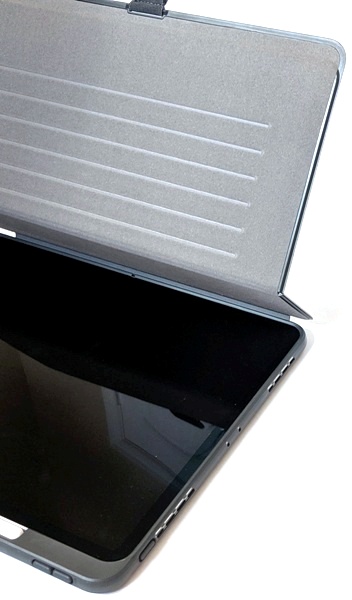
The clasp is a hard plastic oval piece attached to a nylon strap which is looped through the cover of the case. The bottom of the case contains the cutouts for the power port and speakers. The top of the case contains cutouts for the speakers and microphones and also contains the power button. Inside the case, the front cover is lined with a soft material to prevent scratching the screen. It also contains multiple grooves to allow the case to be used as a multi-angle stand.

The back of the case has a clear hard plastic area to allow you to see any asset tags; in other words, it allows you to view any labels on your iPad Pro. But because of the clear plastic, there are no magnets in this area of the case (the Speck iPad Mini cases have such magnets) to hold the back cover – the portion that bends away from the clear plastic area- to the back of the case.

Performance

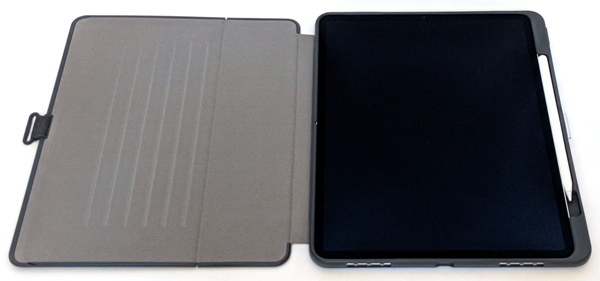
The 12.9-inch iPad Pro 2018 fits very snugly inside the Presidio Pro Folio case. In fact, it was quite difficult getting the iPad into the case. And now that it’s in, I don’t intend on getting it back out. Our iPad and its case are now one with each other.

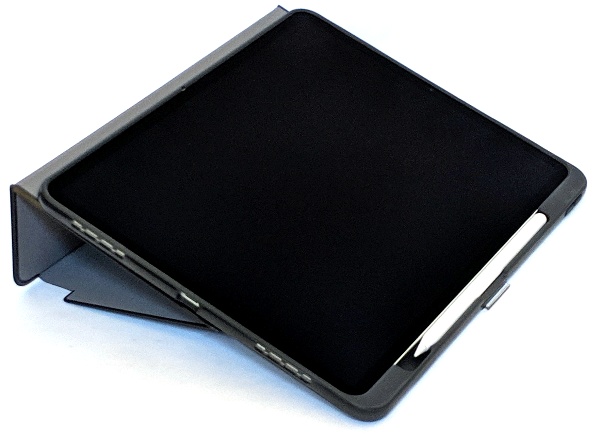
The case accommodates the Apple Pencil 2 very nicely (note: the tip of the pencil should be pointed toward the bottom of the case) and allows the pencil to magnetically adhere to the iPad Pro to charge without any issues. Speck designed the case such that there is enough room to stick your finger in just below the tip of the pencil to easily pop it out. Those of you with larger fingers may have a little more difficulty accomplishing this, in which case, using your pinkies may work best. The side of the case shown above displays the volume up and down buttons. From the above view of the iPad, you can see the raised bezel that helps to protect the screen from scratches or even drops if the iPad falls and lands facedown (according to Speck). All of the cutouts lined up well with the speakers and the charging port. The opening for the charging port seems large enough to accommodate a variety of USB-C cables.
The above photo shows how the cutouts on the top of the case line up precisely with the speakers and the microphones on the iPad Pro. You can also see the power button on the top of the case.

All of the buttons are easy to press and work well.

The cutout for the camera provides plenty of room for the camera, its microphone, and the sensor. The back of the case is raised enough so that the camera is protected when the iPad is laying on a flat surface.

Our iPad Pro is used mainly for creating magical works of art. With the case on, it is easy and comfortable to use the iPad while it is laying on someone’s lap. It also works well in the stand configuration.  Furthermore, by folding the front cover toward the back of the case as shown above… …the case can be configured to work at an “art angle”.

Even though the case has a locking clasp instead of a magnetic closure, the cover does have magnets that will automatically put the iPad into sleep mode when closed to help preserve battery life. And having a locking clasp ensures that the case will stay closed if it suffers from a fall.

Speck states that independent labs have drop-tested the Presidio Pro Folio from six feet several times to ensure the protection of the 12.9-inch iPad Pro (2018). I have used Speck cases on smaller devices in the past and having accidentally dropped them without any damage, I believe that this case will protect our iPad.

In addition, the case is fairly slim for a drop-protection type of case. It is also simple in design and allows you to use the case as a multi-angle stand.


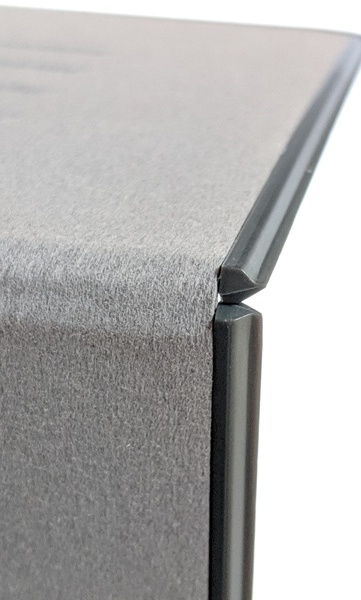
The case does, however, add some weight to the iPad and the front cover edges are sharp as shown in the right photo above (the left image gives you a reference point for the image on the right). It would also be nice to have a larger selection of colors to choose from.

What I like

  • The Speck Presidio Pro Folio 12.9-inch iPad Pro Case provides drop-protection
  • It accommodates and protects the Apple Pencil 2
  • It has a simple attractive design
  • It’s not too bulky

What needs to be improved

  • The edges of the front cover are sharp
  • It would be nice to have more colors to choose from

Final thoughts

The Speck Presidio Pro Folio 12.9-inch iPad Pro Case provides drop-protection for the ever expensive 12.9-inch iPad Pro (2018). Speck cases have historically provided such protection without being too bulky and looking “industrial” which is why I find it to be one of the more attractive iPad Pro cases. Because we’ve never had anything larger than an iPad Mini, all our cases have had magnetic closures, so getting used to the locking clasp takes a little time. This clasp is supposed to keep the case closed even when dropped and thus provide protection for the screen. This updated case actually accommodates the Apple Pencil 2 nicely (the earlier version of the 3rd generation iPad Pro Speck case did not), allowing it to magnetically adhere to the iPad to charge.

It does, however, add weight to the iPad; the front cover has sharp edges; and if you are used to magnetic closures, it takes a little time to get used to the locking clasp. These are minor inconveniences and thus I recommend using Presidio Pro Folio 12.9-inch iPad Pro Case (2018) to protect your iPad Pro.

Price: $59.95 – $89.95
Where to buy: Amazon or Speck
Source: The sample of this product was provided by Speck.

Filed in categories: Reviews

Tagged:

Speck Presidio Pro Folio 12.9-inch iPad Pro Case (2018) review originally appeared on The Gadgeteer on June 1, 2019 at 9:00 am.

Note: If you are subscribed to this feed through FeedBurner, please switch to our native feed URL http://the-gadgeteer.com/feed/ in order to ensure continuous delivery.
Nodpod weighted sleep mask review

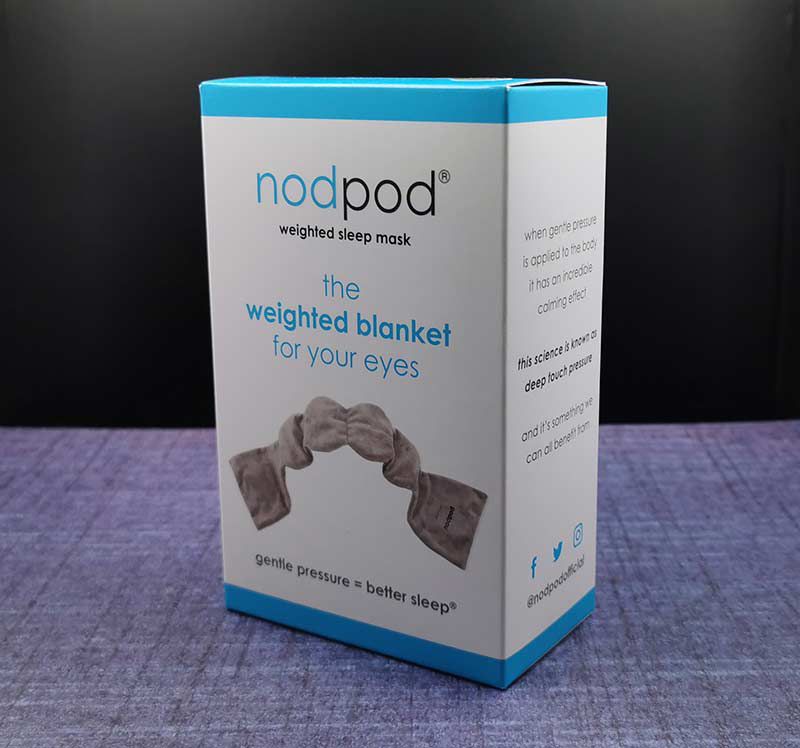
REVIEW – In the last year or so, weighted sleeping blankets have been a trendy product for people who have sleep issues. Why would you want a heavy blanket on you while you sleep? Apparently, when gentle pressure is applied to the body, it has a calming effect. This is known as deep touch pressure therapy and if it’s good for your body, it has to be good for your eyes as well, right? Let’s check out the Nodpod weighted sleep mask.
What is it?

Nodpod is a sleeping mask that covers your eyes to block out the light to help you sleep. But this mask goes one step further and applies gentle pressure to your eyes to help you relax and fall asleep faster.

Design and features

Avaliable in six colors, the Nodpod has a soft microfiber fleece side that will you can use to keep you warm.

The other side is made of knit jersey cotton (like a T-shirt) to keep you cool.

The sleep mask features four pods that are filled with microbeads to add weight.

One end of the sleep mask has a slit in the material that you can use to fasten the mask around your head.

The other end slides through the slit to make it easily adjustable.

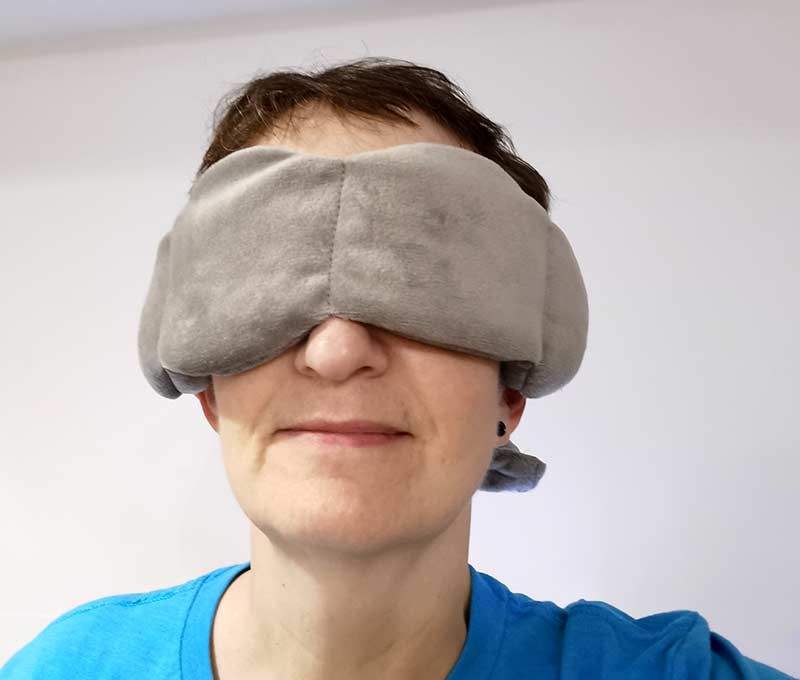
Hmmm, looks like someone just woke up from a nap. Look at that messy hair! 😉

The ends of the Nodpod are flat and not filled with beads so that you can wear the mask and sleep on your back or side without any discomfort. Or, you don’t have to fasten the sleep mask at all and can just lay it across your face if you tend to sleep in one place and not flop around a lot.

You can even use it sitting up, so it would be useful while traveling on a plane, train, etc.

The mask is soft and the material is scent-free and it’s machine washable. You can even put it in the freezer and it will remain flexible and won’t sweat.

What I like

  • Simple product
  • Washable
  • Comfy sleep gear

What needs to be improved

  • Price

Final thoughts

So did the Nodpod elevate my sleep game? I’m not sure if it improved my sleep all that much as I really don’t have any sleep issues. But I know that it felt very comfortable and helped me drift off to nap nap land a little quicker than I usually do. I think I may have slept deeper and more restful when using it too, but that’s just a guess and I think most ordinary sleep masks might do the same thing.

I do like that the Nodpod helps to block out light if you’re a day time napper or sleeper which is what I would normally want to use a sleeping mask for in the first place. In the past, I’ve used a towel or a rolled up T-Shirt to block out the daylight, but the Nodpod is a more elegant solution. For me though, I’m not sure it’s worth $30 when I can use a rolled up a towel for free.

Price: $29.99
Where to buy: Amazon
Source: The sample for this review was provided by Nodpod.

Filed in categories: Reviews

Tagged:

Nodpod weighted sleep mask review originally appeared on The Gadgeteer on May 31, 2019 at 11:00 am.

Note: If you are subscribed to this feed through FeedBurner, please switch to our native feed URL http://the-gadgeteer.com/feed/ in order to ensure continuous delivery.