Glacier Tek Sports Cool Vest Review

REVIEW – Let’s have a show of hands. How many of you like to do yard work while the sun is bearing down? (crickets) I thought so—me neither. In fact, humid Central Florida summers (where I live) can be some of the worst anywhere. When oppressive heat is combined with thick wet air, temperatures can feel as much as 15° above the actual temperature. In fact, while standing outside and doing nothing, I still sweat like a pig during summer months. Which brings me to something that may help with the heat—the Glacier Tek Sports Cool Vest.

What is it?

The Glacier Tek Sports Cool Vest is just that—a vest made to help keep you cool while working outdoors for extended periods of time. Whether you’re a weekend yard worker, outdoor exerciser, or pro who has to work outdoors, the Glacier Tek vest can bring down your core body temperature helping you withstand the hottest days. That’s the goal, anyway. Does it work as advertised?

Hardware specs

  • Adjustable side straps
  • Self-contained and portable
  • One size fits all
  • PureTemp Cooling Packs
  • Maintains 59°F up to 2-3 hours in 100° heat

In the box

  • Sports Cool Vest
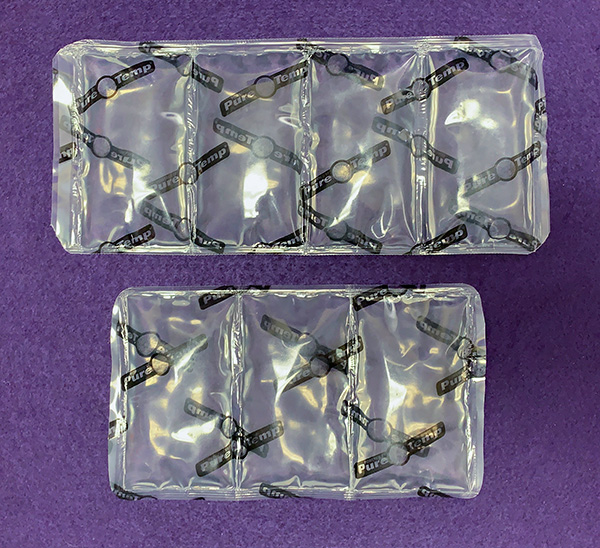
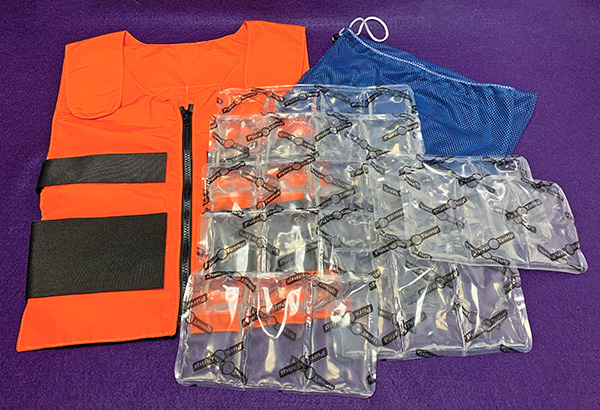
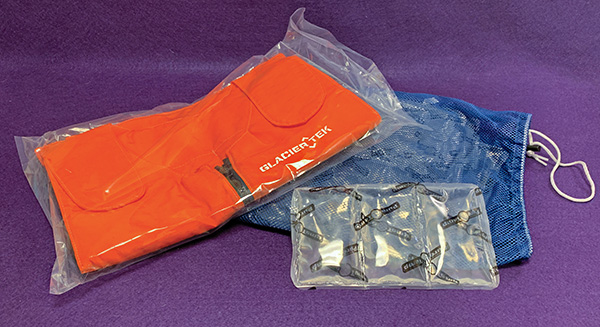
  • One set of eight cooling packs (four large, four small)
  • Mesh bag

Design and features

Before I get into the review of the Glacier Tek Sports Cool Vest, let’s understand the different kinds of cooling vests. There are circulatory cooling vests—a NASA-developed technology that cools the body by circulating chilled water through a network of tubing sewn inside the vest. Race car drivers use this method to help with the extreme heat inside a car. Evaporative cooling vests—made up of fabric that uses evaporation to provide cooling. The vest is soaked in water and then the dampness evaporates as its worn. This method works well in hot, dry climates—in other words, it will not work in Florida. Then there’s phase change cooling Vests. These are designed with phase change material (PCM)—a non-toxic liquid inside leak-proof packs that stay cool in high heat. The vest freezes at 58°F and stays at that temperature for about 2-3 hrs. This method works in all climates—dry and humid. The Glacier Tek Sports Cool Vest uses PCM technology.

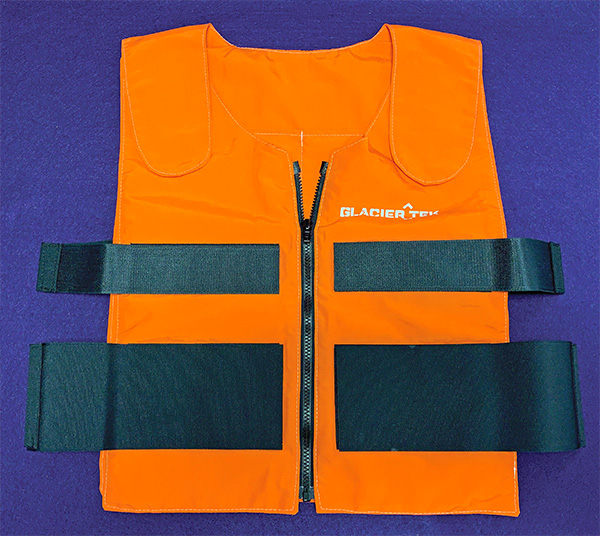
The Glacier Tek Sports Cool Vest comes in four colors: Safety orange, Red, Gray and Blue. I requested and received the orange vest so my wife could easily see me working in the yard and be able to tell if I was vertical or horizontal. She worries. 

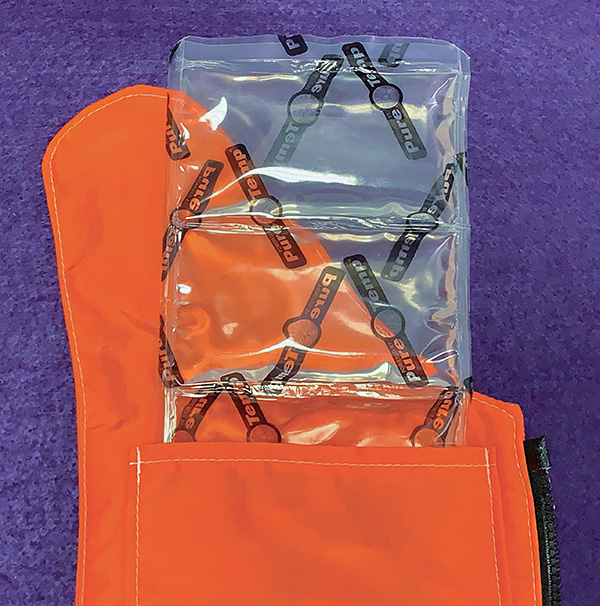
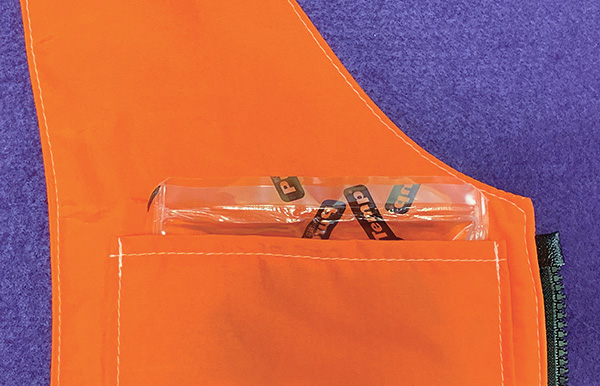
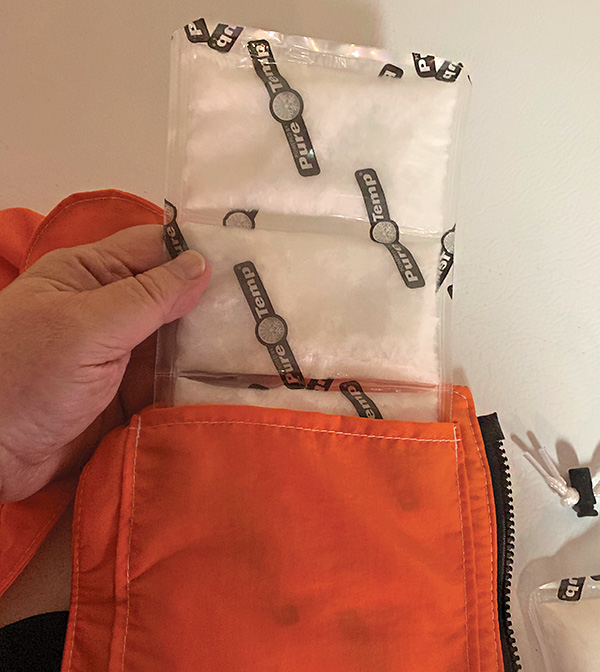
The vest comes in only one size, but four wide, removable velcro straps on the side make it easy to fit any body size or shape. The vest is machine washable and sewn together well with a sturdy front zipper. Packs easily fit into four hidden interior pockets. Both the large and/or smaller packs fit well. They can be used separately of doubled-up for a longer cooling effect. Because the packs are divided into sections, they remain flexible even when frozen. 

Packs can be placed in a freezer for one hour and “recharged” by dipping into a cooler filled with ice-water for 20-30 minutes. When placed into an included mesh bag, the packs don’t take up a lot of room in a freezer. It takes up about as much room as a small turkey.

So does the vest work or not? It does, but it also depends on what your expectations are. It’s like introducing a digital audio converter (DAC) to headphones or speakers—stay with me here, let me explain. DACs are designed to improve the audio quality of any headphone or speaker. When connected, the initial response is often one of disappointment and you may be thinking, “I don’t hear any improvement.” However, after using a few days, when you disconnect the DAC, you immediately notice how much worse the audio sounds!

It’s the same way with this vest. After using it once or twice, my initial reaction was like the Peggy Lee song, “Is That All There Is?” However, once it’s not used, the heat bothers me much more. 

When the Glacier Tek Sports Cool Vest is used, I still get hot. I fact, my t-shirt is still wet from sweat and my head and face still sweat as much as ever (I hate how sweat runs into my eyes). But here’s the important part: When I finish working in the Florida heat, I’m not as wiped out when using the vest as I am when not using it. Before using the vest, it would take me 2 hours to cool down my body. The Glacier Tek Sports Cool Vest helps prevent that. Now when I finish, I’m not as hot and I recover much more quickly. In Florida, that’s a win!

What I like

  • Easy to freeze packs
  • Packs fit into vest well
  • Vest is easy to put on and remove 

What I’d change

  • Expensive

Final thoughts

The effectiveness of the Glacier Tek Sports Cool Vest grows on you with use. Don’t use it once or twice and give up. Use it a few times and you will begin to feel the benefits more by what does not happen (from the effects of extreme heat) than by what does happen.

Note: If the Sports Cool Vest isn’t your style, Glacier Tek makes other styles and kinds of vests that may be a better fit for your needs.

Price: $189 US
Where to buy: Amazon
Source: The sample of this product was provided by Glacier Tek.

Filed in categories: Reviews

Tagged:

Glacier Tek Sports Cool Vest Review originally appeared on The Gadgeteer on July 2, 2019 at 9:00 am.

Note: If you are subscribed to this feed through FeedBurner, please switch to our native feed URL http://the-gadgeteer.com/feed/ in order to ensure continuous delivery.

Satechi M1 Wireless Mouse review

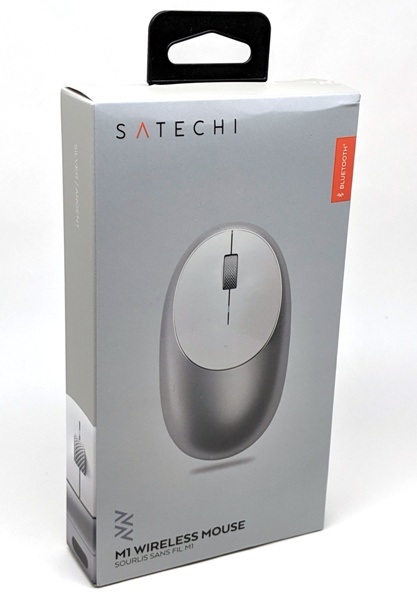
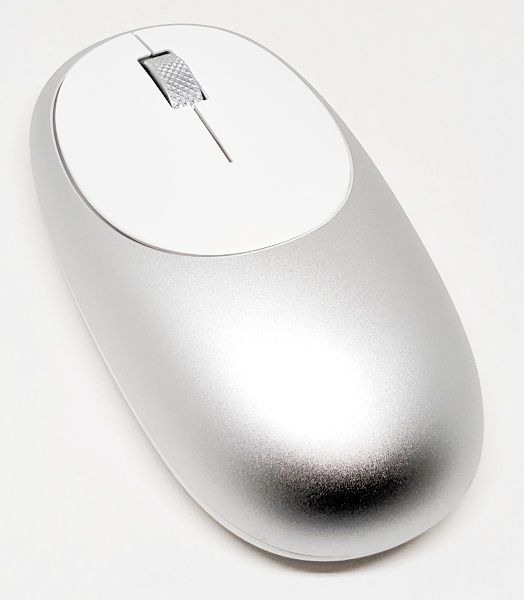
REVIEW – I really prefer using a mouse over my laptop’s trackpad and Bluetooth mice are ideal because they don’t take up my valuable USB-A port. Satechi recently came out with the M1 Wireless Mouse which is a beautiful mouse – the top and wheel are made of aluminum. I got the chance to review this mouse and I found that it is a nice travel companion for me because it takes up a small amount of space due to its low profile. It was easy to pair to my laptop and provides basic typical functions using the left and right click mouse buttons and the wheel/middle click button, however, it doesn’t seem to work well on my granite countertop where my laptop resides (thus it may not work on other shiny surfaces either).

What is it?

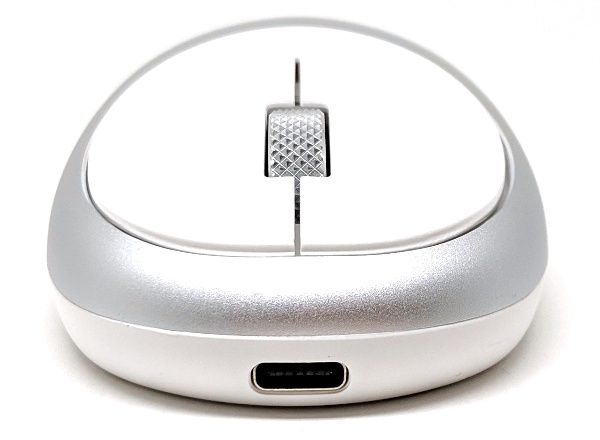
The Satechi M1 Wireless Mouse is a computer input device used to move a cursor around on the computer screen. This particular mouse connects to a computer wirelessly via Bluetooth 4.0 and recharges using a USB-C-to-USB-A charging cable.

What’s in the box?

  • Satechi M1 Wireless Mouse
  • User Manual
  • USB-C (USB-C to USB-A) charging cable

Hardware specs

  • COMPATIBLE DEVICES: Mac Mini, iMac, iMac Pro, MacBook Pro/Air, MacBook, Chromebook, Microsoft Surface Go, Dell XPS, Lenovo, HP Spectre, ASUS, most Bluetooth-enabled computers and tablets. Supports Mac, Windows, Android and Chrome OS. Not compatible with iOS devices.
  • CONNECTOR TYPE: Rechargeable Type-C port
  • DIMENSIONS & WEIGHT: 4.37″ x 2.25″ x 1.25″, 6.2 oz
  • MODEL NO/UPC: ST-ABTCMS/879961008277 (Silver), ST-ABTCMM/879961008260 (Space Gray), ST-ABTCMG/879961008291 (Gold), ST-ABTCMR/879961008307 (Rose Gold)
  • GUARANTEE: 1 Year Manufacturer Warranty

Design and features

The Satechi M1 Wireless Mouse is a sleek looking basic Bluetooth mouse. The top and wheel of the mouse are made from aluminum. Satechi sent me a silver mouse, but it also comes in gold, rose gold, and space grey colors.

This mouse does not need batteries. It is recharged via USB-C cable.

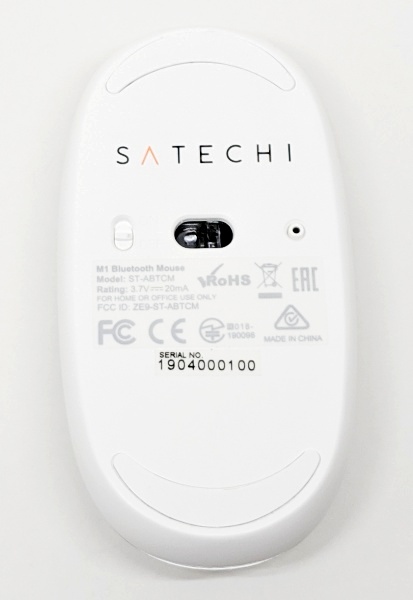
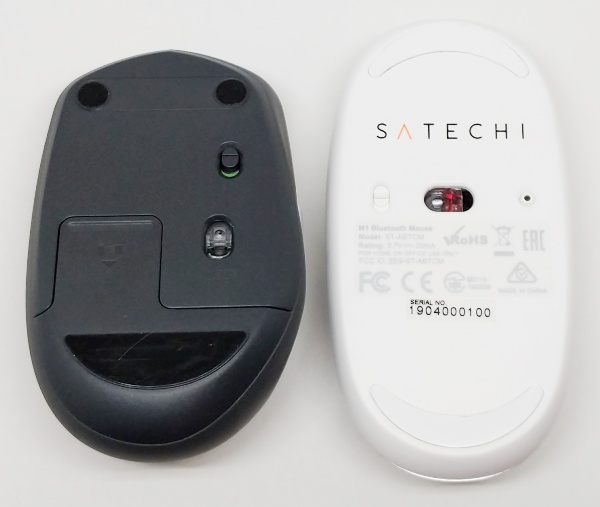
The bottom of the mouse contains the On/Off (Power) switch, the red LED and optical sensor, and the Connect button (or Bluetooth pairing button).

There is a small LED located below the scroll wheel of the Satechi mouse that lights up blue when the mouse is charging and is supposed to shut off when it is finished charging. This LED will also flash red when the mouse is low on battery.

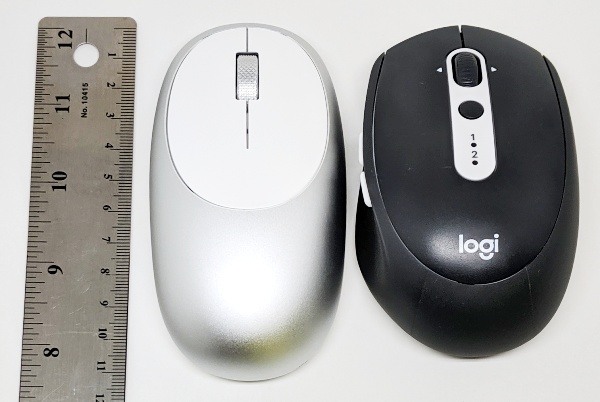
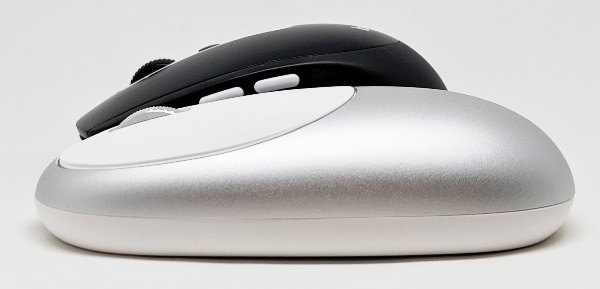
The Satechi mouse is a little longer than my Logitech M585 mouse. And it has a lower profile compared to my Logitech mouse.

The dimensions compared:

  • Satechi M1 Wireless Mouse – 4.37″ (111 mm) L x 2.25″ (57 mm) W x 1.25″ (32 mm) D
  • Logitech M585 mouse – 4.05 in (103 mm) L x 2.52 in (64 mm) W x 1.57 in (40 mm) D

When both mice are powered on, you can see that the Satechi mouse has a visible LED versus that of my Logitech mouse.

Setup


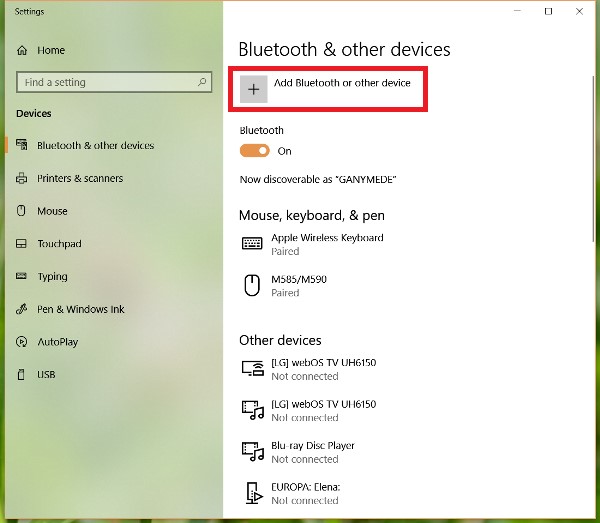
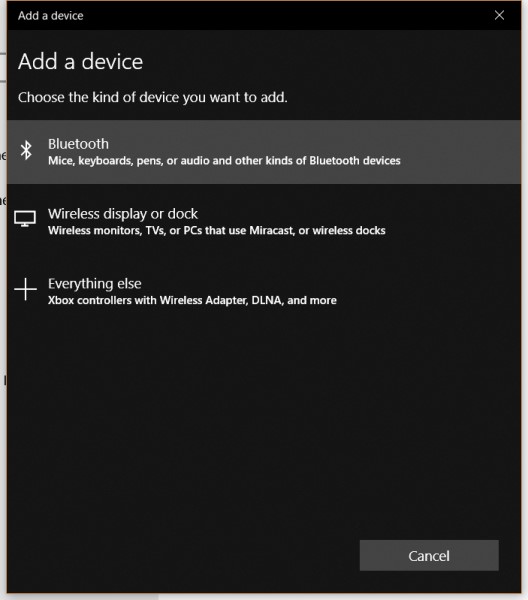
To pair the Satechi mouse with my Windows 10 laptop, I went into my laptop settings (Start > Settings > Devices) and made sure that my laptop’s Bluetooth was on. I then clicked on “Add Bluetooth or other device” as shown in the left screenshot above.  Afterward, I clicked on “Bluetooth (Mice, keyboards, pens, or audio and other kinds of Bluetooth devices)”.


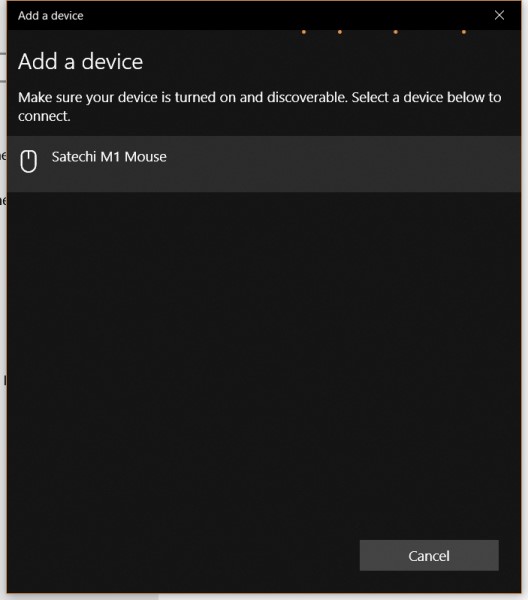
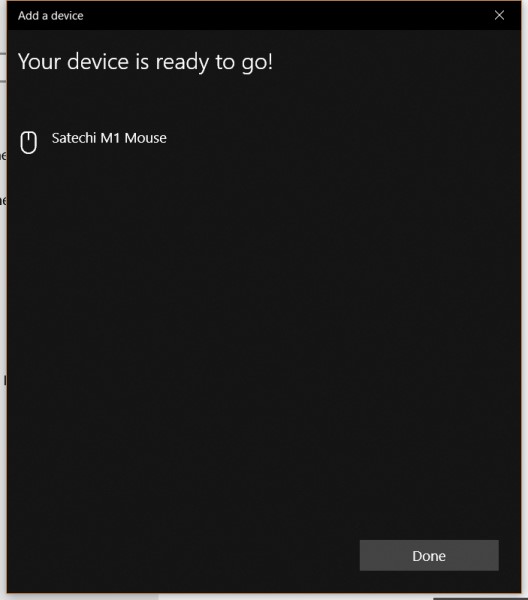
The “Add a device” screen told me to make sure that my device that I was trying to pair to my laptop was on and discoverable. With my Satechi mouse powered on, I pressed the Connect button on the mouse for about three seconds after which I saw the LED on the mouse flash blue. Then on my laptop, I saw that the Satechi M1 Mouse was discovered. I then clicked on it and it was successfully paired to my laptop.


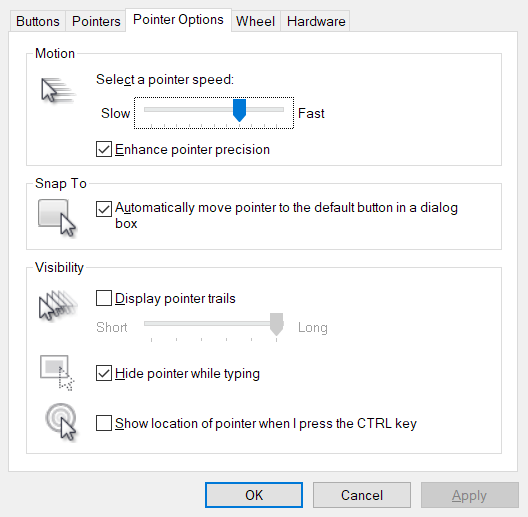
I tweaked the Satechi mouse features by going into the Settings on my computer (Start > Settings > Devices > Mouse > “Additional mouse options”). I like a little faster pointer so I increased the pointer speed under the Pointer Options tab.

Performance

After pairing the mouse to my laptop, I tried using it. I discovered immediately that stuttered. I found out that this was because I was using it on a shiny granite surface where my laptop normally sits. This problem did not exist if I used a mouse pad. It’s been a long time since I’ve used an optical mouse that had trouble on any surface, probably because I’ve been using solely Logitech mice in the past which have never given me problems on any of the surfaces I use them on.

The Satechi mouse provides basic functions with the normal left and right click buttons and a scroll wheel/middle click button. Tracking seemed accurate enough as long as I was using the mouse on a non-glossy surface. I had no problems placing my cursor in specific places in a document that I was working on or selecting things with the left click button or bringing up menus with the right click button. Using the middle click button (short press on the wheel) opened web pages in a new tab and closed Chrome tabs without issues. The Satechi mouse also has a low profile making it is easily portable when traveling (it fits nicely in my laptop travel case).

However, while using it, I found that I really missed being able to horizontally scroll through web pages (navigate forward a page or backward a page by tilting the mouse wheel to the left or right) which is a feature that my Logitech mouse has. I also found that periodically after several days of not having used the Satechi mouse with my laptop, I had to remove the mouse from the list of paired devices then re-pair the mouse to the laptop for it to work again. And one last thing to note: the documentation states that the Satechi mouse is compatible with Mac computers and laptops but not with iOS devices.

What I like

  • Beautiful brushed aluminum finish (my mouse is silver colored) which is possibly more durable because the top and wheel are made out of aluminum
  • Its low profile is good for travel
  • Provides basic left and right click buttons and wheel/middle click button functions

What I’d change

  • Does not work well on granite (or possibly other shiny surfaces)
  • Not compatible with iOS devices
  • No wheel tilt for horizontal scrolling
  • Periodically need to be re-paired with my laptop
  • I have more functions on my Logitech mouse (M585) than this mouse which costs about the same

Final thoughts

The Satechi M1 Wireless Mouse is a really beautiful mouse whose face is made out of brushed aluminum. It comes in silver, gold, rose gold, and space grey colors. It provides very basic functions (left and right click mouse buttons and a scroll wheel/middle click button). It doesn’t work well on my granite countertop where I do most of my work on my laptop, but it works well on all other surfaces that I have tried. When contrasting the Satechi mouse with my Logitech mouse, the Satechi mouse has a lot fewer features for the same price. However, in addition to its good looks, this mouse has a low profile and thus stores in my laptop’s travel case much better than any of my Logitech mice. I recommend this mouse if you only need basic functions and you really like the brushed aluminum look.

Price: $29.99
Where to buy: Satechi or Amazon
Source: The sample of this product was provided by Satechi.

Filed in categories: Reviews

Tagged:

Satechi M1 Wireless Mouse review originally appeared on The Gadgeteer on July 2, 2019 at 8:00 am.

Note: If you are subscribed to this feed through FeedBurner, please switch to our native feed URL http://the-gadgeteer.com/feed/ in order to ensure continuous delivery.
Fairywill P11 electric toothbrush review

REVIEW – A couple of months ago at my 6-month dental cleaning appointment, my dentist recommended that I start using an electric toothbrush. They wanted me to buy one of the expensive Sonicare toothbrushes that they were selling there in their office. I declined and later bought a Fairywill toothbrush on Amazon for less than $20. I didn’t review that toothbrush but was recently surprised when someone from Fairywill contacted me to ask if I would like to review their new P11 electric toothbrush. I said yes, and here we go!

What is it?

The Fairywill P11 is a USB battery rechargeable electric toothbrush with replaceable brushes.

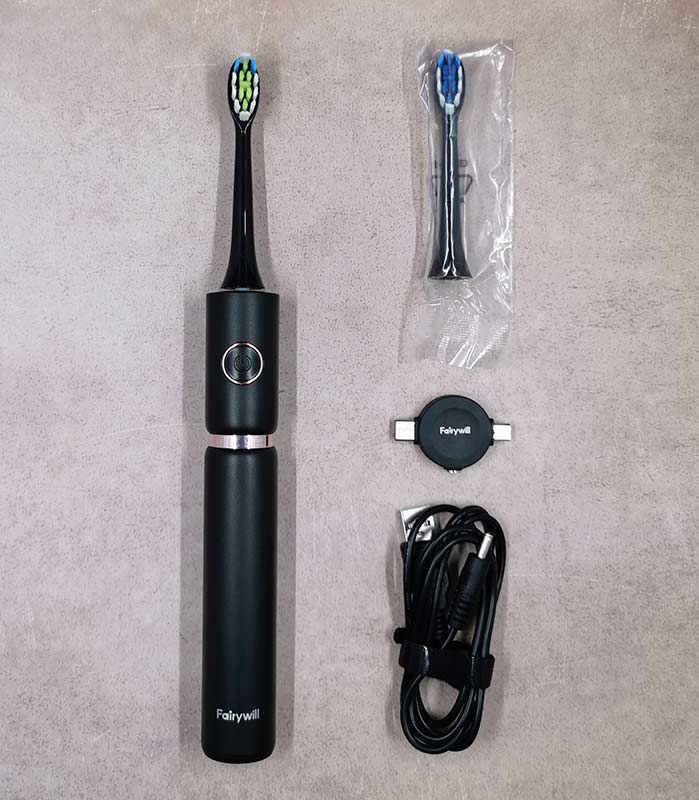
What’s in the box?

  • Fairywill P11 electric toothbrush
  • Extra brush head
  • USB charging cable
  • Travel adapter

Design and features

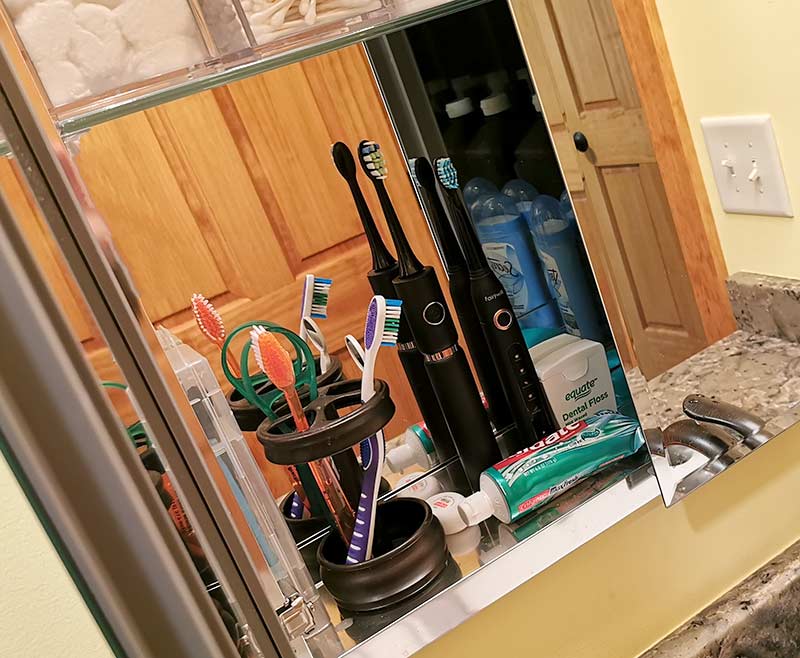
The P11 electric toothbrush is quite a bit larger compared to my other Fairywill electric toothbrush which is shown in the first image of this review.

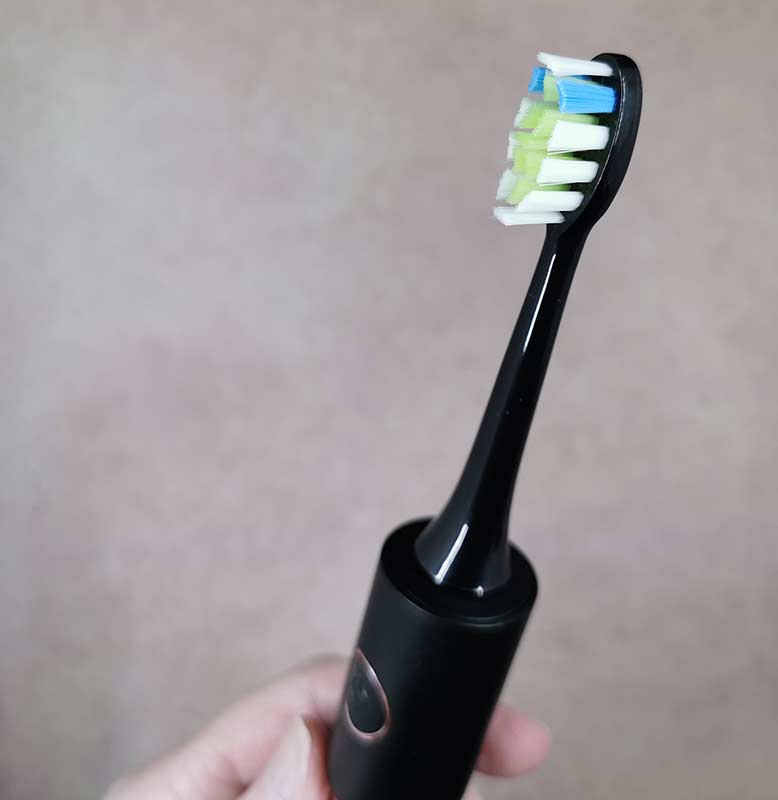
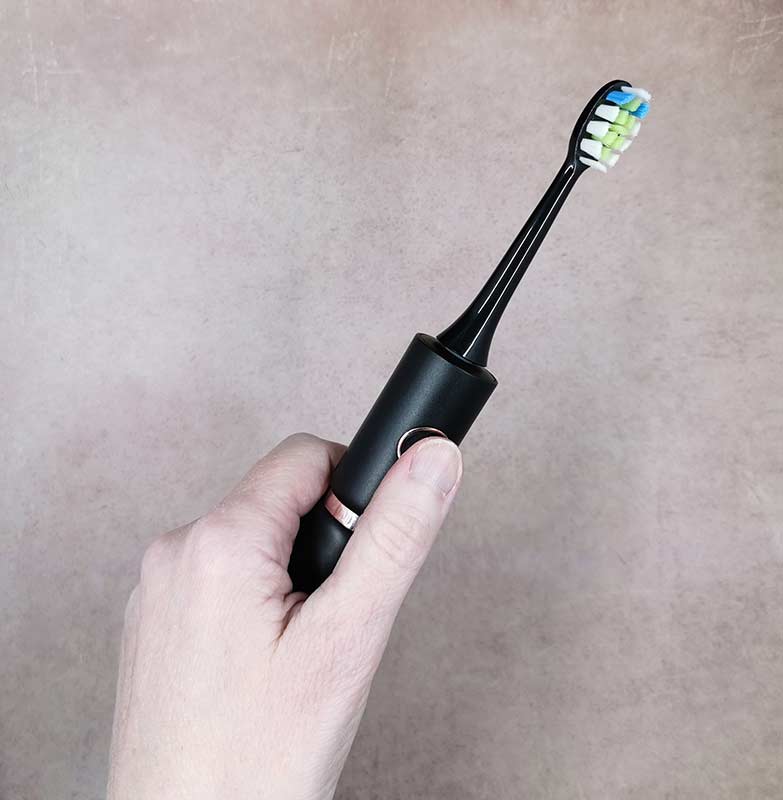
The P11 has a black plastic housing with gold-tone accents. The handle is comfortable to hold for an adult but I think it might be too large and bulky for a child to use.

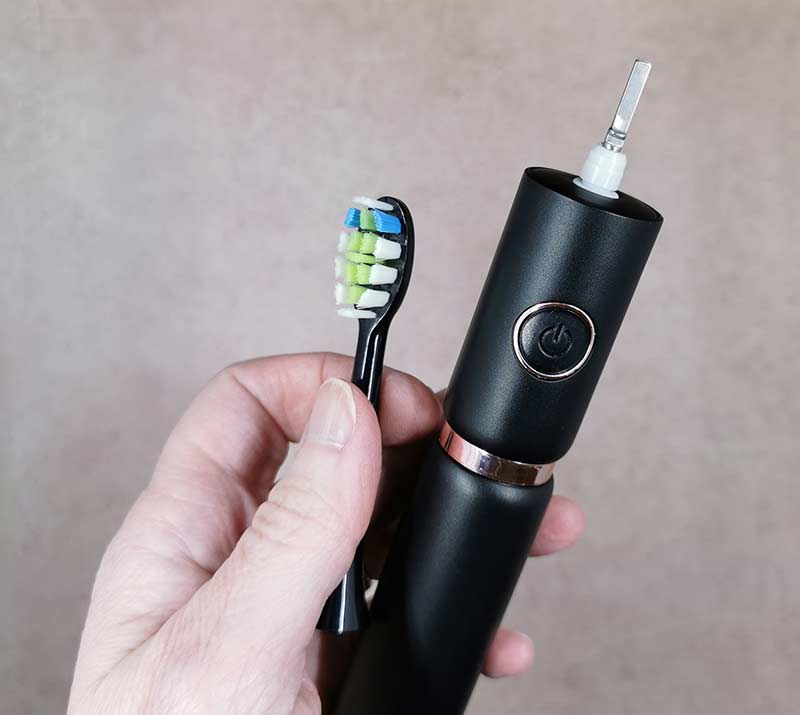
The toothbrush head easily pulls off from the top of the handle when it’s time to replace it and it is just as easy to reseat when installing a new one. At the time of this writing, I don’t have info on the price for the replacement brushes, but I’ll update the review when I have that info to share.

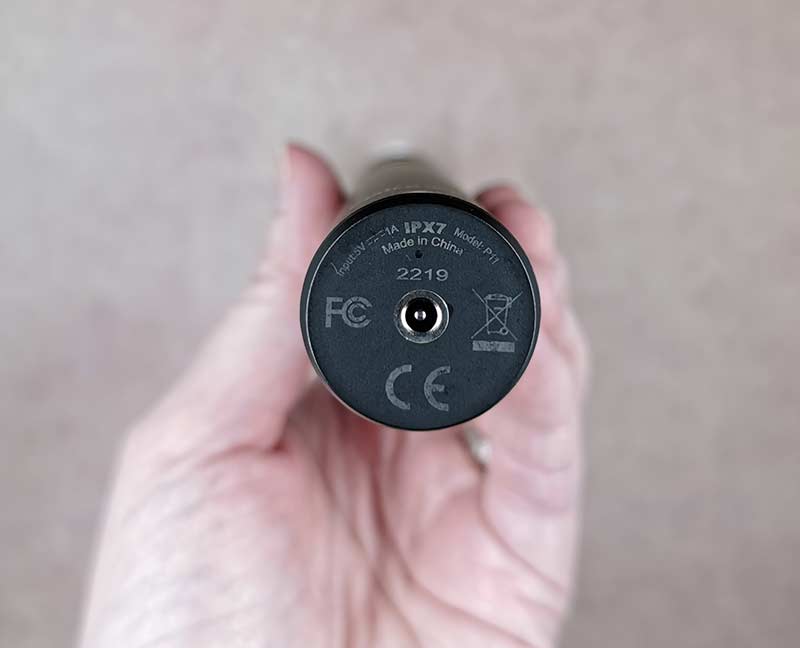
The brush has one button on the handle, a charging status LED around the handle, and a battery charger port on the bottom of the handle’s base.

The port is proprietary, so you will need to use the included USB cable that ships with the toothbrush.

As a little extra gift, a USB adapter is also included so that you can use the same USB cable to charge USB-C and micro USB devices.

A 2hr or so charge of this electric toothbrush should allow for up to 30 days of use so you won’t need to bring the cable and an AC charging adapter (not included) with you while you travel.

Operating the Fairywill P11 electric toothbrush is pretty straight forward. After it’s charged, you can put some toothpaste on the brush and press the button on the handle to cycle through the 3 brushing modes which include: Clean, Soft, and Massage. No matter which mode you select, the brush will do its thing for 2 minutes with 4 30 second intervals. After each 30 second interval, the brush will pause to let you know it’s time to go to the next part of your mouth.

I like to use the P11 electric toothbrush in Clean mode and find that it does indeed help to keep my teeth free of plaque, tartar, and other gunk that might build up if I would fail to brush my teeth two times a day. The 62,000 brush movements per cycle make my teeth feel smooth and I think they even look brighter.

The waterproof rating of IPX7 means that I can rinse off the toothpaste from the head and handle without worrying that it will damage the components.

See it in action

The video above shows the battery status LEDs on the handle while the brush is charging and shows the 3 brushing modes.

What I like

  • Long battery life
  • Large but comfortable handle
  • Powerful brush

What I’d change

  • Include more brushes

Final thoughts

I really like using the Fairywill P11 electric toothbrush. I think it does a better job than a traditional non-electric toothbrush but I won’t know for sure until my next dental cleaning appointment is at the end of August. My hope is that there will be less picking and scraping at that appointment compared to previous appointments. I’ll be sure and do an update then to let you know how my appointment turned out.

Price: $49.99
Where to buy: Pre-order now from Fairywill with delivery due on July 15th.
Source: The sample for this review was provided by Fairywill.

Filed in categories: Reviews

Tagged:

Fairywill P11 electric toothbrush review originally appeared on The Gadgeteer on July 1, 2019 at 12:00 pm.

Note: If you are subscribed to this feed through FeedBurner, please switch to our native feed URL http://the-gadgeteer.com/feed/ in order to ensure continuous delivery.
Alpaka 7VEN Mini messenger bag review

REVIEW – Ok, I’ll admit it. I’m Ian, and I’m a messenger bagaholic.  Through the years I’ve had no-name messengers, multiple  Timbuk2s, a custom made BO-Gear and the list goes on.  When I found another Australian messenger company, Alpaka Gear (yeah, not a very Aussie name. Why isn’t it the Roo, or the Echidna or the Koala? 🙂 )  I knew I had to get my fix and give them a try. How well does it fit my addiction? Will it be the one? Read on………

What is it?

A messenger bag is a messenger bag is a messenger bag.  Obviously, a messenger bag is a very personal item, it’s size, how many pockets, how heavy are all factors that will determine if a messenger bag is for you. Over time as mentioned above, I’ve had multiple messengers all of which get used at different times depending on my requirements such as carry capacity.  The 7Ven Mini Messenger is what I’d consider a medium size messenger designed to be used both for business and personal use and has some very handy features.

Specifications

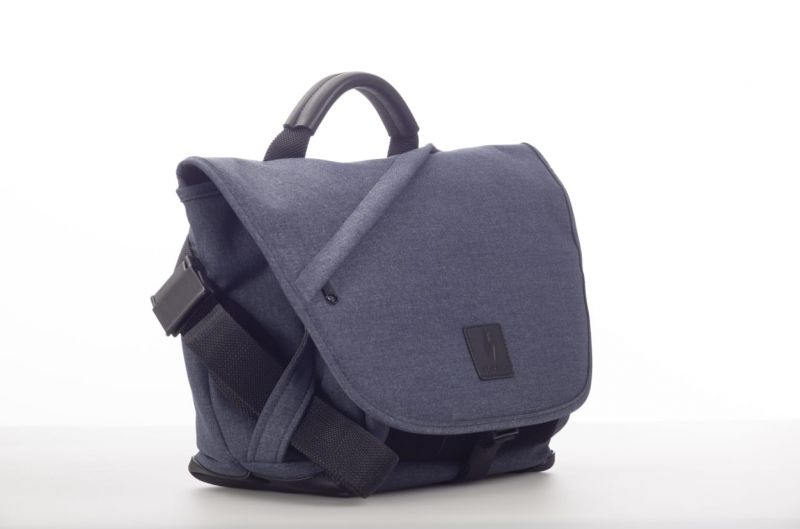
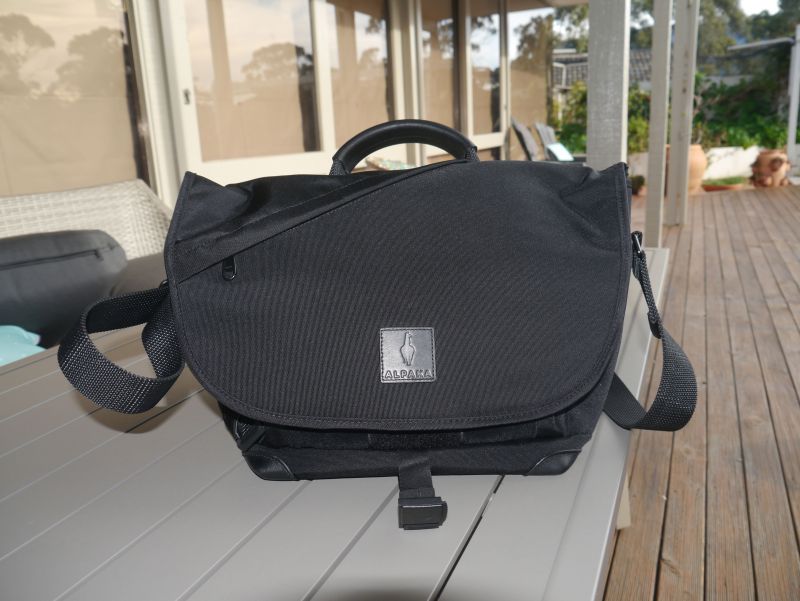
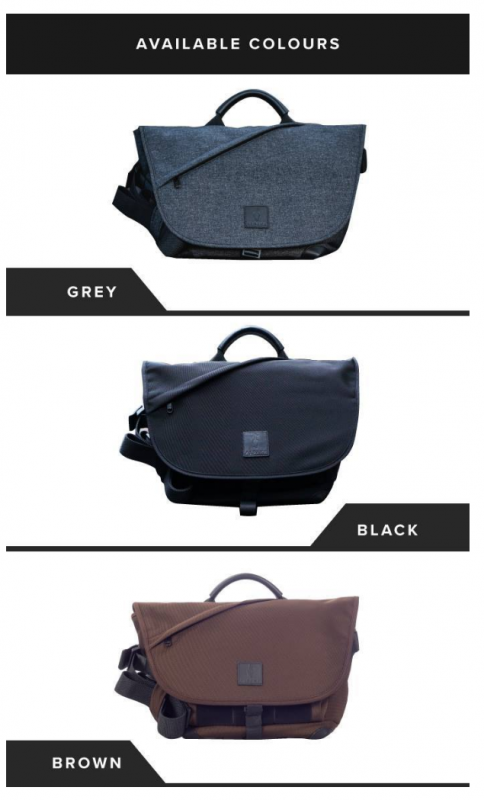
The 7Ven Mini Messenger comes in 3 colours, black, brown and faux wool. The unit I received is black (at my request 🙂 ).

Dimensions

  • 26 (10.2) x 33 (12.9) x 17 (6.6) cm/in
  • 15-20 litres
  • 1.1 kg (2.4 lb)

Exterior
Exterior 1000D Ballistic Nylon (Black / Brown) | 750D Nylon FauxWool (Grey)

Lining
210D Ripstop Nylon

Design and features

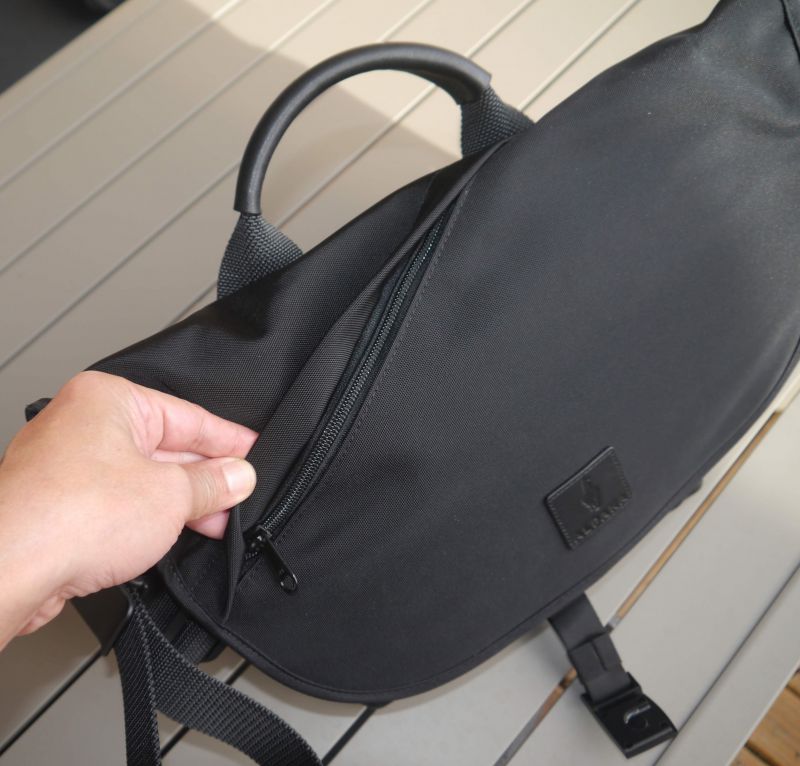
The front flap has a slash pocket on the front for easy access.   There’s a nice “overhang” over it which should keep water out if you should be singing in the rain. Interestingly the flap also has a hard insert in it. This makes sure that the front flaps falls correctly and keeps its form ( well that’s my take) as items in this front pocket sit in front of the hard insert, so the insert’s not there for protection. This pocket is great for those items you need easy access to without opening the main flap.

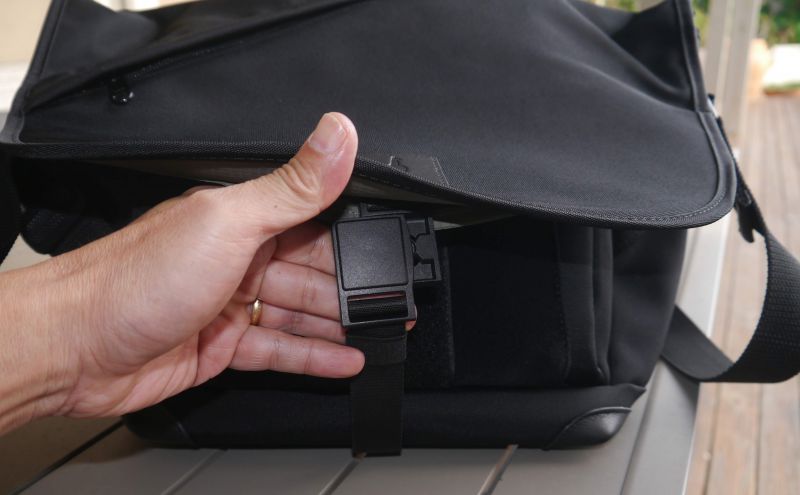
Locking the bag is this neat Fidlock magnetic connector. It’s actually pretty cool and once you get used to it, it’s much easier to open and close than your standard press clip. It makes a nice satisfying “click” when you close it. The connector strap is adjustable for carrying different size loads.

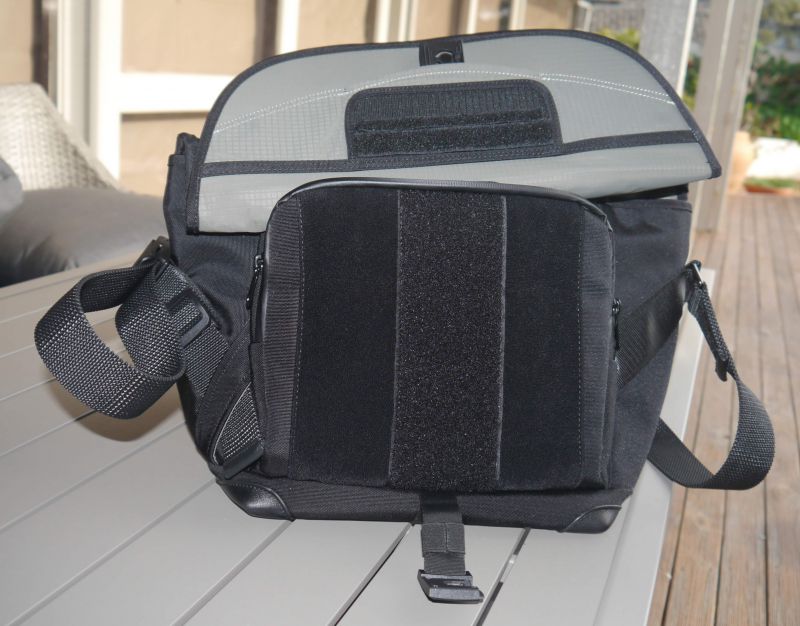
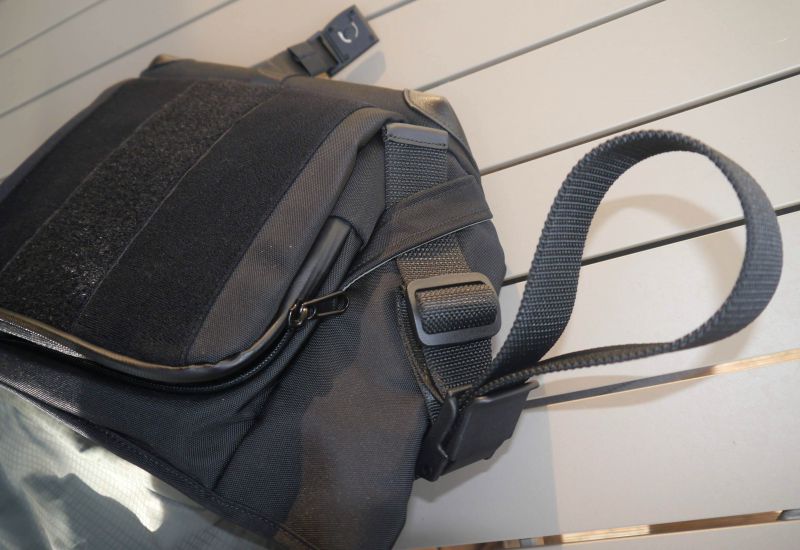
For additional security, there’s also a big velcro patch. Because of the size of the pad, you can overstuff your bag and the front flap still remains secured and you adjust the fidlock for that additional layer of protection.  If however, you don’t like that velcro “RRRRIPPPP” noise then while secure, this bag is very loud when you open it. Not good in a quiet, meditative environment. That being said if you look closely you’ll see I’ve minimized this using some double sided velcro tape from the discount store for about $2, only about a metre and a half more and I’ll have used it all up 🙂   I can easily remove my homemade “velcro silencers” if required.

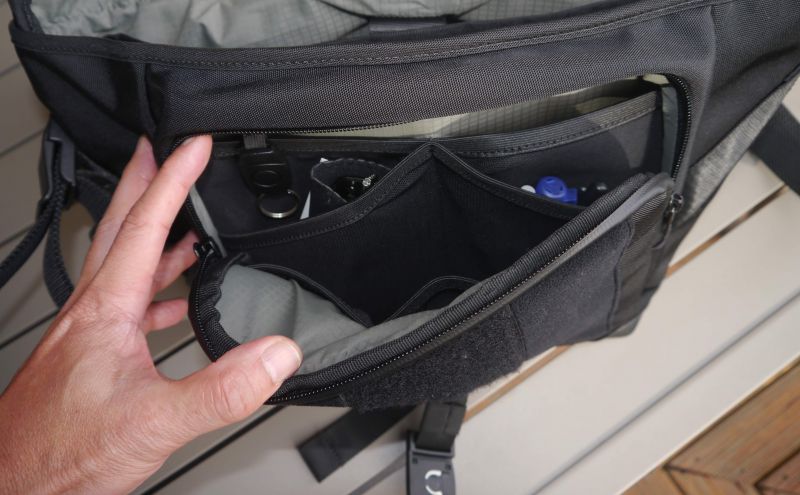
The front pocket has 7 elasticized pockets so you can easily organise all those bibs and bobs you need quick access to. There’s a keyfob too for securing your keys. The grey ripstop inner liner throughout makes it easy to see your items.

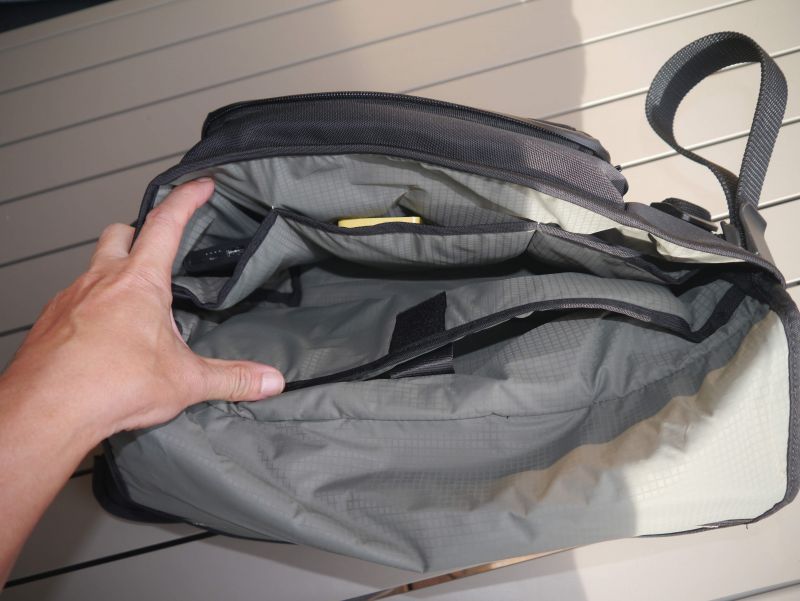
The main compartment is fairly sizeable, there’s a padded notebook/tablet pouch with velcro securing strap which should take up to a 14″ device and there are 3 padded pockets on the front.

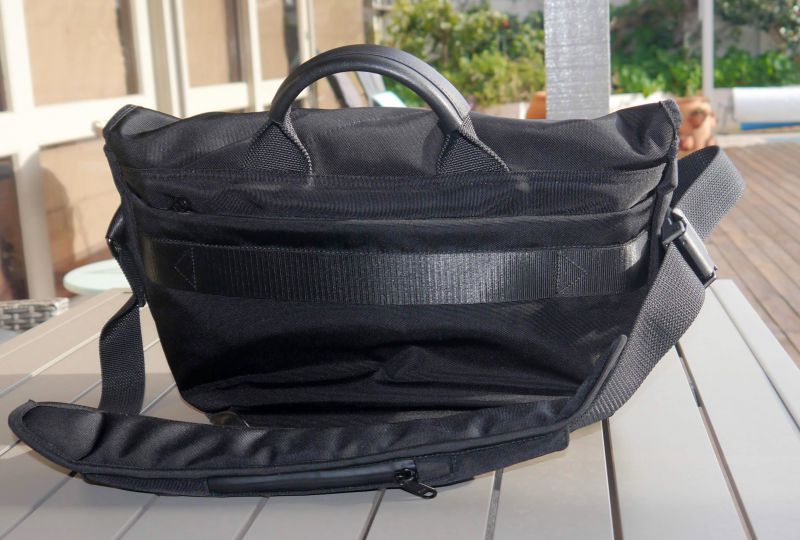
On the top is a very nice leather padded handle and on the back a strap for using your bag with a wheelie suitcase.

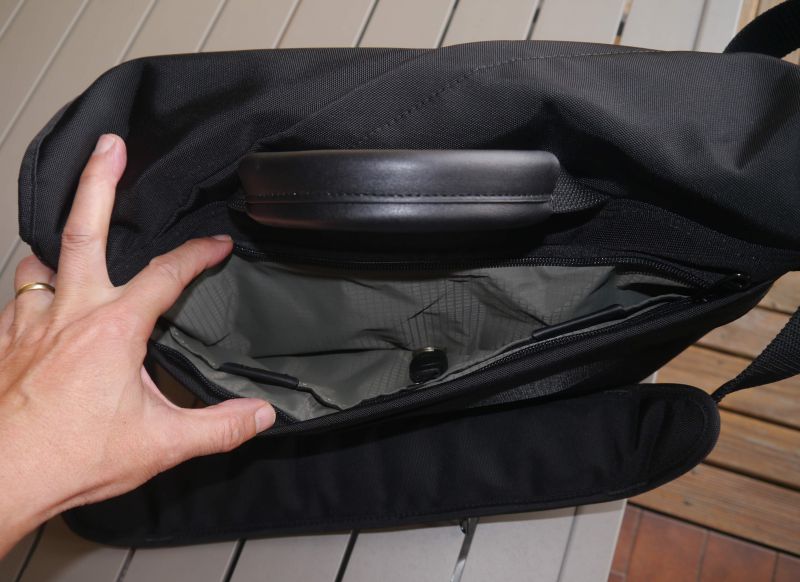
On the back is another compartment with 2 large pockets.  Note the nice leather touches on the pockets.

On the left is the main strap adjustment cam buckle.  There’s also a holder so that you can keep the excess strap from flapping around. This is especially useful if you’re using in briefcase mode. The ends of all the straps are finished off with a piece of leather.  Not really a functional addition but a nice aesthetic touch.

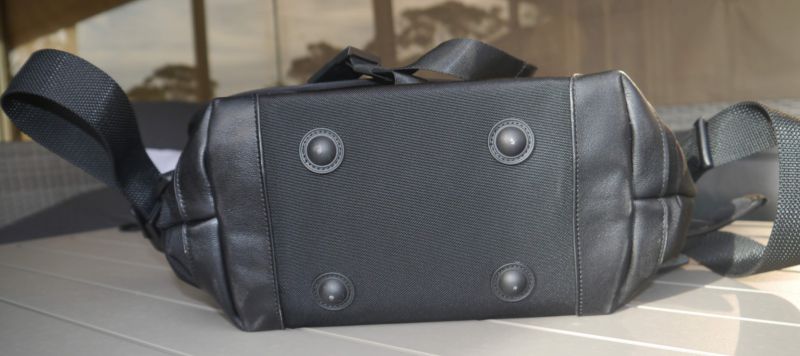
Pretty much with every one of my bags the corners are the first to go.  This messenger has some nice leather corner protectors as well as 4 small feet.  This adds some cushioning and also goes some way to protecting your bag from sitting in the dirt when you put it down. Because the bag is a triangular shape and because of the padding the bag sits upright most times when putting down rather than falling over or just “flopping”.

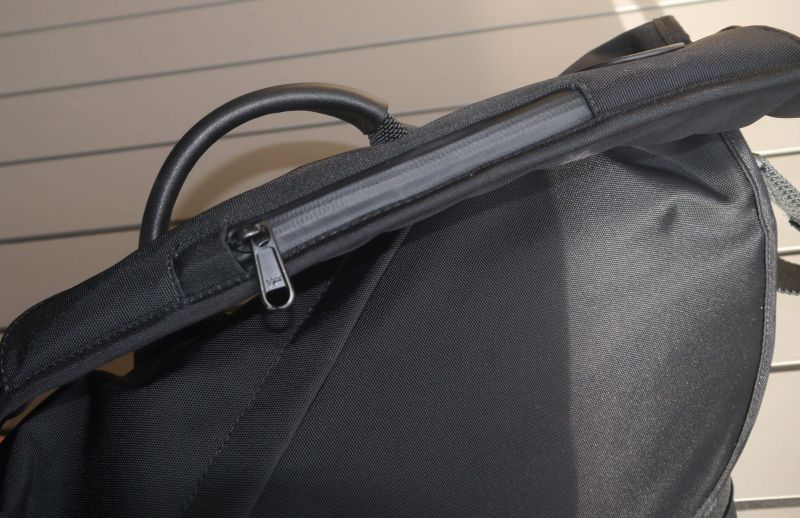
The shoulder strap pad is nice and long, and there’s an integrated zipper pocket along its length with a nice waterproof zipper. Very handy for keep things like say your transport or access card. The strap pad is also removable.

What I like

I really do like this bag. I’ve been using it over the last couple of week for work and for weekends.  It’s about the right size for my EDC to work but has the flexibility to expand out if I need to take more additional stuff some mornings, or if I need to bring something else back from work (like say the two mesh routers I received the other day).  The padding inside is enough that you don’t have to put any of your delicate items into additional cases. There’s enough pockets in enough places to have a place for everything though you will have to remember where you put them.

What I’d change

There’s not much I’d change in this bag. As mentioned in the beginning a lot of it comes down to personal preference. A few suggestions that would make it better for me:

  • reflective striping for night use
  • some “dog ears” on the main flap to keep things more secure and safe
  • a blinky light strap

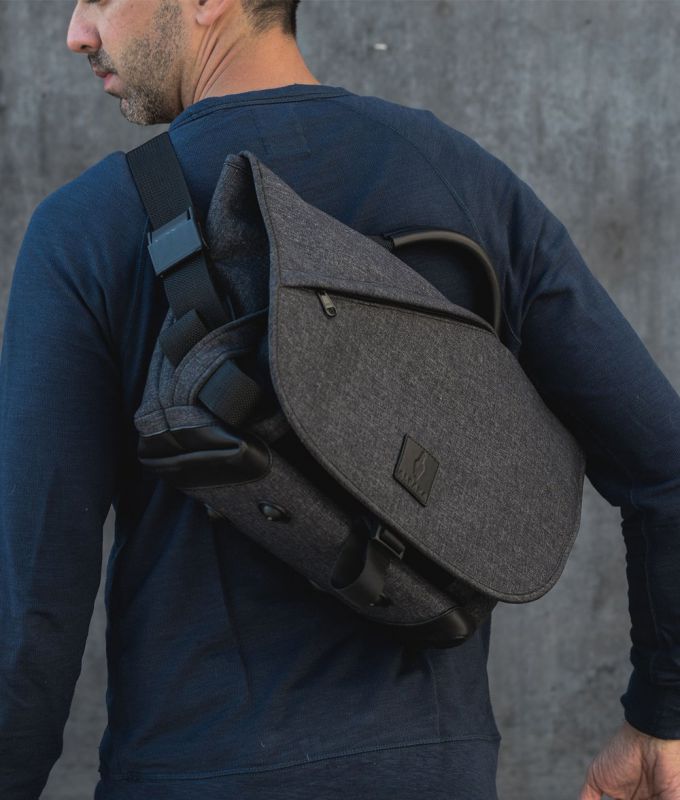
However, there is one MAJOR thing I would change and it’s big enough to make me not use this bag as an EDC long term. All the great features are badly outweighed by just one variable.  If you look at the adjustment cam buckle it’s on the left of the bag.  Now I wear my messengers with the strap sitting on the left-hand shoulder which means that with this bag the cam is actually sitting behind you.  This makes it VERY hard to easily adjust the bag.  I tend to wear my messengers high on my back as this means you’re not bending over trying to compensate for the weight of the bag and its contents. Sometimes just adjusting an inch or so on the go makes a huge difference to the comfort. I cannot easily adjust with this bag.  When I’m using this as a photography bag I want to be able to release the cam to lower the bag, get my camera gear out, take the shot, and then put the bag back high on my back. I just can’t do this with this bag. Even being able to release the cam to take the bag off over my head or put it back on and shorten the strap feels “wrong” and awkward.

I actually thought maybe I’d received a left-handed version of the bag and sent an email to the manufacturer.  Their response was “The 7ven Messenger and 7ven Mini were only made to carry over the right shoulder”.  I tried this but it just doesn’t feel right.  Even little things like the Alpaka logo being upside down and the front flap pocket being the “wrong way” for easy access when you put it on your left-hand shoulder supports their claim.

Final thoughts

All up this is a great bag and would easily be my EDC EXCEPT  for the cam buckle being designed for people that carry their messengers on their right-hand shoulder (predominantly left-handed people?) . All the major strap adjustment benefits of using a messenger are basically lost to me because of the setup. If you do wear your messenger on your right-hand shoulder then I’d highly recommend this bag however for me it looks like the search for the perfect messenger continues.

Price: $ 189 USD
Where to buy: From Alpaka Gear
Source: The sample of this product was provided by Alpaka Gear

Filed in categories: Reviews

Tagged: ,

Alpaka 7VEN Mini messenger bag review originally appeared on The Gadgeteer on July 1, 2019 at 10:14 am.

Note: If you are subscribed to this feed through FeedBurner, please switch to our native feed URL http://the-gadgeteer.com/feed/ in order to ensure continuous delivery.
Moshi 2 Meter USB-C to HDMI Cable review

REVIEW – So my niece’s graduation was moved indoors by a rampaging storm in the Philadelphia area. That meant limited seating, and we were forced to livestream the event on YouTube. But you know what? I happened to have my Moshi USB-C to HDMI cable. That meant glorious HD viewing from the comfort of my living room. Graduation was saved! To the review!

What is it?

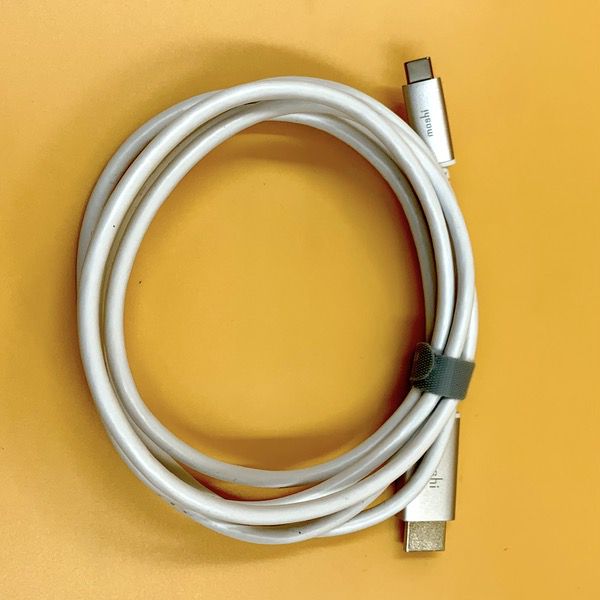
It’s a 2 meter (6.6 foot) USB-C to HDMI cable.

Hardware specs

  • 2 meters (6.6′) overall length
  • 3.06 ounces
  • Supports both 1080p HD and 4K UHD video output at up to 60 fps
  • Supports High Dynamic Range (HDR) and multi-channel digital audio
  • Aluminum casing to minimize electromagnetic interference

Design and features

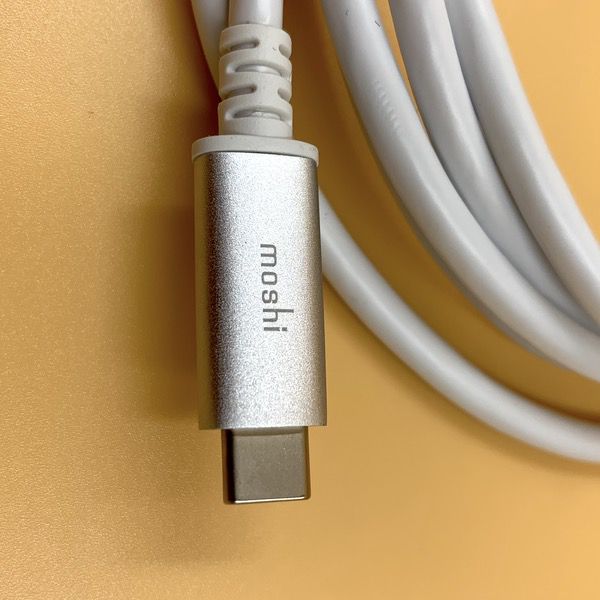
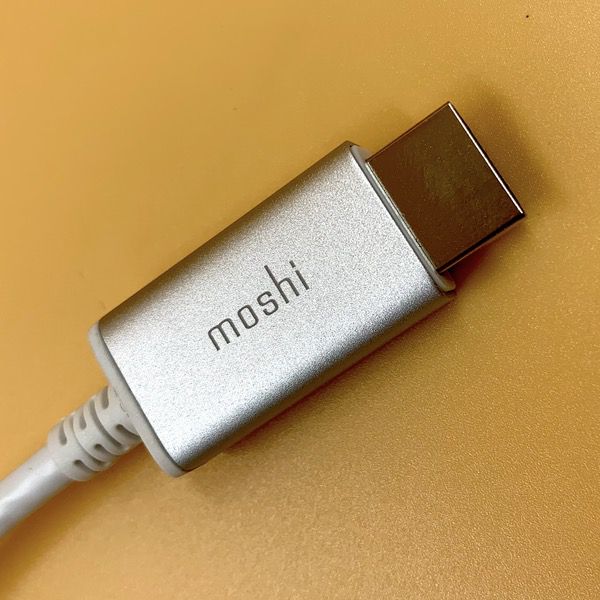
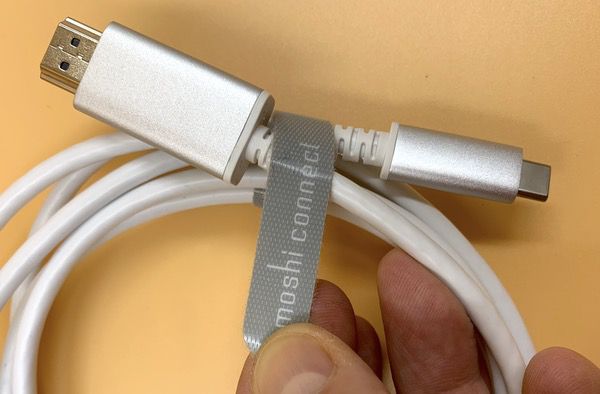
The Moshi USB-C to HDMI cable is a solid piece of gear. It’s got a total length of 2 meters (or 6.6 feet), with beefy aluminum-jacketed & reinforced plugs. You won’t worry about this being kicked around in your bag if you travel with it. Check out the closeup shots below:

It’s also got a sturdy hook-and-loop strap to manage the cable when it’s coiled. The strap is just as durable, and strong enough that it won’t come undone unless you give it a good rip.

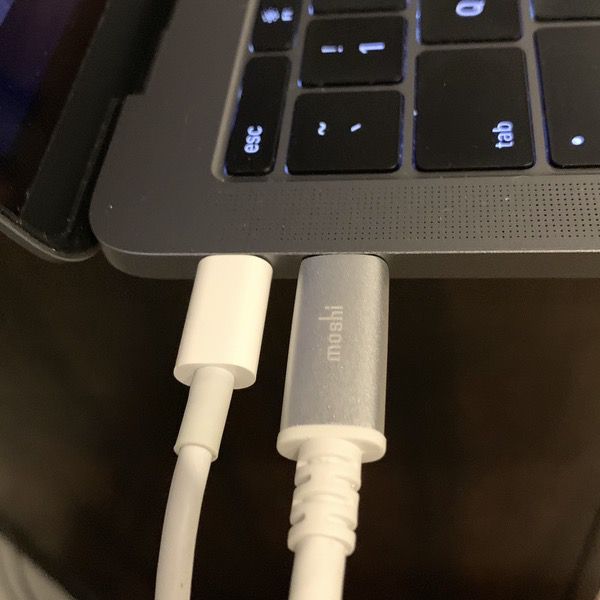
When downpours changed the plans for my niece’s graduation, this not-so-short cable was a lifesaver. I just plugged the USB-C plug into the port on my MacBook Pro…

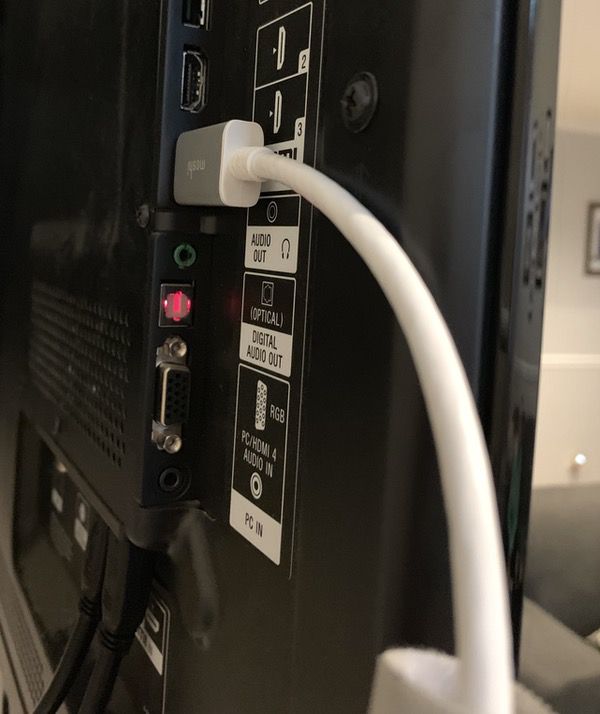
…and then popped the HDMI plug into the port on the HD TV in my living room…

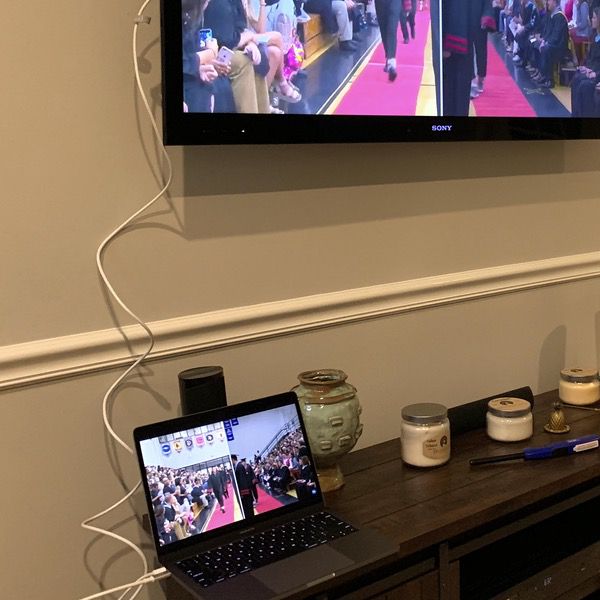
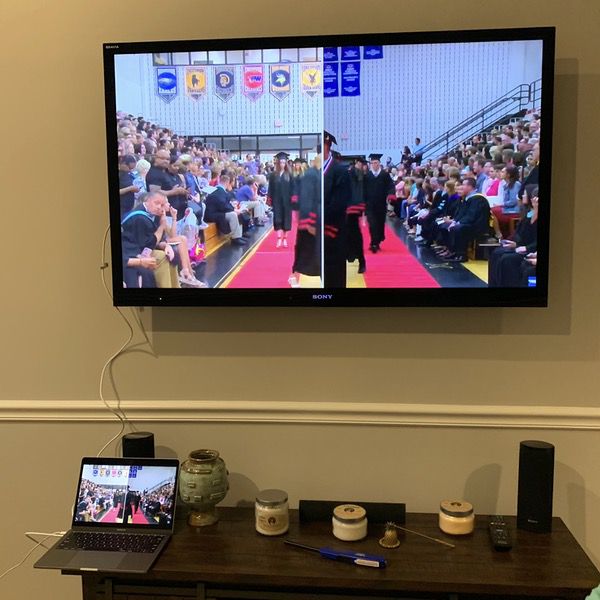
… And presto! Within minutes I was streaming the event in full HD from YouTube, including stereo sound. With the long cable, I didn’t have to cook up some sort of structure to get my laptop closer to the TV. I just put the laptop on my credenza, and I was good to go:

I’ve since been using this cable as a backup in my bag for conference rooms as well as streaming the occasional Netflix film to my big TV. Not only is the build durable, but the length is amazing for getting connected to remote places in a conference room. Wall mounted monitor? Check. Got a ceiling-mounted projector? Check. The cable is rated to support 1080p HD and 4K UHD video output at 60 frames per second.

What I like

  • Durable construction for travel
  • Excellent cable length makes it easy to connect to televisions, monitors & projectors

What I’d change

  • Nothing that I have found so far

Final thoughts

This one is an easy one. If you find yourself needing to stream from your USB-C compatible device like a MacBook Pro, you’ll enable a 2 meter HDMI connection to whatever monitor is hanging about for under 50 bucks. It serves double duty for work and home entertainment. It’s a winner.

Price: $44.95
Where to buy: Go to the product page to buy direct from Moshi.
Source: The sample of this product was provided by Moshi.

Filed in categories: Reviews

Tagged: ,

Moshi 2 Meter USB-C to HDMI Cable review originally appeared on The Gadgeteer on July 1, 2019 at 8:00 am.

Note: If you are subscribed to this feed through FeedBurner, please switch to our native feed URL http://the-gadgeteer.com/feed/ in order to ensure continuous delivery.