SimpleUSB Automotive 12V to USB Adapter Dashcam Installation Kit review

I have reviewed (more than) my fair share of dashcams and radar detectors over the past few years. All of these devices require power in a relatively inconvenient place in your car. Typically these devices are installed up near your rearview mirror. Few automobiles have a 12V or USB port anywhere near that location. Running or hanging power cables from your 12V port to your rearview mirror can be a time-consuming hassle or dangling eyesore. I have been searching for a solution for a while now and the SimpleUSB Automotive 12V to USB Adapter seems like a quick and easy DIY project to make this happen.

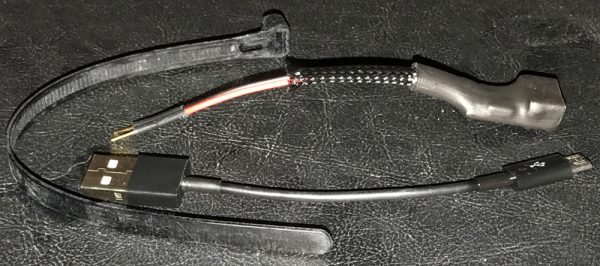
The SimpleUSB adapter is a pretty simple device, designed to tap into a majority of powered rearview mirrors and provide enough juice to power most automotive-centric USB devices (aka radar detectors and dashcams). The SimpleUSB adapter is meant for those brave enough or those who enjoy DIY projects.

What’s included:

  • SimpleUSB Automotive 12V to USB Adapter
  • 3″ microUSB cable
  • Zip-tie

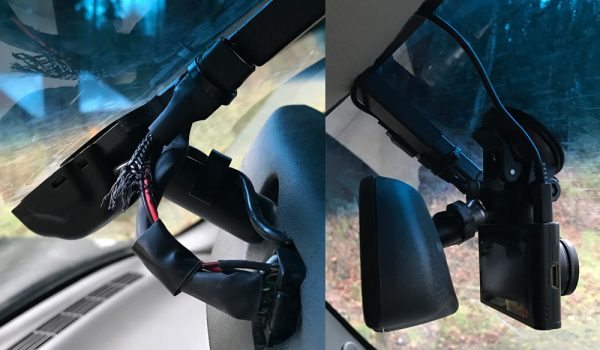
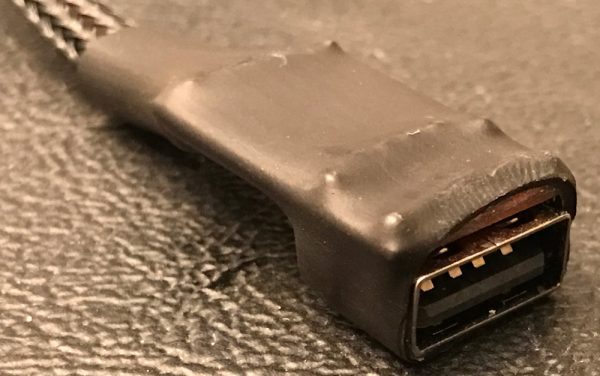
The USB end of the adapter is heat-shrink wrapped to hold and protect the electronics powering/controlling the port.

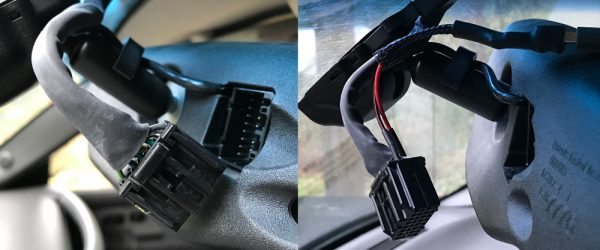
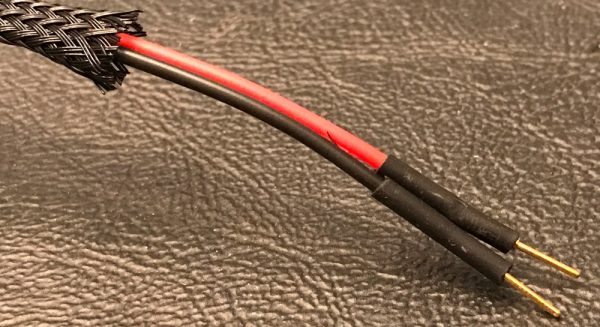
The prongs are designed and sized to be inserted/slipped into the back of your powered mirror’s wire harness, the red into the switched 12V power and the black into the ground. The prongs, wires, and assembly wrapping is all pretty mediocre quality but do get the job done.

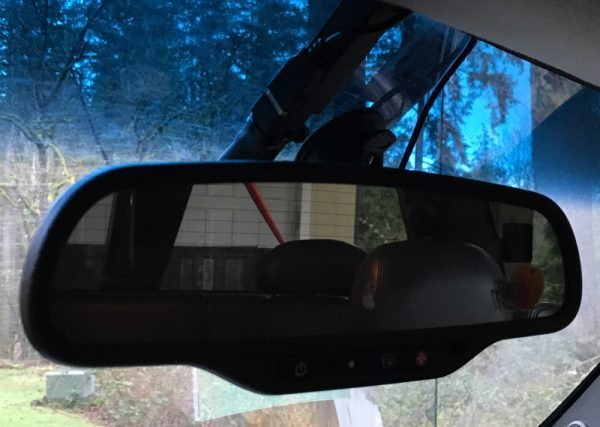
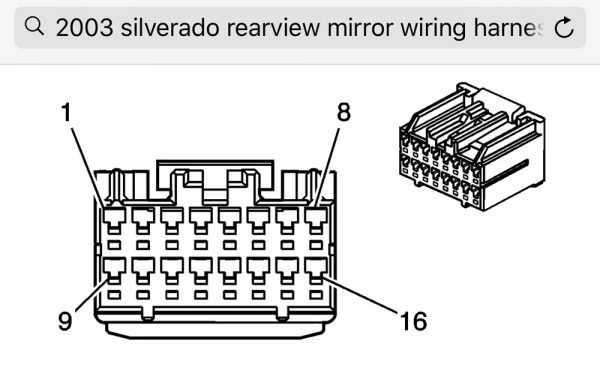
The only difficult part of this whole process was figuring out which wires to tap into. My old truck was pretty top of the line back in its day and the rearview mirror has OnStar, exterior temperature, compass direction, dimming, and various other LED indicators. Which means it has a relatively complex wiring harness that plugs into the back of it. But with a bit of Googling and internet surfing, I found that the switched power was wire 13 and the ground was wire 8.

Being the tech-smart Gadgeteer I am, I test drove the connection points to make sure they provided the power needed to run the VicoVation dashcam I wanted to install. It worked first try…but I was worried the entire time that the fragile metal prongs would snap off as I was getting everything dialed in.

I used better zip-ties, double sided tape, and electrical tape to ensure the SimpleUSB Automotive 12V to USB Adapter was securely installed. I was definitely careful on how tight I synched down the zip-tie due to the very breakable electronics surrounding the USB port. But once everything was anchored down and the mirror angled back in place, there shouldn’t be any real stress on the setup. Though I may add more electrical tape but that is just me being AR. Here you can see the VicoVation Vico-MF3 dashcam installed. The 3-inch microUSB cable included with the adapter was too short, so I used a spare 6-inch one that I had laying in a drawer.

Even though the SimpleUSB Automotive 12V to USB Adapter build quality is less than ideal and the prongs are a bit fragile, it gets the job done. Overall, I am very pleased with my DIY effort. I have been meaning to install something like this in my truck for ages now. Having a power port near my rearview mirror will make setting up devices like dashcams and radar detectors far easier than running wires or putting up with the unsightly tackiness of dangling power cords.

Source: The SimpleUSB automotive adapter used in this review was purchased from Amazon with my own funds.


Product Information

Price: $26.50
Retailer: Amazon.com
Requirements:
  • Powered rearview mirror
Pros:
  • Compatible with most powered rearview mirrors
  • Easy installation
  • Does not require routing of bulky wires to fusebox or 12V power port
  • Does not require removal of trim or headliner during installation
  • Is able to power most car USB devices
Cons:
  • Mediocre build quality
  • Only works with powered mirrors where the harness/wires are accessible

Filed in categories: Cables, Batteries and Chargers, Car Gear, Do-It-Yourself, How-To, Reviews

Tagged:

SimpleUSB Automotive 12V to USB Adapter Dashcam Installation Kit review originally appeared on on March 11, 2017 at 3:10 pm.

Note: If you are subscribed to this feed through FeedBurner, please switch to our native feed URL http://the-gadgeteer.com/feed/ in order to ensure continuous delivery.

Mesqool AM/FM projection alarm clock review

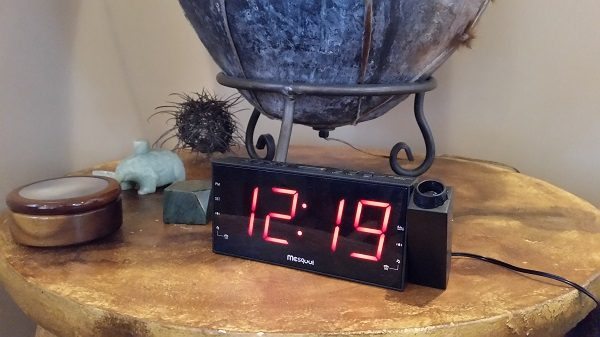
This projection alarm clock is pretty cool. It has a lot of features most radio alarm clocks have, and a few that are not so common. My favorite function on this clock, of course, is the ability to project the time onto the ceiling. I love this because I always sleep on my back, and it’s a pain to have to turn over, or turn my head to see the clock.  I guess I’m a lazy sleeper…  Don’t judge me!  With the projector, you just have to open your eyes, and you see the time on the ceiling. 
Standard radio alarm clock features are dual alarms, AM/FM radio, and the alarm sound is either a buzzer or radio. But it has some nice ‘extra’ features on it, too, like battery backup, DST setting, and 3-mode dimmer.

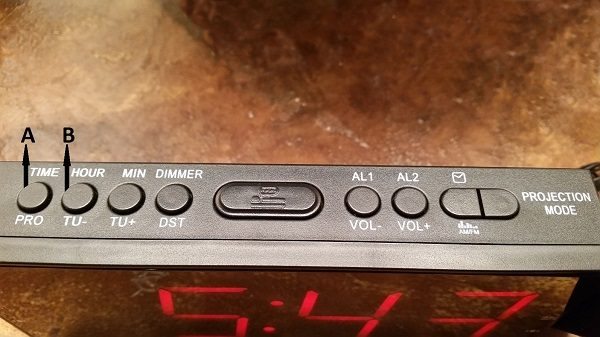
The “A” button, pictured above, sets the time, programs radio stations, and selects preset stations after they’ve been programmed.

The “B” button advances hour increments when setting the time, and reduces the radio frequency when tuning stations.

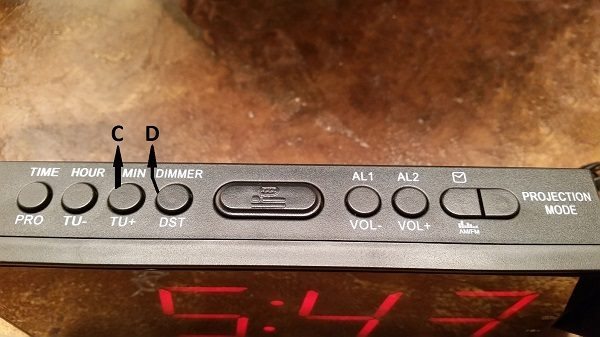
The “C” button, pictured above, advances minute increments when setting the time, and increases the radio frequency when tuning stations.

The “D” button dims the display, in three modes: High, Medium, and Low.  It also turns the DST (Daylight Savings Time) function On/Off.

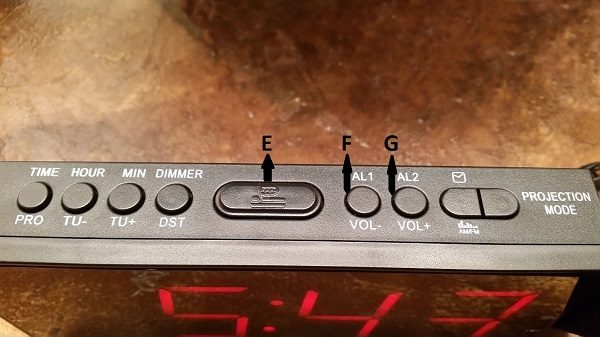
The “E” button, often the favorite, is the Snooze button.  It lets you sleep for 9 additional minutes after the alarm goes off.  You can do this six times before the clocks ‘gives up on you’, and then you’re on your own. GET OUT OF BED!!  This “E” button also sets the sleep timer. While listening to the radio, you press this button repeatedly until your desired sleep time is displayed (up to 90 minutes), and the radio will automatically turn off after the entered sleep time expires.

The “F” button is used to set the 1st alarm time, to turn the alarm On/Off, and to decrease the volume of the radio.

The “G” button sets the 2nd alarm time, turns that alarm On/Off, and is also used to increase the volume of the radio.

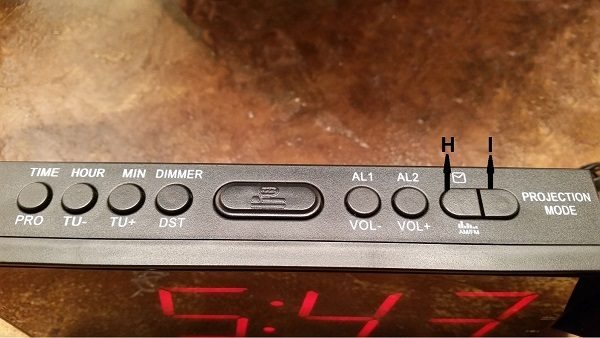
The “H” button turns the radio On/Off, it deactivates alarms when they turn on at their set time, and it also deactivates the snooze button, if you had pressed it earlier, but decide to get up before the alarm sounds again.

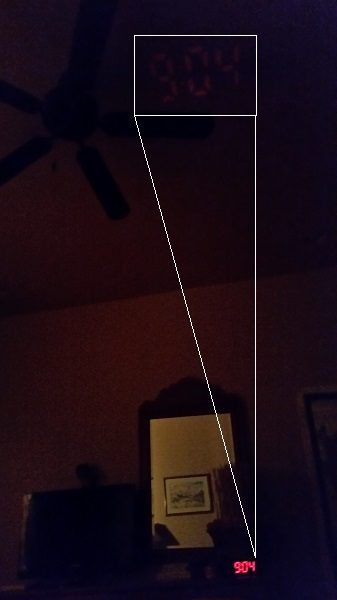
The “I” button changes the mode of the projector on the device.  This button is really helpful.  The projected time can project forward, like when your clock is next to you on your nightstand.  Or, the time can be in a reversed image, which is very helpful, if you’re one of those people that needs to have the clock on the other side of the room in order to wake up.  This lets you see the clock face from across the room, and it projects the time backwards on the ceiling so you can still see the projected image from your vantage point.  So it gives you a lot more options for where to place the clock in your room.  Just press this “I” button to project the time in ‘regular’ mode, ‘flipped’ mode, or turn the projector off altogether.

The picture above shows how the projection looks on the ceiling when you’re lying in bed, and the clock is facing the direction you see on the nightstand.  This requires the projector to be in the flipped mode.  The picture below shows what the projection looks like on the ceiling when the clock is across the room from your bed, and the projector is in normal mode.

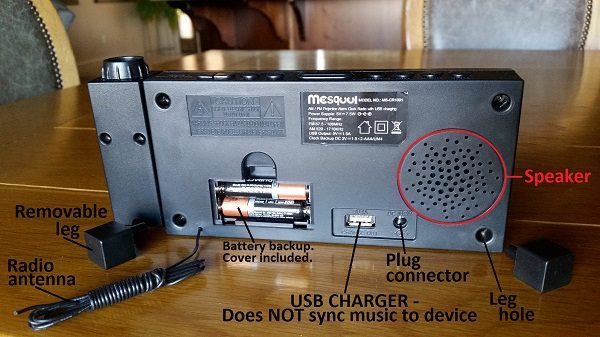
The product has a radio auto-scanner to automatically find radio stations. You can save 10 FM radio stations, and 10 AM radio stations, too.  It has a USB charging port in the back of the unit, and you can focus the beam of the projector by twisting the focus ring so you get a crisp, clear image of the time on your ceiling.  As for sound from the speaker; it’s designed for mid- and high-range audio.  It doesn’t do very well with bass.  But it is loud enough to wake the average sleeper.  I was pleasantly surprised that when the volume was all the way up – the speaker didn’t oversaturate.

The unit also has a very small footprint, so a lot of your nightstand isn’t taken up by the clock.

The instructions for this clock are very detailed and clear.  It’s really outstanding, which is rare in most instructions included with products these days.

Overall, I really like this clock radio with time projection.  I have not experienced any problems with it, and am really pleased with the functionality, operation, and options.

It takes 2 “AAA” batteries for battery backup, measures 8″L x 1.125″W x 2.5″H, has a 1.8″ LED display, and costs $29.99.

Source: The sample for this review was provided by Mesqool.  Please visit their site for more info and Amazon to purchase.


Product Information

Price: $29.99
Manufacturer: Mesqool
Retailer: http://amazon.com
Pros:
  • Projection lamp
  • Projection 'flip' capability
  • Easy-to-read display
  • Sleep timer
  • Dual alarms
  • Battery Backup
  • Easy DST setting
  • 3-mode dimmer
  • Radio station presets
  • Small footprint
  • Excellent instructions
  • Great price for the features
Cons:
  • "Tinny" sounding speaker
  • Unstable without attached legs
  • USB port only charges your phone/tablet – won't sync music

Filed in categories: Reviews, Watches and Clocks

Tagged:

Mesqool AM/FM projection alarm clock review originally appeared on on March 11, 2017 at 8:35 am.

Note: If you are subscribed to this feed through FeedBurner, please switch to our native feed URL http://the-gadgeteer.com/feed/ in order to ensure continuous delivery.
Riveci Olympus – Bowie Pull-up Brown wallet review

I’ve discovered that I have a real affinity for leather wallets. They’re flexible, durable, attractive and they smell great. I’ve also discovered an affinity for those wallets that carry my plastic cards vertically rather than horizontally. The Riveci Olympus – Bowie Pull-up Brown wallet is such a wallet and I was given the opportunity to review it. Will this minimalist leather wallet accommodate all that I need?

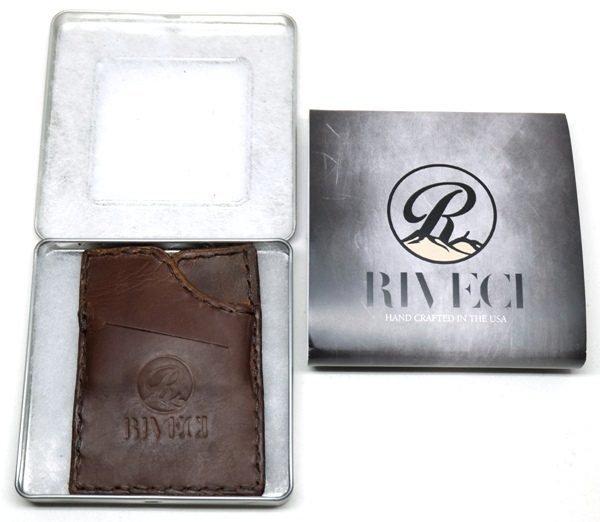
The Riveci Olympus – Bowie Pull-up Brown wallet was sent to me in a metal case that contained batting to protect the wallet. I noticed that when I took the wallet out of the case, the wallet’s seams were coated in an oily substance. It took me by surprise because I didn’t notice it before I started handling the wallet and thus my hands were then coated with the same substance. I have well-oiled hands now.

Specifications

  • Handcrafted In the USA
  • Capacity: 6 Cards
  • Cash Slot: Yes – Front
  • Size: 3.8in x 2.8in x.25in
  • Leather: 4oz Veg Tanned
  • Finish: Smooth High Sheen
  • Quick Access Cards: 4
  • Edges: Burnished and Oiled
  • Stitching: Saddle Method

Design & Quality

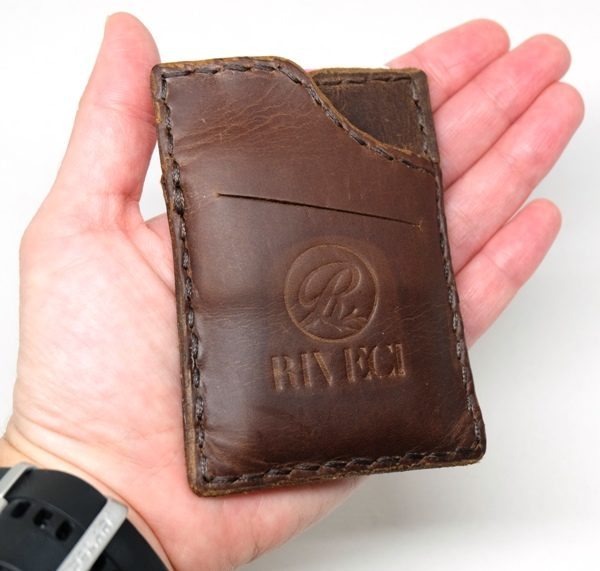
The Riveci Olympus wallet is a rugged looking full-grain leather wallet made from soft, flexible, pull-up leather. It is handcrafted in the United States using materials “sourced from U.S. vendors”. This wallet is rather small measuring only  3.8″ L x 2.8″ W x.25″ D. It has a money slot in the front (the slit in the front of the wallet) and the front pocket has a curved opening to allow you quick access to your credit cards.

The jagged burnished edges and slightly uneven stitching make the wallet look like it is purposely made to look handmade.

I have never owned anything that was made from pull-up leather before, so this wallet proved to have a very interesting feel to it – smooth with a very slight oily feel to it. According to textileglossary.com, pull-up leather is defined as,

a waxy or oiled-finished leather. These leathers lighten when stretched, bent, or “pulled up”. They are categorized as natural because they do not have a thick top coat. They have a nice hand, and develop a unique distressed look with time.

The leather also felt more “stretchy” than other leather items I have used. The thick thread felt waxed and the stitch length was rather long (I tend to prefer a smaller, tighter stitch), but this seems consistent with its styling.

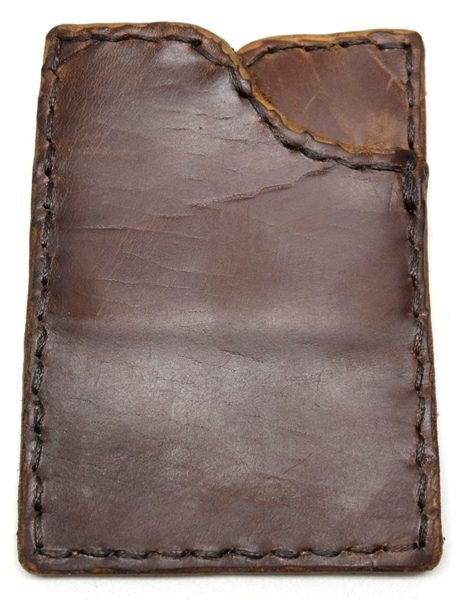
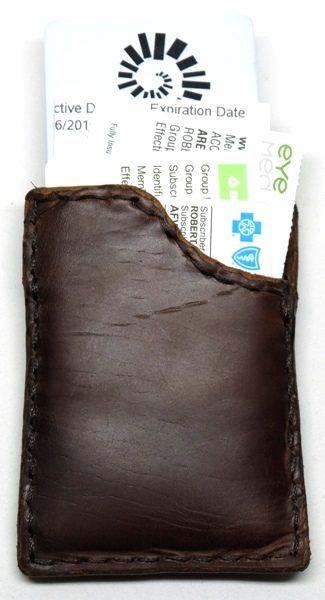
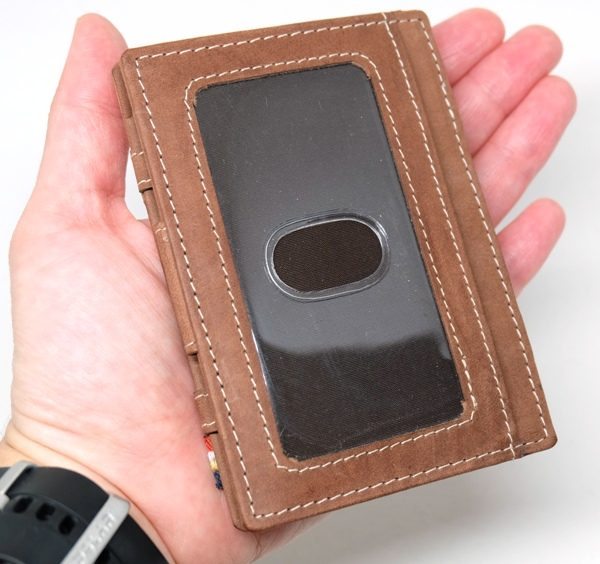
The back of the wallet shows the last slot. It too has a curved opening to allow quick access to your cards.

It is difficult to tell in the photo above but there was one stitch that was loose – the “tie off” or finishing stitch (located along the right edge of the wallet in the above photo at the corner of the curved edge of the back piece of leather) which makes me question how long the stitching will last. The Riveci wallets only have a two-year warranty on them.

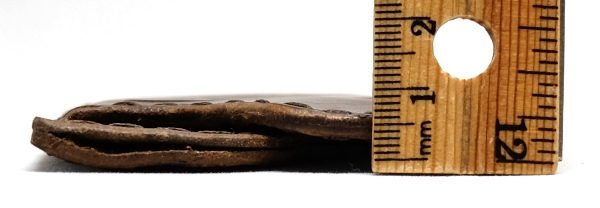
Empty, the wallet is around 0.7 cm. I like that the wallet is made of thicker leather (their specs say it is made from 4 oz leather which is 1.6 mm thick). It makes it feel more robust.


None of the pockets are lined with any material. The interior of the last pocket (the third photo above) shows how only the top portion of the piece of leather that divides the two main pockets is sewn into the seams of the wallet, the lower portion of which is not sewn in – perhaps to avoid adding too much bulk to the edge of the wallet.

Use


I was able to fill the money slot with one $20 bill (I could have put more in there, but that’s all the cash I had at the time), and the front pocket with four plastic cards. The back pocket I filled with one plastic card and four paper cards (which are the size of credit cards). The wallet contains all of these cards perfectly. If, however, I insert a business card into the wallet, the card is slightly taller than all of my other cards, thus it might be beneficial to make the wallet 2 mm longer for those who would like to use this wallet for business/customer appreciation cards.


I don’t tend to like having all my cards inserted into one or two pockets because they are not organized and easily accessible which means that I then have to dig into the wallet to search for the appropriate card when necessary. However, I rather liked how compact the wallet is after being stuffed with all that I deemed necessary to carry. I also liked the cracked distressed appearance and pull-up effect of the leather (lighter color in the stretched areas) after placing my cards into the wallet. Rubbing over the stretched area with your hands or fingers will often rub out the lighter color of the stretched leather if desired.

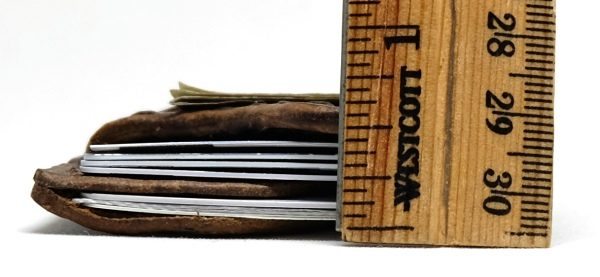
The thickness of the wallet remained fairly compact (in my opinion) especially with all the cards I placed in it (a little less than 0.75″ thick).

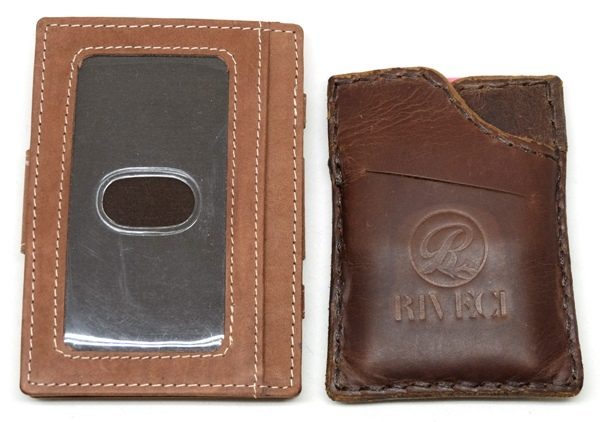
When compared to my Garzini Essenziale Finestra wallet, the Riveci Olympus wallet is small indeed.


It’s even noticeably smaller in my hand.

Final Thoughts

The Riveci Olympus – Bowie Pull-up brown wallet grew on me as I continued to use it, so much so, that I like it almost as much as my current Garzini Essenziale Finestra wallet. I was a little concerned about the one loose “tie off” or finishing stitch and the wide stitch length – wondering if the stitching will last, especially since the wallet only has a two-year warranty. But the fact that the wallet is small and compact yet stretches to fit five plastic cards and four paper cards, as well as a $20 bill, was very appealing. It also has rugged good looks with its cracked distressed appearance and pull-up effects. I’m not sure that I will use it as my everyday wallet, but it seems to function well as my coupon/customer appreciation card (I had to trim these down to fit into the wallet)/bandaid wallet which I use frequently. Time will tell how long this wallet will last and since it is $48.95, which is a little expensive for me, I’m hoping it will last a very long time.

Source: The sample used in this review was provided by Riveci. Please visit their website for more information or to purchase one.


Product Information

Price: $48.95
Manufacturer: Riveci
Pros:
  • Rugged, 4 oz (1.6 mm) full-grain leather
  • Small and compact
  • Pull-up effect is attractive
  • Made in the U.S. with material sources from U.S. vendors
Cons:
  • Expensive
  • Loose "tie off" or finishing stitch
  • Long stitch length

Filed in categories: Reviews, Wallets

Tagged:

Riveci Olympus – Bowie Pull-up Brown wallet review originally appeared on on March 10, 2017 at 9:02 am.

Note: If you are subscribed to this feed through FeedBurner, please switch to our native feed URL http://the-gadgeteer.com/feed/ in order to ensure continuous delivery.
Julie’s favorite gear page, Neato Botvac D80, Kensington M720 mouse and more – Review updates

I’ve got six quick updates for you today for products that I have been using on an everyday basis past the date that I reviewed them. These updates provide a long-term view of how a product stands the test of time.

Julie’s Favorite Gear page

Astore Qi Type-C Nexus 6P wireless charger sticker receiver review by Julie Strietelmeier

Neato BotVac 80 robot vacuum review by Julie Strietelmeier

Withings Body Cardio scale review by Julie Strietelmeier

Logitech M720 Triathlon multi-device wireless mouse review by Julie Strietelmeier

Mujjo Double Layered Touchscreen Gloves review by Julie Strietelmeier


Product Information

Price:

Filed in categories: Reviews

Tagged:

Julie’s favorite gear page, Neato Botvac D80, Kensington M720 mouse and more – Review updates originally appeared on on March 10, 2017 at 7:59 am.

Note: If you are subscribed to this feed through FeedBurner, please switch to our native feed URL http://the-gadgeteer.com/feed/ in order to ensure continuous delivery.
dreamGEAR Retro Arcade Machine X review

Back in my day, we didn’t have fancy schmancy handheld gaming devices like the Nintendo Switch. We had 1000 pound machines that we had to feed quarters and stand up to play. And we liked it! If you’ve ever wanted to relive the golden age of video games, the dreamGEAR Retro Arcade Machine X has that covered. Or does it? Let’s find out.

What is it?

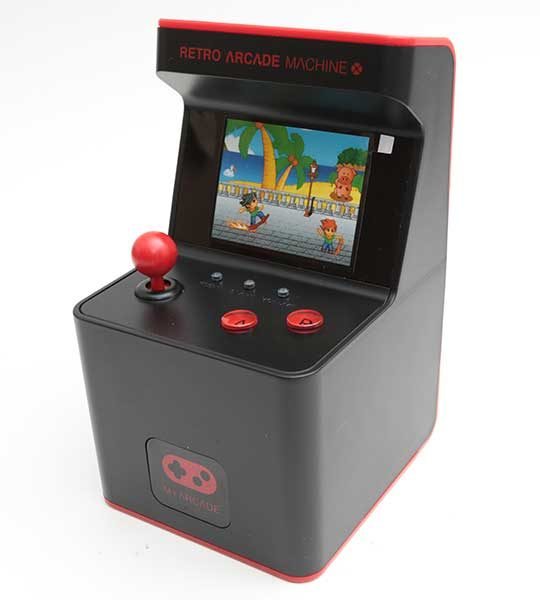
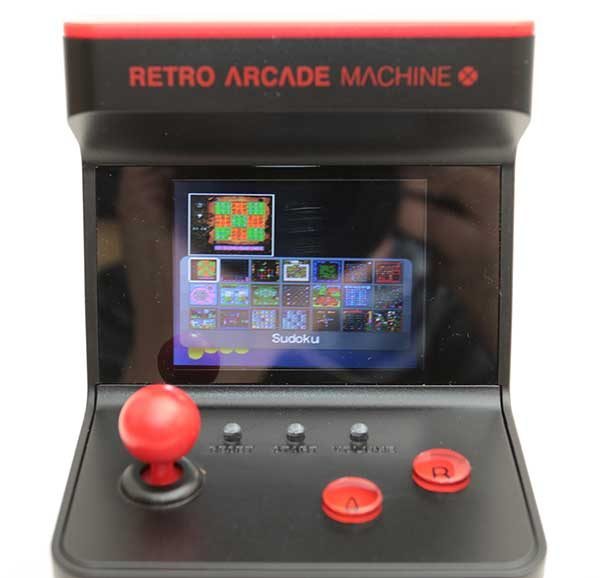
The dreamGEAR Retro Arcade Machine X is a miniature replica of a classic arcade machine with a built in 2.5 inch LCD, joystick, buttons and 300 games!


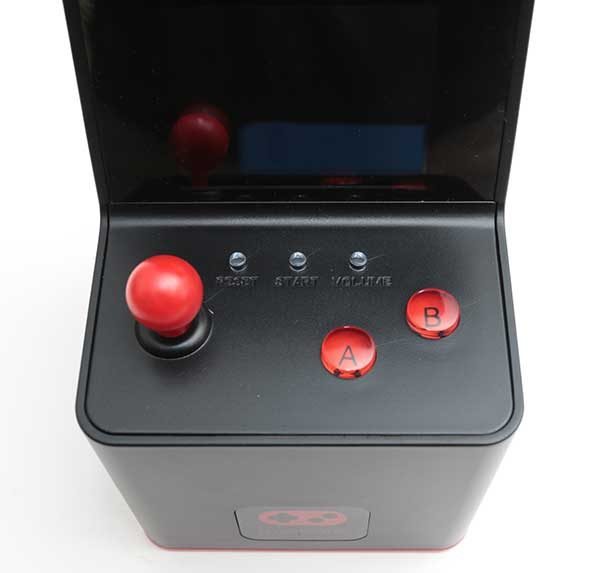
The dreamGEAR is less than 6 inches tall, making it the perfect desk toy. It has black and red plastic case with a built-in joystick and classic A / B buttons on the top.

The dreamGEAR is powered by 3 AA batteries that are not included. The batteries install into the back of the device and it requires a screwdriver to remove the cover.

Also on the back of the device is the power switch that has 3 settings: off, on and on with lights.

There’s a self-centering joystick, A and B buttons, a reset button, start button and a volume button that has 4 settings including mute.

After you load the batteries and flip the switch on the back of the dreamGEAR, it’s immediately ready to go and presents you with the main menu.

You can choose between sports, shooting, puzzle and arcade style games.

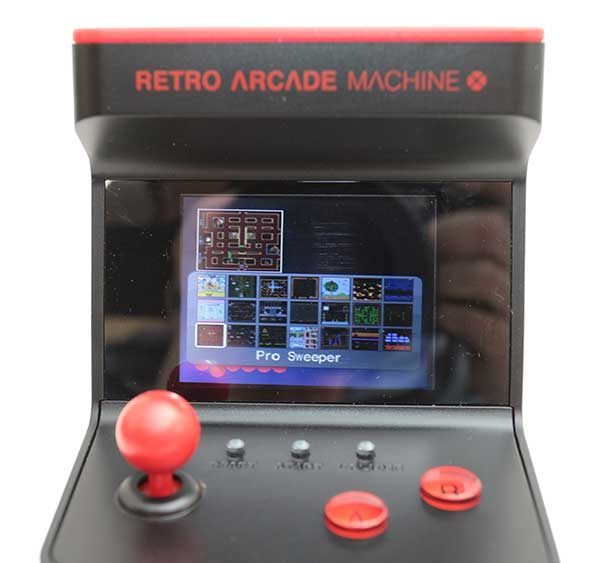
Each category has a LOT of games that you can scroll through. As mentioned at the start of the review, there is a total of 300 different games but there’s no list of what’s included or any type of description. There’s also no easy way to search for a game if you have a favorite.

The biggest bummer is that there are none of the classic games that I grew up with are included. There’s no Pacman, Centipede, Space Invaders, Gauntlet, Donkey Kong, or Asteroids. There are some clones, like Pro Sweeper which is sorta of like Pacman, but a really lame version of it.

The fun factor of the dreamGEAR wore off for me in less than a couple of minutes due to the fact that the screen is only 2.5 inches and the games are all boring.

So, there are 300 games that you won’t want to play… at least I don’t want to play them…

Final thoughts

I was excited to try the dreamGEAR, but my nostalgia bubble burst a couple of minutes after I loaded the batteries and switched it on. Save your money folks, this little gaming device really isn’t worth it because the games are not fun – at all. If you want to relive the days of classic arcade games, you’d be better off loading a MAME emulator on your phone or tablet. You can also head over to http://my.ign.com/atari and play some games right through your browser for free.

Source: The sample for this review was provided by dreamGEAR. Please visit their site or Amazon for more info.


Product Information

Price: $43
Manufacturer: dreamGEAR
Retailer: Amazon
Pros:
  • Nostalgic
  • Easy to play
  • 300 games
Cons:
  • Games are lame
  • Tiny screen

Filed in categories: Gaming Gear, Reviews

Tagged:

dreamGEAR Retro Arcade Machine X review originally appeared on on March 9, 2017 at 5:39 pm.

Note: If you are subscribed to this feed through FeedBurner, please switch to our native feed URL http://the-gadgeteer.com/feed/ in order to ensure continuous delivery.