Vacuvita vacuum food storage system review


Do you ever feel like you waste money on food each week because it spoils before you eat it? One solution is to shop for only what you need each day, but that can be too time-consuming. Another solution is to try a food storage system like the Vacuvita. They sent me their complete kitchen package that includes the Vacuvita Home Base, several containers, and bags. Let’s take a look.

What is it?

You are probably familiar with other food storage systems like FoodSaver. We’ve used one for years to save leftovers in bags that we then store in the freezer. The Vacuvita food storage system can also vacuum pack food inside special bags, but in addition to that, it has a Home Base unit that sits on your counter to store food items that you need frequent access to and can vacuum pack food in containers that you can keep in the fridge or cabinet.

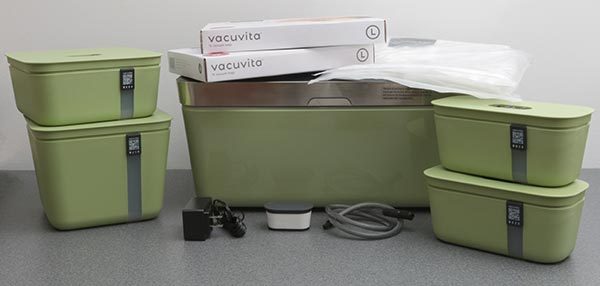
What comes with the complete kitchen package?

Vacuvita Home Base
AC adapter
1 large container
1 medium container
2 small containers
40 bags (20 large and 20 medium)
Vacuum adapter
Quick start guide
Manual

Design and features

The Home Base is a large storage chest that has been designed to be left out on the kitchen cabinet. You can buy it in a variety of colors from the green that you see here, to white, black and blue and orange.

The home base is 18.5 x 12 x 8.25 inches. That means you will need to devote significant space on your counter top for it and consider that it needs some clearance for the opening lid too.

Pressing the latch on the front of the Home Base will cause the lid to unlock and open by itself to reveal a roomy storage area.

The storage area inside the Home Base is about  16 x 7 x 6 inches which is large enough to hold a loaf of bread and other items. It can be used to store items that you want to access frequently like bread, crackers, chips, cookies, cereal, and other dry food items that don’t require refrigeration.

An easy to clean filter is located on the back wall of the Home Base. Sometimes you will need to remove the filter to clean it.

According to the manual, the liner of the Home Base can be removed and washed either by hand or in a dishwasher. But I wasn’t able to remove it from the unit and didn’t want to try prying it out with a screwdriver.

On the back of the Home Base is the socket for the vacuum adapter.

This is where you plug in the adapter and hose that are included with the system. The adapter is used to vacuum pack food in the Vacuvita bags and the Vacuvita containers.

The containers are made of microwave and dishwasher safe BPA and BPS free plastic.

Notice the QR code on the side of the container? If you like, you can use the Vacuvita app to keep track of the food that you store in the containers and the app will alert you before the food expires.

Scanning containers with your phone might sound a little goofy, but since the containers are not see-through (except for the tiny frosted window on the front), it’s going to be tough to remember what’s in each container unless you label them or open them, which of course breaks the vacuum seal.

The containers can be used to hold dry or wet food items and can even be stored in the freezer.

The only thing I didn’t like about the containers were the ribs on the lid and hump on the bottom of the container which made washing wet foods a little more work than if the lid and bottom of the container had a smooth surface.

When you plug in the Home Base, the latch will light up and the air inside will automatically be sucked out. The vacuum process can take from a few seconds to about 45 seconds if the container is mainly empty. The Home Base continuously checks the vacuum inside the unit and will suck out air as it needs to as time goes by. The vacuum process does make some noise, but it’s not terribly loud.

When the vacuum adapter is plugged into the socket on the back of the Home Base, a LED capacitive button appears on the lid.

Pressing the capacitive button will initiate the vacuum process through the adapter. You use the adapter with the Vacuvita containers and the bags.

A rubber flap in the container’s lid can be lifted to release the vacuum so that you can remove the lid.

Unlike FoodSaver bags, the Vacuvita bags have a zip seal the top and can be resealed and reused several times.

You can freeze the BPA free bags and even use them to do sous-vide cooking. With sous-vide cooking, you place the food (usually meat) in the bag with spices and marinade. Then you vacuum out the air which rapidly infuses the food with the flavor of the marinade. You then cook the food right in the bag by placing it in hot water.

The vacuum adapter removes air from the Vacuvita bags when you hold the adapter over the designated area on the bag and press the button on the home base to start the vacuum process.

Just like with the Home Base and the Vacuvita containers, the vacuum process will (should) automatically stop when all the air has been removed from the bag.

Using the Vacuvita food storage system

Using the Vacuvita to store food in the Home Base, containers and bags is not difficult. But there were a few times when I had some issues with the vacuum adapter. The main issue that I had was either getting the vacuum process to automatically stop or actually suck the air out of a bag or container.

I also noticed that the vacuumed bags would not hold the vacuum for more than a day or so when leaving the bag out on the counter. But if I placed the bag in the freezer there was no problem. On the other hand, the containers seemed to hold the vacuum a lot longer than the bags.

Does the Vacuvita keep food fresh 5 times longer?

Does it keep frozen foods vacuum packed in the Vacuvita bags fresher 5 times longer than foods not in vacuum packed bags? I can’t say for sure because I’d need to check the foods in a few months, but since the bags feel similar to the FoodSaver bags that we’ve been using for years, I’m confident enough to say that yes, the bags do keep food fresh longer when you freeze them because the bags protect the foods from freezer burn.

Does the Vacuvita keep foods fresh longer in the bags when not frozen? From my limited testing, I would say no. The bags do not hold the vacuum longer than a day or so.

Does the Vacuvita keep dry foods fresh longer in the Home Base? Yes, from the limited amount of testing that I’ve done with loaves of bread, chips, cookies and even some fruits, I do believe that it does help keep those items fresh longer than when they are just sitting out on the counter.

Does the Vacuvita keep foods fresh longer in the containers either in the fridge or on the counter? Yes, I believe it does. I was able to store some deli meats, and homemade soup in the refrigerator longer than I typically would store them without using the Vacuvita. I was able to eat them days later than I ever would without the Vacuvita and since I’m still above ground, I didn’t succumb to food poisoning which is a good sign 🙂

See it in action

Final thoughts

The Vacuvita food storage system is well made and easy to use. If you don’t mind the price and the space that the Home Base requires on your counter, it is a handy way to keep food fresher for up to 5 times longer than normal.

Source: The sample for this review was provided by Vacuvita. Please visit their site for more info and Amazon to order.


Product Information

Price: $299
Manufacturer: Vacuvita
Retailer: Amazon
Pros:
  • Well made
  • Easy to use
  • 3 ways to store food: Home Base, bags, and containers
  • Resealable bags
Cons:
  • Bags didn't hold the vacuum for more than a day
  • Can't see what's in the container without labeling or opening it
  • Expensive
  • Takes up a lot of room on the counter

Filed in categories: Reviews

Tagged: ,

Vacuvita vacuum food storage system review originally appeared on on May 10, 2017 at 9:00 am.

Note: If you are subscribed to this feed through FeedBurner, please switch to our native feed URL http://the-gadgeteer.com/feed/ in order to ensure continuous delivery.

QQC Corp Q-SWAP mobile power review


Who doesn’t need an extra power supply?  The devices we use every day suck down energy almost as fast as we can replenish it.  I’ve been testing these QQC Corp Q-Swap mobile power supplies for over a month, and really put them through their paces.  How did they fare?  Check this out.

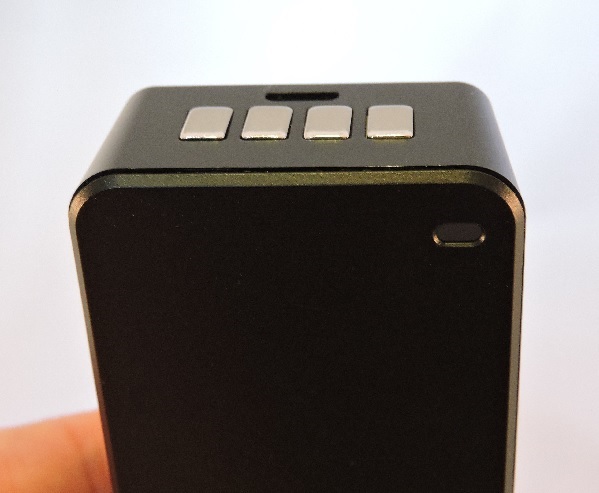
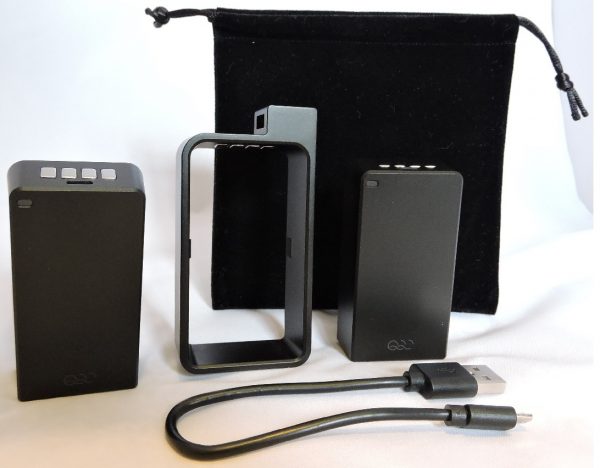
This mobile power supply comes with a nice, velvety carrying case, two rechargeable batteries, a charging ‘ Q case’, and a USB charging cable.  The dimensions (in the charging case) are: 1.8 x 0.7 x 3.7 inches.  It’s very light, too, weighing in at just 5.1 ounces, which is about the weight of a deck of playing cards.  For such a small size and weight, the power capabilities are pretty good.  Each battery holds 5,200mAh, giving you a total of 10,400mAh of backup power.  It is also legal to take these on planes, as the batteries are less than 100-watt hours (38.5, to be precise), which is in alignment with International Air Transport Association regulations.  Here are the main features of the device:

  • Swap and Go.  I rather like the design and creativity of these batteries.  The Q-Case design allows you to hot-swap batteries with no issues at all.  And the USB port allows you to charge the batteries, or power your devices with ease and convenience.  The design also helps prevent cord bending and breaking, because you hold the cord against the case, making it much more stable.
  • Easy Read Display.  If you touch the battery on the corner opposite the indicator light, it will give you a green, yellow, or red LED, which tells the remaining power level in the battery.  There is a LED on each side of both batteries.
  • BAM!  No waiting for recharges.  You can use one battery to power your devices, while the charger and other battery are plugged it getting juiced up.  Once one battery dies, just pop the other battery in, charge the dead one, and you’re back in business in about 10 seconds.
  • Convenience.  As I mentioned before, the batteries are very lightweight and portable.  You can always have extra power when you need it.
  • Scalability.  Q Swap sells additional batteries separately, so you can add or subtract as many batteries as your day will require.
  • Easy swap.  The batteries are slightly angled so that they will only fit in the Q case a certain way.  This makes sure there are no mistakes or burn-outs when charging.  The case also holds the battery in via little clips on each side, so you just pop them in and out.  Also, the batteries are Panasonic, in case you were wondering.
  • Safety, reliability, security.  The charger comes with a multi-protection circuit, and automatically detects the power needs of your device and charges them accordingly (works on 1-amp devices).

Here are some more pictures of the actual batteries and the Q case.  You can see the USB charging port, the charging connectors, the little clips/divots that hold the batteries in place while in the charging unit, and the LED lights on the batteries.

The packaging is clear and easy to understand.


It’s elegantly designed, with simple, informative graphics and instructions.


This picture highlights the trapezoidal shape of the battery.

And this one shows how the Easy Read Display operates, where to touch, and what the colors of the LED mean.


You can see below that the device fits very well into your hand.  The first picture demonstrates part of the safety functions of the device:  The USB cord plugs into the Q case very close to the case itself, so any downward or inward force on the connector is well-mitigated.  You can also see that the USB cable has a thicker, flexible end towards the plug.  This helps the cable withstand bending and breaking better.  The cable also conveniently wraps around the device while in your hand so the cable is held securely against the Q case, making breaks less likely.


You can see below, that the Q-Swap mobile power device has completely charged my Samsung Galaxy S5 (yeah, it’s time to upgrade).  Also, please take this shot for granted.  It was not easy getting the battery and phone to stay upright like that!  Sure, it would have been simpler to take ‘looking down’ shot… but you guys deserve the best!  And I’m here to give it to you.

And yes, it can charge large devices, like the Samsung Galaxy Tab S 10.1″.  Can you tell whether I like oceans or not?  Well, I like them NOW.  Until I was four years old, I was SEVERELY allergic to drowning.  Hehe.

OK, blah blah blah.  How well does it WORK?  So I’ve been using these batteries for about 45 days.  I mainly used them on my Galaxy S5, but also used them a few times on my Galaxy Tab S.  Typically, I would let my S5 run down to about 15% power remaining in its own battery, then I would start recharging with the Q-Swap batteries.  On average, the Q-Swap battery would fully recharge my S5 from 15% to 100% in an hour and a half.  Pretty sweet!  Comparable to having it plugged into an AC power source!  The quickest I got it from 15 to 100% was an hour and 23 minutes.  The longest it took was an hour and 38 minutes.  I estimate that this was caused by variance(s) in the level of “15%” juice left in my phone battery.  By the way, this was with the screen OFF for the vast majority of the time.  I was pretty happy with these batteries for the S5 phone.

Regarding my Galaxy Tab S 10.1 tablet, though…it has always had more staying power than my phone.  It has a physically HUGE battery – I’ve replaced it, so I know.  How did the Q-Swap’s handle the needs of the tablet?  Again, I started at 15% battery power remaining in the Tab S.  After two-and-a-half hours, one of the Q-Swaps charged it from 15% to 57%.  That’s the nice thing about having TWO instantly swappable batteries.  I popped the fully charged new battery into the Q-Case, and continued charging – again, with the screen off.  After 3 hours and 5 minutes, the second Q-Swap battery tuckered out, but it had charged my Tab S to 99%.  So, all-in-all, it took roughly five-and-a-half hours to charge the tablet from 15% to 99%, and two Q-Swaps did the job.  It’s good that the Q-Swaps get charged from an USB port faster than they can charge a device.  That way, you’re sure to always have that 2nd battery ready to go.

My overall impression of the QQC Corp Q-SWAP mobile power units is mostly positive.  I would recommend giving them a try.  They’re not “mega batteries”, like a 32,000mAh portable power supply (together, these are 10,400mAh), BUT, they’re also not as bulky either.  Here’s a picture so you can see for yourself.  Slightly smaller in width and length, but 1/8″ thicker than the deck of cards.

These would easily fit in your pocket(s) and satisfy most of your charging needs between the two.  They charge impressively fast (in my opinion) for what you get back from them.  Once one is done discharging, the other one is ready for a 3-second replacement swap.  Super easy.  Great for on-the-go power, very convenient, and you can always add additional batteries.  It has 22 reviews on Amazon, ALL of which are 5-stars.  Give them a try!  “Swap” your old portable battery supply.

Source: The sample for this review was provided by QQC Corp, and can be purchased on Amazon.


Product Information

Price: $89.95
Manufacturer: QQC Corp
Retailer: QQC
Pros:
  • Portable
  • Convenient
  • Scalability (can add more batteries)
  • Enough power to get you through your day
  • Size
  • Quick to recharge
Cons:
  • Charging devices can take some time, and possible battery swaps
  • 3 pieces
  • Cost

Filed in categories: Reviews

Tagged:

QQC Corp Q-SWAP mobile power review originally appeared on on May 9, 2017 at 9:00 am.

Note: If you are subscribed to this feed through FeedBurner, please switch to our native feed URL http://the-gadgeteer.com/feed/ in order to ensure continuous delivery.

WTFactory SlimClip VR Steady iPhone case review


Most of us need to stay connected to their iPhones when we exercise. You shouldn’t take calls and texts on the gym floor (except in emergencies), but music and workout apps are essential to many of our fitness regimens. The Wonderful Things Factory (WTFactory for short) has designed an iPhone case that’s a unique alternative to the arm bands and waist packs that you see around the gym, track, or trail. They claim that it is the world’s thinnest clip case for active lifestyles, and I have been testing SlimClip V4 Steady iPhone case for a month to see how it works in real-world situations.

Let’s go get sweaty!

Design and Build

The SlimClip Case V4 boasts a simple and rugged design, made specifically for the iPhone 6/6S/7 and Plus models. It’s a snap-on style sleeve made from a shock-proof, rubber coated plastic to provide impact protection during physical activities. The case is a bumper-style cover that wraps the back, corners, and sides of the phone. The rim of the bumper is raised to provide additional protection from drops & bumps. The base of the phone is open to allow full access to your audio and lightning ports, with enlarged openings for your camera lens and access to the iPhone silencer switch. Overall the build is tight and precise, with no stray bits of plastic or loose components. The cover snaps firmly into place when installed, and I haven’t noticed any loosening after several weeks of taking the phone in and out of the case.

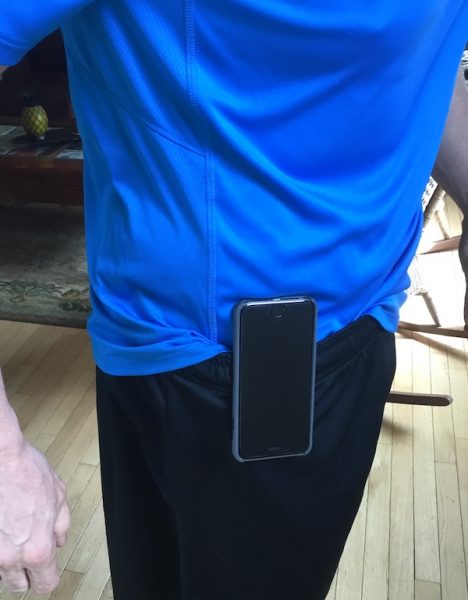
The SlimClip is a fitness accessory, and here is where its unique design features come into play. It is super thin, adding only 3mm to the overall depth of the phone. Even though it’s thin, the shockproof material adds enough protection to survive bumps and drops (as I have found out in the gym, as you’ll see below). The back panel is cut in such a way that it slides onto your waistband or pocket… kind of like a paper clip. When in place, the phone hangs upside down with the media plug is at the top, which makes it easier to manage your headphones. It makes for a very streamlined packaged that adds very little bulk or weight to your phone.

To the Gym!

I usually hit the gym 5-6 times a week for weight training, cardio, and isometric workouts. While I am not a runner, I am a daily dog-walker. After a month of putting the SlimClip through its paces, I think it does a good job of delivering on its intended purpose. It’s minimalist, super-slim, and does a good job protecting your phone from accidental drops and bumps.

Where you attach the phone is important. There’s no additional grip to the SlimClip to help it stay in place once attached, so it can come loose if you whack it during your workout. After bouncing my phone off the gym floor several times, I learned that it’s a good idea to position it away from my elbows. I think this is really an adjustment issue because I am not used to this style of phone. Fortunately, the case does a good job of protecting the phone if it hits the ground.

There are a few usability issues that I discovered during extended use. Attaching the phone to your waistband is a two-handed exercise, which isn’t as convenient as gator-style or raised clips you’ll find on other cases. It’s not too bad if you are attaching it at the hip, but takes some contortions if you want to clip it at the small of your back. Depending on how you wish to clip your phone (and how flexible you are) this may be a consideration.

As with most fixed-position clips, there’s no easy way to access the phone controls without stopping, removing the phone, doing your thing, and re-clipping. It’s a minor annoyance in practice that became more apparent over time, especially if I accidentally activated the voice controls in the middle of an exercise (I really wish Apple would give us a way to disable that!). This is a common issue with clip-style phones, however. If you are comfortable using voice controls to manage your phone or don’t access your phone at all during workouts, I suspect that you’ll never notice this.

>For outdoor use, you should know that the SlimClip does not provide any protection from the elements, nor is your screen protected. It’s something to consider if you do a lot of rough outdoor activity or like to run when the weather turns nasty.

Conclusions and Pricing

After making some adjustments to the design, I’m very happy with the performance of the SlimClip Case. It’s ridiculously thin, offers good protection, and stays out of the way during most fitness activities. If you are looking for a streamlined alternative to bulky armbands or waist packs, this may be a good choice for you if you don’t need the additional protection for weather or really rough outdoor activities. I’ve also found it to be a great day-to-day phone case that slips easily into your pocket, yet offers the additional convenience to attach to your front pocket if needed.

The WTFactory SlimClip V4 Steady iPhone case retails for between $20 and $40 depending on the model. For more information, visit SlimClipCase.com.

Source: The sample for this review was provided by WTFactory. Visit their site for more info.


Product Information

Price: $40.00
Manufacturer: WTFactory
Pros:
  • Offers good protection for a minimalist case.
  • Slim and unobtrusive.
  • Designed for fitness fans, but just as well outside of the gym.
Cons:
  • Requires both hands to clip in place.
  • No protection from the elements for outdoor activities.
  • Can get knocked loose if not properly positioned.

Filed in categories: Reviews

Tagged:

WTFactory SlimClip VR Steady iPhone case review originally appeared on on May 8, 2017 at 10:56 am.

Note: If you are subscribed to this feed through FeedBurner, please switch to our native feed URL http://the-gadgeteer.com/feed/ in order to ensure continuous delivery.

Tacklife HD60 laser distance measurer review


Normally, picking up a laser measure for the first time is accompanied by the thought or statement, “how far away is that [object]?” Then after a quick press of a button and flash of red light, a result is displayed that is usually accompanied by the thought or statement, “Cool!” The novelty and simplicity of these devices is underscored by two very cool operating principles: the speed of light and laser frequency is measured in order to calculate the measured distance, and accurate measurements require the optics and circuitry to function at MHz frequencies. The Gadgeteer was presented a Tacklife HD-60 to review. Beyond providing an accurate distance, the Tacklife has some neat features to simplify taking measurements without tape or an assistant. Read on to see what I think! 

The Tacklife HD-60 comes in an easy to open, environmentally friendly and lightweight cardboard box. Inside is the laser distance measure, two AAA batteries, a nylon belt case, a lanyard an instruction booklet and a 24 month warranty.

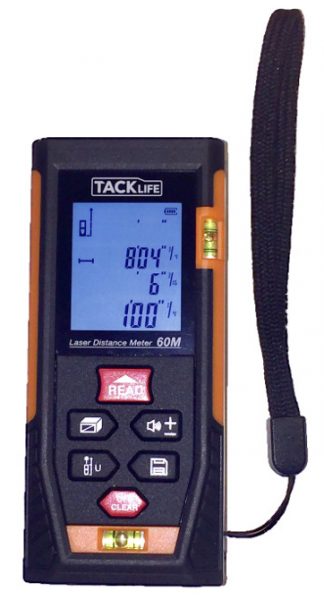
The unit is about 2.4” wide, 1” tall, and 4.3” long and weighs 4 oz with batteries installed. The exterior of the unit is a composite bi-injection rubber and plastic. The rubber will absorb hits more than a completely plastic case and provides a better gripping surface to prevent drops in the first place. The fact that this is bi-injection molded should provide enhanced durability over a plastic case with a rubber boot. One thing that would potentially make this more usable is a tripod mount. The buttons are soft silicone and laid out in a hexagon on the bottom half of the topside. In fact, the entire bottom half of the unit is uniform rubber membrane which will prevent dirt and liquid from getting inside to the circuit board better than individually seated buttons. Most of the buttons are multi-functional, but after a short amount of practice using the unit, pressing the correct button for each feature is easy to remember or easily determined by a quick glance at the icons on the button face. The topside of the unit also includes a horizontal and vertical spirit bubble to help ensure that the measurements between the measurer and the target are not at an angle. (A deviation of little more than 5° will change the measured distance by a foot at 196 ft.)

The unit is powered by 2 AAA batteries which were easy to install and, when the time comes, should be easy to replace because they are readily available. If the unit is not operated for more than 150 seconds it shuts off automatically to conserve the battery power. A fresh set of batteries can take 8000 single measurements.

The unit is powered on by a quick press of the read button. The display is back-lit in a cool white hue that makes the LCD numbers and icons on the screen easy to read in low light conditions. All of the LCD display segments are displayed on startup to enable the user to verify the display is fully functional. At its most basic level the display shows an icon depicting if the point of reference for the measurement is the front or rear face of the unit, battery strength, 3 memory registers of the previous three readings, the current reading, units for each of the readings, and an icon to show if the mode of operation is linear distance, area, volume, or distance determined by one of three Pythagorean constructions. The keypad is not back-lit, but it makes sense that the keys will be easy enough to see in the conditions that allow you to see where you are measuring from and to.

The manual is well written and is available here.  But just to summarize on the mail features, I’ll describe how to take a measurement. To take a reading the read button is pressed. The laser is lit to allow the user to target the measurement. Once the measurement is aligned the read button is pressed again. The laser flashes twice and then the result is displayed. A long press of the read button will cause the laser to remain illuminated and the measured result to be updated 80 times a second until the read button is pressed again, locking the result onto the screen. In the constant read mode, the maximum and minimum results obtained are also updated, and these are also saved once the constant read mode is exited. Depending on the situation, the operation of the measurer may be improved by using the audio function. Holding the button marked with a speaker will toggle the beeps associated with a keypress and with the conclusion of a measurement. Results may be saved by holding the save button until a number is displayed at the top of the screen. Saving has a 30 result memory, which may be accessed by hitting the save button and scrolling through with the Pythagorean button (forward) and the audio/+- button (backward).

The Pythagorean constructions can be quite useful, especially for measuring halfway up a tall wall, or a segment of a long corridor, where a laser target would be required to demarcate the extents of the desired measurement. Before getting to the Pythagorean modes there are two other calculators built into the unit: area and volume. Pressing the calculator button once brings you to the area calculator. to perform a calculation ensure that you read the measure of the length that is blinking on the picture on the display. Pressing the calculator button again allows you to calculate volume. Note that for area the shape must be a parallelogram, rectangle or square and for volume, the floor and ceiling must be parallel. Pressing the calculator button a third time brings you this calculation:

Enter the distance a and then b by pushing the read button (the user manual says to push off/clear, but this is incorrect). Make sure that the base of the measurer doesn’t move so that the measurements are all taken from the same location. I measured my wall and later confirmed the length by measuring from the floor the ceiling and the measurements were within an 1/8 inch.  This won’t work if x is not perpendicular to b, but will work even if the measurement is not vertical. Pressing the calculator button a fourth time brings you this calculation:

Enter the distance a and then b by pushing the read button (the user manual says to push off/clear, but this is incorrect). Make sure that the base of the measurer doesn’t move so that the measurements are all taken from the same location and that the measurement a and b are perpendicular to each other. Pressing the calculator button a fifth time brings you this calculation:

This mode is great if want to measure a section of wall but don’t have access to an area perpendicular to the area you want to measure. For instance, this is useful to measure the height of a flag at the top of a flagpole. In order for this calculation to produce correct results, the measurement of C must be perpendicular to the length measured. Again, the manual states to use the off/clear button to take measurements but the read button is the correct one to press. The final press of the calculator mode will calculate this construction:

In this construction, b should be perpendicular to x, and the length measured will be most accurate if the targets of a, b, and c are linear.

I had the opportunity to compare the results of the Tacklife with the results obtained by a Jetery laser distance measurer and a Bosch Laser Distance measurer. Both comparisons yielded excellent agreement of the measured distances.


I also verified the result of the distance meter with a tape measure and found that the laser distance results agree with the distance indicated by the tape over 24 feet. On short lengths of a foot or shorter there is some disagreement, so measuring with these distances are best accomplished with a ruler.

In conclusion, the laser distance measure should be one of the basic tools that every gadget lover has in their arsenal. The price of these units has absolutely crashed from a few years ago and is now low enough that most people can afford to have it around the house for those jobs where a tape measure is too short or unwieldy. Yet, the construction of the HD60 is top-notch and is very similar to the Bosch unit that I tested it against. I recommend you pick one up today.

Source: The sample for this review was provided by Tacklife. Please visit their site for more info and Amazon to order.


Product Information

Price: $75.99 (on sale for $36.97)
Manufacturer: Tacklife
Retailer: Amazon
Requirements:
  • 2 x AAA batteries
Pros:
  • easy to use
  • accurate
  • inexpensive
Cons:
  • no tripod mount

Filed in categories: Reviews

Tagged:

Tacklife HD60 laser distance measurer review originally appeared on on May 7, 2017 at 10:00 am.

Note: If you are subscribed to this feed through FeedBurner, please switch to our native feed URL http://the-gadgeteer.com/feed/ in order to ensure continuous delivery.

iClever F56 Bluetooth transmitter and receiver review


Most of us listen to some form of audio to get us through part of our day; maybe you enjoy listening to podcasts while working or streaming a specific playlist to pump you up at the gym.

I personally enjoy listening to music while driving in my patrol car at work. Unfortunately, the vehicle isn’t equipped with Bluetooth so I can’t stream audio from my phone. I imagine I’m not the only person who has run into this issue.

Fortunately, there are plenty of gadgets that can act as a bridge between your phone and your vehicle. I’ve recently reviewed one such device, the iClever F56 Bluetooth receiver, and transmitter.

In the box

  • 1 x IC-F56 Bluetooth Transmitter/Receiver
  • 1 x 3.5mm Audio Cable
  • 1 x Micro USB Cable
  • 1 x User Manual

Specifications

  • Bluetooth Version: 4.1
  • Bluetooth Profile: HFP/HSP/A2DP/AVRCP
  • Bluetooth Range: up to 30ft
  • Power Supply : Li-Poly 180mAh
  • Working Current: 22mA (Max)
  • Charging Voltage: DC 5V

Design

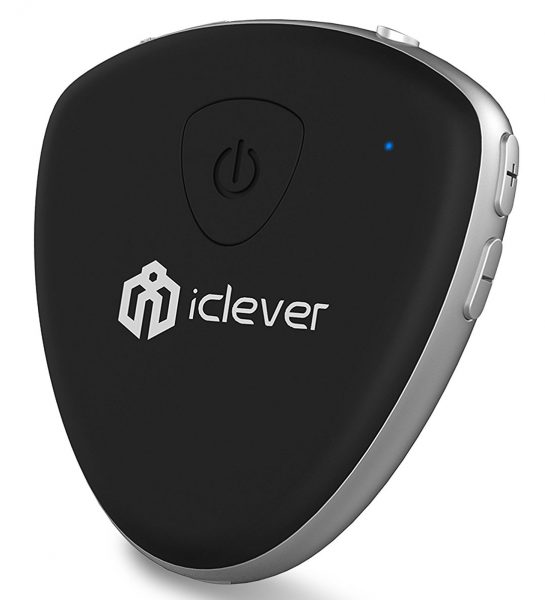
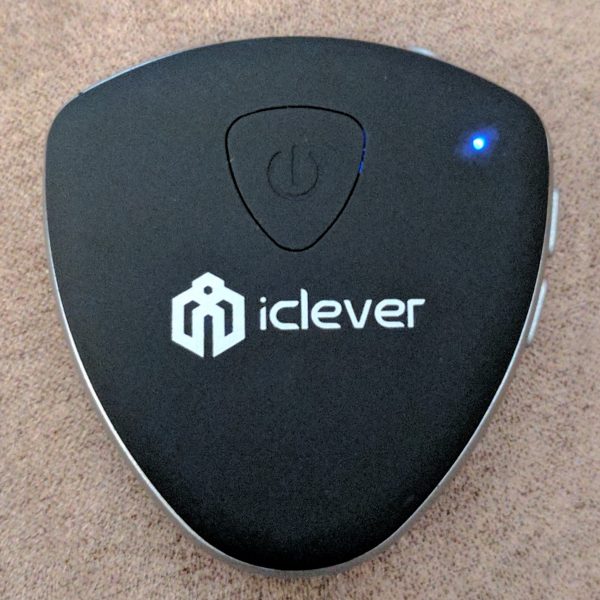
The F56 is a rather small device; at its widest points it measures approximately 2 inches and is about 1/4 inch thick. It actually looks like an over-sized guitar pick.

The front of the device has the power button and an indicator light. The power button also doubles as the play/pause and answer/hang-up button.


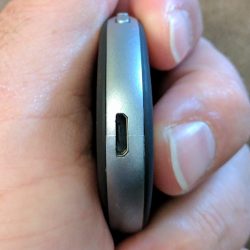
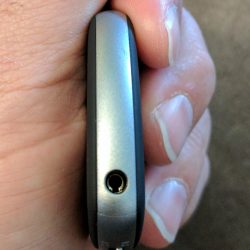
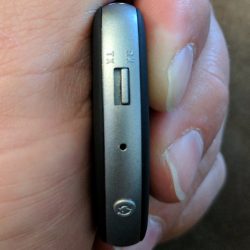
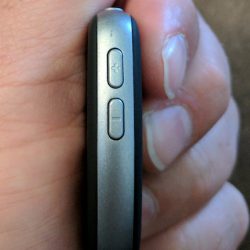
The edge of the device contains the charging port, the 3.5mm port, the receiver/transmitter switch, pairing button, microphone, and track/volume controls.

That’s all there is to the design of the F56. It’s a compact device that is travel friendly.

Performance

The F56 is extremely easy to use.

First, you have to decide whether you want to use the device to transmit or receive Bluetooth audio. I elected to use it to receive audio and placed the selector switch to “RX”. 

The first time you use the device it enters into pairing mode; I only had to open my phone’s Bluetooth menu and select “IC-F56” from the available devices.


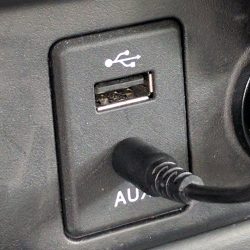
Next I placed one end of the 3.5mm audio cable into the device’s jack and the other end into my vehicle’s aux port.

I turned on the radio and began streaming music.

The sound quality was great; I didn’t hear any background static or any distortion.

I was able to pause, skip tracks, and adjust volume directly from the F56. My only complaint is the buttons are very tiny and I can’t imagine being able to use them without taking my eyes off the road.

I also made a phone call while using the F56. The audio from the caller played through my car speakers; it was clear, although the volume was lower than the music that was earlier playing.

The person I was speaking with didn’t appear to have any idea I was speaking through the F56 and didn’t make any complaints about the audio quality.

I next decided to test the F56 in transmit mode.

I switched the selector from “RX” to “TX” and paired the device with one of my Bluetooth speakers. I inserted the audio cable into my phone and the F56 and began streaming audio.

As with my car stereo, the sound quality was great and free of any issues.

Conclusion

The F56 is a pretty nifty gadget and easy to use.

You can stream music to a non-Bluetooth device, or you can transmit music from any device with an auxiliary port to a Bluetooth device. It’s a very versatile device.

At only $29.99 the device is relatively inexpensive. If you’re in the market for a multi-faceted Bluetooth device, consider the F56.

Source: The sample for this review was provided by iClever. Please visit their site for more information and Amazon to order.


Product Information

Price: $29.99
Manufacturer: iClever
Retailer: Amazon
Requirements:
  • Bluetooth capable device
Pros:
  • Small
  • Easy to use
Cons:
  • Buttons very tiny

Filed in categories: Reviews

Tagged:

iClever F56 Bluetooth transmitter and receiver review originally appeared on on May 6, 2017 at 8:51 am.

Note: If you are subscribed to this feed through FeedBurner, please switch to our native feed URL http://the-gadgeteer.com/feed/ in order to ensure continuous delivery.