Monster iSport Freedom Bluetooth headphones review


We’re all familiar with tapping and swiping, we use them every day with our phones and tablets. Now Monster has brought that to a pair of Bluetooth headphones. The new iSport Freedom headphones use tapping and swiping to perform functions like play, pause, and volume control. Completely eliminating the need for buttons. Do these gestures transfer well to a pair of headphones, or is this just a cool gimmick? Let’s find out together.

In the box:

  • Headphones
  • Micro USB charging cable
  • 3.5mm Audio cable
  • Users Manual

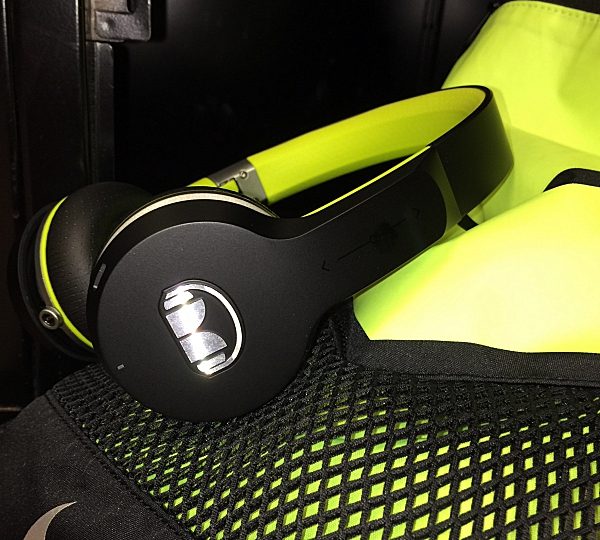
Designed with the athlete in mind the Freedom headphones are part of Monsters iSport line. They’re very lightweight, with well-padded pivoting earcups which give them a comfortable secure fit. The adjustable headband also makes it easy for anyone to find the perfect size and fit that’s right for them. I really like their sporty look, especially the Highlighter Green and Black color combination. They’re also sweat-proof, water-resistant and washable.


A closer inspection reveals the lack of any kind of control buttons. The control buttons have been replaced by a Touchpad, more on that later. On the right earpiece, you’ll find the multifunction button, Micro-USB charging port, 3.5mm cable port and indicator light.


The iSport Freedom headphones fold up, making them compact enough to fit in the zipper pocket of my gym pack. Although I wish they would’ve included some kind of carrying case to protect the headphones when I’m not using them.

The Freedom headphones have some really nice features.

  • Dual pairing which allows for you to connect two separate Bluetooth devices at the same time.
  • 3 different listening modes (wired, wireless and USB Direct Digital Audio).
  • A built-in high intelligibility mic with advanced echo suppression.
  • Voice activated calling.
  •  Low battery voice prompts and Indicator LEDs.

However, the standout feature of these headphones is the Touchpad. The Control Touchpad is located on the right earpiece, just above the Monster logo. Actions that used to require physical buttons are now performed by tapping or swiping on the Touchpad. A single tap on the Touchpad will play and pause music. A double tap plays next track and a triple tap plays the previous track. Volume is controlled simply by swiping up on the Touchpad to increase volume and swiping down to lower volume. I found the Touchpad to be very responsive and quick. It took a little getting used to but after a short learning curve, it was very easy to use. This feature is not going to be for everyone. Understandably, some people are just uncomfortable with a new way of doing things. And I must admit that to some, standing there repeatedly tapping the side of your headphones might appear to be a bit goofy. Personally, tapping or swiping my finger on the side of the headphones is quicker than fumbling for my phone, or searching for buttons. And if I look a little goofy, I’m okay with that. Overall I think the Touchpad is more a solid feature than a cool gimmick

Charging:

Charging the headphones is done using the provided USB Micro cable. You can use a standard USB compatible charging device that plugs directly into a wall socket, or you can plug the USB cable directly into a laptop or PC. A full charge on an empty battery takes 2 hours. More impressive though is the 20 hour listening/talk time. I’ve had these headphones for nearly 3 weeks and I haven’t had to charge them once.  However, if you’re ever in a situation where the battery is running low, you can listen to your headphones using the provided 3.5mm audio cable.

Pairing:

To pair the headphones first turn on your Bluetooth enabled device then turn on the headphones. If they have not been previously paired they will automatically enter pairing mode, and the blue and red indicator lights start to flash quickly. The headphones are now ready to pair with your device. To pair the headphones if they have been previously paired with another device, ensure that the headphones are switched off, and press and hold the multifunction button (for about five seconds) until the blue and red indicator light starts to flash quickly. Activate the Bluetooth feature on your phone or music player, and set it to search for Bluetooth devices. Select “FREEDOM” from the list of found devices on your phone or music player. If necessary, enter passcode 0000 to pair and connect the headphones to your device. To disconnect the headphones from your device, switch off the headphones, or disconnect it in the Bluetooth menu of your device.

Voice Activated Calling:

Like most headphones these days the iSport Freedom have Voice Activated Calling. I put the calling feature through its paces and it worked as expected. Calls were nice and clear on both ends, and making and receiving calls using the touchpad was easy. Music automatically pauses when you answer a call, and resumes once the call has ended. Actions such as placing and answering a call are controlled by the Touchpad using different combinations of taps and presses. See reference chart.

Sound Quality:

Even with all the bells and whistles, the most important thing when considering purchasing a pair of headphones is sound quality. The sound quality here is exceptional. Audio is full bodied, rich and very clear. There’s no muffling of vocals. The sound is well balanced and immersive, almost as if you’re being pulled into the music. Even when listening to music at a lower volume there is no loss of clarity or detail. One reason music sounds so good is Monsters use of apt-X audio. Apt-X allows for music to stream at a significantly reduced bitrate over a Bluetooth connection without affecting the audio quality or introducing latency issues, ensuring that you always get the best sound quality from your music. You also get a choice of 2 different sound profiles, standard, and Turbo. Interestingly, although this feature is listed on the box there was no mention of how to use it anywhere in the Users Manual. I finally found that answer in the Q & A section on Monsters website. A quick double press of the multifunction button, while the headphones are on, toggles you between the two modes. I really couldn’t tell much difference between the two. The Turbo mode did offer a slight boost in overall sound and bass, but nothing that made me say “WOW”! Monster also recommends a listening break-in time of 20 hours. That’s right I said break-in time. It’s the first time I’ve heard of this with regards to headphones, but it does make sense. According to Monster “Like any high-performance product, whether it’s cars or headphones, they’re mechanical devices that settle in after use. Your new headphones will sound incredible out of the box, but will “mellow” out after use and sound even better.” I have nearly 12 hours of listening time on mine and I can say they do sound better now than the first time that I used them. I guess you learn something new every day.

At the Gym:

I workout 4 to 5 days a week and have been using a pair of Rowkin Pulse Bluetooth earbuds that I reviewed earlier this year. I’ve seen several people at my gym wearing on-ear headphones and was curious as to whether or not I would like using them while I workout. With the iSport Freedoms, I didn’t just like it, I loved it! These headphones are super lightweight and extremely comfortable. The fit was nice and secure, and they didn’t move around at all as I worked out. The on-ear design does a great job of blocking out most ambient noise. And Freedom’s Touchpad controls were really easy to use while working out. All in all the iSport Freedom headphones are the perfect workout partner.

Final Thoughts:

Overall I found the Monster iSport Freedom Bluetooth headphones to be exceptional. Frankly, they’re the best pair of wireless headphones I’ve ever tried. There’s a lot to like about these headphones. They’re sporty, lightweight, comfortable, compact and most importantly they sound fantastic. Not to mention their cutting edge Touchpad controls. Well worth their $199.95 price tag. So if you’re auditioning sub $200 headphones be sure to add the Monster iSport Freedoms to your list. You’ll be happy you did.

Source: The sample for this review was provided by Monster. Please visit their website for more info and to purchase.


Product Information

Price: $199.95
Manufacturer: Monster
Pros:
  • Sporty looks
  • Lightweight
  • Compact
  • Great Sound
Cons:
  • No mention of how to use Turbo mode in the Users manual.
  • No big difference between Standard and Turbo modes.
  • Lack of any kind of carrying case.

Filed in categories: Reviews

Tagged:

Monster iSport Freedom Bluetooth headphones review originally appeared on on May 28, 2017 at 10:00 am.

Note: If you are subscribed to this feed through FeedBurner, please switch to our native feed URL http://the-gadgeteer.com/feed/ in order to ensure continuous delivery.

WiMiUS Q4 4K action camera review


As you may or may not know, there is a sea of POV action cameras, aka sports cameras, out there in the market today. Some that you immediately recognize by their commonly used name and some you have never heard of. But one thing is for sure, camera makers are making their move to the 4K resolution for everyday consumers.

This review is for the Q4 4K WiFI Dual Screen action camera from WiMiUS. This is just one of WiMiUS’s model in their line of 4K cameras so be sure to head on over to www.wimius.com and check out their other cameras.

Let’s go ahead and get the specs out of the way first.  The Q4 has the same rectangle matchbox shape that most POV cameras have. It has a nice big 2.0″ in. LTPS screen on the back and a 0.66″ in. Status Screen on the front. The Q4 records to Micro SD cards and up to 64GB.
The camera body itself is 59.2×40.5×23.9 (2.3″in x 1.6in ” x 0.94in”) and weighs 45.1g/1.6oz. (61.7g/2.18oz. with battery).

The Q4 camera is WiMiUS’s double screen design that has the screen on the back as well as a Status Screen on the front. Although the Status Screen is a great feature, it does not illuminate in any way so it is hard to see in low light and impossible in the dark. But in daylight and in a well-lit area it is a great addition to the camera. It would be nice if it had some kind of backlight for those low light conditions because I do use POV cameras like this in low light and sometimes dark locations from time to time. For example, I set up action cameras on a stage at concerts or shows for B-roll footage where lighting is very dim or limited.

The camera has a 170° CMOS wide angle lens with a Sony IMX179 image sensor. It records in an MP4 video format and can shoot video in 4K@30fps, 2.7K@30fps, 1080P@60/30fps, and 720@120/60/30fps.

Unfortunately, the Q4 only records 4K at 30 frames per second. I would have hoped to record at 60fps or 24fps to get the ultimate 4k experience. However, the camera does offer, slow motion (1080P@60/30fps or 720@120/60/30fps), Time-lapse, loop recording, and a Car Mode.

The Q4 has megapixel photo resolutions at 16M, 12M, 8M, 5M, and 2M.  Along with Single shooting, the camera has other photo options such as Burst Mode and Self-Timer modes. One thing I did notice is that in Still Camera it mode did pretty good taking photos in low light.

One of the great features I like about this camera is that it comes with an extra 900mAH battery along with a charging cradle. Not only do you have an extra battery that you don’t have to purchase, but you don’t need to keep the battery in the camera to charge. This way you can have a fresh battery charged and ready to go when you need it. The battery life is about 90 minutes and has a charging time of 3 hours.

Although the WiMiUS Q4 only records 4K resolution at 30fps, recording at 30fps does reduce the file size so you won’t fill up your card’s space as quickly. However, if you do have the card space why not have the option to record at 60fps or 24fps in 4K? According to their website, the Q4 supports microSD cards up to 64GB.

I recorded some footage using the 4K,  2.7K and 1080P options but upon review of what I shot I wasn’t too impressed with the quality of the recording.  I saw a lot of digital artifacts and digital noise in all the resolutions except the 4K setting. Even the 2.7K and 1080P still had artifacts and the 720 wasn’t great at all. Overall, shooting in 4K just looked like footage recorded in 1080 at best.

One thing I noticed is that the Q4 became very warm when I was shooting it in the 4K setting.

Keep in mind that to view the 4K footage properly in all its glory you need a monitor that can support 4K video. Unfortunately, not unlike the majority of people out there, I don’t have a 4K monitor to reference but you can definitely tell the higher quality difference when you review the footage recorded in 4K. 

I tried exporting out a sample video in 4K resolution but I couldn’t get a proper clip exported from Premiere Pro. I was editing with CS5.5 and each time I exported out a 4K clip using a .h24 codec preset I kept getting an exported video in a .m4v extension when the extension should have been .mp4.

So, when I uploaded the clip to YouTube I would get this notice from YouTube: “We did not recognize the format of this file, but we will try to process it anyway. See this article on recommended formats for more information.”

YouTube doesn’t support .mk4 files so what ended up happening is that YouTube took my 4K sample video clip and downconverted it to 720 each time. So naturally, I didn’t see a reason to view a 4K sample clip in 720 resolution so I didn’t want to upload that clip to YouTube.

I guess I need to convert or encode my sample clip to a format that YouTube supports before uploading. I am looking more into this issue so I can upload a 4K  sample in the future.

4K Screen Capture

2.7K Screen Capture

1080P 60fps Screen Capture

I have included a few screen captures of stills from different resolutions taken with the Q4. You will notice that the 4k resolution(1st screen capture) is the only one that truly looks crisp.  The 2.7K wasn’t bad, however, the 1080P (last screen capture) had plenty of noise and digital artifacts which you can tell in the blue sky. I reviewed the footage and extracted the stills on a 21.5″ in. iMac so the native screen resolution was at 1920×1080.

The large 2.0″ inch screen is great for reviewing footage on the camera. You won’t have to squint as you replay your footage and it makers framing your shots easier since you will be able to see more clearly what is in or out of the camera view. The smaller Status Screen on the front of the camera is handy to have and I like having the camera stats readily displayed. It is definitely handy to see the status of things such as the remaining battery life, if WiFi status, shooting mode, and more.

Since this camera is WiFi supported, there is an app that you can download for your Android and iOS devices to control the camera and review videos and photos you have shot. Unfortunately, it seems like the app needs a little work because I had few issues when trying to connect to the Q4 with the app. The first time I couldn’t get the app to cooperate. The app crashed the first time I tried using it and a couple of times after. When I finally got the app to work it was buggy. Some features worked while other features such as reviewing captured footage caused the app to crash or freeze forcing me to restart the app.  The app seemed useful when it worked.

The Q4 comes with several mounts and other accessories such as a camera clip, a drawstring carrying bag, a tether wire and more. You can mount the camera right away on just about anything so you can start using the camera right away. The Q4 action camera also comes in a Black color as well.

For the price, you can’t go wrong if you want to start shooting with a camera in 4K resolution. The 4K resolution from the Q4 is surprisingly nice, however, just keep in mind that the other camera resolution settings below 4K are okay at best. So you might just have to keep this camera in the 4K setting to get that crisp high-quality footage that many action cameras are moving up to.

Source: The sample for this review was provided by WiMiUS. Please visit their site for more info and Amazon to order.


Product Information

Price: $55.99 on Amazon
Manufacturer: WiMiUS Technologies Company Ltd.
Retailer: Amazon
Pros:
  • Low price.
  • Has 4K and 2.7K resolutions.
  • Status Screen on the front.
  • 1080P/60fps or 720/120fps Slow Motion setting.
  • Extra battery supplied.
  • Battery charger adapter.
  • Don't have to charge battery in camera.
Cons:
  • Only 4K resolution is free of noise and digital artifacts.
  • Status Screen has no backlight.
  • No 60 or 24 frame rates in 4K and 2.7K. Only 30fps.
  • Camera became very warm while recording in 4K.

Filed in categories: Reviews

Tagged:

WiMiUS Q4 4K action camera review originally appeared on on May 27, 2017 at 9:00 am.

Note: If you are subscribed to this feed through FeedBurner, please switch to our native feed URL http://the-gadgeteer.com/feed/ in order to ensure continuous delivery.

Pocket Hose Top Brass Bullet expanding garden hose review


I’ve reviewed and used two Pocket Hoses in the past few years and have liked how they are lightweight, don’t take up that much space, and are so much easier to move from place to place compared to traditional rubber garden hoses. The only problem with the Pocket Hoses that I’ve used in the past is that they don’t hold up for more than a year or so before they fail for some reason or another. The latest Pocket Hose that has been sent to me is the Pocket Hose Top Brass Bullet expanding garden hose. Weird name, yes. But is it sturdier than past Pocket Hoses? Let’s take a look.

What is it?

The Pocket Hose Top Brass Bullet is an expanding water hose that has a cloth-like outer casing and brass fittings on the ends. This particular hose even comes with a removable brass spray nozzle.

Design and features

I was sent the 50-foot long version of this hose. The Pocket Hose Top Brass Bullet is also available in lengths of 75 and 100 feet.

The only way I know of to describe the outer casing of this hose is that it is made of a heavy black knitted material that feels really strong, but stretchy. The covering does not have any seams that can tear or pop open from water pressure.

On each end of the hose is a brass fitting with a thick rubber strain relief sleeve.

The Top Brass Bullet hose also comes with a removable brass nozzle that has 3 spray options from a fine pinpoint to a fine miss and a full power spray.

Of course, if you prefer a nozzle with a squeeze grip, you can remove the freebie nozzle and add your own.

See it in action

Final thoughts

We’ve only been using this hose for a couple weeks, so this is more of an overview than a real review. That said, so far, the Pocket Hose Top Brass Bullet looks and feels like a higher quality hose than the other expanding hoses that I’ve reviewed.

I’ll do a review update after a full season of using the hose, but if my hunch is right, I think this hose will still be going strong when it comes time to store it for the winter later in the fall.

Source: The sample for this review was provided by BulbHead. Please visit their site for more info and Amazon to order.


Product Information

Price: $29.99
Manufacturer: BulbHead
Pros:
  • Doesn't get kinked
  • Lightweight
  • Comes with a removable nozzle
Cons:
  • None

Filed in categories: Reviews

Tagged:

Pocket Hose Top Brass Bullet expanding garden hose review originally appeared on on May 26, 2017 at 3:21 pm.

Note: If you are subscribed to this feed through FeedBurner, please switch to our native feed URL http://the-gadgeteer.com/feed/ in order to ensure continuous delivery.

TP-Link Deco M5 Whole Home Mesh WiFi System review


Here at Bob’s house, we’re awash in technology. Between computers and gadgets, we probably have 15-20 different Wi-Fi enabled devices. But I’m not a gearhead. I don’t like spending hours tinkering with network settings to keep everything up and running. When our current Wi-Fi router started to drag, I was offered an opportunity to test Deco’s M5 WiFi System. TP-Link promises whole-house coverage (up to 4500 square feet), drama-free network management, and a host of control features managed through a simple app. Will it bathe your home in glorious, trouble-free WiFi? Let’s find out!

Out of the Box

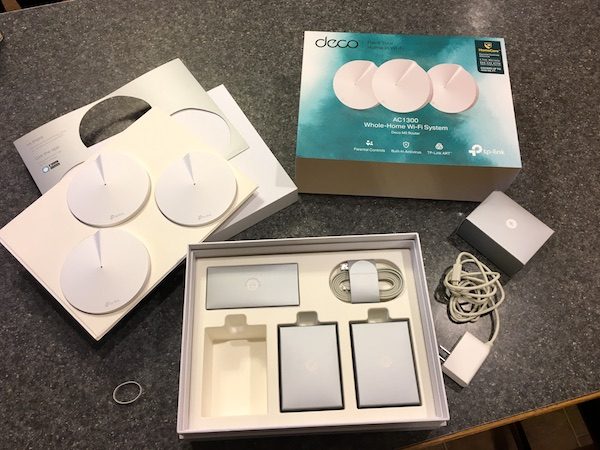
I like how TP-Link has designed the Deco packaging to set the stage for an easy experience. Upon opening the box, you’re greeted with the network pods and a friendly message to go and download the app to get started. All of the cables, power supplies, etc. are individually packaged in a second tray underneath. It’s a simple, classy setup that’s easy to follow.

The wifi pods are streamlined and elegant. Each is about the size of a home smoke detector, all white, with a little-whorled contour that adds a touch of art-deco design. There are no protruding antennas, only a single led light in the center of the device. The subtle design blends well in any corner of your house, and the low profile allows you to stash them easily in out-of-the-way places. You’ll see pics of the pods around my house a bit later in the review.

Rounding out the package, you get a power strip for each pod (also in white), and a network cable to connect to your modem.

Installation & Network Management Features

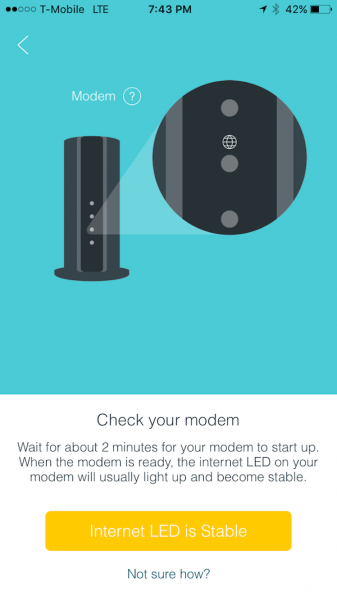
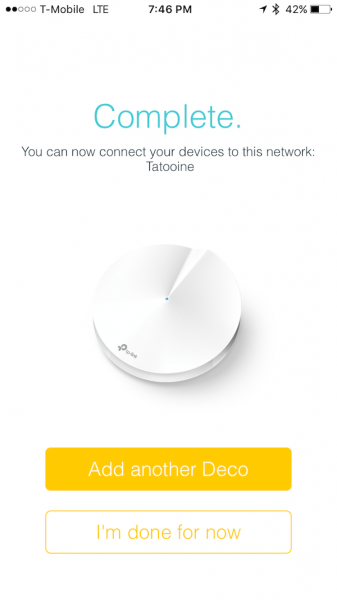
Installation and setup are all driven through the app you download for your Bluetooth-enabled Android or iOS device, which you will also use to manage your network. Download the app and it walks you through the process of connecting to your modem and establishing the network. You’ll connect the first pod to your modem using the provided cable. After setting up the new network, you identify the location of each pod as you set them up (office, living room, bedroom, etc.), and follow the instructions to bring each one online. It’s really easy and user-friendly, with the app providing all instructions (and troubleshooting) if necessary. The whole setup took me about 10 drama-free minutes to get fully operational. I’ve included some sample screen shots below:


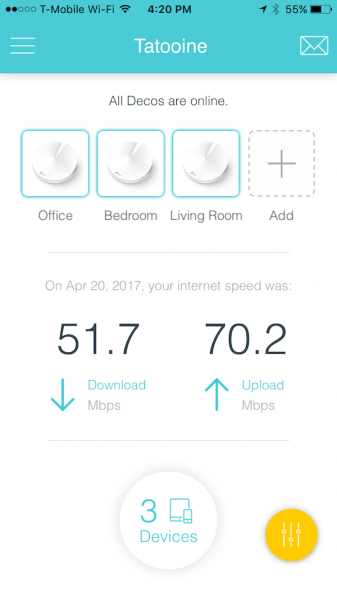
Once installation is complete you have complete control over the network via the app. Real-time reporting provides continuous updates on upload and download speed availability as well as the health status for each pod. You can see all the devices that are connected at any given time, and are notified as new devices are added to the network. Network settings can be tweaked to prioritize specific activities such as gaming, streaming, or web surfing. TP-Link also provides antivirus protection for the whole network that includes blocking malicious content, preventing external intrusions, and quarantining infected devices. You’ll also be able to pull reports on all of these activities, including network usage by individual devices. 

You can also access and manage your network controls from anywhere that you have Internet access, at home or on the road. I was at the car dealership the other day, and was able to check in on my network and see what was happening. The screen shot below shows the current status snapshot I took while I was away:

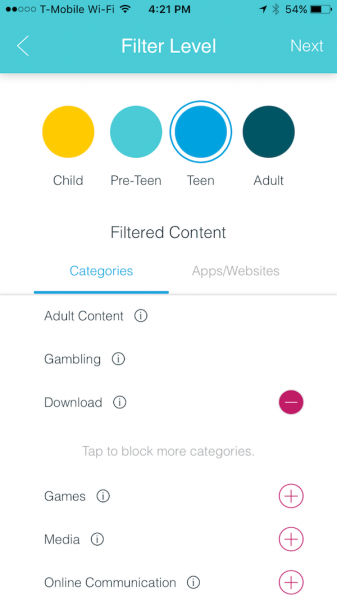
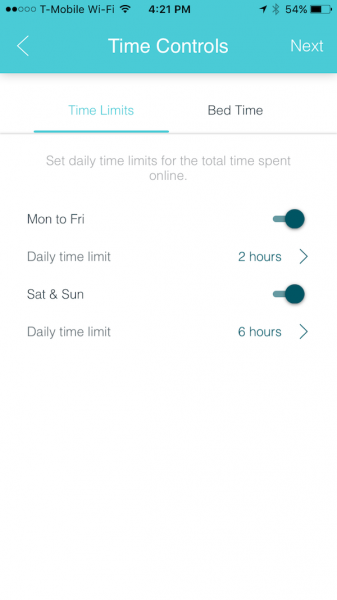
Got kids in the house? You can completely control network usage and access to content for individuals in your household with an impressive degree of customization. First, you set up a profile for the individual user and assign an age level to set default access to various content (adult content, gambling, downloading, social networks, etc.). You can then customize that access to your desired preferences, and/or block access to specific apps/websites for that individual. Once you have the permissions established, you assign all the appropriate devices to that profile to lock it in. You can also define the number of hours of allowable network access per day (weekdays and weekends), and/or establish bedtime settings that will disable network access at specified times. The app interface makes this all a lot easier than it sounds with an intuitive interface that makes it easy to set up, manage and remove profiles.


Some Important Points about the Network and Hardware

While the features of the Deco M5 Wi-Fi System are excellent, there are several important elements that you’ll need to consider before you buy with respect to network and hardware requirements as well as the security package. I think these issues are important enough to address before we proceed.

Using this system requires you to set up a new network that, along with the app, are connected to TP-Link at all times. This gives you the benefits of continuous worry-free network security and remote access, but your data can be reported to the company and/or may be subject to privacy risks. This is true with any cloud-based service (such as Google’s suite of tools and enabled gadgets), so you’ll have to decide if this is a concern for you.

It’s also important to note that this system is not designed to augment/extend your current network. There is no support for access-point mode, so you can’t use your existing router. You must set up a new network on the system, so you’ll experience compatibility/sharing issues if you wish to continue to use your existing router and network for some devices. If you’re looking to extend your current network and use your existing hardware, this won’t be the right solution for you.

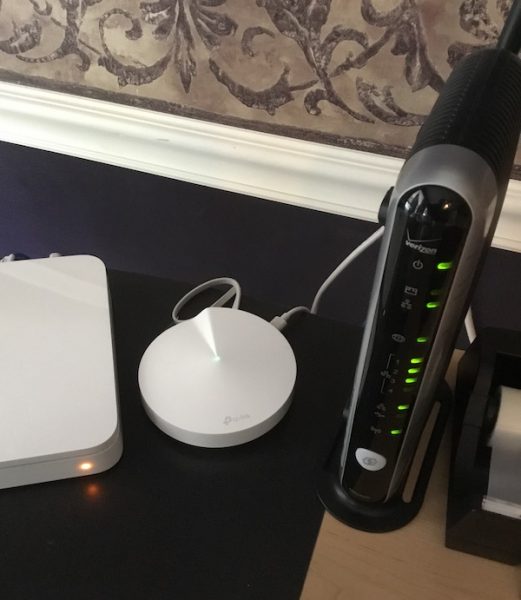
In my house, we have Verizon Fios as our internet provider and use a Verizon-provided modem/router combo. I also have an Apple Time Machine that can act as a router. Both are older & slower Wi-Fi units, so I was completely OK with ditching both and connecting the modem directly into the Deco. I’m also OK with the TP-Link connection because I find that remote access and the antivirus/security features are worth the trade off.

Finally, the network security features are provided by Trend Micro. You get three years for free with the system, after which it looks like you’ll need to pay for the service. I was unable to find pricing at the time of writing this review… the TP-Link site claims that the service is a $360 value, but I am not clear about what future pricing will be after the initial agreement expires.

Setup and Daily Use

As I mentioned before, I don’t like tinkering with technology. I like products that work as defined, are easy to use, and don’t require constant maintenance to keep operational. With a solid month of operation, I feel that the Deco M5 WiFi System delivers a hassle-free network experience.

I’ll set the stage for our test. Our home is a standard colonial, roughly 2500 square feet of total space. The cable modem is installed on the second floor in the middle bedroom, on the inside front wall of the house facing the street. We have three full-time household occupants (not including the dog) that are actively using tablets, laptops, smartphones, and gaming systems throughout the day and evening in addition to peripherals including a network printer and streaming media devices. We’ve always seen slower performance towards the rear of the house, especially in the backyard and the basement that were farthest away from the router.

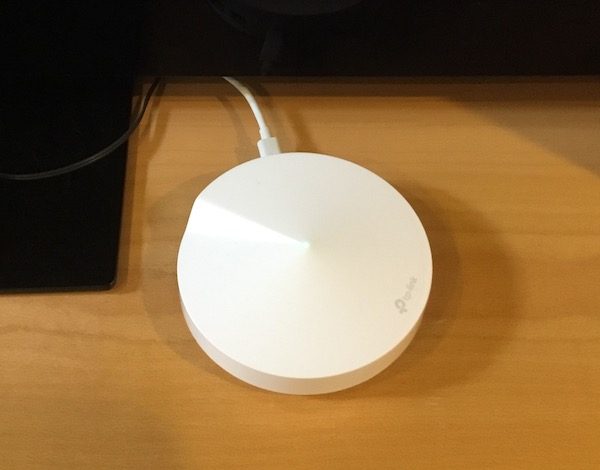
The first Deco pod is installed & connected directly to the modem by the provided Ethernet cable:

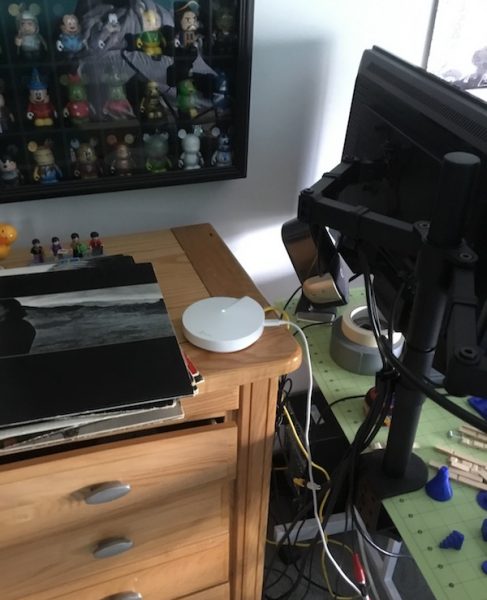
I set up the additional pods towards the rear the back of the house to cover trouble areas. One is installed on the second floor in my son’s room to support his myriad of Wi-Fi gadgets (computers, peripherals, gaming systems, etc.) and to cover the back yard:

The final pod is installed on the opposite end of the house in our family room, which is the hub for most activities and subject to heavy usage of tablets, laptops, and accessories:

The difference in performance in all locations has been significant. After a month of continuous use, we have seen little to no latency in streaming, browsing and gaming devices that used to continually plague parts of the house. Where the old routers would occasionally need to be rebooted, we’ve seen no drops in Wi-Fi service since installing the new system. 

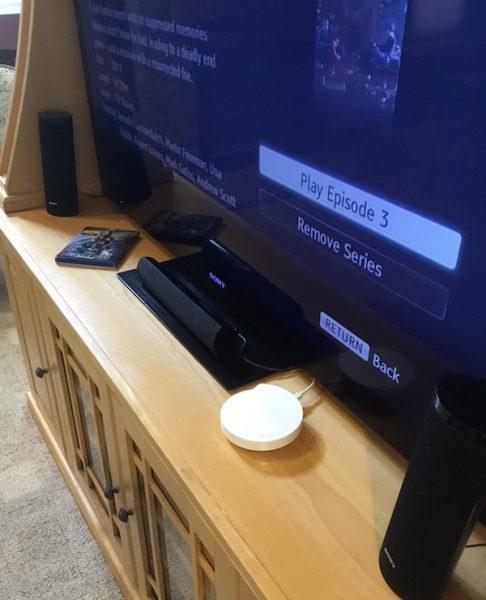
Here’s a quick example: the picture above shows my entertainment system which includes Wi-Fi for streaming services, but it’s about 10 years old at this point so signal strength is not great. Prior to installing the Deco Wi-Fi setup, we always had issues with downloading speeds, latency, downsampling of video quality, and connection problems with the old router. This was especially true when multiple devices were active on the network, which could be very frustrating when trying to catch up on shows ion Netflix or Amazon prime. With a pod installed right on top of the entertainment center, I now get full-band streaming with no issues… even when the rest of the family is gaming and streaming away in other parts of the house.

The Deco M5 leverages the latest in network technologies to optimize performance. It’s a dual-band system that supports throughput speeds of 400 Mbps on the 2.4GHz band and 867Mbps on the 5GHz band if you can support that kind of speed in your home. The Deco M5 Wi-Fi system utilizes adaptive routing technology, leveraging all three pods to adjust bandwidth to optimize delivery to each device on the network based on current use. It also supports MU-MIMO technology, which creates greater network stability and allows data-hungry users to play nicely with other devices on the network. This all leads to stability and consistency in performance, which I can say was borne out in our day-to-day testing.

I recognize that we’re not using the latest modem for our network, and could probably get more performance out of the system if I upgraded. In all honesty, however, we have found that the system is more than adequate for our needs and looks like it will support even higher bandwidth if I were to upgrade. The bottom line: when no one is complaining that the network is slow, Bob is a happy guy. And it’s been happy in my house for the past month, with no issues to report.

Conclusions and Pricing

The TP-Link Deco M5 Wi-Fi System is simple to install, reliable provides outstanding coverage up to 4500 square feet, and provides a comprehensive range of control/management features in an easy to use package that also provides the benefit of hands-off antivirus and security. But is it the right choice for you home? That depends on what kind of user you are.

If you are a person who likes low-maintenance, plug-and-play solutions (think Apple products), then this will be great for you and your family. You’re probably going to be OK with letting the system do the work and not having to worry about it. Know that you are giving up some potential privacy issues due to the continuous connection to TP-Link for your network, but you’re probably doing that already with your Apple accounts and Google cloud-based tools. You’ll also be OK with ditching your old home network because you’re not that attached to it anyway. You’ll like this for all the reasons stated above.

If you are a power user that likes control of your systems, I’m not sure that this will be right for you. Your current routing hardware can’t be utilized here, and you may have some concerns about not having complete control over your network privacy. You’ll also not have the ability to tweak your network to the level of detail that you might like, especially if you have things tuned to certain devices that are heavy data users. If any of these examples seem like you, you’ll probably want to look into network extenders to provide the extra home coverage you are looking for.

Finally, you’ll want to consider the long-term fees for the security package. As I mentioned above, there’s no price set that I could find once you get beyond the initial three-year free period. TP-Link sets the value at about $10 a month based on the promotional materials. I like the idea of not having to mess with security for my network, but you’ll have to determine if its worth it for you.

In my opinion, the TP-Link Deco M5 Wi-Fi system is a solid buy for the casual network user at $299. You can also buy an additional pod for further coverage for $129. You can check it out at TP-Link’s web site for more information.

Source: The sample for this review was provided by TP-Link. For more info visit their site and Amazon to order.


Product Information

Price: $299.99
Manufacturer: TP-Link
Retailer: Amazon
Pros:
  • Easy to install.
  • Robust management and user control features.
  • Excellent coverage.
  • Consistent, reliable performance.
  • Excellent, hands-off antivirus and intrusion security.
  • Remote control features allow you to manage your network from anywhere.
Cons:
  • Need to replace your existing network.
  • Continuous data sharing with TP-Link could present some risks.
  • Long-term pricing for the security package is unclear.

Filed in categories: Reviews

Tagged: ,

TP-Link Deco M5 Whole Home Mesh WiFi System review originally appeared on on May 26, 2017 at 9:26 am.

Note: If you are subscribed to this feed through FeedBurner, please switch to our native feed URL http://the-gadgeteer.com/feed/ in order to ensure continuous delivery.
TP-Link Deco M5 Whole Home Mesh WiFi System review


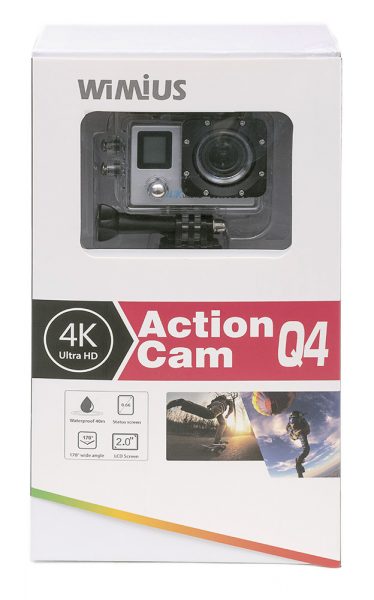
Here at Bob’s house, we’re awash in technology. Between computers and gadgets, we probably have 15-20 different Wi-Fi enabled devices. But I’m not a gearhead. I don’t like spending hours tinkering with network settings to keep everything up and running. When our current Wi-Fi router started to drag, I was offered an opportunity to test Deco’s M5 WiFi System. TP-Link promises whole-house coverage (up to 4500 square feet), drama-free network management, and a host of control features managed through a simple app. Will it bathe your home in glorious, trouble-free WiFi? Let’s find out!

Out of the Box

I like how TP-Link has designed the Deco packaging to set the stage for an easy experience. Upon opening the box, you’re greeted with the network pods and a friendly message to go and download the app to get started. All of the cables, power supplies, etc. are individually packaged in a second tray underneath. It’s a simple, classy setup that’s easy to follow.

The wifi pods are streamlined and elegant. Each is about the size of a home smoke detector, all white, with a little-whorled contour that adds a touch of art-deco design. There are no protruding antennas, only a single led light in the center of the device. The subtle design blends well in any corner of your house, and the low profile allows you to stash them easily in out-of-the-way places. You’ll see pics of the pods around my house a bit later in the review.

Rounding out the package, you get a power strip for each pod (also in white), and a network cable to connect to your modem.

Installation & Network Management Features

Installation and setup are all driven through the app you download for your Bluetooth-enabled Android or iOS device, which you will also use to manage your network. Download the app and it walks you through the process of connecting to your modem and establishing the network. You’ll connect the first pod to your modem using the provided cable. After setting up the new network, you identify the location of each pod as you set them up (office, living room, bedroom, etc.), and follow the instructions to bring each one online. It’s really easy and user-friendly, with the app providing all instructions (and troubleshooting) if necessary. The whole setup took me about 10 drama-free minutes to get fully operational. I’ve included some sample screen shots below:


Once installation is complete you have complete control over the network via the app. Real-time reporting provides continuous updates on upload and download speed availability as well as the health status for each pod. You can see all the devices that are connected at any given time, and are notified as new devices are added to the network. Network settings can be tweaked to prioritize specific activities such as gaming, streaming, or web surfing. TP-Link also provides antivirus protection for the whole network that includes blocking malicious content, preventing external intrusions, and quarantining infected devices. You’ll also be able to pull reports on all of these activities, including network usage by individual devices. 

You can also access and manage your network controls from anywhere that you have Internet access, at home or on the road. I was at the car dealership the other day, and was able to check in on my network and see what was happening. The screen shot below shows the current status snapshot I took while I was away:

Got kids in the house? You can completely control network usage and access to content for individuals in your household with an impressive degree of customization. First, you set up a profile for the individual user and assign an age level to set default access to various content (adult content, gambling, downloading, social networks, etc.). You can then customize that access to your desired preferences, and/or block access to specific apps/websites for that individual. Once you have the permissions established, you assign all the appropriate devices to that profile to lock it in. You can also define the number of hours of allowable network access per day (weekdays and weekends), and/or establish bedtime settings that will disable network access at specified times. The app interface makes this all a lot easier than it sounds with an intuitive interface that makes it easy to set up, manage and remove profiles.


Some Important Points about the Network and Hardware

While the features of the Deco M5 Wi-Fi System are excellent, there are several important elements that you’ll need to consider before you buy with respect to network and hardware requirements as well as the security package. I think these issues are important enough to address before we proceed.

Using this system requires you to set up a new network that, along with the app, are connected to TP-Link at all times. This gives you the benefits of continuous worry-free network security and remote access, but your data can be reported to the company and/or may be subject to privacy risks. This is true with any cloud-based service (such as Google’s suite of tools and enabled gadgets), so you’ll have to decide if this is a concern for you.

It’s also important to note that this system is not designed to augment/extend your current network. There is no support for access-point mode, so you can’t use your existing router. You must set up a new network on the system, so you’ll experience compatibility/sharing issues if you wish to continue to use your existing router and network for some devices. If you’re looking to extend your current network and use your existing hardware, this won’t be the right solution for you.

In my house, we have Verizon Fios as our internet provider and use a Verizon-provided modem/router combo. I also have an Apple Time Machine that can act as a router. Both are older & slower Wi-Fi units, so I was completely OK with ditching both and connecting the modem directly into the Deco. I’m also OK with the TP-Link connection because I find that remote access and the antivirus/security features are worth the trade off.

Finally, the network security features are provided by Trend Micro. You get three years for free with the system, after which it looks like you’ll need to pay for the service. I was unable to find pricing at the time of writing this review… the TP-Link site claims that the service is a $360 value, but I am not clear about what future pricing will be after the initial agreement expires.

Setup and Daily Use

As I mentioned before, I don’t like tinkering with technology. I like products that work as defined, are easy to use, and don’t require constant maintenance to keep operational. With a solid month of operation, I feel that the Deco M5 WiFi System delivers a hassle-free network experience.

I’ll set the stage for our test. Our home is a standard colonial, roughly 2500 square feet of total space. The cable modem is installed on the second floor in the middle bedroom, on the inside front wall of the house facing the street. We have three full-time household occupants (not including the dog) that are actively using tablets, laptops, smartphones, and gaming systems throughout the day and evening in addition to peripherals including a network printer and streaming media devices. We’ve always seen slower performance towards the rear of the house, especially in the backyard and the basement that were farthest away from the router.

The first Deco pod is installed & connected directly to the modem by the provided Ethernet cable:

I set up the additional pods towards the rear the back of the house to cover trouble areas. One is installed on the second floor in my son’s room to support his myriad of Wi-Fi gadgets (computers, peripherals, gaming systems, etc.) and to cover the back yard:

The final pod is installed on the opposite end of the house in our family room, which is the hub for most activities and subject to heavy usage of tablets, laptops, and accessories:

The difference in performance in all locations has been significant. After a month of continuous use, we have seen little to no latency in streaming, browsing and gaming devices that used to continually plague parts of the house. Where the old routers would occasionally need to be rebooted, we’ve seen no drops in Wi-Fi service since installing the new system. 

Here’s a quick example: the picture above shows my entertainment system which includes Wi-Fi for streaming services, but it’s about 10 years old at this point so signal strength is not great. Prior to installing the Deco Wi-Fi setup, we always had issues with downloading speeds, latency, downsampling of video quality, and connection problems with the old router. This was especially true when multiple devices were active on the network, which could be very frustrating when trying to catch up on shows ion Netflix or Amazon prime. With a pod installed right on top of the entertainment center, I now get full-band streaming with no issues… even when the rest of the family is gaming and streaming away in other parts of the house.

The Deco M5 leverages the latest in network technologies to optimize performance. It’s a dual-band system that supports throughput speeds of 400 Mbps on the 2.4GHz band and 867Mbps on the 5GHz band if you can support that kind of speed in your home. The Deco M5 Wi-Fi system utilizes adaptive routing technology, leveraging all three pods to adjust bandwidth to optimize delivery to each device on the network based on current use. It also supports MU-MIMO technology, which creates greater network stability and allows data-hungry users to play nicely with other devices on the network. This all leads to stability and consistency in performance, which I can say was borne out in our day-to-day testing.

I recognize that we’re not using the latest modem for our network, and could probably get more performance out of the system if I upgraded. In all honesty, however, we have found that the system is more than adequate for our needs and looks like it will support even higher bandwidth if I were to upgrade. The bottom line: when no one is complaining that the network is slow, Bob is a happy guy. And it’s been happy in my house for the past month, with no issues to report.

Conclusions and Pricing

The TP-Link Deco M5 Wi-Fi System is simple to install, reliable provides outstanding coverage up to 4500 square feet, and provides a comprehensive range of control/management features in an easy to use package that also provides the benefit of hands-off antivirus and security. But is it the right choice for you home? That depends on what kind of user you are.

If you are a person who likes low-maintenance, plug-and-play solutions (think Apple products), then this will be great for you and your family. You’re probably going to be OK with letting the system do the work and not having to worry about it. Know that you are giving up some potential privacy issues due to the continuous connection to TP-Link for your network, but you’re probably doing that already with your Apple accounts and Google cloud-based tools. You’ll also be OK with ditching your old home network because you’re not that attached to it anyway. You’ll like this for all the reasons stated above.

If you are a power user that likes control of your systems, I’m not sure that this will be right for you. Your current routing hardware can’t be utilized here, and you may have some concerns about not having complete control over your network privacy. You’ll also not have the ability to tweak your network to the level of detail that you might like, especially if you have things tuned to certain devices that are heavy data users. If any of these examples seem like you, you’ll probably want to look into network extenders to provide the extra home coverage you are looking for.

Finally, you’ll want to consider the long-term fees for the security package. As I mentioned above, there’s no price set that I could find once you get beyond the initial three-year free period. TP-Link sets the value at about $10 a month based on the promotional materials. I like the idea of not having to mess with security for my network, but you’ll have to determine if its worth it for you.

In my opinion, the TP-Link Deco M5 Wi-Fi system is a solid buy for the casual network user at $299. You can also buy an additional pod for further coverage for $129. You can check it out at TP-Link’s web site for more information.

Source: The sample for this review was provided by TP-Link. For more info visit their site and Amazon to order.


Product Information

Price: $299.99
Manufacturer: TP-Link
Retailer: Amazon
Pros:
  • Easy to install.
  • Robust management and user control features.
  • Excellent coverage.
  • Consistent, reliable performance.
  • Excellent, hands-off antivirus and intrusion security.
  • Remote control features allow you to manage your network from anywhere.
Cons:
  • Need to replace your existing network.
  • Continuous data sharing with TP-Link could present some risks.
  • Long-term pricing for the security package is unclear.

Filed in categories: Reviews

Tagged: ,

TP-Link Deco M5 Whole Home Mesh WiFi System review originally appeared on on May 26, 2017 at 9:26 am.

Note: If you are subscribed to this feed through FeedBurner, please switch to our native feed URL http://the-gadgeteer.com/feed/ in order to ensure continuous delivery.