Ventev Chargestand backup battery and device stand review


So, external batteries are something that everyone who uses a smartphone is aware of needing. Ventev has released a new take on the battery pack, the ChargeStand. What makes it different? Take a look.

Note: Photos may be tapped or clicked for a larger image.

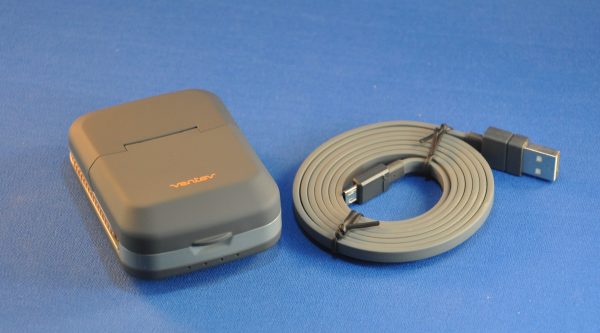
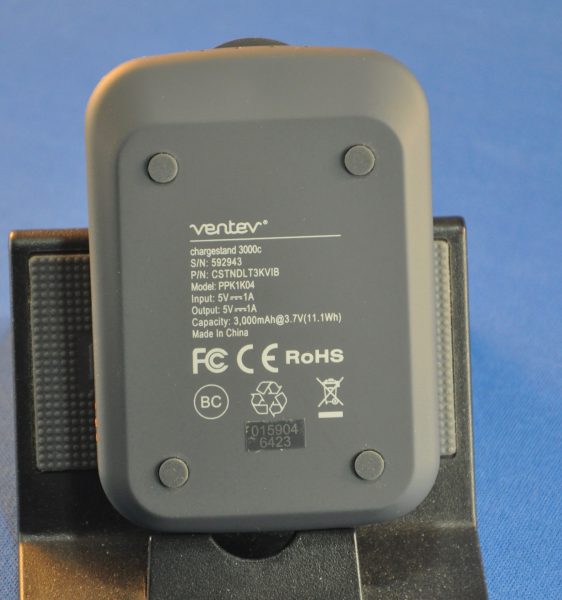
The ChargeStand comes with a flat USB to microUSB cable that is about 4′ long. You’ll have to supply your own power source (which shouldn’t be hard these days!), and remember to carry the cord with you when you travel. It doesn’t charge with a USB to Lightning cable.

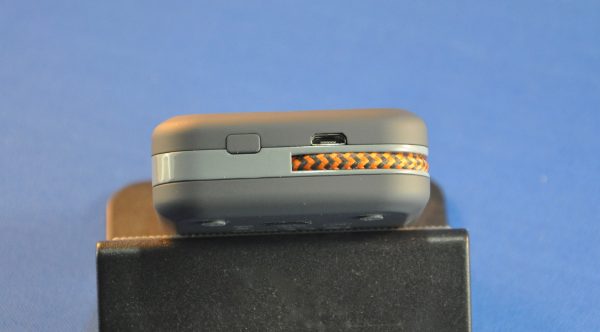
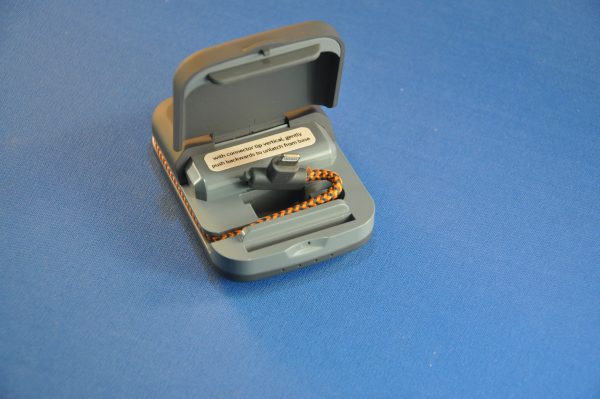
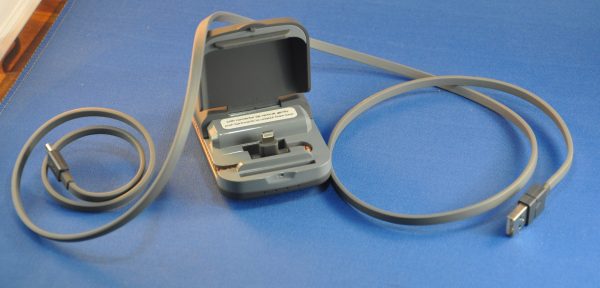
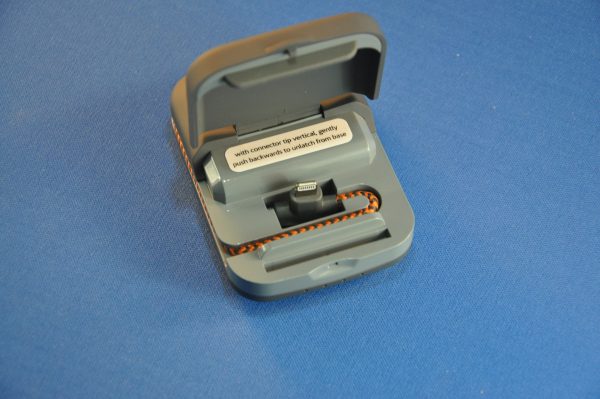
The unit itself is 3.5″ x 2.25″ and tapers on the narrow edge from 0.875″ to 1.125″. It opens on the large end to reveal a hard plastic stand holding a moveable lightning adapter and a soft, flexible fusion on the lid to rest your device against.

On the rear side (away from the opening) is the charging port and a button to activate the charger when something is plugged in. (I used to not like this, but there have been more than a few times that I’ve found batteries drained because they didn’t have that type function.)

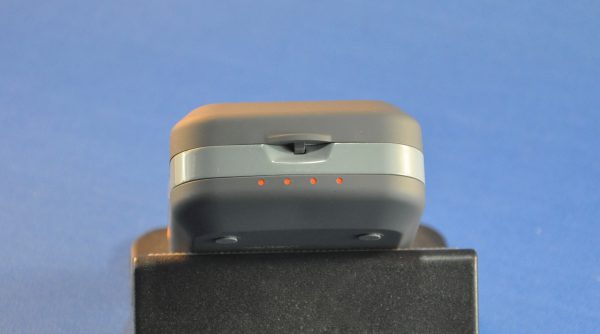
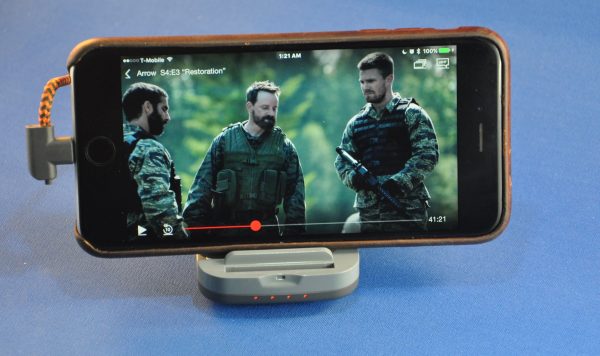
The lip that you raise to open the stand has a slight indent to get your finger under, as well as 4 orange LEDs to let you know charge level when you press the button. These do go out after a few seconds, but I tripped them on in order to show them as well as the battery connection (top right of the frame from “Arrow” below.)

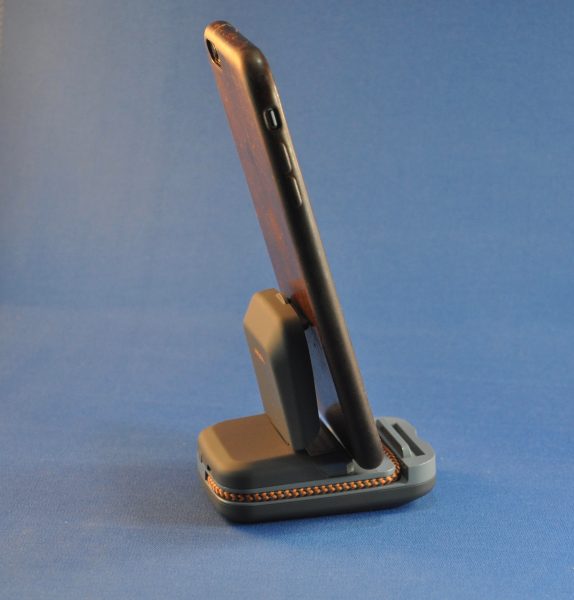
The Ventev can be a stand for devices in portrait or landscape mode. For Portrait mode, the lightning connector is slotted into the base, and hinges back and forth, depending on the angle of your device.

For landscape orientation, the charging tip can be released from the base and attached to your iOS device on either side via a flexible, braided cable. This works for all sizes of iPhones and iPods touch, but iPads are too large and tend to topple over.

At 3.5 oz, it’s not weighty enough to hold down a full-sized iPad. The iPad mini works OK, but I would make sure and have plenty of room on the table around the stand, in case it falls over. In landscape mode, the iPad mini doesn’t quite connect. At 3000 mAh, it s not going to keep your phone charged during a weekend camping trip, but it is good for one full charge to my iPhone 6s Plus, which has a 2750 mAh battery. (Interesting discussion of power banks and their charging abilities here.)
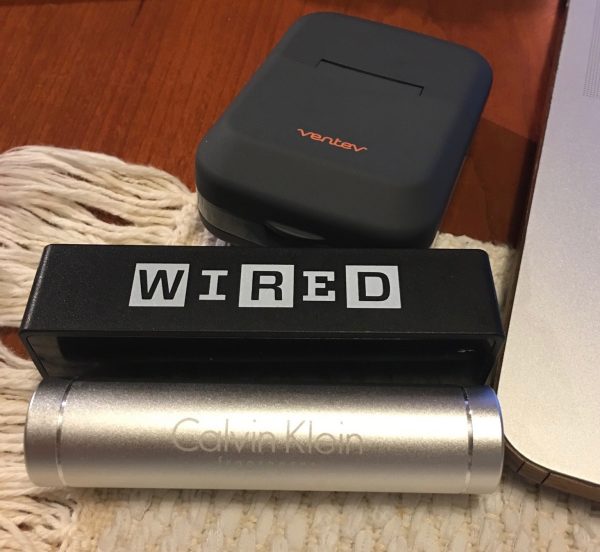

I’ve got a drawer full of batteries that will give me an “iPhoneful” of charge, but none of them have the flexibility of a stand with a cable attached. Many of those other batteries have been give-aways from everything from Wired Magazine to Calvin Klein Fragrances. (What can I say, I worked retail last holiday season!). Of course, more than a few of those don’t give a full charge, even though they are rated for it. For the $43.88 price, even with the stand and captive cable, though, I’m not sure I would buy the Ventev Chargestand. I don’t consider 3000 mAh enough to be table stakes in 2017. Better to pay a little more and get a lot more potential energy in my pocket.

Source: The sample for this review was provided by Ventev. Please visit their site for more info and Amazon to order.


Product Information

Price: $43.88
Manufacturer: Ventev
Retailer: Amazon
Requirements:
  • USB power supply to charge battery
Pros:
  • Small, light, and a decent stand.
  • Innovative design with captive cable and stand.
Cons:
  • Too light for many iOS devices.
  • Battery far to small for the price.

Filed in categories: Reviews

Tagged: ,

Ventev Chargestand backup battery and device stand review originally appeared on on June 16, 2017 at 10:00 am.

Note: If you are subscribed to this feed through FeedBurner, please switch to our native feed URL http://the-gadgeteer.com/feed/ in order to ensure continuous delivery.

Who knew diamonds could be so loud?


They used to say, “Diamonds are a girl’s best friend.” I doubt that’s still true in our more enlightened times, but it could be true now to say, “Diamonds are an audio geek’s best friend”—as in DiamondBoxx. DiamondBoxx makes speakers that will blow away every other speaker in its class. Since I reviewed the Braven XXL and Monster Blaster Bluetooth speakers, I came to appreciate the convenience of powerful speakers that can drive a backyard or camping get together. Then I thought, “Is this all there is?”

As it turns out, not by a long shot.

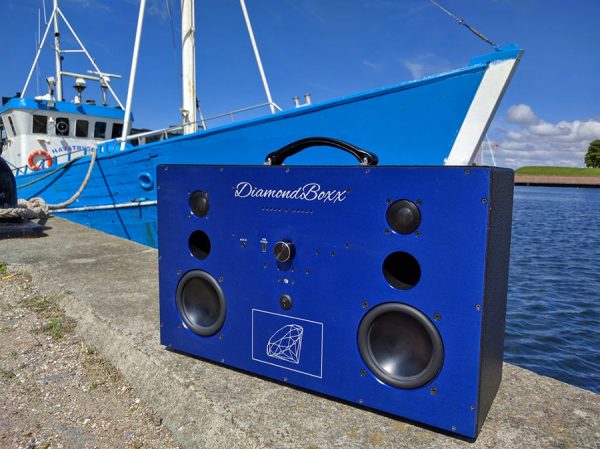
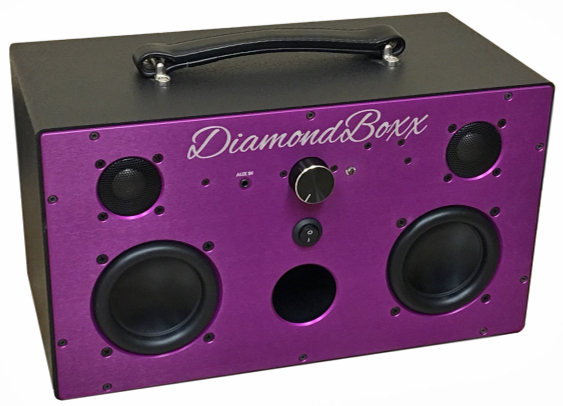
DiamondBoxx makes BIG speakers. How big? DiamondBoxx speakers come in three sizes. The DiamondBoxx M will turn the volume up to 109 decibels—comparable to a live rock concert. The M is water resistant and will play up to 60 hours on a single charge from its optional 231Wh battery (77Wh is standard). The M weighs 10 lbs. and its dimensions are 15 in. X 9 in. X 7.6 in. A 320 Watt HiFi Class A/B bi-amplified amp drives two 1 inch titanium dome tweeters and two 4 inch active woofers. Despite all that power, the M is the smallest DiamondBoxx speaker!

Then there’s the DiamondBoxx L. This 19 lb. speaker measures a slightly larger 22.2 in. X 13.5 in. X 7.6 in. It features 5.3 in. woofers for a bigger bass impact. It sports the same amp and tweeters as the (not much) smaller M. The L can go up to 111 decibels. Think of the L as a bigger and badder M.

Finally, there’s the XL which is just insane. 960 total watts of power (that’s 960!) divided among 12 separate amplifiers. All that ridiculous power drives two 10 in. woofers and eight tweeters that will crank up to 120 decibels—ear damaging loudness that’s just shy of standing next to a jet engine. The XL is not a backyard speaker as much as it’s a stadium speaker. Oh, and if that’s not loud enough, you can link two of them for double insanity.

All DiamondBoxx speakers are hand-made in California. Materials consist of Duratex-sealed MDF wood, leather and titanium with anodized aluminum front and back panels. Each speaker comes with 50 ft. range A2DP Bluetooth, AUX input, analog audio limiters to prevent distortion at any volume, battery-life meters and other goodies. DiamondBoxx speakers are available now: $549-$649 for the M; $799-$899 for the L; $1,699 for the XL. Visit DiamondBoxx for more information and check Amazon for pricing.

Filed in categories: Reviews

Tagged:

Who knew diamonds could be so loud? originally appeared on on June 16, 2017 at 8:00 am.

Note: If you are subscribed to this feed through FeedBurner, please switch to our native feed URL http://the-gadgeteer.com/feed/ in order to ensure continuous delivery.
Turtle Beach Elite Pro Tournament Gaming Headset and Elite Pro Tactical Audio Controller review


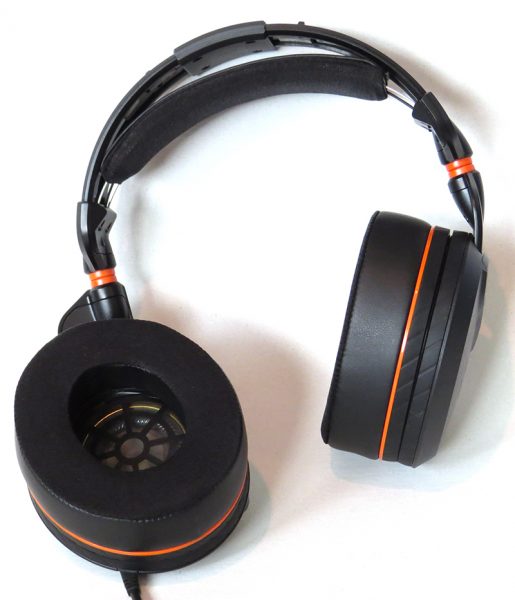
I’ve been lucky enough to review several gaming items recently, but one thing I have never upgraded since I purchased them years ago is my gaming headphones. Turtle Beach must have heard this, and quickly offered their Elite Pro Tournament Gaming Headset and Elite Pro Tactical Audio Controller. I was eager to try out what the professionals use and see if it would help up my game any.

In the boxes you’ll find:

Headset:

– Elite Pro Headset
– Elite Pro Microphone
– Elite Pro 1.3m Audio Cable


Audio Controller:

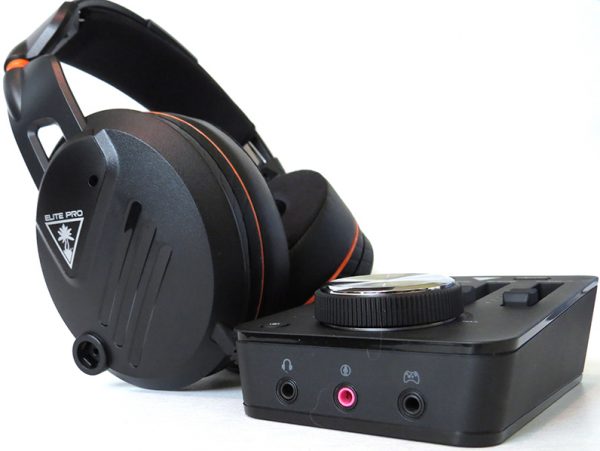
– Tactical Audio Controller (TAC)
– Mini-USB Power Cable
– Digital Optical Cable
– AUX cable
– Micro-USB Programming Cable

So I had this brilliant idea; let’s try the headset without the TAC first, then add in the TAC later. Well, this was quickly defeated by the fact that you need an adapter cable in order to use the microphone part of the headset with the PC. Since I could not find the cable at my local Fry’s store, I decided to just use the TAC instead. With the PS4, however, I could just plug the headset into my controller and go.

I’ll start with the PS4 first. Setting it up was simple and the included instructions worked great. I plugged the headset in to the controller, went to my settings in the PS4 and changed the output to the headset (which was recognized immediately), and I was ready to go. The microphone sounded great when testing it, and I heard no background noise.

I also tried the PS4 using the TAC, and to do so, I had to plug in the headset to the TAC, plug the TAC in via USB on the PS4, and also use the included Optical cable. The TAC worked great, just as good as the PC, but I had cords strung from the PS4 to a shelf near me, and then into the headphones. It was so much easier to just plug in the headset via the PS4 controller. Unless you are a very hardcore gamer, if you are only using the PS4, I would recommend just getting the headset to start out with.

Now, on to using the headset and TAC with the PC. Like I mentioned above, I was unable to test just the headset with the PC due to not having an adapter for the headset. The TAC was very easy to set up; you just plug in the USB to the computer, plug in the headset on the front, and you are set.

The difference between my old Turtle Beach headset and this one was night and day. The sound came in clear and explosions boomed nicely in my ears. On team chat, everyone’s voice came in great, and with the TAC, I was able to customize my own microphone levels based off of what voice chat client I was using. Overwatch voice chat picked up the microphone very well and everyone said my quality was great, but when on Teamspeak 3, I had to turn up the mic boost so they could hear me as well as in Overwatch.


Surround mode on the TAC was my favorite part of these headphones. Being able to tell exactly what direction sounds were coming from made me so much more aware of my surroundings in the game. When I turned off the surround mode, it was just terrible. I don’t think I can go back to playing with a standard headset after using the headset and TAC for a few weeks. Gaming with these headphones and the TAC has been an incredible experience.

The TAC has 12 different presets grouped into four categories: Game mode, movie mode, music mode, and surround off. Each mode has Turtle Beach’s “Signature Sound” as the first option, but there are other options as well as you go through the presets. The user guide tells about every option available. I generally stuck with “Surround Off/Bass & Treble Booster” for my everyday music and YouTube video watching. For my gaming, it really depended on the situation. In the Game Mode preset, “Footstep Focus” really did let you hear footsteps coming, but the Signature Sound was best for an overall, rounded experience. Of course, with the push of a button, you could change from hearing those footsteps and back to the overall sound easily.

So, the sound is great, gaming is incredible, but what about comfort? Well, these headphones are super comfortable, with not only the ability to adjust the height of the ear cuffs but also how tight they fit on your head. I have easily worn these for hours at a time and my ears did not sweat, nor did they feel fatigued or uncomfortable. For those of you with glasses; they also have the option to modify the ear pads to keep them from pressing against your glasses.


Overall, this has been one of the most enjoyable reviews I have written for well over a year. The sound and build quality of the Turtle Beach Elite Pro gaming headset is top notch, while the Elite Pro Tactical Audio Controller added another dimension to gaming that I had never experienced before. If you want to improve your gaming experience, take a look at the Turtle Beach Elite Pro gaming headset, and if you want to take it further, check out the Tactical Audio Controller. They may be pricey, but they are worth looking into.

Source: The sample for this review was provided by Turtle Beach. Please visit their site for more information and Amazon to order.


Product Information

Price: Headset: $199.95 – TAC: $149.95
Manufacturer: Turtle Beach
Retailer: Amazon
Pros:
  • – Incredible comfortable headphones
  • – Great all around sound quality
  • – Able to be used on most gaming platforms (PC/PS4/XB1)
  • – Solidly built
Cons:
  • – Pricey
  • – Needs adapter for PC if you have separate mic/speaker ports

Filed in categories: Reviews

Tagged: ,

Turtle Beach Elite Pro Tournament Gaming Headset and Elite Pro Tactical Audio Controller review originally appeared on on June 15, 2017 at 1:46 pm.

Note: If you are subscribed to this feed through FeedBurner, please switch to our native feed URL http://the-gadgeteer.com/feed/ in order to ensure continuous delivery.
Tacklife IT-T05 Dual Laser Infrared Thermometer review


I used to have one of these infrared thermometers, but it’s since gone missing.  I suspect it was stolen in the Great Garage Robbery of 2015.  I recently had a chance to test out another infrared thermometer, but with not one laser, but two!  Let’s check out this laser-y goodness.

Specifications :

● Temperature: -50°C~550°C (-58°F~1022°F)
● Accuracy Resolution: ≥100°C±2% / ≤100°C±2°C
● Response Time: ≤0.5S
● Emissivity: Adjustable (0.1-1.0)
● Distance to Spot Ratio: 12: 1
● Storage Temperature: -20 to 50°C (-4 to 122°F)
● Operating Temperature: 0 to 50°C(32 to 122°F)
● Power/ Power Life: 9V / about 12 hours

Included In The Package:

1 X Tacklife T05 Pro infrared thermometer
1 X 9V battery
1 X User Manual
1 X Carrying Case
1 X 24 Months Warranty

To be honest, this looks similar to every other infrared thermometer you’d find on Amazon.  I suspect a handful are made by a few companies, then rebranded across many, many different names.

The model T05 comes with a carrying case and a 9V battery.

What I did not expect was a belt loop in the back.  Not bad!

Look familiar?  If you’ve ever owned an inexpensive infrared thermometer, there’s not a whole lot of difference other than cosmetics.

It’s feeding time!  The T-05 takes a single 9 V battery (included).

One thing about the T-05 that stands out:  Dual laser pointer.  The space between the two dots indicates the approximate “circle” you’re measuring.  To me, this is a must-have feature.

Don’t forget to peel off the plastic film!  The LCD display can be backlit.  There are four buttons that let you toggle the backlight or laser on or off, set degrees C or F, and change emissivity (0.1 to 1.0).  The default emissivity is 0.95 out of the box.

Let’s go measure things! This block of reusable “ice” measured a frosty 7.6°F  Note the two laser dots.

For something warm, I measured a cup of warm water.  (The red laser dot on the edge of the cup is actually a reflection).  Both the T-05 and my trusted Thermoworks Thermapen Mk4  measured about the same at the surface of the water.  Of course, one thing the infrared thermometer can’t do is measure temperatures BELOW the surface.

Is the Tacklife IT-T05 useful?  Sure it is.  Keep in mind that I consider this a strictly non-scientific instrument that’s really only good for “how much hotter/colder is this thing vs. ___?”   However, the addition of two laser “dots” indicating the area measured makes this a far more useful thermometer than those without.

Source: The sample for this review was provided by Tacklife. Please visit their site for more info and Amazon to order.


Product Information

Price: MSRP $49.99 ($24.97 at the time of this review)
Manufacturer: Tacklife
Retailer: Amazon
Requirements:
  • 9V battery (included)
Pros:
  • Dual laser pointers makes remote measuring a snap
  • Carry case and batteries included
Cons:
  • Only takes surface measurements

Filed in categories: Reviews

Tagged:

Tacklife IT-T05 Dual Laser Infrared Thermometer review originally appeared on on June 15, 2017 at 7:32 am.

Note: If you are subscribed to this feed through FeedBurner, please switch to our native feed URL http://the-gadgeteer.com/feed/ in order to ensure continuous delivery.
myCharge HubPlus C portable charger review


You can never have too many portable chargers in my opinion.  I have them everywhere, at my house, my office, and my car.  I also give them as gifts to my friends and family, and I have reviewed many of them here at the Gadgeteer.  So I am always on the lookout for new features in chargers that I haven’t seen before, and the myCharge HubPlus C portable charger brings new features to the table.  Let’s find out what they are!

So let’s start with the specs and product features from the manufacturer:

Battery: 6700mAh Lithium Ion

Product Dimensions: 4 in x 2.5 in x 0.9 in

Product Weight: 0.43 lbs.

Output: 18W

Smart-sense: ensures complete device compatibility

Hyper-charge: ultra-fast charging of your devices; up to 65% faster than competitors with Qualcomm Quick charge 3.0

Devices compatible with quick charge: Google Pixel, Samsung S8, Type C Smartphones

Power-stay: maintains battery power for up to 1 year

Max-power: maximum power transfer from power bank to device

High-density battery: the smallest and lightest power bank

Safe-cell: provides the highest level of battery safety

Rapid-recharge: power bank recharges up to 50% faster than competitors

Pass Through Charging: will charge the power bank and connected device simultaneously

What I liked

The myCharge HubPlus C is easy to hold with one side nicely curved. It has 2 built-in cables (micro-USB and USB-C) that fold-out when in use and tuck neatly into the side of the HubPlus C when you don’t need them, so you never have to carry your cable with you.  And it has a built-in fold-out power plug so all you have to do to charge it is fold-out the plug and insert it into the nearest wall socket.  And it also has a standard USB-A port to charge any USB device you want.

The HubPlus C also has pass-through charging, which means it can be plugged up to the wall to charge and then you can plug up your device to the HubPlus C to charge your device at the same time.  That isn’t the case with most portable chargers, so that is a definite advantage.  It also automatically turns on when you plug up your device to the HubPlus C so you don’t have to press the power button on the side.  In fact, the only use I can find for that button is to see the 4 status lights on the side that display how much charge is left inside.

The capacity of 6,700mAh means that I can fully charge my Samsung Galaxy S6 Edge+ twice with just a little bit left over.  I have other chargers that are about the same size as the HubPlus C that have much higher capacities, so it would be nice if the HubPlus gave me a few more charges with all the other great features it comes with.

Left: compared to my Galaxy S6 Edge+ Right: the HubPlus C is quite thick.

The downside

Although the HubPlus C has Quick charge 3.0 from Qualcomm, there are only certain devices that can utilize it. So my Galaxy S6 Edge+ doesn’t use the Quick charge feature.  It does charge pretty fast, no doubt, but I don’t get true Quick charge with my phone.  Also, when you charge multiple devices at the same time, the 18 amps output is divided up pretty quickly and you pretty much get standard charging rates.

I also don’t like that the cables are so short.  I mean, one of the great features of the HubPlus is that the cables are built-in.  But that is also a detriment because if you want to take a call while your phone is charging, you have to awkwardly hold both of them up to your head.  And if you want to plug up the HubPlus C to the wall outlet and charge your phone at the same time, you could find your phone dangling from the wall and the cables awkwardly twisted.

Bottom line

The HubPlus C is portable, the built-in cables and power plug are convenient, and the Quick charge is great for those who can take advantage of it.  The HubPlus C is worth the price of $79.95 in my opinion, despite the downsides that I listed.  I can live with those because the HubPlus C is a quality product that has enough features to make just about anybody happy.

Source: The sample for this review was provided by myCharge. Please visit their site for more info and check their offerings on Amazon.


Product Information

Price: $79.95
Manufacturer: myCharge
Retailer: Amazon
Pros:
  • Built-in cables
  • Small and portable
  • Built-in wall-prong
  • Pass-through charging
Cons:
  • Small capacity
  • Short cables
  • Only rapid charges certain devices

Filed in categories: Reviews

Tagged:

myCharge HubPlus C portable charger review originally appeared on on June 14, 2017 at 7:04 am.

Note: If you are subscribed to this feed through FeedBurner, please switch to our native feed URL http://the-gadgeteer.com/feed/ in order to ensure continuous delivery.