Master & Dynamic MW60 wireless and MW50 wireless headphones review

In 2015, I had the privilege (and it was a privilege) to review Master & Dynamic’s new MH40 headphone. At the time, nothing else looked like them. The MH40 has that classic, timeless look—like they’ve been around for many years, yet they were a brand new headphone from a brand new company. The MH40’s combination of aluminum and leather made you feel like you had something special when held. They are that beautiful. Also, the MH40 headphones sound as good as they look. With the MH40, Master & Dynamic hit a home run right out of the box. Since then, M&D has expanded their product line to include earphones, an on-ear MH30 headphone and an unusual Bluetooth speaker made of concrete.

However, 2015 is so yesterday and this is 2017. Master & Dynamic has entered the wireless age with the MW60 (released in 2016) and new MW50 wireless headphones.

The over-ear MW60 is designed like the MH40 with some unique touches. The on-ear MW50 looks like a lovechild of the MH40 and MH30. Both are equally stunning to look at which is becoming a Master & Dynamic trademark. Both are also covered in metal and leather. However, there are some important differences (besides size and price) that I will detail later in this review.

Let’s look at both the MW60 first and then the MW50.

MW60

The MW60 is basically a wireless version of the MH40. Because of the added electronics, it’s a bit thicker and heavier looking than the MH40 although it’s really 15 grams lighter. On the MH40, I’ve always liked the wire mesh at the center of each ear cup. That’s missing on the MW60—replaced by solid metal with a circular pattern. It’s okay looking, but I still prefer the mesh look. Even though the MW60 has lost some of the retro looks of the MH40, it’s still better looking than most other headphones out there.

The MW60 may be 15 grams lighter than the MH40, but it’s still a bit on the heavy side. The weight doesn’t bother me much because the headphones are so darned comfortable. The lambskin ear pads breath better than faux leather which cuts down on heat buildup—that’s a big deal for me because I have a head that sweats too much. The headband is only slightly more padded than the MH40—it could still use more. Even so, the MW60 can be worn for hours with no noticeable discomfort.

An added benefit of over-ear pads is isolation. The MW60s are not noise-canceling headphones, but they have a good seal that blocks out a decent amount of noise from the outside world.

Master & Dynamic has incorporated Bluetooth into the MW60 in a clever way. You can see the plastic Bluetooth antennas built into the aluminum frame of the left earpiece—a perfect fit with no seams. The left ear cup also houses the on/off/pairing buttons. Note that these buttons are solid metal and have a satisfying click when pressed. Pairing is dead simple—just slide the button beyond the on position for a couple of seconds and a blinking light tells you it’s ready to pair. I didn’t even have to look at the manual to figure this out. That’s good design. Plus, there are audible signals to let you know that pairing is either happening or has connected. The right ear cup has the volume/pause buttons which act and feel the same as the other buttons.

Using the built-in mic, I made a phone call to a friend and he said I sounded perfect. It always amazes me that a headphone can have a tiny microphone under my ear, yet my voice sounds just like I’m speaking directly into the phone’s mic.

Note: Unless you have money to burn, forget about using the MW60 as a commuting headphone. Yes, they fold easily and can be carried in an included soft case, but I would become quite ill if I left them behind in a cab, train, or bus. Master & Dynamic makes more affordable earphones for the commuter.

The sound from the MW60’s 45mm neodymium speaker drivers is on the warm side, meaning that the headphone has a boosted bass sound, but only just a bit. This has two benefits: It cuts down on much of the treble harshness that can be present in some recordings plus music can be listened to more comfortably for hours. A warmer sound profile is generally more forgiving of lower resolution MP3 files which can sound too bright on super-accurate headphones. It’s a bit contradictory that a slightly less accurate headphone can sound better than one that is clinically accurate in its musical detail, but it’s true. Master & Dynamic did a good job tweaking the ear cups to achieve the right tonal balance. Drums have a nice kick; vocals are clear and slightly forward while the treble frequency is reined in but still allowed to express itself.

Soundstage (the audio illusion of where in space sound is coming from) is excellent with the MW60s. It’s not an audio 3D effect, but it’s both wide and deep—placing you in the middle of whatever you’re listening to. Note that a wide soundstage is also the result of a great recording—even so, it’s up to the headphones to bring it out.

Afro Celt Sound System’s “Release It” is a good song for experiencing a wider frequency spectrum. Deep bass drumming, as well as higher, pitched tin whistles and bagpipes, combine with other instruments giving the song a multi-continental flavor. You can hear all the instruments individually and equally resulting in a perfect mix.

The opening keyboard fade-in on Pink Floyd’s “Wish You Were Here” can hide some very subtle electronic sound effects on lesser headphones, but the MW60 lets them be heard amidst Rick Wright’s aural synth wave. When David Gilmour’s crystal clear guitar chimes in, you just know you’re in for a treat. This album shines on the MW60s.

Battery life on both the MW60 and MW50 headphones is rated at 16 hours—which is plenty of life for an extended listening session or a long flight. Battery status is indicated by using the Bluetooth pairing lights that turn green/orange/red depending on the charge. If the battery dies, there is an included mini plug cord, so the headphones can always be used. They will also continue to work with Bluetooth if charging from an external battery. Neither the MW60 nor the MW50 will automatically power down if accidentally left on—which I have a bad habit of doing. As with all other M&D headphones, all cords are stored in a hard leather-covered circular box. Battery charging on the MW50 uses the new USB-C connector rather than the micro USB of the MW60. Maybe this is the direction M&D is heading.
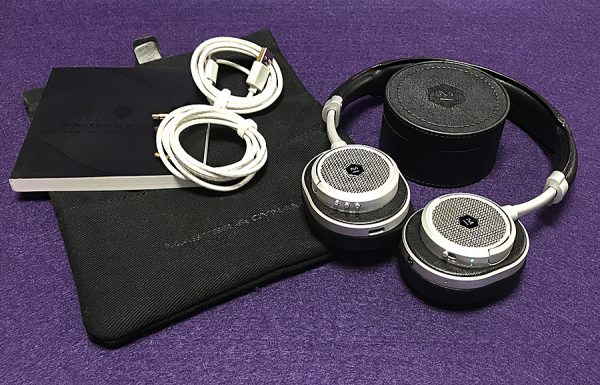
MW50

The on-ear MW50 is two/thirds the weight of the MW60 and smaller overall. Unlike the MW60, the MW50 retains the metal mesh at the center of each ear cup. Master & Dynamic has done a great job designing the MW50. It feels every bit as solid and luxurious as the MW60.

The fact that the MW50 is on-ear might put off some people and I get that. I happen to really like on-ear headphones, mostly because they are lighter and easier to cart around. Plus they look a little less dorky than full sized headphones often do in an office setting. Like the MW60, the MW50 also has lambskin ear pads and a leather headband. The headband is also lightly padded, but since the MW50 is lighter, long-term comfort is not an issue. The MW50 is made to be mobile, but they don’t fold. Even so, they are easier to cart around than the folded MW60s.

The MW50 headphone contains audio tech that surpasses the more expensive MW60. First, the MW50s have beryllium drivers vs. neodymium drivers in the MW60. Granted, the MW60 45mm drivers are 5mm larger than the MW50’s 40mm. But beryllium is lighter and tougher than neodymium, which is better at handling audio signals—especially in the upper-frequency ranges. Beryllium is also more than double the cost of neodymium. So M&D use a much more expensive material in their less expensive headphones. Go figure.

The lambskin pads rest on the ears with little pressure and are even more comfortable on my head than the MW60s. The metal “poles” that connect the headband to the ear cups are curved a bit which can help with larger heads. However, my head is close to the max size the MW50s will fit, so if you have a large head, make sure there’s a generous return policy if they don’t fit well.

Once again Bluetooth pairing is as simple as can be. The buttons act the same way as on the MW60. And the Bluetooth antenna is made as part of the left ear cup using that same attention to detail. Call quality is also identical.

Audio on the MW50 is both pleasing and robust. Granted, you won’t get as much noise isolation as you do on the MW60, but for an on-ear design, it ain’t bad! What is most surprising is the amount of low end heard. Listening to the same high res version of “Wish You Were Here” from Pink Floyd, I was shocked how good the bass sounded. It was as impactful and detailed as on the MW60s!

Keep in mind that bass is no good if its muddy sounding and bleeds into the other frequencies. None of that happens with the MW50 headphones. There’s a clarity in the sound (bass included) that belies the headphone’s size. The audio coming out of the MW50s sounds way larger and better than you would expect.

Afro Celt Sound System’s “Release It” sounds even warmer and deeper than it does on the MW60s. The bass still retains its sharp attacks without being sloppy. How is this possible?

Within the last few years, Master & Dynamic has established themselves as a respected audio brand—with good reason.

If you’re in the market for an upscale wireless headphone that cuts no corners in audio quality or materials you can’t do better than M&D. The main downside to the MW60 and MW50 wireless headphones is having to choose one over the other. They both have their advantages. If you prefer over-ears (most serious headphone people do), then the MW60 is an obvious choice. But I would ask that you try out the MW50 if possible. You might be pleasantly surprised.

My bottom line is that as good as the MW60 sounds, the MW50 sounds just as good, if not a bit better, is more comfortable and just more fun to listen to—and less expensive. I wouldn’t be surprised if M&D is already working on an MW60 successor.

The MW60 is available in Black metal/black leather; Gunmetal/black; Silver/brown; Silver/navy and sells for $549 US.

The MW50 is available in Silver metal/black leather; Silver/brown and sells for $449 US.

Source: The samples for this review were provided by Master & Dynamic. Please visit www.masterdynamic.com for more information and shop for them on Amazon.


Product Information

Price: MW60 – $549 US MW50 – $449 US
Manufacturer: Master & Dynamic
Retailer: Amazon
Pros:
  • Excellent build & sound
  • Stunning design
  • Comfortable
  • Excellent wireless signal
Cons:
  • Expensive
  • Headband could use more padding
  • MW50 doesn't fold

Filed in categories: Reviews

Tagged:

Master & Dynamic MW60 wireless and MW50 wireless headphones review originally appeared on The Gadgeteer on July 20, 2017 at 7:02 am.

Note: If you are subscribed to this feed through FeedBurner, please switch to our native feed URL http://the-gadgeteer.com/feed/ in order to ensure continuous delivery.

Galen Leather MacBook sleeves review

I am a total sucker for nice leather gear and fine woodworking. I find the old world craftsmanship and artistry very appealing in today’s disposable world. So when Julie asked if I’d like to review some handmade items from Istanbul, Turkey I jumped at the chance. In this case, Galen Leather is a small leather company that creates handmade covers, cases, wallets, and tech-accessories that they ship worldwide. 

Note: Images can be clicked to view a larger size.

The Galen Leather backstory talks to me in several ways… Like Zeynep, I was diagnosed with cancer back in my twenties and while fine and dandy a lifetime later the experience forever changed the path of my life and how I walk thru it. In addition to that, I have always wanted to work with leather and am impressed how she transformed that hobby into a full-time career. And while I’ll never go into the business, I hope/plan to take a class or two of leather working in my retirement. All of my ramblings aside, let’s get down to the review.

Galen Leather sent, for lack of a better term, a care-package or sampler of their products to checkout. So, instead of a focused review on a single item, I thought I would discuss them and their overall material quality, craftsmanship, and design. Galen Leather sources their materials locally. The leather they use is 2-4mm thick vegetable tanned cow leather, all stained, edge painted and finely stitched by hand.

Leather MacBook Sleeves:

Galen sent two MacBook sleeves, one in brown and the other in Crazy Horse leathers. The are both perfectly fitted for the 12″ MacBook.

The brown sleeve is their basic design meant to hold just your MacBook. It has a medium softness/stiffness that will wear in with time. The sleeve was a bit tight initially but loosened with time. The closure flap slides under the strap that holds it in place.

The Crazy Horse sleeve they sent is the more deluxe variant with the optional back pocket (+$23) and handle (+$12). The Crazy Horse leather is softer with a more rugged look. Here you can see it holding my 12″ MacBook and 10.5″ iPad…it was a bit snug but works very well for carrying both.

As mentioned above, all the stitching is hand done with waxed polyamide thread. The edges are beveled, waxed, and burnished for a nice finished look. Of the two, I prefer the softer Crazy Horse leather sleeve with the back pocket…it is currently my goto sleeve for may laptop.

Leather Zippered Large Pencil Pouch / Case – Crazy Horse:

The zippered case is designed to carry pens, pencils, cables, etc. It is also a nice size for helping organize your EDC gear.

That is my plan for it…replacing my old nylon pouch, to carry my multitude of bits and cables around.

N0. 38 Minimalist Leather Wallet – Dark Brown

Funny story regarding the wallet, I opened the package from Galen with my wife’s Friday night wine club. As soon as I opened the box with the No.38 minimalistic wallet, my wife immediately said “I want that!” Even with all the review items I receive, that is relatively rare circumstance…so I guess she has dibs 😉 .

Like all Galen Leather products, the leather is hand finished and stitched with a great old world vibe to it.

The No. 38 wallet has two internal slipper pockets, each designed to hold a handful of credit cards, your ID, and a few bills as well. Here you can see it with 6 cards and a few bills. The wallet is held securely closed by a brass snap.

Walnut Hard Wood MacBook Stand

The walnut laptop stand has an interesting design, made from two identical pieces of hardwood that slide together like a jigsaw puzzle. Like all Galen Leather products, the wood stand is nicely sanded/finished and stained by hand.

When separated, the two legs support the MacBook above your work surface at a more useable height and angle for viewing.

The stand is meant to be used with a separate keyboard and mouse/trackpad. Here you can see it with the iogear ultra-slim mini USB-C dock I reviewed a few months ago. And with a bit of double sided tape, this setup works for me much better than I thought it would.

The bottom line: I really like all of the Galen Leather products Zeynep & Yusuf sent to me. Like I said, their Crazy Horse leather sleeve is my goto method for carrying my 12″ MacBook when not in my gear bag. The Walnut MacBook stand works very well and continues to suspend my laptop above my desk. And lastly, my wife has taken possession of the N0. 38 minimalistic wallet as promised. All of their products are handmade with great care and artistry…well worth considering.

Source:  The sample for this review was provided by Galen Leather. Please visit their site for more information and to order.


Product Information

Price: Varies
Manufacturer: Galen Leather
Pros:
  • Handmade Old World craftsmanship
  • Constructed from high quality materials
  • Great minimalistic design
  • Perfectly fitted
  • Design to last decades
Cons:
  • None

Filed in categories: Reviews

Tagged: , , , ,

Galen Leather MacBook sleeves review originally appeared on The Gadgeteer on July 19, 2017 at 9:27 am.

Note: If you are subscribed to this feed through FeedBurner, please switch to our native feed URL http://the-gadgeteer.com/feed/ in order to ensure continuous delivery.

PrimoToys Cubetto review

Before receiving Cubetto, the thought of teaching computer programming to our young boys, ages four and six, never crossed our minds. Even though I am an engineer, I had not yet considered how to give them some basic tools that would perk their interest in STEM subjects, specifically computers.  Our kids are as efficient as any out there on an iPad to navigate to their games or YouTube Kids, but actually learning computer logic wasn’t on our list of important things for them to be learning this summer…..until this little wooden cube named Cubetto from PrimoToys arrived. 

PrimoToys has come up with a very approachable platform for children to learn basic computer coding and logic, which my kids have taken to from the moment our new little friend was freed from his cardboard box. Being Montessori approved, Cubetto is every bit an educational toy but it is sly in its teaching through the use of stories and maps, which the children learn how to follow the story using coding to move the little robot across one of six large floor maps.

What’s in the box? Included in the package is Cubetto, a little wooden robot, the control board, a bag of coding tiles and six floor maps, each with its own story and adventure.  Each story starts you off on a designated square on the map and begins to lead you around the map.  Your child’s job is to use the four different tile types to accomplish these tasks.  Within minutes of unboxing Cubetto and selecting the first adventure, our six-year-old was navigating his new little friend all over the map with ease.  Both my wife and I were astounded at how quickly he picked it up and knew what he had to do to follow the direction of the story. 

Our four-year-old is a little more abstract so he liked to try to make his own adventure, not following the exact story but was able to navigate Cubetto nonetheless. PrimoToys says this is for children ages three and up.  This may be a little advanced for a three-year-old but I can see how they could still enjoy it with a little more help from a parent.  Both of our children are now able to come up with their own adventures and design their own codes to play out their own stories when they want to go off script.

Both of our children are enrolled in a Montessori school so this method of teaching fits right in with their school activities. Both of them have already said they want to bring it to school in the fall to show their friends and teachers the new skills they learned over the summer.

Summary

Pros: Easy for kids to pick up and start playing and learning right out of the box and a great family activity that introducing coding and logic skills.  A unique toy that teaches real life skills and builds a foundation for future education in computers.

Cons: One thing that I would recommend to Primo is to add more coding tiles to the set.  We often find ourselves running out of tiles before being finished with a task and having to break up Cubetto’s journey into multiple segments because of this limitation.  It is also on the expensive side for a children’s toy but there are a few packages left on the Kickstarter page that offer some savings.

Overall this has been a fantastic toy for our children, both as a family activity and something they can do on their own. I have already recommended it to friends for their children and will also recommend this product here.  I am thrilled that our children have enjoyed it so much and are learning skills that can help them be better prepared as they continue their education.

Source: The sample for this review was provided by Primo. For more info visit their site and their Kickstarter campaign to order one.


Product Information

Price: $225
Manufacturer: Primotoys
Retailer: Kickstarter
Pros:
  • Easy for kids to pick up and start playing and learning right out of the box and a great family activity that introducing coding and logic skills.  A unique toy that teaches real life skills and builds a foundation for future education in computers.
Cons:
  • One thing that I would recommend to Primo is to add more coding tiles to the set.  We often find ourselves running out of tiles before being finished with a task and having to break up Cubetto’s journey into multiple segments because of this limitation.  It is also on the expensive side for a children’s toy but there are a few packages left on the Kickstarter page that offer some savings.

Filed in categories: Reviews

Tagged: , ,

PrimoToys Cubetto review originally appeared on The Gadgeteer on July 19, 2017 at 8:00 am.

Note: If you are subscribed to this feed through FeedBurner, please switch to our native feed URL http://the-gadgeteer.com/feed/ in order to ensure continuous delivery.

OxyLED stick-on lights review

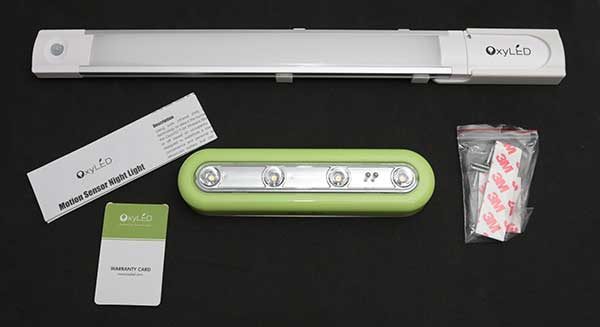
Adding extra light where none exists can be a huge hassle and expense when wiring, and new electrical work is concerned. An easier way is to add easy to install stick up lights like the OxySense T-01 DIY Stick-On Anywhere 4-LED Touch Tap Light and the Motion Sensor Night Light from OxyLED. Let’s check them out.

What is it?

OxyLED lights are easy to install stick up lights that don’t require you to call an electrician or your friend who works construction. Anyone can install these lights including me. All you need is a place that needs some extra light and a flat surface to stick them.

OxyLED sent me two lights. One runs on regular batteries and the other one has a rechargeable battery. Let’s take a look at the OxySense T-01 first.

OxyLED OxySense T-01 DIY Stick-on Anywhere 4-LED Touch Tap Light

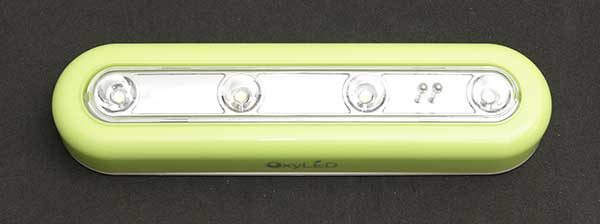
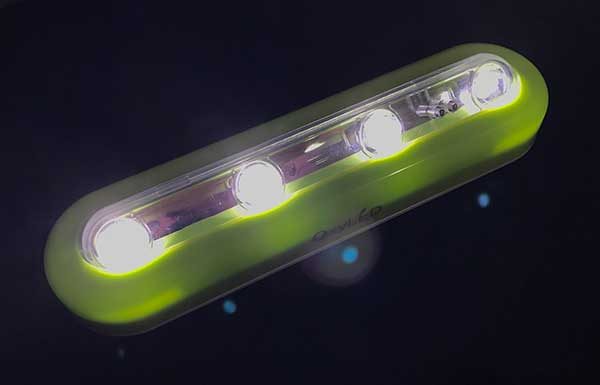
The OxySense T-01 DIY Stick-On Anywhere 4-LED Touch Tap Light which I’ll just call the OxySense from here on out, is a simple light that has 4 LEDs arranged in a horizontal line.

This light has a plastic 6.89 x 1.77in case which is available in a few different colors like the green that you see here.

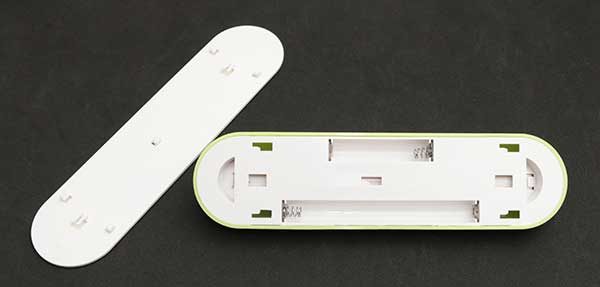
If you flip the light over, you’ll see two 3M adhesive pads which you’ll use to mount this light on a flat clean surface.

The back slides off to reveal the battery compartment. The OxySense runs on 3 AAA batteries which are not included. There’s also no info on the OxyLED site about how long the batteries should last.

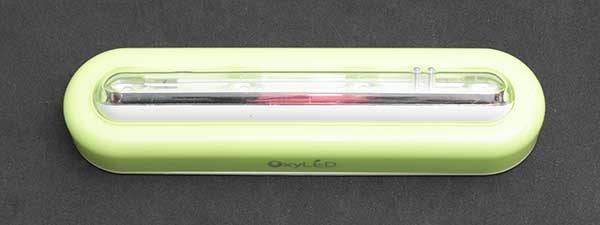
The light bar can rotate 180 degrees so you can direct the light to the right angle. Notice the two small “pegs” that protrude from the light bar on the right side. That’s the touch switch. When you touch that switch with your finger, it will toggle the light on or off.

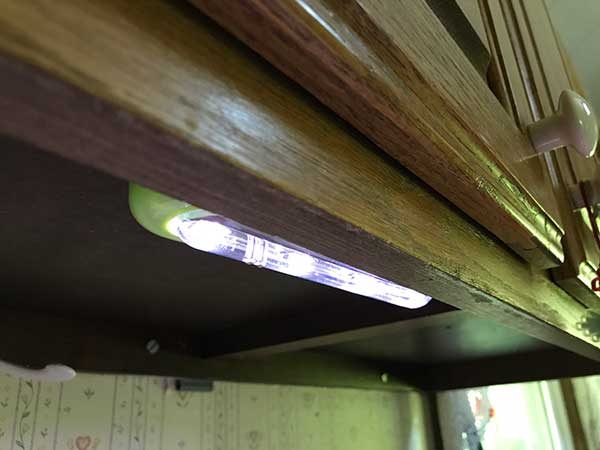
To install the OxySense, you insert 3 AAA batteries in the battery compartment, replace the battery cover, peel the covering off the 3M stickers and then press the light to a flat surface. As you can see from the image above, I’ve mounted the light under a cabinet in my kitchen.


How bright are the LEDs? Check out the photos above. The photo on the left shows the OxySense turned off and the photo on the right shows the OxySense with the light turned on. Drastic difference? I don’t think so. Actually, the only reason you can tell that the light is on in the images above is that it was a gloomy day when I took them. If I turn on the overhead light in the kitchen and then turn on the OxySense light, you can barely tell it’s on.

This light is only good for really dark areas. It’s not going to offer much in the way of additional lighting for an area that already has medium bright lighting.

Price: $8.99 from Amazon.

OxyLED T-04 Motion Sensor Night Light

I was more interested in reviewing the T-04 Motion Sensor Night Light than the OxySense T-01 because the Motion Sensor Night Light has a rechargeable battery, multiple ways to mount it and it’s motion activated, which means you don’t have to flip a switch to turn on the light.

The bar shaped light is 15.8 x 1.5 x 0.7 inches and comes in white.

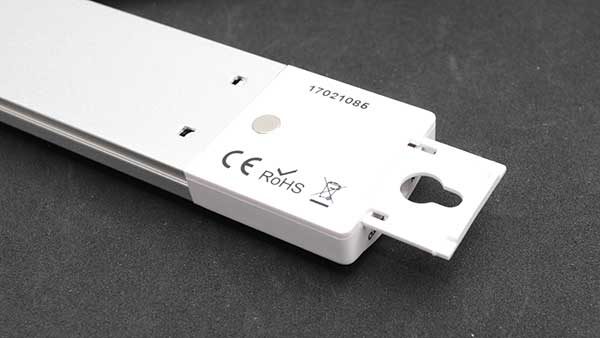
The light comes with several ways to mount it. One way to mount it is with the small magnets on the back that will let you stick the light to a flat steel surface.

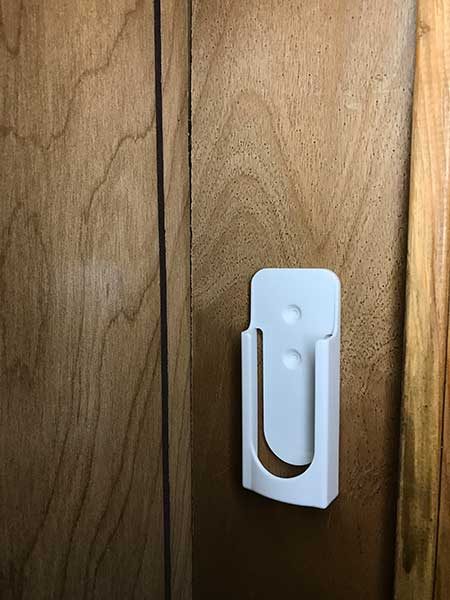
There’s also a vertical plastic clip that you can attach with screws on the included adhesive strip.

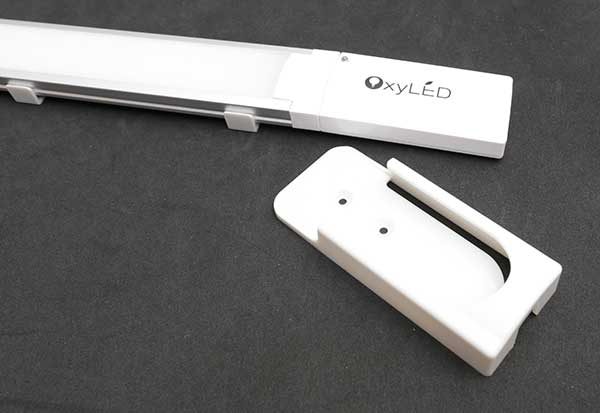
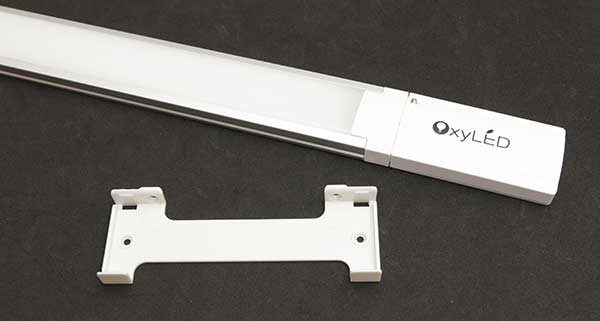
There’s also a horizontal bracket that you can also mount using screws or the adhesive strips.

Another way to mount the OxyLED T-04 Motion Sensor Light is with the slide out hang tab.

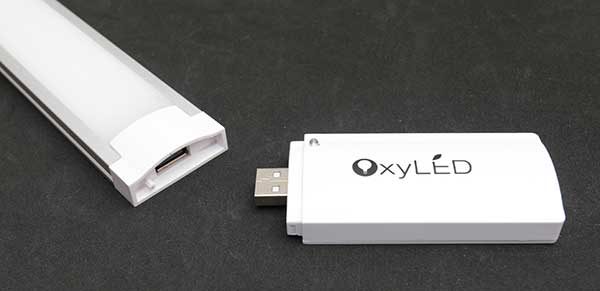
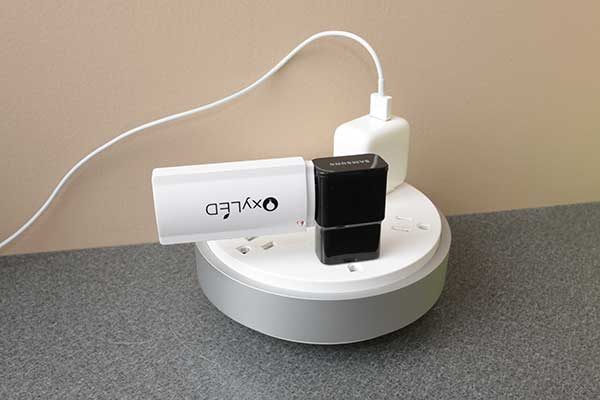
You won’t need to search around for batteries to power this stick-up light because it has a built-in rechargeable battery.  To charge it, you detach the battery pack from the end of the light and then plug it into a USB port on your computer or into a USB charging adapter.

It can take up to 3hrs to fully charge the 900mAh battery pack. An LED on the front will glow red while charging and will turn off once charging has finished.

A full charge will provide up to 4 hours of light. Take into consideration that you’ll probably not turn the light on for that full time… although you can.

Most people will probably use the light’s motion switch and only light it when motion is detected like when the door to a dark closet is opened.

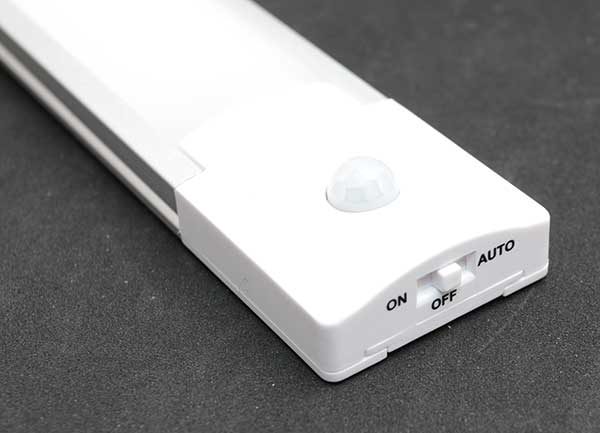
The switch on the end of the light has 3 settings that you can use to control the behavior of the light. Of means it won’t light at all. On means it’s always on and Auto means it will light up when it detects motion and will turn off after 20 seconds of inactivity.

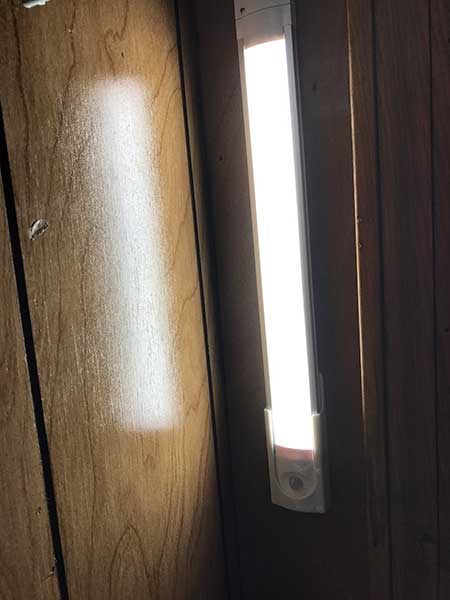
A dark closet is where I decided to mount the OxyLED Motion Sensor Light using the vertical clip.

The light has 25 cool white LEDs that put out a decent amount of light. How much light?

Here’s my hall closet with the T-04 turned off.

And here it is with the light turned on.

Although it’s twice as expensive, I like the OxyLED T-04 Motion Sensor Night Light a lot more than the OxySense T-01 light. With the T-04 you don’t have to worry about feeding it batteries and it turns off and on automatically.

Price: $19.99 from Amazon.

Final thoughts

OxyLED stick up lights are easy to install and use. I recommend the T-04 Motion Sensor Night Light. But the T-01 OxySense would work fine in a dark closet as long as you don’t forget to turn it off when you’re done.

Source: The sample for this review was provided by OxyLED. Please visit their site for more info and Amazon to order.


Product Information

Price: $8.99 – $19.99
Manufacturer: Oxyled
Retailer: Amazon
Pros:
  • Both: Easy to install
  • T-01: Easy on/off with a tap
  • T-04: Multiple mounting options
  • T-04: Motion activation
  • T-04: Rechargeable battery
Cons:
  • T-01: Doesn't come with batteries
  • T-01: Isn't very bright

Filed in categories: Reviews

Tagged:

OxyLED stick-on lights review originally appeared on The Gadgeteer on July 18, 2017 at 5:21 pm.

Note: If you are subscribed to this feed through FeedBurner, please switch to our native feed URL http://the-gadgeteer.com/feed/ in order to ensure continuous delivery.

Joopic CamBuddy Pro DSLR remote review

In January of 2017, I wrote a news post about the Joopic CamBuddy Pro. The folks at Joopic enjoyed the news post and provided me a Joopic CamBuddy as a sample to review. The CamBuddy provides WiFi control of the camera’s settings and also provides shutter release triggers from four different sensors: Light, sound, laser, and (on the CamBuddy Pro) radio transmitter. By combining the ability of WiFi remote control composure and viewing, an intervalometer for unattended time-lapse photography, and a multitude of remote triggering sensors, the CamBuddy provides capabilities that can be appreciated on even the latest WiFi enabled camera. Lets Take a look at what this gadget is capable of!

The Joopic CamBuddy  is 3.2″ long x 2″ wide and 1″ tall – about the size of  an old-school flip phone and weighs about 58 grams. (I apologize for the dated reference but nothing is that size anymore!) The unit comes with a velour carrying case, a micro USB charging cable, a N1 hotshoe mount and a micro screwdriver for uninstalling the C1 (Canon) hotshoe and replacing it with the N1 (Nikon) sized one, a protective rubber case with weather-resistant port lugs, and a Velcro cable strap.

The CamBuddy also comes with the following remote trigger connection cables that fit into the 3 conductor 2.5 mm port on the side of the CamBuddy:

  • DC0 shutter release cable – suitable for the following Nikon DSLR cameras: D3S, D4, D4S, D5, D300, D300S, D500, D800, D800E, D810, and D810A.
  • DC2 shutter release cable – suitable for the following Nikon DSLR cameras: D600, D610, D750, DF, D90, D3100, D3200, D3300, D5000, D5100, D5200, D5300, D5500, D7000, D7100, and D7200.
  • E3 shutter release cable – suitable for the following Canon DSLR cameras: 60D, 60Da, 70D, 80D, 100D (Rebel SL1), 550D (Rebel T2i / Kiss X4), 600D (Rebel T3i / Kiss X5), 650D (Rebel T4i / Kiss X6i), 700D (Rebel T5i / Kiss X7i), 750D (Rebel T6i / Kiss X8i), 760D (Rebel T6s), 1200D (Rebel T5), and 1300D (Rebel T6).
  • N3 shutter release cable – suitable for the following Canon DSLR cameras: 1D Mark IV, 1D X, 1D X Mark II, 5D Mark II, 5D Mark III, 5D Mark IV, 5DS, 5DSR, 6D, 7D, 7D Mark II, and 50D.

In addition, the CamBuddy comes with a 2 conductor 3.5mm to male-connector PC sync cable to enable synchronizing a flash with trigger events (Pictured to the left in the picture above).

As if that wasn’t enough, the CamBuddy also comes with a laser generator; it is essentially a laser beam with a large external battery and tripod mount to be used as a laser source for laser trigger shooting.

The laser should be targeted to the receiver on the left of the clear front window. The emitter end has a threaded defraction grating for making it easier to target the beam.

You can see the two extents of moving the defraction window in and out in the two pictures below

One thing that I did not receive with my sample was a manual, but you can download one from here or here.

In order to use the CamBuddy you’ll also need a USB control cable from your camera. For my Canon EOS Rebel T3i that is a customized mini USB, but your camera may have another adapter cable. When installed the CamBuddy does have plenty of wiring to and from it. In addition, considering the CamBuddy’s 4-hour continuous operation limit, you may also need to connect an external power source to the CamBuddy for long term operation. The CamBuddy’s main application is unattended use, so the two to four wires coming out of the side of the CamBuddy shouldn’t be an impediment to its normal use, but it’s definitely not “pretty.” All of these wires are on the left side of the CamBuddy to not interfere with the standard right side grip of the DSLR.

The rear of the unit has a multi color LED (red for charging, green for a full charge,  blue blinking for searching, blue steady for linked, and purple for linked and charging), power switch and pin-reset switch.

The base of the unit has holes for the microphone.

The front of the unit has two multi-color status LEDs, a receiver for infrared filtered light, and a receiver for laser light.

As indicated above, the CamBuddy is fitted with a hotshoe on the base of the unit, but this only serves as a convenient way to mount the unit to the camera; the mount on the CamBuddy has no electrical contacts on the hotshoe. If the hotshoe is not available the rubber boot may be used along with the supplied Velcro strip. It would be nice if the CamBuddy would also support a 1/4″-20 nut for a tripod mount.

The software can be downloaded from www.joobot.com/tools/download.php?file=joopicapp, The Android Google Play store has several comments that antivirus software identifies the Joopic app as a threat. I scanned the app on android with Kaspersky and did not discover any issues. The link above brings you to the Chinese iTunes page but the only Joopic app is the one that you’ll need, so it is easy to type in Joopic to the iTunes of your locality. Also, the Joopic page indicates the latest iTunes version is 2.2.3 but I couldn’t find this for my iPhone 6. The Joopic .apk and google play versions are both 2.2.3. The firmware that I’ve loaded onto the CamBuddy is 2.1.10. 

The software requires you to set up a username and password. The account will allow you to save pairing information for all of your CamBuddys no matter which device you are using. This was very convenient and allowed seamless switching from my iPhone to my Android.  The reset button must be depressed for more than 3 seconds when switching accounts with the CamBuddy.

The CamBuddy uses Bluetooth in the pairing sequence but the device operates via WiFi. If there is a prevalent WiFi signal then the CamBuddy can be set up to utilize that network, and if more than one CamBuddy is controlled by a single app then the group must use an external WiFi network. However, if there is no other network available the CamBuddy can set up an ad-hoc network for communicating with the app. Outside the ad-hoc network worked pretty well up to about 87 ft away. Beyond that range the signal got spotty and it became difficult to work with and unreliable. I expect that it would fare better indoors with some surface to bounce the signal off of. But here’s a selfie from 100 ft away.

Here’s the camera on a tripod with a purple clipboard serving as a laser target for the distance meter.

Most new cameras come equipped with built-in WiFi but my DSLR is older so it doesn’t have these features out of the box. It is great that I can add these features with an add on. If you have a WiFi camera with a bad app or a smaller range, the CamBuddy can still be used (assuming that the camera model is supported).

Except for remote shooting, the iPhone or Android device is only used to program the CamBuddy. For instance, the phone is used to program the intervalometer but the CamBuddy schedules the shots to occur at the prescribed time. Also, the phone does not need to be paired for the lighting, sound, or laser triggers to fire.

In order to test the intervalometer, I set the camera on a tripod and took pictures 10 minutes apart of the setting sun. 10 minutes is a long interval, but this was just to test how well the hardware performed and made the tripod getting bumped about halfway through a tolerable circumstance. The compiled video is linked below:

In order to test the sound trigger, I bounced a basketball in my basement against a tile floor. The camera went off quite quickly but was still slow for being able to catch the ball against the ground because Ii was using a shutter release. If you opt for using a flash trigger, you can prepare the camera in a darkened room and keep the shutter open, then the flash will go off when the sound is heard and the result should be a very crisp and quickly executed photo.

In order to test the light trigger, I tried using the CamBuddy as a reverse slow-synchro light triggered remote flash. I shot my flash against a door in a darkened hallway and triggered the camera to shoot when the flash lit the door up. This didn’t work too well in practice but it demonstrated the capability of the light trigger. The setup (with hallway lights on) and resultant picture (with lights off) is shown below.


This should in theory work quite well for lightening since a lightening bolt is usually a lot slower than a camera flash. The laser trigger is generally a light trigger in reverse. I tested its operation by aiming the laser at the CamBuddy and then moving the beam, but the same effect could be achieved by having a subject interrupt the beam.

Its price of $199 is much less than the $1360 worth of features that the manufacturer claims it replaces into one, small attachment. There’s no denying that the CamBuddy is definitely a convergence device. The real test of a convergence device is if it can perform moderately as well as the devices it is replacing. Not having the collection of photographic instruments at my disposal to test this premise, I can only say that the CamBuddy did everything that it claimed to (with a small difference in WiFi range). After having tested all of the features of this unit I’m quite impressed. This little gadget does a lot and in the right hands will provide enormous freedom of creativity for the photographer.

Source: The sample for this review was provided by JooPic. Please visit their site for more info and Amazon to purchase.


Product Information

Price: $199 – $209
Manufacturer: Joopic
Retailer: Amazon
Requirements:
  • Supported Camera with USB cable
  • Supported iPhone or Android
Pros:
  • Many features
Cons:
  • Does not have tripod mount
  • Requires a lot of external wiring
  • WiFi range may not reach 100 feet

Filed in categories: Reviews

Tagged:

Joopic CamBuddy Pro DSLR remote review originally appeared on The Gadgeteer on July 18, 2017 at 7:00 am.

Note: If you are subscribed to this feed through FeedBurner, please switch to our native feed URL http://the-gadgeteer.com/feed/ in order to ensure continuous delivery.