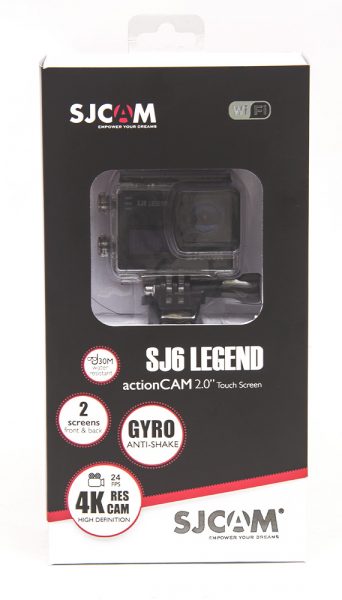
The SJ6 Legend from SJCAM is a 4K camera in their arsenal of budget conscious action cameras. From the other action cameras I have reviewed, there were some that I was truly happy with in reviewing, and then there were some that left me feeling quite disappointed. There was plenty of flash but they didn’t deliver on performance. However, looking at the specs and features of the SJ6 Legend, I can honestly say that it grabbed my attention.
Now, let’s see if the SJ6 will live up to its name or just get lost in the proverbial pages of history.
 The SJ6 Legend has your typical rectangle matchbox shape similar to most action cameras on the market. However, when I picked up the camera the first thing I noticed is that it had some weight and felt solid. Although it has a plastic body, the SJ6 didn’t feel lightweight or fragile. It felt beefier than most action cameras I have handled, and that was a nice change. And from what I can tell it has a sleeker and thinner form compared to other SJCAM cameras such as the SJ4000 and the X1000.
The SJ6 Legend has a 16MP CMOS Panasonic Sensor 166° wide angle lens that is capable of recording video at 4k@24 fps, 2K @30fps, 1080@60/30fps, 720@120/60/30.
The nice thing I noticed about the image the SJ6 Legend captures is that the wide angle didn’t have a very strong barrel distortion. As a matter of fact, there is a setting in the Menu that you can turn on or off for the Distortion Correction.
 What sets this camera apart from other cameras is the 2″ inch LCD touchscreen on the back. The touchscreen screen was fairly responsive considering it’s size and was nice and bright too. You can reach the camera’s menu by the LCD touch screen or by the lower button on the camera’s side. Scrolling through the menus did take some getting used to since the buttons on the side aren’t like the typical SJCAM action camera. Along with the 2″ screen on the back is a smaller 0.96″ screen on the front of the camera that displays info on the camera. This is really handy because you won’t have to rely on the back of the camera to check the camera’s status since it will display it up front.
 The Power button is no longer at the front of the camera but rather at the side on the top. And below that is the Settings button that brings you to the Menu. Hold this button and it will bring up the camera’s WiFi. And speaking of the Power button, SJCAM made the power button on the SJ6 so much better than on some of their previous cameras such as the SJ400 or the X1000. When I slightly touched or grazed the Power button it would turn on the camera. I couldn’t stand when that happened. There have been plenty of times when I just picked up those cameras and I accidentally tapped the Power button and it came on. Now with the SJ6, you have to hold the Power button down for about 4 seconds for the camera to boot up. Keep in mind to turn off the camera, it only requires a second of holding the Power button down.
 Some other physical features that I found appealing on the SJ6 is the change in the battery door. No longer is it the typical removable door that pops off and could get lost if you dropped it, but now it is a slide door with a spring hinge. And the hinge feels solid as well. When it pops open it feels durable and not flimsy at all. The door didn’t feel like it would fall or break off at all. This type of battery door is so welcoming and overdue. It is so much quicker and easier to remove the battery on the SJ6 than from the SJ4000 or the X1000. I’m sure many other users will agree.
 Another nice, yet simple, feature on the SJ6 Legend is the 1/4″ screw thread on the bottom of the camera. No longer would you need the waterproof case or even the clip that has the tripod screw on it if you don’t want to. I can attach the SJ6 to any tripod, table top tripod, or car mount without any extra mounts which is not only convenient but makes for a fast setup. And the screw thread is metal and not plastic which could wear down in time from overuse.
 On the opposite side of the Power and Settings button is the SD card slot, mini HDMI, and USB charging port. Keep in mind that the USB port is the mini USB type and not the micro USB, which many cameras tend to have. So, you can’t go swapping out another cameras micro USB cable or for that matter, your cell phone’s micro USB cable. This means that you will have to break out those older mini USB cables that you probably have stashed in a drawer somewhere. That is if you still have them since most devices nowadays use the micro USB cables.
 Speaking of the mini USB, you can connect an optional lavalier microphone to the SJ6 via the mini USB port for capturing better sound. I’m not sure how likely you would use a lavalier microphone with an action camera when you are trying to capture action shots. However, I can see this being very useful for doing interviews and capturing good dialogue with the camera.
 Another optional accessory for the SJ6 Legend is the waterproof housing with a USB charging cable. Basically, you can have constant power running the SJ6 while using the waterproof housing so you are no longer limited to the mercy of a standard battery. You can have more power to record for a longer duration without worrying about your battery dying or having to switch out a battery for a fresh new one.
 Another helpful accessory for the SJ6 is the selfie stick with an RF remote. The selfie stick is an aluminum telescopic selfie stick that you can attach the SJ6 to the end of it and record some great action shots. The selfie stick comes with a removable 3m waterproof remote. I really liked the remote because it is so small and compact and it works flawlessly. The buttons are very responsive and it has several key buttons on the front of the remote such as the On/Off button, Start/Stop, WiFi, and more.
 Another accessory that the SJ6 Legend has, that I was surprised to find out about, is a filter adapter for the lens. It is an actual threaded adapter for filters such as a UV Filter. Although it may look odd that it is so large for such a small lens, it does a job to keep your lens protected. I use UV filters on all my lenses video cameras and DSLR cameras mainly to protect the camera’s lens. Since the adapter is threaded there may be other options to replace the UV filter with other filters on the market such as cooling or warning filters or circular polarizers.
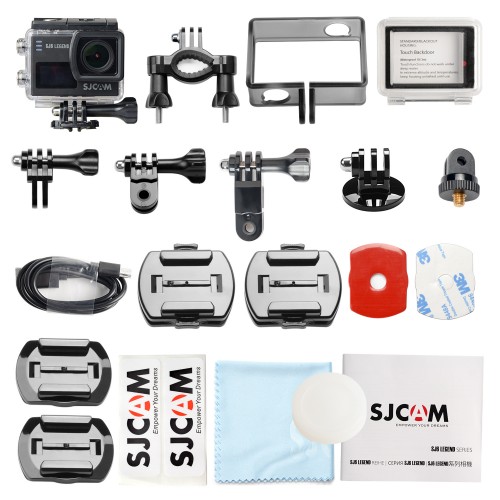 The SJ6 Legend does come with extra accessories, clips, and attachments in the box so you are pretty much ready to mount the camera where you can. The only thing I would say about the included accessories that action camera companies give is that I wish they gave a suction cup type mount. Even if a small and simple one. But I get that companies need to make that extra add on sale. However, it would be nice. I’ve bought a couple of suction mounts for the inside of my car and each mount literally cost me $2 or $3 dollars on Amazon and they work really well. I have one mounted and it has not dislodged yet.
 Aside from some of the physical attributes mentioned above, the SJ6 Legend is full of camera options. You can record in a .MP4 or .MOV format. Also, the SJ6 has the ability to capture photos in JPEG or RAW. The SJ6 also sports a Gyro Anti-Shake feature which helps the camera record super smooth shots. This is helpful when you are recording with that selfie stick, on a drone, or on a bike mount, and more. Basically, it helps smooth out those rough and jarring movements that the camera normally gets.
With or without the Gyro Anti-Shake, the SJ captured some really decent quality footage. The 4K looked really nice all the way down to the 2K, to 1080, and to the 720 video settings. I have to admit, although the SJ6 can record in 480 I didn’t bother testing that low resolution. For me, long gone are the days of SD, so I just kept my tests to the HD settings. Besides, HD seems to be the resolution that many care about anyway.
 To sum it up, the SJ6 Legend from SJCAM not only shot great footage but also had some nice physical improvements from their other cameras like the SJ4000 and X1000. I love the touchscreen and the extra attachments and accessories that the camera offers like the external microphone, waterproof housing with power cable, and filter adapter. As of right now, because I really like what this camera has to offer, is now my go to action camera. I plan to shoot more often with it and I plan on using it on many of my upcoming projects. I think SJCAM is on the right path to becoming an affordable and alternative to other major action camera companies and I hope to see more new cameras and new improvements from them in the coming years. And if the SJ6 Legend is an example of what’s to come then we should expect great things from SJCAM.
Source: The sample for this review was provided by SJCAM. Visit their site and Amazon for more info.
Product Information
| Price: | $159.00 |
| Manufacturer: | SJCAM |
| Retailer: | Amazon |
| Pros: |
|
| Cons: |
|
Filed in categories: Reviews
Tagged: Action Camera
SJCAM SJ6 Legend 4K camera review originally appeared on The Gadgeteer on August 4, 2017 at 11:07 am.
Note: If you are subscribed to this feed through FeedBurner, please switch to our native feed URL http://the-gadgeteer.com/feed/ in order to ensure continuous delivery.

