Rowkin Surge Charge wireless earbuds review


What is it?

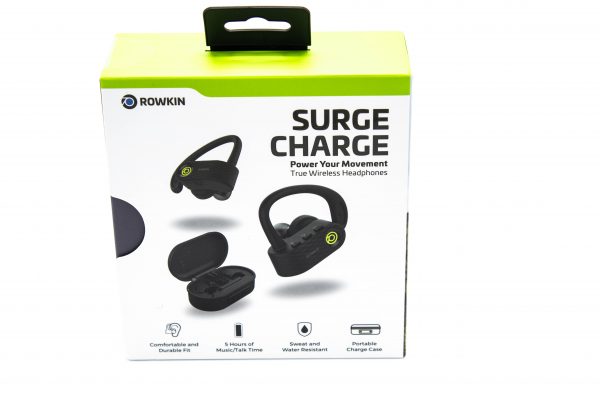
The Rowkin Surge Charge wireless headphones are a pair of earbuds that fit individually in each ear, to provide mono or stereo capability for phone or music.

What’s in the box
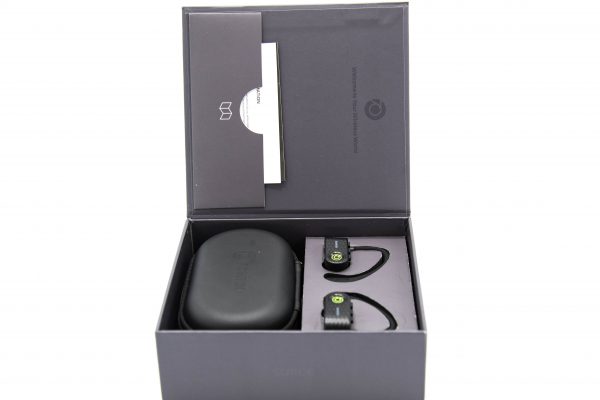

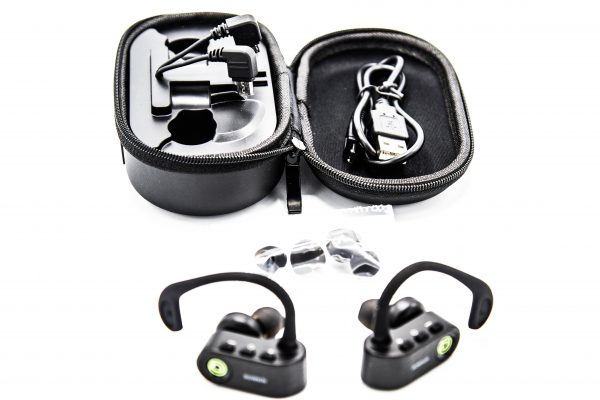
1 x Case with the built-in battery and charging cables
2 x Earbud (1 Left & 1 Right)
1 x Micro USB cable
2 x Pair of additional ear-tips (Different sizes)
1 x Instruction booklet

Design and features

The Rowkin Surge Charge earbuds are designed with complete and mirrored controls on each earbud. The controls include (+) plus, (-) minus and (o) power buttons, that control all of the call and music functions. The top (+) button works as “volume up” and “track forwards”, and the bottom (-) button works as “volume down” and “track backwards”. The (o) power button also works to stop and play music, and to answer and to disconnect calls.
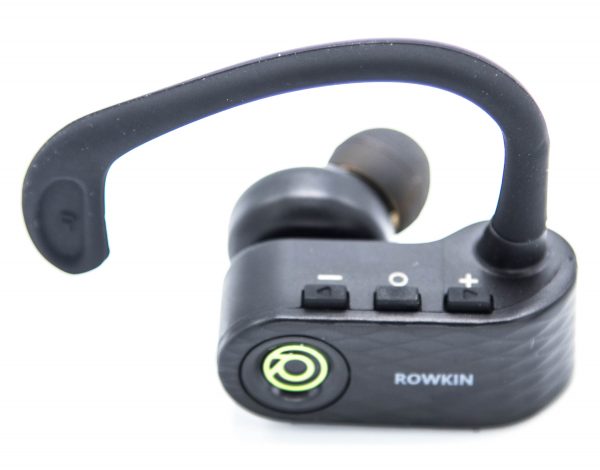
There is also a micro USB port on each earbud for charging, and an extended ear strap for securing around each ear.
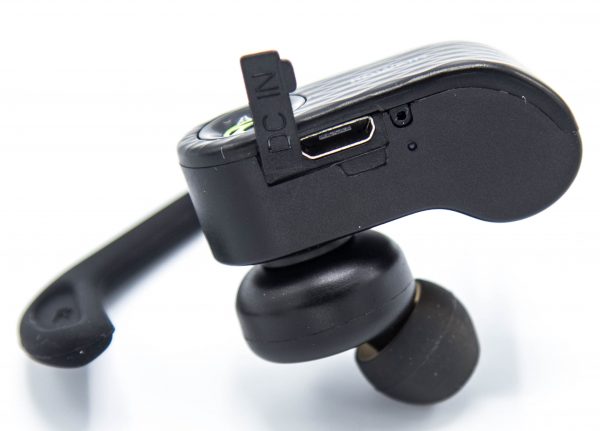
The ear strap is flexible and can be molded by hand around each ear for the desired fit. It is important to note that if not properly adjusted to each ear, the ear straps will present some discomfort. These earbuds are large in comparison to other in-ear earbuds that are currently available, but they are light and only create a slight presence on each ear.

The charging case includes a built-in battery that allows the case to be charged and in turn charge the earbuds from depleted to full about 4 times, before the case itself needs to be recharged. Within the charging case, there are two built-in micro USB cables that have to be plugged into each earbud for charging. There is a LED on each earbud that is red when charging, and white when fully charged. The separate micro USB cable that is provided is used to charge the case. There are additional ear-tips that are provided in different sizes. I switched from the ones that came attached to the smallest ones provided.

The earbuds have to be powered on individually, but only one has to be paired to the phone. Pairing is accomplished by holding down the power button for about 5 seconds until it blinks blue and red, which is typical of most earbuds. The pairing process was very easy, and I soon realized that I had the option to pair one earbud, or both earbuds individually. This is an interesting feature that allows each to function separately, for all of the functions including music and phone. Once both earbuds are powered on and the voice command for connected is heard, a second voice command confirms “true wireless stereo” connection. I sometimes heard the “true wireless stereo” confirmation prior to the “connected” confirmation in one or the other earbud. I suspect that this is quite normal since once any one of the earbuds is connected via Bluetooth, they connect to each other to provide the stereo experience without the need for the other to be connected individually. This, of course, is why only one earbud has to be paired if so desired. When using both earbuds, the volume and track controls on either one work for both. I mention this because if using one, you will notice that the volume setting may be completely different than when in stereo mode, since it reverts to the setting of the individual earbud.

Performance:

The Rowkin Surge Charge wireless earbuds are an absolute pleasure to listen to. The Bass, Mids and Highs are well balanced, and are easy but fulfilling on the ears. Out of the dozen or so wireless earbuds/earphones that I have tested so far, these sound the best. However, I did experience several momentary individual dropouts and disconnections, but I cannot really qualify the disconnections since the same happens to some of my other Bluetooth earphones, and usually at or close to the same locations. While it is likely that there is some environmental cause that is accountable for some of the disconnections, I suspect that most were the fault of the earbuds. At times either earbud would fade and then regain the normal connection and volume, and a few times they disconnected and reconnected. While it is very annoying when these events occur, they were not what I considered a “deal breaker”, since they only occurred once or twice during an hour of listening.

When using these earbuds for phone calls the sound quality is clear, and I received the same confirmation from the other party on the call. With normal use, the charge lasted a bit over 4 hours before the “battery low” warning was heard.

What I like

I really like the sound and clarity of these earbuds. They provide a pleasurable and comfortable listening experience irrespective of the volume. I like that they can operate individually, and that you are not forced to use one particular ear for phone use. The time between recharges is acceptable, and the ability to recharge them via the case is a plus.

What can be improved

The biggest issue I find is the way the earbuds charge. Unlike most earbuds that are housed in a charging case, each of these has to be physically plugged into the micro USB plugs that are built into the inside of the case. I am used to just having to drop my earbuds into the case, and the built-in contacts do the rest. For me, this is a major negative. I also would like to see the size reduced so that no ear strap is needed, and so that they are lighter, albeit that I suspect that the size has something to do with the great sound and the individual operational features.

Final thoughts

The Rowkin Surge Charge wireless headphones are great to listen to, and once the time is taken to fit them properly to each ear, they do not disappoint. They are somewhat large and therefore not inconspicuous. The great features that they offer are also a plus, but they may not be able to overcome the many other available earbuds that offer smaller and lighter devices, with true wireless charging. That being said, I will continue to use them until I find a similar pair with comparable operational features and sound reproduction, along with a better design.

Price: $119.99
Where to buy: Amazon
Source: The sample for this review was provided by Rowkin.

The post Rowkin Surge Charge wireless earbuds review appeared first on The Gadgeteer.

Filed in categories: Reviews

Tagged:

Rowkin Surge Charge wireless earbuds review originally appeared on The Gadgeteer on April 30, 2018 at 1:32 pm.

Note: If you are subscribed to this feed through FeedBurner, please switch to our native feed URL http://the-gadgeteer.com/feed/ in order to ensure continuous delivery.

Blue Designs Compass microphone boom arm review

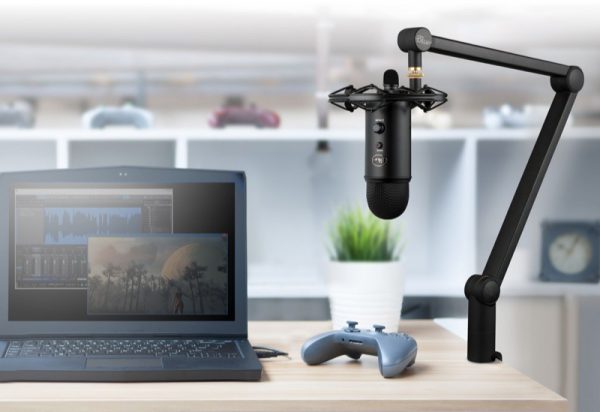
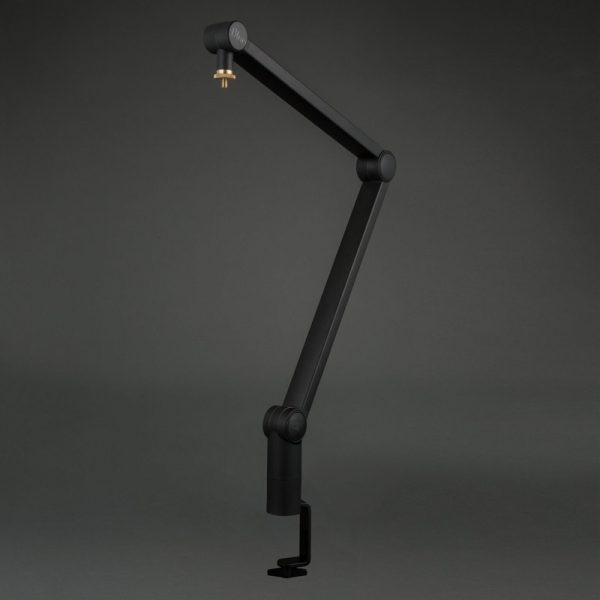
One of the golden rules of audio is to put the microphone where the sound is. For recording purposes, this means placing the microphone close to your mouth, but not in an obtrusive way. Blue Designs, the makers of the popular USB Yeti Microphone, introduces a sleek adjustable boom arm with good looks to boot.

What is it?

The Compass is sold as a standalone product, which is good news for those of us with (too) many microphones and other audio gear. It looks like a desk lamp but without the springs and knobs you normally find on such a thing.

Hardware specs

  • Boom Type: Extruded aluminum
  • Desktop Mount: C-clamp
  • Rotation: 360 degrees
  • Max Horizontal Reach: 32”
  • Max Weight Hold: 2.4lbs (including mic and shockmount)
  • Cable Management: Hidden-channel cable management
  • Threading: standard 5/8” threading, adapter for 3/8” threading

What’s in the box?

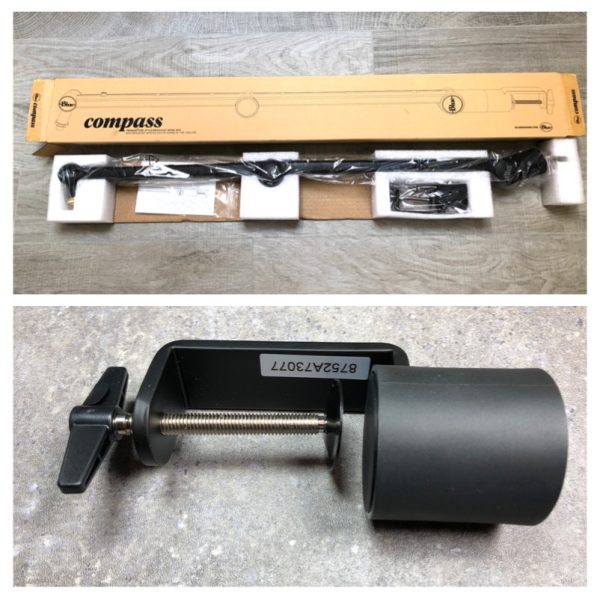
In the box, you’ll find the compass desktop boom arm, C-clamp for desktop mount, and a 3/8” to 5/8” adapter.

Design and features

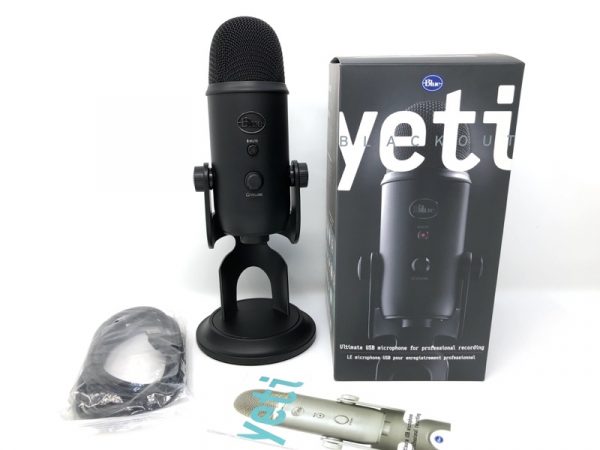
In order to test the Compass with the corporate brethren, I was given a Yeti Microphone (in black) to test, alongside a Radius III shock mount (an update from previous versions).  All three items are available as a package called the Yeticaster.

The Yeti should be a familiar sight by now.  This one is called the “Blackout” which matches the Compass arm perfectly.

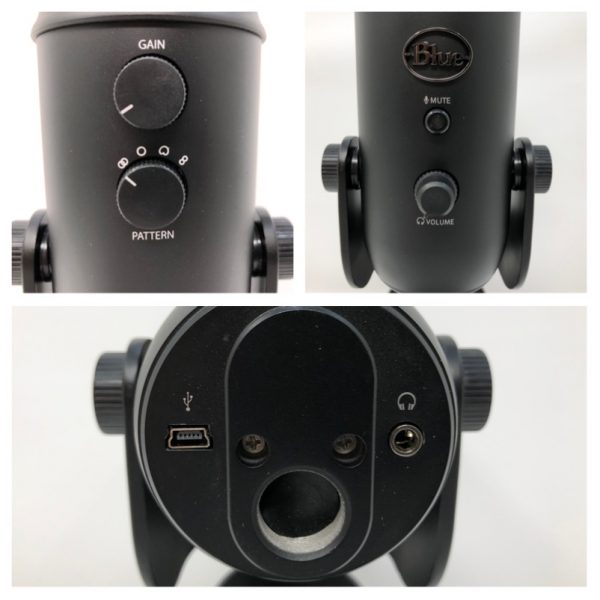
Here’s a peek at the Yeti’s controls, including gain, pattern selection, mute, headphone volume, mini-USB, mic stand thread and headphone output.

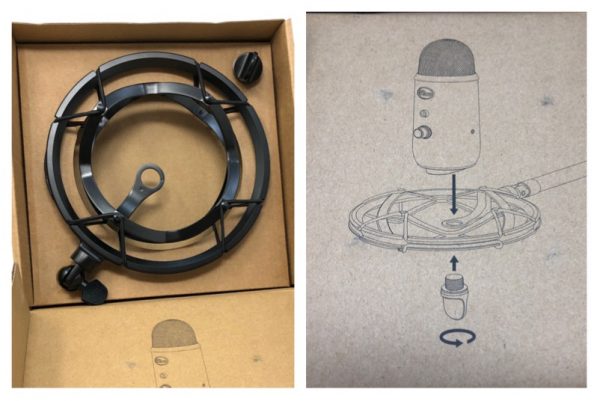
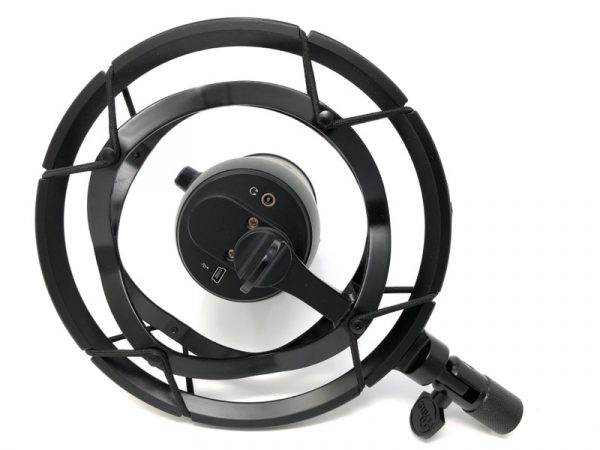
The Radius III shock mount comes in a plain cardboard box with a clever diagram for assembly.  For the Yeti microphones, a thumb screw attaches to the base of the mic.

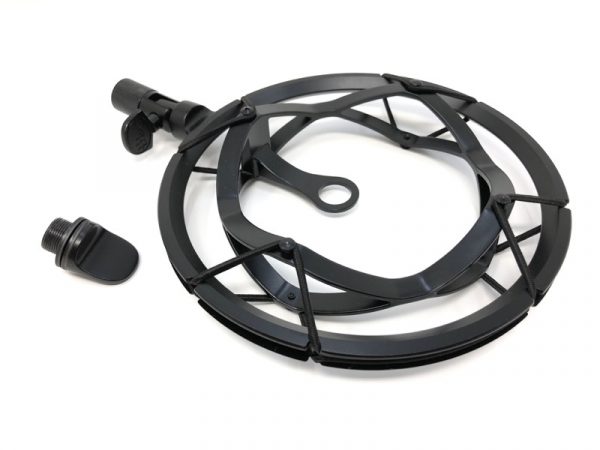
There are only two pieces in the entire box, in matching black.

Setup

The thumb screw is shown attached to the bottom end of the Yeti mic. The four elastic bands isolate the microphone from external vibrations.

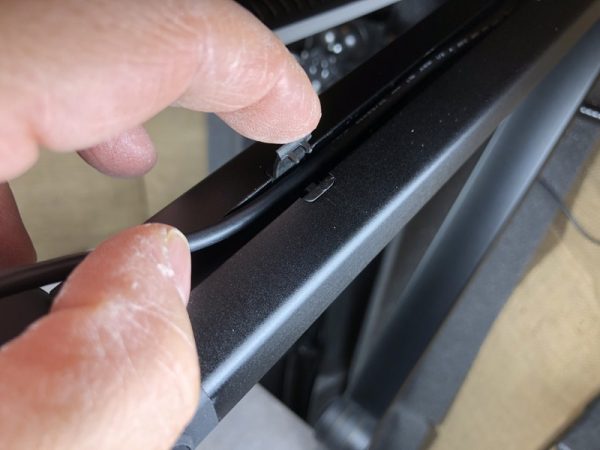
The compass arm has a channel with snap tabs that hold cables in place.  You’ll need a fingernail to pry the tabs open.


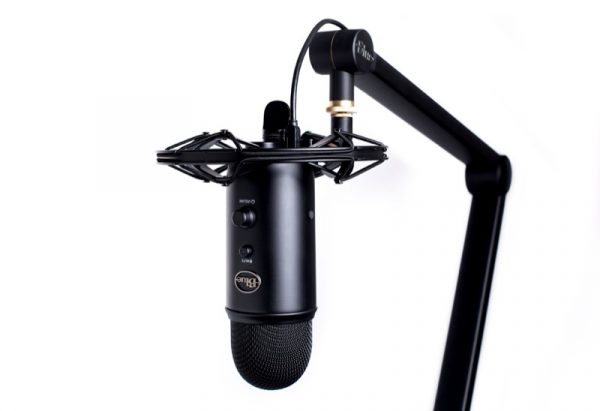
When fully assembled, the matte black color is really sleek.

Performance

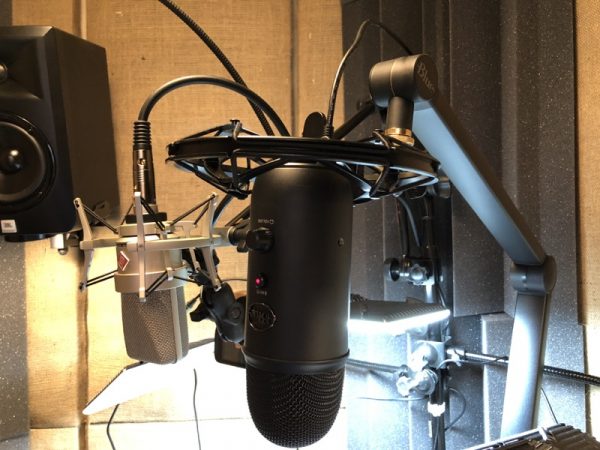
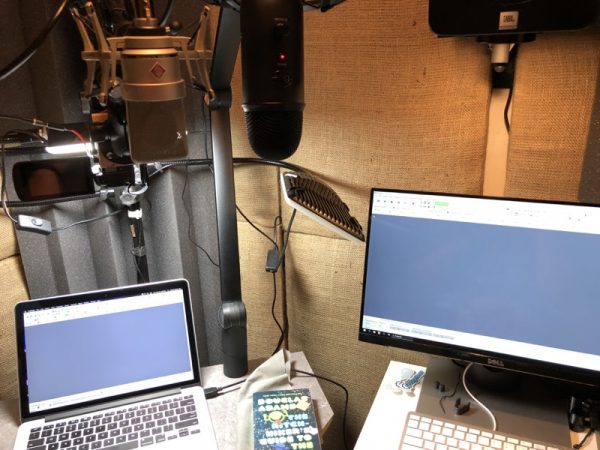
My recording booth setup is pretty cramped. I put the Yeti/Compass/Radius combination next to my Neumann TLM103 mic setup and recording a track side by side.

I read an excerpt from The Hitchhiker’s Guide to the Galaxy.  Don’t panic!  Both tracks were recorded simultaneously with the same settings on each with no processing.  The Yeti was set for a cardioid pattern.

As I had expected, the Yeti sounded very good. The Neumann had much, much more low end made more apparent by my deep voice. Your results will vary heavily on recording environment. I was recording in a treated room that was specially built for audio.

What I like

  • Handsome hardware at a reasonable price
  • Yeti punches above its price point and is fine for 99% of your average podcaster

What needs to be improved

  • Compass tension adjustment knob could use a little more “grip” or meat. Right now they’re a sliver of plastic.

Final thoughts

If you’re looking for a slick, adjustable microphone boom arm, the Compass boom arm is the way to go. The matching Radius III shock mount pairs perfectly with the Yeti USB microphone, or purchase all three as a bundle with the Yeticaster kit.

Price: $99.99 (Compass), $129 (Yeti microphone), $49.99 (Radius iii) or $199.99 (all three, the YetiCaster Kit)
Where to buy: Blue Designs
Source: The sample of this product was provided by Blue Designs.

The post Blue Designs Compass microphone boom arm review appeared first on The Gadgeteer.

Filed in categories: Reviews

Tagged:

Blue Designs Compass microphone boom arm review originally appeared on The Gadgeteer on April 30, 2018 at 11:00 am.

Note: If you are subscribed to this feed through FeedBurner, please switch to our native feed URL http://the-gadgeteer.com/feed/ in order to ensure continuous delivery.
JBL Clip2 Bluetooth speaker review

Earlier this year I was hiking with the Boy Scouts, where we came across another group of hikers. One of them had music playing on one of those clip-on bluetooth speakers attached to a backpack, which was a little annoying since we were out in nature. I won’t become a noise polluter, but I was curious about this JBL Clip2 Bluetooth speaker, which as the name implies, comes with a clip and is also waterproof.

What is it?

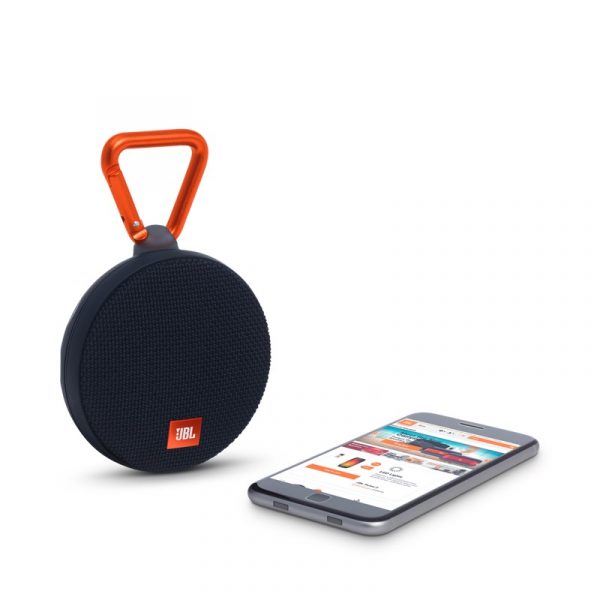
The JBL Clip2 Bluetooth Speaker is a lightweight “dunkable” device with surprisingly loud sound from such a tiny package.

Hardware specs

Up to 8 hours (varies by volume level and audio content)
Battery charge time 2.5 hour @ 5V, 0.5A
Signal-to-noise ratio >80dB
Battery type Lithium-ion polymer (3.7V/730mAh)
Frequency response 120Hz – 20kHz (-6dB)
Output power 1 x 3W
Transducer 1 x 40mm
Dimensions (H x W x D) 141 x 94 x 42 (mm)
Weight 184g
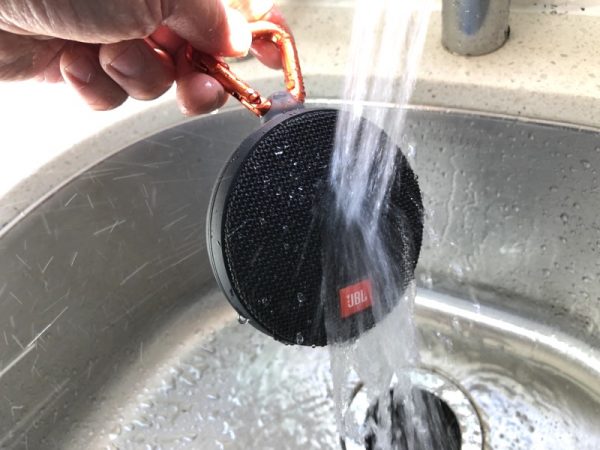
IPX7 water resistance (can survive immersion in 1 meter/3.3 feet for up to 30 minutes.)

What’s in the box?

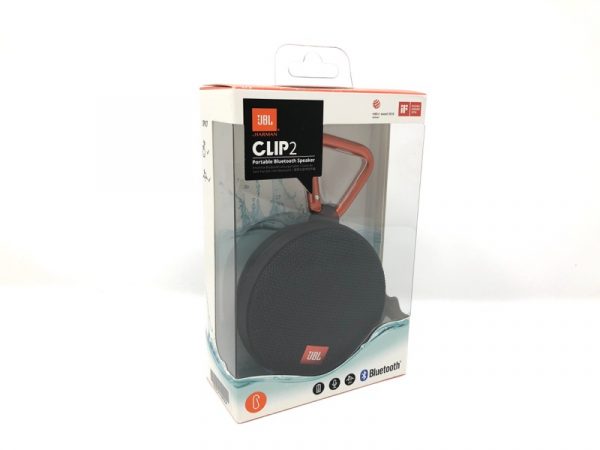
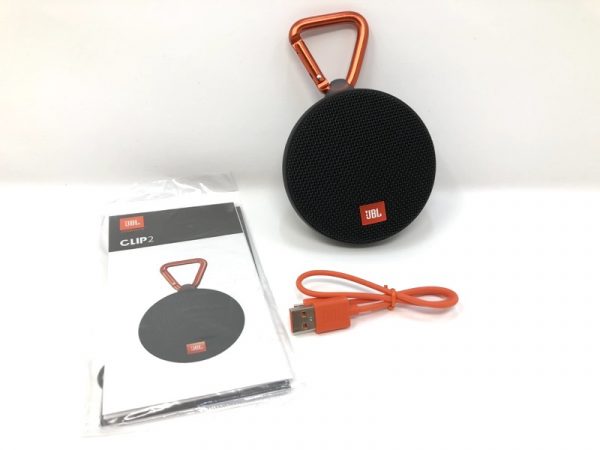
In the box, you’ll find some documentation and a color-matched USB charging cable.

Design and features

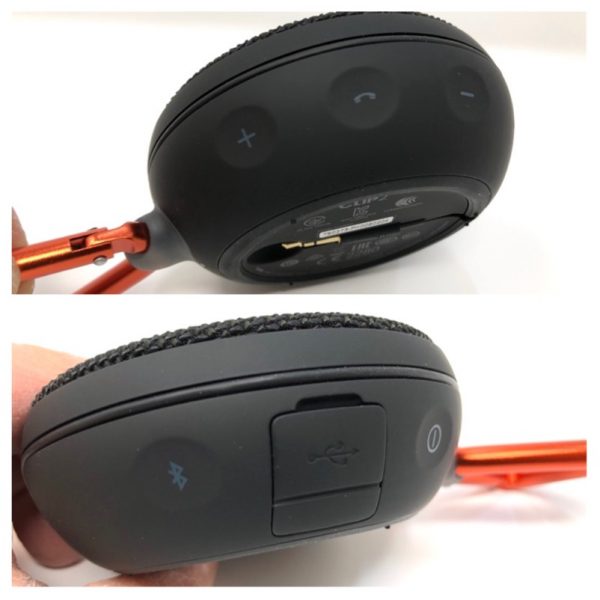
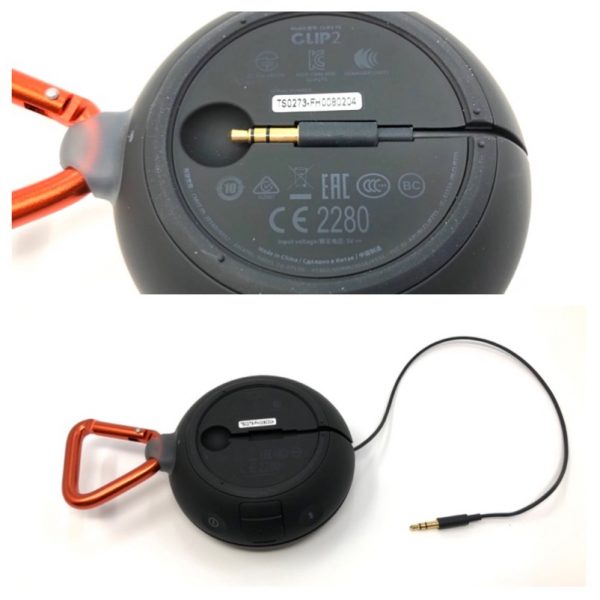
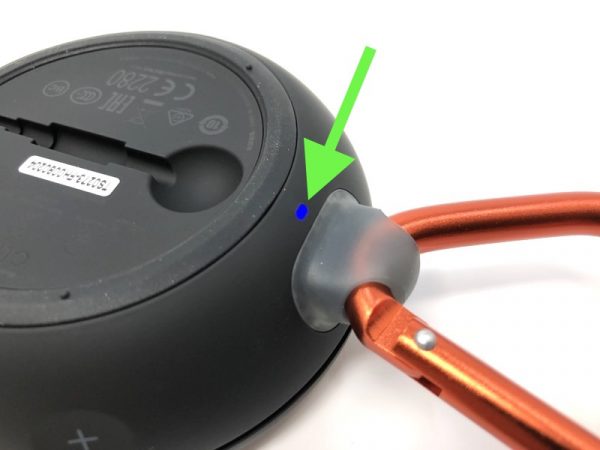
The outside of the speaker is covered in a grippy, rubber-like finish.  On one side is the volume and phone control. On the other is the Bluetooth pairing button and power button. Note the sealed USB charging connector. The Clip2 has a secondary, non-wireless playback method. Simply uncurl the attached headphone-style cable and plug into your 1/8″ inch headphone output. I’d be careful with this one. It appears to be the weakest link on the Clip2. I almost missed the tiny LED indicator at the base of the carabiner clip.  Here it is lit up in blue to indicate pairing status.

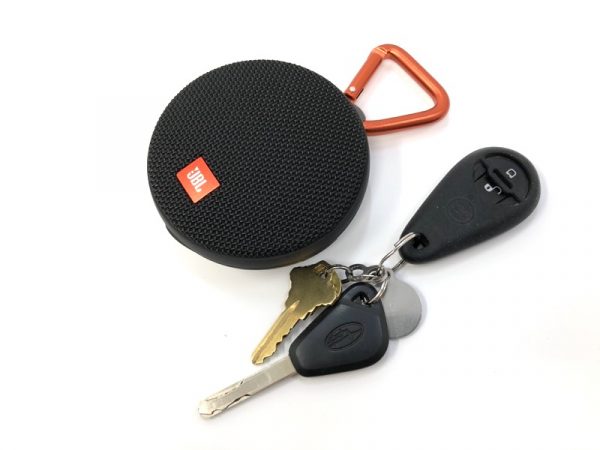
Did I mention it’s pretty small?  Here’s the Clip2 alongside a set of keys.

Setup

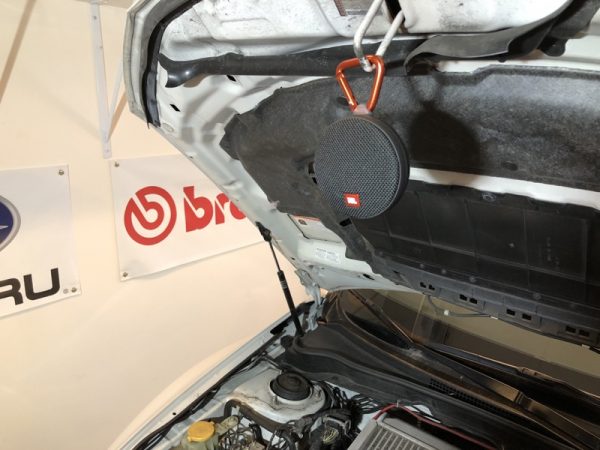
There’s not a lot of setup beyond the initial pairing.  I had to try the Clip2’s party trick: the carabiner.

The carabiner clipped easily to most things, such as the hook of an open car hood.

Performance

As with any speaker this small, the Clip2 is not going to blow your socks off. However, the output is impressive for something so tiny. It got plenty loud! The IPX7 rating meant that it had no problem surviving a dunk or splash of water.

What I like

The waterproofing and small size means you can really take this anywhere. The carabiner clip is really quite handy.

What needs to be improved

A magnetic mounting option would be really handy!

Final thoughts

I cannot imagine blasting music during a hike in the woods. No way I would personally clip this on a backpack on an outing! But for everything else, the JBL Clip2’s water resistant build and carabiner clip makes this a no-brainer for your outdoor adventures.

Price: $59.95 MSRP
Where to buy: JBL, Amazon
Source: The sample of this product was provided by JBL.

The post JBL Clip2 Bluetooth speaker review appeared first on The Gadgeteer.

Filed in categories: Reviews

Tagged:

JBL Clip2 Bluetooth speaker review originally appeared on The Gadgeteer on April 29, 2018 at 12:02 pm.

Note: If you are subscribed to this feed through FeedBurner, please switch to our native feed URL http://the-gadgeteer.com/feed/ in order to ensure continuous delivery.
Buckle & Seam Sierra 15″ Messenger Bag (2018) review

I recently reviewed the Buckle & Seam Sierra 15″ Messenger bag, but they have since updated the product (they made it with thicker leather).  Is it a vast improvement over its predecessor? My opinion is that it is somewhat better, but far from what I was hoping for.

What is it?

The Buckle & Seam Sierra 15″ messenger bag is a leather bag used to carry a 15″ laptop and various documents for business or personal use.

Design and features

This updated Buckle & Seam Sierra 15″ Messenger bag is made exactly like its predecessor with the only difference being that the body of the bag is made of thicker leather. Since they are almost exactly the same bag, this review will include much of what was written for the original bag. The updated bag, just like its predecessor, holds a 15″ laptop and is made using full grain leather.

The leather used in this bag has been vegetable tanned. This is more environmentally friendly than Chrome VI tanning or other chemical tanning processes and takes four to five weeks to complete. This leather is also susceptible to scratches and will develop a patina over time. They call the leather Crazy Horse Full Grain Leather.

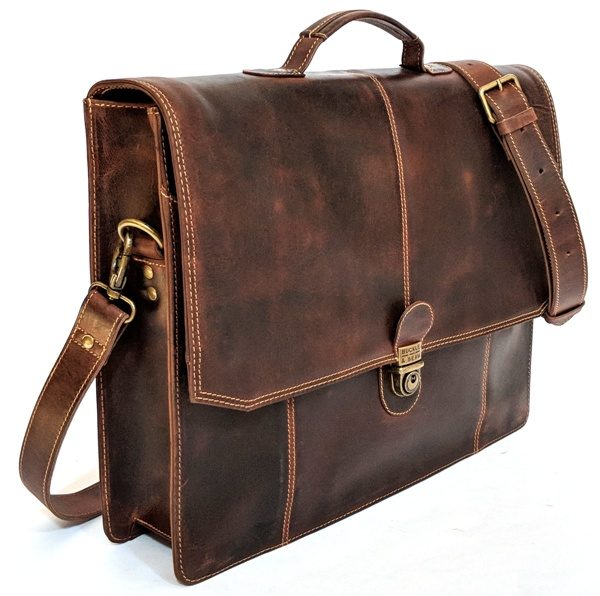
The main compartment flap uses a tuck catch lock closure.

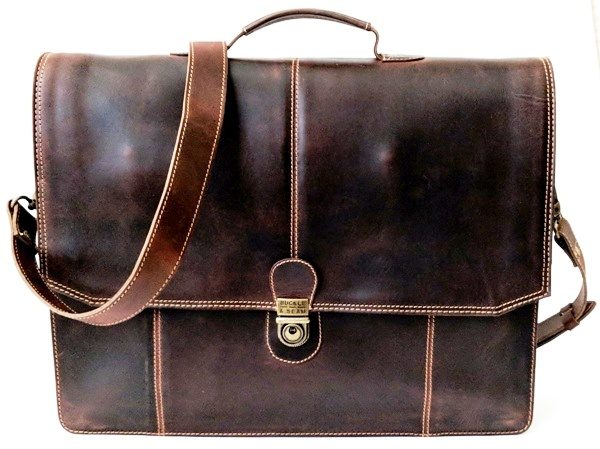
The front of the Sierra messenger bag shows how the bag is assembled. They employed a double stitch using recycled polyester thread. Everywhere you see stitching in this bag indicates the areas where two pieces of leather are sewn together. Thus the front flap of the bag is made up of two pieces, and the lower front portion of the bag is made up of three.

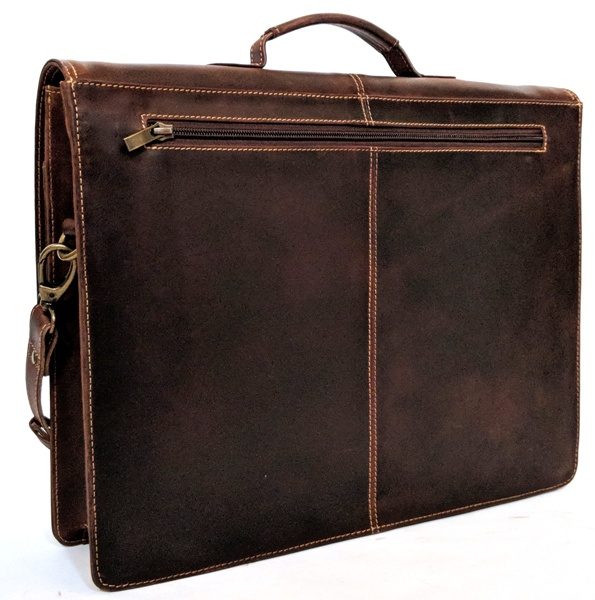
The back of the bag also shows the double stitching and is made of two pieces of leather sewn together. The back of the bag has a zipper pocket. YKK elastic zippers are used on Buckle & Seam’s business bags.

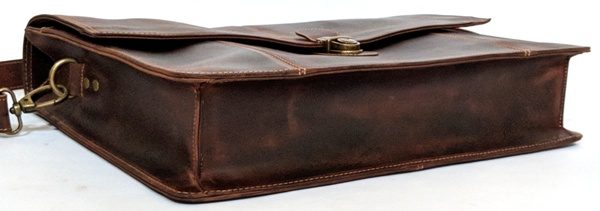
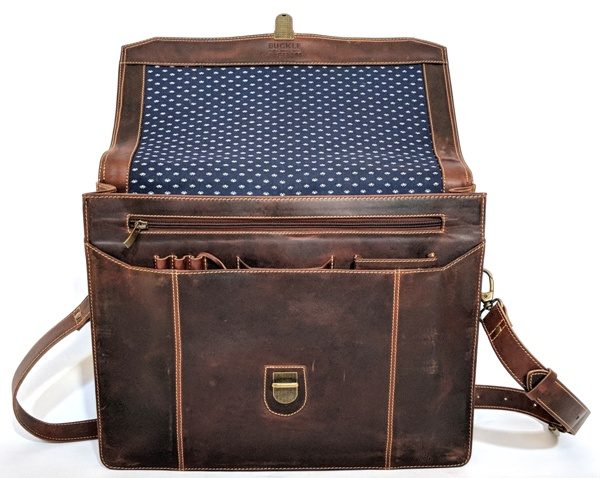
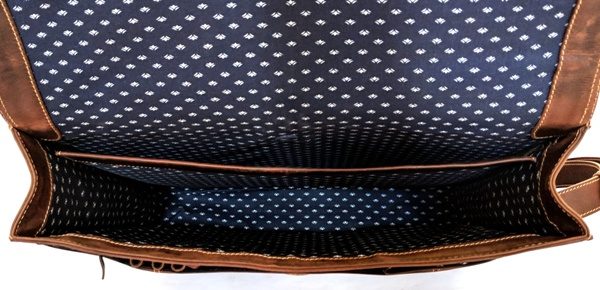
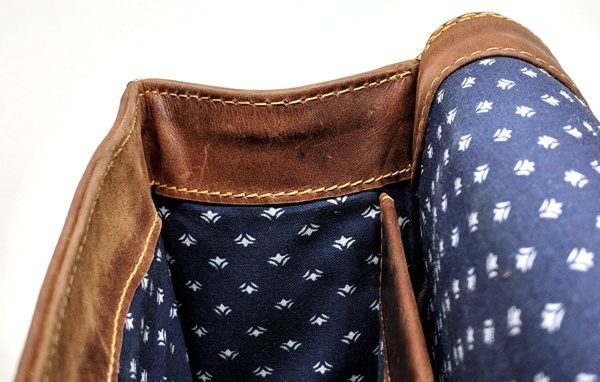
The bottom and sides of the Sierra messenger bag are made by sewing three pieces of leather together (two for the sides and one for the bottom). The entire bag is lined with a sailboat blue custom lining which was “developed by our in-house design team and [is] manufactured only for us out of premium cotton” according to Buckle & Seam’s Managing Director, Marco Feelisch. There are different lining colors and patterns to choose from: Dots, Checked, Boats, Paper Planes, and Plain.

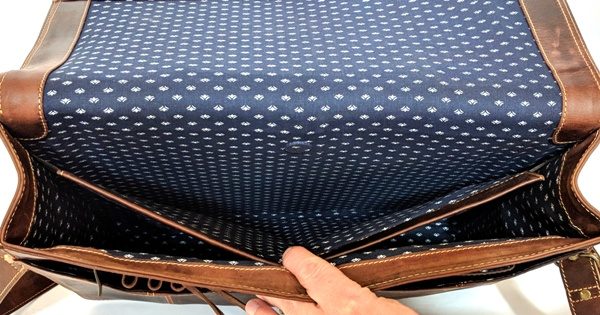
The main compartment of the bag contains a padded laptop pocket. This pocket will accommodate 13″ and 15″ laptops according to the Buckle & Seam website. The top of the laptop pocket uses a round magnetic closure (about 2 cm in diameter).

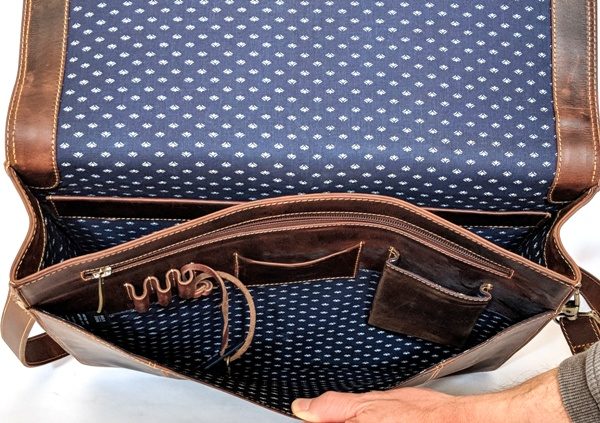
The material that separates the laptop from the main compartment is sewn into the inside of the bag using two 2″ wide strips of elastic material on each side (top and bottom). This is done so that the pocket can stretch to accommodate thicker laptops. The main compartment’s internal measurements are about 14″ wide x 3″ deep x 11.5″ high. The open front pocket, which measures 14.75″ wide x 8.5″ high internally, contains all the organizing slots and pockets which include places to hold three pens/pencils, a pocket for business cards, and a phone pocket. You may also store more documents here if desired.

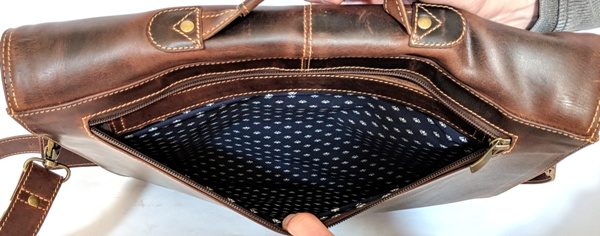
There is a thin zippered pocket (shown above) lining the back of the front pocket which has internal measurements that about 11.25″ wide x 9.75″ high.

The bag comes with a key to lock the tuck catch lock closure. When the bag was shipped to me, the key and the Buckle & Seam tag were tied to the bag through one of the pen/pencil slots using a strip of leather as shown in the above photo.

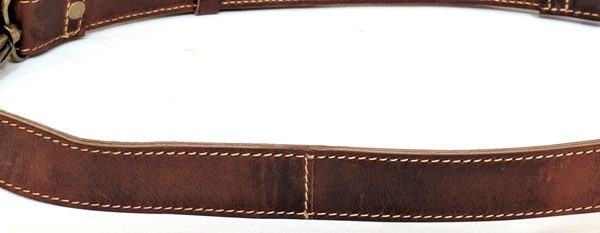
The back zipper pocket will hold more of your documents. It measures 11.5″ wide x 9.5″ high but, in addition, it also has a trolley strap so that you can slide the messenger bag over a suitcase handle to make traveling easier (Buckle & Seam calls it a “hidden trolley solution”). The shoulder straps are attached to the bag using swiveling metal lobster claw clasps.  The shoulder strap is made up of what looks like two thin layers of leather sewn together but I also noticed that in order to get the length that they desired, the strap is made up of sections that are spliced together as well. The seam you see above also exists on the other side at nearly the same point. Again, the shoulder strap is a high-stress area of the bag and thus has greater potential to fail in the future because of the design of the strap.

Use

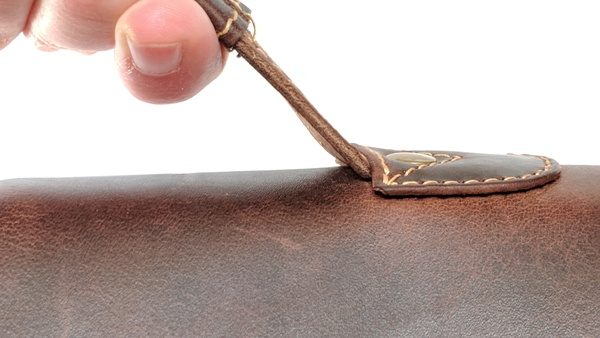
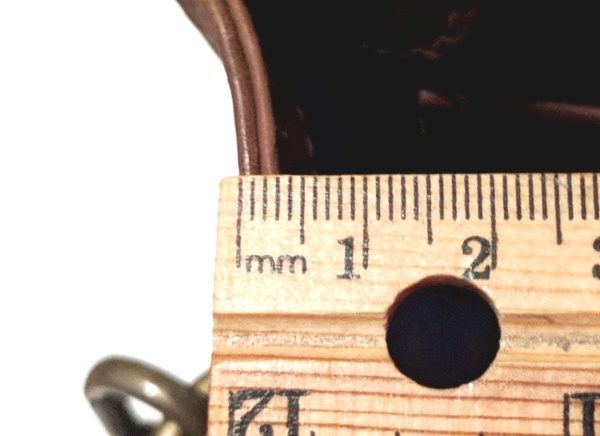
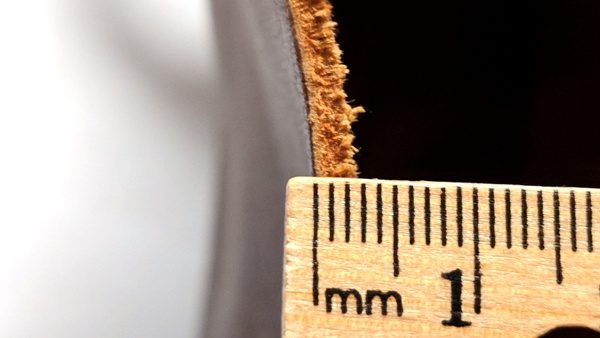
Just like the other Sierra bag, this one carried my things comfortably. Inside is a couple of thin paper folders, a large Biology textbook as well as a pencil case. In the laptop pocket, I was able to store my Bluetooth portable keyboard which measures 11.75″ x 7.75″ x 0.75″ (my laptops are larger than 15″ and thus do not fit). The Buckle & Seam website states that they use leather that is on average 1.8-2 mm thick. However, the handle of the bag is one of those areas where two thin layers of leather were sewn together to make a handle that measures about 2 mm thick. This is thin for a handle. Since this is a high-stress area, it could very well fail if it is heavily used.

When the bag was full (without a laptop), the above photo shows how much stress is placed on the handle when carried this way. The leather that the handle is sewn and riveted into is a little thicker compared to the previous Sierra messenger bag. This may increase the durability at this stress point. And like the previous bag, they included a 7″ long x 0.5″ wide rigid strip of reinforcing material where the handle attaches. This rigid strip is hidden between the leather of the main compartment flap and the lining of the bag.

Quality

I have learned from top-notch leather companies that the fewer seams you have in a bag, the more durable it is. In other words, they use fewer pieces of leather to assemble the bag to increase the durability and quality of the product. The seams of a bag are weak points especially if there is weight or stress exerted on those areas. The Sierra 15″ messenger bag is made with a lot more pieces of leather and has more seams than I’d like. Perhaps this is why it has only a two-year warranty.

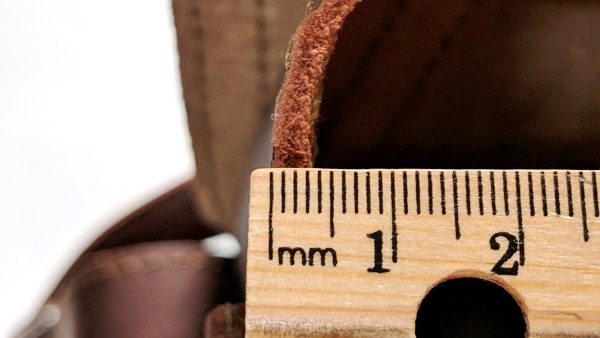
The body of this Sierra bag was a little thicker than my last bag, but you’ll notice that the leather on the inside of the bag does not continue down the length of the bag …

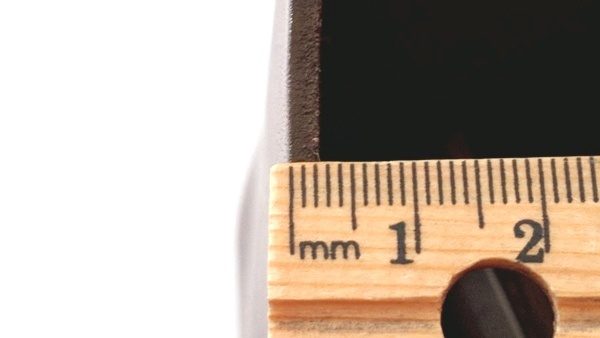
… thus, the sides are not quite as thick as you might think. The Buckle & Seam website states that they use leather that is on average 1.8-2 mm thick.This is the thickness of the previous Sierra messenger bag.I compared the Sierra messenger bag to several other leather bags that I have reviewed. These other bags are not messenger bags but do illustrate the quality materials and craftsmanship used by these other companies. The Saddleback Leather Thin Front Pocket Leather Backpack is made from leather that is about 2.2 mm thick (single piece thickness) as shown above. Saddleback has a lifetime warranty on their products.
The Pad & Quill Roll Top Leather Backpack is made using full grain leather that is also about 2 mm thick (single piece thickness) as shown above. They have a 25-year warranty on their leather products.The Colonel Littleton No. 18 Leather Hunt Bag is made from full grain leather that is about 2 mm thick (single piece thickness) as shown above. The Go Forth Goods Charging Cable Tool Roll is made from full grain leather that is about 2.4 mm thick (single piece thickness) as shown above. They provide a lifetime warranty on their products.

Each of these other products looks feels so much more robust and well-made than the Sierra messenger bag.

Humanitarian efforts

The founders of Buckle & Seam are committed to providing the highest standard of working conditions for their Pakistani employees. And for each bag sold, a part of their revenue goes to sending a girl to school in Pakistan.

What I like

  • The Buckle & Seam Sierra 15″ messenger bag has an attractive design
  • It has a hidden trolley strap to make travel easier (strap that fits over a suitcase handle)
  • It uses vegetable tanned leather which is more environmentally friendly than other chemical tanning processes
  • The company is committed to providing good working conditions for their Pakistani employees
  • They donate part of our revenue for each bag sold to a school that promotes girls’ education in Pakistan

What needs to be improved

  • The bag uses too many pieces of leather to assemble the bag thus making it less durable
  • The leather is still too thin for my personal preferences
  • The handle is way too thin
  • Sections of the shoulder strap were spliced together to make up the desired length which weakens the strap
  • It has only a two-year warranty

Final thoughts

The Buckle & Seam Sierra 15″ Messenger Bag remains an attractive business messenger bag with many pockets and slots to organize your materials. It is made from vegetable tanned leather which is more environmentally friendly than chemical tanning processes. Buckle & Seam also donates a part of their revenue to send Pakistani girls to school to help increase the literacy rate.

However, I remain disappointed in the quality and craftsmanship of the bag. Although the updated Buckle & Seam Sierra 15″ messenger bag is made from thicker leather than the previous model, it still falls far short of the other premium leather products that I have reviewed in the past. These other companies make leather products that have much longer warranties thus illustrating their confidence in the craftsmanship and quality of their products (Saddleback, Pad & Quill, Colonel Littleton, and Go Forth Goods products).

The Sierra messenger bag is created using many pieces of leather and thus has many seams thereby decreasing its durability. Its handle and strap contained no improvements. Both were made by layering together two thin pieces of leather. The shoulder strap was made of pieces that were spliced together to obtain its full length which weakens the strap.

In addition, this bag is only backed by a two-year warranty. If I had $330 to spend on a leather bag, I’d rather spend my money on a product that was better made and backed by a better warranty.

Price: $330
Where to buy: Buckle & Seam
Source: The product used in this review was provided by Buckle & Seam

The post Buckle & Seam Sierra 15″ Messenger Bag (2018) review appeared first on The Gadgeteer.

Filed in categories: Reviews

Tagged: ,

Buckle & Seam Sierra 15″ Messenger Bag (2018) review originally appeared on The Gadgeteer on April 29, 2018 at 10:00 am.

Note: If you are subscribed to this feed through FeedBurner, please switch to our native feed URL http://the-gadgeteer.com/feed/ in order to ensure continuous delivery.
Loop High Fidelity Earplugs review

Over the last several years, I’ve noticed a problem developing in my left ear when exposed to continuous loud sounds (it sounds like there is cotton constantly moving around in my ear). I haven’t gone to a doctor about this because it happens infrequently. I’ve tried using inexpensive protective foam earplugs (those intended for use in loud industrial environments) to help with this problem. However, I despise using them because I can’t seem to get a good seal in my ear canal.

When I saw the Loop High Fidelity Earplugs news post on the Gadgeteer, I thought they were attractive and I liked the fact that you can replace the eartips with standard silicone or memory foam eartips. I put in a request to review them and after receiving them and trying them out, I found that I enjoy using them and they help alleviate my problem.

What is it?

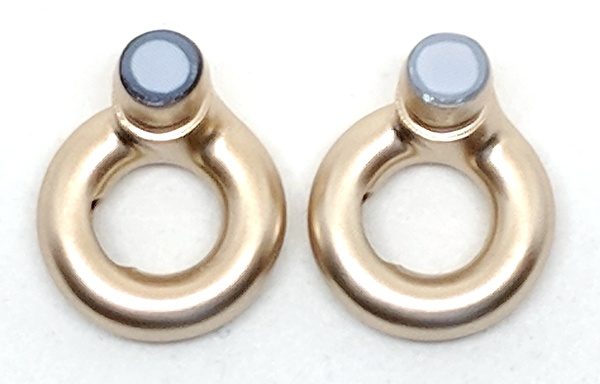
The Loop High Fidelity Earplugs are plugs inserted into your ear canals designed to decrease the level of sound when exposed to a loud environment without decreasing the quality of the sound. They come in many colors: Midnight Black, Glorious Gold, Raving Red, Swinging Silver, Flirty Rose Gold, Brilliant Black, Funky Blue, and Electric White.

What’s in the box?

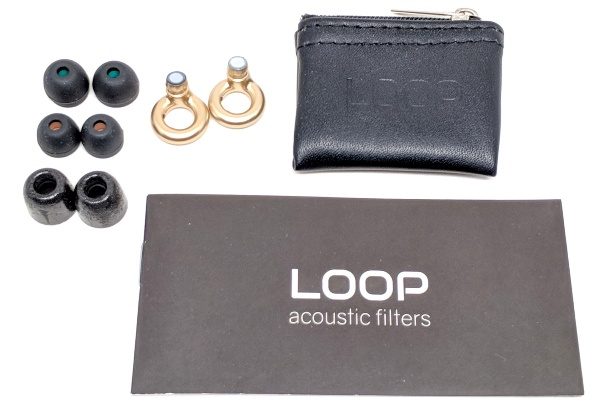
Loop High Fidelity Earplugs
Medium hybrid silicone eartips
Small hybrid silicone eartips
Comply memory foam eartips
Artificial leather pouch
User guide

Design and features

The Loop High Fidelity Earplugs are attractive earplugs made out of a hollow hard plastic material.

Many of the inexpensive protective foam earplugs create a muffled sound because they block your ear canals which act as resonators. To improve the clarity of speech and music and avoid a muffled sound, Loop earplugs use 3D printing technology to create a round compact acoustic hollow channel that mimics the resonator function of your ear canals.

Sound waves enter Loop via a small opening. They then travel through the hollow channel on the inside of Loop. This acoustic resonator has the same length as your ear canal and has a quarter wavelength resonance at 2700 Hz. … At the end of this sound tube we placed an acoustic filter which lowers all frequencies equally. This filter is installed in a laboratory by Dynamic Ear Company. To make sure there are no leaks, they use a UV light technology.” (the Loop website).

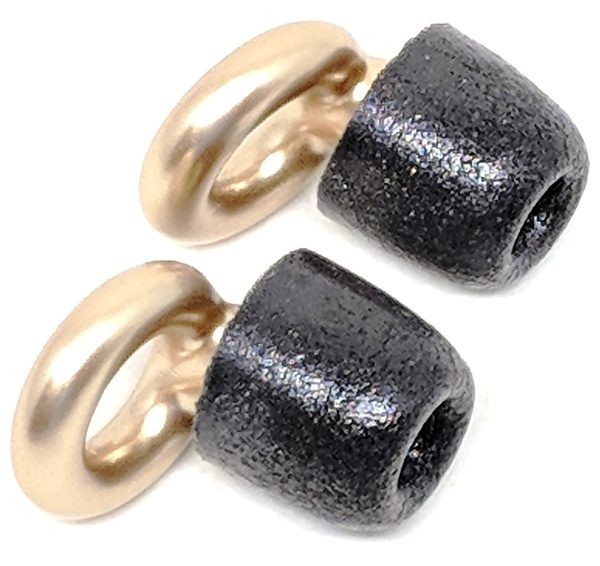
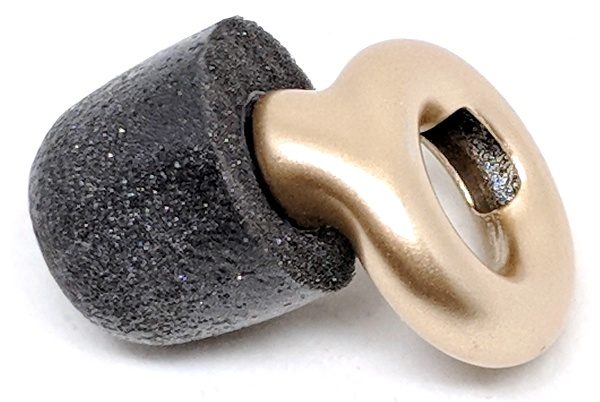
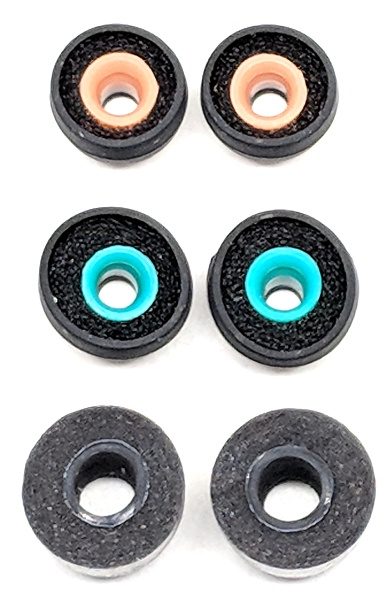
In order for the Loop earplugs to work, you must seal your ear canals. The earplugs come with small and medium-sized hybrid silicone tips as well as a pair of Comply memory foam tips. The top of the photo above shows the hybrid silicone tips which, when viewed from the underside, illustrate how the hollow spaces behind the eartips are filled with foam (they are filled with foam from the inner diameter of the tips to the outer diameter of the tips). The eartips are easily attached to the Loop earplugs by pushing and twisting the tips onto the stem of the earplugs.

Use


After receiving the Loop earplugs, I tried using the medium sized silicone tips first, but they were too loose for my ear canals. I needed to use the Comply memory foam eartips to obtain an adequate seal; apparently, even though I am a small person, I have very large ear canals.

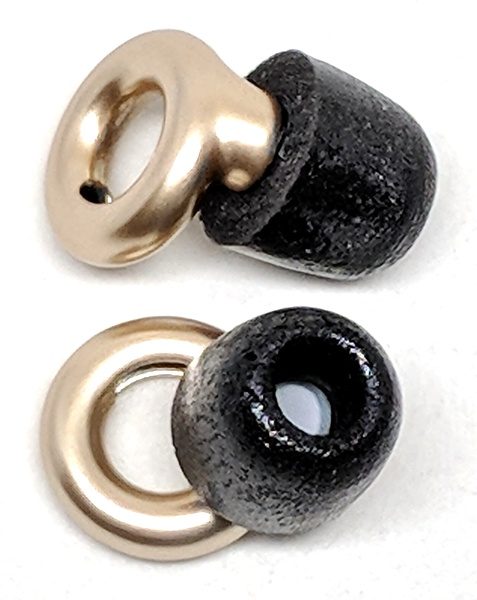
Inserting the earplugs into my ears was very easy to do once I figured out the correct orientation. The loop portion of the earplugs should not be oriented in an up or down position relative to the eartips but instead should be oriented horizontally. Once they were inserted, they were very comfortable to wear, although I must admit that I only wore them for about 15 minutes at a time.

I use the Loop earplugs each week when attending our church services. The music is quite loud and when I tested the sound level using the Sound Meter Android app by Abc Apps, the music level hovered around 80 dB. The Loop website states that the earplugs reduce the sound by 20 dB equally across all frequencies. I cannot say how much the sound level decreased when using the earplugs, but it made a significant difference to me and alleviated the issues I’ve been having with my left ear.

Also when using the Loop earplugs, I was unable to differentiate the sound quality of the Loop earplugs versus the inexpensive foam earplugs, but I was still able to hear people talking to me.

Protection

It is also important to note that the inexpensive protective foam earplugs that I’ve used have an ANSI/OSHA noise reduction rating (NRR) of 33 which equates to a 13 dB sound reduction. The Loop website does not state anything about being ANSI/OSHA compliant. It does state that the Loop earplugs are not suitable to use when shooting.

What I like

  • Reduces sound in loud environments
  • Very attractive design
  • Lightweight and comfortable
  • Easy to use
  • Eartips can be replaced using standard silicone eartips or memory foam eartips
  • Comes with nice zippered artificial leather pouch for storage

What needs to be improved

  • A little expensive

Final Thoughts

The Loop High Fidelity Earplug are wonderful to use. I have used inexpensive protective foam earplugs in the past and have so much trouble getting them to fit properly, but the Loop earplugs insert in seconds and fit perfectly and comfortably using the Comply memory foam eartips. They create a great seal and really help to decrease the sound around me when in a loud environment. Would I have purchased them at $29.95? Probably not, but at $20 or less, I definitely would have.

Price: $29.95
Where to buy: Loop and Amazon
Source: The product used in this review was provided by Loop

The post Loop High Fidelity Earplugs review appeared first on The Gadgeteer.

Filed in categories: Reviews

Tagged: ,

Loop High Fidelity Earplugs review originally appeared on The Gadgeteer on April 28, 2018 at 10:00 am.

Note: If you are subscribed to this feed through FeedBurner, please switch to our native feed URL http://the-gadgeteer.com/feed/ in order to ensure continuous delivery.