MPOW H5 Active Noise Canceling Bluetooth Headphones review

This is me, on a Philly train during rush hour, enjoying blissful solitude. How is this possible? I’m rocking the MPOW H5 Active Noise Cancelling Bluetooth Headphones. Spoiler alert: the active noise canceling feature is the real deal. Let’s have a look!

What is it?

They are Bluetooth enabled headphones with a noise canceling mode that reduces low-frequency background sound.

Hardware specs

  • Bluetooth 4.1
  • Active noise canceling mode
  • Aux-in port for wired use
  • 20-hour battery life
  • CVC 6.0 noise-canceling microphone
  • Inner ear cup size: 1.65- 2.95 in
  • Foldable & rotatable design

What’s in the box?

The package comes with a hard case, auxiliary cable, and USB to micro-USB charging cable.

Design and features

The MPOW H5 Active Noise Cancelling Bluetooth headphones are of the over-ear style, completely covering your ears to focus the sound. For a $50 pair of headphones, I was pleasantly surprised by the build quality. All the hardware and components are nice and burly, and the housings are all capped to protect the delicate bits. There’s nice thick padding on both the cups and the frame for comfort. It’s built to take the hard knocks associated with commuting or traveling.
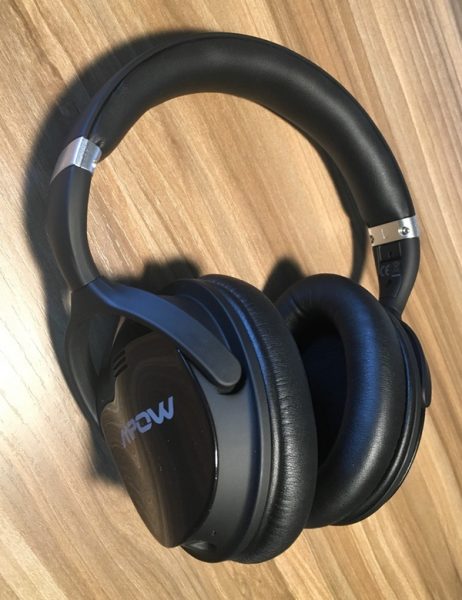
I’ve found these headphones to be very comfortable to wear for extended periods of time. The ear cups swivel 90 degrees and include length adjustments to tweak the fit to your head shape. With a total weight of about 8 ounces, they also don’t feel like they are dragging you down.
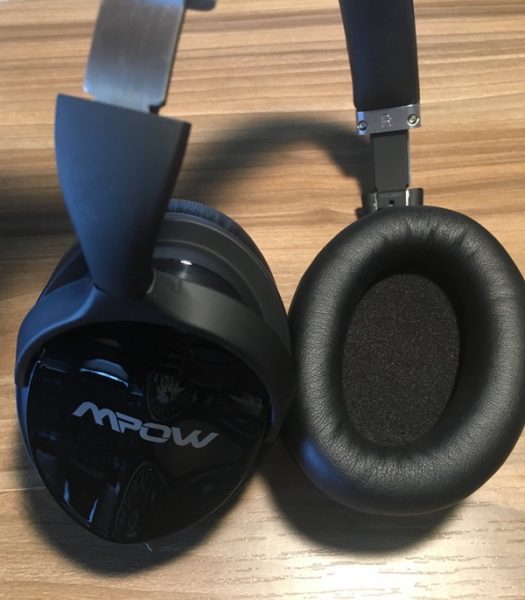
All of your controls and ports are built into the ear pods. You’ll find the volume controls, power/Bluetooth button, and charging port on the left ear pod. The active noise control switch and aux cable port are on the right ear pod. Placement of the controls is on the rear of the cups so that can manage all your functions with your thumbs while the headphones are on. I have found that I occasionally hit the power/Bluetooth button when I go to adjust volume since it is set between those two controls. It’s not a huge problem, but it would be nice if MPOW tweaked the layout here.
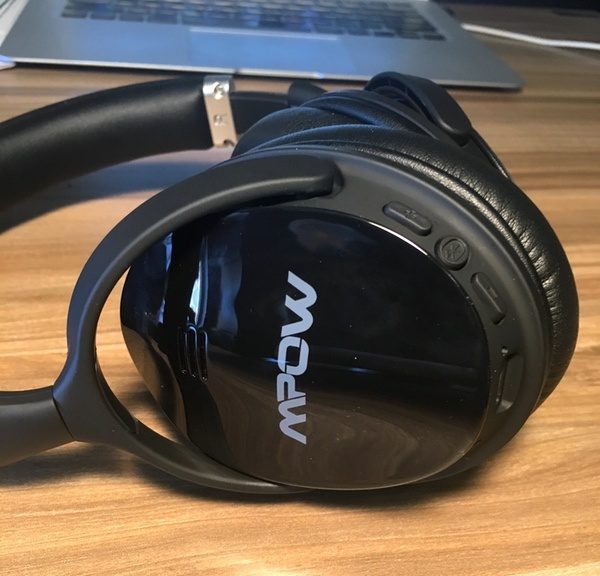
The combo Bluetooth/power button is where you get started. Press and hold for two seconds, and voice indicator tells you that you’re powered up, pairing, and connected to your device. Bluetooth pairing is pretty straightforward. The headphones will go into discovery mode if no device is connected. By pressing and holding the button on power up, the device will go back into pairing mode if you want to connect a new device. Press and hold that same power button for 2 seconds to power down again. It’s all straightforward & easy to use.

Sound quality is great to begin with, but the active noise canceling (ANC) is the big feature here. It’s a slider switch that, when enabled, focuses the sound and reduces low-frequency noise. The MPOW Amazon page spends quite a bit of time qualifying how well this works, which gave me some doubts… until I used the headphones on a recent train trip and a cross-country flight. Boy, what a difference. Low level background noises like train rumblings and cabin just vanish. You’ll still hear higher-frequency and louder noises (think human voices, machinery), but even those are muted. I’ve also used it at the office, where it significantly reduces background noise on a busy office floor. It does a lovely job of focusing you in on your music, audiobooks, or podcasts. You’ll really notice the difference when you switch ANC mode off, and that background noise creeps back in again. I’m a believer.

MPOW does a nice job providing a complete package for travelers. The 20 hour battery life is great, and you can switch to wired mode to further extend your battery. The headset folds up nicely into an included hardshell case, which also includes an aux cable and a charger. There’s even a nice little web pocket in the case to corral your chords. Everything you need for long trips.
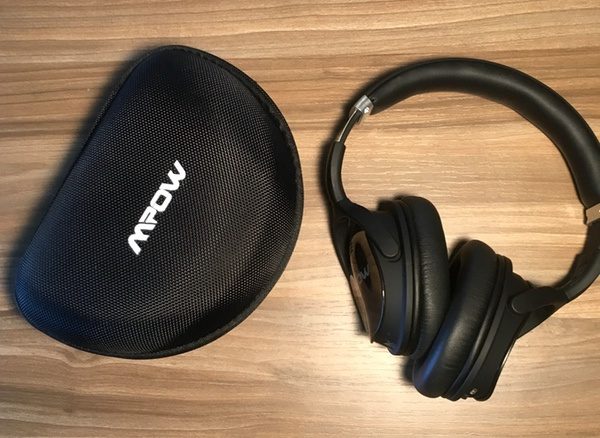
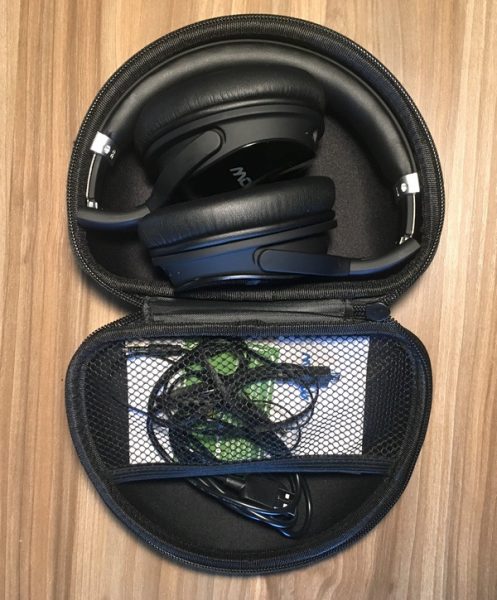
Two warnings about charging. When you flip it to ANC mode, it will continually drain the battery even if you are not connected to a device. There’s a green indicator light that lets you know when it’s on, but it’s kind of a bummer if you forget to hit the switch. The headphones are also not to be used with 12W chargers, or you risk overheating. Standard USB charging from your laptop is fine, as are most smartphone power blocks. I haven’t seen any issues with this, but they put a big warning sticker in the package. Forewarned is forearmed.

The MPOW H5 also sports an integrated microphone for making/receiving calls. Incoming sound is good, but outgoing audio is just OK. the microphone just sits too far away from your mouth, so I received reports of very muted sound when I used it. It’s a nice extra option, but I don’t know that I would rely on it for extended calls (like conference calls) on the road. You’ll need to speak very loudly to be heard.

Finally, it is important to note that the MPOW H5 is a bulkier headset at 5″ by 3 1/2″ in the case. It’s going to take up some room in your bag, and won’t fit in slim briefcases or backpacks if you already have your laptop and gear loaded up. There’s also no external attachment point to clip it to the outside of your bag. You’ll want to check the dimensions of your usual carry and packing needs.

What I like

  • Great sound quality with an active noise cancellation feature that really works
  • Very comfortable
  • 20-hour battery life
  • Aux-in cable option
  • Durable
  • Hard case included with purchase

What needs to be improved

  • Using ANC will drain the battery, even if you’re not connected
  • Rated for charging on 5W USB only
  • Bulky dimensions may not work for you if you’re traveling lean and mean
  • Phone microphone isn’t very useful

Final thoughts

If you’re a frequent commuter looking for a headset for listening to your tunes & podcasts, the MPOW H5 Active Noise Canceling Bluetooth Headphones are a good option. The noise reduction feature actually works, sound quality is great overall, and the unit is built with far more rugged durability than I see in most headphones at this price point. I would not recommend them if you’re on the phone a lot. Also keep in mind that while they are lightweight, you’re adding a chunky addition to your daily carry.

Price: $49.99
Where to buy: Amazon
Source: The sample of this product was provided by MPOW.

The post MPOW H5 Active Noise Canceling Bluetooth Headphones review appeared first on The Gadgeteer.

Filed in categories: Reviews

Tagged:

MPOW H5 Active Noise Canceling Bluetooth Headphones review originally appeared on The Gadgeteer on May 9, 2018 at 10:26 am.

Note: If you are subscribed to this feed through FeedBurner, please switch to our native feed URL http://the-gadgeteer.com/feed/ in order to ensure continuous delivery.

OmiCam 4K VR action cam review


What is it?

OMICAM is a versatile wearable VR action camera with built-in auto horizon and image stabilization, along with supporting features that include editing and streaming.

What’s in the box

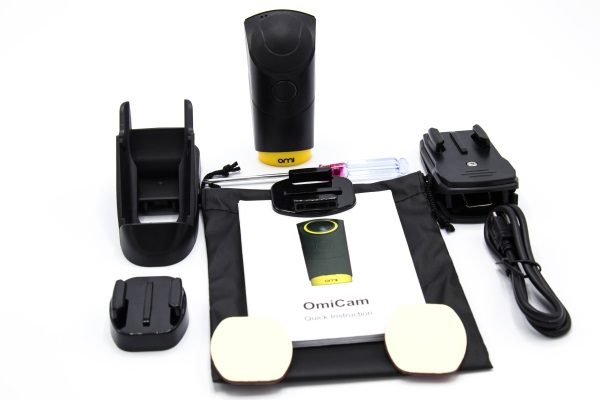
Package contents:

1x OMI Camera
1x OMI Stand with Quick Release
1x 360 degree Quick Release Clip
1x Quick Release Set (Flat Mount, Screw Mount, 3x Tape)
1x Carrying Bag
1x Micro USC Charging Cable
1x Screw Driver
1 x Instruction booklet

Design and features

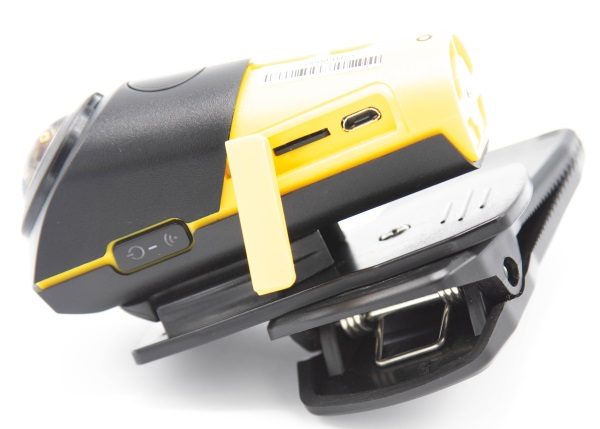
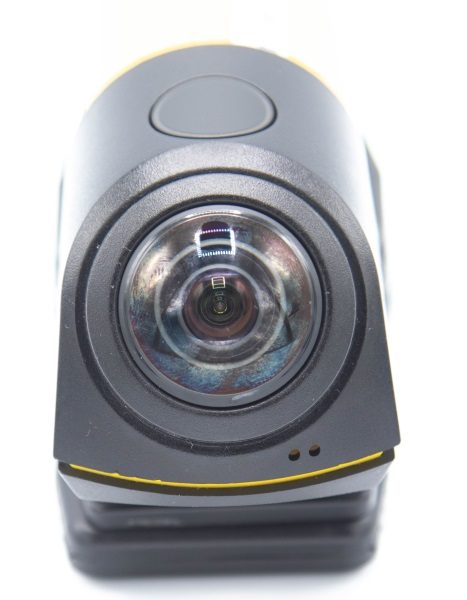
The OMICAM VR action camera is a small, compact, water resistant action camera that records video in 4K, and has the ability to provide stabilization on both horizontal and vertical planes even with rigorous movement. At the top of the camera, there is the lens in a circular encasement, and on the front, there is a shutter button.

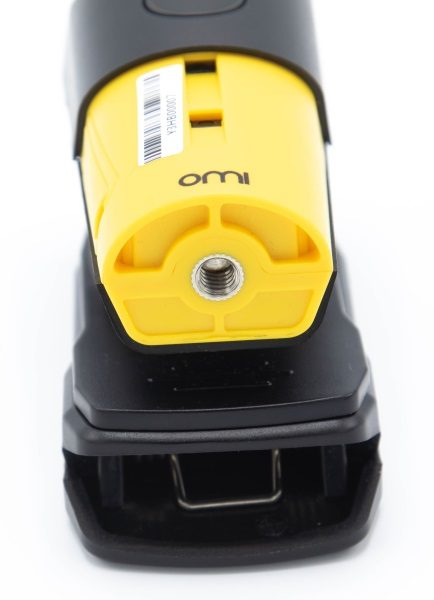
On the bottom there is a ¼”-20 female threaded mount.


On the left is the power button and Wi-Fi button as one button, the micro SD card port, and the USB port.

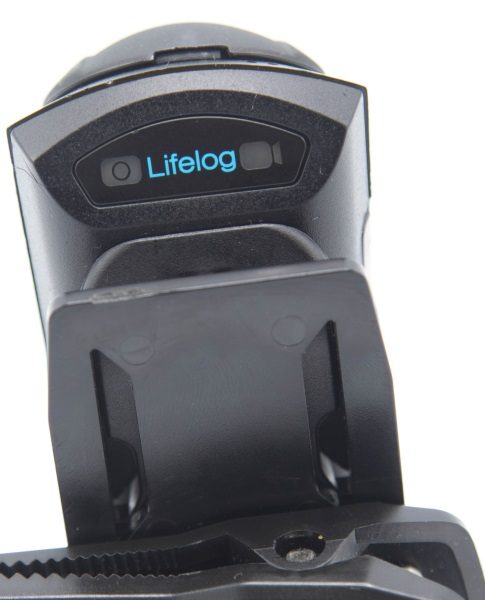
On the top at the back there is the Lifelog button which allows you to switch the selection between photo and video. The camera and video icons light green when the camera is on and in ready mode, and the video icon lights red when recording video. The camera icon flashes blue when the shutter button is depressed to take a picture.

The rest of the back has the mounting holes for the various mounts.

This action camera has a lens that is able to capture footage at a 240 degree angle, which provides a nice perspective when moving up or down or side to side. When I viewed the video, looking at the footage from that VR 240 degree perspective was strange. The camera recorded both video and audio, and for every one minute, it took up 108MB of space on my micro SD card. It has a 12 Megapixel Sensor for capturing great images,  records up to 80 minutes in continuous video mode,  2 1/2 hours of video in lifelog mode, and 15 hours of video when filming in long period Lifelog mode. It records 4K video at 30 frames per second. In Lifelog mode, the OMI Camera uses a smart algorithm to record up to 15 hours of film. It does this by turning off for 3 minutes and then waking up for 5 seconds to record video. It continuously repeats the cycle. It can also take snapshots/photos at intervals.

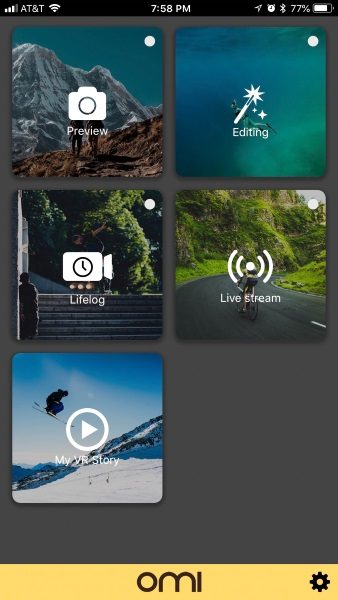
Once you download the app, it connects to the OMI Camera via the Wi-Fi built in to the camera. When you open the app you see the main screen.


From the app you can go into the recording screen and choose photo mode or video mode, and either take a picture or start and stop the video recording. The camera records in one minute files that are 108MB in size. When you are done with your recordings, they can be viewed and edited by going to the edit tab.


Once you select a video to edit, you can play it, choose to add or remove stabilization, and/or make a square video for mobile upload or sharing. You can also save it to an album. You can also take snapshots with this camera and process them via the mobile or desktop app.


On the top right hand corner, there is an icon to download the video. When that icon is selected, the next screen gives you the option to download as a VR story in different resolutions, or save as the original video.


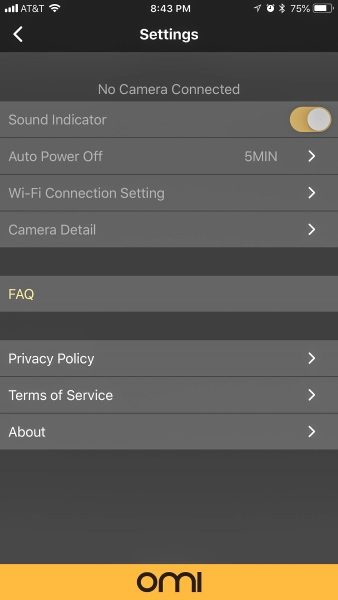
There is also a settings screen that allows you to set up the operational basics of the camera. This screen also has a link to FAQs, the Privacy Policy, the Terms of Service, and the usual “About” information.


There is also a desktop version of the software for both PC and MAC. Once downloaded and installed, you can create a VR Story, or process a single video, or batch them together.

The following are links to 2 videos that I recorded with the OMICAM during my daily commute:

Here is a snapshot that I  took from above in my truck:

What I like

I like that this action camera can capture clean video footage in 4K and that it has versatile mounting capabilities. It also includes the ability to mount a tripod plate, or the numerous other ¼”-20 available rig options. The audio is also quite clear for anything audible in relatively close proximity.

What can be improved

The two major aspects that can be improved are the access to the micro SD card slot, and the cover that slides on to protect the ports and the front bottom half of the camera. The micro SD slot is indented and I guess because of my “big” fingers, I had to use a paper clip to fully insert the card. To remove the card, I once again had to use a paper clip to press it in to engage the spring loaded mechanism, and once it popped out, I was still unable to pull it out by hand. I had to use tweezers squeezed tightly to get the card out the rest of the way.

When I first examined the front cover that protects the ports, I felt that it did not click into place securely, and that it could be easily lost. Sometime during my third recording outing and just as I suspected, it fell off and was lost.

Final Thoughts

The Omicam 4k VR action camera is a nice action camera for someone that enjoys capturing and watching footage from that 240 degree perspective. It is quite different from a conventional video camera, and even different from the famous GoPro action camera. Whatever footage that you capture with this camera will be very good. I do believe that in scenes such as kayaking through waves that pass over you, or in adventurous places like caves in mountains, etc, it would provide amazing footage. In my opinion, while it is unlikely to be an everyday mainstream action camera for many, it will be very popular for people seeking the specific perspective that it offers. On the other hand, the very effective built-in horizontal and vertical stabilization may very well make it a major contender against some of the more popular action cameras on the market today, as long as the front cover issue is resolved.

Price: $249.99
Where to buy: Omicam and Amazon
Source: The sample for this review was provided by Omicam.

The post OmiCam 4K VR action cam review appeared first on The Gadgeteer.

Filed in categories: Reviews

Tagged: ,

OmiCam 4K VR action cam review originally appeared on The Gadgeteer on May 8, 2018 at 10:00 am.

Note: If you are subscribed to this feed through FeedBurner, please switch to our native feed URL http://the-gadgeteer.com/feed/ in order to ensure continuous delivery.
MNML Case Pixel 2 XL thin case review

I prefer to use my phones naked. That’s the phone, not me! 😉 Cases add bulk and cover up the phone’s style. But, I also like to keep my phone protected and add some grip to it since a lot of phones these days are ultra slippery. One way to add a little protection and grip to a phone is to add a thin cover to the back. The folks at MNML Case sent me one of their 35mm thin covers for the Pixel 2 XL. Let’s take a look.

What is it?

The Pixel 2 XL Thin Case from MNML is exactly that. It’s a really thin case. 35mm thin to be exact. And it is available in 6 colors including the Really Blue version that they sent me.

Design and features

There’s not a whole heck of a lot to say about this “case”. It’s basically a super thin piece of flexible plastic that snaps on the back of your phone.

The case has cutouts for the power button, volume buttons, camera, fingerprint sensor, USB-C port, and microphone.

When it’s snapped in place, it covers the sides and back without adding any extra weight or thickness to the case.

The MNML case also does not have any branding at all. This is a completely utilitarian style case. There’s nothing flashy about it.

One nice feature is a lip around the camera lens that slightly higher than the lens itself, which adds a bit of protection when the case is on a flat surface.

The cutouts for the power button and volume buttons line up perfectly and since the case is so thin it doesn’t hinder pressing the buttons.

The MNML case doesn’t affect your calls in any way either.

Although this case covers the corners and the back of the phone, it only adds the basic protection from scratches and knocks. I would not expect the case to offer any protection from falls.

What I like

I like that the MNML case is so thin that you will forget that it’s there. I like that it adds a little bit of protection to the camera lens and it will keep the back of your phone from being a fingerprint magnet.

What needs to be improved

A lot of people like to add a thin case to their phone to provide extra grip because their phone is slippery. Unfortunately, I don’t think that the MNML case improves the slipperiness of my Pixel 2 XL at all and it might be just a little bit more slippery than without it. I really wish the MNML case had more of a rubberized coating that would improve the grip.

Final thoughts

The Pixel 2 XL thin case from MNML adds zero bulk and some basic protection from scratches to the back of your phone, but that’s about the extent of it. If that’s all you desire for your Pixel 2 XL, and your budget is small, the MNML case isn’t the worst choice that you can make, but I think there are better choices if you don’t mind paying more. You can check out my favorite gear page to see my current favorite Pixel 2 XL cover.

Price: $14.99
Where to buy: Amazon
Source: The sample for this review was provided by MNML.

The post MNML Case Pixel 2 XL thin case review appeared first on The Gadgeteer.

Filed in categories: Reviews

Tagged: ,

MNML Case Pixel 2 XL thin case review originally appeared on The Gadgeteer on May 7, 2018 at 5:12 pm.

Note: If you are subscribed to this feed through FeedBurner, please switch to our native feed URL http://the-gadgeteer.com/feed/ in order to ensure continuous delivery.
Roland GO:MIXER audio mixer review

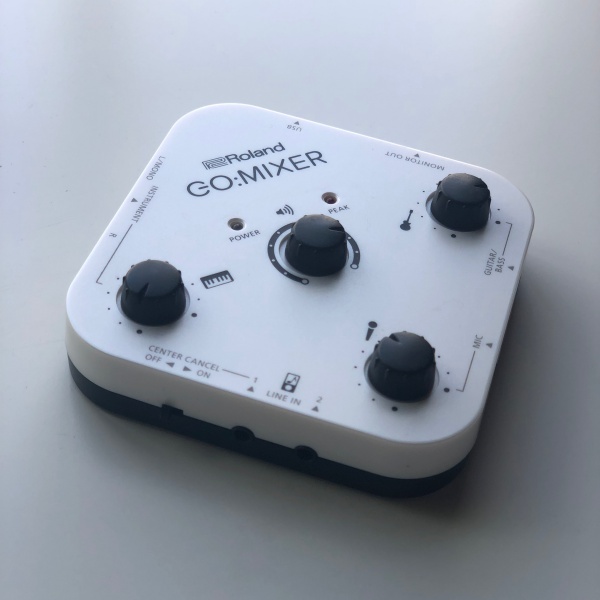
The GO:MIXER from Roland is a palm-sized audio mixer aimed at today’s content creators whether their taste is music, podcasts or video.

What is it?

It’s a small format mixer that lets you blend multiple input sources for a seamless output to a USB connected smartphone, tablet or laptop.

Hardware specs

Audio Channels: 8 input channels, 2 output channels
Connectors: Instrument (L/Mono, R) 1/4”
Line-in 1&2: 3.5mm stereo audio jacks
Mic-in: 1/4” (no phantom power)
Guitar/Bass: 1/4” (high-impedance)
Monitor out: 3.5mm stereo audio jacks
USB: USB Micro-B
Power supply: USB bus power
Current draw: 40 mA
Accessories:
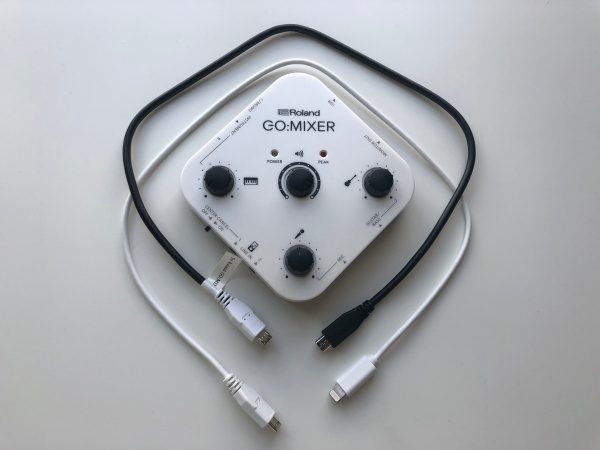
     Lightning to USB Micro-B cable (~50cm / 1.5’)
USB OTG Micro-B to Micro-B cable (~50cm / 1.5’)
Size & weight: 95mm x 95mm x 28mm and 100gm (without cables)

What’s in the box?

Roland GO:MIXER
Lightning to USB Micro-B cable
USB OTG Micro-B to Micro-B cable

Design and features

YouTube, Instagram and other video sharing sites continue to grow and the success of a clip can just as easily depend on production quality as it does on the content itself. It’s clear that Roland aimed this product squarely at these creators. Let’s dive in a bit further…

Setup

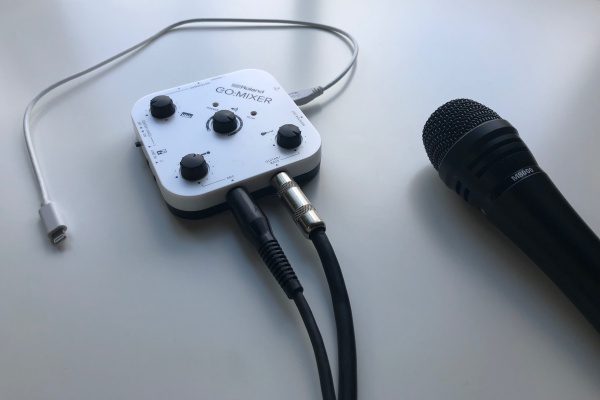
The GO:MIXER is really its own instruction manual. As with most traditional audio products all the inputs, outputs and knobs are clearly labeled with their intended use and function. There are input level knobs for each of the three inputs as well as a knob for master output volume. Depending on what you’re trying to do, all that’s left is to connect your instruments, mic and/or auxiliary audio with the appropriate cables. In this review we’ll be connecting a microphone and an acoustic electric guitar via 1/4″ cables.

Performance

My son is a guitar player and I’ve enlisted his help with this review. Over the years, he’s created a number of videos for social channels and quickly got frustrated with audio quality when relying on his phone to capture audio with the onboard mic. The solution was to record audio separately (he prefers Reason) and then use iMovie to sync them up after the fact. That process worked well but required a lot of time.

The GO:MIXER solves for this exact scenario. With it’s included lightning cable (Micro-USB for Android) any audio sources coming through the GO:MIXER are piped straight to the phone in lieu of the iPhone mic. Playing an instrument, a vocal take with a microphone, or any combination of sources all come through pristinely. It’s important to note all sources are live feed so they need to be simultaneous. If you want to layer multiple takes, you’ll still need to use editing software.

I’ve created A and B videos with an iPhone X for comparisons. I didn’t worry about getting the video perfect for these as it’s the audio we’re focusing on for this review. The videos in this case are to help provide visual reference for what you’re hearing.

Video A

This video is shot with an iPhone X in the standard camera app using the built-in mic. The phone is set up on a tripod using a Glif smartphone holder from Studio Neat.

Overall, it sounds pretty good for a video recording on a mobile phone. What you don’t hear or experience is the multiple takes necessary to avoid the barking dog or the truck rumbling by. The bottom line is you’re going to get whatever audio is happening around you.

Video B

This is the same guitar / iPhone / tripod setup, but with some direct connections. The GO:MIXER is connected to the phone with the lightning cable. The acoustic/electric guitar to the guitar input. An Audio Technica M8000 microphone to the mic line-in. (The mic is actually not a Sennheiser as described in the video; bad cues on my part there.)

In the video, you’ll notice that he voice is clearer (holding a mic obviously). The guitar is crisp with more of the many subtleties present (fingers sliding on strings, fretting, etc.) While the audio levels may not be perfect in this video, a little experimentation will land on the best settings for each sound source.

Observations

  • The included cables are pretty short; only about 18”. They work well with smartphones and tablets if you’re using the selfie or front facing camera. If you want to use the (usually better) rear-facing camera, the short cables put the GO:MIXER further away from you and out of reach which means you’ll need to have your settings figured out ahead of time, as well as a way to start your recording remotely. Not a deal breaker by any means, but something you’ll want to consider. Micro-USB to Lighting cables are not readily available, so finding one will be a bit tricky should you need one.
  • The USB-bus power is a cool feature and it means one less thing to charge. Connect the GO:MIXER to your phone and it’s powered. The only catch here is that if your phone turns off / times out, the power to the GO:MIXER is also cut. It’s not an issue if you’re actively recording or have an app set to keep the phone from sleeping, but if you’re just practicing and the phone times out, the audio drops. Setting your phone to never sleep is a quick fix but you’ll obviously drain your battery faster.
  • The GO:MIXER also works well with a computer. Just supply your own USB Micro-B to USB A cable and connect it. Make sure to select it as the source in whatever application you choose to use.
  • There’s also a karaoke feature called “center cancel”. This should knock vocals down on audio source connected to Line-in 1 or 2. This function does not work if you’re playing audio from the USB connected phone. Makes sense, but unfortunate given the phone is where most of us keep our music these days.
  • There is a note on their website that some Android smartphones may convert the stereo USB audio output to mono on receipt. This was something I was unable to verify with the equipment I had on hand.

What I like

  • No batteries or power supply
  • Lightweight and small
  • Simple, understandable controls
  • App agnostic
  • Relatively low cost

What needs to be improved

  • Length of the included cables
  • Center-cancel function doesn’t work on a USB connected music source

Final thoughts

The GO:MIXER is intuitive and does what they claim it will. For capturing clean signals from simultaneous sources Roland has made it very easy to record a video without a lot of setup or post editing. There are more expensive solutions out there that are dedicated to source input for editing software, but for a multipurpose solution with a focus on one-and-done, Roland’s got a winner here. If you need to know more, Roland’s GO:MIXER webpage has a lot of detail.

Price: $99.99
Where to buy: Amazon
Source: The sample of this product was provided by Roland

The post Roland GO:MIXER audio mixer review appeared first on The Gadgeteer.

Filed in categories: Reviews

Tagged:

Roland GO:MIXER audio mixer review originally appeared on The Gadgeteer on May 7, 2018 at 10:00 am.

Note: If you are subscribed to this feed through FeedBurner, please switch to our native feed URL http://the-gadgeteer.com/feed/ in order to ensure continuous delivery.
BenQ PD2710QC DesignView 27-inch Designer Monitor review

I’ve been using the same 29-inch monitor from LG that I reviewed four years ago but about a month ago I started thinking about upgrading. The universe must have been listening to my thoughts because BenQ contacted me to ask if I would like to review one of their monitors. Truth be told, BenQ had not been on my radar when I was dreaming about a new monitor. But when they offered the 27-inch PD2710QC DesignView Designer Monitor I decided to take a chance but wondered if I would regret losing 2-inches of screen real estate. Let’s find out.

What is it?

The BenQ PD2710QC monitor is a 27-inch monitor that has extra features including a built-in USB-C docking station for your laptop that includes a variety of connections.

Hardware specs

Screen Size: 27 inches
Resolution (max.): 2560×1440
Panel Type: IPS
Backlight Technology: LED backlight
Brightness: 350 cd/㎡
Native Contrast(typ.): 1000:1
Viewing Angle (L/R;U/D) (CR>=10): 178/178
Response Time: 5ms (GtG)
Refresh Rate: 60Hz
Aspect Ratio: 16:9
Display Colors: 16.7 million colors
Color Gamut: 100% sRGB/Rec. 709
Display Area(mm): 596.7(H) x 335.7(V)
Pixel Pitch (mm): 0.2331
PPI: 109

For the full specs listing, visit the spec page for this monitor on BenQ’s site.

What’s in the box?

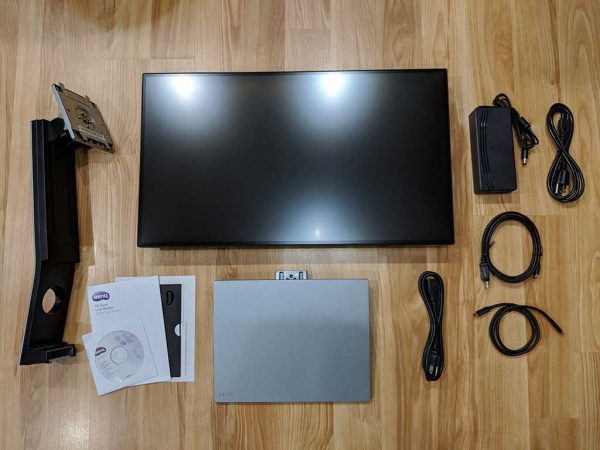
  • PD2710QC monitor
  • Power supply
  • USB-C cable
  • DP to mini DP cable
  • Quick start guide
  • CDrom with drivers

Design and features

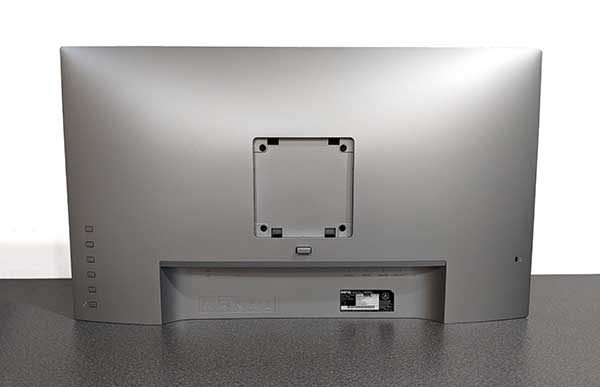
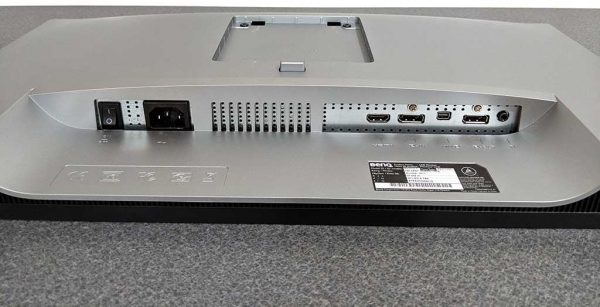
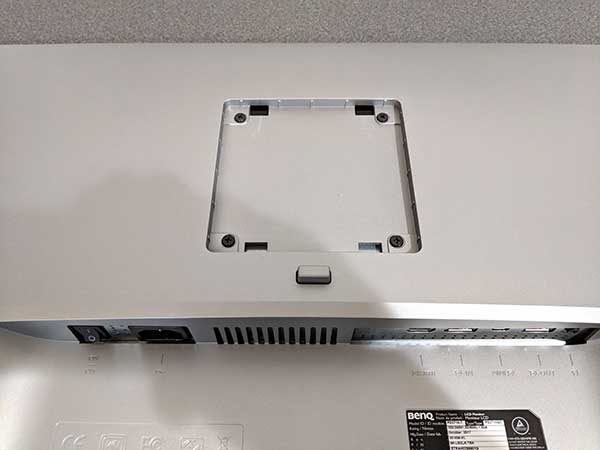
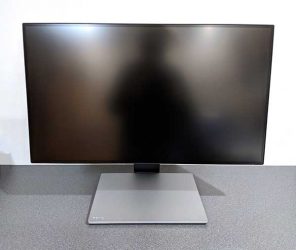
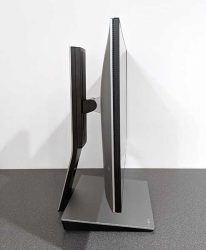
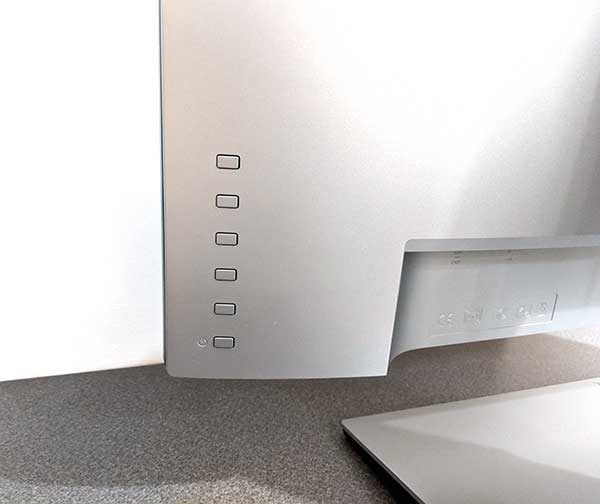
The BenQ PD2710QC monitor has a grey and black plastic shell. The front of the monitor is completely flat, but the back is curved with the support connection in the center, control buttons on one side, a 12. Kensington lock slot on the opposite side, and video and power connections in a recessed area.

The connection panel has a power switch, power connector, HDMI socket,  DisplayPort socket, Mini DisplayPort socket, DisplayPort output socket (for Multi-Stream Transport, MST), and a Headphone jack. The bottom of the monitor also has downward firing speakers built into it.

The monitor comes has three main parts. The main monitor, the base/docking station, and the monitor support.

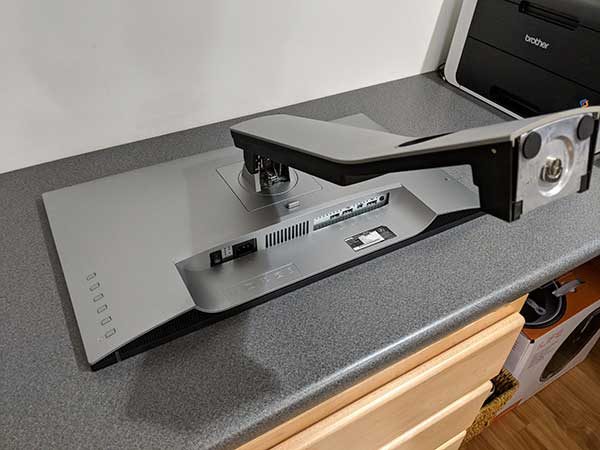
Assembling the parts is easy and does not require any tools at all other than your hands. First, you need to do is place the monitor face down on a flat clean surface.

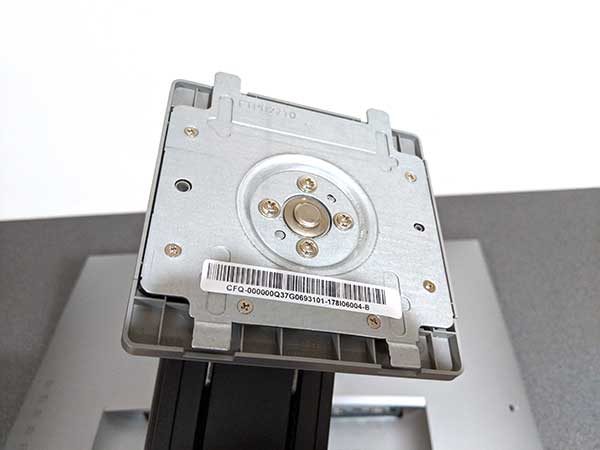
Then you take the monitor support which has a metal plate on the piece that snaps into the back of the monitor.

Attaching the two pieces is very easy because the support clicks and locks in place with minimal effort.

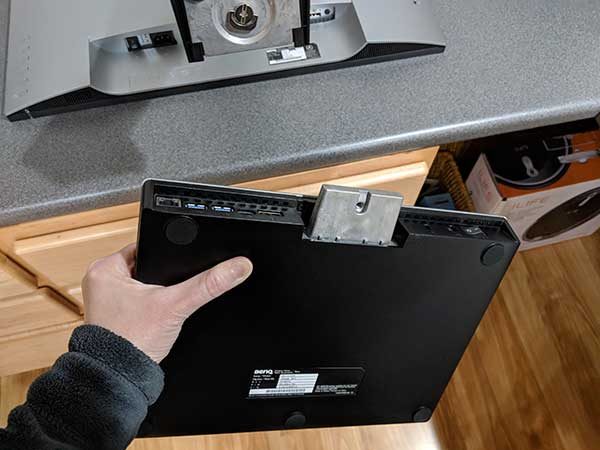
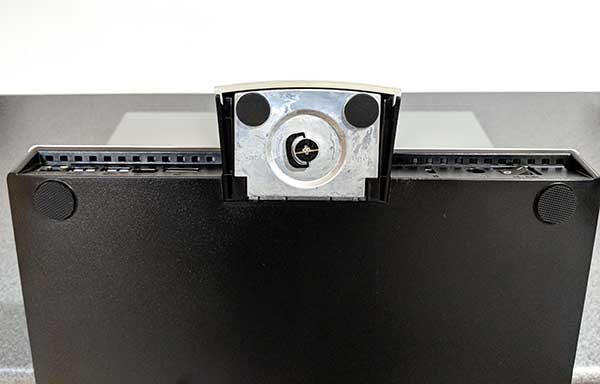
Next, you take the base/docking station which has metal arm protruding from the back, and you slide it into the bottom of the support arm.

A metal thumbscrew on the bottom tightens to secure the base to the support.

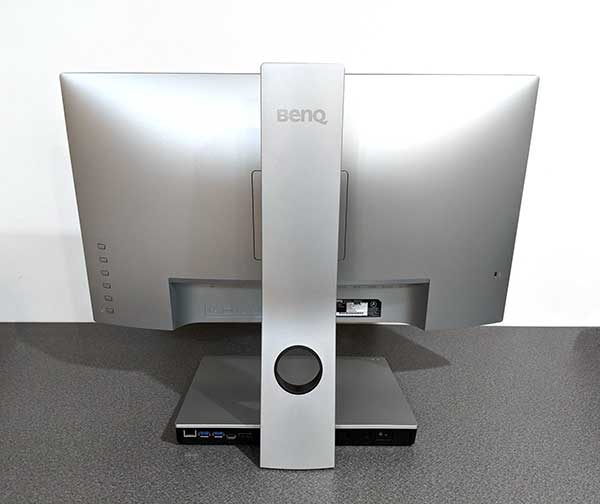
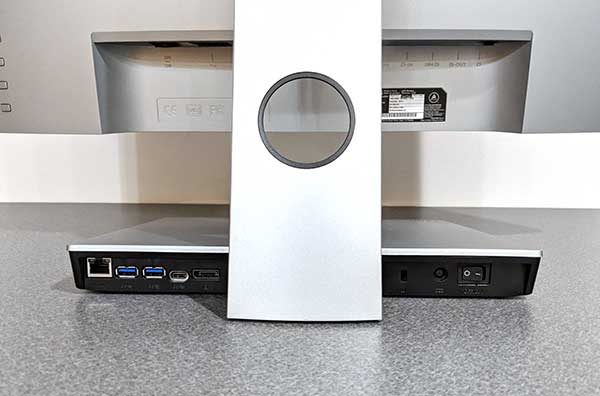
Here we can see the back of the assembled BenQ PD2710QC monitor. You’ll notice a circular cutout in the support arm. That cutout is a pass-through for the cables. Unfortunately, that’s the only built-in cable organization feature for this monitor. And since you have to connect 2 cables from the monitor and 2 additional cables from the base, it really needs better cord management.


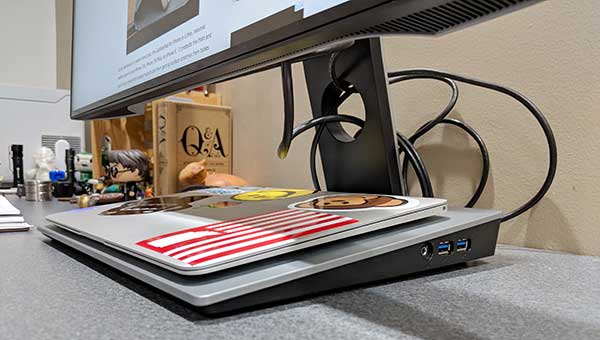
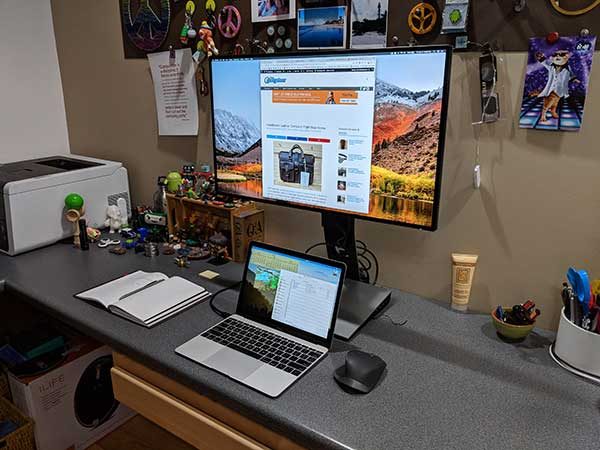
The BenQ PD2710QC’s base is 12 inches wide and 9.5 inches deep and provides a perfect home for my 12-inch MacBook.

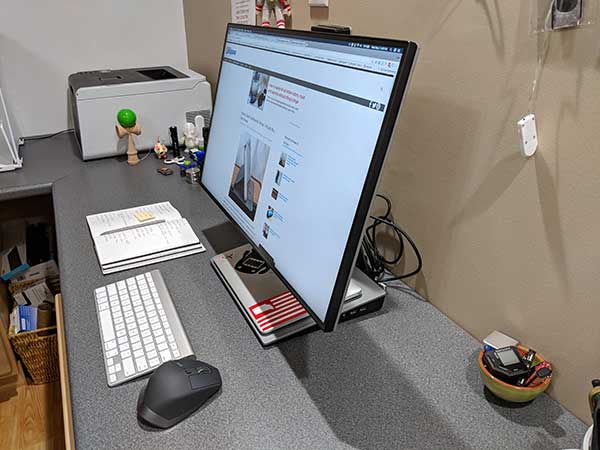
The base of the monitor not only a convenient shelf to place your laptop, but it’s also a USB-C docking station. On the back of the base, there’s an Ethernet (Local Area Network) port (RJ-45 connector), 2 USB 3.0 ports, USB Type-C port, DisplayPort socket, and a power switch for the base.

You’ll also notice that there are more ports on the side of the base/docking station. I didn’t even notice the additional 2 USB ports and headphone jack until about 2 weeks after I’d been using the monitor. The location of these ports provides easier access than the back of the docking station and is useful for flash drives and headphones.

Some people might think that the monitor’s large base is not attractive and dare I say clunky looking. I’m not one of those people. I like it a lot. But, I also have a large desk. So desk size is something to consider before buying the PD2710QC.

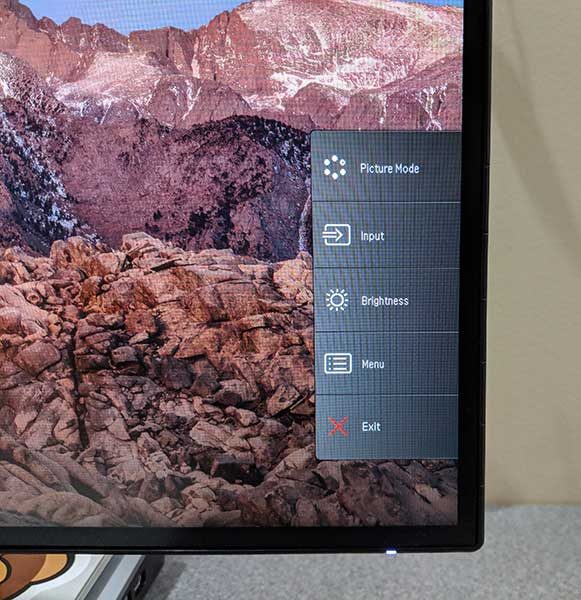
Let’s take a closer look at the control buttons. Guess what? The buttons do not have any labels except for the bottom button which is the power button for the display. How do you know how to change the monitor’s settings if the buttons aren’t labeled?

Pressing any button (other than the power button at the bottom) will cause a menu to pop up on the display. Then you can press the corresponding physical button on the back of the monitor to show that menu and navigate the settings.

It takes a little practice, but this method of going through the menus works fine as long as you don’t accidentally press the bottom button which will turn off the display and you’ll have to start over to find the setting you want to customize.

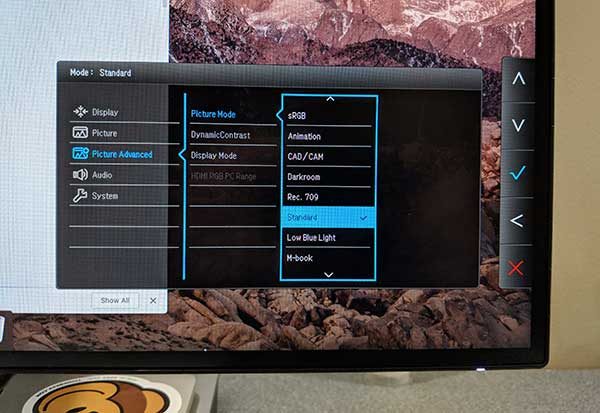
There are a LOT of display settings you can change on this PD2710QC monitor. From basic settings like brightness, contrast, sharpness and input choice, to individual RGB color levels and to choosing different display modes.

Display modes

The BenQ PD2710QC is a monitor that has modes for several different use cases. I’ve listed the modes with a brief description taken directly from the monitor’s manual.

sRGB

For better color matching representation with the peripheral devices, such as printers, digital cameras, etc.

Animation

Enhances the contrast of the dark shades so you could work on the details easily when making an animation.

CAD/CAM

Enhances the contrast if a CAD / CAM software is used.

Darkroom

For image editing and viewing in a post-processing environment with a dim light. This mode enhances the sharpness and clarity of shades and shows more details.

Rec. 709

For better color matching representation with Standard Rec. 709.

Low Blue Light

Decreases the blue light emitted from the display to reduce the risk of blue light exposure to your eyes.

M-book

Minimizes the visual differences between the monitor and the connected MacBook series product.

Standard

This is the default setting which basic PC application.

User

Applies a combination of picture settings defined by users.

I used the Standard display mode for weeks and then switched over to the M-book mode since I did all my testing with my 12-inch MacBook. I immediately noticed that the M-book mode is a lot brighter than the Standard mode but I’ve left it set to M-book and I think I prefer it.

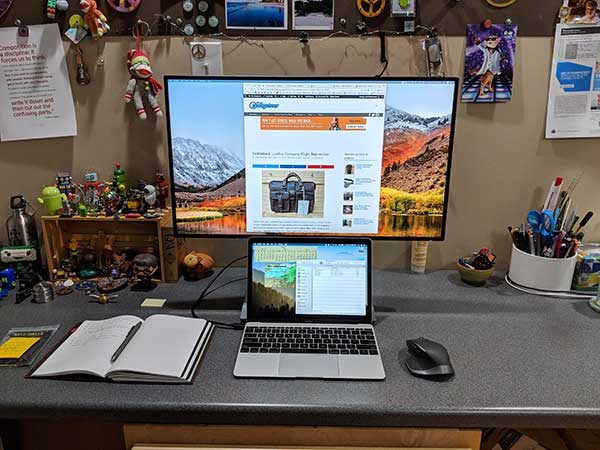
As already mentioned I tested the PD2710QC monitor with my 12-inch MacBook connected via the supplied USB-C cable to the monitor’s base/docking station.

I have to say that I’ve fallen in love with the docking station which provides 4 additional USB connections, a headphone jack, Ethernet port, as well as a connection directly to the monitor.

I’ve used 3 different adapters and docks with my MacBook since buying it and the BenQ dock and I like this one the best yet just because it’s all one unit. That said, the base does not have a card reader for SD or micro SD cards and it only provides 61W of power delivery, so it might not be suitable for other laptops which use USB-C for power like the 15-inch MacBook Pro. Again, that’s something consider before purchasing this monitor.

Something else that should be mentioned is that you can use the USB ports on the dock to charge other devices, BUT, charging is only active when your laptop is connected to the dock. When I disconnect the USB-C cable from my MacBook, my Pixel 2 XL stopped charging when connected to one of the other ports on the dock.

When I use my MB with the monitor, I use it a couple different ways. Sometimes I raise the monitor and use the MB’s display below it like you see above. The monitor can be raised up a maximum of 11 inches from the bottom of the display to the top of the desk. You can tip back the screen and get a box to rest your keyboard and you have a standing desk! At the lowest level, the bottom of the screen is about 4 inches to the desk.

I will also place the monitor on the base and use it all by itself. Note that the monitor can tilt back as much as 20 degrees, and forward as much as 5 degrees.

You can also rotate it a full 90 degrees like you see here. This is great for web designers who want to check out the layout of their sites.

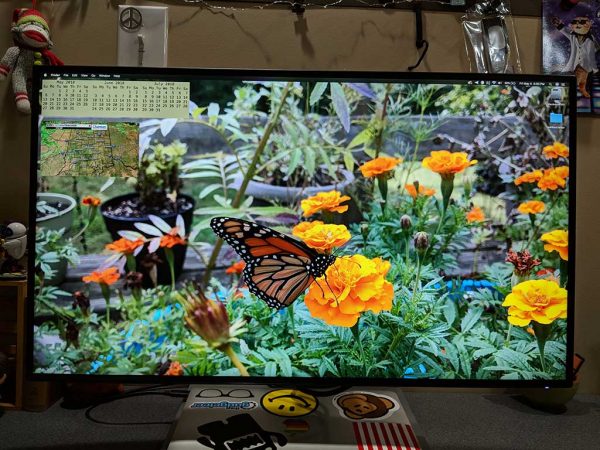
The BenQ PD2710QC’s display is gorgeous. I know it’s not 4K, but it’s sharp as a tack and everything I look at on it looks beautiful, vibrant, and crystal clear. I’ve used the monitor for everything you typically use a monitor for. I’ve surfed the web, watched movies, played a few games, edited images in Photoshop, read documents, typed out documents and more.

Like other BenQ monitors, the PD2710QC has been Technicolor Color Certified and individually factory calibrated and validated against industry color standards.

I’ve found that the monitor’s viewing angle is excellent and the non-glare coating makes it easy on my eyes and I enjoyed using it no matter what task I was doing.

Extra features that I didn’t test

If you’re a Windows user, can also install the BenQ Display Pilot software which will allow you to partition the screen. I’m a Mac user, so I didn’t test this.

I also didn’t test the display daisy chain feature that will allow you to connect up to 4 monitors using MST (multi-stream transport technology) to span your laptop’s screen across the monitors.

What I like

  • Clear, crisp and vibrant colors
  • The built-in USB-C docking station
  • 3-year warranty

What needs to be improved

  • Needs better cable management
  • Needs an SD or microSD card reader in the base
  • The base may not be able to charge the battery on some laptops
  • Power delivery on dock’s USB ports deactivates when the laptop is disconnected
  • Built-in speakers are only ok
  • Requires two power cords. One for the monitor and one for the base. I wish it only needed one.

Final thoughts

I’ve been using the BenQ PD2710QC monitor for the last month and I’ve been more than happy with it for all the tasks I do on a daily basis. The display provides my 12-inch MacBook with a place to sit and a selection of ports. But it’s also easy on my eyes and gives me great color and crispness for everything I look at.  I may not have had BenQ on my radar for monitors before, but now I’m impressed and will make sure to check out their monitors the next time I need to upgrade.

Price: $599.99
Where to buy: Amazon
Source: The sample for this review was provided by BenQ.

The post BenQ PD2710QC DesignView 27-inch Designer Monitor review appeared first on The Gadgeteer.

Filed in categories: Reviews

Tagged:

BenQ PD2710QC DesignView 27-inch Designer Monitor review originally appeared on The Gadgeteer on May 6, 2018 at 4:50 pm.

Note: If you are subscribed to this feed through FeedBurner, please switch to our native feed URL http://the-gadgeteer.com/feed/ in order to ensure continuous delivery.