Well Desk Double Monitor standing desk review

REVIEW – I don’t know about you but I have seen a great influx in the number of convertible and standing desks at my office. This got me thinking. I wonder if I would like something like this? Julie offered to let me review the Double Monitor standing desk from Well Desk. Let’s dive into it and see what we think.

What is it?

The Well Desk is standing desk that is designed to help you be more ergonomic and burn more calories at work by standing. This desk like the name implies is made to hold 2 monitors for double duty while working.  The desk is designed to be easy to assemble and to be fully adjustable.

Design and assembly
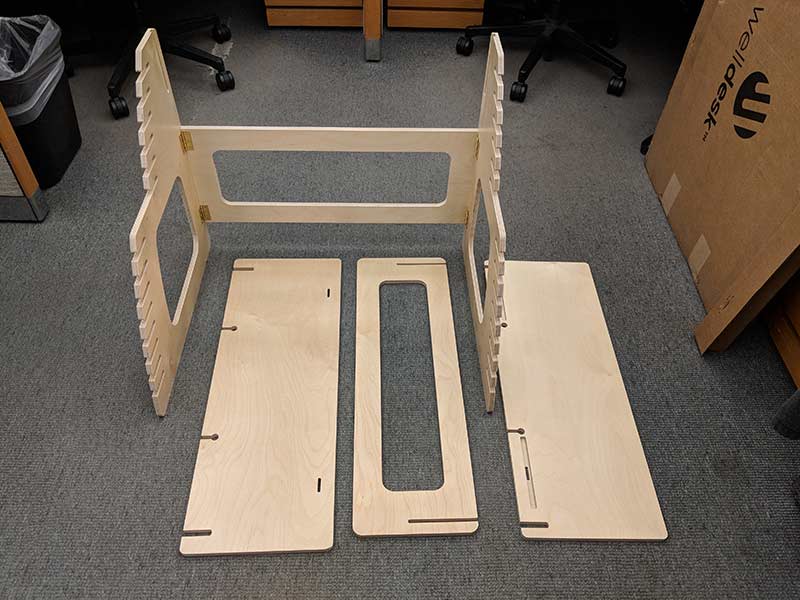
In the box were the 4 pieces that make up that standing desk. Each was packed without any wrapping around them but none of my pieces had any damage. The biggest piece is the back of the desk which is made up of 3 pieces that are already assembled using screws and hinges. The entire desk is made out of Baltic Birch plywood and is really a high grade of plywood if you ask me. In fact, a colleague of mine asked where I got the plywood to make it because he wanted to make something with such nice plywood.
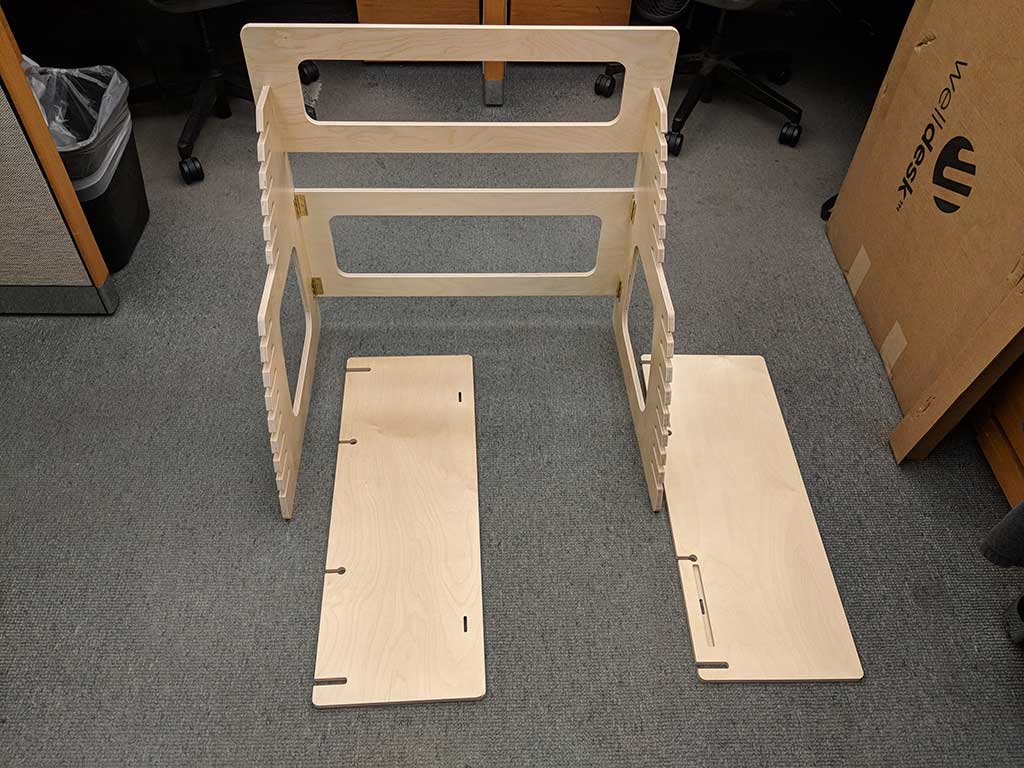
The first step in the easy assembly process is to add the rear monitor guard to the main legs of the desk. This will keep your monitors from falling off the back of the desk. Yeah, probably a pretty good thing! I would hate to lose a 24in monitor! Really, I would hate to have to explain to my boss why I need a new monitor!
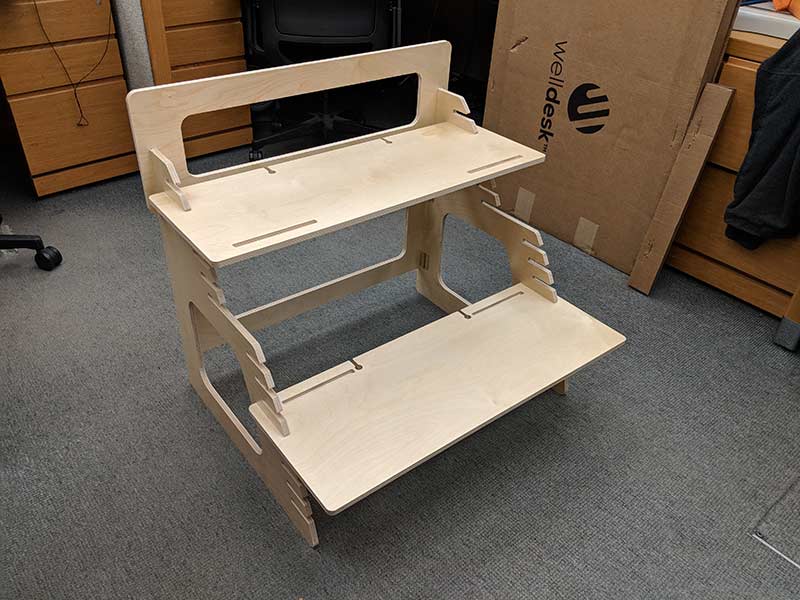
The next step is to add the monitor and keyboard shelves and you are good to go! Then the fun part starts when you put your desk back together again. I think that it took all of 2 minutes to put together the Well Desk and that is probably a pretty long estimate.
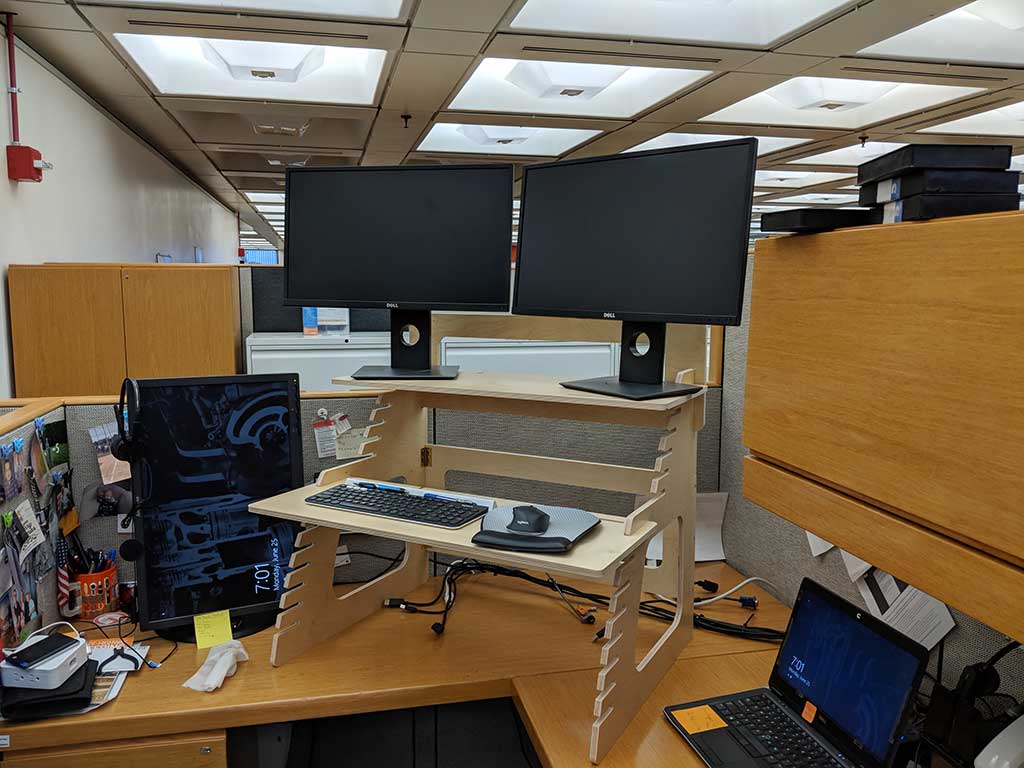
This is one of the setups that I had using the desk. I tried several different setups to see what I might like better.  The two monitors on the top are 24-inch monitors and they fit well with only about an inch of each base sticking over the end of the monitor. Not enough to really worry about them falling off. I like to have my monitors pointed in for a more immersive environment. You can see that in this picture my mouse and keyboard fit nicely on the keyboard shelf with plenty of room to spare. You might have a bigger keyboard but I went with a Logitech K780 that Julie reviewed and I now enjoy. Thanks, Julie!
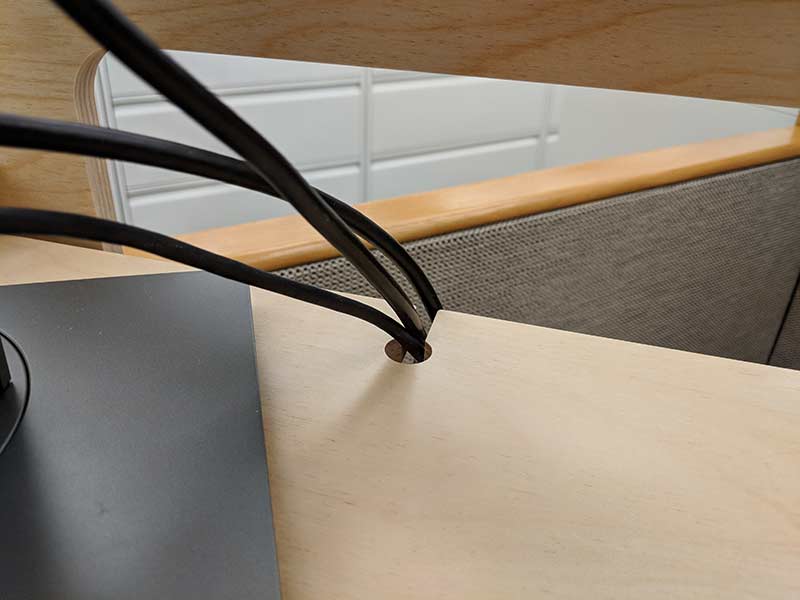
In this picture, you can see the cord cutouts to run cables to cut down on the crazy wires going everywhere. This is a nice feature. I have been trying lately to get my wires tamed at my desk.
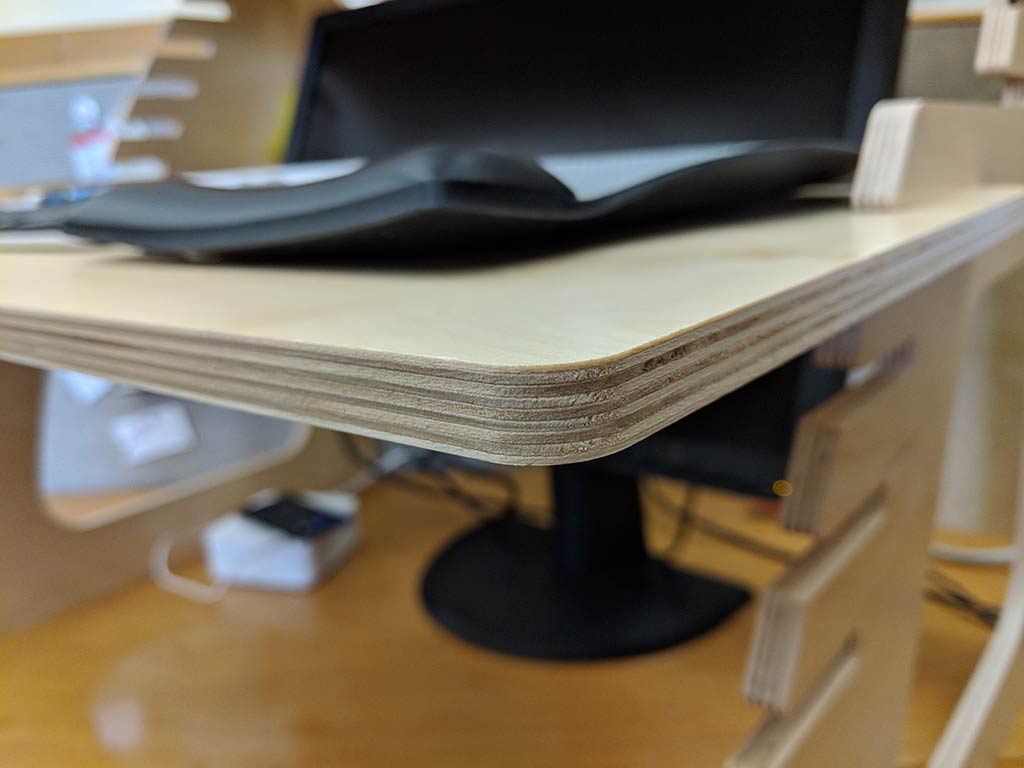
This picture gives you a feel for the thickness and quality of the plywood. It is made up of 1/2 in. thick plywood. This makes the unit very sturdy.
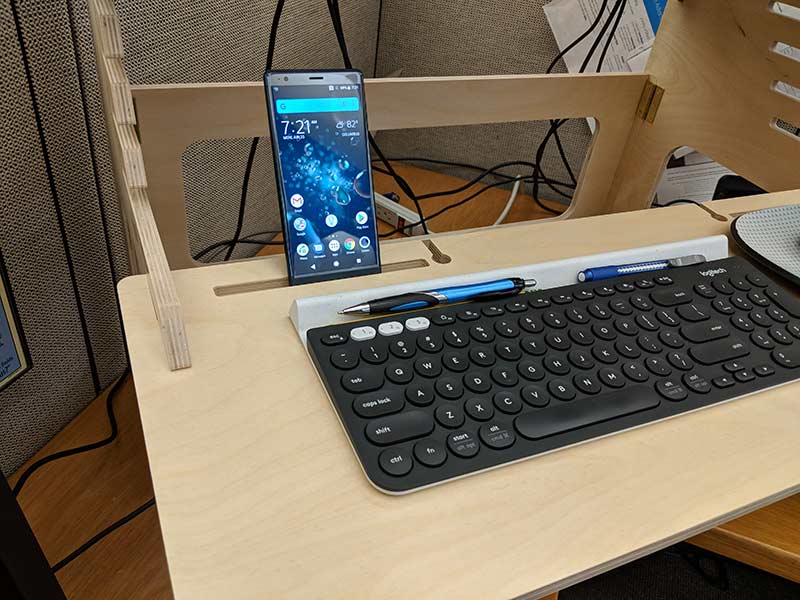
One of the neat features of the Double Monitor Well Desk is the mobile device slots on both the keyboard and the monitor shelves. The original model of the Well Desk does not come with these slots. I found it very useful for holding my phone throughout the day. They also have holes cut out so that you can charge you phone while it is in the slot. You can also see the keyboard and mouse cord cutouts in this shot but I use wireless so I had no need for them.

Standing vs. sitting

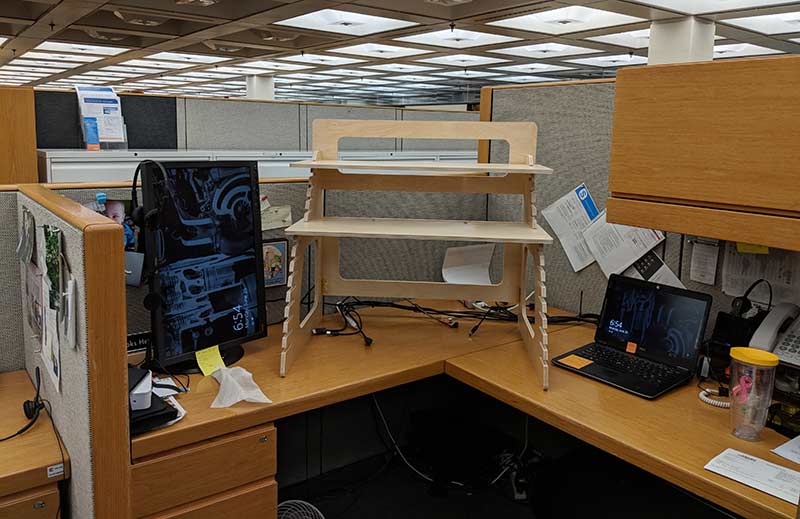
This is my original setup before I started reviewing the Well Desk. I had the three external monitors that I was using and then the laptop display as well. A lot of the time I found myself getting very tired in the afternoon.

This is me standing at the desk after it was all set up and after a little engineering of the Well Desk. Well not on the desk itself but the setup of the monitors that I was using. I did find that in the afternoons while I was standing I did not get as groggy and tired as I had when I was sitting all day.

The Well Desk is not designed for sitting, but…

After some thought, I figured out that even though the Well Desk is not designed to be a convertible desk why not try anyway! So low and behold you can fit a 27 in. monitor very nicely under the monitor stand on the top. This was my way to help with the transition to standing a lot of the time. One can never have 2 many monitors or in my case 3 monitors!
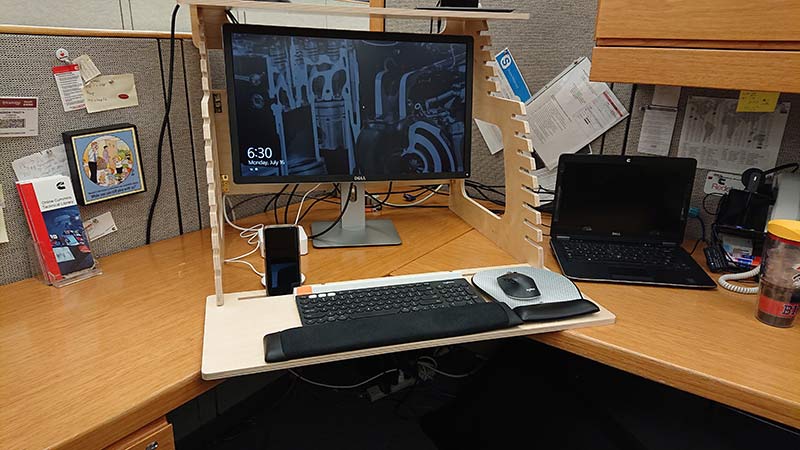
The shelves are easy to move and only take a few seconds to move.  Because of the way the slots are cut they slide together easily without a lot of effort. I don’t think though that I would try moving the monitor shelf with two 24-inch monitors on the shelf. I have a feeling this might end badly!

What I like

  • Easy to Assemble
  • Very solid even with 2 heavy monitors on it
  • Quality materials

What needs to be improved

  • The corners of the shelves could be sharp depending on how you put your hand on them
  • For me being 6ft. 3in. tall, the top slot for the keyboard shelf was too short so I had to use the lowest slot for the monitor shelf which put me a little closer to the monitors than I would have liked

Final thoughts

The Double Monitor Well Desk is easy to put together and because it is not convertible, it is cheaper than most convertible desks. It is made of a high-quality plywood and seems like it will hold up very well. The desk is supposed to provide health benefits like burning more calories and reducing back pain. I would assume that this probably depends on the person using the device. I know for me, I started standing the majority of the day and ran into my back hurting but when I switched from sitting to standing throughout the day no problems. I have enjoyed using the Well Desk and will continue to use it at my office to see how it can help me long term. If you are looking to get a standing only desk then this would be a great and economical purchase.  You might want to think about it more if you are needing a convertible desk.

Price: $179.99
Where to buy: Well Desk and Amazon
Source: The sample for this review was provided by Well Desk.

Filed in categories: Reviews

Tagged: , ,

Well Desk Double Monitor standing desk review originally appeared on The Gadgeteer on July 24, 2018 at 11:00 am.

Note: If you are subscribed to this feed through FeedBurner, please switch to our native feed URL http://the-gadgeteer.com/feed/ in order to ensure continuous delivery.

RAVPower 10,000mAh 5W Wireless Portable Charger review

REVIEW – All these personal devices make our lives easier, but they demand the juice, don’t they? Enter the portable charger, the market for which has exploded (thankfully figuratively, not literally).  I own and/or have reviewed a handful of portable chargers and I’ve been fairly happy with most of them, but the RAVPower 10,000mAh 5W Wireless Portable Charger has a fairly unique feature, a built-in wireless charger that can be used to charge Qi-enabled smartphones.  With a couple of the latest wireless charging capable iPhones in our household, I was excited to give the RAVPower 10,000mAh 5W Wireless Portable Charger a try.  Gadget on!

What is it?

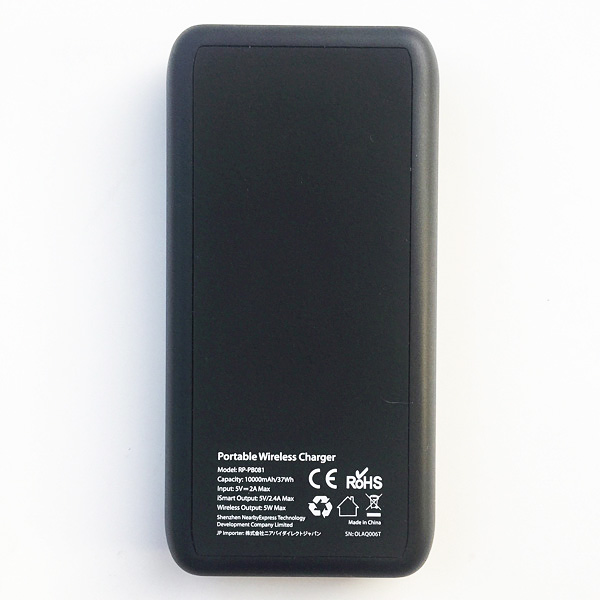
The RAVPower 10,000mAh 5W Wireless Portable Charger is a compact portable charger that can charge devices via either wireless or wired means.

Hardware specs

  • Input: DC 5V/2A max (via Micro USB port)
  • Wireless Output: 5W max
  • iSmart 2.0 Output: 5V/2.4A max (via USB port)
  • Dimensions: 5.7 x 2.9 x 0.8 in / 14.6 x 7.4 x 2 cm
  • Compatible Models: iPhone X / 8 / 8 Plus, Samsung S9 / S9+ / S8 / S8+ / Note8/ S7/ S7 Edge/ S6 / S6 Edge+, and all Qi-enabled or Qi receiver-equipped devices.
  • Warranty: 30 Months – Get 18 months out of the box and extra 12 months by simply registering the wireless battery pack

What’s in the package?

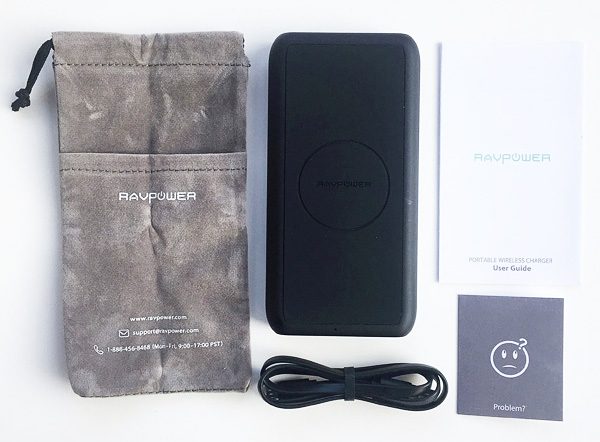
  • RAVPower Wireless Portable Charger (Model: RP-PB081)
  • 2 ft / 0.6 m Micro USB Cable
  • Storage Pouch
  • User Guide

Design and features

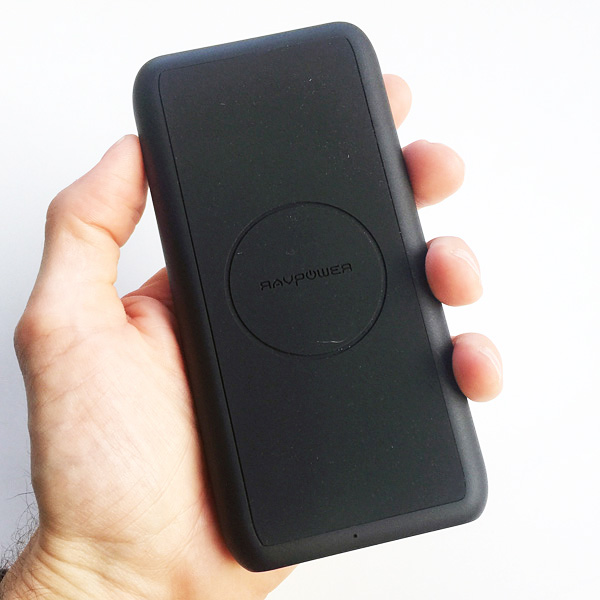
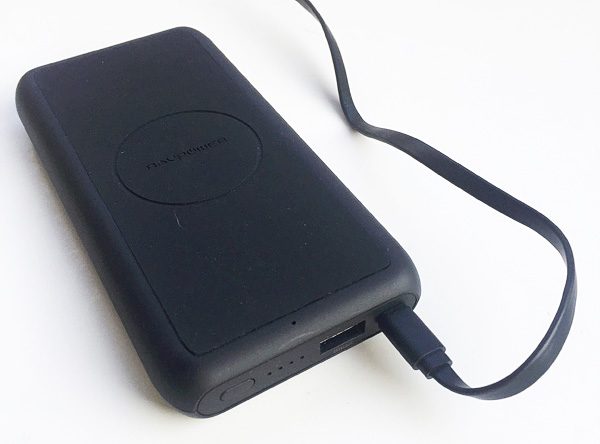
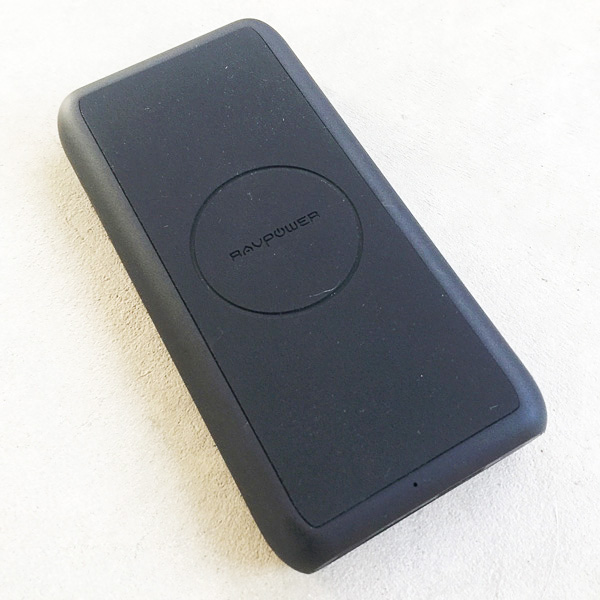
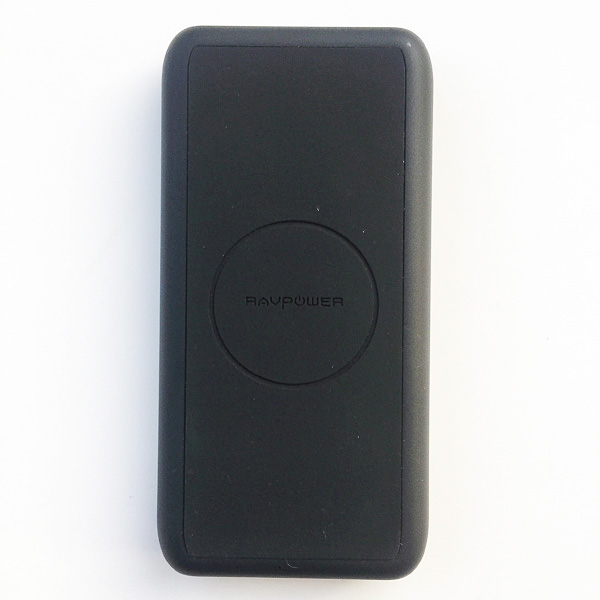
First impressions: Compact size and shape, especially for a battery pack that has a 10,000 mAh capacity and can perform both wireless and wired charging.  The circle on the top dead center of the charger, seen in the image above, is the spot where wireless charging capable phones need to be placed.  More on this below.
I also like the slightly tacky, matte black look and feel, which looks cool and helps with gripping the device.

As mentioned above, this charger is a nice size, as seen in the image above.  It can easily be slipped into a backpack or purse, and even a fairly large pocket if need be.

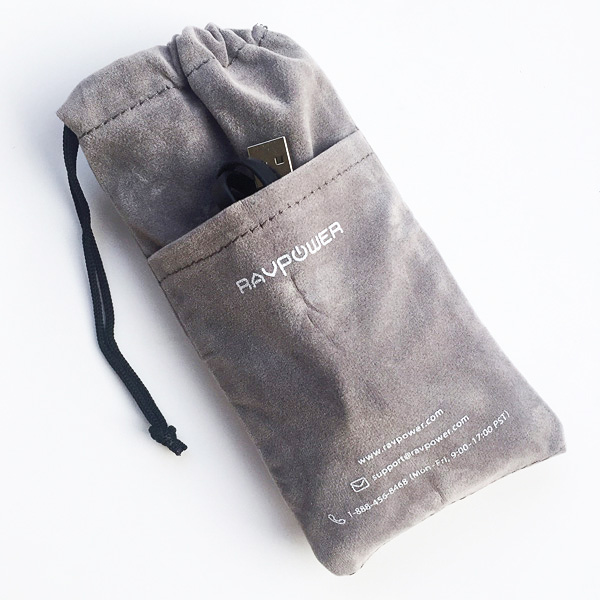
This charger includes a drawstring pouch made of soft cloth for storage.  There is also a small pocket on the outside for cable storage.

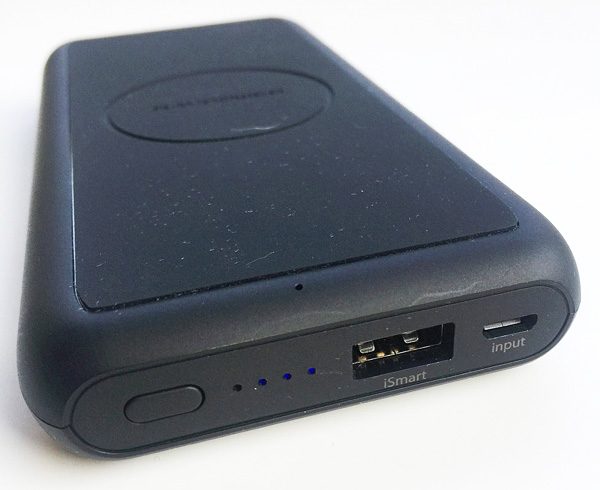
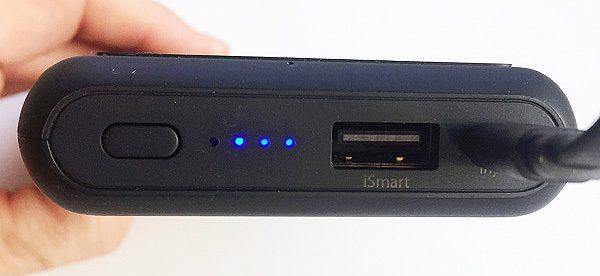
When I removed the charger from its box and pressed the button on its end, two small blue LEDs out of four up.  This indicated the charger already had about half of its full battery capacity.

The next thing I did was plug the charger into a wall outlet to top it off to its full battery charge, as shown above.  RAVPower recommends that a 2.4 Amp AC wall charger be used to most quickly charge this device.


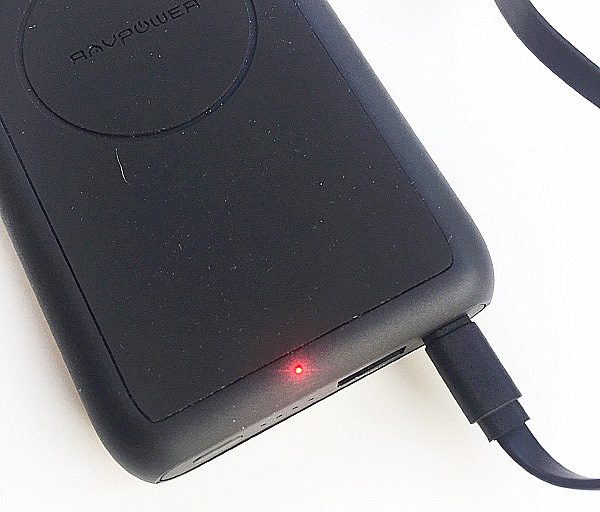
Upon plugging the charger into a 2.4A AC wall charger, a tiny red LED near the end of the charger lit up.  This indicated that the device itself was being charged via its input port, and turned off after 15 seconds.

It wasn’t long before a third of the four small blue LEDs lit up, indicating that the charger’s internal battery was charging.

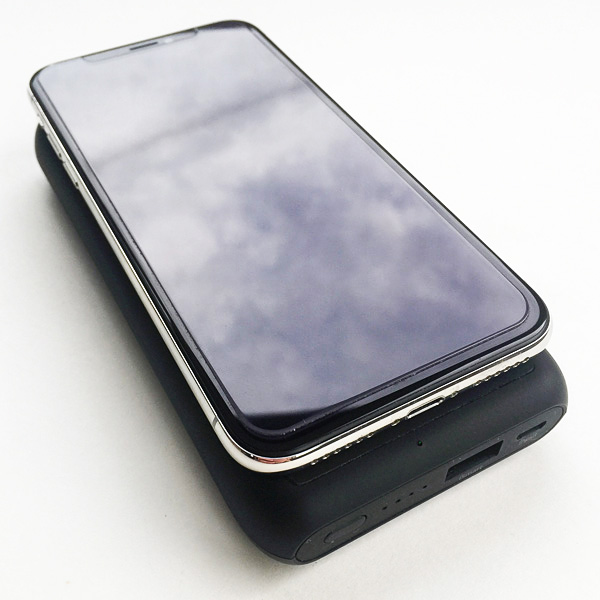
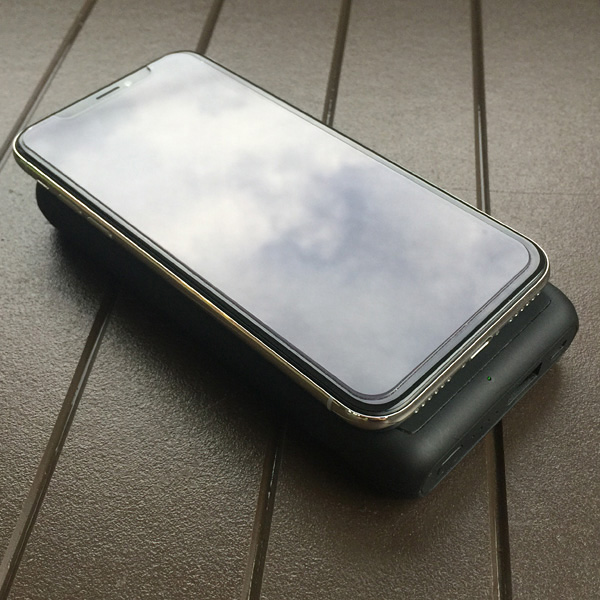
Once I had the charger at full battery charge, the first thing I wanted to try was the wireless charging feature, which I did using my wife’s iPhone X.  I simply placed her iPhone X atop the charger.  This charger is compatible with any Qi-enabled wireless charge-capable device.  Its footprint is also roughly the same as an iPhone X’s footprint (thought it is also thicker).

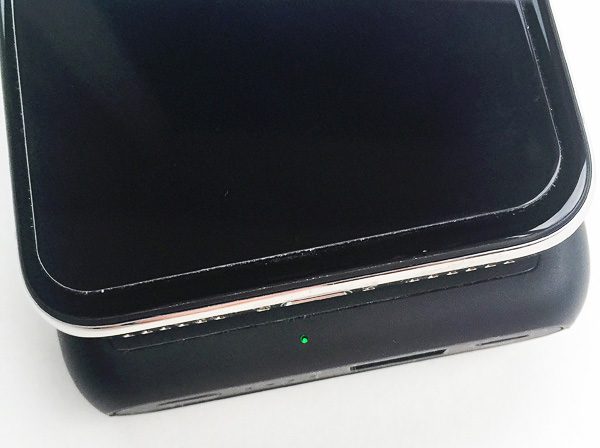
Once I placed the iPhone X atop the charger, another tiny LED lit up and blinked, this one indicating that the charger detected that it was in contact with and charging a wireless-enabled device.  Once the iPhone X was fully charged, the green LED turned off.  Note that this LED flashes red if a non-wireless-charging capable device was placed upon it.

My wife’s iPhone X charged without incident atop the charger.  The charging speed wasn’t as quick as with a wired charging connection, but from my understanding that is typical with wireless charging.  Also, in these photos I am showing the charger with an iPhone X out of a case, but the charger was able to charge my wife’s iPhone X as well as my brother-in-law’s iPhone 8, each while within relatively thin, but not super thin cases.

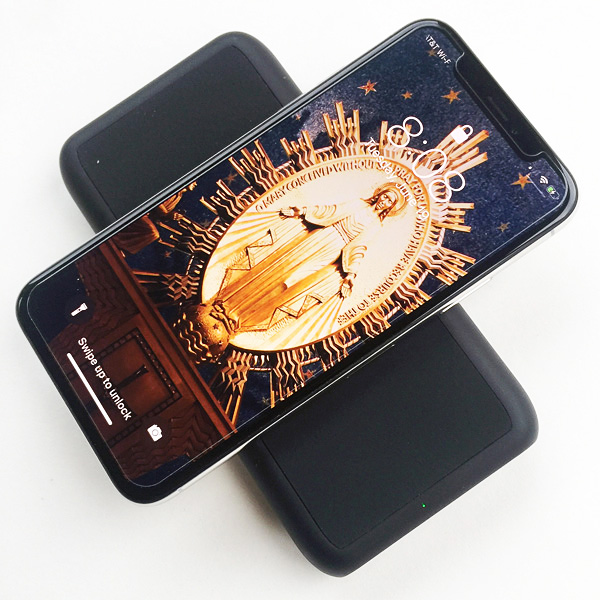
I also rotated the iPhone X 90 degrees on the charger to see if it would still charge, and it did.  As long as the iPhone X’s center was fairly centered on the circle on the face of the charge, all was well.  Moving the iPhone X a bit off center would sever the wireless charging connection.


In addition to the wireless charging, I also evaluated the charger’s ability to charge two devices simultaneously.  In the image above, I have my wife’s iPhone X charging wirelessly atop the charger on the left, and my iPhone 6 Plus charging via cable connection on the right.  The USB output wired charging connection is iSmart 2.0 and can output 5V/2.4A max.  Note that sometimes the button on the charger had to be pressed to initiate charging of the phones, and other time this did not seem to be necessary and the phones began charging automatically as soon as they were sat on tip or plugged into the charger.

A few weeks prior to posting this review, I brought the RAVPower 10,000mAh 5W Wireless Portable Charger on a 2-week family trip across Europe and it performed well in general.  With long days of sightseeing, including using my iPhone 6 Plus’s browser to look up things, apps for directions and recommendations, and snapping hundreds of photos per day, this charger gave the extra boost I needed in the afternoons and evenings to keep my iPhone 6 Plus functioning.  Several times I used it to charge two iPhones at once, one wirelessly and one wired, and with its 10,000 mAh capacity, it continued to charge multiple devices for many hours.  At night, I would just plug in the charger and top off it battery again to be ready to use it the next day.  It also held up well to the abuse of being placed into and out of backpacks, purses, pockets and suitcases.  The one caveat is that once the charger was fully drained, I sometimes had a difficult time getting it to charge again.  It may have been the AC voltage and frequency difference between the USA and Europe, but some places that I tried to charge up the charger’s battery just did not work.  However, upon returning to the USA it has charged fine.

What I like

  • Simultaneous wireless and wired charging of two devices.
  • 10,000 mAh capacity will charge multiple devices for hours
  • Relatively small and compact size

What needs to be improved

  • Needing to push the button to initiate charging—this was inconsistent and as a result, I sometimes forgot to do it

Final thoughts

The RAVPower 10,000mAh 5W Wireless Portable Charger is a very useful and handy charging device.  It is sturdily built, fairly compact, can charge two devices simultaneously using its wireless and wired charging capabilities, and its 10,000 mAh capacity will charge devices for hours.  This is a nice little portable charger and I found it very useful.

Price: $41.99
Where to buy: RAVPower or Amazon
Source: The product sample for this review was provided by RAVPower.

Filed in categories: Reviews

Tagged:

RAVPower 10,000mAh 5W Wireless Portable Charger review originally appeared on The Gadgeteer on July 24, 2018 at 9:00 am.

Note: If you are subscribed to this feed through FeedBurner, please switch to our native feed URL http://the-gadgeteer.com/feed/ in order to ensure continuous delivery.
Online Switch Plus Fountain Pen review

REVIEW – I’ve seen many ballpoint pens with a built-in stylus, but the Online Switch Plus Fountain Pen from JetPens just might be the first fountain pen I’ve seen that has a built-in stylus. It’s like old world tech meets the tech of today with this pen. Let’s take a look.

What is it?

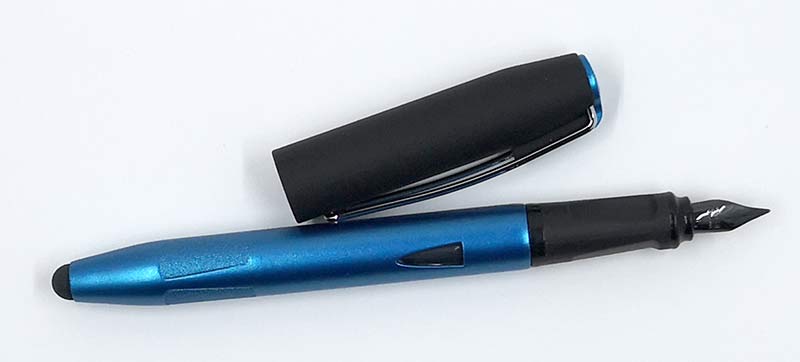
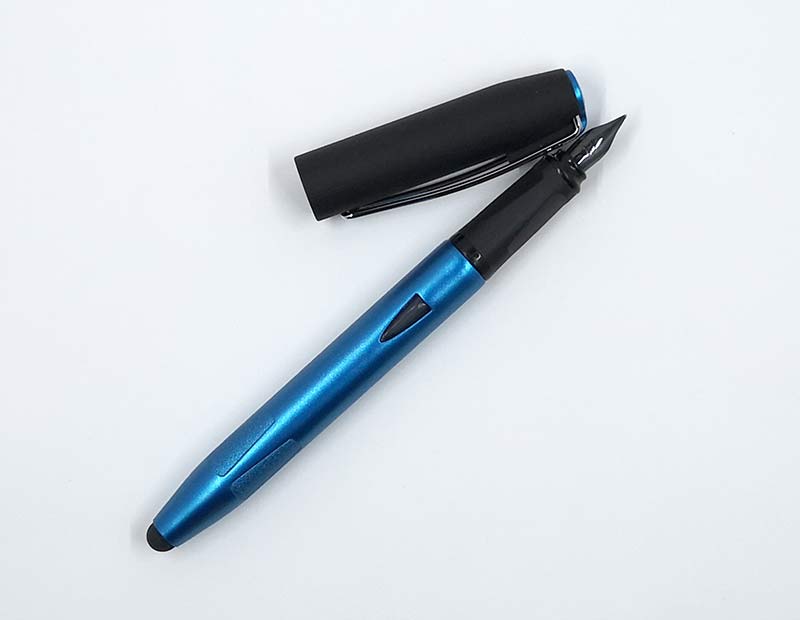
The Online Switch Plus Fountain Pen is a lightweight plastic bodied fountain pen that is available in 5 colors and with nibs sizes from extra fine to medium. I was sent the Petrol Blue fountain pen with a fine nib and a blue ink cartridge.

Pen specs

Converter Included: No
Eyedropper Convertible: No
Filling Mechanism: Cartridge – Standard International Short, Converter
Diameter – Grip: 10.4 mm
Diameter – Max: 14.9 mm
Length – Capped: 15.0 cm / 5.9 inches
Length – Posted: 16.7 cm / 6.6 inches
Length – Uncapped: 13.9 cm / 5.5 inches
Weight – Whole Pen (Empty): 0.67 oz / 19 grams

Design and features

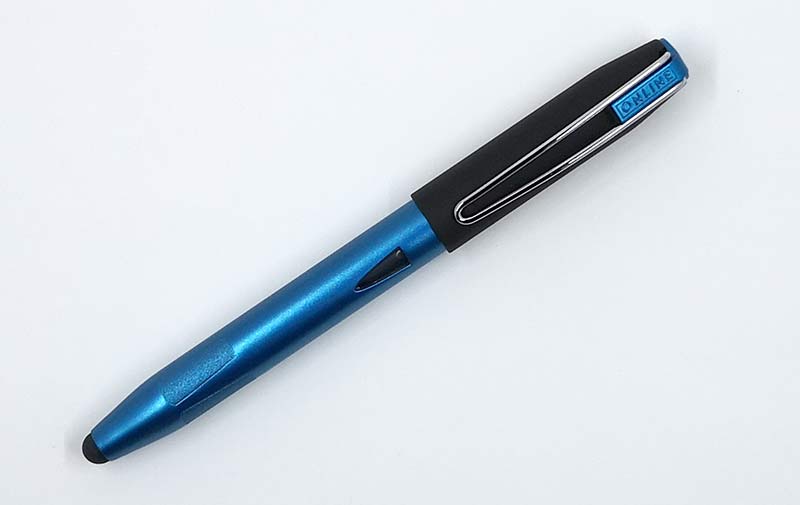
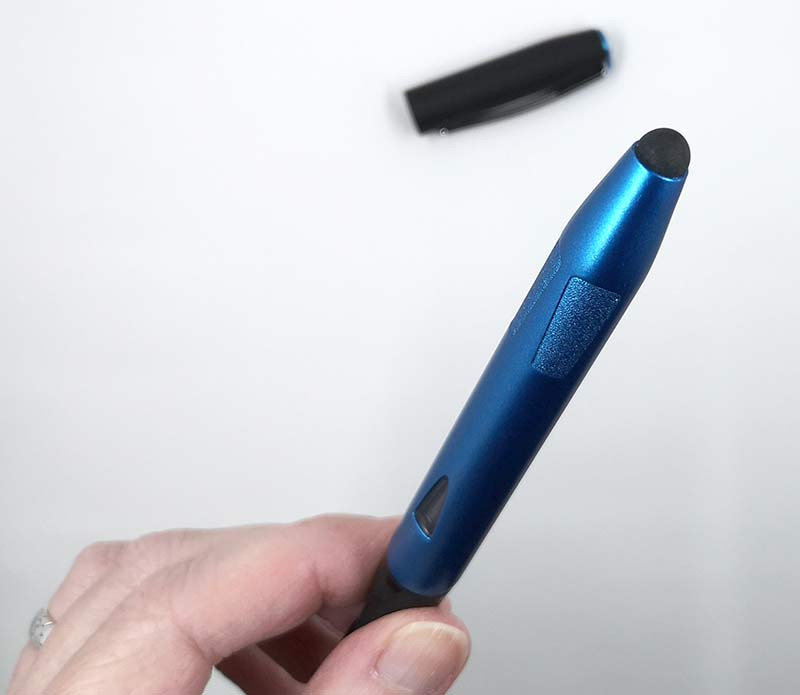
The Online Switch pen has a modern look with the two-color body and snap-on cap with a chrome pocket clip. The main barrel of the pen has a soft rubber coated area for fountain pen use and two small knurled grippy areas when the pen is flipped over for stylus use.

There’s a window in the barrel so you’ll know when it’s time to replace the ink cartridge. I don’t know how effective that window really is though as I can’t see anything through the window and without a matching opening on the opposite side of the barrel, there’s no light to help you see through the ink cartridge to see the ink level.

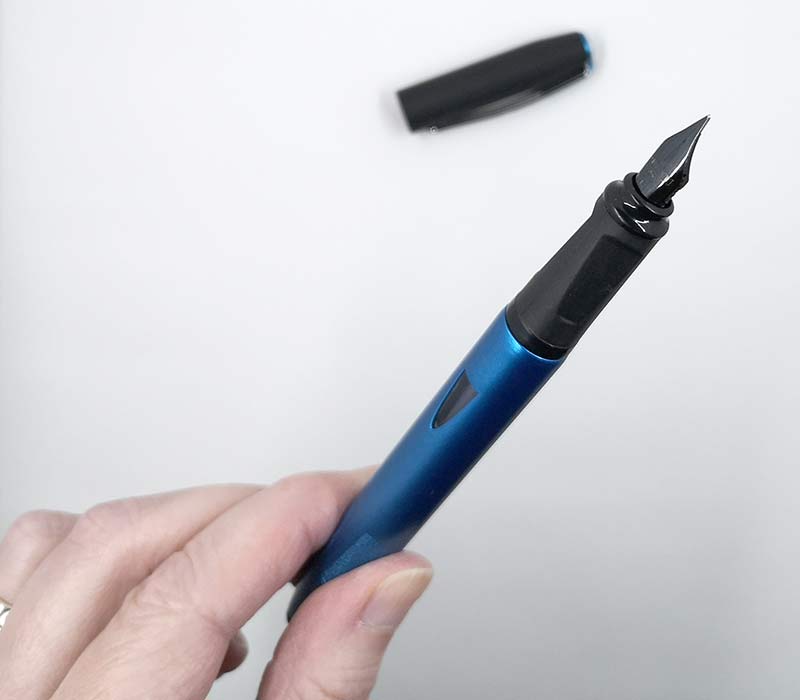
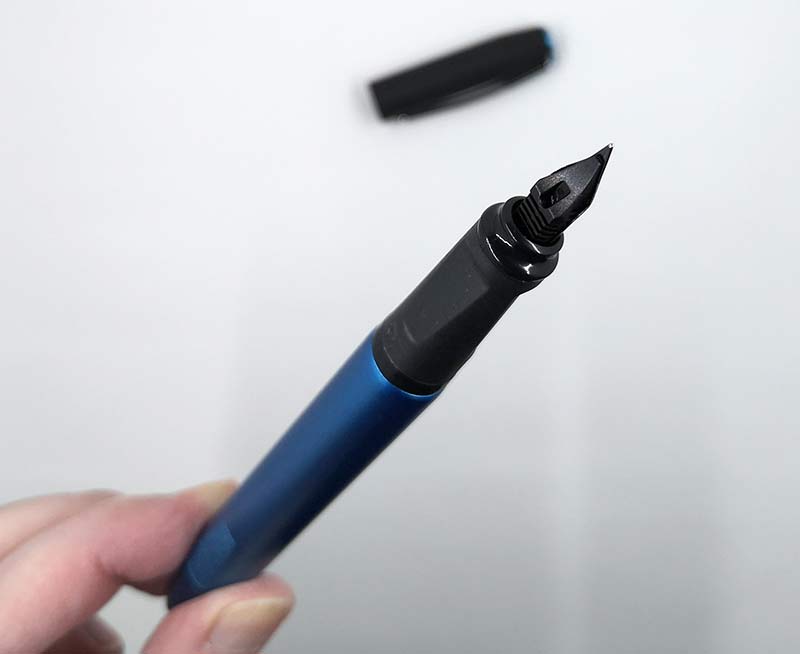
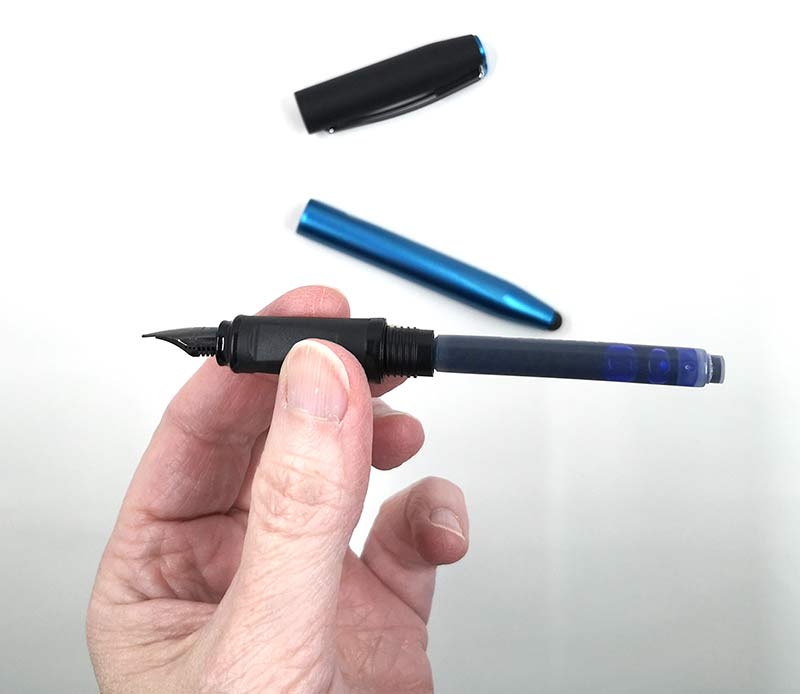
I’m not a fountain pen expert but the nib of the Online Switch looks like a typical fountain pen nib to me. The nib is made of steel that has been painted a glossy black and has a split ink channel.


On the underside of the nib is the black plastic feeder channel. Note that the nib on the Online Switch fountain pen is a non-replaceable part.

On the opposite side of the pen’s barrel, you’ll find a capacitive stylus tip. The stylus tip is a wide rubber style tip that doesn’t lend itself well to precision writing or drawing, but it’s just fine for scrolling through pages, tapping onscreen buttons, and icons.

The Online Switch fountain pen uses ink cartridges like the one that you see in the image above. That’s the blue ink cartridge that comes pre-installed. Jetpens sells a large variety of replacement ink cartridges in many colors.

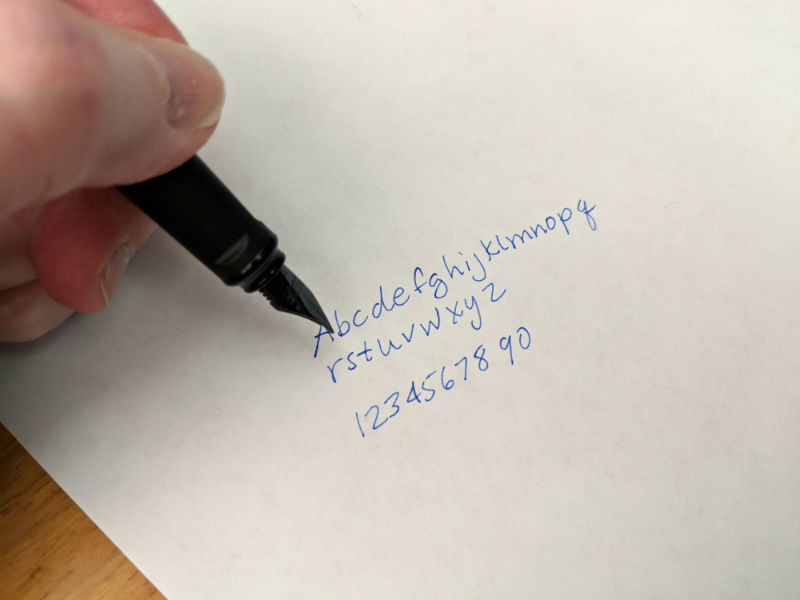
I mentioned earlier that I’m not a fountain pen expert. So I can only compare the feel to writing with this fountain pen to my favorite style regular pens that use the Pilot G2 refill. That said, the Online Switch fountain pen writing tip felt scratchy on all paper that I tried with it.

I think the main problem that I have with fountain pens is the fact that I’m left handed and find it hard to hold the pen so that the nib is at the optimal angle to the paper. There’s also the fact that when you write with your left hand, you push the pen’s tip across the paper instead of pulling it across the paper. When I tried using this pen in my right hand, the nib to paper feel was smoother. But still not as smooth as using a ballpoint pen.

What I like

  • Inexpensive
  • Built-in stylus

What needs to be improved

  • Nib can’t be replaced

Final thoughts

The Online Switch fountain pen is a nice looking fountain pen that has the extra feature of a built-in stylus tip at an affordable price. I have a feeling that this pen isn’t one that a fountain pen afficianado would choose, but for someone just starting out with fountain pens and who also likes to use a stylus with their mobile devices, the Online Switch is a fountain pen to consider.

Price: $21.50
Where to buy: Jetpens
Source: The sample for this review was provided by Jetpens.

Filed in categories: Reviews

Tagged: ,

Online Switch Plus Fountain Pen review originally appeared on The Gadgeteer on July 23, 2018 at 1:00 pm.

Note: If you are subscribed to this feed through FeedBurner, please switch to our native feed URL http://the-gadgeteer.com/feed/ in order to ensure continuous delivery.
Flexound HUMU Augmented Audio Cushion review

REVIEW – One of the great things about writing for the Gadgeteer is the number of fun and interesting products I have a chance to review. That being said it isn’t often that I get to review a product that is really unique. The Flexound HUMU Augmented Audio cushion is one of those products. I was excited to be given the opportunity to test it out. Let’s see if my excitement was warranted.

What is it?

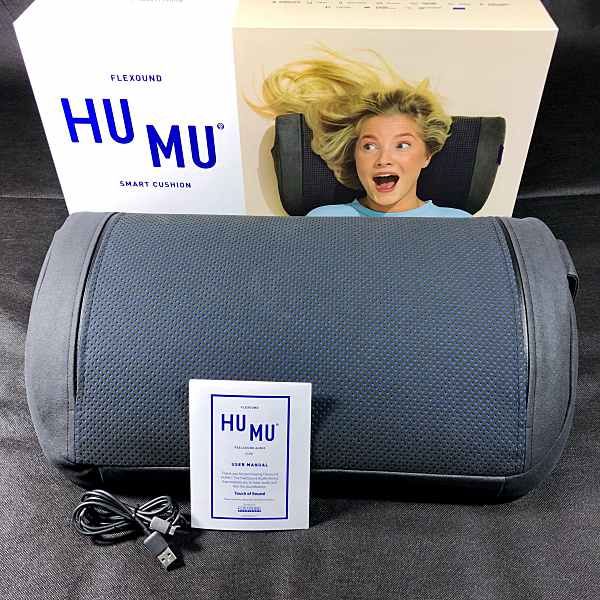
The Flexound HUMU Augmented Audio Cushion is a binaural stereo cushion that makes you both hear and feel the sound from your favorite entertainment. The cushion is boosted by Flexound Augmented Audio technology that adds the sensation of touch to all audiovisual experiences. HUMU also uses near-field audio so you can listen to it without disturbing others around you.

What’s in the box?

  • HUMU sound cushion
  • Micro USB charging cable
  • Users manual

Design and features

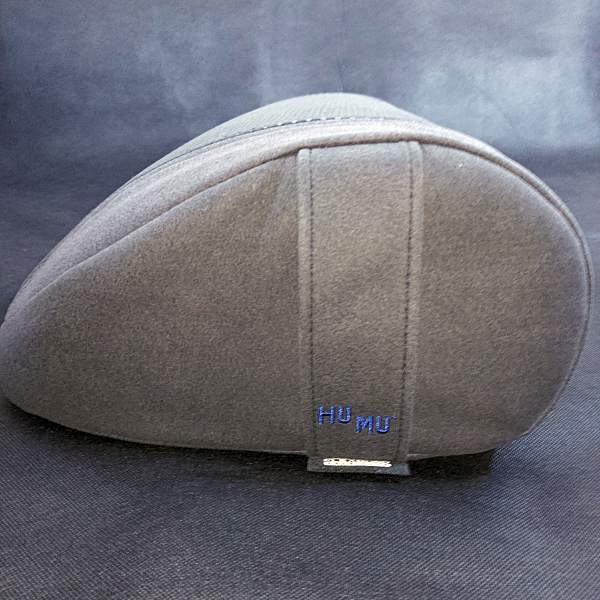
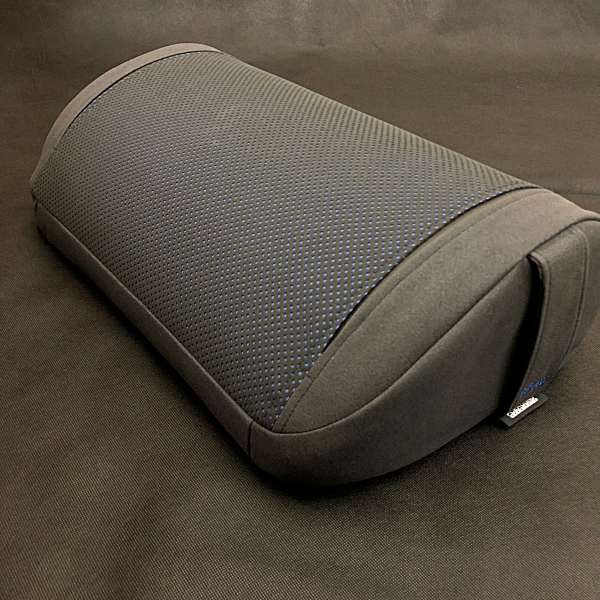
With its removable vegan suede cover and wedge shape, HUMU has a modern look. Made up of 50% polyurethane and 50% nylon, vegan suede is artificial. Despite not being real suede it feels soft and comfortable against the skin.

I received the cushion in graphite, it’s also available in gray.

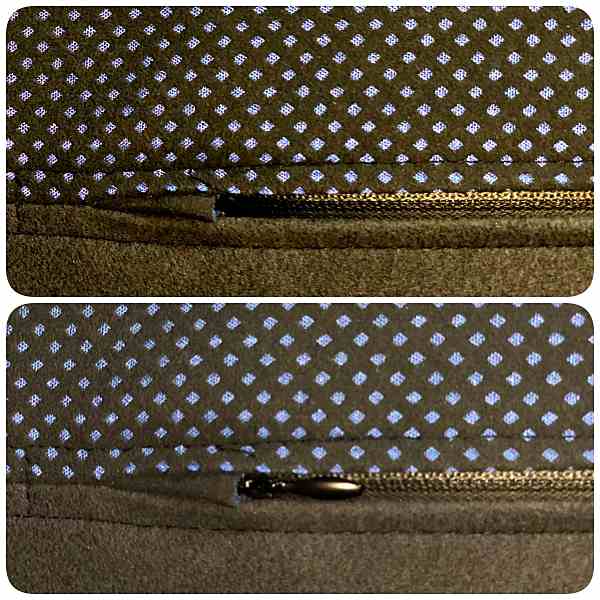
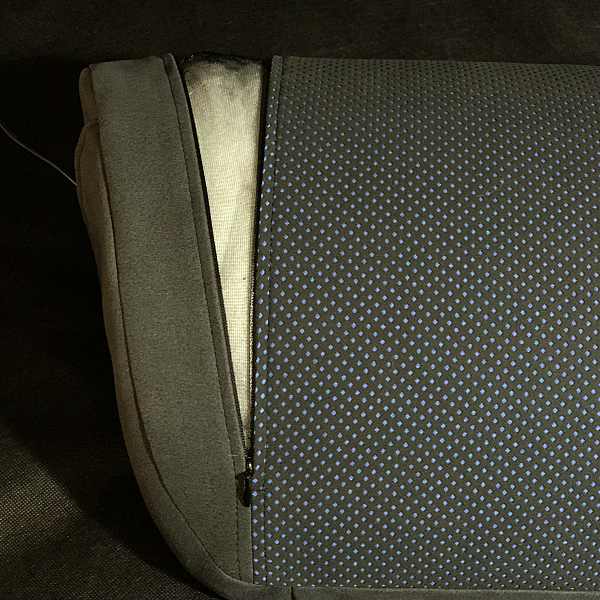
There are two zippers one on either side of the cushion that allow you to remove the cover. The zippers blend so seamlessly into the cushions design that it took me a while to find out how to access them.

The cover is easy to remove and put back on. You can spot clean it using a wet cloth or wash it by hand.

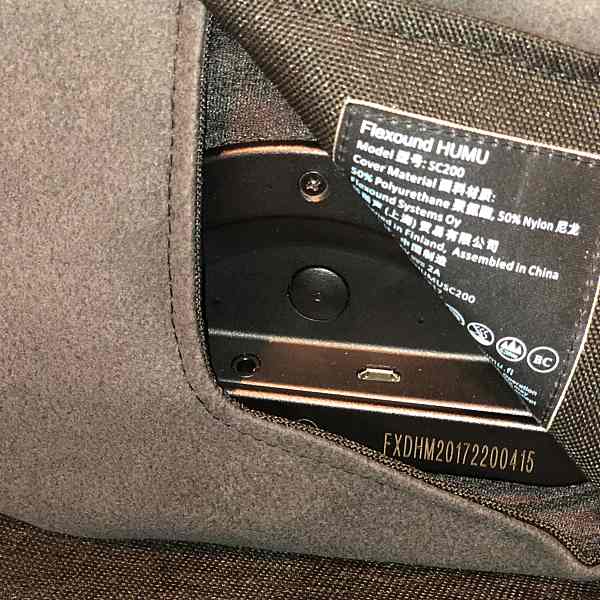
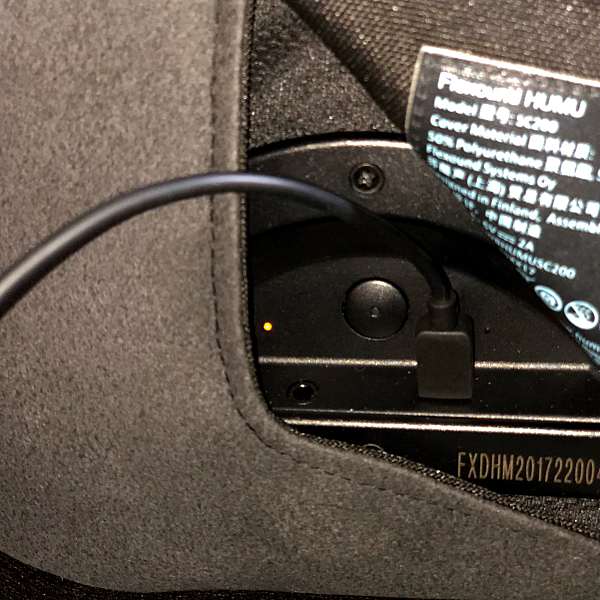
On the left side of the cushion, there’s a magnetic flap that lifts up to reveal the power button, charging port and indicator lights.

On the other side of the cushion, there’s a fabric carrying handle.

The cushion itself is pretty comfortable, although it does take a little breaking in. And it holds its shape well.

Battery & Charging

HUMU runs on a rechargeable Lithium battery. On a 3-hour charge, the battery can last up to 8-hours.  A provided 62-inch long Micro USB cable makes it easy to charge the cushion during use.

To charge the cushion plug the cable into the charging port located behind the magnetic flap. The indicator light glows orange while charging and turns off when fully charged.

Connection

HUMU uses Bluetooth 4.2 technology to connect to any Bluetooth enabled device. It can also be connected using a 3.5mm audio cable (not provided).

Bluetooth set up is easy as one, two, three. 1. Turn on HUMU. 2. Enable the Bluetooth function in your smart device. And 3. Select “Flexound Xperience” to pair.

I was able to easily connect it to my iPhone X, iPad Pro, and my 4K Apple TV.

Note: When using the cushion with a Bluetooth transmitter, my tv’s built-in Bluetooth or a 3.5mm audio cable I was unable to control the volume level.

How it works

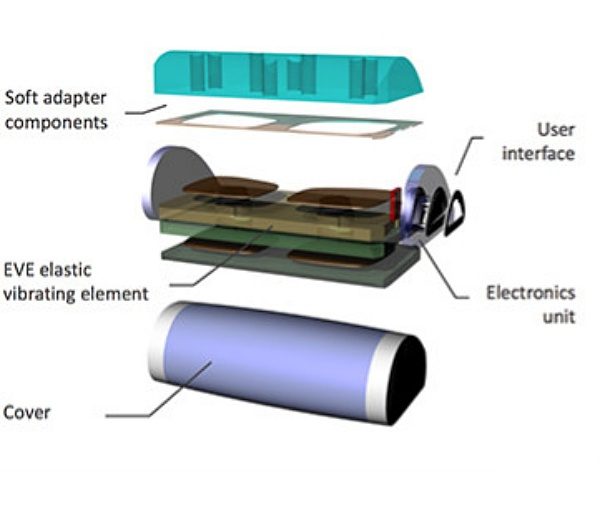
Unlike loudspeakers that vibrate sound into the air, Humu contains a single, proprietary Flexound Augmented Audio module with patented Elastic Vibrating Element (vibrating soundboards) to vibrate sound into an intelligent foam interior. This allows it to produce a wider range of frequencies (20 to 20,000 Hz) than most consumer loudspeakers or headphones. 

Performance

Movies, music, gaming, and relaxation all take on new life using HUMU.

Movies

During action movies, you feel every explosion, gunshot, and punch.

Horror movies are more immersive making them even more intense. I admit I even jumped a few times from the vibration of the cushion during scary scenes.

Even soundtracks seem to come to life.

HUMU’s like a mini home theater built into a cushion.

My experience using Humu to watch movies blew me away. So it’s not surprising that the technology will soon be available in movie theater seats.

If you’re a big fan of movies, you’ll love the 3D home theater experience that Humu provides.

Music

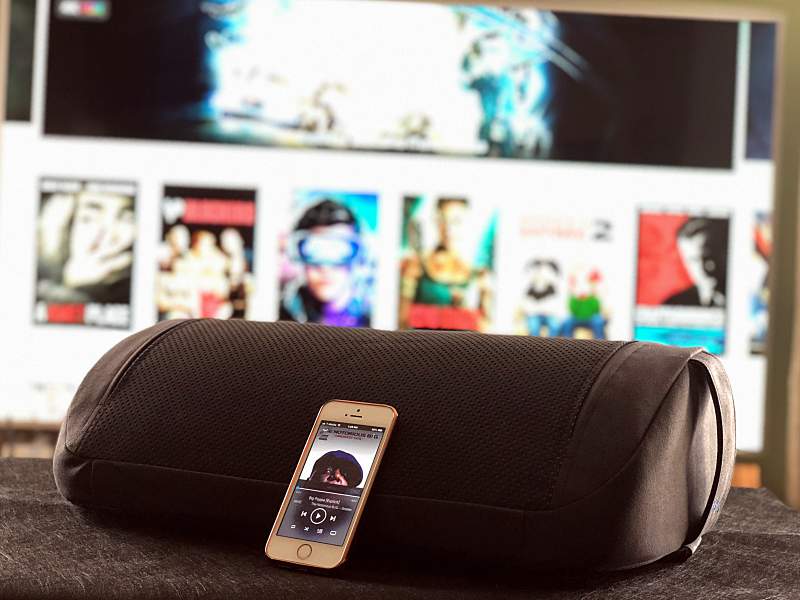
Listening to music provided a front row experience. I could feel the music as though I were actually sitting in the front row of a concert. Vocals, highs, and lows were all crisp and clear. The bass, especially from hip-hop tracks made the cushion rumble. HUMU creates a personal 3D stereo sound bubble that gives music a more spatial element, a wider soundstage if you will.

Why would you only listen to music if you can also feel it?

Gaming

I’m not much of a gamer but I tested a couple of games out on my Apple TV using HUMU. Like with movies and music it made gaming a more immersive experience.

Relaxation

I like to try to sneak a catnap into my daily routine whenever possible. Humu was a perfect excuse for me to take one of those naps. For testing purposes of course. Using my iPhone, I popped on a relaxing thunderstorm soundtrack. The experience was immersive, the rain felt like it was falling around me and I could feel a gentle vibration from the cushion with every roll of thunder. The sound was both resonate and soothing. To say it was relaxing would be an understatement, I was out like a light within 5 minutes. Humu took my relaxation to a whole other level.

What I like

  • Everything

What needs improvement

  • Nothing

Final thoughts

Was my excitement about HUMU warranted? You better believe it was. The Flexound HUMU Augmented Audio Cushion is one of those magical products that don’t come along very often. It provides a personal audio experience, unlike anything I have ever heard or felt before. And it immediately shot to the top of the list of my favorite products ever reviewed for the Gadgeteer. If you’re looking for a unique audio experience that you can actually FEEL, then you need to get your hands on a HUMU.

Price: $279.99
Where to buy: Indiegogo and Sharper Image
Source: The sample of this product was provided by HUMU.

Filed in categories: Reviews

Tagged:

Flexound HUMU Augmented Audio Cushion review originally appeared on The Gadgeteer on July 23, 2018 at 11:00 am.

Note: If you are subscribed to this feed through FeedBurner, please switch to our native feed URL http://the-gadgeteer.com/feed/ in order to ensure continuous delivery.

Aukey WiFi Smart plug review


REVIEW – Aukey has entered the home automation market with its new WiFi smart plug. Let’s take a look at how it works and why it might be the entry point you’ve been looking for.

What is it?

Aukey’s smart plug is basically a WiFi enabled switch that you place in between your wall outlet and the device that you want to be able to control. As far as home automation goes, it’s a very easy first step and when paired with a home assistant like Amazon Alexa or Google Assistant can be quite powerful.

Hardware specs

  • Input / Output: AC 110–125V 15A
  • Maximum Power Output: 1800W
  • Dimensions: 63 x 37 x 33mm / 2.48” x 1.46” x 1.3”
  • Weight: 79g / 2.78oz

What’s in the box?

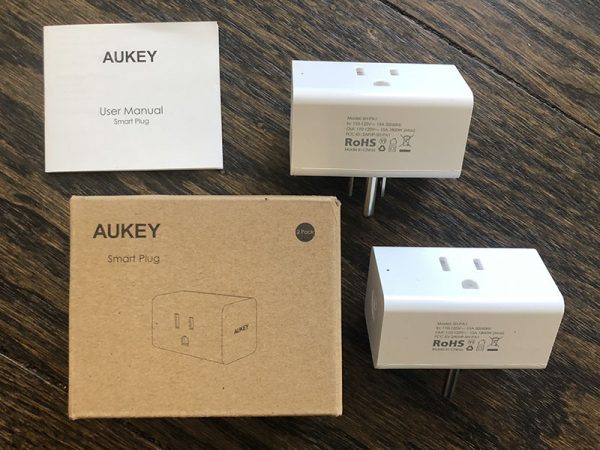
The review sample was actually their dual pack which makes a lot of sense as you start kitting out your home, and it’s nice to see the minimal packaging. Here’s what’s included…

  • 2 WiFi smart plugs
  • User Manual

Design and features

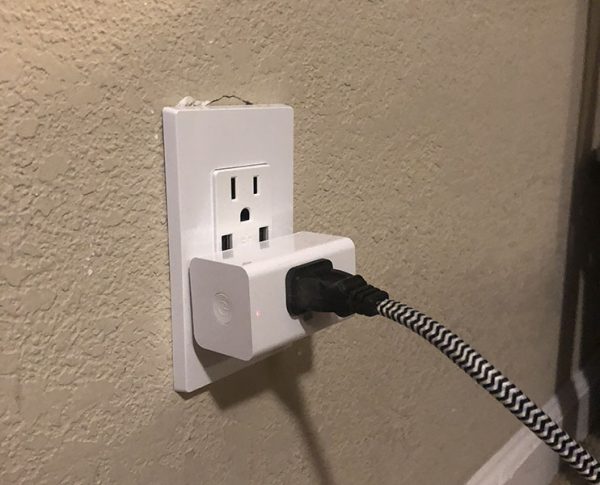
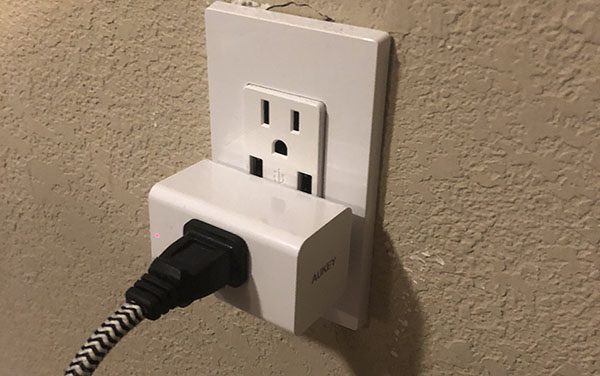
From an aesthetic point of view the smart plugs are minimalistic and are meant to not draw your attention. Their minimal width keeps them inside the dimensions of most wall plates. Keeping the height down allows you to place one above another on one double wall outlet. This particular outlet I’ve connected it to has USB ports which are now blocked by the unit, but that’s an outlet problem, as connecting USB cables frequently interferes with any AC plug.

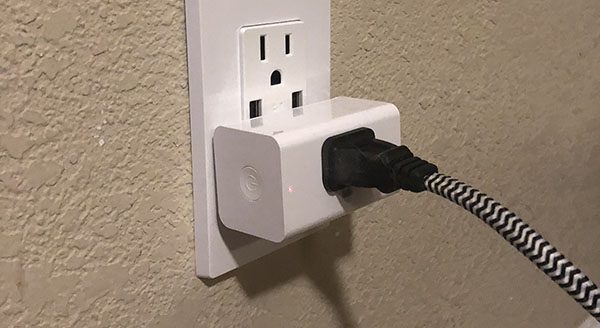
Staying consistent with the minimal approach, There’s very little else on the smart plug. On the left end, there’s a power button and a simple LED light on the front edge next to it.

Setup

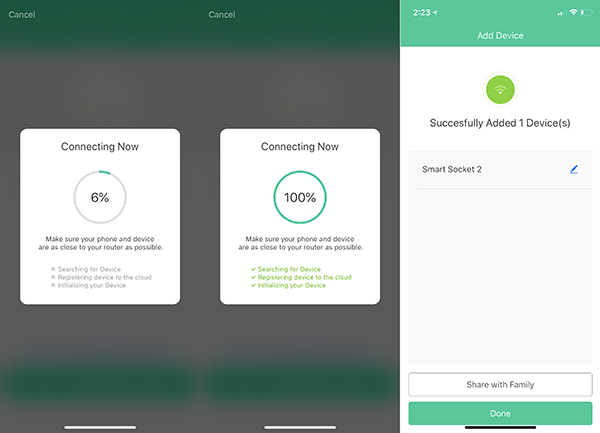
Getting started is a similar process to most WiFi enabled, app-controlled accessories. Download and launch the AUKEY Home app from the app store for your device. Bounce over to your WiFi settings and connect to the WiFi that the device is broadcasting, and then back to the app to enter your home network information. The app then does the connection for you which in my case took maybe 30 seconds. It was really fast and worked first try on both smart plugs which is something I cannot say for some other smart plugs that I’ve tried.

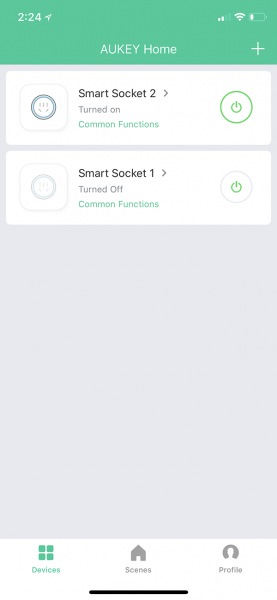
So at this point, the smart plugs are set up and you will see them (and any others you may have set up) in the app as seen here. If all you want to do is launch an app and turn things on and off, you can read the next paragraph and then skip ahead to performance.

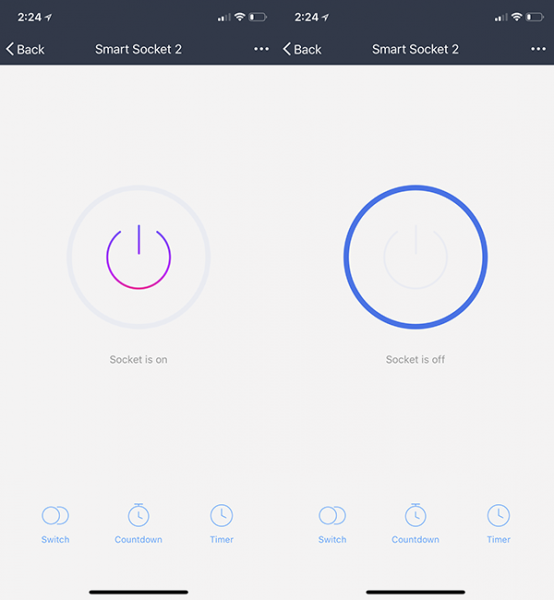
The power button icon on the right of each smart plug lets you toggle power to whatever device you have plugged in. You can see above the language changes ‘Turned on’ vs. ‘Turned off’ as well as the icon on the left is highlighted in blue when a device is on. Clicking into the device also lets you toggle power with the center icon or the bottom ‘switch’ icon (redundancy) and the visual is even more clear as to its status.

You’ll also see the two other icons across the bottom of the screen where you can start to customize further. Countdown lets you set an expiration time in case you might fall asleep while reading as an example. Timer lets you set an event to turn on or off at a specific time and have it recur or be a one time need.

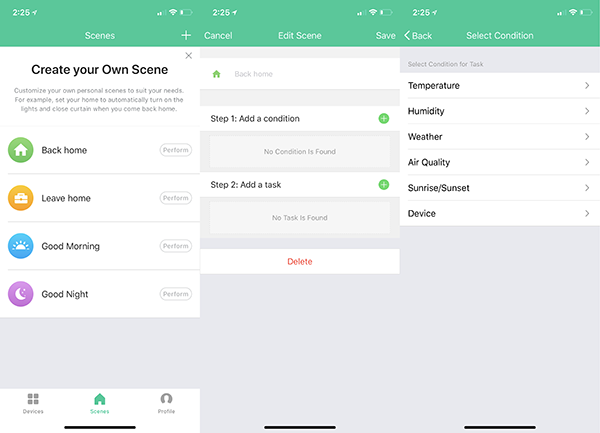
Creating ‘Scenes’ lets you activate multiple smart plugs (and of course the devices connected to them) and set conditions that trigger them. There are four scenes built in as you see above, but you can choose a condition and have it perform a task which is typically toggling a smart plug.

So want your floor lamp to come on at sunset? Choose sunset and the smart plug connected to your floor lamp, and then give the scene a distinctive name. This is important as if you connect an assistant like Alexa you want it to easily understand.

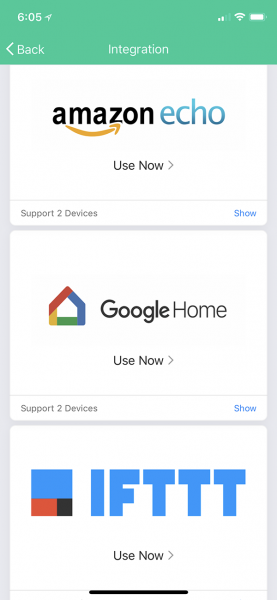
That brings us to the last part of setup if you want to connect it to your Alexa device should you have one. In the profile section (icon in the leftmost image above) you’ll see a selection called integration. Once there, you’ll see these three options.

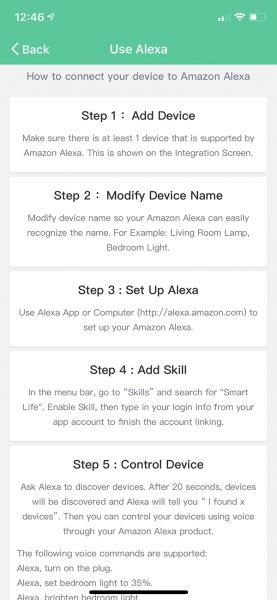
Amazon and Google are pretty self-explanatory, but if you haven’t heard of IFTTT (IF This, Then That) you should definitely check it out. That may be your solution when you wish you were able to automate something that otherwise doesn’t look to be supported by whatever system you’re using. As for connecting your Amazon Echo, here are the instructions that Aukey provides in app and while this crowded screen may make it look time-consuming, it’s super fast and works first try.

Okay, enough with the setup already. How does it work?

Performance

As I’ve mentioned a couple of times above, Aukey’s smart plugs just plain worked. It’s something that I’ve come to be surprised by in today’s ‘ship it and fix it with firmware later’ mentality. I have 10 (yes ten) smart plugs and switches from an established brand and every time I add a new switch the app forgets some of the earlier ones and let’s not even get into updating wifi passwords (ugh). Aukey’s app is clean, simple and controls devices in a logical way. The integration with Alexa is great with Amazon taking the naming convention directly from Aukey without a problem.

So what’s the catch? None really, just a couple of things to keep in mind.

First, choose distinctive device and scene names. If you’re using Alexa and all your devices are ‘something lights’ there’s a good chance background noise will cause Alexa to only hear ‘lights’ and you’ll get a ‘there are multiple devices with that name’ response which is annoying. You can double this issue when you add scene names as well. The second part of this is just making sure that they’re memorable and not too lengthy. This is an ‘assistant’ problem and not a flaw of Aukey or their device.

Second, the smart plug like all the others on the market, are toggling power only. This means you can’t connect just any device and have it work. Lamps and any other lighting with an AC cord work great (remember the lamp itself needs to be on). A coffee maker, on the other hand, would only work if said coffee maker automatically starts brewing when the power switches on. Similarly, a computer that needs a password after startup, or a TV that always defaults to the input you don’t use won’t work so well.

Lastly, please be careful automating something that could be dangerous, like a space heater. Asking Alexa to turn something on while you’re home is one thing, but if it’s set to come on at 6am to warm up the house and the dog has dropped a toy or pushed their dog bed too close, nothing is going to catch that and decide maybe it’s not a good idea to turn on right now.

What I like

  • Small and compact
  • Two unit bundle
  • They just work
  • Integration with assistants like Amazon and Google
  • The low cost

What needs to be improved

  • Would like to see native Apple HomeKit support

Final thoughts

I’m going to sound like a broken record here, but again, these just work. I’ve spent a few hours mucking around with products like this only to get frustrated or resort to full WiFi reset up. This was as simple as it gets and again I found myself surprised. If you’re looking to have control of a few lights or other compatible devices and want a low-cost way to do it then look no further. The other players in the space are twice this cost and don’t function this well.

Price: $27.99
Where to buy: Amazon
Source: The sample of this product was provided by Aukey.

Filed in categories: Reviews

Tagged:

Aukey WiFi Smart plug review originally appeared on The Gadgeteer on July 23, 2018 at 9:00 am.

Note: If you are subscribed to this feed through FeedBurner, please switch to our native feed URL http://the-gadgeteer.com/feed/ in order to ensure continuous delivery.