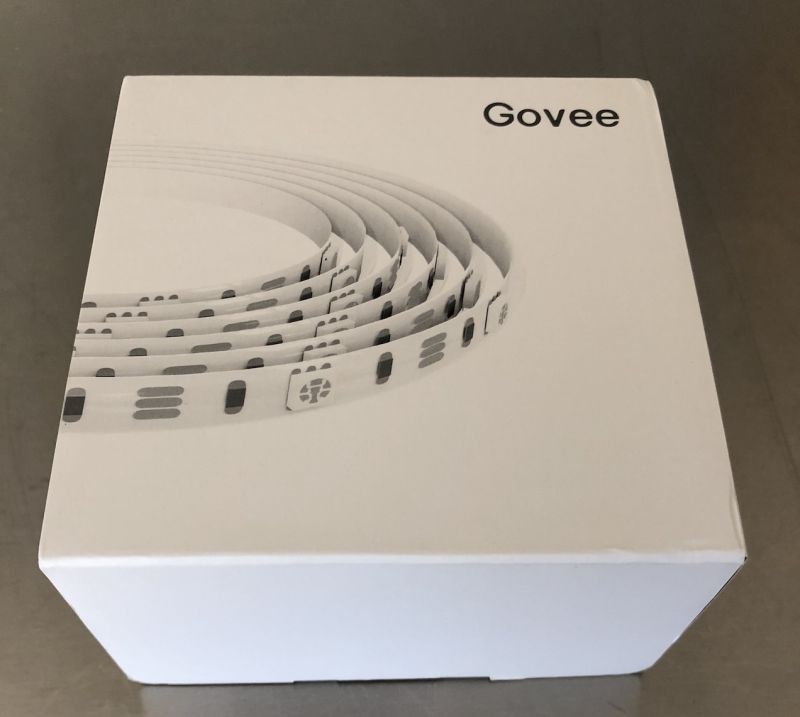
Govee TV LED Backlights review

REVIEW – My wife and I love our basement theater room and especially enjoy turning out all the lights and watching our movies like we’re actually in a theater. We had read over and over how LED back lighting made the viewing experience even better. A couple of years ago, we bought a strip light that stuck to the back of the TV and was USB powered, however, it frequently fell completely off the television, the stickers were just not strong enough and it also would not turn off with the TV and had to be plugged in every time. I definitely wanted an upgrade and then the Govee TV LED Backlights popped up for review.

What is it?

These are multi-color LED lights powered by either USB or power adapter – that connects to Alexa or Google applications for home control. It has a wired remote with push button controls as well. It uses 3M stickers on the backing to apply to the desired surface.

What’s in the box?

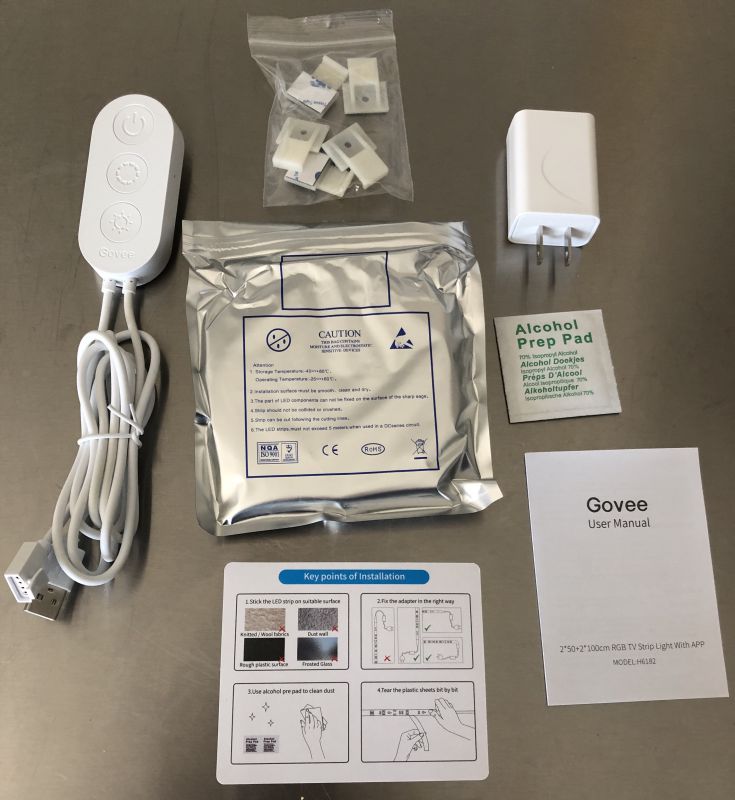
  • Power cord with controls
  • Adhesive Clips
  • Power adapter
  • Cleaning swap
  • User manual and install instructions
  • Reel of LED back lights

Design and features

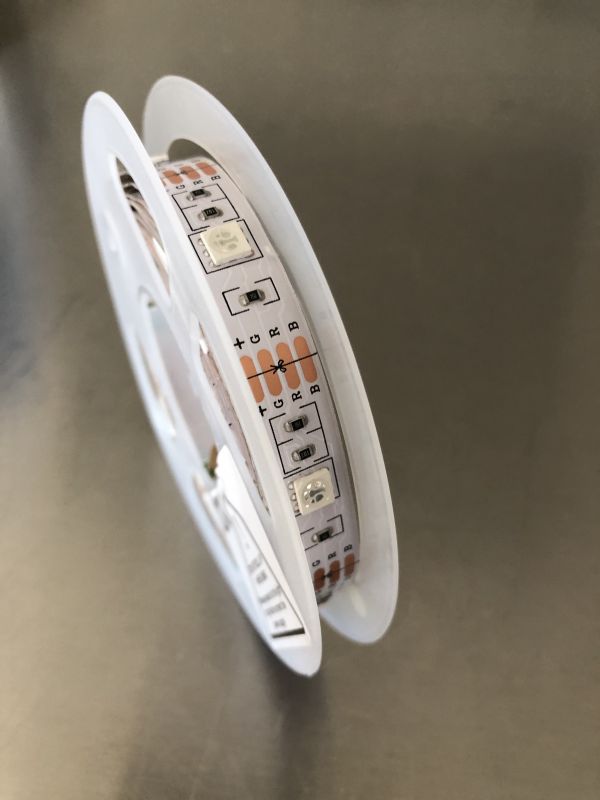
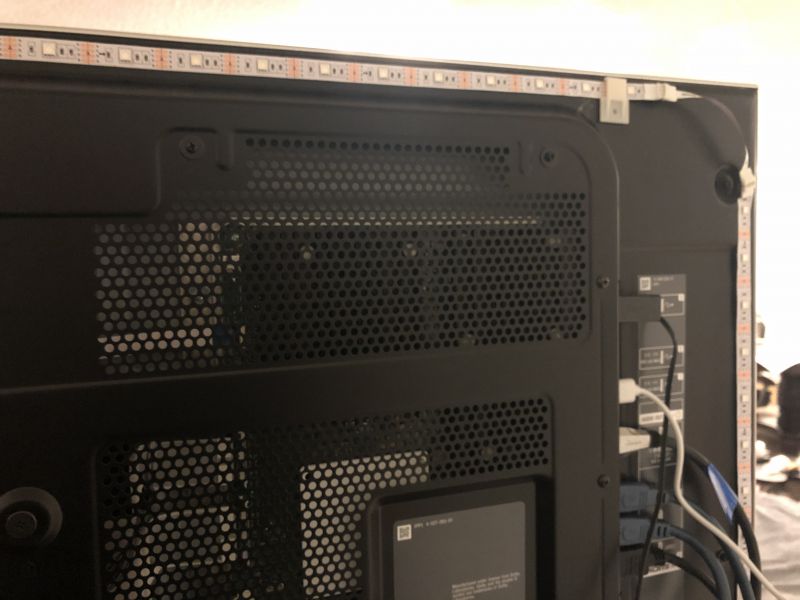
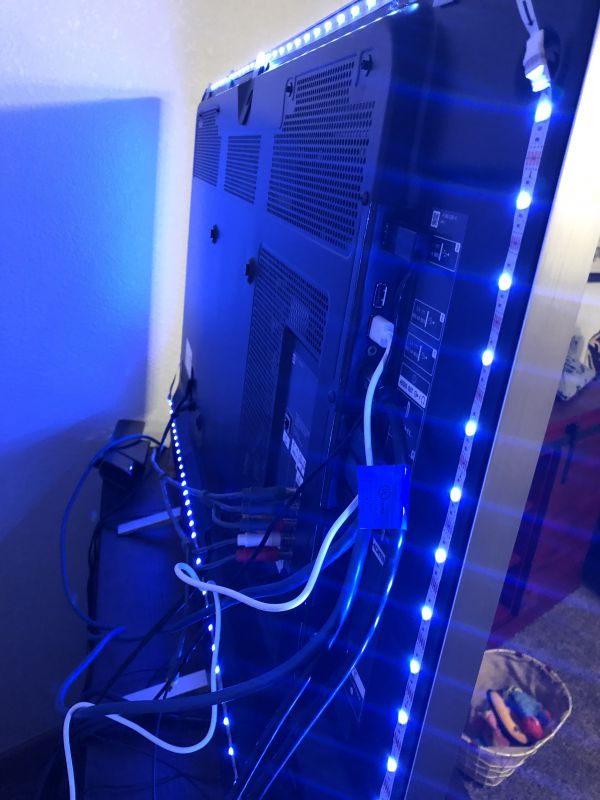
It is a fairly simple design with the reel of LED lights designed to be taken off incrementally, the pull off tape removed and then applied to the desired surface. As I worked my way around the back of the TV, I also applied clips along the top of the screen to lessen the effect of gravity on the strips sticking, which was the downfall of our original lighting. Simply plug the lights into the USB adapter and then into the TV USB slot and you’re ready to go.

After downloading the app, you’re able to connect your phone to the corded remote, although the app is not required to use as all features can be accessed via the wired controller. There are three basic settings: Music, Color and Scenes. Music will change the color based on the ambient music in the room, color allows you to select the specific color, and Scenes is preloaded with 7 different colors for Movies, Dating, Candlelight, Romantic, Breathe, Blinking and Energetic settings. Brightness can be adjusted from 0 to 100%, however if using the USB port on the TV we have found you can only go up to 20% so you will need the included wall power adapter if you want to get the full 100% – however we actually enjoyed the quality at 20% and left it plugged into the TV USB port.

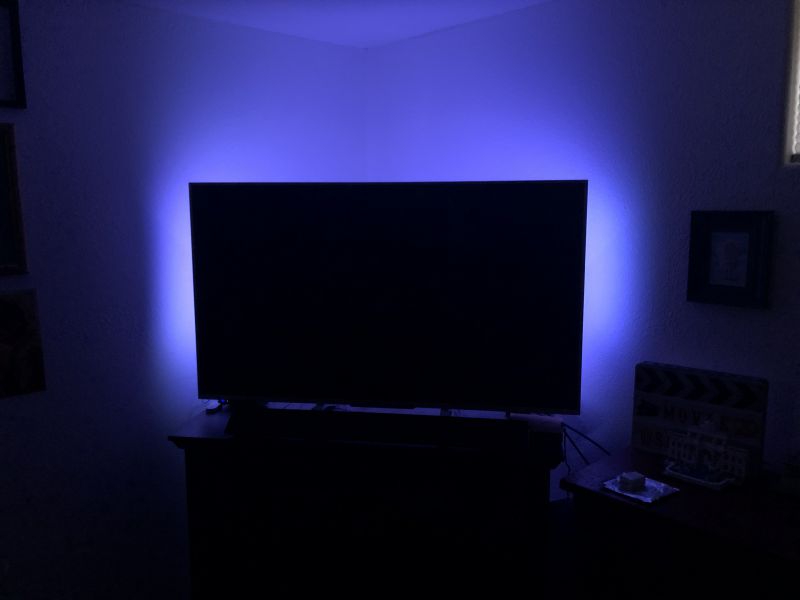
So here you can see the halo it provides behind the television. At first I thought this would be a distraction, however we both found over time that it lessens strain on the eyes and also makes it much easier to transition back to regular lighting once you’re done watching television. As you can see below, it doesn’t have a negative effect on viewing either, as we purposefully picked a rather dark scene from a recent show that we remembered being difficult to see during the first viewing:

Performance

Overall, the performance of the lighting was great. We were able to customize the color to best suit our viewing experience and should we ever have a party, we have built in lighting that will change with the music! Our previous lighting had one color and nothing more than an on/off setting. The strips have stayed adhered to the back of the television without a problem and the controls on the phone or the physical controller both work ideally. It is a bit frustrating that we can’t use it at full power via the USB port on the TV but it is easily remedied by the plug power adapter that is included with the unit. Finally, you can connect it to your smart phone via the company’s app and then also connect it to Google and/or Alexa for voice controls. It integrated nicely into our collection of smartphone controlled devices.

What I like

  • Strong adhesive – stays in place once installed
  • Customizable colors
  • Easy smartphone integration and controls – straight forward product with simple controls

What I would change

  • Honestly, this is the first product I’ve reviewed where I can’t really think of much to improve on. It does what I expect of it and I wouldn’t change a thing.

Final thoughts

I’m thoroughly impressed and delighted with the Govee TV Backlight, it has performed very well and met every expectation. Additionally, it comes at a very reasonable price at $21.99 via Amazon but keep an eye out as I believe they run promotions as well for even more value. I’m glad I was able to pick this item up, it has definitely made our theater room viewing experience better overall.

Price: $21.99
Where to buy: Amazon
Source: The sample of this product was provided by Govee.

Filed in categories: Reviews

Tagged: ,

Govee TV LED Backlights review originally appeared on The Gadgeteer on August 5, 2019 at 8:00 am.

Note: If you are subscribed to this feed through FeedBurner, please switch to our native feed URL http://the-gadgeteer.com/feed/ in order to ensure continuous delivery.

Tom Bihn Nik’s Minimalist Wallets review

REVIEW – We’ve reviewed lots of wallets here at The Gadgeteer, and quite a few products from Tom Bihn as well.  So it only makes sense that we review the new Tom Bihn Nik’s Minimalist Wallet.  How does it stack up against Tom Bihn’s high-quality, durable, well-designed bags and travel accessories?  Let’s find out!  Gadget on!

What is it?

Tom Bihn Nik’s Minimalist Wallet is a wallet that caters to the minimalist crowd in size, thinness, and simplicity, yet is durable, affordable and available in many different colors, fabrics and configurations.

What’s in the box?

Hardware specs

  • Styles:
    • Wallet #1 – $24, Two interior fabric pockets. No exterior pockets.  (reviewed here)
    • Wallet #2 – $26, Two interior pockets — one pocket is fabric, the other pocket is clear urethane for your ID or any other card you might want to show off. No exterior pockets.
    • Wallet #3 – $30, Two interior pockets: one is fabric, the other is clear urethane. One exterior pocket.   (reviewed here)
    • Wallet #4 – $32, Exactly the same as Wallet #3 except for one the addition of a small webbing loop.
    • Wallet #5 – $30, Two interior pockets, both of which are fabric. One exterior pocket (reviewed here)
  • Materials:
    • Exterior:
      • 210 denier 2×2 Ballistic nylon
      • 400d Halcyon
    • Lining: 120d Aether ripstop
    • Window (Wallet #2 & #3 Only): .016″ clear urethane
  •  Colors:
    • 210 Ballistic nylon in Black, Cloud (reviewed here), Coyote, Dawn, Island, Viridian, and Grass
    • 400 Halcyon  nylon in Black and Nordic
  • Dimensions:
    • Unfolded: 5.7″ x 3.9″ / 145 x 100 mm
    • Folded: 2.9″ x 3.9″ / 75 x 100 mm
  • Weight: 0.6 oz / 16 grams (all styles are approximately the same weight)
  • Construction:
    • Made in USA with fabric from Korea / Japan / U.S.A.
    • 100% finished seams

Design and features

The Tom Bihn folks graciously provided three of the five styles of their Nik’s Minimalist Wallets to review.  Let’s start with the basics that are common to some or all of these wallets, and then we’ll progress into more specific features of the wallets.

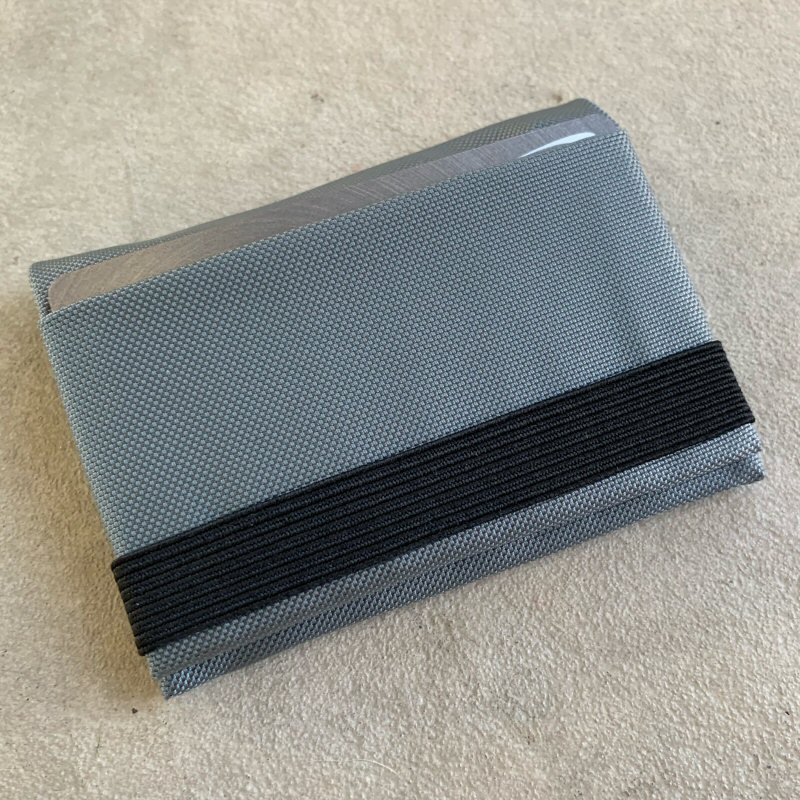
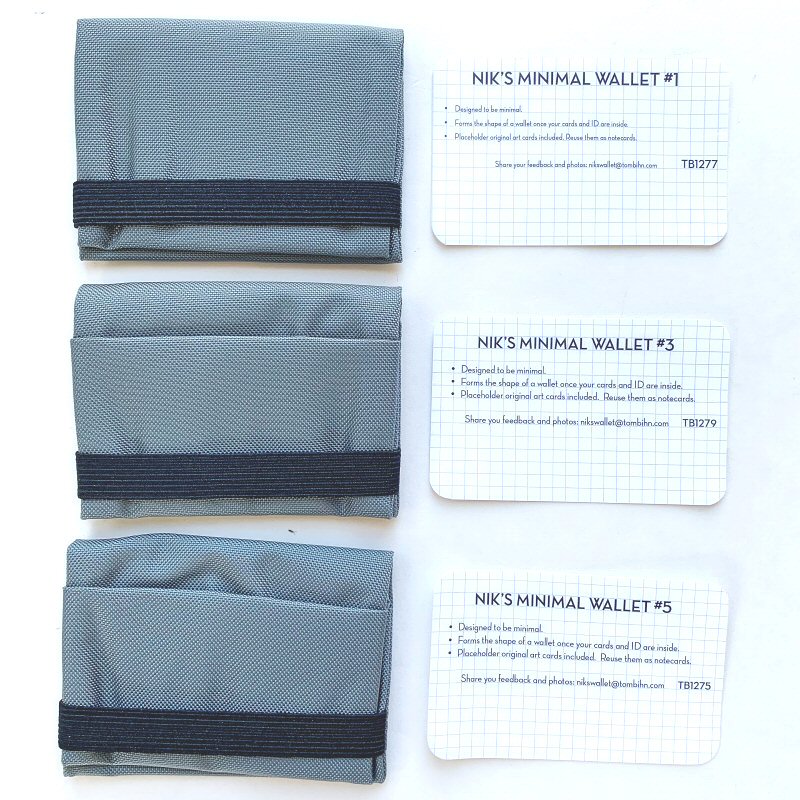
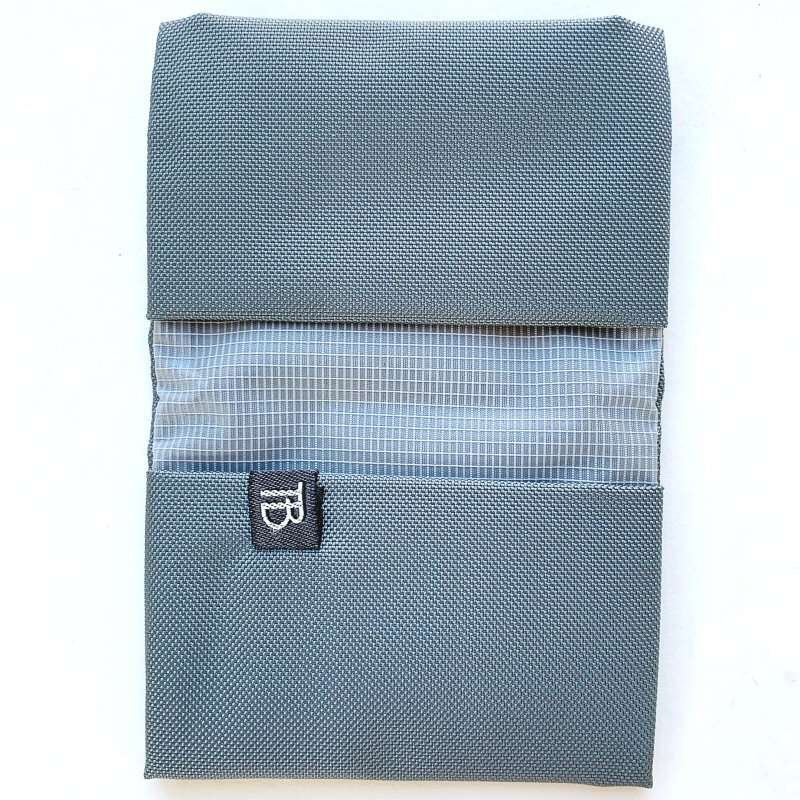
My initial impression of the Nik’s Minimalist Wallets was that they are small, thin, lightweight and feel very well-constructed and durable.  I also really liked the color, which was “Cloud,” a type of gray color that can look different depending on the lighting conditions, as can be seen in the images in this review.  The above photo above shows the “front” and “rear” view of the three Nik’s Minimalist Wallet samples that I reviewed.  All look very similar from the outside and each holds about 6-10 cards and/or some folded cash bills.

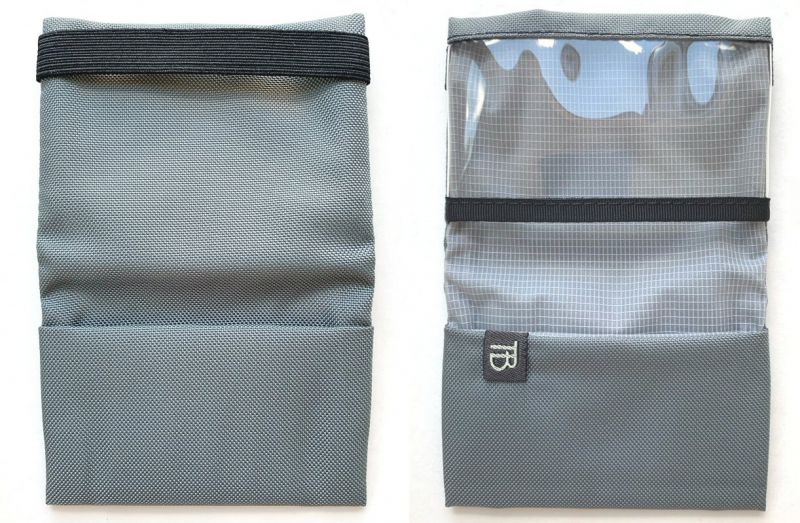
The above photo illustrates the relative footprint size of the Nik’s Minimalist Wallet.  It is quite small and lightweight, and the material is soft, which makes it perfectly suited for either back pocket or front pocket carry, and could even easily be carried in the chest pocket of most shirts.  Additionally, one of the features common to all of the Nik’s Minimalist Wallets is a simple but elegant elastic band, which is used to keep the wallet closed.  It gave me a feeling of greater security knowing that the wallet could not accidentally open or items fall out of it inadvertently due to this elastic band.

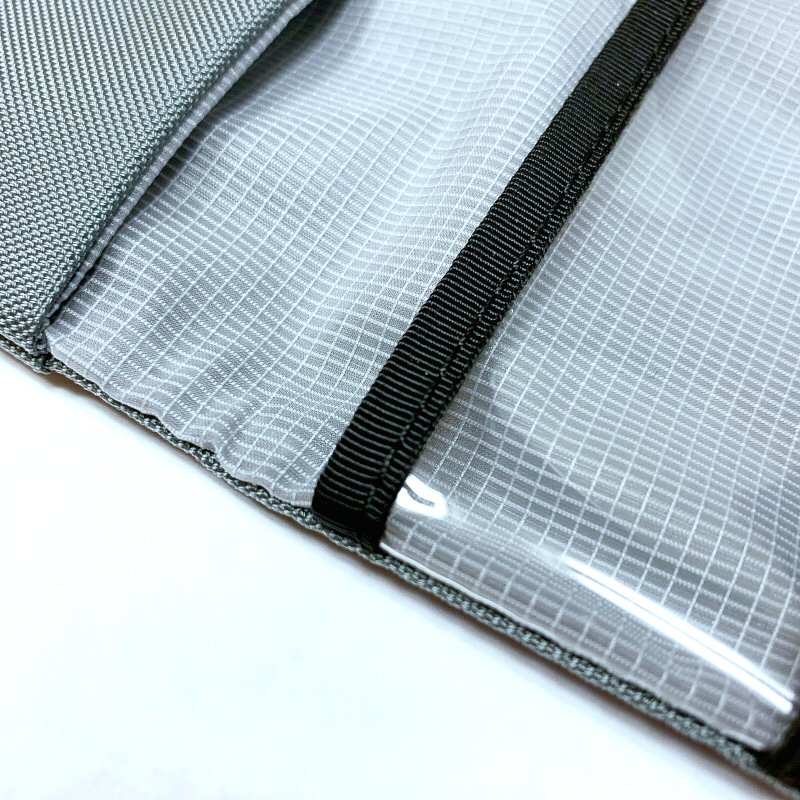
The Nik’s Minimalist Wallet is made from two materials, an exterior shell, and interior lining material.  Depending on the wallet selected, the exterior is either 400D Halcyon nylon or 210D Ballistic nylon, the latter being the material of the wallets reviewed here.  210D Ballistic is a “ballistic” type of nylon material this is lightweight with a smooth feel but very durable, and fairly water-repellant.  The interior lining is 120D Aether ripstop nylon material that is very lightweight and also has some water-repellant properties.  The use of high-quality, lightweight, durable, engineered fabrics like these is among the hallmarks of Tom Bihn’s products.

Nik’s Minimalist Wallet #1

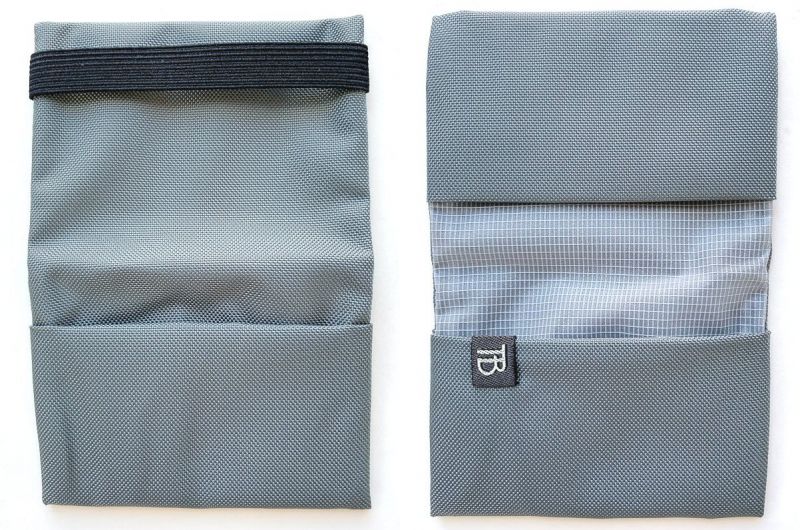
Nik’s Minimalist Wallet #1 is the simplest and most minimalist of the five wallet designs, but don’t let that fool you—it still manages to easily and securely hold several cards and some cash.


The interior of the Nik’s Minimalist Wallet #1 has two pockets, one on either side, which is the basic interior layout for all of the five wallet designs.  I really like how Tom Bihn has chosen to orient these pockets, with their openings toward the wallet’s central fold.  This means that when the wallet is closed, the likelihood that a card or some cash will fall out is greatly reduced, and when the elastic strap is used, this likelihood reduces to almost zero.   There is also a small, simple “TB” logo tag sew to the inside.  If you’ve read my other reviews, you might know that I am a fan of minimal to no exterior branding, and the Nik’s Minimalist Wallet hits a home run for me here.

Due to the aforementioned fabrics used in the construction of the Nik’s Minimalist Wallet, when empty, it is quite unstructured and even somewhat floppy.  This is by design, as these wallets were intended to be very minimalist and featuring thin, lightweight, durable materials without any rigid stiffening materials that just add bulk and weight.

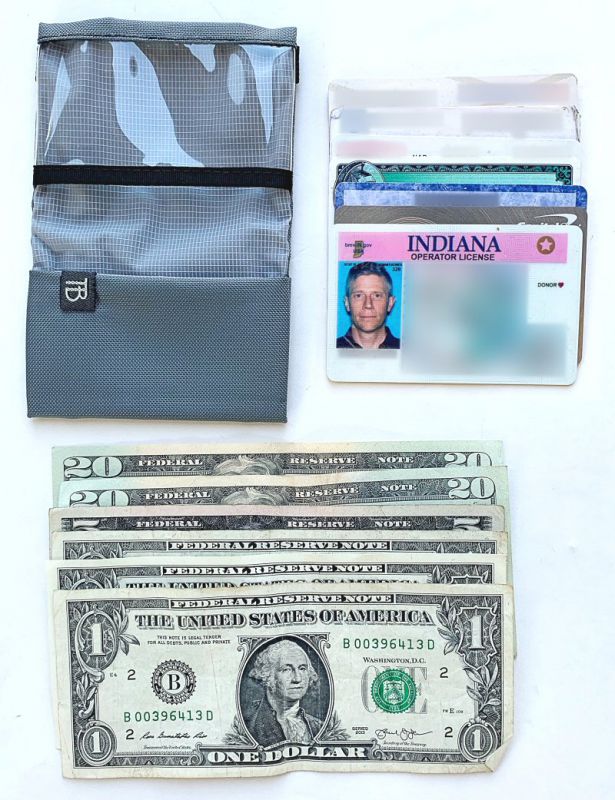
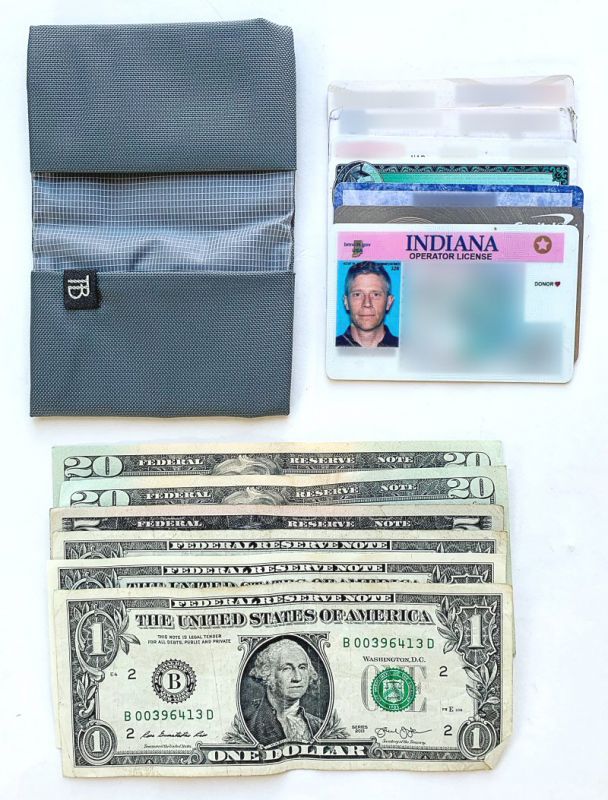
To realistically evaluate the Nik’s Minimalist Wallet, I loaded it up with the above items: 6 bills and 7 cards, which is a fair representation of what I might typically carry in my wallet on an average day.

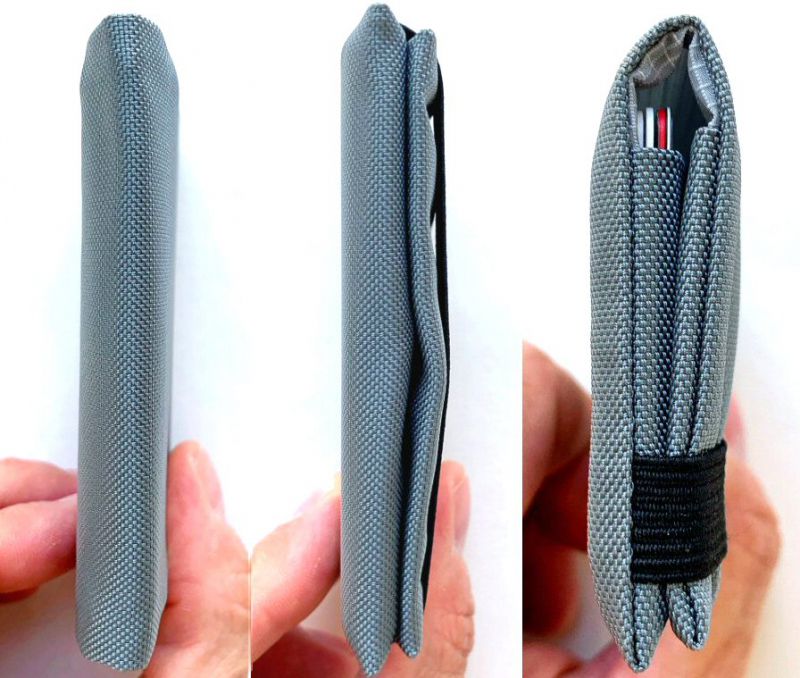
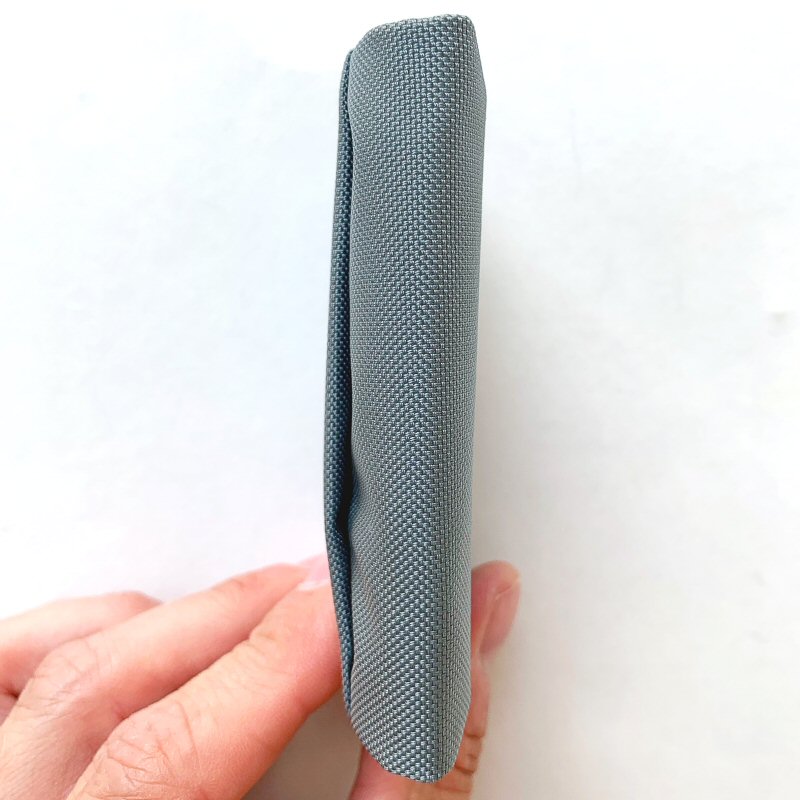
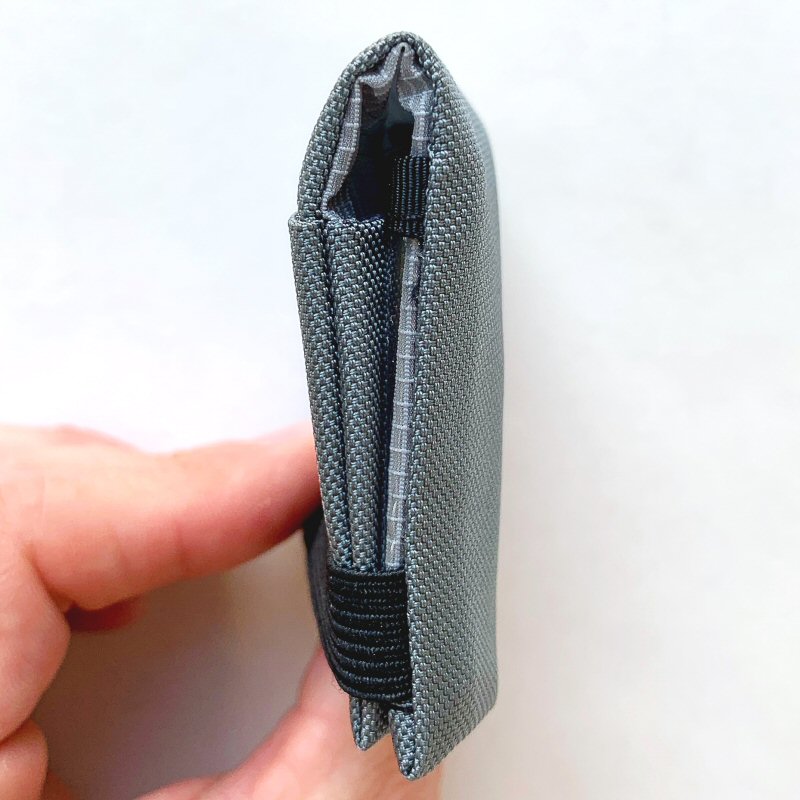
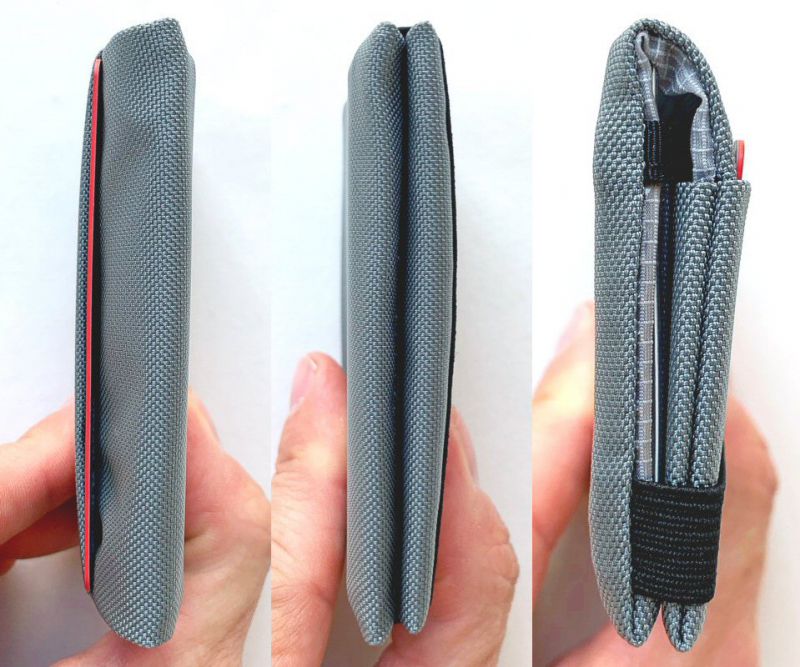
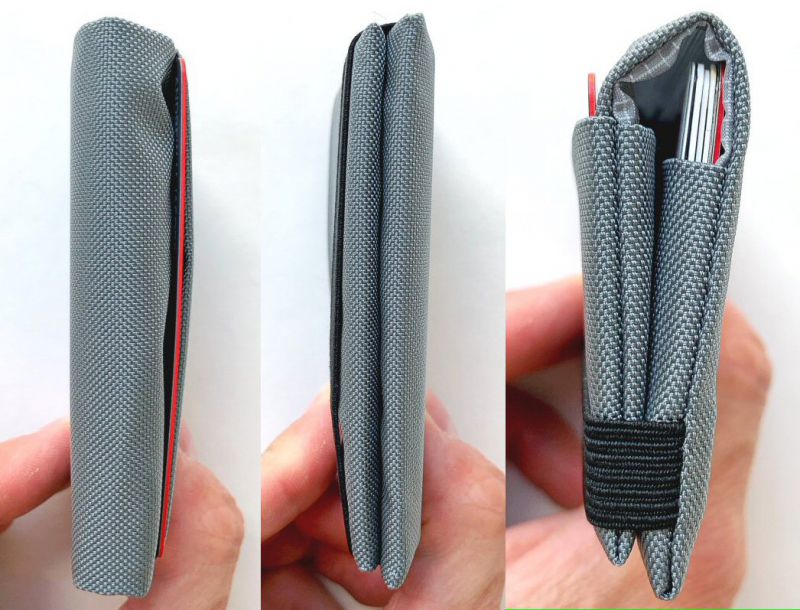
As seen in the photos above, once loaded, the Nik’s Minimalist Wallet #1 takes on form and shape and yet doesn’t really increase appreciably in thickness due to the thinness of its materials and construction.

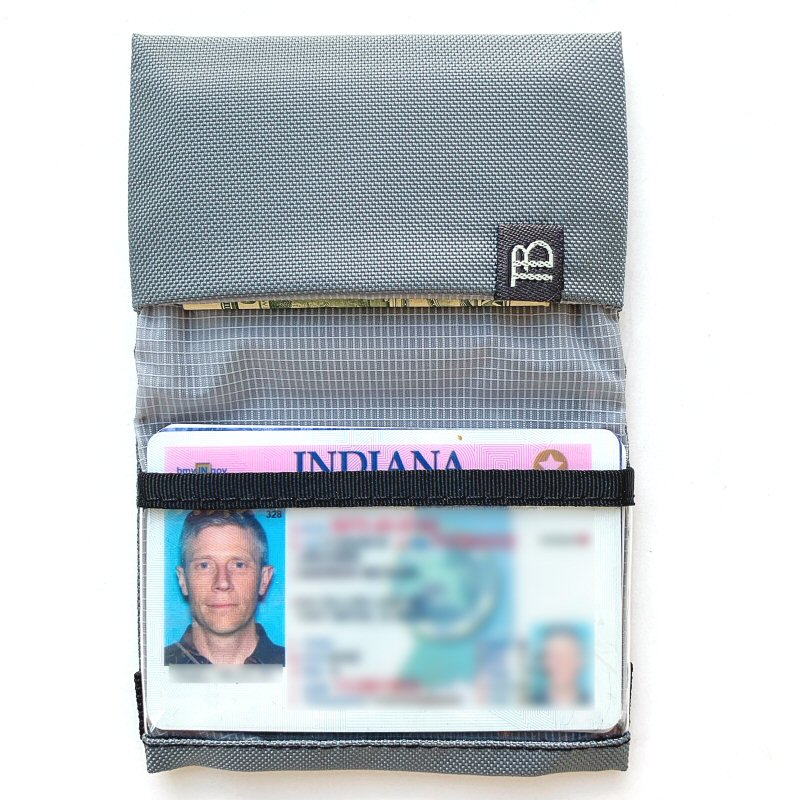
One aspect I did notice about each of the Nik’s Minimalist Wallets was that when US paper bills are folded in half once and placed into one of the wallet’s pockets, the top edge of the cash sits just past the centerline of the wallet, which is where the wallet would tend to naturally fold.  Note that this effect is also further illustrated in the far right photo in the series of three photos above.  This means that the very top edge of the cash can get a bit curled.  While this is certainly not a show-stopper by any means, I think that if the Nik’s Minimalist Wallet were even just a few millimeters wider, this curling of the edge of the bills would have been prevented.

Nik’s Minimalist Wallet #3

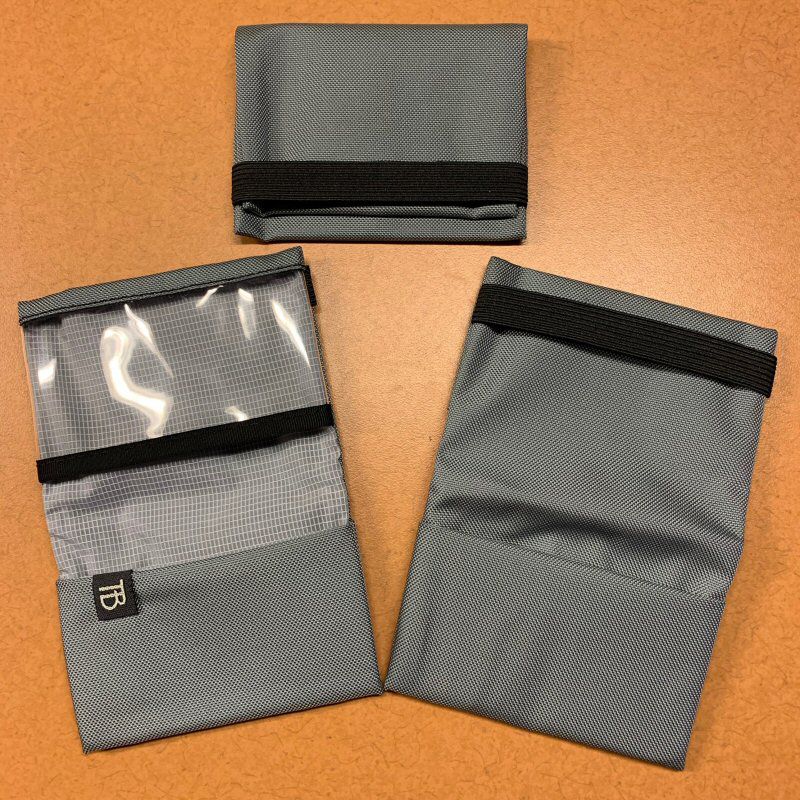
Next up is Nick’s Minimalist Wallet #3.  This version further builds on the features of Nik’s Minimalist Wallet #1 reviewed above.  It add an exterior pocket has the same interior pocket configuration as Nik’s Minimalist Wallet #1, but one of its two interior pockets has been converted into a transparent window pocket for an ID card.

The ID window pocket is made from .016″ clear urethane, which is fully transparent and very durable without adding greatly to the wallet’s thickness.


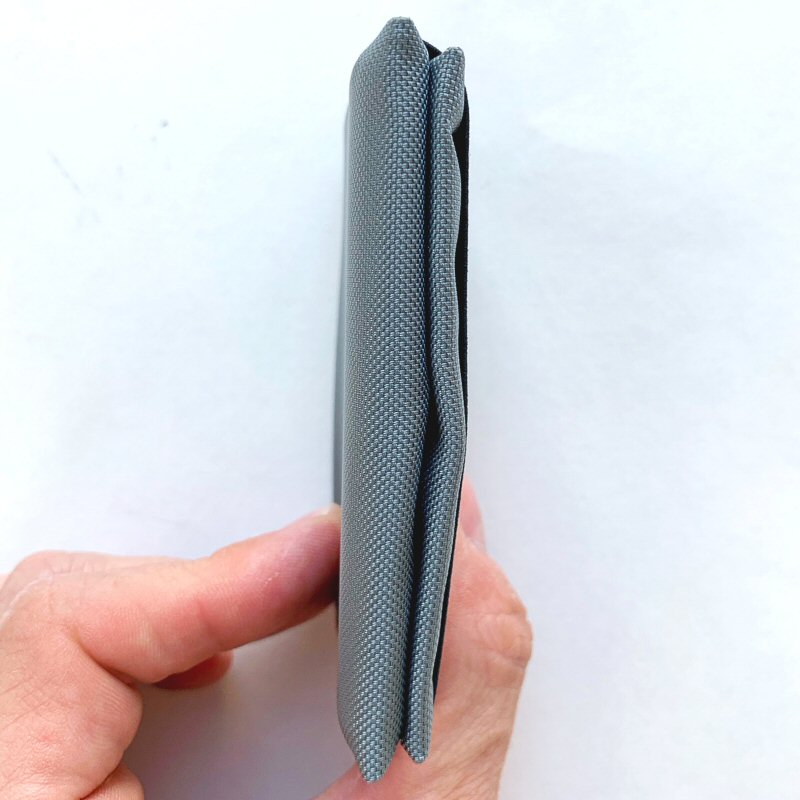
Even with the added exterior pocket, Nik’s Minimalist Wallet #3 is still quite thin when empty.

What the above photo fails to convey is that, although it may appear thick when empty, this wallet is actually very thin and compressible.

As with Nik’s Minimalist Wallet #1, to realistically evaluate Nik’s Minimalist Wallet #3, I once again loaded it up with the above items: 6 bills and 7 cards, which is a fair representation of what I might typically carry in my wallet on an average day.

I placed the cash bills, folded over twice, in the non-window pocket and all of the cards save one in the window pocket with my ID to the front so that it would be visible should I need to show it.

In the exterior pocket, I place the card that I use most often.  The exterior quick-access pocket can actually hold more than one card—I found that it could hold two cards easily and even up to three cards, though this does start to get a bit snug.  While this exterior pocket does provide quick access to your most often used card or two, or even some folded cash, I think the one and only drawback of this pocket is that it is somewhat exposed, so there is the potential for a card or cash placed within it to fall out, though this possibility does seem remote.  Also, the more items that are placed in the wallet (not just in the exterior pocket), the snugger all of the contents fit, thus holding everything together that much more securely.

The series of photos above illustrate that Niks’ Minimalist Wallet #3 does not increase appreciably in size once it has been filled with several cards and cash.

Nik’s Minimalist Wallet #5

Nick’s Minimalist Wallet #5 was the third and final version sent by Tom Bihn.   It includes the same exterior pocket and interior pocket configuration as Nik’s Minimalist Wallet #3, but the transparent urethane window pocket has been converted to a fabric pocket.

As with Nik’s Minimalist Wallet #3, even with an additional pocket added to the exterior, Nik’s Minimalist Wallet #5 is quite thin when empty.

Once again, as with the wallets above, to realistically evaluate Nik’s Minimalist Wallet #5, loaded it up with the above items: 6 bills and 7 cards, which is a fair representation of what I might typically carry in my wallet on an average day.


While the Nik’s Minimalist Wallet #3 is a bit thicker than  Nik’s Minimalist Wallet #1 due to the added exterior pocket, it is roughly the same thickness as Nik’s Minimalist Wallet #3—which is actually quite thin even once loaded.

As with Nik’s Minimalist Wallet #3, the exterior pocket here served quite well for quick-access carry of my most often-used card.

What I like

  • Very small, compact, thin, and lightweight
  • Durable materials and solid construction
  • Highly suitable for back pocket or front pocket carry (or even front shirt-pocket carry)
  • Available in multiple styles, colors, and fabrics to suit the needs of the user

What I’d change

  • Nothing

Final thoughts

really like Tom Bihn’s Nik’s Minimalist Wallet.  Its design is the definition of functional minimalism: simple, yet with enough organizational features to still be useful; lightweight, yet with high-quality, durable materials and construction, and with a small enough footprint and thickness to easily be carried in the back or front pants pocket or even front shirt pocket.  Its many colors, materials, and styles give the user many options to suit his or her EDC  needs.  Plus, the price is extremely affordable at $24-$32 depending on the Wallet style selected.  If you are in the market for a small, minimalist wallet that is durable and affordable, I would encourage you to give the Tom Bihn’s Nik’s Minimalist Wallet a serious look.

Price:

  • $24 for Wallet #1
  • $26 for Wallet #2
  • $30 for Wallet #3
  • $32 for Wallet #4
  • $30 for Wallet #5

Where to buy: Tom Bihn
Source: The samples of this product were provided by Tom Bihn.

Filed in categories: Reviews

Tagged: ,

Tom Bihn Nik’s Minimalist Wallets review originally appeared on The Gadgeteer on August 4, 2019 at 8:39 am.

Note: If you are subscribed to this feed through FeedBurner, please switch to our native feed URL http://the-gadgeteer.com/feed/ in order to ensure continuous delivery.

Kenu BingeBank all-in-one powerbank and wireless charger review


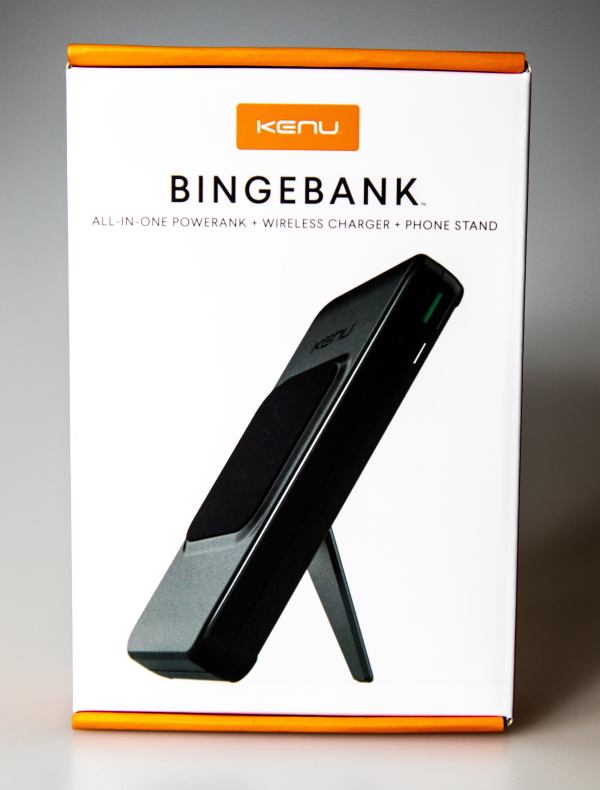
REVIEW – It seems that every computer or technology-based store and website is selling power banks in every shape, size, and capacity. The key to getting the best fit and right deal is the versatility of the power bank. The Kenu BingeBank is another entry into this crowded field. Let’s see how it matches up!!

What is it?

The Kenu BingeBank is a power bank that is capable of delivering 18W power to charge up to three devices at once and 10000 mAh capacity for up to 3X charges. It can also support up to approximately 30 hours of video playback.

What’s in the box


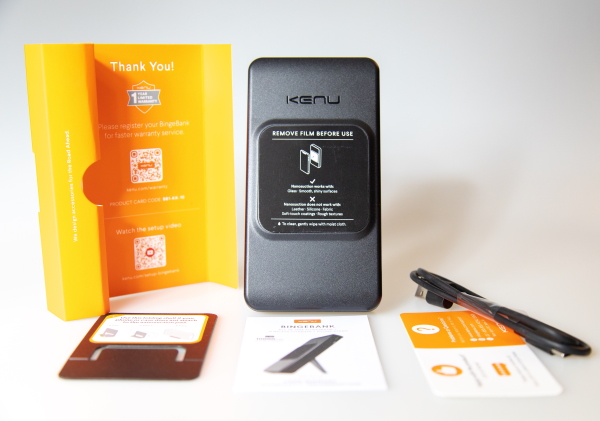
1 x Kenu BingeBank
1 x Nanosuction Adapter Shelf
1 x USB-C Charging Cable
1 x User Guide

Design and features

Specifications

Features
CHARGE UP TO 3 DEVICES AT ONCE: Three ways to charge: (1) Qi-Wireless, (2) Quick Charge 3.0 USB, (3) 18W Power Delivery USB-C input/output. Charge an iPhone 8 or later up to 50% in 30 minutes (Lightning to USB-C cable req., not incl.)
CHARGE UP TO 3X OR PLAY VIDEO 30 HRS LONGER: The 10000mAh lithium-ion external battery charger extends your smartphone viewing session with power to spare so you’ll never miss another episode.
PREMIUM DIE-CAST KICKSTAND AND MAGIC NANOSUCTION GRIP: BingeBank is the only portable power bank that combines an exclusive die-cast metal kickstand, Qi-wireless charging, and a nano suction phone grip, letting you BINGE-WATCH, VIDEO CHAT, or LIVE STREAM HANDS-FREE while you charge! Stop searching for cables and outlets when you travel, charge anywhere with your screen in view.
CHARGE LAPTOPS: Our power pack is capable of charging a USB-C compatible MacBook, MacBook Pro, or MacBook Air (USB-C to USB-C cable req., not incl.)

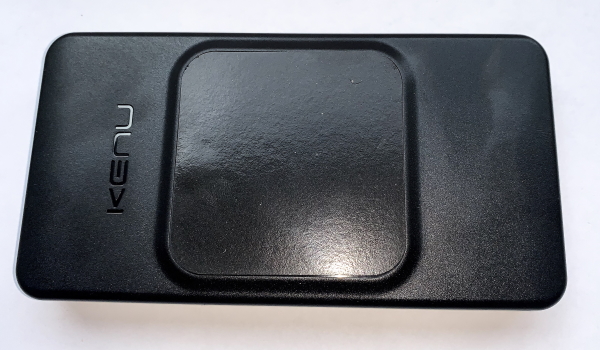
On the front side of the Kenu, there is the branding and the raised nanosuction phone mount Qi wireless charging pad.

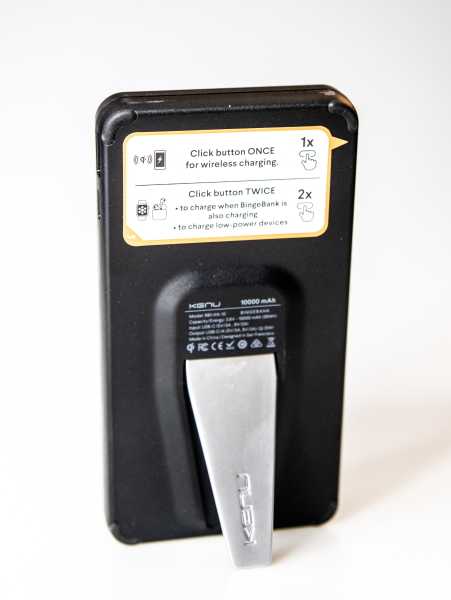
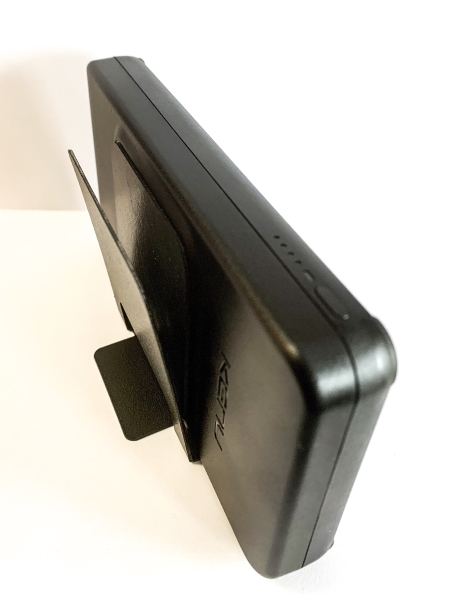
On the back of the BingeBank, there is a kickstand, and above it, there are operating instructions for charging.

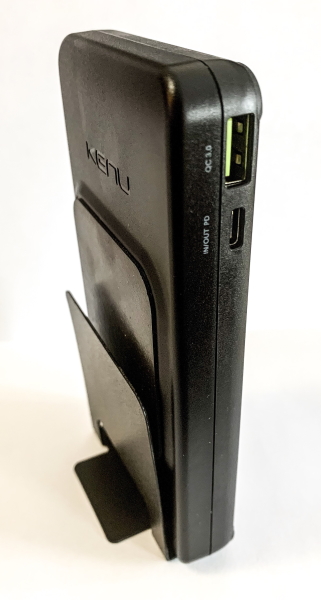
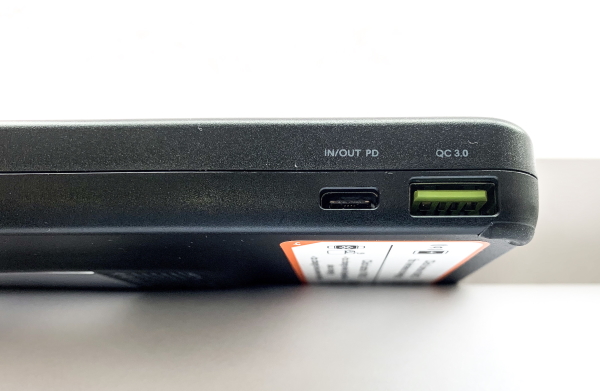
On one edge of the BingeBank, there are the connectivity ports. From left to right as shown below, there is the Type-C input/output 18 W Power Delivery port and the USB power output Quick Charge (QC) 2.0/3.0 port.

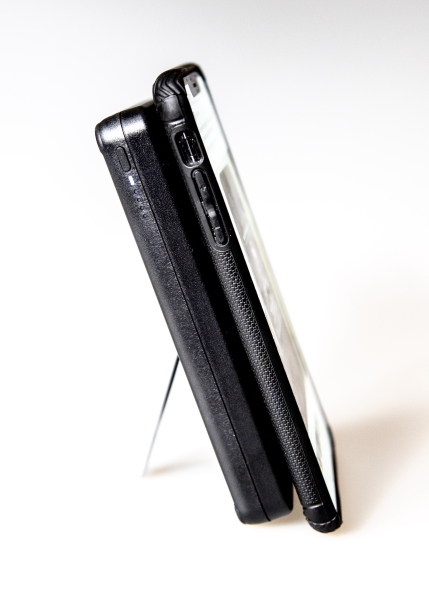
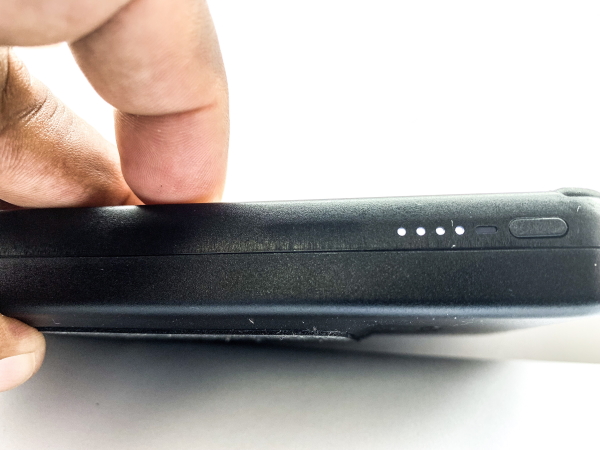
On the opposite edge of the power bank, there are the 4 LED charging lights, each representing 25% of the charge level and the on/off power button.

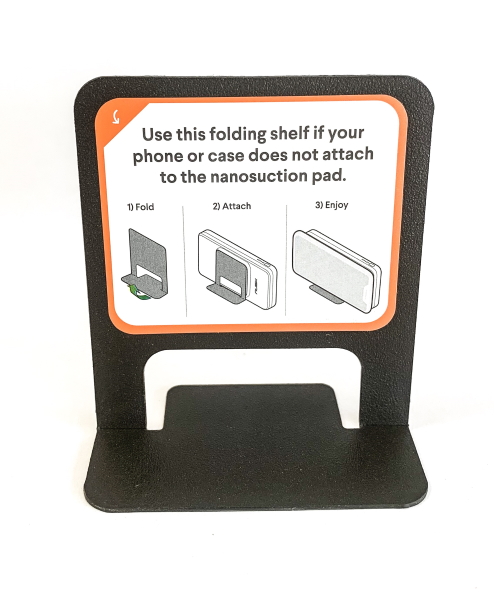
If your phone does not work with the nanosuction pad, Kenu has included a separate folding shelf.

Performance

Like any other power bank, the first thing that you do when you take it out of the box is to charge it. It is an all-black power bank with a silver kickstand, a bit smaller than the iPhone 10x Max and about twice as thick. The first feature I tried was the nanosuction charging pad. It works well even with my case on my phone, but I do wonder how long the suction will work before it no longer adheres. The wireless charging works well, and the instructions on how to just charge the phone as well as charging the phone while charging the power back work as designed. The Quick Charge (QC) function via a cable also works well and I was able to use the USB-C power delivery function to charge my iPad. No USB-C to USB-C cable is included.

As shown below, the included folding shelf allows you to use the Kenu either horizontally or vertically with or without the kickstand. My attempts to use it with my iPhone were not successful. Maybe I was doing something wrong or maybe I am confused about its use, but the folding shelf is not rigid enough or strong enough to support the phone and the Kenu without using the kickstand. Honestly, I do not really see any beneficial use for it. The kickstand that is built into the device allows it to stand in both portrait or landscape whether charging with a cable or wirelessly.

What I like

  • Build quality
  • Battery capacity
  • Kickstand
  • Suction attachment
  • Charging options including QC 3.0

What I’d change

  • Since the device offers USB-C power delivery, a USB-C to USB-C cable should be included

Final thoughts

The Kenu BingeBank is a nice affordable power bank that incorporates features that make it convenient and easy to use. The battery capacity is great and the kickstand allows me to use it at eye level while charging. I like it!!

Price: $59.95
Where to buy: Kenu website and Amazon
Source: The sample for this review was provided by Kenu

Filed in categories: Reviews

Tagged: ,

Kenu BingeBank all-in-one powerbank and wireless charger review originally appeared on The Gadgeteer on August 3, 2019 at 10:00 am.

Note: If you are subscribed to this feed through FeedBurner, please switch to our native feed URL http://the-gadgeteer.com/feed/ in order to ensure continuous delivery.

Adonit Note iPad stylus review

REVIEW – This an active stylus for the 2018 and later iPad and iPad Pro. This stylus provides all of the precision and low latency of the Apple pencil without the pressure sensitivity or tilt detection. The Adonit costs less than an Apple Pencil, but is it worth it? Read on to see what I think!

What is it?

The Adonit Note is an active stylus that takes advantage of a technology included with the 2018 and later Apple iPad and iPad Pro.  The pen has an internal rechargeable battery and antenna. It communicates with the iPad but does not need to be paired with it using Bluetooth. Using this technology the pen is able to draw on the iPad glass with high precision and low latency so that it looks and feels like it is applying ink to the screen.

What’s in the box?

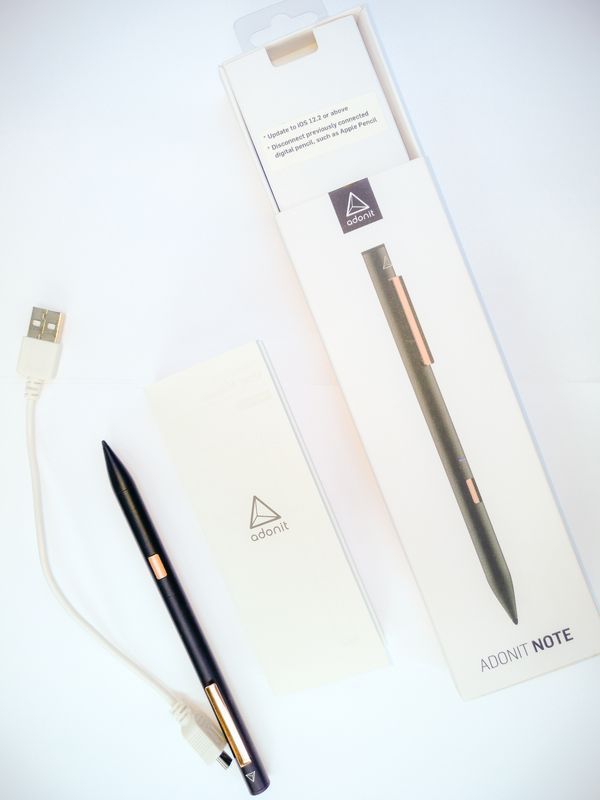
The Adonit note comes with the following:

  • Adonit Note
  • User Manual
  • Micro USB cable

Hardware specs

There are only a few technical details about the Adonit Note.

Pen diameter: 9 mm
Pen Length: 154 mm
Pen weight: 13 grams

Design and features

Unboxing

The Adonit Note comes in a telescoping box. The exposed inside of the box has a sleeve which holds the directions (printed in 11 languages) and a micro USB cable.  The pen is packaged in a foam rubber cutout below. 

The cable is about 8.5″ long. One of the features of the pen is that it can be used while it is charging, but in order to take advantage of this feature, at least a 24″ cable should be included.

Build

The pen comes in two colors: black and silver. Each design has the same rose gold accent on the power button and the pocket clip. The Adonit tetrahedron is printed in white above the pocket clip and Adonit Note is printed on the barrel opposite the clip. The pocket clip is not replaceable but is made of sturdy metal, with a  welded bead at the base to make contact with the barrel.

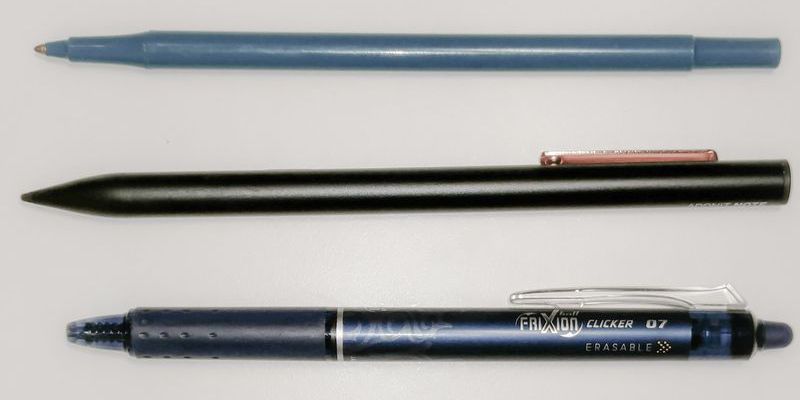
The top of the pen has a micro USB port surrounded by a plastic end cap. It seems that the diameter of the pen is based partly on the dimensions of the power adapter. Having it placed at the top is a good location for access even while the pen is being used. It is a little thicker than a typical disposable ball-point pen or no. 2 pencil.

The pen can still be fastened with a grip enhancement. The one I borrowed from my son covered up the power button but still allowed the button to function.

The barrel of the pen is completely smooth; it is easy to hold in the summer but it may be more challenging to hold in the winter months with drier hands.

The power button is located on the side of the barrel, just below a multicolored LED. The power button location may be a sensible choice based on the internals of the pen, but it seems like a poor choice for general usability. I continually turn the pen on and off based on my rather unconventional left-handed scrawl. I think a better location for the power would be at the top of the barrel opposite the pocket clip.

The tip is a replaceable soft plastic nub that looks similar to a fine felt tip pen. It threads into the barrel.

Performance

Using the pen is as easy as powering it up and touching it to the iPad. Adonit is not advertising how they technically achieve this bit of magic, but I suspect they are tricking the iPad into thinking an Apple Pencil is near and triggering the high precision digitizer scan mode. The Adonit does not have a Bluetooth radio, which is used by the Apple pencil to relay tilt and pressure, so the iPad treats all input as occurring at the rest angle with minimal pressure. The Adonit has an accelerometer, but this is only used to turn off the pen when not in use to conserve power. Because all the magic happens because of the iPad hardware and software, there are a few compatibility constraints:

Adonit Note is designed to work with the 2018 and later iPad and iPad Pro. Compatible devices, as of July 2019, include:
iPad Air (3rd Generation), model A2152, A2123, A2153, A2154.
iPad mini (5th Generation),A2133, A2124, A2126, A2125
iPad (6th Generation),A1893, A1954
iPad Pro (3rd Generation, 11″& 12.9″) A1876, A2014, A1895, A1983

Additionally, the stylus only supports iOS version 12.2 or newer and any previously connected digital pencil, such as Apple Pencil, must be disconnected.  Beyond these constraints, the Note just works. I think it is cool how it can be shared between two iPads without having to pair or connect via Bluetooth.

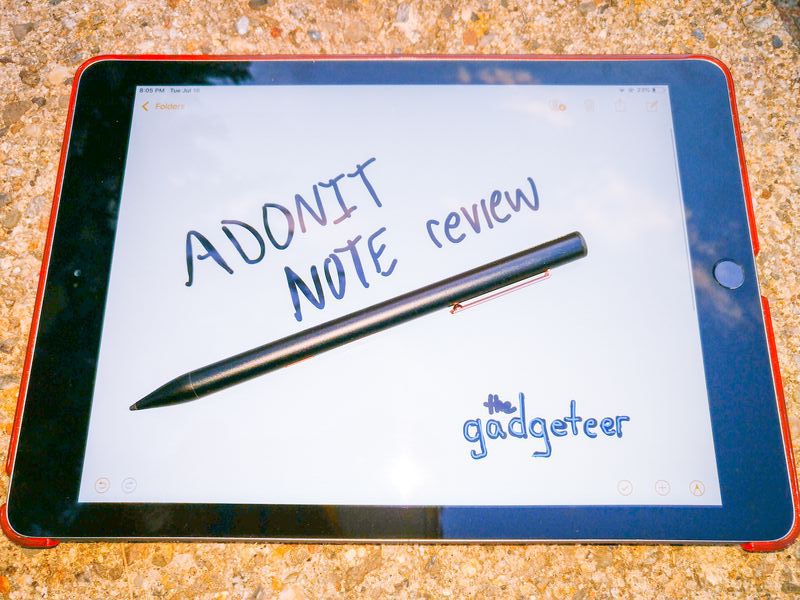
I have some example text below


This is also an example of a drawing.

Both of these were done in Apple note, so no ink flare was done on the text and no blending was done on the drawing, allowing native appreciation of how the iPad renders the pen input. Please don’t judge the stylus or the iPad for lack of capability in either of the above examples.

What I like

  • no-configuration design
  • quick charging

What I’d change

  • Location of the power button

Final thoughts

The Adonit Note succeeds at a basic design philosophy that few gadgets these days can attain: it does one thing, but it does it very well. If all you are looking for is the “ball point pen” for your iPad then the Adonit will fit the bill perfectly. If you are looking for more creativity, then a pressure and tilt sensitive design may be a better option.

Price: $49.99
Where to buy: Amazon.
Source: The sample of this product was provided by Adonit.

Filed in categories: Reviews

Tagged:

Adonit Note iPad stylus review originally appeared on The Gadgeteer on August 3, 2019 at 8:03 am.

Note: If you are subscribed to this feed through FeedBurner, please switch to our native feed URL http://the-gadgeteer.com/feed/ in order to ensure continuous delivery.

Swann Floodlight Security Camera review

REVIEW – Not all that long ago we had an event where someone let themselves into our unlocked car (my bad), and root through our glovebox. Not unexpected as we live in an area where cars are broken into frequently and packages are stolen all the time. What was infuriating is that I had/have a nest cam clearly visible on the garage and this person sat in the car with the door open for 15 minutes and casually looked through all the papers in our car. Time to up the game. Swann has a new Floodlight Security Camera with motion detection, siren and two-way audio. Review time! To the keyboard.

What is it?

What do you call a floodlight that also has a security camera? It should have a name that aptly describes what it is without further definition… Hmm. How about a Floodlight Security Camera? All kidding aside, Swann has given it a name that ensures it will show up in search results which is likely more than half the battle in getting eyes on your product. As you would expect, this is an all-in-one unit that could result in you having fewer things hanging off the side of your house or garage.

What’s in the box?
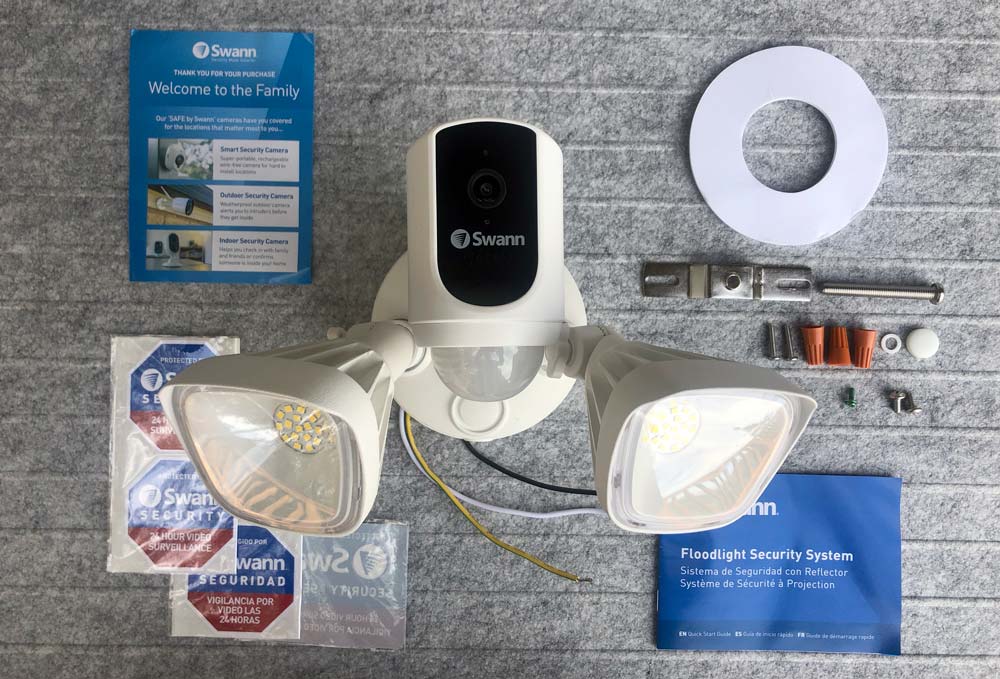
  • Security Floodlight Camera
  • Double-sided foam mounting ring
  • Mounting hardware and wire nuts
  • Manual and welcome card
  • Security stickers and window badge

Hardware specs

Video: 1080p (1920 x 1080 px) resolution, Wide 125º viewing angle, True Detect™ PIR thermal/motion sensor (≤ 32ft, 270º)
Night vision: Infrared night vision (32ft in B&W), Floodlit night vision (100ft in color)
General: 2500 lumens brightness, 5000K color temperature
Video storage: Internal & Secure Cloud
Audio: 2-Way Audio (microphone & speaker), Siren (≤ 75dB)
Operating temperature: -4ºF to 140ºF / -20ºC to 60ºC
Dimensions and weight: 9.5″ x 9.5″ x 6.7″, 2.44lbs
Weather resistance: Indoor & outdoor ready (weatherproof IP65 rated)
Power Source: Hard Wired. Connects to existing wiring, 100~240V AC 50/60hz, 30W power
Wi-Fi Frequency: 2.4GHz (wireless range up to 65ft/20m*)
App: SAFE by Swann (available on iOS & Android)

Design and features

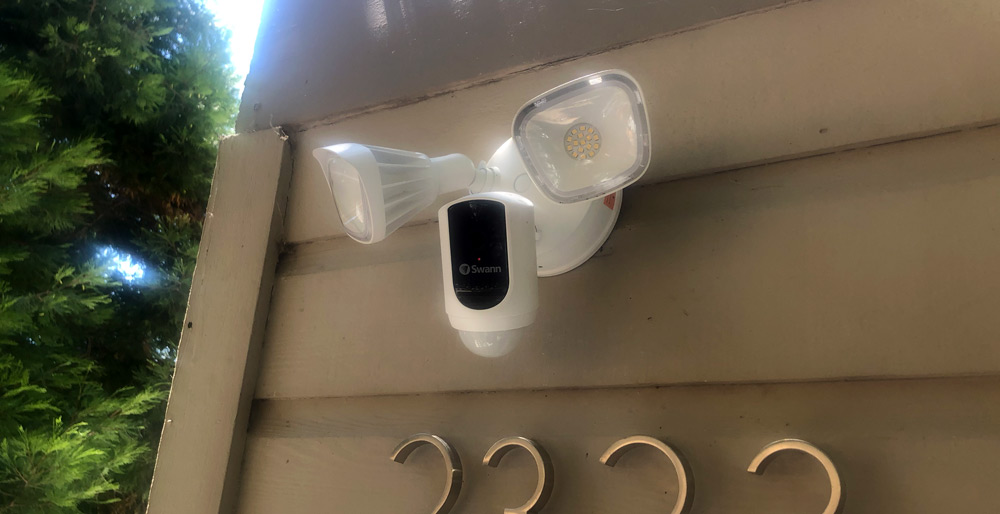
The most relevant design feature is that this looks like a traditional floodlight. It’s not immediately obvious that this product has a camera and that’s to its advantage. Thieves and nefarious types scoping your property may be less concerned with a floodlight than with something that is clearly a standalone camera until that floodlight is more than a floodlight.

It has two-way audio so you that you can use your app to speak directly through the fixture as well as hear what’s going on. A built-in siren can be set to automatically sound on motion detection.

The fact that it’s hardwired is also great as it means you’re not at the whim of battery issues unless of course there’s a black out or your power is cut. You likely have a bigger problem in both of those cases.

Setup

I’ll refer to the Security Floodlight Camera as SFC going forward to keep things easy. You’ll need to be comfortable with some electrical wiring and lightweight home-fix-it skills. For this install, we’ll make the assumption that you are replacing an existing light fixture. Let’s get set up.

Go to your electrical panel and find the breaker switch for the light you’re replacing. Make sure to switch it off and check that power is not present.

1. Remove your current light fixture and mounting bracket (likely a combination of screws and electrical wire-nuts). Take note if this light is connected to a switch. If it is you’ll want to bypass, or tape/mark that switch not to be used as you will not want the SFC accidentally switched off.

2. Install the double-sided mounting tape circle to the back of the SFC.

3. Install the mounting bracket for the SFC allowing the home’s electrical wires to extend beside the main arch.
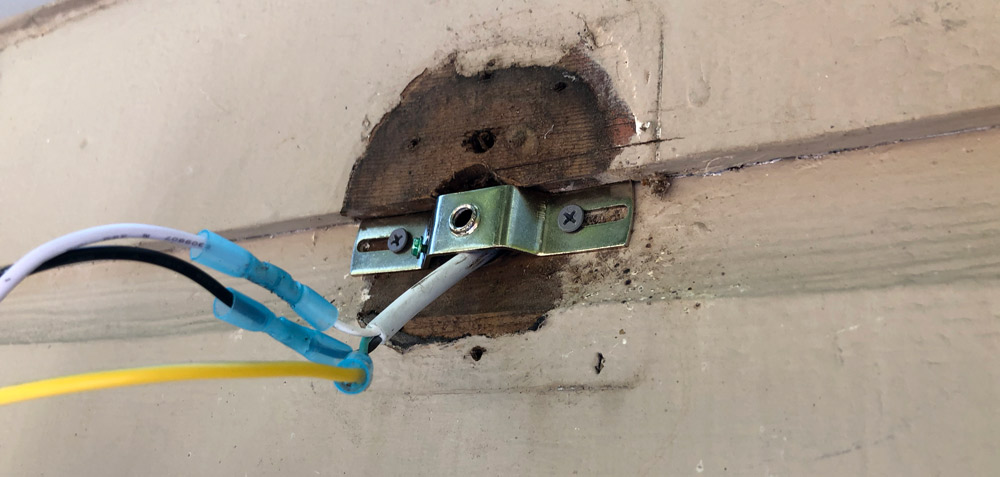
4. Wire the positive, negative and ground wires to your home’s electrical wires using the supplied wire-nuts. (You’re likely to have a more traditional junction box than my above scenario where I used crimp connectors that I had on hand so that I could feed the excess wiring through the hole before mounting.)

5. Turn on your breaker and confirm that you have the SFC correctly connected. The lights should come on initially (but could time out) and the blue LED should start blinking for pairing the wifi. If all is good, turn the power back off and finish the hardware install.

6. Peel the remaining backer off the mounting tape, insert the long mounting bolt through the SFC with the rubber o-ring in place into the mounting bracket and tighten (If you missed the adhesive step earlier, cut the ring in one spot so you don’t have to undo the wiring).
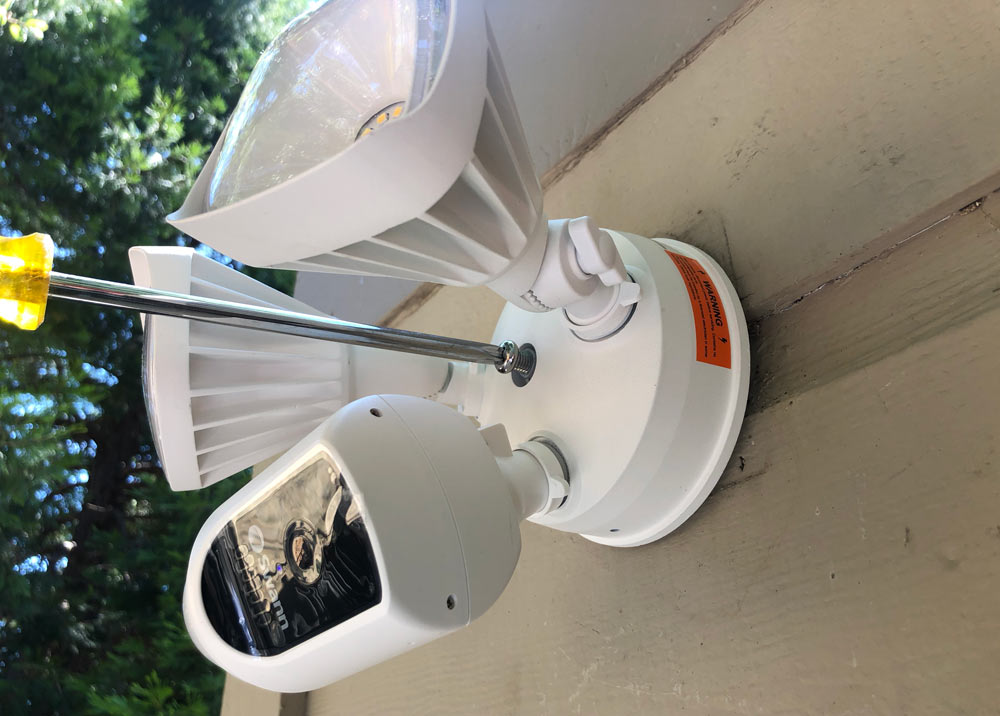
7. Position your lights and camera by using the wingnuts to adjust the toothed pivots. Use the collar to adjust the rotation. Use care to turn any of these in the direction that involves the least rotation to avoid pulling internal wires unnecessarily. Leave them a bit loose as you’ll end up adjusting them to suit your specific situation after the next steps.

Now it’s time to set up the app.

8. Find the app in the appropriate store for your device, download, open and register for an account.
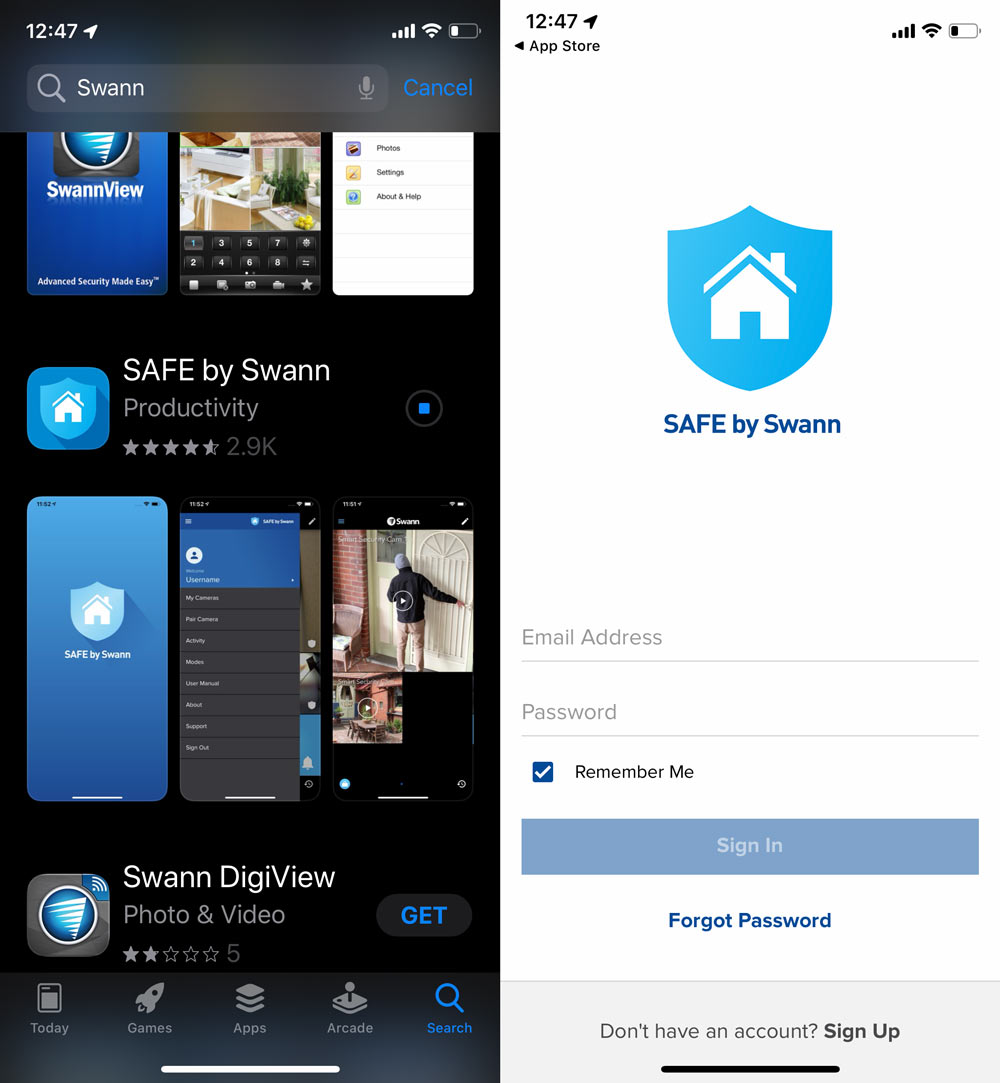

9. Turn on your breaker switch (hopefully for the final time) to power up the SFC and confirm the blue LED is blinking.

10. Open the app and follow the instructions to pair your new camera. You’ll need to know your wifi network name and password and be prepared to do the app to settings, back to app jump that all the kids are doing these days.
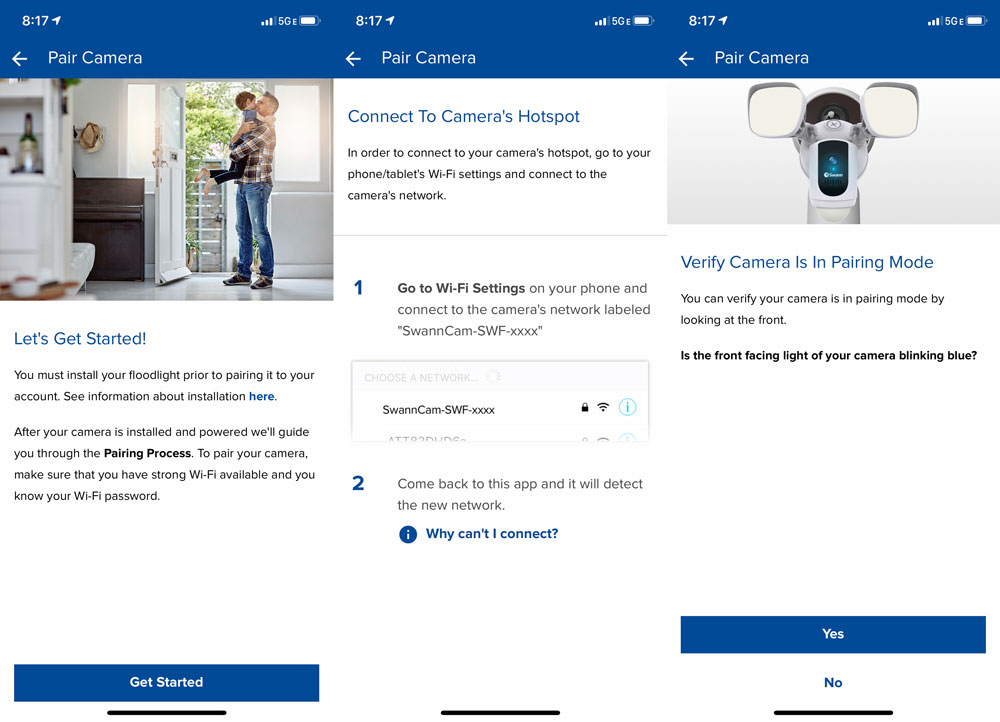
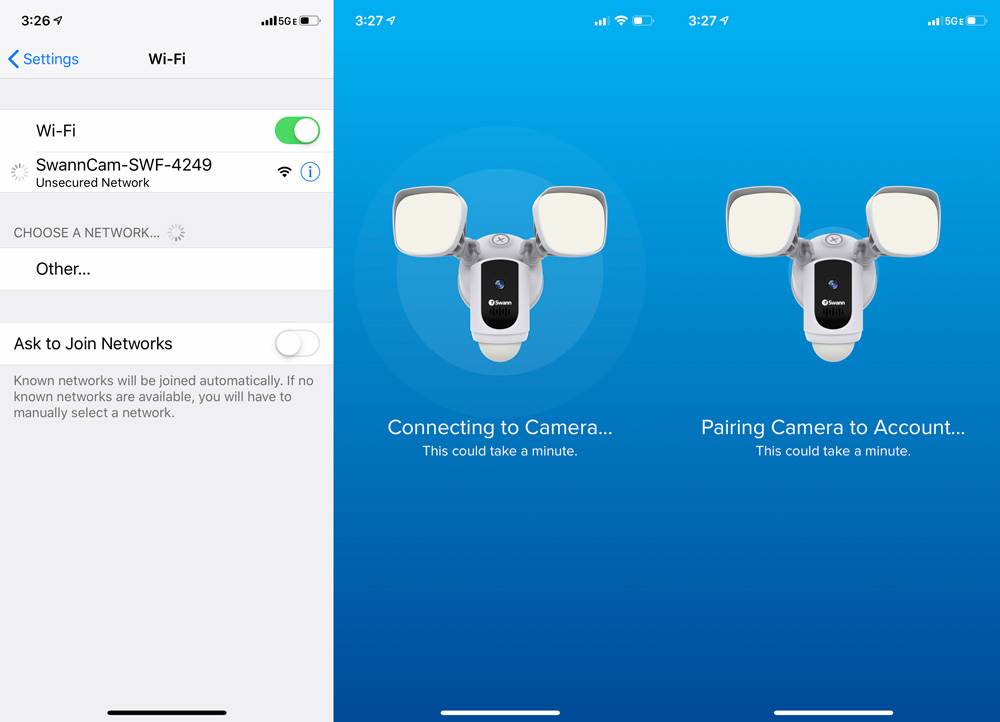
11. If all that finished properly you should be good to go. The remaining set-up is all physical positioning and app preferences which ends up being a bit of back and forth between both of those. Let’s move on to performance and address that in the rest of the review.

Performance

Once everything is up and running, the system works like this…

When the Security Floodlight Camera detects motion the light, siren and camera activate based on how you’ve set them up in the app. Simultaneously you will receive a push notification on your device through the app. Click on the message and you’re taken into the app, directly to the Activity page where you will find recorded clips ordered from most recent to oldest. Here’s a screenshot of the video quality which is set to medium quality for this review.
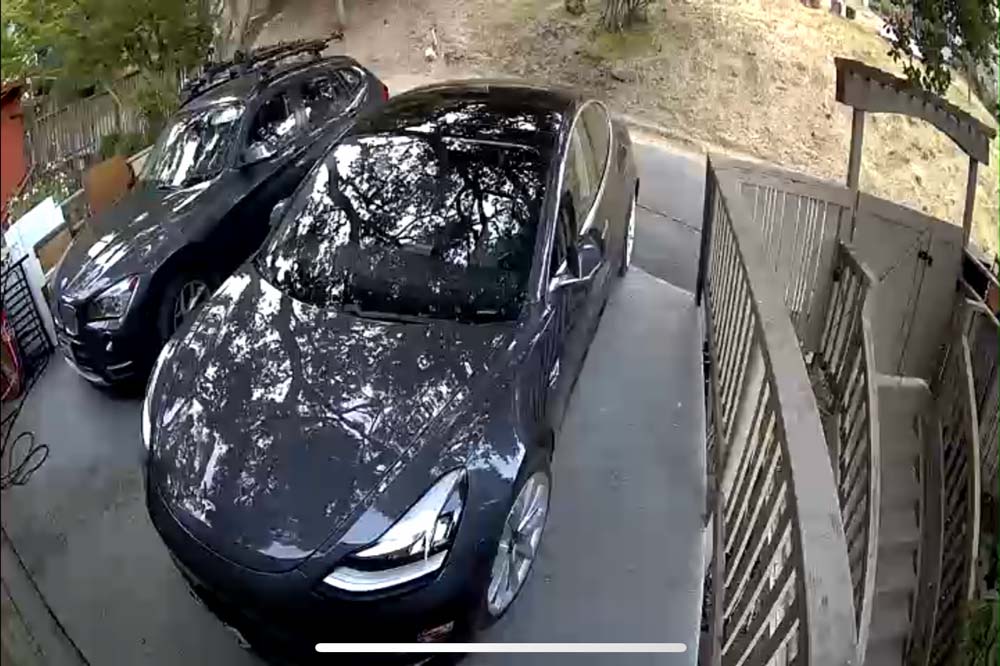
Swann recommends that the fixture is mounted at least 8 ft off the ground. My garage is only 8 feet tall total so using the existing mounting location it sits just under 7′. As you can see my driveway is also pretty short so there are a couple of camera settings I needed to make right away. Here’s what those settings screens look like.
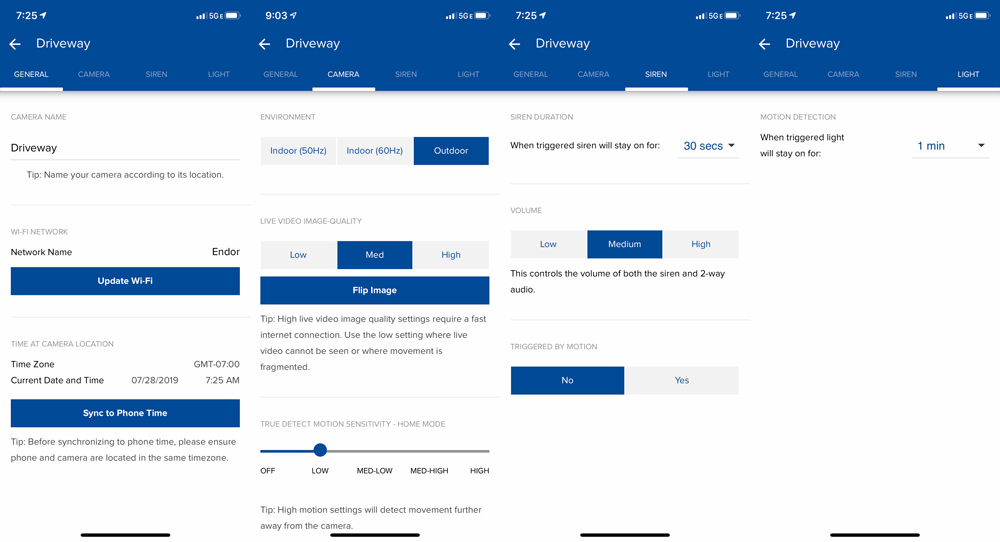
Under the Camera tab, I had to set the motion sensitivity to Low, as anything higher generated an alert for every single car driving by as well as anyone walking their dog. These were also triggering push notifications (as they should) which meant I was getting a couple a minute during the day as we’ve got a lot of construction activity on our street. I went ahead and turned off motion detection until I could fix the settings.

Even at the low sensitivity setting, I was getting too many false motion detects. Each setting is a discrete position on that slider instead of a 0-100% bar where you can just find the real setting you need. To solve that I had to tilt the camera down further to shorten the range. This is a trial and error adjustment as there’s no visual in the app to estimate where the “trigger” line is for motion. My situation may be an edge case so ignore if your setup is more traditional. Now set up, I re-enabled the motion detection.

When you hop into the app normally, your landing page gives you access to Lights and Siren toggle buttons as well as a live view you can click into. I named the camera ‘Driveway’ so this will be whatever location name you choose.
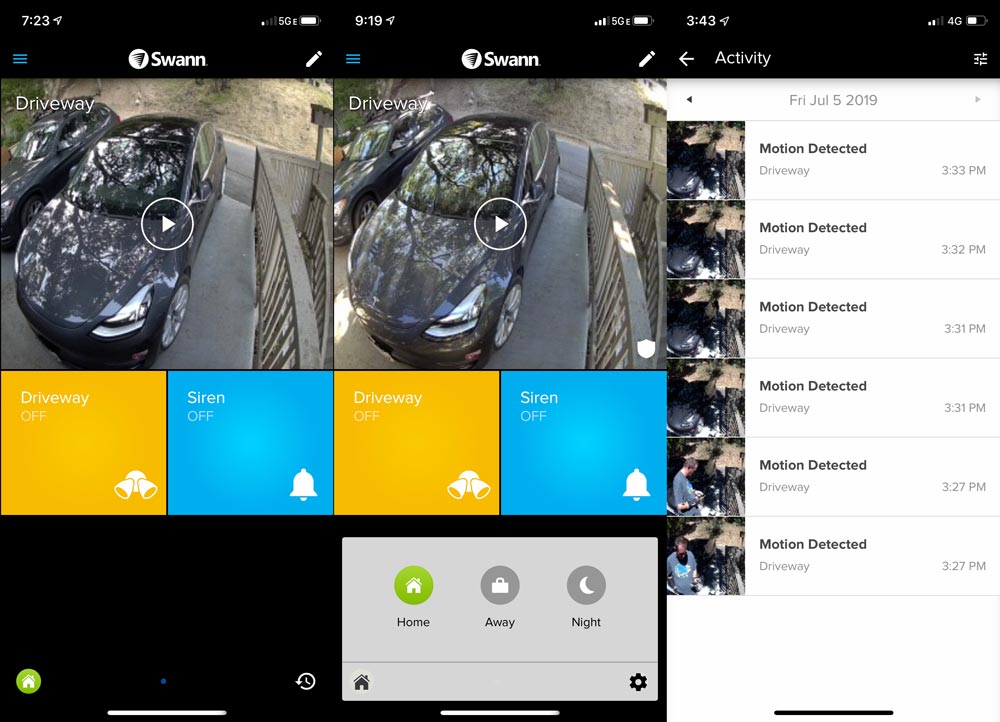
The bottom left icon lets you toggle between Home, Away and Night settings and will show whatever icon is currently active. Each of these can be set up with their own settings for camera, siren and lights to match your needs.

The bottom right icon is a quick jump into activity recordings. The built-in memory card stores 8 days on a rolling basis where day 8 overwrites day 1 to start the cycle again. If something isn’t visible on the Activity page, check the backup at the very bottom of the camera settings in the app by pressing ‘View Camera Backup’. You can upload clips to Swann’s Secure Cloud for two days and if you need more storage you can upgrade to a subscription plan that includes 30 days of storage for $4.99/month within the app.

The app takes a little navigating to get used to as almost every screen has additional settings and buttons so allow yourself some time to get comfortable in there. Clicking into the live view (main image) gives you access to lights and siren as well as additional buttons for Talk, Record and Capture.
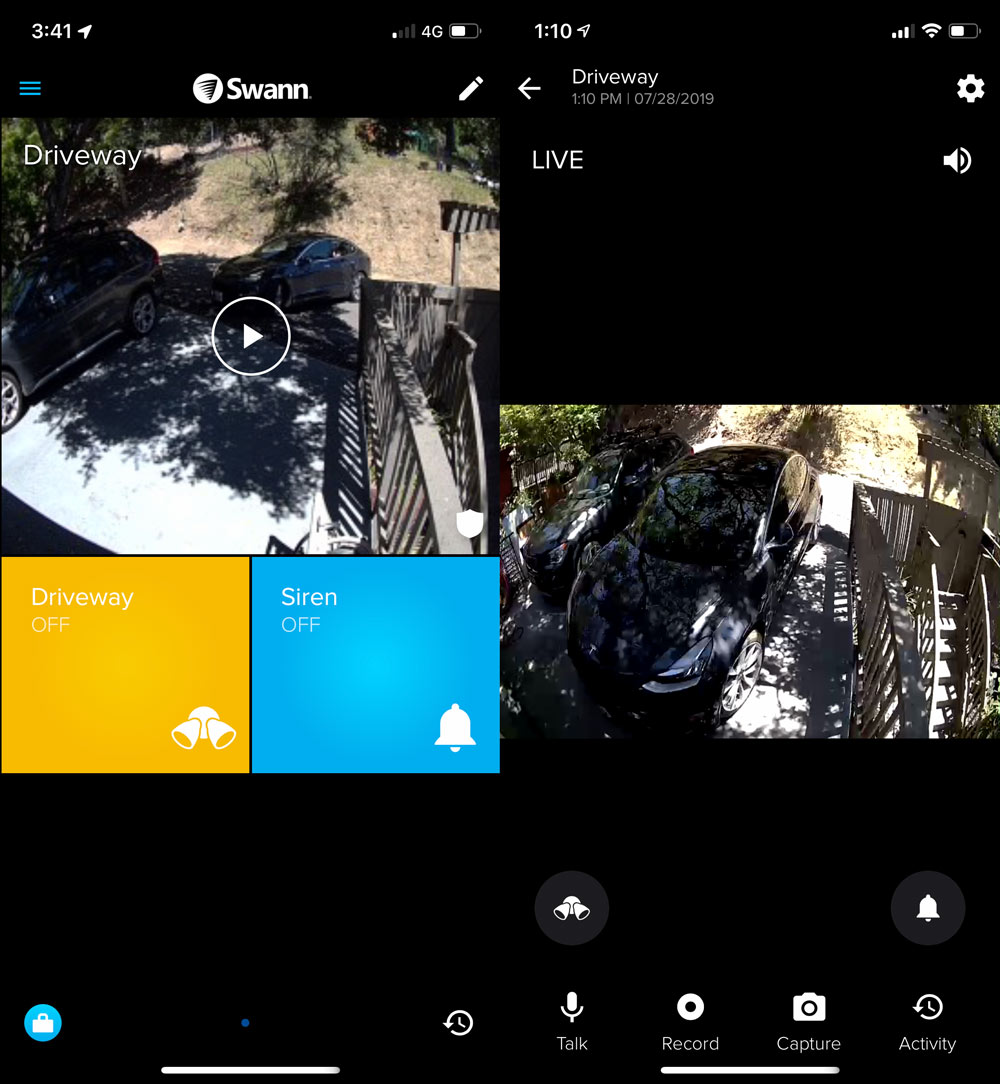
With talk you can converse with your thief, or tell your kids it’s time to put down the basketball and come in for dinner. Record starts a video recording whereas Capture takes a photo.

The light settings can be set to stay on for .5, 1, 2, 5, 10 or 15 minutes after motion detection and you can set the brightness level anywhere from 1-100%. You should also know that the lights will not activate in sunlight (which in general shouldn’t be an issue). I’ve currently got the brightness set to 35%, but here’s a shot with the light at 100% for reference. Plenty bright to illuminate a shady character or wildlife in the dark.
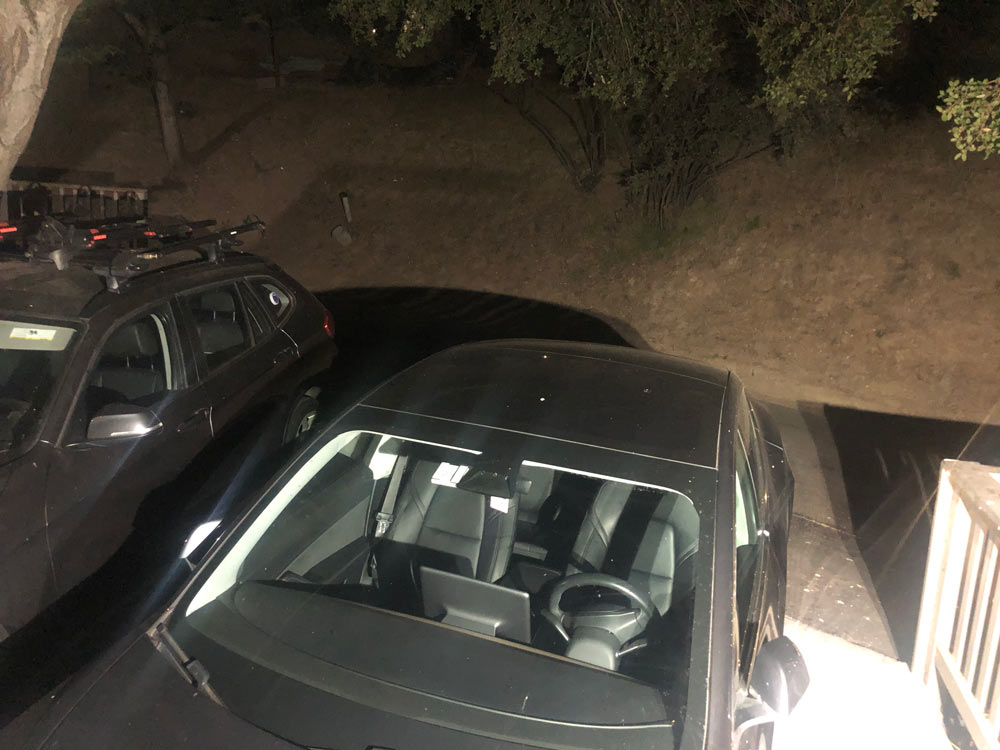
The siren has its own Yes/No toggle for responding to motion and can be set to sound for seconds (5, 10, 15, 30) or minutes (1, 2, 5) at Low/Medium/High volume which also sets the level for 2-way audio. Sirens are not very effective here in Oakland unless you’ve got a subscription with a security service to respond, so it’s more for the owner’s benefit in that case. Our driveway is also covered by a large tree that moves a lot in wind resulting in false alarms, so I have the siren set not to activate. I did test the siren though and the low setting isn’t loud enough to cause anyone any fuss, so I’d recommend setting to High if you’re actually trying to use the alarm as a deterrent.

You’ll definitely want to set up the Home, Away and Night settings so that the alerts that come through are ones that matter. With four of us at home on different schedules, it’s unlikely this will get switched when it needs to. Here’s a friendly nudge at Swann to look into supporting IFTTT for helping that automation take a step forward.

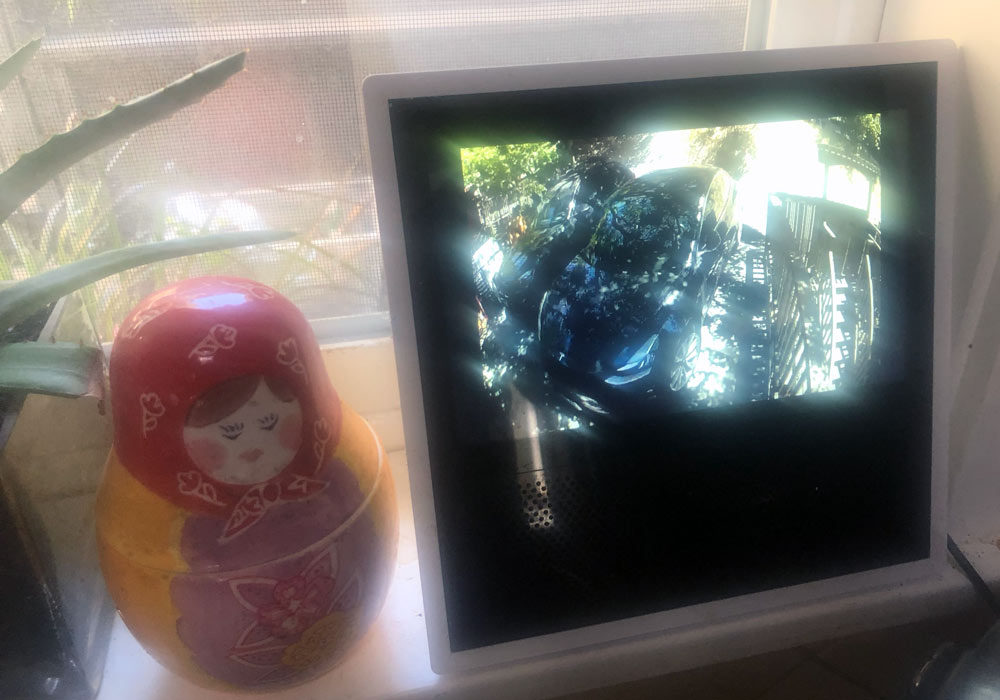
There is integration with Alexa or Google Assistant for working with some home devices you might have. Ask Alexa to “Show Driveway” and you get a live view after about 15 seconds of thinking.
What I like

  • Pretty low effort install
  • Bright lights with good coverage
  • Easy to access recordings without recurring monitoring fees
  • Very configurable (lights, siren, motion detection)

What I’d change

  • Better method for determining detection range during setup
  • Automation for determining Home, Away, Night

Final thoughts

The Swann Floodlight Security Camera is installed and my driveway lights up when entered and I get a motion alert on my phone and watch. I haven’t had and uninvited car visitor since installation and continue to hope I won’t, but I do feel safer and more aware of what’s happening in my driveway. The lighting is superb and the automatic recordings make it easy to see and hear what happens in my driveway when I’m not around. Thanks Swann!
Price: $179
Where to buy: Swann and Amazon
Source: The sample of this product was provided by Swann.

Filed in categories: Reviews

Tagged:

Swann Floodlight Security Camera review originally appeared on The Gadgeteer on August 2, 2019 at 11:00 am.

Note: If you are subscribed to this feed through FeedBurner, please switch to our native feed URL http://the-gadgeteer.com/feed/ in order to ensure continuous delivery.