iQunix Noma Laptop Stand review

REVIEW – With laptops adding more cores and getting thinner and faster, the heat build-up is real in todays portables. The convection built into turbo-charged laptops works much better when there is a clear higher-level place for the air to flow. iQunix has developed a very simple yet eye-pleasing stand called the Noma. I was sent one to test and am here to report my findings.

Note: Photos may be tapped or clicked for a larger image.

What is it?

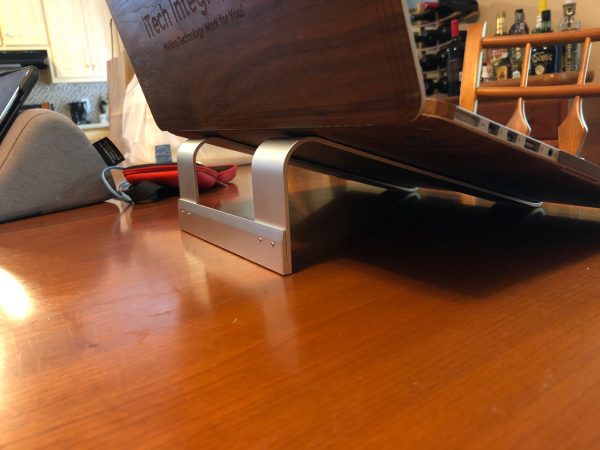
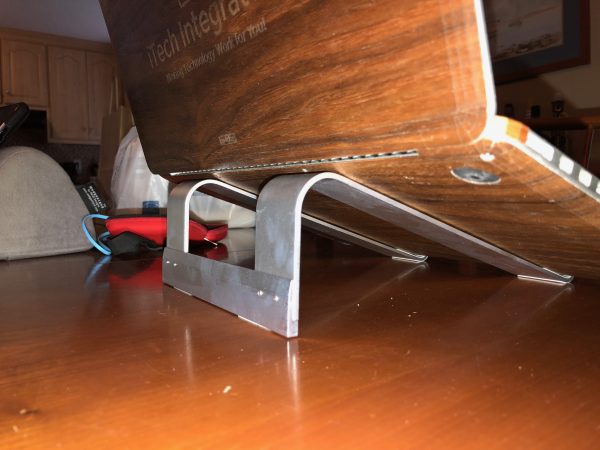
The iQunix Noma is an aluminum “L” stand that allows the stack effect to cool your laptop – increasing it’s life, and giving you better performance and better battery life. (Heat is the enemy of all electronics. Lowering the operating temperature by only a few degrees can help.)

Setup

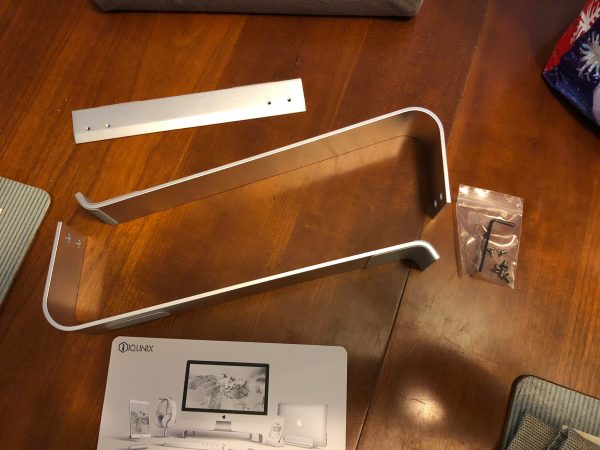
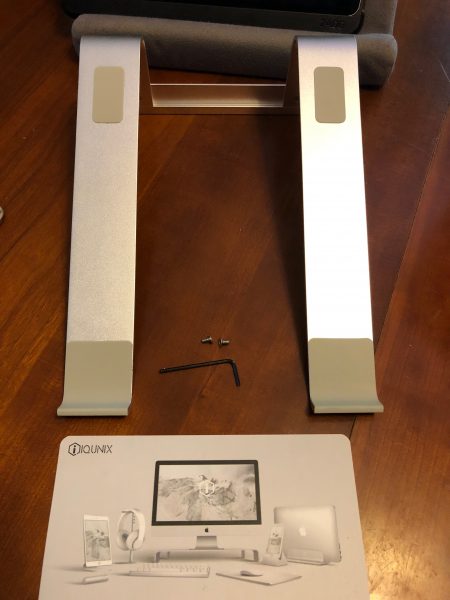
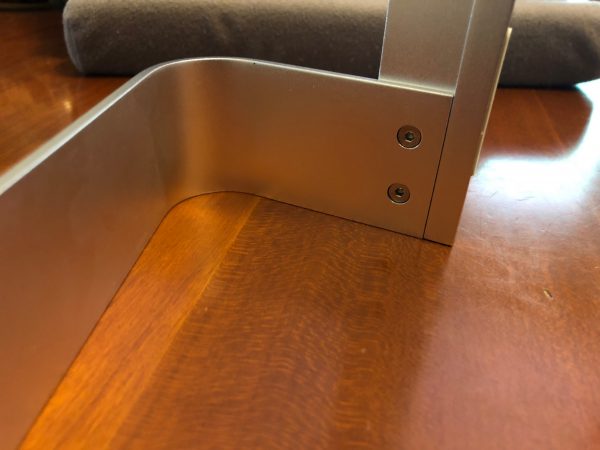
The Noma stand arrives as three pieces of high-quality aluminum that fit together with the (included) screws to form a 10” long ramp that raises the far end of your laptop 3” off a flat surface. This slants the keyboard 18º from the surface, and holds the outside edges 7.25” apart. Every place that would touch your computer or desk is covered by a grippy silicone pad in a neutral beige. I put it together in maybe 4 minutes after opening the box and photographing the pieces. There are no instructions included.

What’s in the box?

  • 2 ramps with silicone pads
  • 1 connector that attaches securely to hold legs, also with pads
  • 6 countersinking hex-driven machine bolts
  • 1 Allen wrench to fit the screws
  • 1 marketing card

Design and features

I was a bit surprised to see the stand come disassembled, but really appreciate the nod to less air in a package. It would have taken twice the cardboard to surround the 10”x7.25”x3” stand fully assembled, rather than the 11.75”x1.75”x3.75” unbleached cardboard box that arrived. It would be nice to know if the tiny piece of styrofoam that held things for shipping was as highly recyclable as the rest of the packaging.


The pieces fit together precisely. There is a lip across the base of the crosspiece that the legs sit against, and the holes line up to where the weight of your laptop rests on that solid lip, rather than the screw posts. With no give or play in these joints, I can’t imagine ever having a screw get lost or need tightening, but it’s nice to have a few extras.


The simplicity of the stand belies its effectiveness. When using my mid-2014 MacBook Pro with 2.2 GHz i& and 16GB RAM to play a graphic-intensive online game (World of Tanks Blitz), I noticed it was much less warm than when I played it on the same desk flat. I’m not a fan of using it at the 18º angle for long periods of typing, but for bouts of tanking, it’s not too bad.

If there are additional sub-headings that you want to add in the main part of your review, use H3 titles. Examples that you might want to use but can remove if you don’t…

What I Like

  • Highly ecological design and packaging
  • Tight, well-designed parts
  • Simple and Effective
  • Works with laptops or tablets, from 9” to 17”

What needs to be improved

  • Nothing, really.

Final thoughts

I’m not normally one to put my laptop on a stand. Save for the aforementioned game, most of the stuff I run on my Mac is limited to web browsers, RSS feed apps, and text processors. Occasionally, I’ll edit some video in iMovie. But not of it even taxes this 4-year-old workhorse. If I regularly connected to external projectors for presenting (which tends to take more video power), I’d probably use a stand at the presentation area to keep the fans from powering on. This is the simplest, least expensive, and tightest fit/finish I have seen of any stand, however. If you’re in need of a one-trick pony like this, you will probably not find one better for this price.

Price: $19.99
Where to buy Amazon
Source: The sample of this product was provided by company iQunix.

Filed in categories: Reviews

Tagged:

iQunix Noma Laptop Stand review originally appeared on The Gadgeteer on September 6, 2018 at 9:00 am.

Note: If you are subscribed to this feed through FeedBurner, please switch to our native feed URL http://the-gadgeteer.com/feed/ in order to ensure continuous delivery.

Jese Air Fryer review

REVIEW – With more and more people looking for healthier ways to prepare food air fryers are becoming very popular these days. I have been researching them myself recently so when I got the chance to review the Jese Air Fryer I didn’t hesitate.

What is it?

The Jese air fryer is a fryer that uses 360-degree rapid and dynamic airflow instead of oil to fry foods.

What’s in the box?

  • Air Fryer
  • Quick start guide
  • Cookbook
  • Users manual

Design and features

Black with brushed steel accents the Jese Air Fryer has a modern design that would compliment any kitchen. It’s rather large because of its 3.5-quart capacity, so it does take up a little counter space.

The timer knob and fryer basket are located on the front of the unit. The timer knob is large, and the numbers are pretty easy to read going from 0 to 40 minutes.

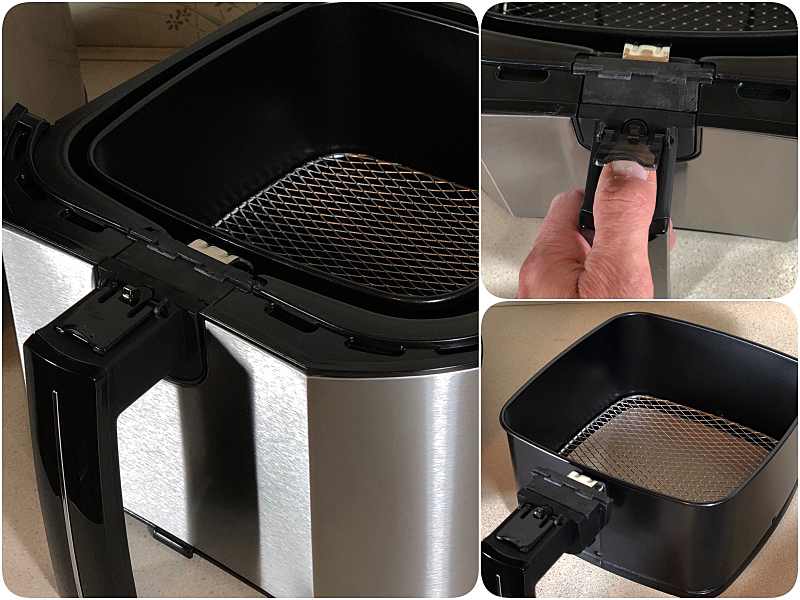
The fryer basket is two pieces. There’s a release button on the handle that’s covered by a small plastic flap. To remove the basket flip the flap up and push the button.

The air fryer has an automatic shutoff feature. It will shut off whenever the basket is removed and will restart when the basket is replaced. It will also shut off once the timer has expired.

The temperature setting dial is located on top of the unit. The numbers on the dial are easy to read with temperature settings from 180F to 390F. And there’s even a handy quick cook guide printed above the dial.

There are also two indicator lights for power and heating.

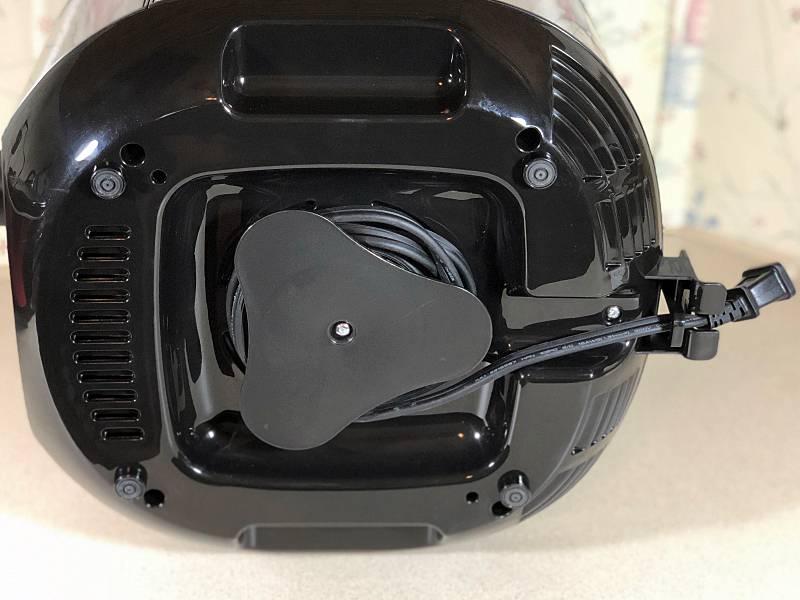
The power cord is a nice length, and I like that you can wrap the cord around the base for easy storage.

I did notice that the fryer is pretty quiet when cooking. I was happy about this because in my research one of the main complaints was how loud some of the fryers were.

Jese is cool to the touch while cooking. The only place where it gets hot is in the back where the hot air vents are located. Just make sure that it’s pulled away from the wall when using it.

One of the things I liked about the Jese is its versatility. You can use it for frying, grilling, baking, and roasting just about anything.

For my first time using the fryer I wanted to start with something simple, so I decided to cut up some squash and zucchini. With the air fryer, you don’t have to use a lot of oil. For the veggies, I used 1/2 tablespoon of olive oil and seasoned them with salt and pepper. I preheated the fryer for the recommended 3 min at 355-degrees. After about twenty minutes the veggies were done. They were delicious. They had a slight crisp on the outside but, the insides remained juicy and flavorful.

One thing about air fryers, you can’t just set them and forget them. You have to occasionally remove the basket during cooking and shake the contents so that they brown on all sides.

I decided to step it up for my next meal. I found an easy fried chicken breast recipe online. The fryer does come with a small cookbook but, I found that the recipes weren’t all that great. Fortunately, with the popularity of air fryers, there are tons of recipes available online. The chicken breast was fantastic. Total cook time was 14 minutes, flipping the breast halfway through. The outside had a nice brown crisp, and the inside was juicy and flavorful. Tip: use a spray oil (I used an olive oil spray) and lightly spray anything that you’re going to bread. This helps the breading brown up and gives it a little more crispiness.

In the past few weeks, I’ve used the Jese to make a lot of stuff. Fresh waffle chips, fried onion potatoes, frozen french fries, and frozen onion rings. I noticed that the frozen foods cooked up the best. They turned out crispier than the fresh foods I made. The fries and onion rings were the best I’ve ever made at home. But everything I’ve made using the fryer has turned out great. I can’t wait to experiment with even more recipes in the future.

The fryer’s 3.5-quart capacity is perfect whether you’re cooking for a family or just one or two people. However, with larger items like chicken breasts, fish or steaks you’ll probably only be able to fit 2 of each in the basket at one time. So cooking these items for a larger group will take some planning.

Clean up is easy. Because you’re not using a lot of oil the mess is minimal. The fryer basket itself is fully submergible, or you can just wipe it clean with a damp cloth.

What I like

  • Easy to use
  • Food tastes great
  • Versatility
  • Easy to clean

What needs to be improved

  • Can’t think of anything

Final thoughts

I love the Jese air fryer and have used it a lot in the past few weeks. I like the fact that it’s easy to use and the results are great every time. And it doesn’t hurt that it makes everything a little healthier without sacrificing taste. If you haven’t tried using an air fryer yet, the Jese is a great place to start.

Price: $61.99
Where to buy: Amazon
Source: The sample of this product was provided by Jese.

Filed in categories: Reviews

Tagged: ,

Jese Air Fryer review originally appeared on The Gadgeteer on September 5, 2018 at 9:00 am.

Note: If you are subscribed to this feed through FeedBurner, please switch to our native feed URL http://the-gadgeteer.com/feed/ in order to ensure continuous delivery.

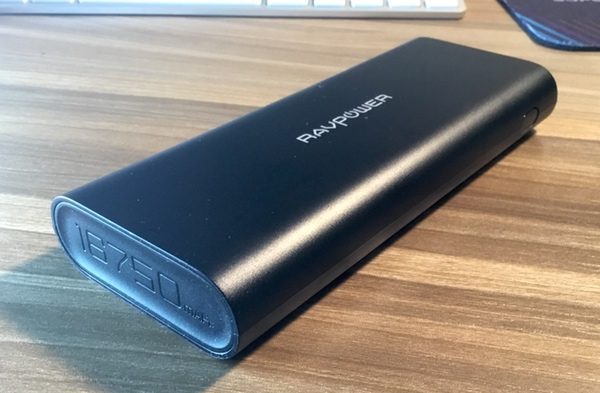
RAVPower 16750 Updated Phone Charger Battery review

REVIEW – I know what you’re thinking. Another portable charger review. They’re all pretty much the same, right? No so, Dear Reader! Sometimes little details matter. I’ve got a updated design from RAVPower to show you what I mean. Let’s check it out!

What is it?

It’s a portable charger with 2 USB ports and a 16750 mAh capacity.

Hardware specs

  • 16750 mAh capacity
  • 4.5A Max Output
  • DC 5V/2A
  • 10.7 Ounces
  • 6.1″ by 2.4″ by 0.9″

What’s in the box?

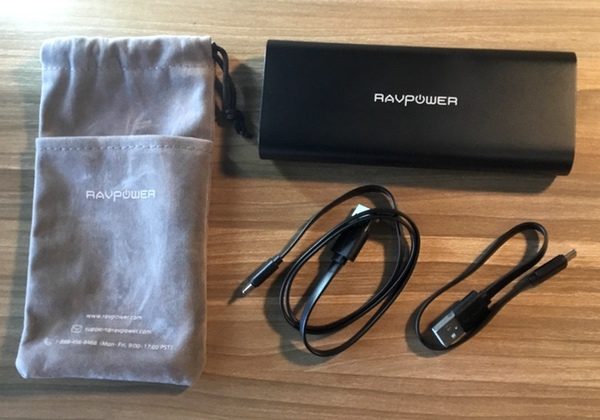
You’ll get the charger, a travel bag, and two USB to micro-USB cables (one 24″, one 8″).

Design and features

Yeah, portable chargers are a pretty common commodity these days. But there’s some nice usability happening with this RAVPower model that I think makes it a standout.

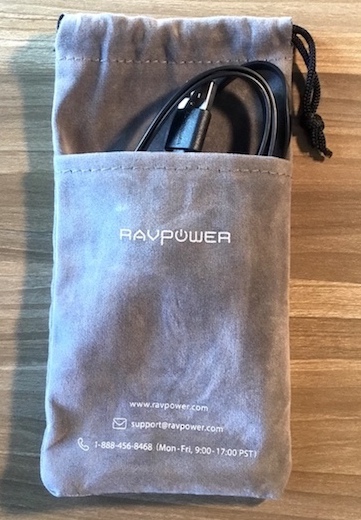
Let’s start with some thoughtful convenience details. This charger ships with both an 8″ and 24″ USB to micro-USB cable, each of which has a little black band to keep it orderly. It also includes a carrying pouch with an external pocket for wrangling those cables, which has the support info printed right on the bag. Little details like this show me that someone is paying attention to user needs.

Portable chargers aren’t exactly sexy devices, but this unit has a nice ergonomic shape for easy handling. That’s a plus, especially when sliding it in and out of your bag.

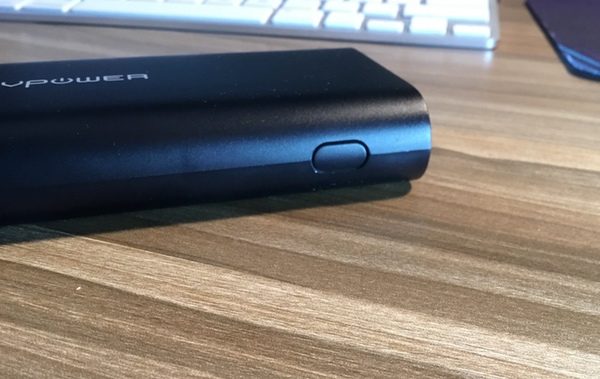
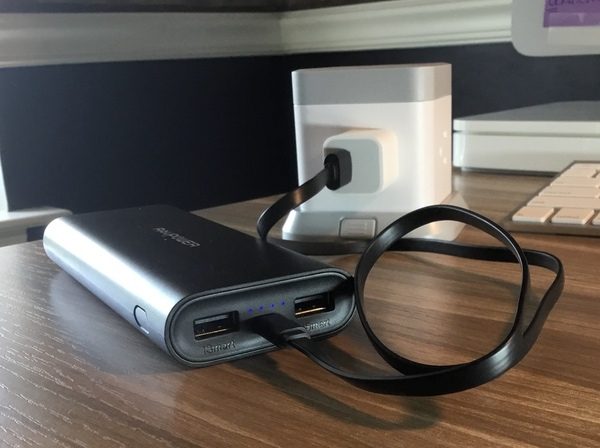
Your power button, status indicators, and input/output ports are all located on one end of the device. Hold the power button down to see how much juice you have in the unit, or to start charging if it doesn’t kick in automatically when a device is plugged in:

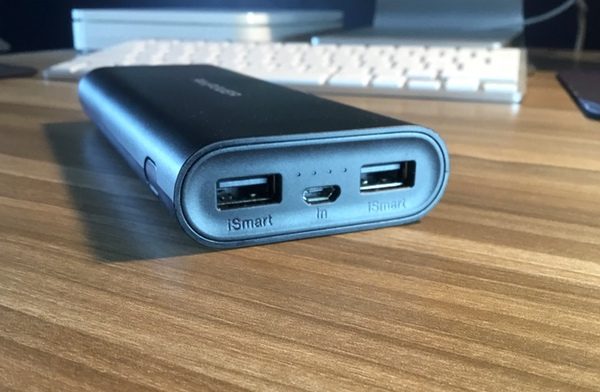
Your power indicator lights, micro-USB charging port, and USB ports are all on the end cap. The USB ports uses something RAVPower called “iSmart technology” to adjust the output to your devices for smooth, stable charging. Each port sports a 4.5A max output with protection against overcharging or short circuits:

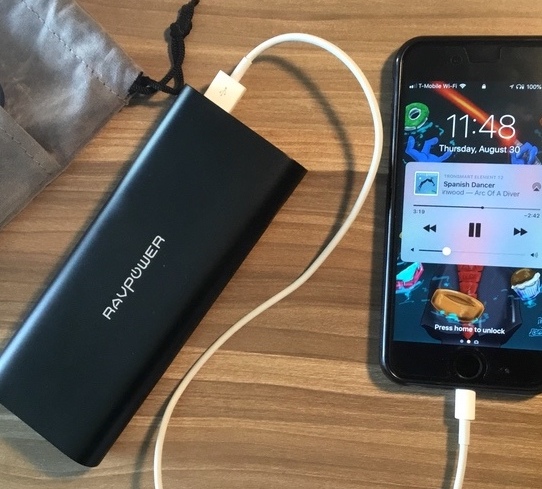
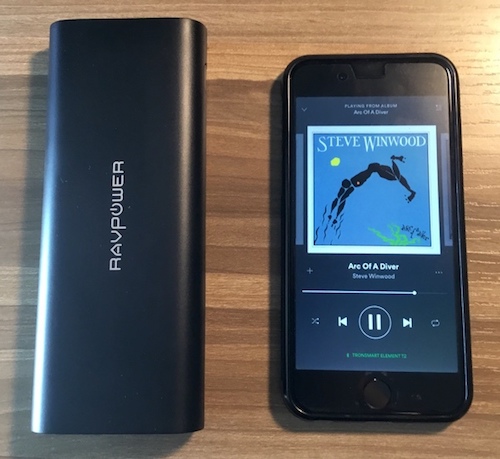
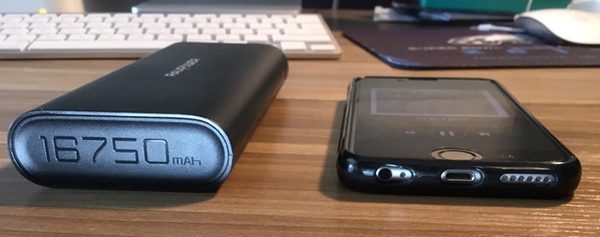
The whole charger is slightly bigger than my iPhone 6s, which means you can stash it just about anywhere in your bag. Here are some reference photos for sizing:

(In case you’re wondering, I happened to be grooving to some classic Steve Winwood albums while taking these pics today. Great stuff. The man is a rare talent.)

With a total of 16750 mAh. RAVPower measures that output as 5.3 charges for an iPhone 8, 1.3 charges for an iPad Air 2, and 3.2 charges for a Galaxy S8. Real-world measurements can be different, but these numbers align with what I see on comparable units. It will take 9-10 hours to fully recharge using a 2A or 2.4A power source.

I’ve been carrying the RAVPower 16750 Phone Charger around with me for about a month now. The power capacity is great. I’m charging the unit once every two weeks or so, and using it charge my iPhone a couple of times a week. It’s all good there.

I really like the 2 USB ports for charging multiple devices at once. I’ve been stuck in a couple of situations where my iPhone and Apple Pencil have both fizzled at the same time. Charging is fast, smooth and efficient.

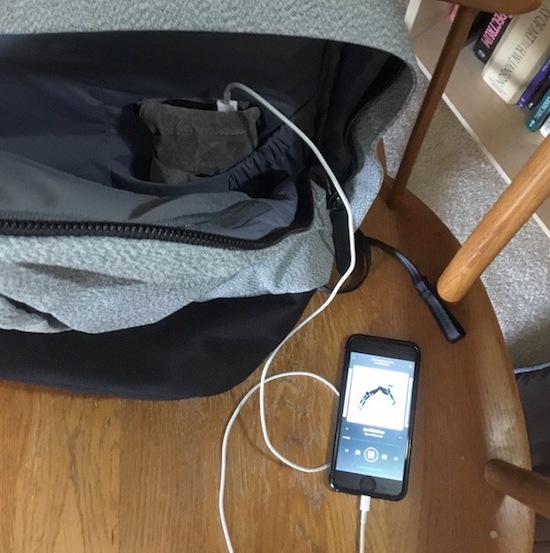
And putting all of those ports on one end has a nice usability benefit. Check out the picture below:

I’ve got the charger inserted in a pocket in the main compartment of my backpack. With a long charging cable, I can charge stuff outside of my bag while I am on the train. It’s easy to get to those ports due to the simple design and adds a wee bit of convenience with the orientation of the ports on the end of the charger.

We’ll see how the durability holds up over extended use. My son has an older model RAVPower charger that has been going strong for over a year now, and he was a big fan. I expect similar performance here. I’ll keep you updated in the long term reviews!

What I like

  • Ergonomic, functional design
  • Ample power capacity with 2 USB ports
  • Long and short USB to micro-USB charging cables included
  • Nice carry bag

What needs to be improved

  • None to be found

Final thoughts

This little charger has made its way into my daily carry. Great power capacity, slim ergonomic design, and some nice usability features. What’s not to like?

Price: $35.99
Where to buy: Amazon
Source: The sample of this product was provided by RAVPower

Filed in categories: Reviews

Tagged:

RAVPower 16750 Updated Phone Charger Battery review originally appeared on The Gadgeteer on September 4, 2018 at 11:00 am.

Note: If you are subscribed to this feed through FeedBurner, please switch to our native feed URL http://the-gadgeteer.com/feed/ in order to ensure continuous delivery.

ALC Wireless Connect Plus home security system review

REVIEW – For many years, I have invested in several different home security systems aimed at providing safety for me and family that includes threats from human intruders, fire, carbon monoxide, etc. My current system works quite well with a few annoying features and failures, and a growing monthly monitoring charge. I was recently offered the opportunity to review a home security system that seemed like it could accommodate most of my security needs albeit not all. Nevertheless, I was eager to try it, knowing that depending on what features were missing, I could possibly find solutions that would ultimately keep me satisfied and eliminate that pesky monthly charge. Here is how it went:

What is it?

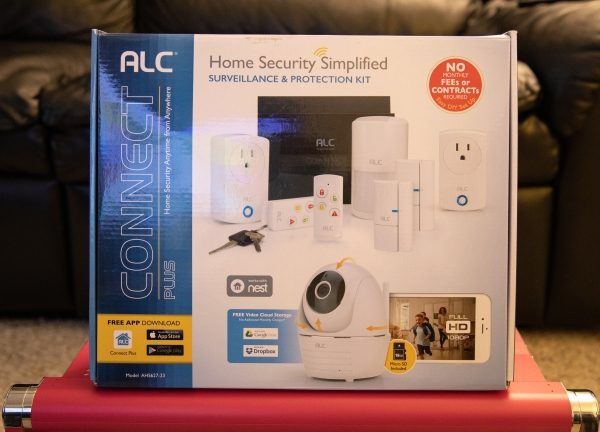
The ALC Wireless Connect Plus kit (AHS627-23) is a home/premise security system/kit with a base package that includes the necessary equipment and features for basic security. Optional add-ons are available to enhance the system.

What’s in the box
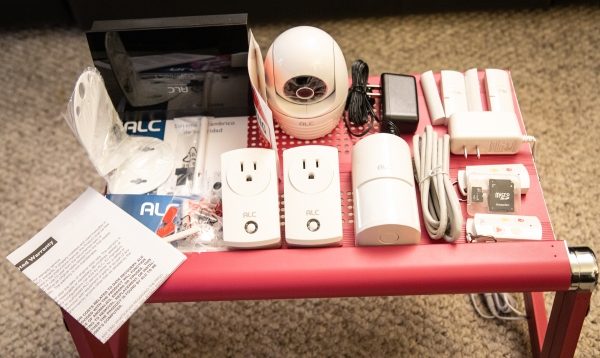

1 x Control Hub with AC Adapter
1 x Ethernet Cable
1 x Wireless Camera with AC Adapter – 1080P HD
1 x Camera Mounting Bracket (Adhesive pads and screws included)
1 x Motion Detector (Battery and adhesive Pads included)
2 x Power Switch
2 x Door/Window Sensors with Batteries (Adhesive Pads and screws included)
2 x Remote Controls
3 x Quick Start Guides (English, French, Spanish)
2 x Warning Stickers
1 x Warranty Leaflet
1 x Micro SD Card with SD Adapter

What I need in a Security System

  • The ability to expand to include several entry/exit sensors, motion sensors, cameras and sirens
  • A built-in notification for entry/exit sensors that can be enabled/disabled
  • A control panel that includes a keypad that can manage all functionality
  • Available accessories like a smoke/carbon monoxide detector, water leak detector, etc that can be easily integrated into the existing system
  • HD cameras that work well and provide clear images even in very low light/darkness
  • If a dedicated live view monitor is available, it should include Wi-Fi and a built-in rechargeable battery so that it is mobile
  • DVR capability in the cameras, via the local network and optional cloud storage
  • Capable of smart-home integration with Alexa, Google Assistant, etc
  • The Option of DIY or paid monitoring

Design and features

Specifications

• Frequency: 916 MHz up to 500ft.
• Maximum Pairable Sensors: 36
• Maximum Pairable Cameras: 4
• Modes: Arm (Away), Arm (Stay), Disarm
• Remote status and camera viewing on iOS and Android Connect Plus App

The ALC Wireless Connect Plus Security System is much like the typical alarm system with the main control box, a camera, and door and window sensors that monitor opening/closing, and a motion sensor. In addition, with this system, 2 power switches are included and they are (or will be) compatible with Alexa, Nest and Google Assistant. ALC also includes quick setup guides in 3 languages, English, French and Spanish, and window security stickers for those that want to display the presence of the system. Unlike most control panels that I have seen and worked with, this Control Hub is the central communication brain for all of the linked devices, but it does not feature a keypad nor any other type of interactive interface other than via the ALC app. On the top/front of the device, there are 2 LEDs that indicate power and connectivity. On the back, there is the AC jack, a reset button, and the Ethernet jack.


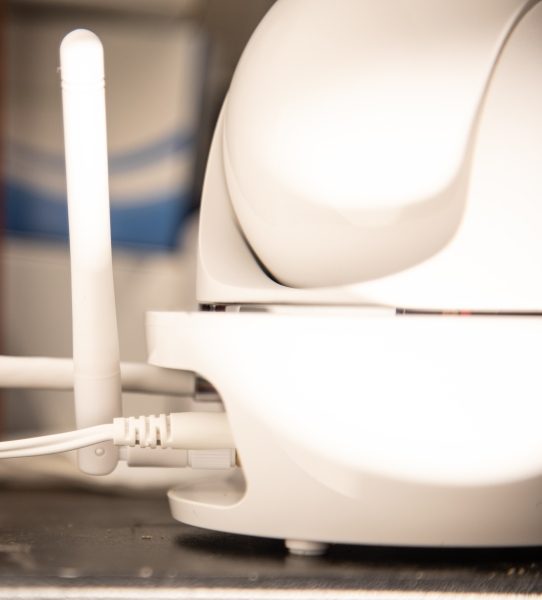
The camera is a pan/tilt wireless camera. On the back there is the wireless antenna jack that accommodates the antenna, a power jack, an Ethernet port for hard wiring, a micro SD slot for on-board recording, a power LED and a reset button.
The door/windows sensors are the typical sensors, as is the motion sensor.


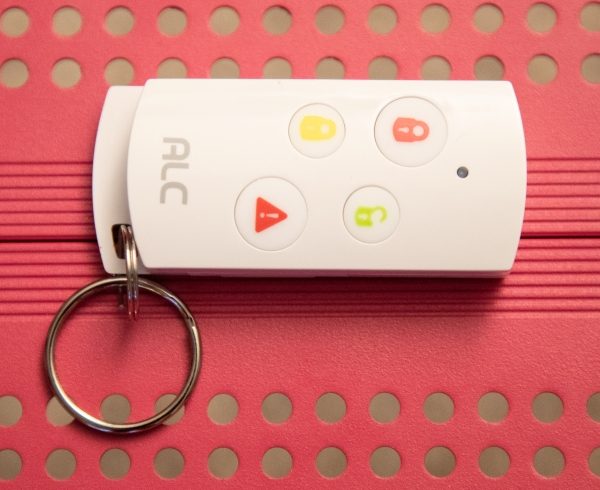
The system comes with 2 remote controls that allow you to arm and to disarm the alarm in both away and stay modes, and a panic button.
Performance

App

The app works very well and is nicely designed and easy to use. It allows you to add/remove devices, view cameras, trigger/retrieve recordings, set notification triggers/contacts and set up scenarios for multiple actions to be triggered based on an initial action by the system. Speaking with someone remotely via the app through the camera, and seeing them in front of the camera is a crystal clear experience for both parties and for both the audio and video, with very little latency that is hardly noticeable. Here are some screens from the app:



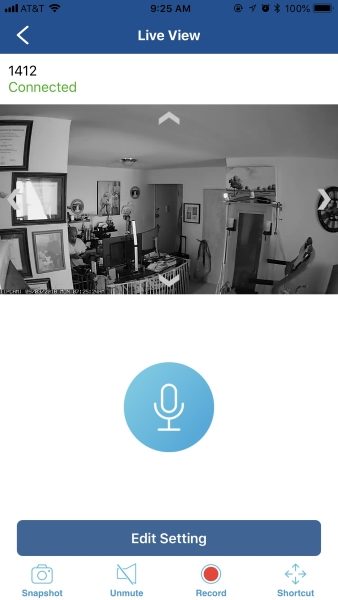
Arming and disarming the device both from the app and the remote controls is very easy, and the notification that you receive via email and text is just about instantaneous. As previously mentioned, there is no keypad on the control hub, so all functions must be controlled via the app or remote. The camera image is really crisp and clear and works very well even in darkness. The following is a screen capture from the app at 9:25 in the morning with the blinds still closed and no lights are on so it is still quite dark inside.
As shown in the picture below, once I open the blinds and there is sufficient light, the images show in color and are still very bright and clear.
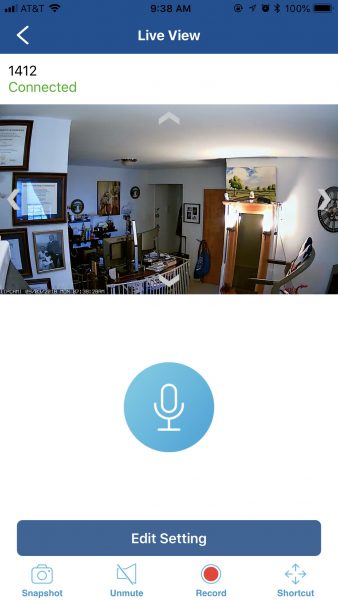
I found that the motion detector was not as sensitive in terms of the distance from a moving object as some of the others I have tried. This could be good or bad depending on your desired level of sensitivity. Just recently, I armed the system and left the house. Shortly thereafter, I received an alert on my phone that the alarm had triggered. I have cameras from another surveillance system pointed at my kitchen and windows and doors. (This system only has one camera installed). I was able to see from my cameras that all was well in terms of an emergency. When I got home, I checked to see what had triggered the alarm, and it was my kid’s balloon that was filled with helium and had floated in front of the motion sensor. Thankfully, and perfect for my needs, this security system only supports DIY monitoring and can send notifications to multiple phones/email addresses. It will NOT contact the police or fire department in the event of an alarm being triggered, which is what I want for now to prevent a costly police/fire false alarm and possible resulting fines. The way it works and the fact that it almost instantaneously notifies me both by text and email, allow me to take a quick look via the cameras and then determine the need for an emergency response.

As I continue to use and test the system, I must mention that the customer service and support for this company are excellent. They responded quickly even in the evening and adequately answered my questions. The most impressive response was when I inquired about the entry/exit chime notification. Here is a record of some of the conversations:

My question:

“I have one of the Connect Plus systems and the Observer HD AWS3377 system. Can I configure them so that I can see the Connect Plus Camera on the Observer HD monitor and app, and the Observer HD cameras on the Connect Plus app?”

ALC response:

“The 2 systems actually run different protocols. The Connect Plus uses 915Mhz radio frequency to contact the sensors, while the Observer HD system uses 2.4Ghz radio frequency to get the video feeds. The sensors themselves do not require a large bandwidth, therefore we could use a lower, more penetrable frequency. With video, however, the data size is much larger so we tend to use 2.4Ghz for that purpose.

However, if you get SightHD cameras – these cameras are WiFi, and therefore can be pulled into the Connect Plus system.”

My question:

Is there a chime notification that I can turn on for the door/window sensors?

My current system lets me know if someone opened the door or window.”

ALC response:

“The closest thing we have would be to alert you on the phone when a door or window opens. However, the way we designed the system is to divide its function between “disarmed” (as in you’re not getting alerts) and “armed” (get all alerts). We can edit which sensor to trigger an alarm (with or without siren) in Advance Setting. So if you would like, we can edit “Arm Stay” under Advance Setting – simply make sure all the door/windows sensors are checked, uncheck everything else. So now, if you set the alarm to Arm Stay, your phone should receive a notification when a door/window opens, and nothing else should go off.”

My response:

“When my current system is disarmed, it tells me when a door or window is opened. It does so with a voice command. However, my previous system would chime to alert me. Both systems did so with the system disarmed.

It is a great feature to have if you have children and want to hear if they open the door. Maybe something that ALC can add via a firmware update?
On another note. The ALC Observer HD AWS3377 system that I have has the Ethernet port built into the monitor so it is not mobile. I do believe that it does not have a built-in battery either. Am I correct?”
ALC response:

“Hi Julian, Yes, I have sent in a ticket to the engineers to see if they can add this function – so users will have the option to turn on/off a quick beep from the control hub whenever a door or window is opened.

That’s correct – the AWS3377 does not have a battery inside. We tried to fit a battery inside during development but it would only get about an hour of power – without the hard drive recording. If we hook up the hard drive to it, then it runs out even quicker. This product supports 1080p (1920×1080) so components tend to drain more power. In our previous version, the battery could hold about 3 hours of power, but it was only recording at VGA (640×480) and it does not have external hard drive support.”

I think that the answers from ALC Support were not only very informative, but I am impressed that they listened to my concerns and desires, and sent an internal request to try to add the feature I indicated. Well done!!

It is important to note that the integration of Alexa and Google Assistant is not currently available, but will be in the next few weeks. I did inquire about this, and here is the response from ALC Support:
Response:
“We haven’t pushed the complete functionality to the public yet. We have the Alexa app ready, but a new firmware and app are coming within the next few weeks. Once those are released, then the Alexa functionality will work.”
” Along with Alexa, Google Home support will be released too. The Google Home app is already online as well, just waiting for that final firmware and app.”

What I like

  • The ease of the installation
  • The sensors and camera come already paired
  • The option of both wired or wireless network connection for the camera and Control Hub
  • The well laid out app
  • The quality of the camera image (resolution)
  • The ease of integration with other products from the same company
  • Nest, Alexa, and Google Assistant compatibility

What can be improved

  • Integration with a smoke/carbon monoxide detector
  • A louder siren on the Control Hub (Additional siren can be purchased separately)
  • Camera triggers the alarm in the “stay” mode. Fix this!
  • Need window and door sensors to provide notification on entry or exit.
  • A fully functional keypad on the control hub

Final thoughts

ALC Wireless Connect Plus kit (AHS627-23) is a nice security system that functions quite well. Installation was very easy and since the system arrives with all of the provided sensors already paired, it is an easy DIY project. The app is well designed and the notifications are quick and consistent. The equipment is well built and so far I have no performance complaints. I do have a desire for the system to have more capabilities and additional design options, and when compared to my “What I need in a Security System” list, the missing features that I desire are evident. However, for the price, this security system is a great value.

Price: $89.99
Where to buy: Amazon
Source: The sample for this review was provided by ALC Wireless.

Filed in categories: Reviews

Tagged:

ALC Wireless Connect Plus home security system review originally appeared on The Gadgeteer on September 4, 2018 at 9:00 am.

Note: If you are subscribed to this feed through FeedBurner, please switch to our native feed URL http://the-gadgeteer.com/feed/ in order to ensure continuous delivery.
Saddleback Boot Leather iPhone case review

REVIEW – I have been a Saddleback Leather fan for years. Their gear is handmade by old world artisans from thick, rich leathers all backed by SBL’s 100 year warranty. In addition to their bags, SBL creates device specific cases and accessories for a select few of the latest and greatest tech devices. This mixing of old and new, not only provides your smart device protection but a stylish, unique look and feel as well. For this review, Saddleback has sent their Boot Leather iPhone X case to checkout.

What is it?

The Saddleback Boot Leather smartphone case is form fitted for the iPhone X. The vegetable tanned leather is cut and then shaped by hand using an ‘ancient’ wet-forming process. And while this slim case is only as thick as the leather itself, it provides decent protection without adding much bulk or weight to the sleek, tech-sexy iPhone X.

Design and features

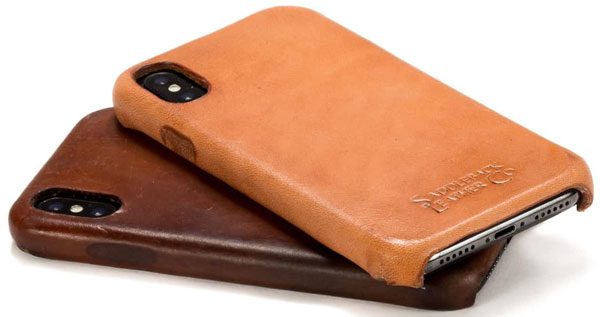
The Saddleback Boot Leather iPhone X case’s slim, form-fitting design wraps your smartphone in a thick layer of high quality leather. According to Saddleback, the leather’s natural and undyed color will patina and darken beautifully with age and use…which I am looking forward to since I prefer darker leathers.

Each Boot Leather iPhone case is handmade with no two the same. Saddleback craftsman form each piece of leather by hand and once set, takes 10 hours to cure. This ancient process wet-forms the leather with no need for an inner plastic liner many/most of the other manufactures use. After a few wks of use, the case has not given up any of its shape or form as it breaks in.

There are press-through notches for the volume buttons and a cutout for the mute switch on the left side of the case.

The right side has a single press-through notch for the power button. All of the press-through buttons are taking time to wear in and initially required a good amount of force to actual press the button.

The top of the case completely covers the corners and top of the iPhone X.

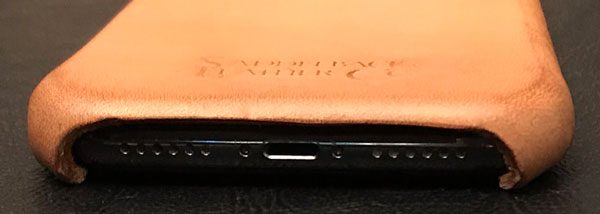
The base of the case has a large single cutout allowing access to the lightening port and speakers while still protecting the corners.

As you can see, the ‘boot’ leather is thick, fine grained, and gorgeous. The case wraps around the curved edges and corners of the iPhone. The raised edging surrounding the screen provides additional protection, allowing you to set the smartphone on a surface facedown without touching.

I was a little worried about what the stiff leather case did to my (very nice) InvisibleShield screen protector. Initially the bottom corners pressed on the screen protector edge causing the glass protector to come away from the iPhone screen. I was able to press the InvisibleShield back onto the face of the smartphone…no harm, no foul. The same thing happened when I pressed the side push-through buttons but like the edges, the screen protector settled back into place. As the case has worn in and become a bit less stiff, this has become less of an issue.

The cutout for the camera is the least fitted/precise part of the Boot Leather case. Seems like Saddleback could have cut this closer to the edges of the camera bulge. Several pictures on their website show similar gaps around the camera. That said, the larger cutout does not lessen its protection of the camera assembly.

The boot leather Saddleback uses has a great, supple feel to it, adding grippability to the slippery glass and stainless steel iPhone. I typically go case-less, trusting in my sure hands to not let gravity and hard surfaces damage my tech-toys. But Saddleback’s Boot Leather case is very tempting indeed…leaving it on @least until the next case I have to review 😉 . I want to see the patina long-term use will bring.
What I like

  • Handmade from high quality full grain leather
  • Perfectly fitted for the iPhone X
  • Gives an old world style and feel to the slick smartphone
  • Adds protection and grippability

What needs to be improved

  • Takes a bit of use before the push-through buttons to wear in
  • Camera cutout could/should be more precisely fitted

Final thoughts

Preferring to use my smart devices naked, I’m a bit surprised how much I like the Saddleback Boot Leather iPhone case. Its style, design, and feel are unique in the world of nearly endless mass-produced iPhone cases. It is well made with high quality leather and old world craftsmanship all-the-while providing solid protection to your very breakable smartphone. Definitely worthy of consideration if you’re in the market for a new iPhone X case.

Price: $79.99
Where to buy: Saddleback Leather
Source: The sample of this product was provided by Saddleback Leather.

Filed in categories: Reviews

Tagged: , ,

Saddleback Boot Leather iPhone case review originally appeared on The Gadgeteer on September 3, 2018 at 11:00 am.

Note: If you are subscribed to this feed through FeedBurner, please switch to our native feed URL http://the-gadgeteer.com/feed/ in order to ensure continuous delivery.