Sylvania LEDVANCE LED Flexible Strip RGBW review

This is the second in a three part review on LEDVANCE lighting and home automation products. The first review was for LEDVANCE’s Sylvania Lightify A19 LED bulb review. This review focuses on the LEDVANCE LED Flexible Strip RGBW. It is a 16-foot flexible strip that can be laid out to fit a variety of locations. The strips can be set to any color and can also tune white, changing from a correlated color temperature (CCT) of a warm 1900K all the way up to a daylight simulating 6500K. While people have been decorating their houses with white LED string lights for years, this product has some unique advantages if you control it with an IFTTT/Stringify integrated hub. Read on to see what I think…

Parts of the system

The light strip is powered by a 12 VDC transformer and controlled by a logic circuit. Both these parts are external to the light strip so the complete unit is made of 3 distinct parts: the transformer, the control module, and the light strip.
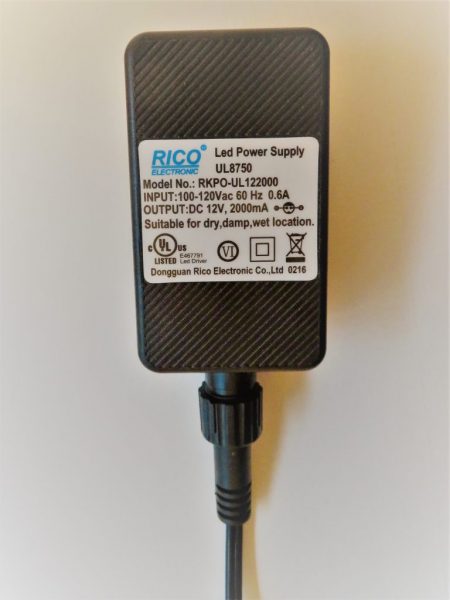
The transformer is a rather large unit at 4 3/16″ long, 2″ wide and 1 5/16″ deep (not including the ungrounded prongs). It has a circular threaded 2 contact connector on the bottom to which the cable to the lamp connects.
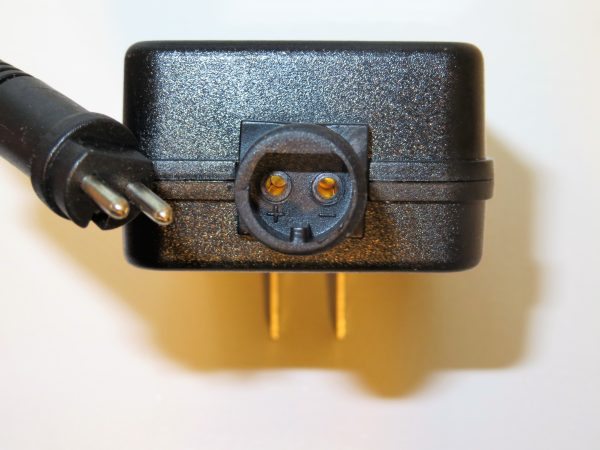
Because of the length of the connection and strain relief on the cable, after connecting the transformer, about 5 1/2″ will be positioned straight down from the top of the transformer. this may be a challenge for most weatherproof enclosures. While the cord does not need to be installed within the enclosure you may find that it prevents plastic shrouds and weatherproof doors from fully closing. The transformer output is rated for 12 VDC and 2 amps, which equals 24 watts, but even though the packaging and product code indicate 24 watts, the warning label attached to the light strip says that the lamp draws 29 watts.
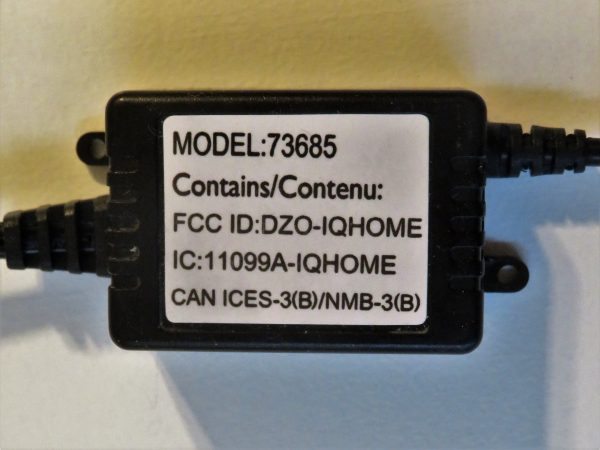
There is about 2 feet of power cord between the transformer and the control module for the light strip. The control module is 2″ long, 1 3/8″ wide and 7/8″ high black plastic box that is DC powered and outputs the correct voltage and current for the red, green, blue, and white LEDs in the light strip. I suppose that the ZigBee radio is in this box too, so it should be mounted where it will be free to communicate with the ZigBee hub.
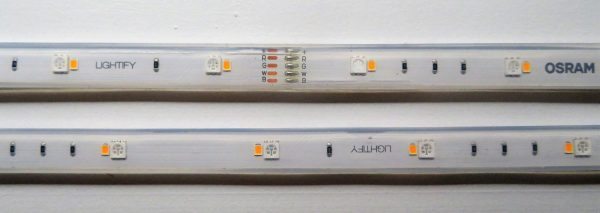
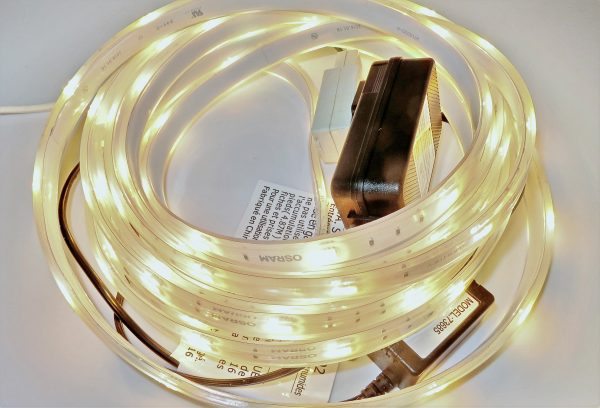
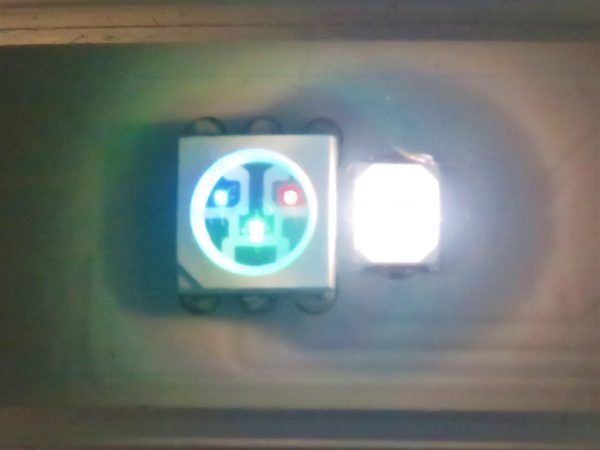
The light strip connects to the control module with 10″ of cable. The light strip is comprised of 16′ of rectangular silicone that contains a flexible copper strip with resistors and surface mounted LEDs. Due to the wiring connections and the extra length of the ribbon on each end, the overall length of the light strip is 16′ 1 1/2″ and it measures 9/16″ wide by 3/16″ deep.  The electronics of the unit are composed of eight 2′ sections. Each section contains 12 resistors and 24 LEDs: 12 RGB LEDs and 12 white LEDs. The LEDs are arranged with a RGB LED adjacent to a white LED and each grouping is spaced 2″ apart. All the LEDs are mounted on one side of the strip, which also acts as a heat sink for the components. The picture above shows the light strip bent back on itself and includes details of how the LEDs are grouped together, the resistors, and the soldering of 2 of the 2′ sections (the solder from the tip of the section on the top left connects and contacts the section adjacent to the letters on the top right.)

Installation

The kit comes with 16 plastic brackets and 34 wood screws to mount the light strip and control box to most surfaces. The installation instructions recommend not using staples or other fasteners that can potentially puncture the outside of the strip or damage the components inside. Because of the flexibility of the fasteners and the average installation offset of 1 foot, it is difficult to get a good tight fit in corners, even though the strip will bend as tightly as ½”. Also, because of the flat strip inside, the layout of the light strip should ideally follow a two-dimensional path as much as possible. It is possible to make left and right turns of the strip if you make a brief excursion into 3D, like so:
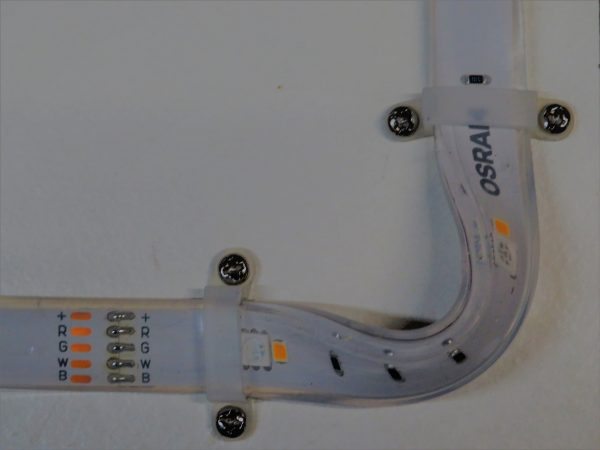
Also, while cutting the strip will leave the non-powered end useless, and at the same time expose the internals to the environment, it should be possible and permissible if the strip will be used indoors. In this case, the strip should be cut at one of the 7 internal junctions. A junction is shown in the picture above at the lower left. However, the packaging insert indicates that the strip should not be cut to length. This is especially true of outdoor installations. So, if you are planning to use this outside, the 16’ design will have to be a hard constraint.

Operation

The LEDVANCE LED Flexible Strip RGBW is designed to be operated through the ZigBee network. It is optimally plugged into a receptacle that is always powered. Most ZigBee hubs will recognize this as a RGBW light and will allow turning the light on and off, changing the color of the light, and tuning the correlated color temperature. The Lightify hub will also allow you to set the default on and off dim rate so that the turning on and off of the light is not abrupt.

Based upon the desired color temperature, level, saturation, and hue the controller will illuminate the RGB and/or white LED to a particular setting. The picture below illustrates all four LEDs illuminated at a low setting and photographed at 1/800 sec, F8 using an ISO1600 setting.
Note that all of the LEDs are controlled on the same circuit. Therefore, this light cannot perform chase or multi-color displays. The benefit of this product is that it can turn on and off and change color, color temperature, hue, level and saturation based on external criteria through IFTTT, Stringy, SmartThings, or other ZigBee enabled hub. Note that the Lightify hub does not have connectivity to IFTTT or Stringify, so using this hub will only allow you to control the lights through the app on a phone and also using Amazon Alexa. Also, although this can be programmed to change color, hue, level and saturation at fixed intervals, because of the latency in the ZigBee signals, it is unlikely that this can be synced to music or video.

Performance

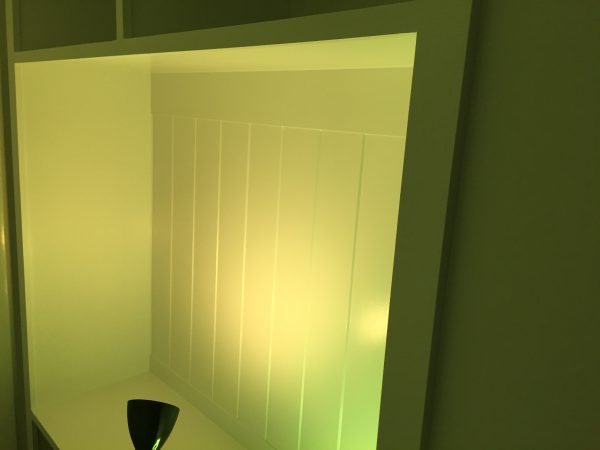
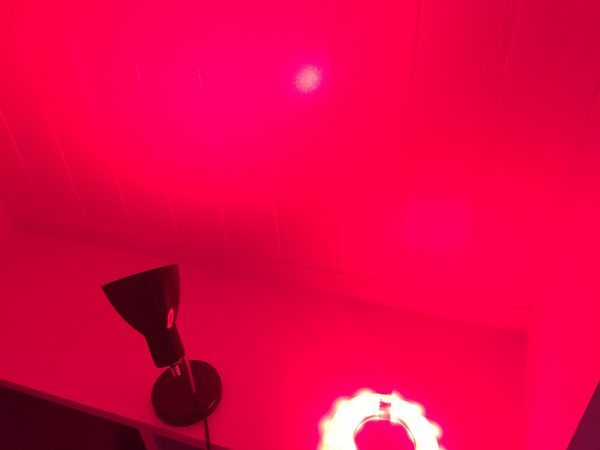
One of the things that I thought was important for this light strip was for to match the other LEDVANCE Light bulb that I have in color temperature, intensity and color hue across a range of settings. That way the two products can be used to color a room consistently. In order to achieve these comparisons, I bound both bulb and light strip to my SmartThings hub and I created a program to set the various settings to the same value for both devices.  As far as the color temperature correlation between the two devices. I placed the bulb in a desk lamp fixture and lay the strip, coiled on a white painted bench in our mud room. I focused my comparison on the color and intensity reflected off of the rear of the bench.
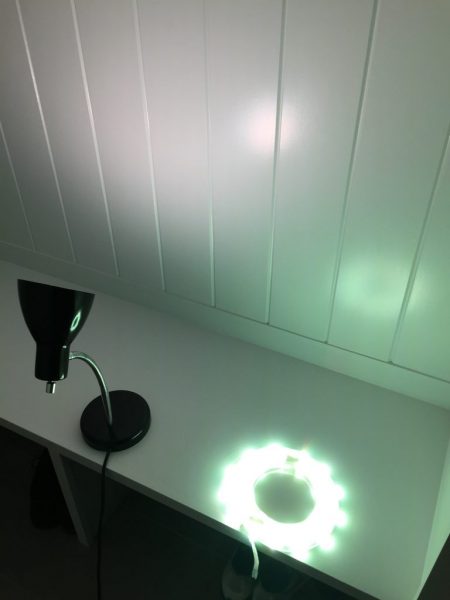
As indicated above, color temperature performance seemed to be a little off between the bulb and the strip. However the disparity I observed first-hand does not seem as bad as what is shown above. The 2700K color seems a little bit too green and the higher temperature colors seem too blue. As discussed below, the strip has some issues displaying green when it should be displaying yellow. I have a feeling this may be due to the silicone casing.

The brightness level also seemed a little bit different from the A19 bulb, but this should be expected since the bulb has a translucent cover and the strip has the bare LEDs exposed. Also the illuminance per sq. ft.  may be the same but because the strip is larger it appears brighter. In the end, they both dim down to what must be only a few candelas.

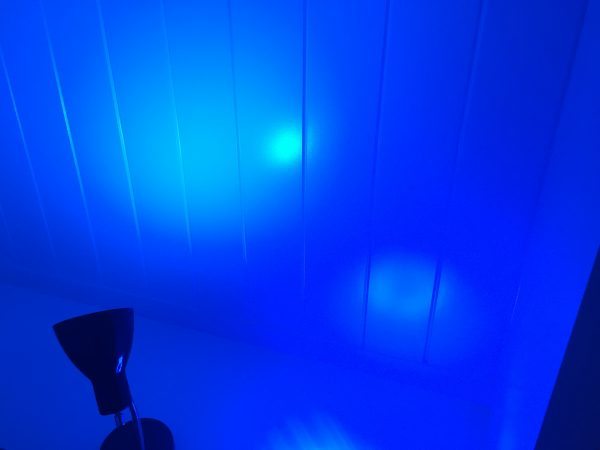
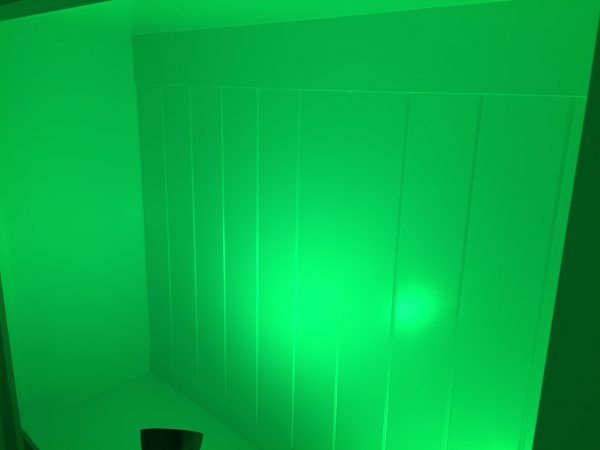
The color performance of the strip seemed to be very close to the bulb, with the exception of yellow. The yellow from the bulb seemed to be a little bit green hued. You can see a little green in the corner of the picture that is mostly yellow. The light was washing out the picture so I needed to adjust my shot to avoid the lamp completely.
Conclusion

The LEDVANCE LED Flexible Strip RGBW is a unique product to allow programmatic or automatic control of weather proof light strips. While other light strips are available that are weatherproof, allow chase, and/or sync to music, they do not allow automation. Other light strips are available that permit automation but they are not weatherproof. The light strip retail price is roughly four times higher than a waterproof color-changing and color-selectable strip with IR remote. But if you want to ask Alexa to on/off and adjust the colors of the light strip around your hot tub (probably the killer app for this item) then the LEDVANCE LED Flexible Strip is the way to go!

Source: The sample for this review was provided by LEDVANCE Sylvania. Please visit their site for more info and Amazon to order.


Product Information

Price: $99.99
Manufacturer: LEDVANCE Sylvania
Retailer: Amazon
Requirements:
  • requires ZigBee Certified Gateway (sold separately)
  • GFCI outlet if mounting outdoors
  • Should not be submerged or installed less than 10 feet from open water.
Pros:
  • With the proper hub and programming, permits Alexa control of operation and scenes
  • Waterproof
Cons:
  • Should not be cut
  • Costly
  • Does not permit chase or color changing

Filed in categories: Home and Kitchen, Reviews

Tagged:

Sylvania LEDVANCE LED Flexible Strip RGBW review originally appeared on on March 18, 2017 at 8:57 am.

Note: If you are subscribed to this feed through FeedBurner, please switch to our native feed URL http://the-gadgeteer.com/feed/ in order to ensure continuous delivery.

Velv will let you oxygenate young wine in no time

An unexpected visit from an old friend and an unopened bottle of Caymus. If you’re amongst the fortunate few to have old friends and a bottle of Caymus you surely know how tragic this event is. But wait! Don’t despair! There’s a gadget to the rescue!  The newly available Velv Wine Oxygenator will develop that bottle’s best bouquet in no time, using 99.5% oxygen to imbue a soft, silky taste and optimal aromatics in three to seven minutes, depending on the varietal.  The Velv uses an oxygen capsule in the handle and a long wand with a sintered tip to disperse microbubbles of oxygen into the wine, even within the bottle.  The manufacturers claim that by increasing the amount of Oxygen, reactions that alter the bouquet are completed more quickly and therefore occur before aroma and taste are lost due to the traditional decanting process. Intrigued? Curiosity will cost you – the starter kit costs $300 and includes the Velv Wine Oxygenator, one Velv PUREOXYGEN capsule, and a Velv Protective Case. Each capsule can prepare approximately 5 to 10 bottles of wine, and additional 2-packs of capsules are available online for $25. For more information, visit www.velvwine.com.

Filed in categories: Home and Kitchen, News

Tagged:

Velv will let you oxygenate young wine in no time originally appeared on on March 16, 2017 at 6:55 am.

Note: If you are subscribed to this feed through FeedBurner, please switch to our native feed URL http://the-gadgeteer.com/feed/ in order to ensure continuous delivery.

DripJoy coffee service and JoyBarista coffee maker review

Like many households, mornings at the Chapman residence usually start with a trip to the coffee maker. I love my coffee hot, but I always put milk in mine, which cools the coffee to barely tolerable levels. DripJoy has a single serve coffee maker called the JoyBarista and a subscription coffee service with multiple types of coffee. What thrilled me most about the JoyBarista brewer was the ability to brew hotter coffee, which is supposed to make it taste better. I’ve just had my cup, so let’s head into the review!


I was sent the JoyBarista and three types of coffee; medium, medium-dark, and dark. I dislike nearly all types of dark coffee, so I had to test theirs out to see if I could tolerate it. My husband, on the other hand, loves dark coffee.


In the JoyBarista box, you’ll find the JoyBarista brewer and an instruction manual.

Setup was really easy. I simply plugged in the brewer, filled up the water reservoir, then ran the recommended amount of cycles to clean out the innards. Once that was done, I was ready to start brewing me some coffee.


Now seems a good time to talk about DripJoy’s coffee subscription service. There are many packages you can choose from, with the price ranging from $.39/cup (256 cups per month) to $.62/cup (24 cups per month). These examples are for the residential home options, and there are further discounts if you need more than that. You can tinker around on their website and see further pricing.

When you start a subscription, you get the option to purchase the JoyBarista for a discounted price. Now, the pods themselves claim to be Keurig 2.0 compatible, so the JoyBarista isn’t a necessity, but I could not get any of the pods to work in my Keurig 2.0 unit. Keurig 2.0 K-Cups worked fine on the JoyBarista, however.


Alright, back to the brewer. The JoyBarista can brew between 6-12 ounces of coffee with a single pod. 6 ounces was a little small, but 8 ounces was just right for both my husband and I. You can easily remove the cup base to place taller cups if need be. The time between pressing the ‘brew’ button and getting your final cup of coffee is just a little longer than the Keurig, which makes sense since DripJoy claims the hot water sits longer on the coffee grounds to draw out the full flavor.


The one thing I disliked about the brewer was the sleep mode. After 1-3 hours (adjustable) of idle time, the brewer will automatically go to sleep. This is to save power since there is a commercial grade heater within the unit, but both my husband and I agreed that waiting for the water to heat up in the morning was quite annoying. I timed it one morning, and it took a little over two minutes for the water to heat up and the brewer to be ready. I contacted support and they said there is no way to disable sleep mode, but they’ve received similar comments to my own and will look into it for future models.


Using the brewer is very, very simple. You press the button on the top and it opens up so that you can place a coffee pod inside, then you close it, choose your cup size, and press the brew button. You can’t customize the coffee strength, which some may dislike, but my husband never complained once. (He uses the strong setting on the Keurig all the time!) When I used regular Keurig coffee pods in the JoyBarista, it tasted good; a little stronger, but more flavor as well. Despite the flavor being better, I still couldn’t stand any of my husband’s dark roast coffee pods.

That being said, the dark roast pods (named French Elation) from DripJoy were much better. These were my husband’s favorite type, and I have happily drank several cups of dark roast coffee. We would definitely get the dark roast pods again. We also were able to try their Colombian Cheer (medium strength) and Morning Joy (medium-dark strength), and my favorite had to be the Colombian Cheer. Since we had a way to bypass the non-Keurig 2.0 pods, I tried the DripJoy branded coffees in the Keurig 2.0 machine we have, and I really preferred using the DripJoy.

Overall, I can’t see myself going back to my Keurig, even when we run out of DripJoy branded coffee pods. My coffee is a bit more flavorful in the JoyBarista than the Keurig, and the temperature of the coffee comes out perfect in my eyes. All of the flavors of coffee we were sent were fantastic, and non-DripJoy branded coffee also tasted good. I am still unsure whether or not the Keurig will be demoted to storage in the garage, but for now, the DripJoy JoyBarista coffee maker will stay on the counter for me and my family to use.

Source: The sample used in this review was provided by DripJoy. Please visit their website for more information.


Product Information

Price: Pods: ~$.39/cup – $.62/cup : JoyBarista – Base price $189.99; discounted with subscription order.
Manufacturer: DripJoy
Pros:
  • – Very simple to use
  • – Hotter coffee than standard Keurig coffee makers
  • – Great tasting coffee both from the brewer and from their coffee pods
Cons:
  • – Have to wait for the water to warm up if it goes into sleep mode
  • – DripJoy coffee pods may not work in Keurig 2.0 coffee makers

Filed in categories: Home and Kitchen, Reviews

Tagged:

DripJoy coffee service and JoyBarista coffee maker review originally appeared on on March 12, 2017 at 9:12 am.

Note: If you are subscribed to this feed through FeedBurner, please switch to our native feed URL http://the-gadgeteer.com/feed/ in order to ensure continuous delivery.

DripJoy coffee service and JoyBarista coffee maker review

Like many households, mornings at the Chapman residence usually start with a trip to the coffee maker. I love my coffee hot, but I always put milk in mine, which cools the coffee to barely tolerable levels. DripJoy has a single serve coffee maker called the JoyBarista and a subscription coffee service with multiple types of coffee. What thrilled me most about the JoyBarista brewer was the ability to brew hotter coffee, which is supposed to make it taste better. I’ve just had my cup, so let’s head into the review!


I was sent the JoyBarista and three types of coffee; medium, medium-dark, and dark. I dislike nearly all types of dark coffee, so I had to test theirs out to see if I could tolerate it. My husband, on the other hand, loves dark coffee.


In the JoyBarista box, you’ll find the JoyBarista brewer and an instruction manual.

Setup was really easy. I simply plugged in the brewer, filled up the water reservoir, then ran the recommended amount of cycles to clean out the innards. Once that was done, I was ready to start brewing me some coffee.


Now seems a good time to talk about DripJoy’s coffee subscription service. There are many packages you can choose from, with the price ranging from $.39/cup (256 cups per month) to $.62/cup (24 cups per month). These examples are for the residential home options, and there are further discounts if you need more than that. You can tinker around on their website and see further pricing.

When you start a subscription, you get the option to purchase the JoyBarista for a discounted price. Now, the pods themselves claim to be Keurig 2.0 compatible, so the JoyBarista isn’t a necessity, but I could not get any of the pods to work in my Keurig 2.0 unit. Keurig 2.0 K-Cups worked fine on the JoyBarista, however.


Alright, back to the brewer. The JoyBarista can brew between 6-12 ounces of coffee with a single pod. 6 ounces was a little small, but 8 ounces was just right for both my husband and I. You can easily remove the cup base to place taller cups if need be. The time between pressing the ‘brew’ button and getting your final cup of coffee is just a little longer than the Keurig, which makes sense since DripJoy claims the hot water sits longer on the coffee grounds to draw out the full flavor.


The one thing I disliked about the brewer was the sleep mode. After 1-3 hours (adjustable) of idle time, the brewer will automatically go to sleep. This is to save power since there is a commercial grade heater within the unit, but both my husband and I agreed that waiting for the water to heat up in the morning was quite annoying. I timed it one morning, and it took a little over two minutes for the water to heat up and the brewer to be ready. I contacted support and they said there is no way to disable sleep mode, but they’ve received similar comments to my own and will look into it for future models.


Using the brewer is very, very simple. You press the button on the top and it opens up so that you can place a coffee pod inside, then you close it, choose your cup size, and press the brew button. You can’t customize the coffee strength, which some may dislike, but my husband never complained once. (He uses the strong setting on the Keurig all the time!) When I used regular Keurig coffee pods in the JoyBarista, it tasted good; a little stronger, but more flavor as well. Despite the flavor being better, I still couldn’t stand any of my husband’s dark roast coffee pods.

That being said, the dark roast pods (named French Elation) from DripJoy were much better. These were my husband’s favorite type, and I have happily drank several cups of dark roast coffee. We would definitely get the dark roast pods again. We also were able to try their Colombian Cheer (medium strength) and Morning Joy (medium-dark strength), and my favorite had to be the Colombian Cheer. Since we had a way to bypass the non-Keurig 2.0 pods, I tried the DripJoy branded coffees in the Keurig 2.0 machine we have, and I really preferred using the DripJoy.

Overall, I can’t see myself going back to my Keurig, even when we run out of DripJoy branded coffee pods. My coffee is a bit more flavorful in the JoyBarista than the Keurig, and the temperature of the coffee comes out perfect in my eyes. All of the flavors of coffee we were sent were fantastic, and non-DripJoy branded coffee also tasted good. I am still unsure whether or not the Keurig will be demoted to storage in the garage, but for now, the DripJoy JoyBarista coffee maker will stay on the counter for me and my family to use.

Source: The sample used in this review was provided by DripJoy. Please visit their website for more information.


Product Information

Price: Pods: ~$.39/cup – $.62/cup : JoyBarista – Base price $189.99; discounted with subscription order.
Manufacturer: DripJoy
Pros:
  • – Very simple to use
  • – Hotter coffee than standard Keurig coffee makers
  • – Great tasting coffee both from the brewer and from their coffee pods
Cons:
  • – Have to wait for the water to warm up if it goes into sleep mode
  • – DripJoy coffee pods may not work in Keurig 2.0 coffee makers

Filed in categories: Home and Kitchen, Reviews

Tagged:

DripJoy coffee service and JoyBarista coffee maker review originally appeared on on March 12, 2017 at 9:12 am.

Note: If you are subscribed to this feed through FeedBurner, please switch to our native feed URL http://the-gadgeteer.com/feed/ in order to ensure continuous delivery.

Click & Grow introduces DIY gardening – sorta

Growing your own food is awesome because you know where it came from and how it was grown (with or without pesticides). But gardening itself takes some effort if you want the plants to actually live long enough to produce fruits and vegetables. The folks at Click & Grow are no strangers to making gardening products that bring food growing capability to everyone. Even people who think they have black thumbs. A few years ago I reviewed their Smartpot system and thought it was a cool idea. Click & Grow has released similar products since then and now their latest product is the DIY Garden Starter Kit.

The DIY Garden Starter Kit includes 9 plant cups that have a wick that draws the exact right amount of water into the cup when submerged in water.

Unlike previous Click & Grow growing products, the DIY kit does not use batteries or power.  The plant cups contain Click & Grow’s NASA-inspired Smart Soil technology which is a nanotech material engineered to supply plant roots with the right amount of oxygen, water, and nutrients. No pesticides, fungicides, hormones or any other kind of harmful substances are used.

It’s up to you to make the holder for the cups though. That’s where the DIY part of the system comes into play. You can get creative by using LEGO, Mason jars, etc.

The Click & Grow DIY Starter Kit is available for $29.95. Growers are able to fill the cups included in the starter kit with the plants, herbs, veggies, and fruits refill capsules that include plants like kale and chili peppers for $19.95 for 3 capsules. For more info visit Click & Grow and their Amazon store.

Filed in categories: Home and Kitchen, News

Tagged:

Click & Grow introduces DIY gardening – sorta originally appeared on on March 8, 2017 at 8:17 am.

Note: If you are subscribed to this feed through FeedBurner, please switch to our native feed URL http://the-gadgeteer.com/feed/ in order to ensure continuous delivery.