AISportage Smart Shoes review

REVIEW – What exactly is a smart shoe? This one is not from Get Smart and does not hide a phone under the heel. It does however have a pocket under the arch for squirreling away some secret tech that could seriously help your running game. Let’s take a closer look.

What is it?

This is a fitness system that includes a smart tracking module, running shoes and smart phone app that work in concert with each other to provide data tracking, analysis and advice.

What’s in the box?

We can’t even discuss what’s inside until we look at this “box”!
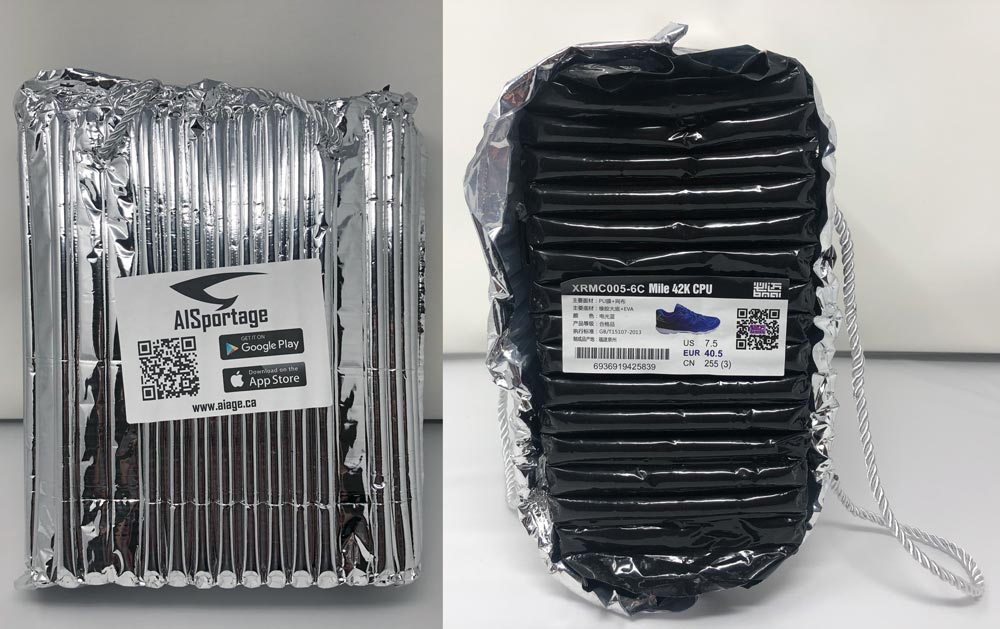
Instead of a traditional shoe box, AISportage opted for a tote bag made of two air-filled packaging material sides nested into each other in opposing directions.
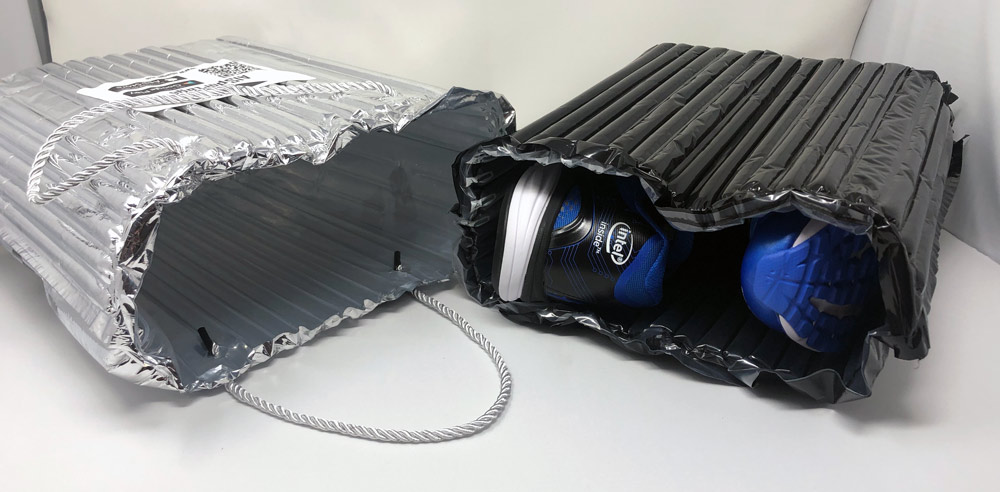
It results in a very different and unexpected take on packaging. It’s pretty cool to receive something like this in the mail, but I can imagine this would not work very well at retail. I also question if it is potentially worse than standard box and paper packaging when it comes to recycling.
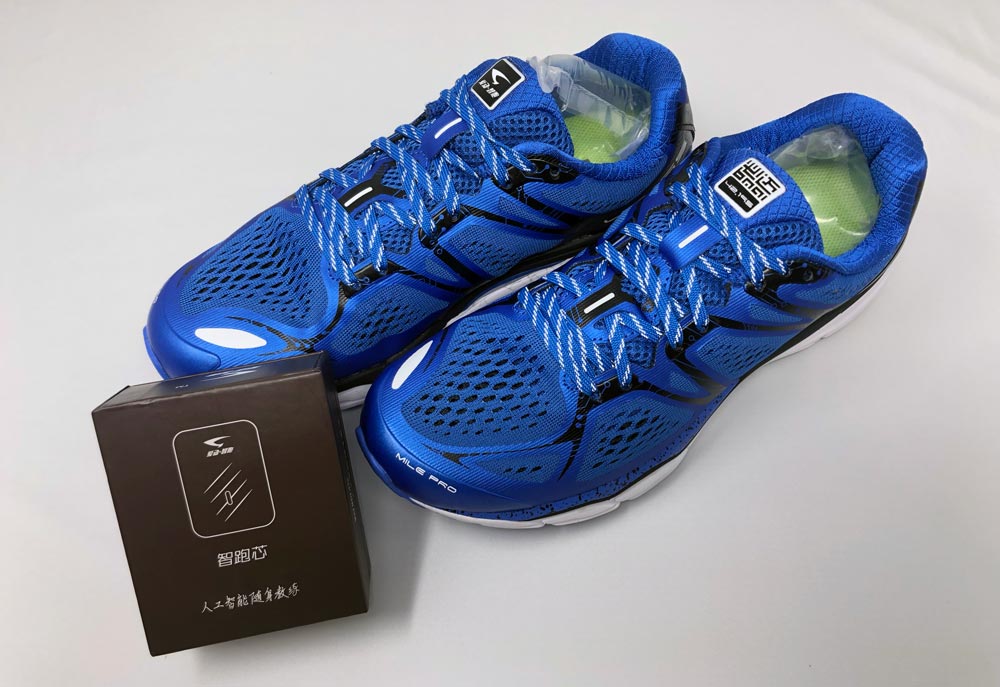
Inside the packaging  is the pair of running shoes and the accessory box.
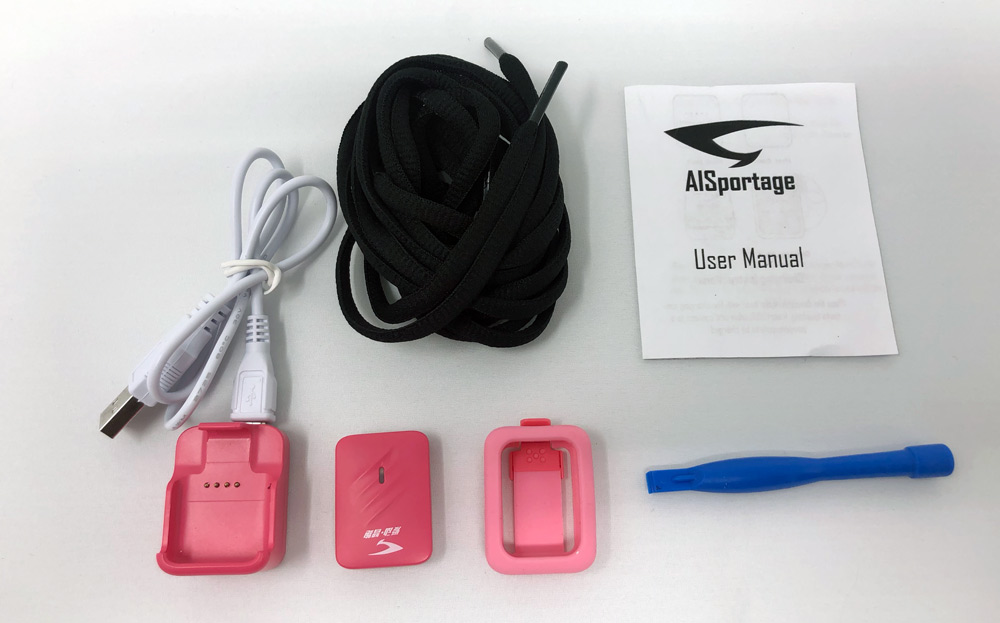
Here’s all of what’s in the box

  • AISportage Smart Running Shoes
  • Smart module
  • Charging unit
  • USB-A to USB-Micro charging cable
  • Shoelace module mount
  • Module removal tool
  • Spare laces
  • Instruction manual

Setup

Let’s get this set up…

  1. Insert the smart module into the charger, connect the USB cable to the charger and a wall adapter or computer and let charge until the light turns green.
  2. Install AISportage app by scanning the QR code or searching AISportage in the app store for your device.
  3. Remove smart module from the charger to pair with your phone.
  4. In the bluetooth settings of your device, pair with the smart module that should show up as AIDong ####.
  5. Install the smart module into the right shoe, or into the shoelace module mount.

Here’s how to install into the AIS running shoe.
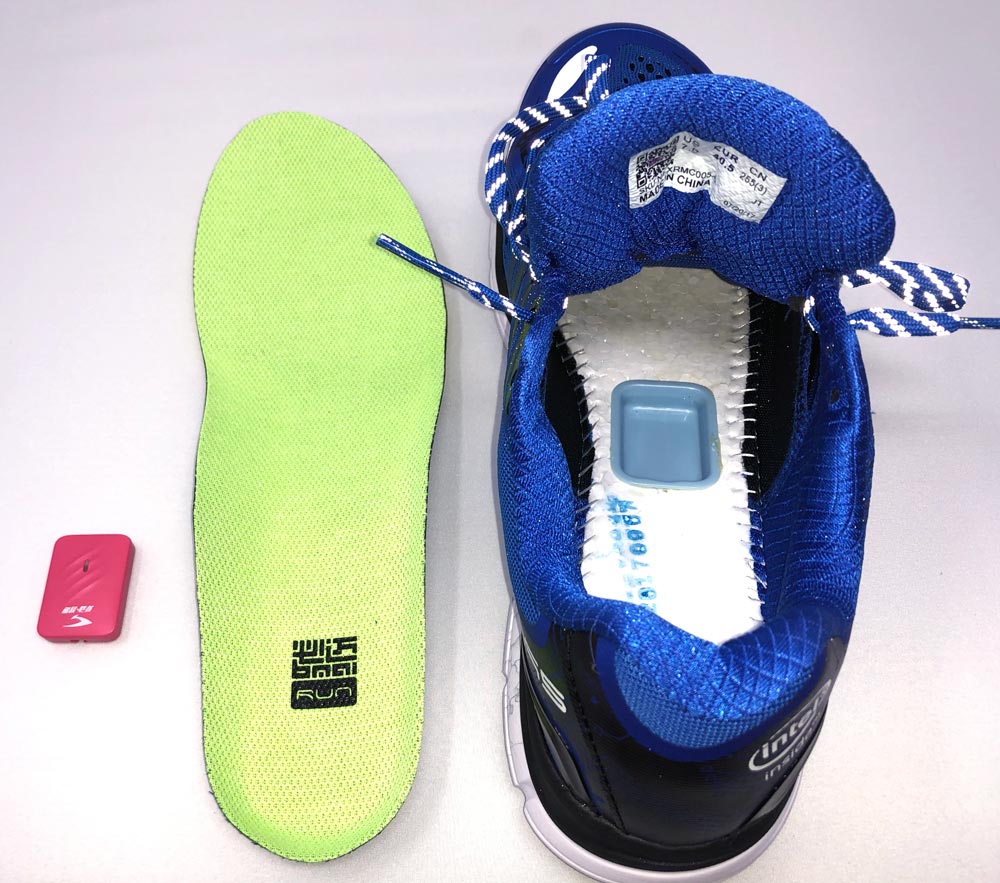
Under the insole in the right shoe is a small cavity for the smart module. Install the module as shown with LED forward and logo towards the heel. The instructions only show a logo without an LED which doesn’t really help clarify. It kinda fits the other way, but doesn’t fully seat properly.
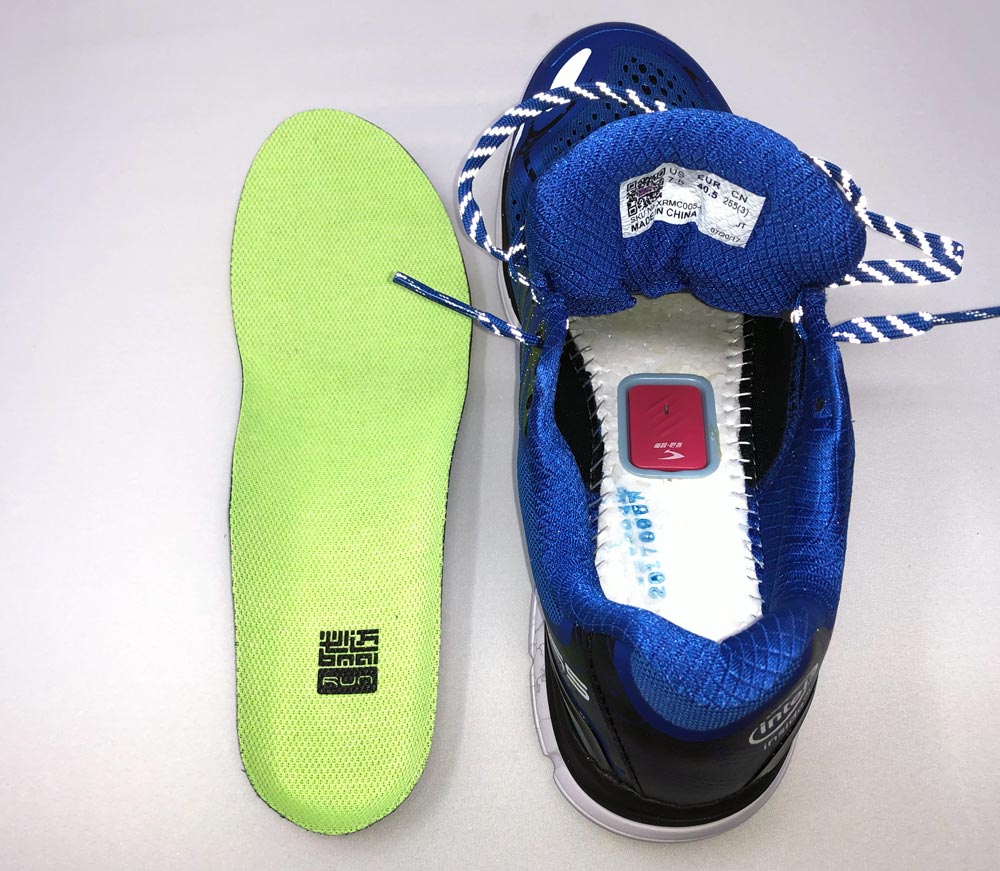
With the smart module installed go ahead and put the insole back into the shoe and you’re ready to run. You’ll need to remove it periodically for charging and to make that simpler, they included a small prybar tool to pick it out. I was also able to knock it out with a couple of swift thwacks against my other hand.

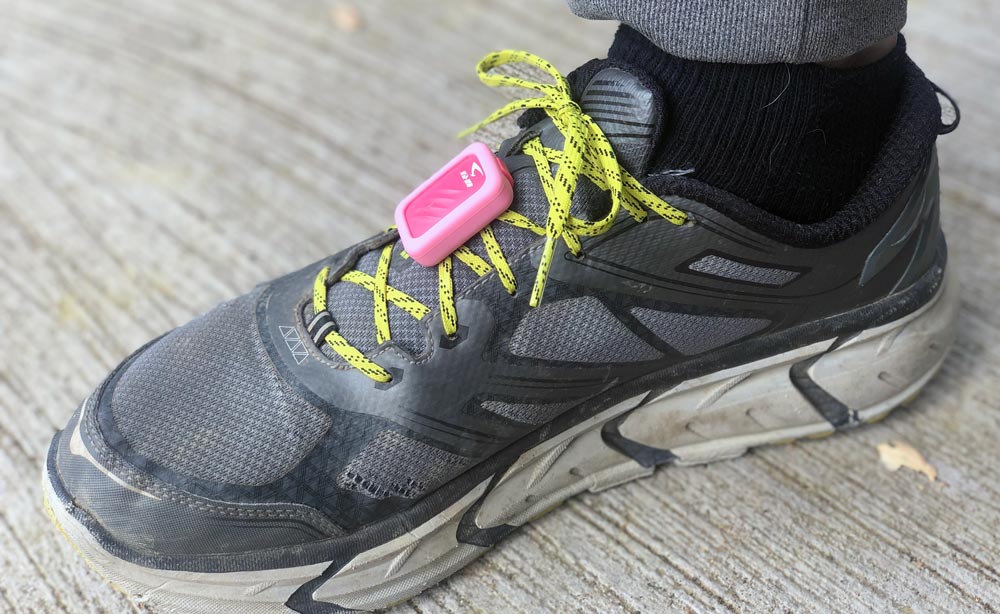
If you’d prefer to use the module with your own running shoes, you can use the lace attachment that’s included in the accessory box. It’s a silicone type material that stretches into place around the module and has a strap for running securely behind the laces.
Design, features and performance

Just to start things on an honest foot, I’m not a runner. My wife is though and she helped quite a bit in this review. We also both worked at adidas on footwear over 20 years ago and are pretty comfortable with shoe construction and materials.

PART I: Let’s look at the shoe first.
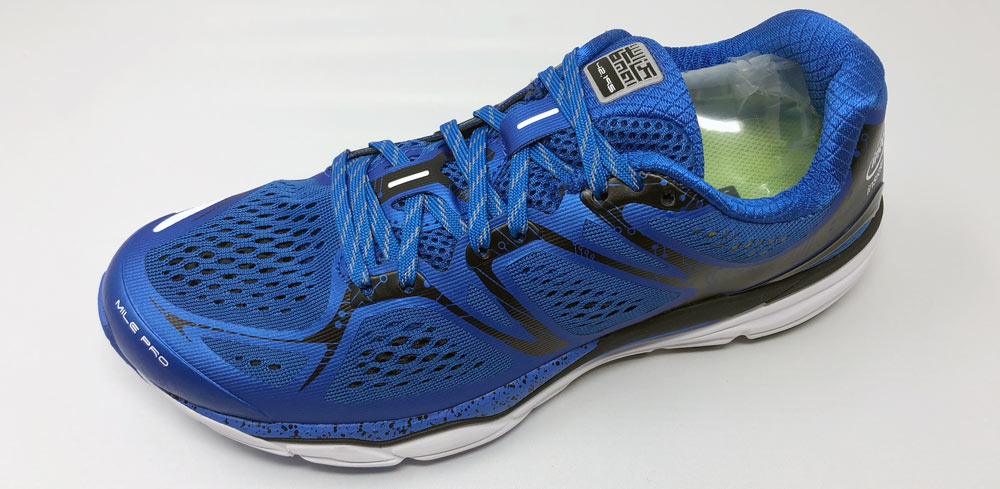
The shoe is built on a standard width last with good quality construction and high quality materials. The upper uses an Air Mesh with non-stretch film heat-pressed or welded to the upper to create a secure cradle around your foot.
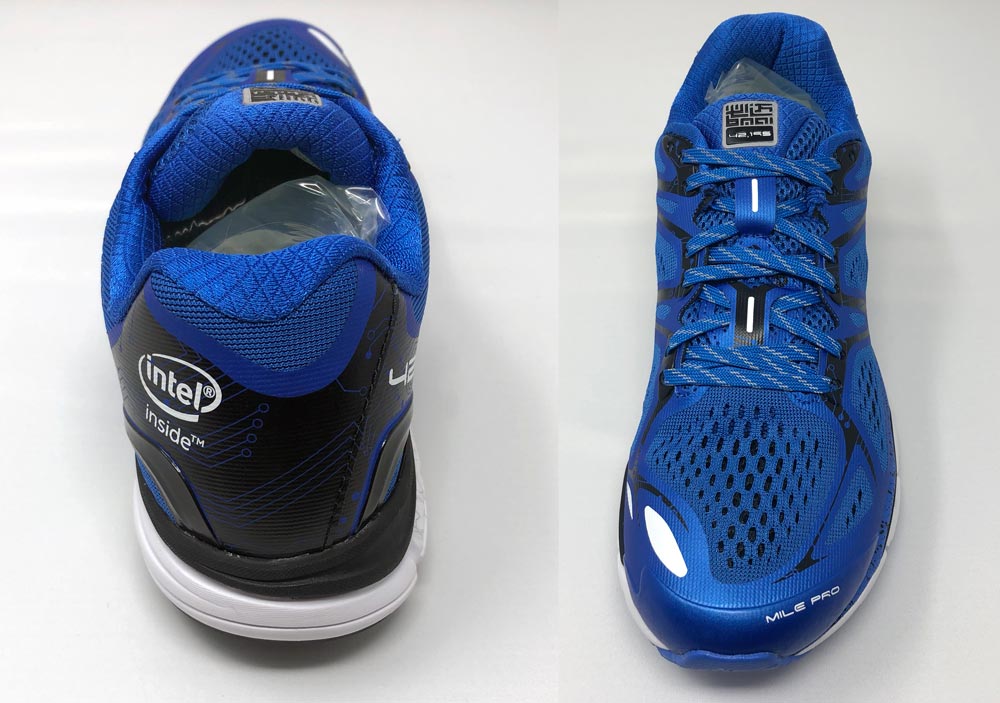
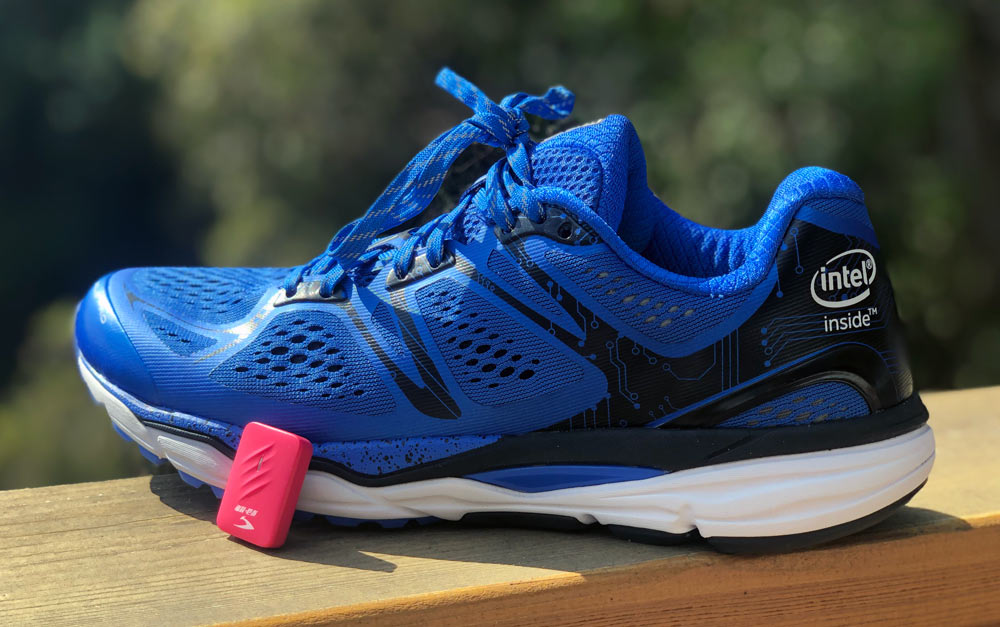
On the heel, it’s hard to see past the intel inside™ branding, but there’s a molded heel counter on each side to minimize side-to-side roll as you run. The ankle and achilles area has additional padding as does the upper tongue to create a comfortable fit. Two lace-through guides help to keep the tongue centered.
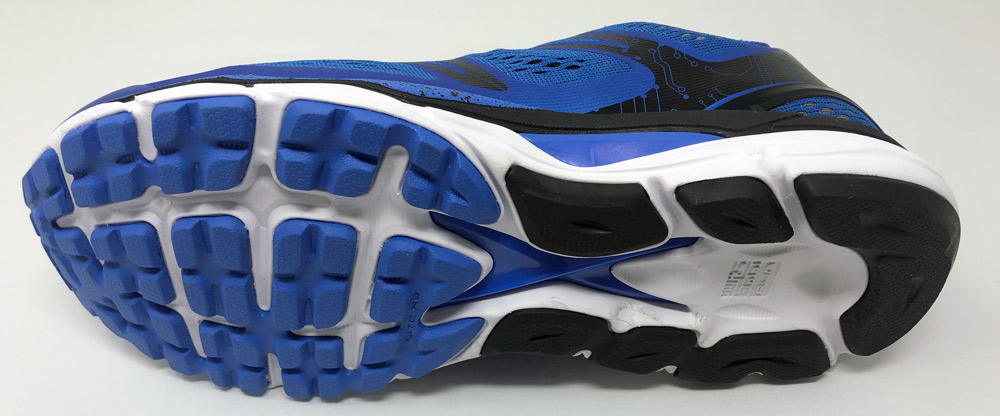
The bottom has good tread pattern with the blue and black rubbers being different hardnesses for compression and rebound. The blue arch-plate’s X-design allows the shoe’s forefoot and heel to move independently without sacrificing torsional support.
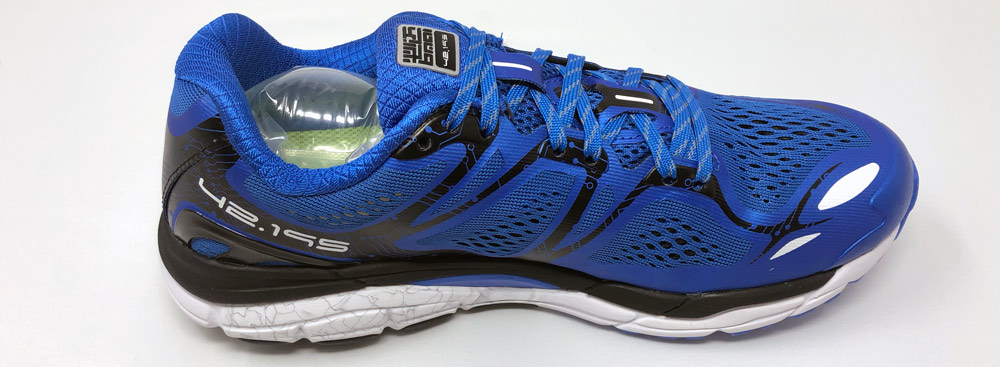
The medial side of the shoe shows the arch support structure of the torsion plate along with the upper’s non-stretch reinforcement.
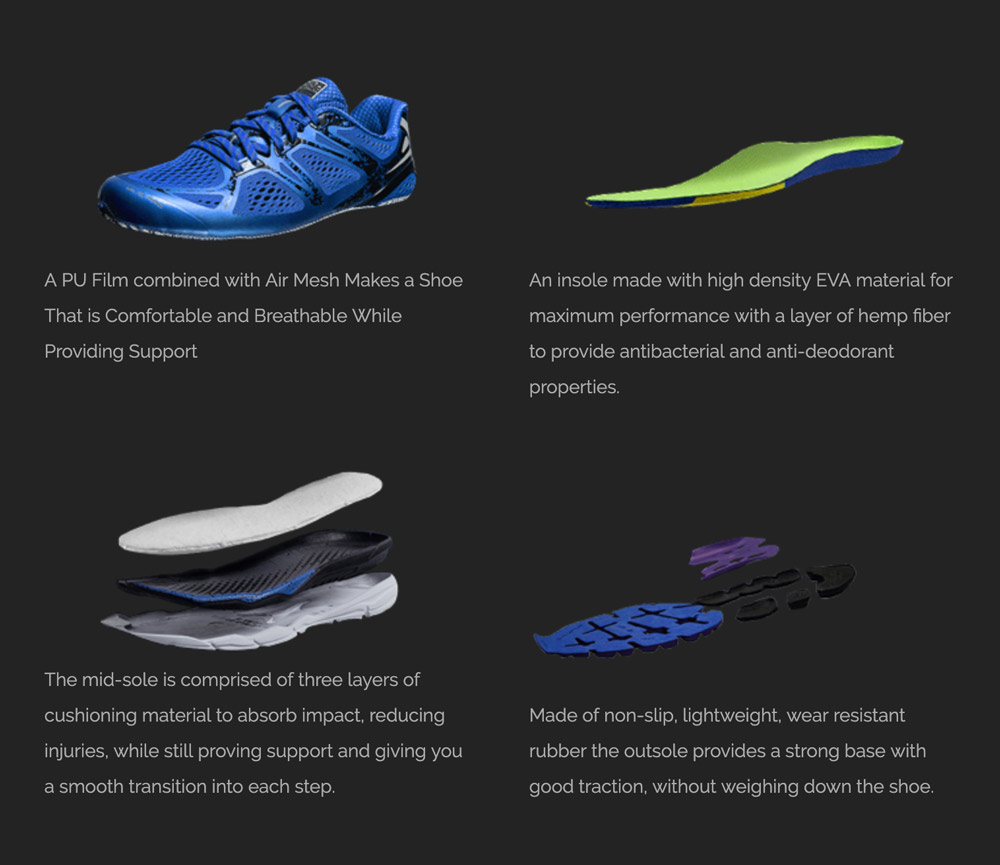
This image from the company’s website shows a bit more of all the shoe components. AISportage sells the shoe for $70 without the technology. This is a pretty good shoe for that price. More on this in a bit.

PART II: Now let’s look at the smart module part of the system…

The device (on the right) is a simple rectangular module with an LED on the top and 4 contacts on the bottom for interfacing with the charger (on the left).
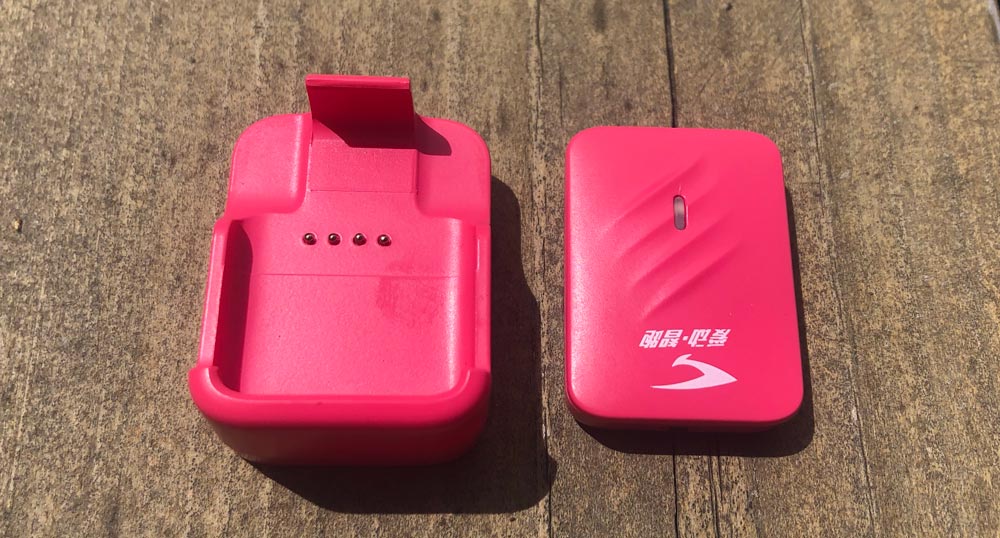
The charger has 4 pins that mate to the module in a single orientation. There is nothing however to keep you from putting it in backward.
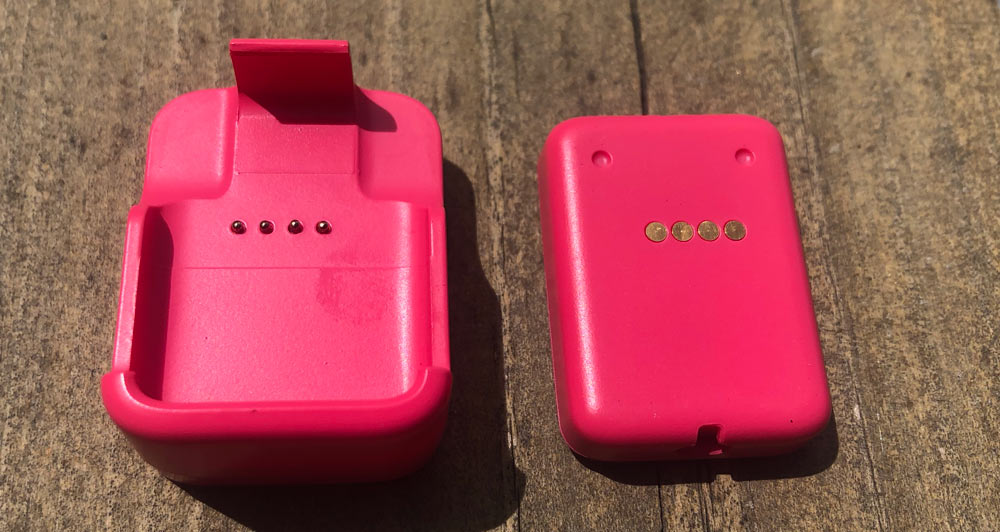
The retention mechanism (lever) does not have a pivot or hinge and instead relies on the material flexibility to deform out of the way during install and removal.
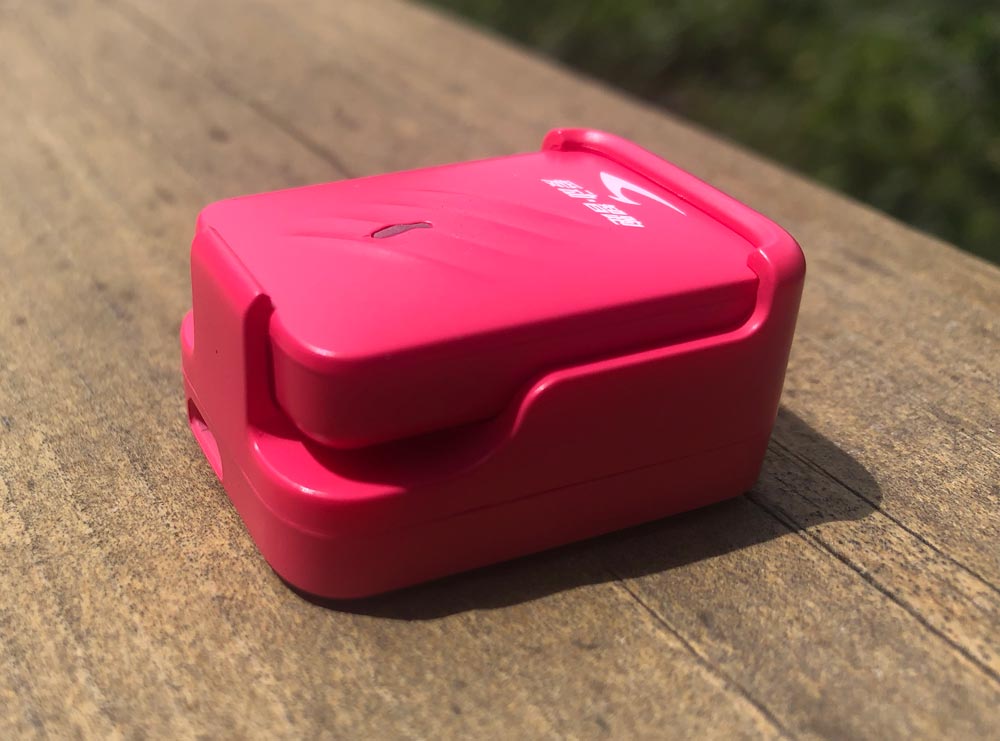
Placing the module in for charging is relatively easy with a positive snap at the end. Retrieving the module however is really difficult. Like break-a-nail difficult as you need to leverage that front edge open to slide the module past.

PART III: App time
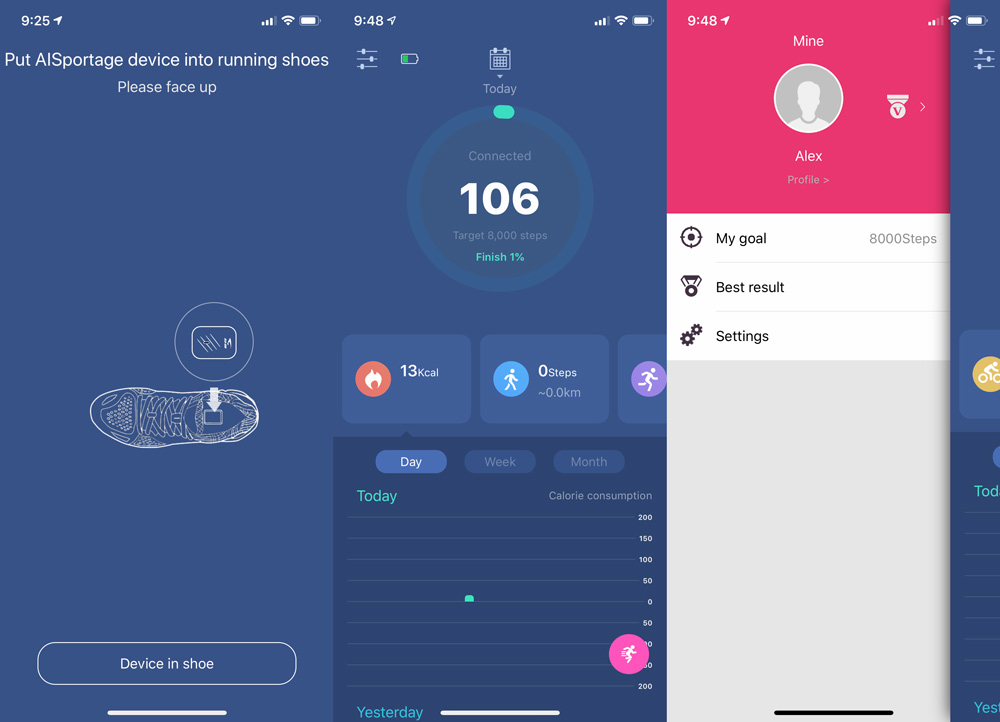
After pairing the module to your phone, launch the app and confirm that it has been placed in (or on) the shoe. The center screen above is the home screen and shows your current step count with selections for day, week or month, along with a side scroll sections of calorie, steps, running, cycling and stair metrics that you can click into for more detail. Tapping the upper left sliders icon takes you to the third screen above where you can edit your goal and access settings for firmware updates, device pairing and clear the cache. The app actively counts your steps, but to log a run, you will want to click the pink run circle at the bottom right and choose indoor or outdoor run.
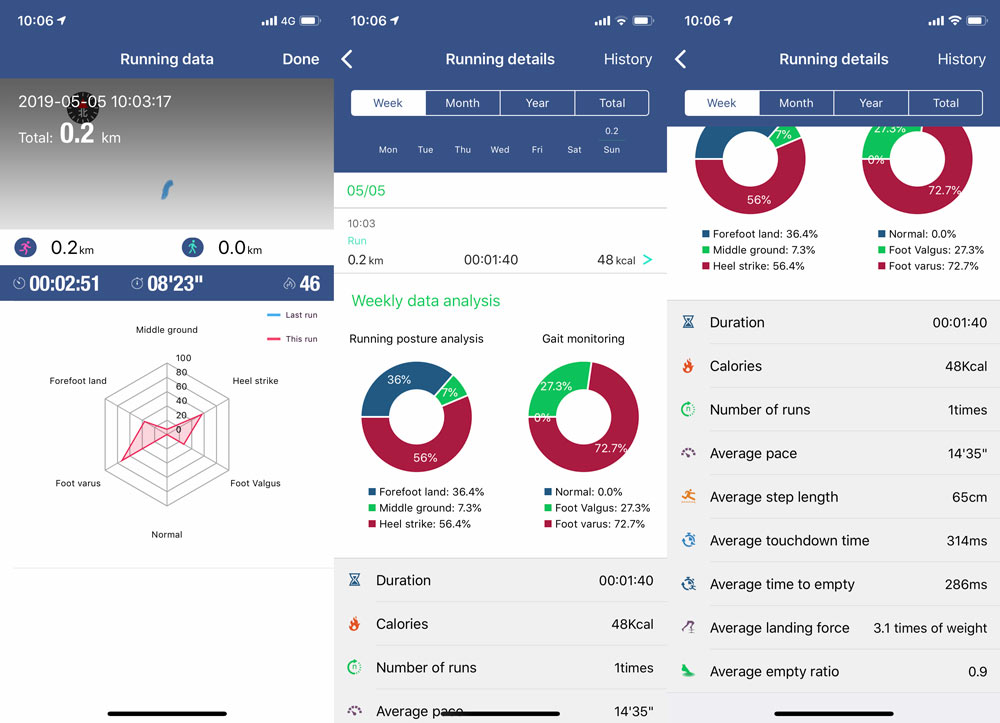
Upon finishing a run and clicking stop in the app, you’re immediately presented with the first screen above. At the top it shows the duration, estimated time for a minute and calories burned. Just below is a very cool spiderweb graph showing balance of forefoot to heel landing and angulation of knee/ankle. It’s then summarized on the next screen (two screenshots above to catch all of the scrolling), but interestingly enough there is no way to find the spider graph again after dismissing it. This was just a quick run, but you can see that I’m a heel striker, with inward angulation that lands with 3 times my weight. In discussing this with my wife, she assured me I would injure myself quickly without learning to transition to more of a forefoot strike.
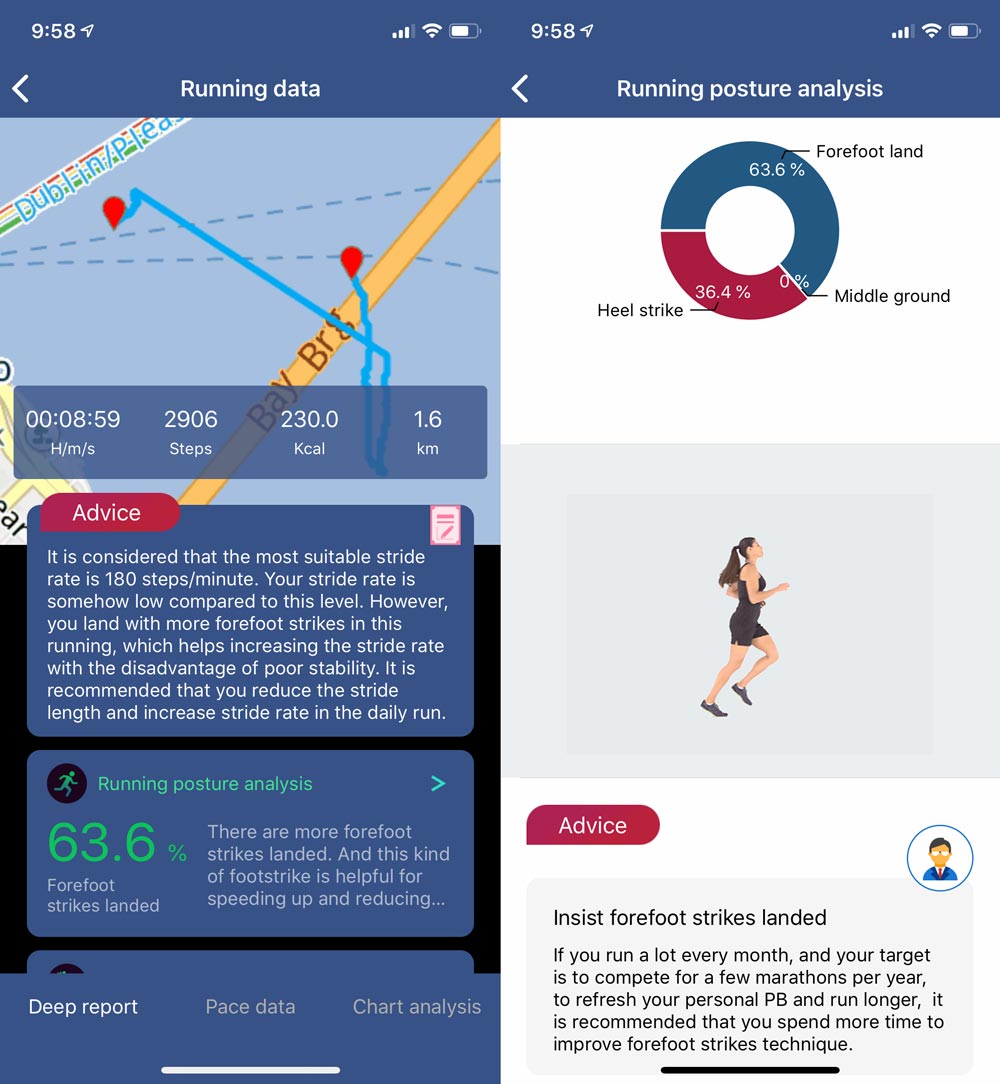
The screens above are from one of my wife’s runs. As you can see, she lands with more forefoot strikes and the app has advice in multiple areas related to that.
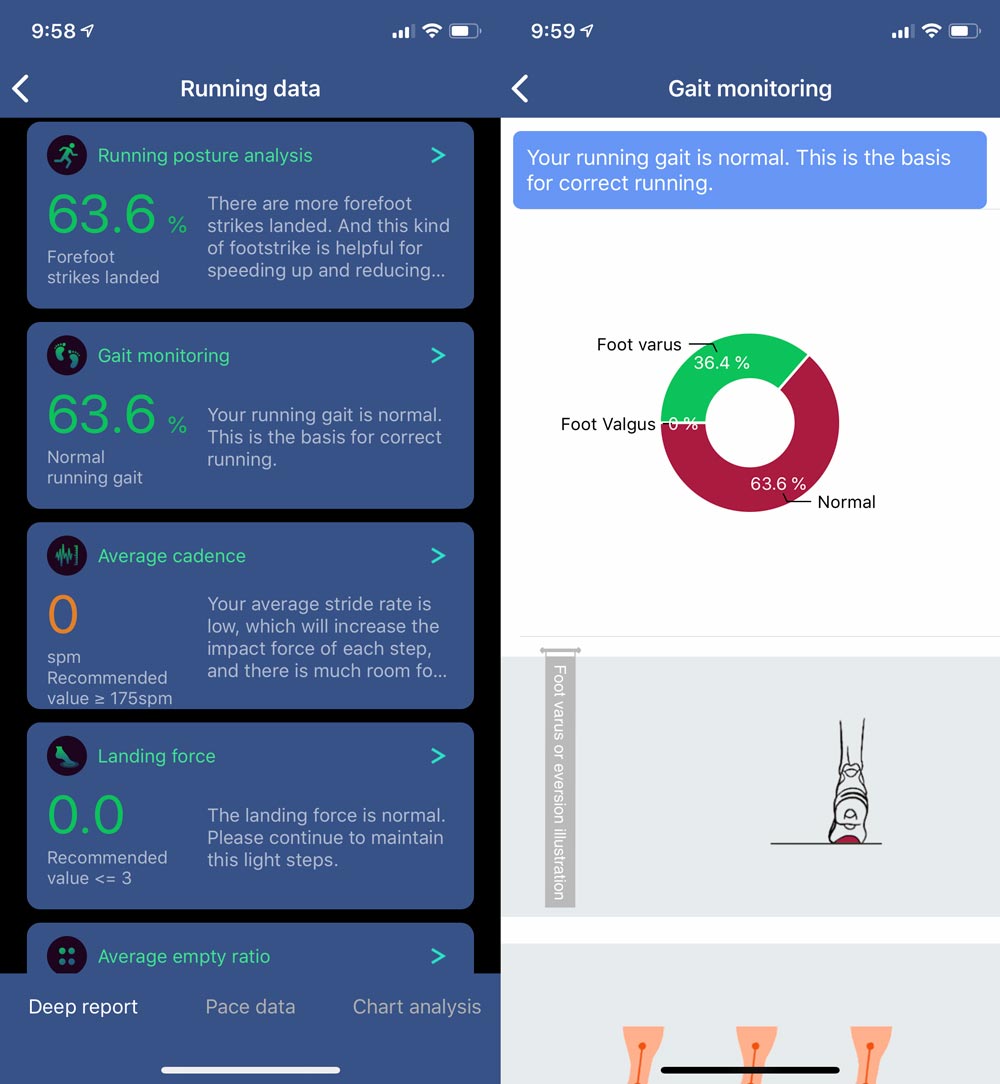
Similarly, the app has details for her on gait as well. The Landing force tidbit above suggests a value ≤ 3 which means I’m in trouble again.
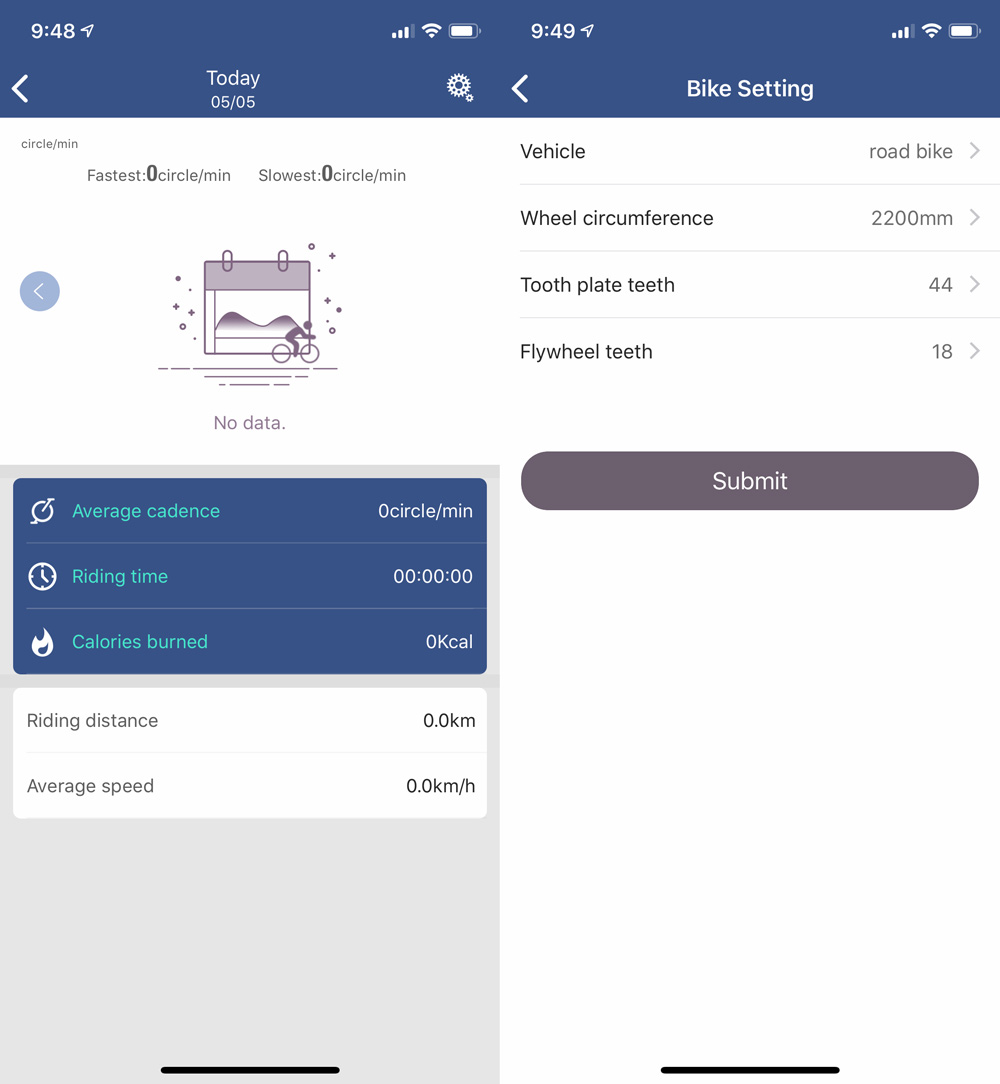
I was excited to find a cycling setting where I could specify bike type. I assumed that it would auto detect a cycling event, but it did not. I’m now guessing that you would also need to click the pink “start run” button and then it would auto-detect that one is cycling due to a lack of any foot strikes.

What’s the takeaway here… I’m struggling a bit with the mix of these products. Data science feels like the main product here in being able to learn about how you run and what you can change to increase performance and reduce strain and injury. There’s a huge benefit to all of that as a stand alone service. The app has a lot of great information and advice, but struggles a bit with navigation and where to find what you’re looking for.

While the shoe is really well made, there are some caveats. One shoe does not fit all runners, although this one should work for anyone in the center of the bell curve. Moreover, left and right feet may have very different strikes and only the right shoe has a cavity for the module. It feels a bit like they needed to make their own shoe to be able to show the value of their module and app. It wouldn’t be surprising as it’s something that many companies have to do; launch hardware in order to ultimately end up as a component or technology vendor within the space they want to be.

It also feels like this would be a product you might use early in your quest to discover and improve your running technique as you’re pretty much guaranteed to have a Fitbit, dedicated running watch, Apple Watch and/or use Strava or Nike Run Club. It’s a tough area to compete in, so maybe they’re looking to break in and end up as a module provider for shoe manufacturers or one of the established wearables. It could explain why there’s no AISportage branding on the shoe, instead choosing to run with a very large ‘intel inside’ logo.

What I like

  • Data collection, analysis and advice of more than steps, distance and route
  • Well made shoe at an affordable price
  • Good value as a package if you’re not duplicating a device or shoe

What needs to be improved

  • Smart module is difficult to install and remove from charger
  • A neutral running shoes may not be the shoe you need
  • Smart module not for sale by itself

Final thoughts

If you’re a runner, you have likely found your way to shoes that work well for your anatomy and running style. From publications like Runner’s World to local running stores that can help you with your gait, strike and other foot positioning, there are multiple ways to get information and help. AISportage has created what may be a great solution for doing that on your time in your own terms. I would hope that they begin offering the technology for sale without the shoe to lower the entry price and help runners hit their stride.

Price: $129 (Currently on sale at $109)
Where to buy: AISportage
Source: The sample of this product was provided by AISportage.

Filed in categories: Reviews

Tagged: ,

AISportage Smart Shoes review originally appeared on The Gadgeteer on May 13, 2019 at 9:00 am.

Note: If you are subscribed to this feed through FeedBurner, please switch to our native feed URL http://the-gadgeteer.com/feed/ in order to ensure continuous delivery.

KetoCoach blood ketone meter review

REVIEW – The keto diet – everyone is on it.  Thanks to my loving wife, and my extended middle, as of May 1, I am as well.  I wanted to be able to tell if I am successfully into ketosis, so when the opportunity to test the KetoCoach blood ketone meter came up, I jumped at it.

What is it?

KetoCoach is an FDA-approved blood ketone meter. A blood ketone meter analyzes a small amount of capillary blood looking for ketones.  What are ketones, you say? Ketones are produced when the body burns fat for energy or fuel. They are also produced when you lose weight or if there is not enough insulin to help your body use sugar for energy. Without enough insulin, glucose builds up in the blood. When this occurs, ketones form in the blood and spill into the urine.

Testing for ketones is a primary test for keto dieters and for folks with diabetes. This meter specifically measures beta-hydroxybutyrate (BHB), the most common ketone the body produces. Since the blood cannot get altered as much as urine can, blood is considered a more accurate, and more consistent measurement of ketosis.

What’s in the box?

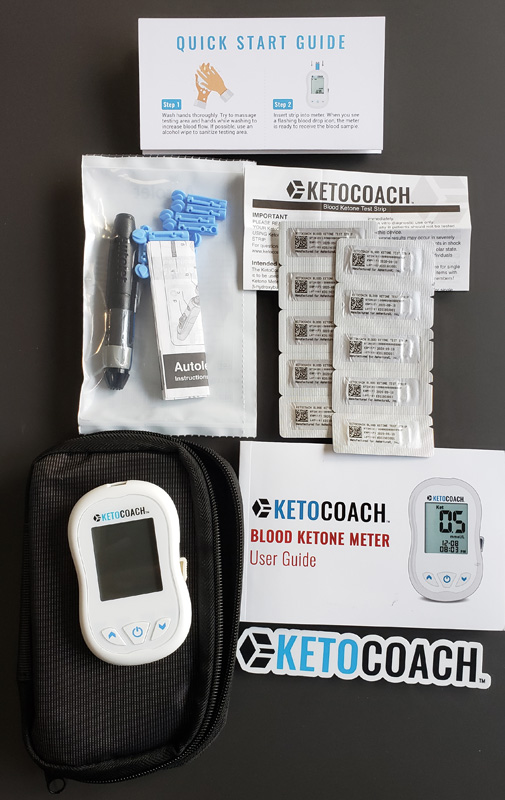
  • KetoCoach unit
  • Carry case
  • User guide
  • Quick start guide
  • 10 lancets
  • Lancing device
  • Lancet instructions
  • 10 test strips
  • Test strip instructions
  • KetoCoach decal

Hardware specs

  • Test range: 0.1 – 8.0 mmol/L
  • Blood sample size: >= 0.8 microlitres
  • Hematocrit range: 20 – 60%
  • Display: Backlit LCD
  • Memory: 500 tests with date and time
  • Dimensions: 99L x 58w x 16H mm
  • Weight: 49g without batteries
  • Batteries: 2 x CR2032 3v lithium coin cell
  • Battery life: 1000 tests in continuous use or one year
  • Auto power-off: 1.5 minutes of inactivity

Design and features

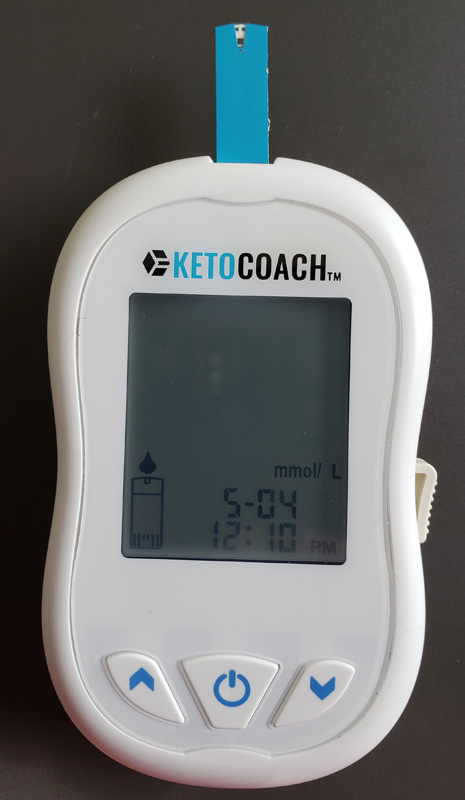
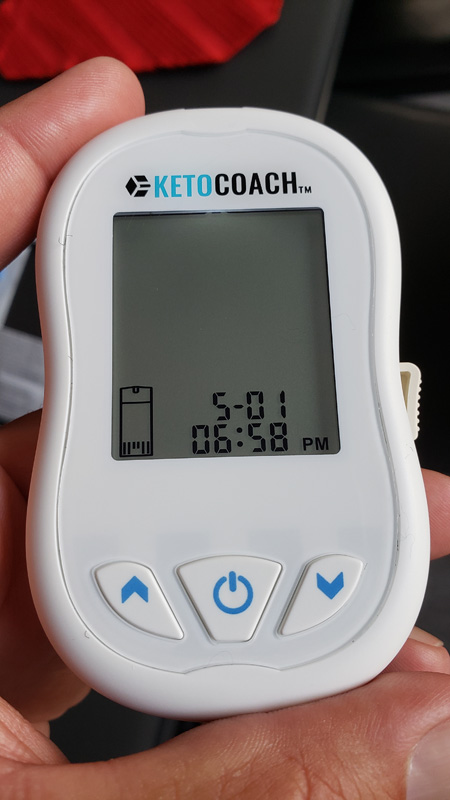
The unit fits easily in the hand and has a large, easy-to-read display with a backlight for dim conditions. The test strip eject lever is on the right side of the meter. The test strip slot is on top of the meter. Beside the power button are up/down buttons used to cycle through historical tests and also for setting the date and time.  Speaking of setup…

Setup

To power up/down the unit, you hold down the power button for three seconds. When you power up the unit for the first time, it steps you through setting the date and time. Once set, the unit is ready for a test strip.

Performance

To get ready to test, I washed my hands, removed one test strip from its protective foil packet and inserted it into the meter.  The meter powered up and the blood drop icon started flashing above the test strip icon, indicating that the meter is ready for a blood sample.

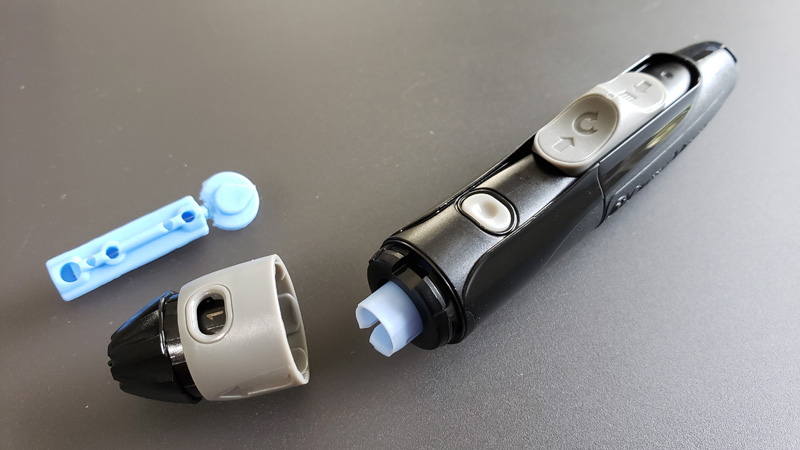
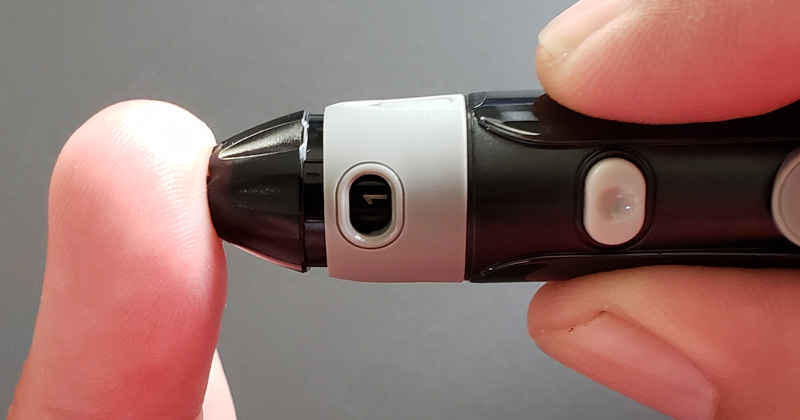
I popped the top off the supplied lancing tool.  Note that I have the depth set to “1”, the minimum lancing depth. You can vary to a deeper depth, up to “9”, if “1” doesn’t get to your capillaries.  For me, “1” was perfect.

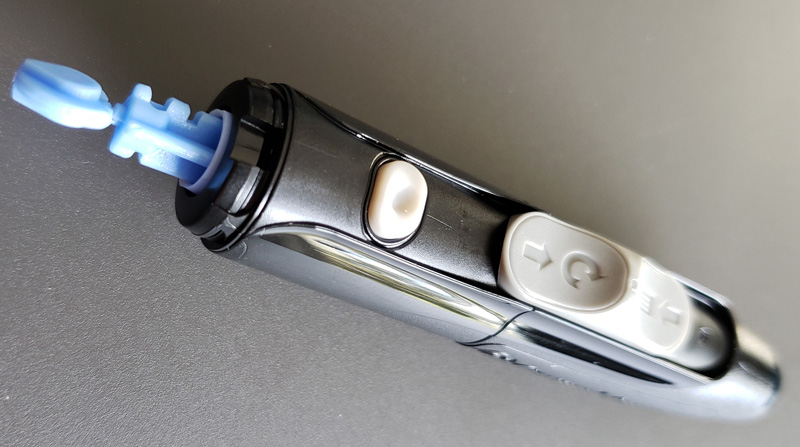
I inserted a lancet into the tool.  Pushing it in automatically cocks the device, getting it ready to stab you. If it doesn’t cock completely, you can slide the large switch to complete the lancet cocking.  That switch also doubles as the lancet ejection switch.

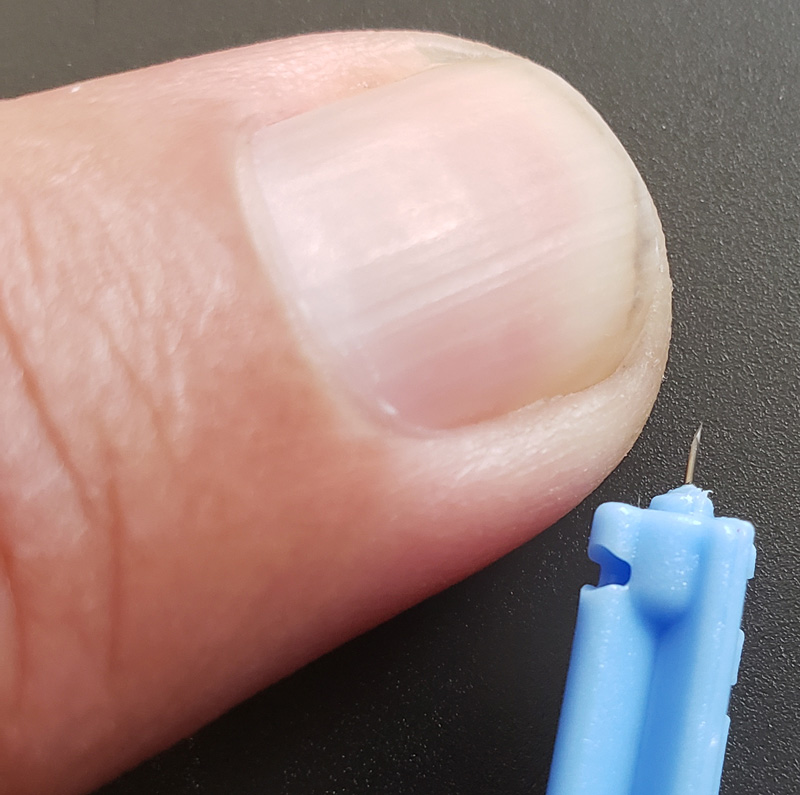
After twisting the protective cover off the lancet and replacing the tool cover, I was ready to pierce my finger. The actual needle is quite thin.

They recommend pushing the tool into the side of your finger to minimize pain. When you’re ready to go, you push the small gray button on the tool.  The lance comes out very quickly and then immediately retracts.

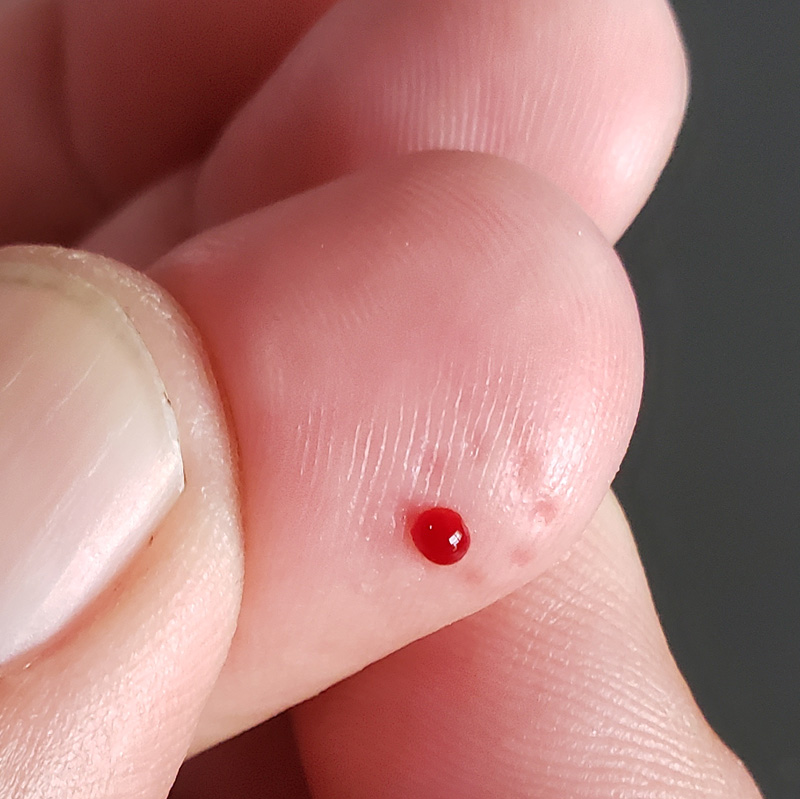
With the thin lances supplied and shallow piercing depth, I didn’t feel anything. When I pulled it away, I could clearly see the indentations of the desensitizing knobs on the tip of the tool.  It is designed to stimulate those nerve endings, minimizing the impact on the nerve endings when the lancet pierces your skin.  It works as I didn’t feel it at all and a small droplet came out.

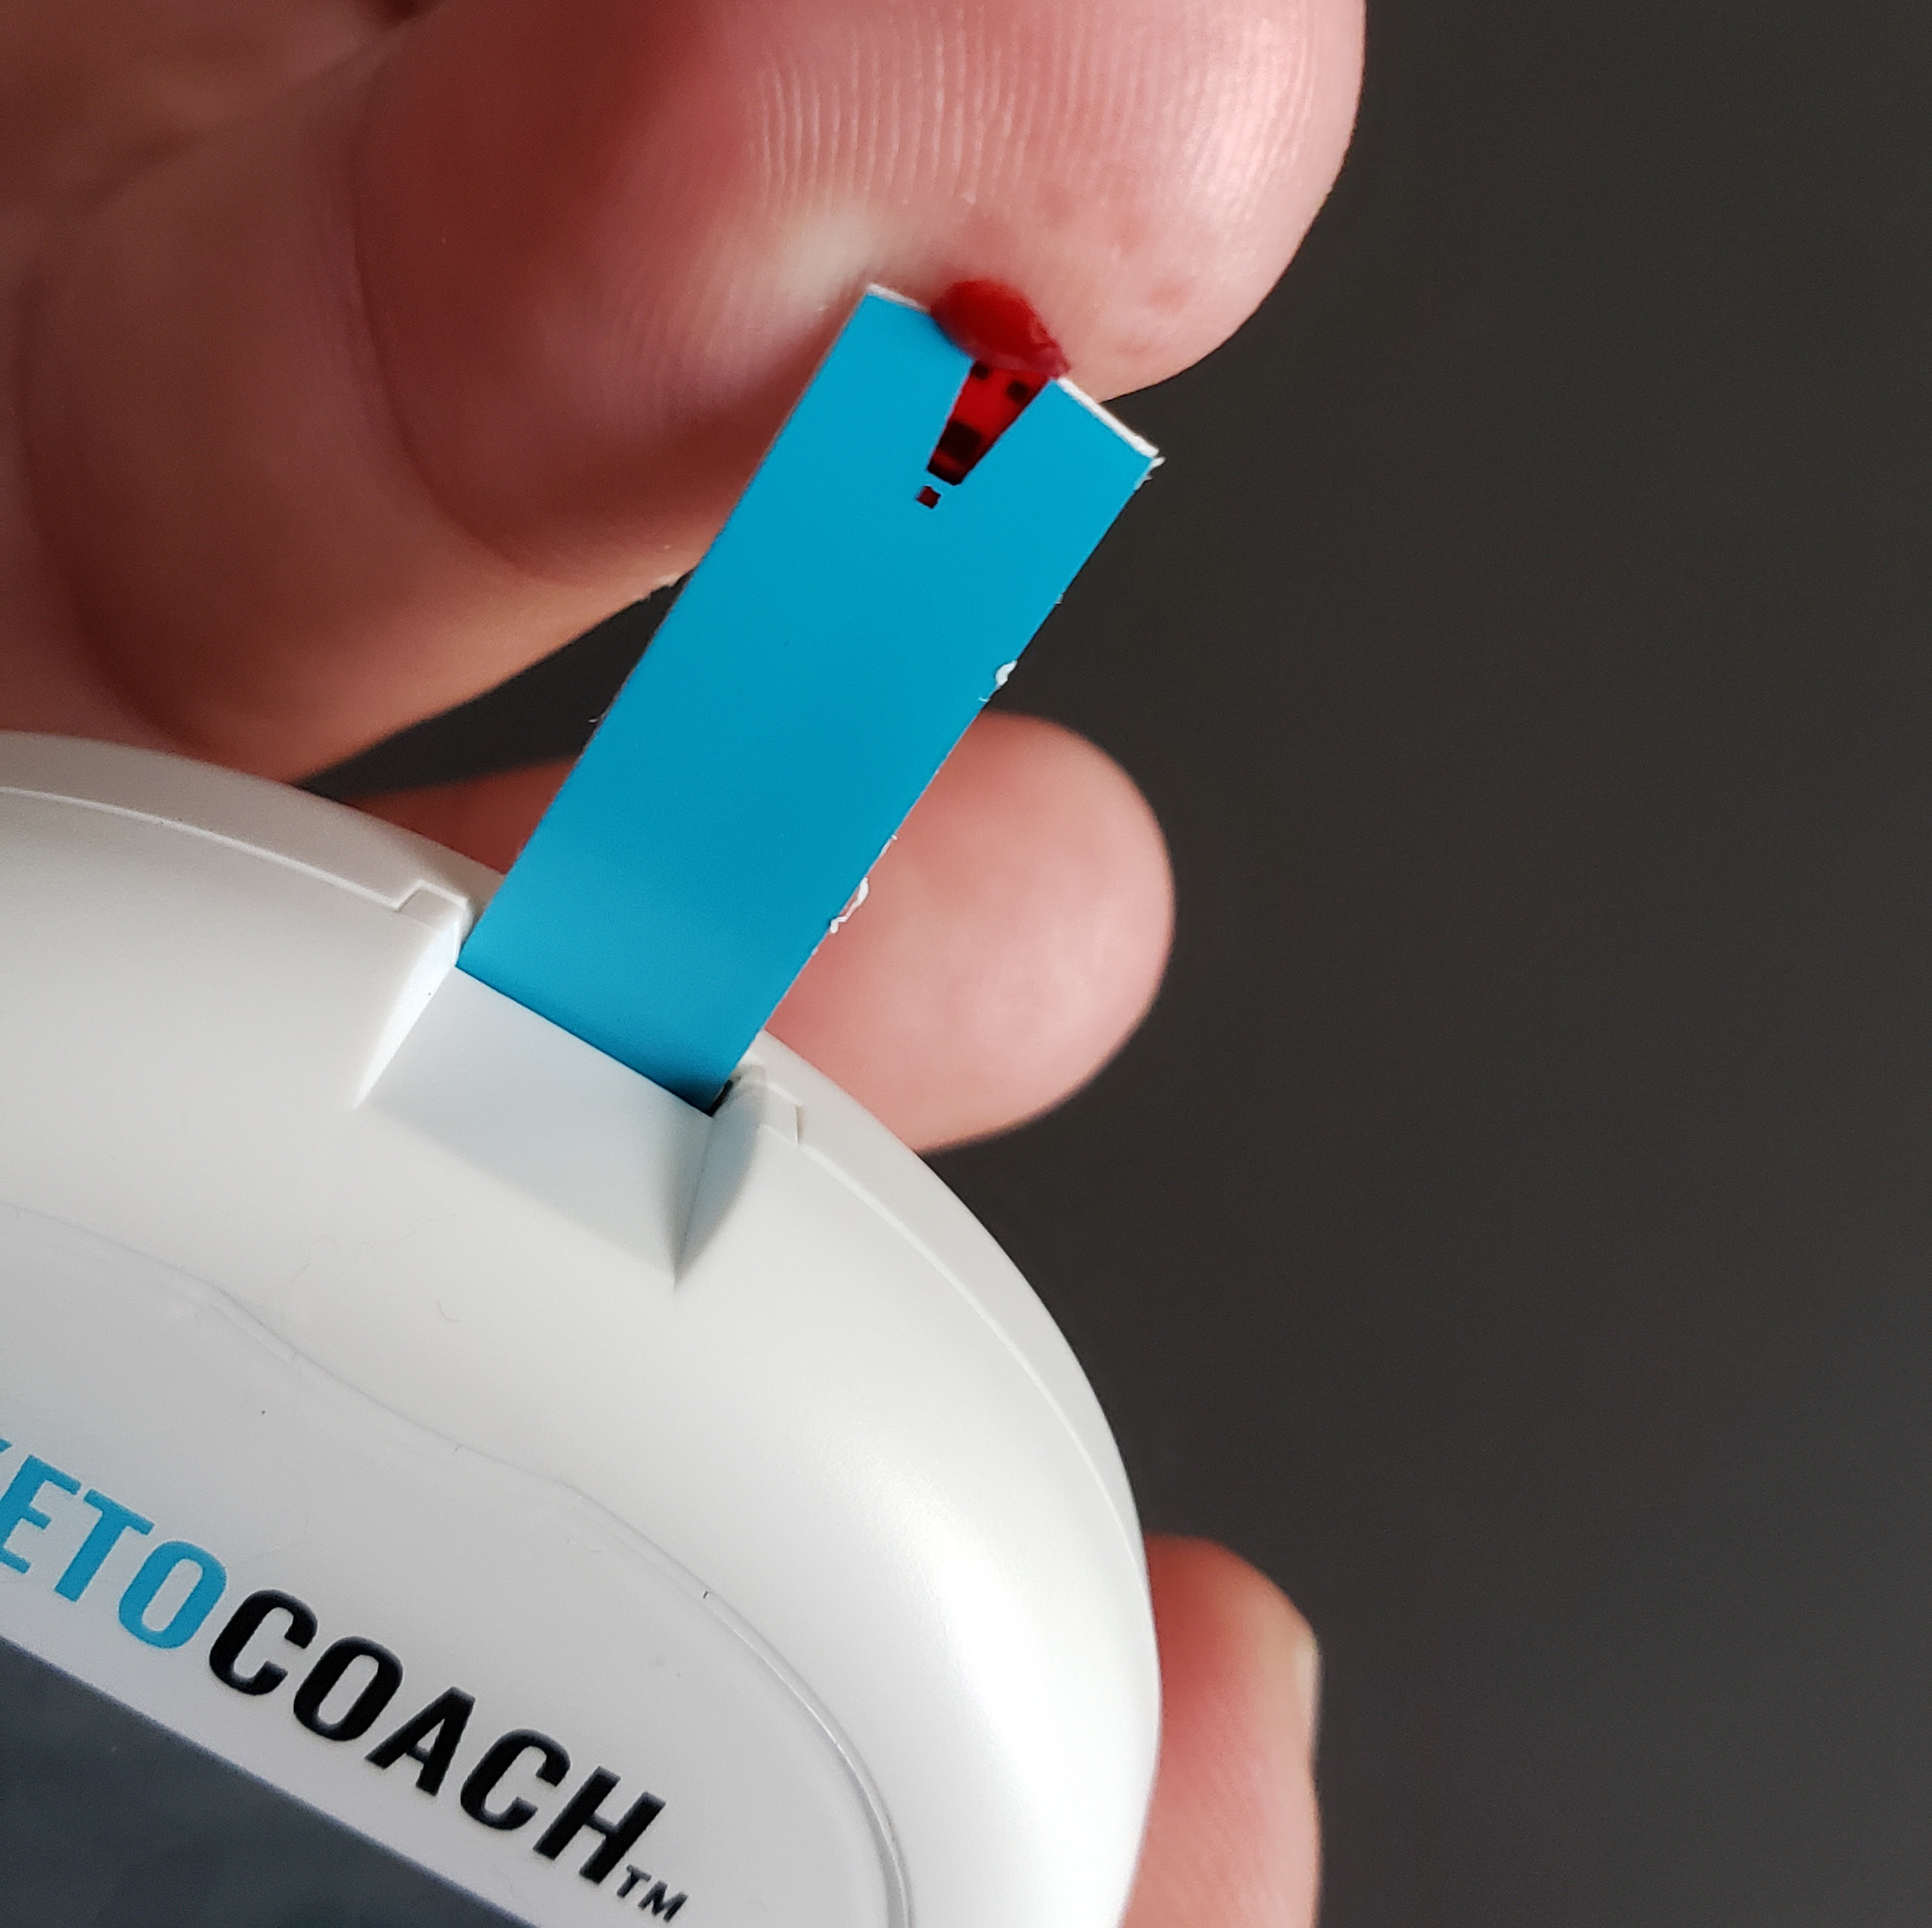
I touched the droplet to the top of the test strip. The strip is designed to pull the blood in.  As soon as it did, the meter started a countdown of about five seconds.

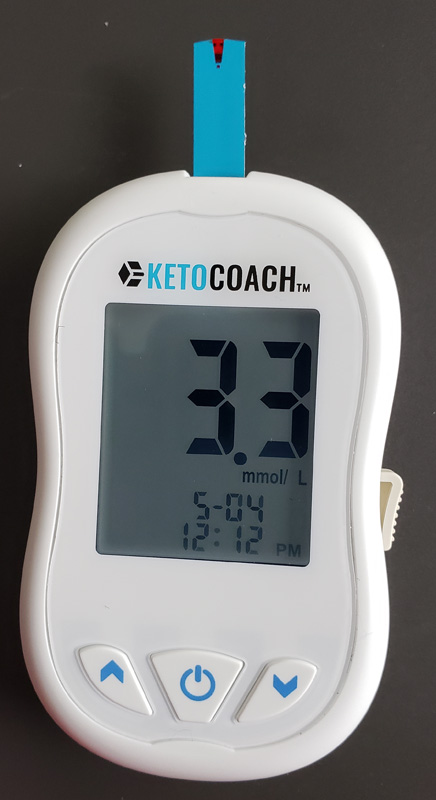
After the countdown, the meter displays the ketone level in your blood.  I was at 3.3 mmol/L – actually a tad on the high side for ketosis.  This is most likely due to the fact that I was severely limiting my carb intake over the past four days to get into ketosis.  This test indicates that I need to up my carb intake a bit

Just prior to doing this test, I also used a urine ketone test strip.  That test indicated I was really deeply into ketosis.  The blood test backed that up.

About the test strips…in my opinion, they’re costly, but that’s relative.  You have to use the specific one designed for, and available exclusively through KetoCoach.  Per the KetoCoach documentation, others will not work with KetoCoach. They run $34.95 for 50 strips or $0.70 per test.  In addition, you need lancets.  Those cost $9.95 for 100, or $0.10 per test, also from KetoCoach.  That adds up to $0.80 per test. If you regularly test your ketones, that can add up quickly. You can buy generic lancets from your favorite pharmacy or online for as low as $0.04 each, bringing the total cost per test down to $0.74. This price compares favorably with other ketone blood test strips I found on Amazon.  Most run between $0.87 and $1.00 per test, plus the cost of lancets.

Alternatively, you can buy urine-based test strips as low as $0.04 each online from Amazon.  Of course, you have the tradeoff of cost versus accuracy, and there’s no argument that blood ketone testing is more accurate than urine ketone testing. Urine ketone testing is much less invasive. While not as accurate as blood ketone testing, it may be accurate enough.

What I like

  • Easy to use (but not as easy as urine test strips)
  • Accurate
  • Nice carry kit allows you to easily take it with you
  • Low start-up cost

What needs to be improved

  • Cost of test strips is a bit high but is lower than competing brands

Final thoughts

I am pretty impressed with the KetoCoach.  As home-based medical devices go, it is easy to use, and the supplied lancing tool does a good job minimizing the pain usually associated with finger-prick testing. They kept the cost of the required supplies reasonable when compared to competing brands.  When compared to urine-based ketone testing, however, the cost is significantly higher.

So, is it worth it?  That’s up to you.  The initial cost at just under $50 is pretty reasonable.  If the ongoing costs work for you, then getting the accuracy of a blood ketone test at a relatively low cost is a pretty good deal.  Combine that with a good design and easy interface and KetoCoach may be for you.

Price: $49.95
Where to buy: Direct from KetoCoachx.com
Source: The sample of this product was provided by KetoCoach.

Filed in categories: Reviews

Tagged:

KetoCoach blood ketone meter review originally appeared on The Gadgeteer on May 12, 2019 at 11:00 am.

Note: If you are subscribed to this feed through FeedBurner, please switch to our native feed URL http://the-gadgeteer.com/feed/ in order to ensure continuous delivery.

Arboleaf body composition smart scale review

REVIEW – We need to address the elephant in the room.  And when I refer to the elephant, that is a thinly disguised reference to me.  May 1, my loving wife said that we are going on the Keto diet.  In one day, I found out that by “we”, she really meant “you”, as she’s been cheating since day #1.  But I haven’t, and as of this writing, this is the start of day #3 for me.  So far, I have been 100% faithful (seriously) to the program and plan to continue for a month to see my results.  I will reevaluate from there.  To really see what is happening, a plain old scale just doesn’t cut it.  The Arboleaf scale also measures a bunch of other factors to help you see what changes are happening as your body changes.  Let’s get into the embarrassing body composition details that are prompting my weight loss journey.

Just a bit more history here.  I was in IT  for 35 years.  That means I sat behind a desk nine to ten hours a day and ate horrible fast food for lunch all the time.  With two active kids, after work meant running them around at night and essentially gave me the excuse to do nothing much physically.  That lead to packing on the pounds.  We retired in January 2018 and moved to an extremely active retirement community in Florida.  Pickleball, golf, and water volleyball 5+ days a week helped me drop 40 pounds fairly quickly.  Then came the dreaded plateau, and I’ve been holding there for several months.  That was the impetus for Keto.  Around that time, the opportunity to review the Arboleaf scale popped up and it was like Karma was telling me to lose weight and use tools to track it, so…here we go!

What is it?

The Arboleaf body composition smart scale, hereinafter called “the scale”, is a digital, Bluetooth-enabled scale that measures weight, plus:

  • Body fat %
  • Body type
  • Visceral fat (fat stored in the abdominal area)
  • Body water %
  • Muscle mass
  • Bone mass
  • BMR (basal metabolic rate – essentially, how much energy you burn when resting)
  • BMI (body mass index)
  • Metabolic age

The scale connects via Bluetooth to the Arboleaf app, available for IOS and Android.

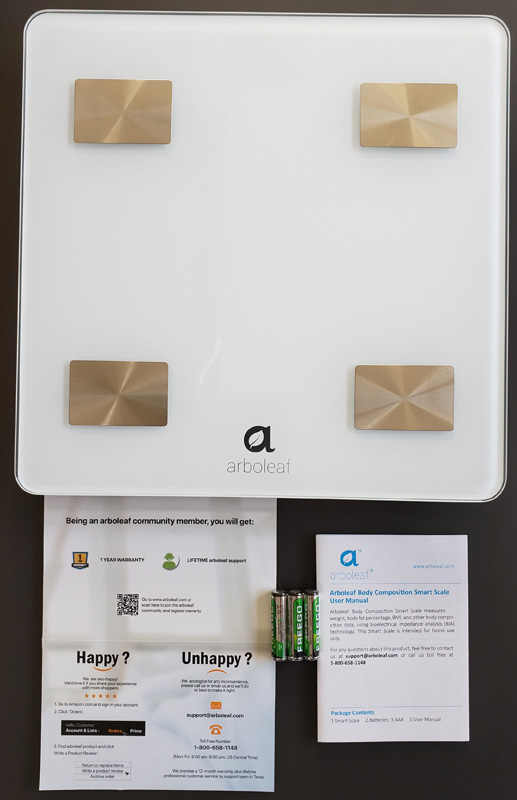
What’s in the box?

  • Arboleaf body composition smart scale
  • User guide
  • Three AAA batteries
  • Warranty and user satisfaction card

Hardware specs

  • Dimensions: 11.8″ x 11.8″ x 1″
  • Weight: 3.53 pounds
  • Power: Three AAA batteries
  • Measurement range: 0.4 – 396 pounds
  • Measurement resolution: 0.4 pounds

Design and features

There are some cautions with this scale.  Since it uses electricity to measure the various body factors, you should not use this scale, or any scale like this, if you have a pacemaker, artificial lung, ECG or any other internal medical device, or if you are pregnant.  The manual also cautions that infants and toddlers should not use this scale and that some of the measurements may not be accurate for users under 18 years of age.

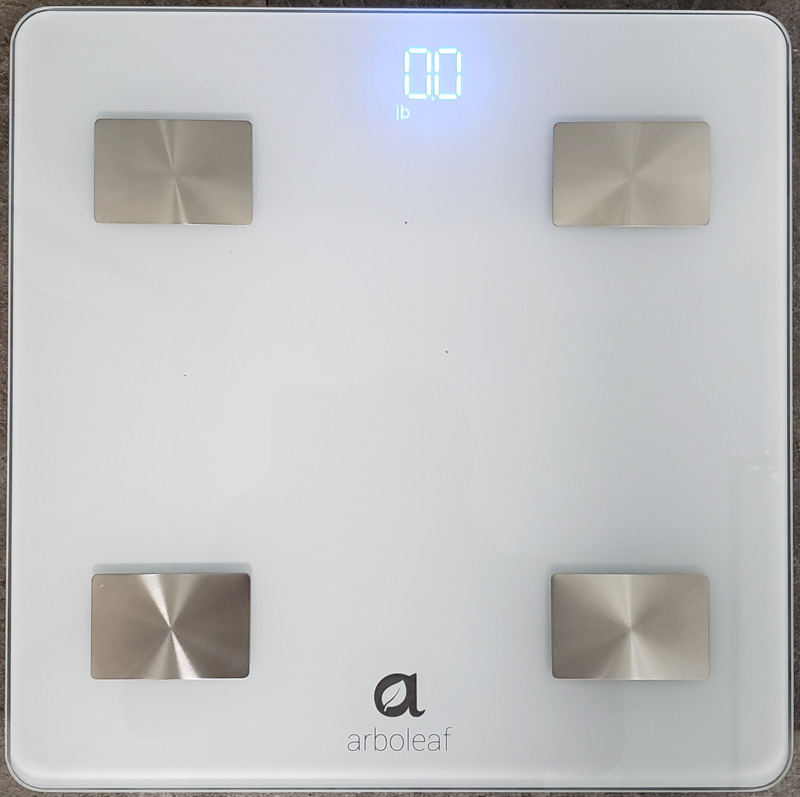
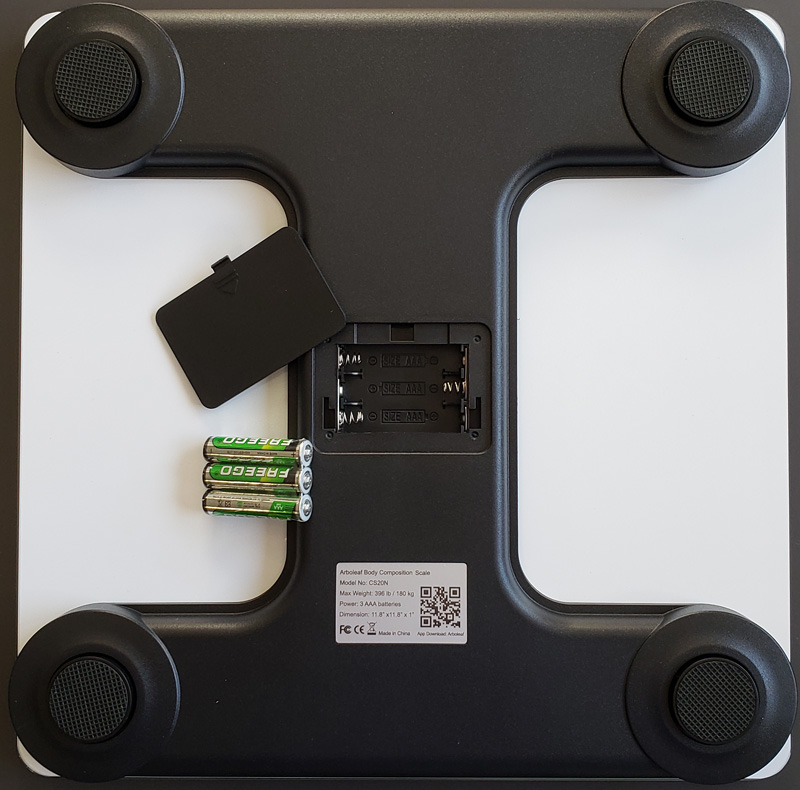
The scale is nicely designed. The glass top has four silver metal pads (in some photos, they look gold, but that was due to lighting) where you place the heals and balls of your feet. The digital reading shows up in crisp blue digits under the center top of the scale. The underside of the scale has four rubberized feet that prevent the scale from sliding around. We also find the battery compartment there as well as the product label.

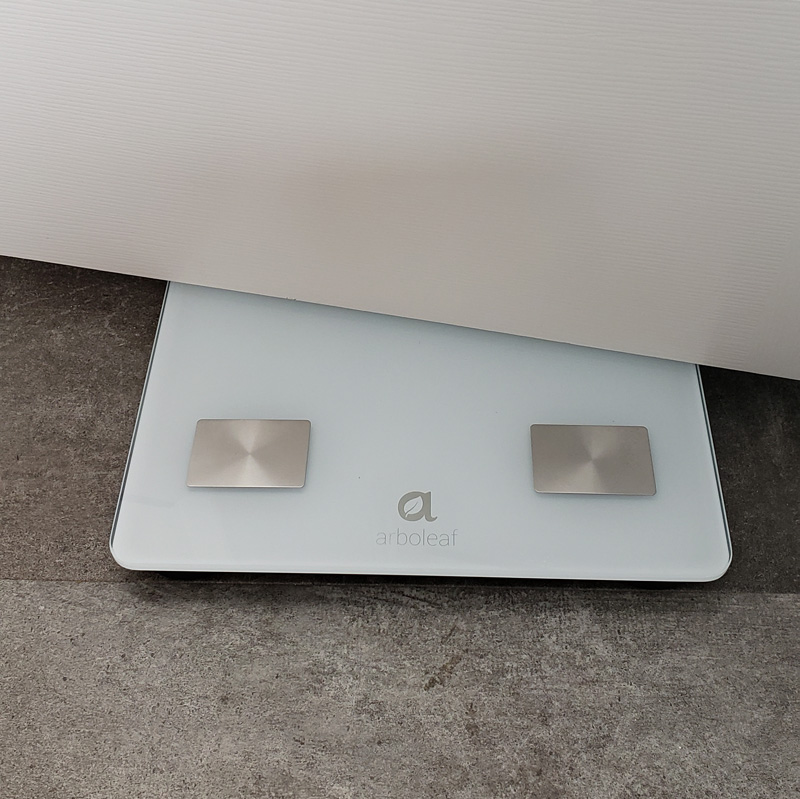
The scale is quite thin at only an inch.  This worked great as it allowed me to place it in the separate toilet room in our master bath.  It was thin enough that I put it up against the wall and the door went right over the top.

Setup

The first step is getting the scale powered up. All that takes is flipping the scale over, popping off the battery door, inserting the included three AAA batteries, and closing it back up.

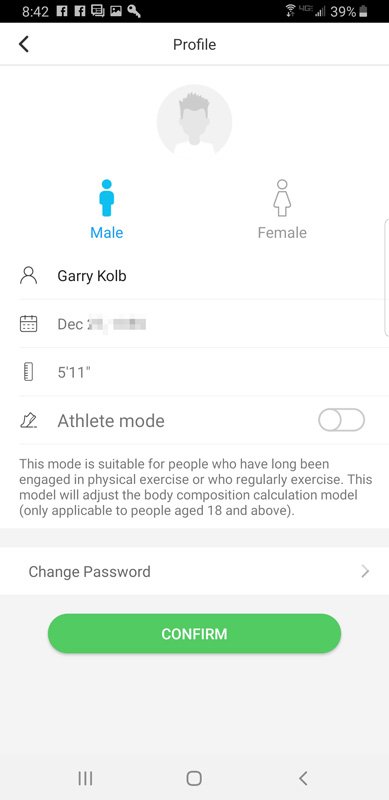
The next step is installing the Arboleaf app, setting up an account with a username and password and providing your specific parameters.

Arboleaf uses your height and age in their calculations for the various body parameters.

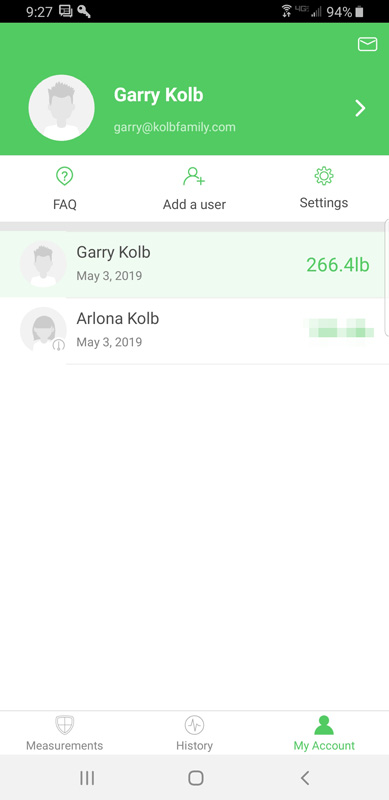
You can also set up unlimited other users.  There are two options – scale users and friends.  Scale users are users on the same scale and app.  You can optionally set up an Arboleaf account for them, but it isn’t necessary. Friends are other Arboleaf users with their own scales and accounts.  This is kind of a cool feature, as you can have a weight loss buddy across the country.  You can both keep track of each other’s progress in your own apps.

The app automatically connects to the scale, so there was no Bluetooth pairing required.

Performance

I set up an account for me and added a user for my wife.  For reasons of marital bliss, while my massive weight is displayed, my wife’s is blurred out.

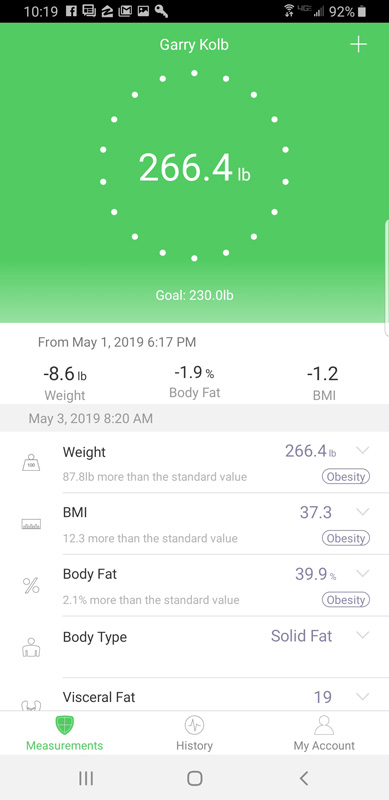
Clicking on any of the users brings up the measurement window. With this window open, the instructions say to tap the scale with your foot to wake it up. I was never able to get this to work. I tapped, pushed, stepped, wiggled, and basically did any move I could think of to produce a tap on the scale.  Nada.  Nothing.  But…just stepping on it fully woke it up and it weighed me and produced the rest of the measurements.

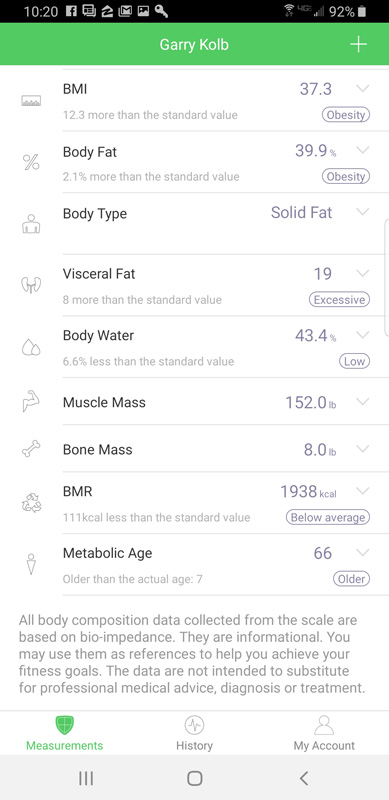
This window shows your most recent weight and all nine other factors that the scale measures. Below are a couple of screenshots of this long screen.  I scrolled down so there is some overlap, but you can see all the parameters.

As you can see, and to nobody’s surprise, it shows that I’m fat.  My metabolic age puts me seven years older than my chronological age.  My body type is shown as “solid fat”. Contrast that with my wife’s which is shown as “normal”. Kind of sobering. All my parameters are out of whack in a bad way – but oddly enough, I show above average muscle mass. Go figure. Perhaps the titanium hip I have is skewing that.

To the right to each of the values, you can see a gray down-arrow.  Clicking on this brings up information about that specific measurement, and includes ranges for that parameter showing what “normal” is for your age/height and all the over/under ranges.

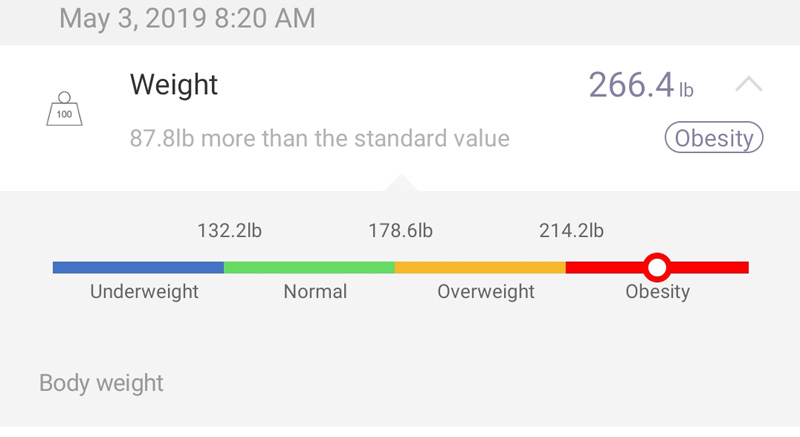
Personally, I think the ranges are a bit laughable. At 5’11”, if I weighed 132.2 pounds, the low end of “normal”, I’d be skin and bones. When I graduated high school, was playing tennis for several hours each day, and in the best shape of my life, I weighed 185 pounds.  According to this, I was still overweight at that point. But, there is no arguing that 266.4 is more than on the high side.

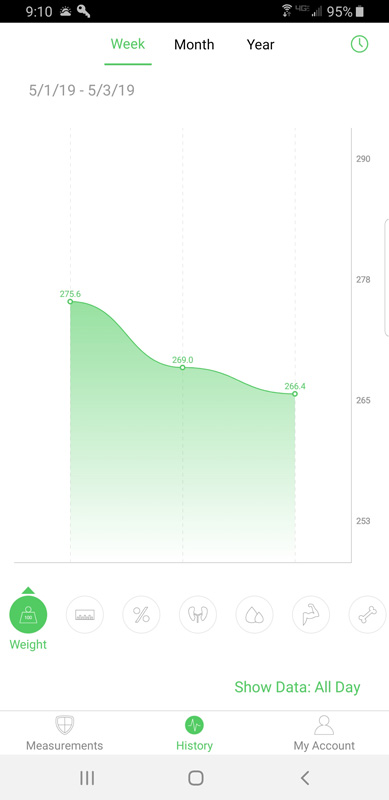
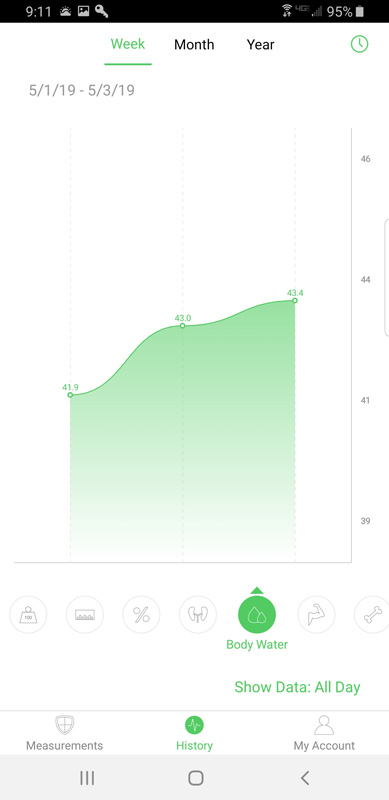
Clicking on the History button at the bottom brings up a historical view of all recorded measurements. This graphs your progress for all of the available measurement parameters. Here are the weight and body water history views.

As you can see, I have shown dramatic weight loss in just two days!  Now, for the real story…the first measurement was late at night, fully clothed and holding my cell phone.  The second and third were done first thing in the morning, after the requisite bathroom visit and before putting on clothes.  The key to accurate tracking is to weigh in at around the same time each day and wearing the same thing (or preferably nothing). Most of my initial weight loss can probably be attributed to water weight.

The instructions also recommend not using the scale:

  • immediately after strenuous exercise
  • immediately after a shower, bath, or sauna
  • after heavy alcohol consumption
  • during or immediately after engorgement (for nursing mothers)
  • when you have a fever

Other features

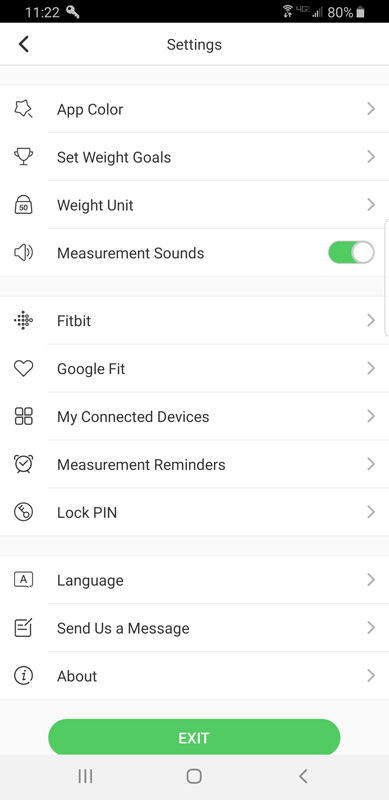
The app lets you change app colors, set weight goals, switch between pounds and kilograms, share data automatically with Google Fit and Fitbit, and set measurement reminders to help make sure you weigh in on time.

What I like

  • Aesthetically pleasing design
  • Excellent list of measurement parameters
  • Ability for multiple users and ongoing tracking
  • Easy linking of the app and scale

What needs to be improved

  • Tap to wake up simply didn’t work
  • Some of the supplied ranges seem a bit unrealistic

Final thoughts

I like this scale and how it works.  I wish it woke up a bit more reliably, but so far, just stepping on it has worked fine. It will be interesting watching the various parameters and how they change as I go on this weight loss journey.

Price: $39.99
Where to buy: Amazon
Source: The sample of this product was provided by Arboleaf.

Filed in categories: Reviews

Tagged:

Arboleaf body composition smart scale review originally appeared on The Gadgeteer on May 11, 2019 at 9:00 am.

Note: If you are subscribed to this feed through FeedBurner, please switch to our native feed URL http://the-gadgeteer.com/feed/ in order to ensure continuous delivery.
Polar Vantage V Pro multisports watch review

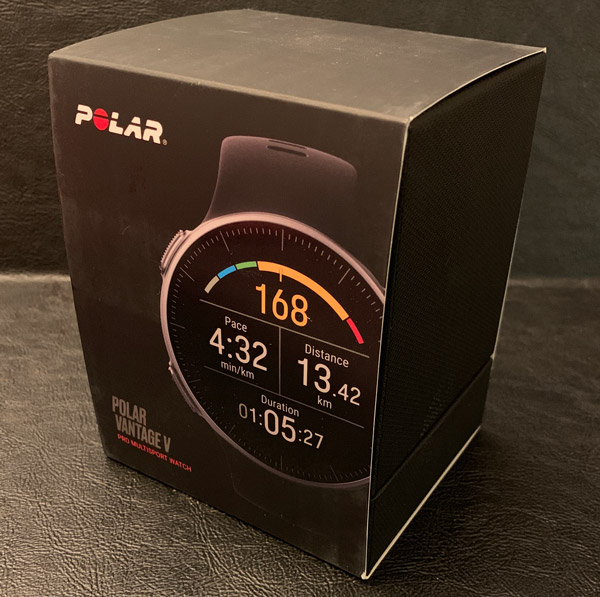
REVIEW – I love receiving new fitness gear to review…nine times out of ten, it amps up my desire to get/be/stay in-shape, workout, pound pavement, etc. As the years roll by, it gets increasingly difficult to be epic but I am a firm believer in that you get what you sow. Today’s tech-world gives us countless gadgets, websites, apps, and support systems to exercise more efficiently and effectively. Hopefully motivating and empowering each of us to reach our goals from wanting our pants to fit to gaining a six-pack. In this case, Polar has sent me their latest and greatest professional multisports training watch: the Vantage V to checkout for this review.

This review will be coming from the perspective of a fifty-something who isn’t nearly as energetic as they use to be back in the day. I will never run a marathon or do a triathlon but do try to workout daily, including running, walking, stairs, elliptical, weights, tennis, etc. For me the key is the long-game, to enjoy exercise but not to the point of injury. Typically I wear a mechanical watch throughout my day and swap it out for a fitness device when I workout, usually an Apple Watch for music and pace/duration. But for the next month or so, I’ll be focusing on the Vantage.

What is it?

The Vantage V is Polar’s flagship multisports training watch engineered to help top-level triathletes, marathoners, hardcore runners, etc. improve their performance and achieve their goals. The Vantage V is Polar’s replacement for the V800. In addition to upgrading the technologies within, Polar has change the overall aesthetics of the watch, going from a rectangular, utilitarian design to a the more classic round form factor.

What’s in the box?

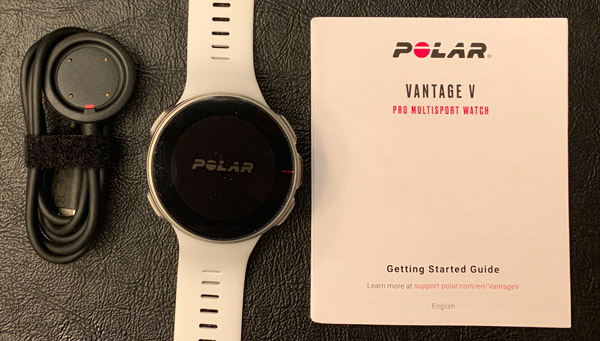
  • Polar Vantage V pro multisport watch
  • Charging cable
  • Polar Vantage V user manual
  • Information note

Specifications:

  • Measurements: 46 x 46 x 13 mm
  • Weight: 68 g
  • Display: Always on color touch display with Gorilla Glass. Size 1.2”, resolution 240 x 240.
  • Battery: 320 mAh Li-pol battery. Battery life up to 40 h in training mode (GPS and wrist-based heart rate).
  • GPS & Barometer: Integrated GPS & GLONASS. Assisted GPS for fast fix times. Barometric altitude, incline, ascent and descent.
  • Connectivity: Bluetooth Low Energy. Custom USB cable for charging and data synchronization.
  • Watch: Time & date. Alarm with snooze.
  • UI languages: English, German, French, Italian, Dutch, Norwegian, Spanish, Portuguese, Swedish, Finnish, Danish, Polish, Russian, Turkish, Indonesian, Czech 
  • Sensors: Compatible with Polar BLE heart rate sensors.
  • Water resistance: Waterproof (WR30)
  • Wristbands: Durable and comfortable silicone.
  • Sizing:

    • Small: wrist circumference 130-185 mm
    • Med/Large: wrist circumference 155-210 mm

Design and features

As I said, the Vantage V is Polar’s flagship, GPS enabled sports watch engineered to track nearly any and all sport and fitness activities: running, swimming, cycling, elliptical, yoga, martial arts, tennis…to name a few. Like a majority of past and present Polar products, their latest & greatest can also track your daily activities including heart rate, steps taken, and calories burned.  But like it’s predecessor, using the Vantage “as a fitness band would be like taking a Ferrari to the grocery store to buy milk”. It works and you’ll look getting there but there are certainly lower priced, just as effective alternatives 😉 .

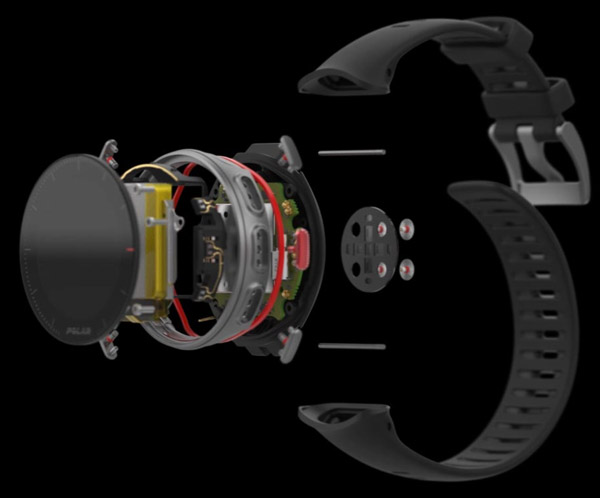
The Vantage V is definitely a well-made device, constructed from aircraft aluminum, gorilla glass, and solid yet comfortable rubber. These premium materials combine to give this multi-sport watch a quality look and feel. The 1.2 inch 240×240 color touchscreen is protected by gorilla glass and is surrounded by the aluminum case that flow nicely into its rubber back.

Fit and comfort

As with a majority of fitness watches, the Vantage V comes on rubber strap.

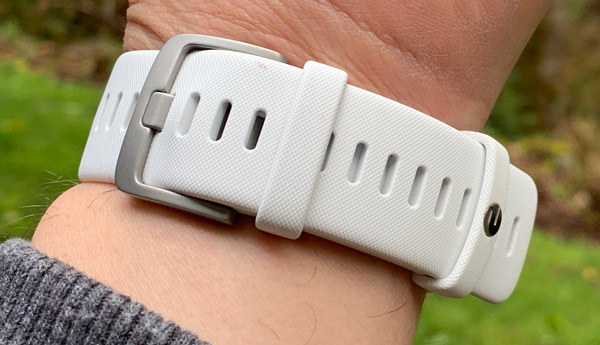
The rubber is soft, flexible, and overall the band is very comfortable to wear. The strap has a knurled texture to it with a standard buckle and locking, logoed free loop to keep the end of the strap in place.

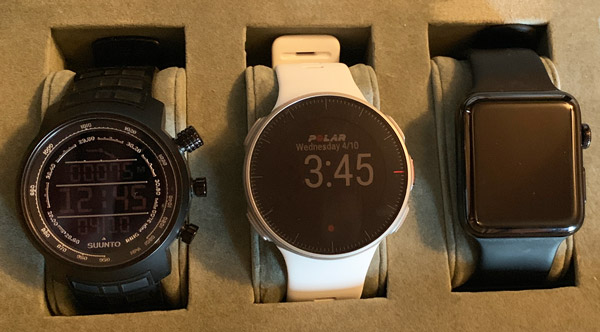
For being a 46mm watch that sits 13mm high, the Vantage V doesn’t wear too big or heavy on the wrist. Here you can see it in comparison to the Suunto Elementum Terra and larger of the two Apple watches. The Vantage wears very nicely on my 7 inch wrist and compared to a stainless steel watch, it’s so light I barely know I have it on.

Setup and Configuration

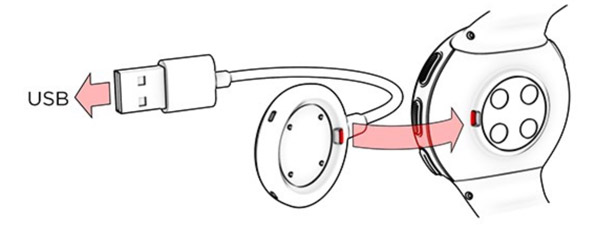
The first step I did in the setup process was to charge the Vantage using its proprietary charging pad.

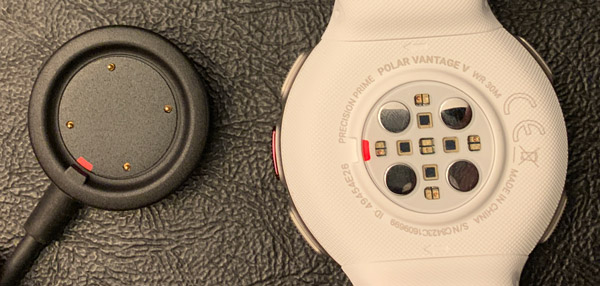
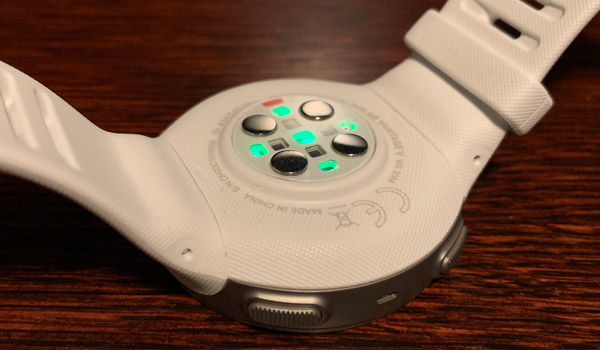
There are four metal plates on the back of this fitness watch engineered to make contact with the corresponding pins on the charging pad. This is definitely a bit old school when many of the big players in smartwatches use inductive charging that can be done on any wireless charging pad.

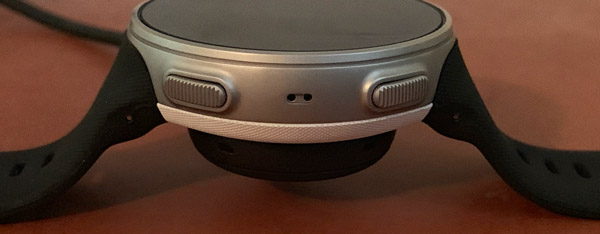
The watch has to sit in a specific orientation to charge. There is a red tab on both the Vantage and charger that align.

The watch and pad are held together magnetically.

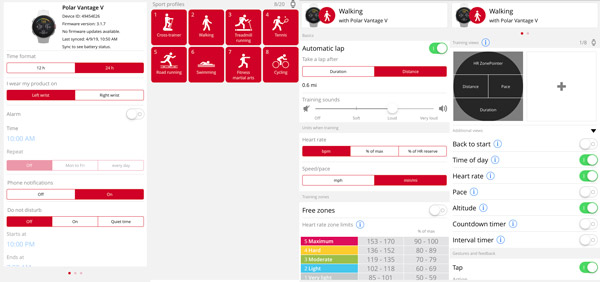
As the watch was charging, I (re)downloaded the Polar Flow app onto my iPhone and logged into my account I setup for previous reviews. All of my preferences were still there, so other than confirming all my info hadn’t changed…getting everything dialed in was quick and easy. That said, 99% of configuring the watch happens either in the app or on the Polar Flow web-interface (I recommend the website. I found it easier).

Setting up your Polar world can be anywhere from a relative short effort to a long and detailed one. The Polar Flow app/website enables you to tweak many facets of that ecosystem, down to how your watch face presents your data and what sensors are being used/enabled during each specific activity.

Once you have your activities arranged and personalized as you want them, you simply sync your watch and smartphone or computer. For you newbies to Polar, I can almost guarantee you that you’ll continue to tweak your profile and watch configurations as you become more accustomed to how you use your multisport watch and what data/stats are important to you as you workout. The more time, effort, and thought you put into this, the more you ultimately get out of using the Polar experience.

Operations

The Vantage V can be controlled by it 1.2 inch touchscreen or 5 physical buttons along the sides of the case. The Vantage products have an MIP display (memory in pixel) with a resolution of 240×240. When I reached out to Polar regarding the Vantage’s screen this was their response:

We decided to go with the MIP display instead of OLED, because an OLED display consumes a lot of power and is not very readable in bright sunlight. We figured extended battery life and the ability to see the display continuously when training (during indoor and outdoor sessions) are important for athletes.

After using various Apple, Samsung, Android Wear watches (not to mention smartphones) over the years, I’ve become relatively accustom to OLED displays and how much they pop especially in low light. But I 100% agree with Polar on this one, I’d rather not have to charge my watch every night and be able to see my time on a bright summer run.

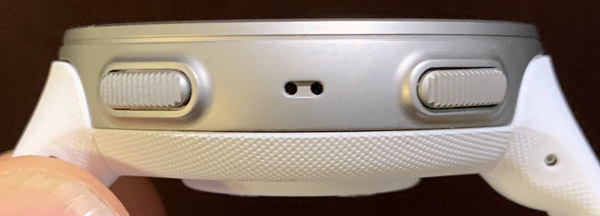
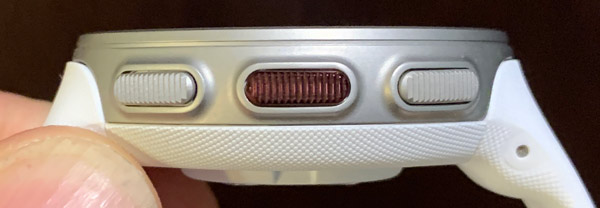
Like its casing, the Vantage V buttons are constructed of aluminum with a ridged pattern machined into their surface. The buttons are easy to find and use while working out. The left side has the LIGHT and BACK (pauses/ends the workout) buttons.

The right side has the page UP and page DOWN buttons for navigating thru the user interface and the red START/SELECT button is for beginning activities, laps and selecting/confirming objects in the various menus.

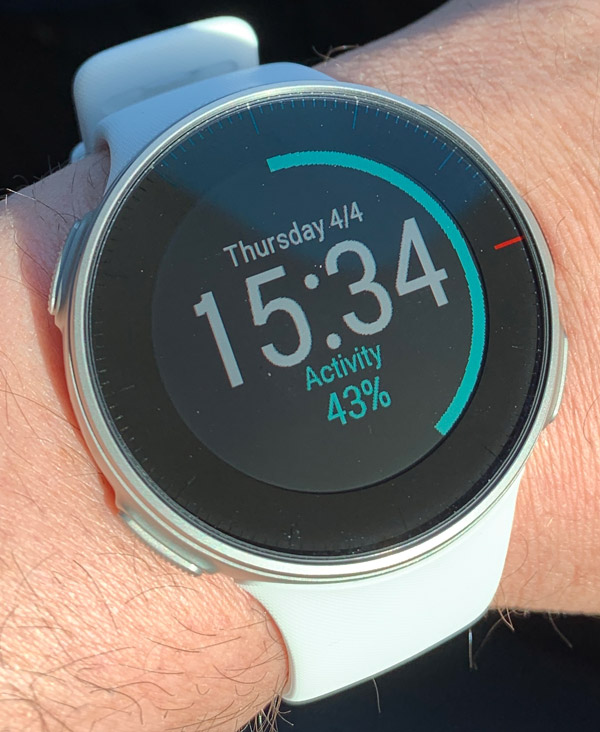
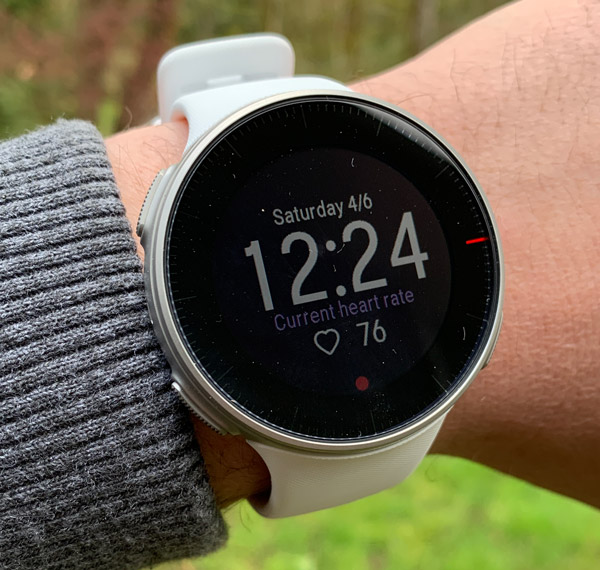
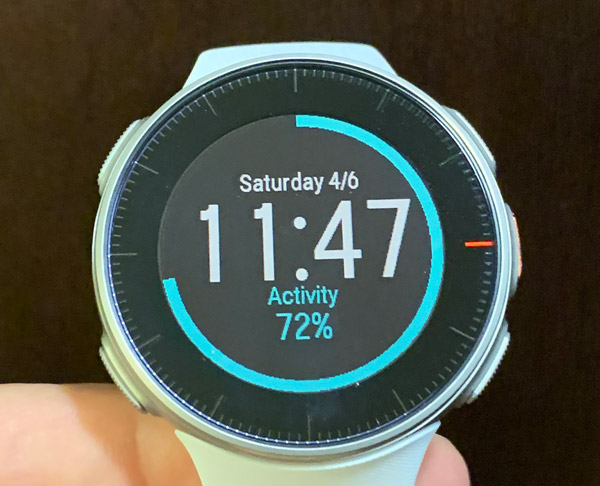
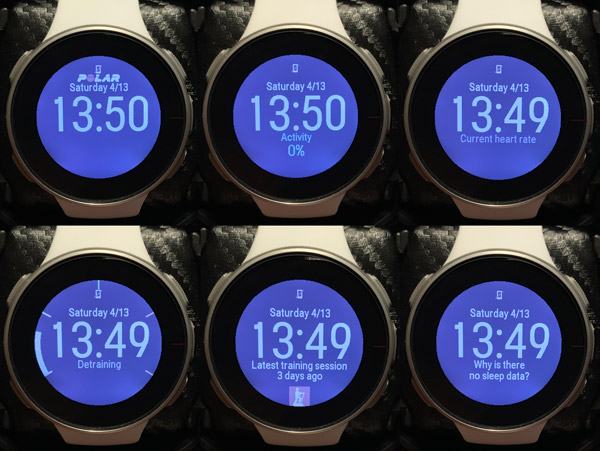
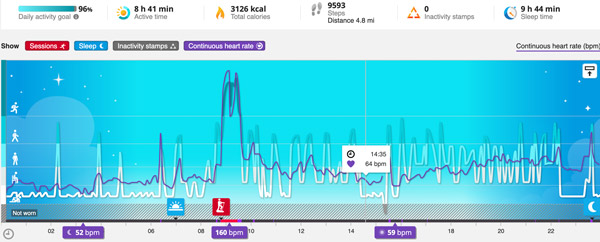
The six main screens all display time, day, and date. The other information you can have at the glance at your wrist is: percentage of your daily activity goal, heart rate, training arch, nag reminding how long it’s been since you last worked out, and sleep data.

In a recent firmware update, Polar has enable smartphone notifications which works very well across the board from my emails and messages to when my security cameras detect movement.

Performance

The Vantage V works as you would expect in today’s high tech world. The Polar OS, while be it a bit old school, is zippy enough, lag-free, and gets the job done. I’d call it direct, usable, and to the point.

The Vantage series has Polar’s new Precision Prime fusion heart rate sensor engineered into back of the watch.  The sensor array has 9 LED that accurately monitors your heart rate during your workout or 24/7 throughout your day. I tested the Vantage’s accuracy against my Apple Watch and elliptical’s handle grip sensors and on average all correlated nicely though there was a bit more variability in the wrist sensors when compared to the fixed grips.

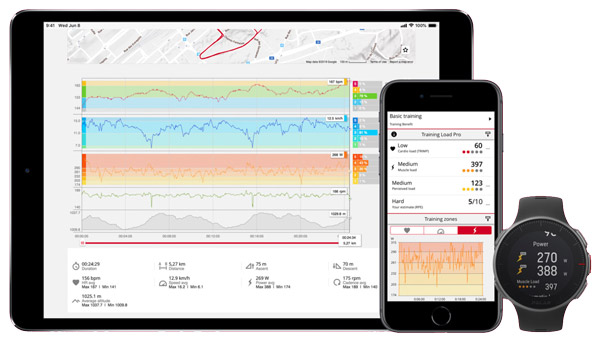
The Vantage V can also calculate Running Power using the heart rate monitor, GPS and barometer data from the wrist – no additional foot pods or sensors needed. This calculation is done with Polar’s proprietary algorithm and it helps you monitor the external load of your running (aka during intervals, hills, or to maintain a constant effort level during a race). The Vantage V can also use Running Power to calculate your Muscle Load, the load that your training session puts on your joints and your muscular and skeletal systems.

GPS distance and pace both seemed relatively accurate from my initial survey standpoint. I ran or walked several known routes and the distances & times were within a few percentage points of what I believe it should have been.  I hope to review this and a few other features more in-depth this summer as I workout more out side.

Polar’s Sleep Plus feature automatically detects the timing, amount, and quality of your sleep in hopes of better rest to ultimately improve your recovery and performance. Or in my case, Sleep Plus let’s me know when my wife’s snoring interrupts my sleep.

Battery life is incredible… Compared to my Apple, Samsung, or Wear OS smartwatches I have used thus far, the Vantage lasts many times longer than the any of the competition. In addition to using the GPS during my outdoor workouts, I had the watch continuously monitoring my heart rate 24/7 and my sleep quality at night and it still latest nearly a week before needing to be recharged.

To conserve power, the Vantage V doesn’t automatically sync with your smartphone, 99% of the time I had to force the issue by long pressing the lower left button on the watch.

Ecosystem

If I had to select the best part of the Polar experience, it would be the Polar Flow ecosystem it creates for its users. I grant you a system is only as good as the data being fed into it. But Polar engineers work diligently to not only provide you a worthy training companion but a place to nerd out over the data it collects.

The Polar Flow app/website enables you to dive very deep into the details of your training and performance metrics.

The Vantage V wirelessly syncs data from the watch to your mobile device which then updates your flow account with your most recent efforts. Without the app, data syncing must be done by plugging the watch into your computer via the charging cable.

Is It a Smartwatch…

That is a question I have been asked about this watch more than once during this review…and my answer is sort of. It doesn’t do apps or pay for stuff or even play music while you run. But like I mentioned above, it does give notifications, provides pace/distance/HR/etc on the fly, and does a great job gathering fitness and physical performance data then transferring it back to the mothership (aka Polar Flow) for further, more detailed analysis. As a modern day digital watch goes, the Vantage V is smart enough and does everything that I need, less music while pounding pavement. That said, I believe Polar will ultimately have to get on the bandwagon like others and produce less niche devices and cater a bit more to the mainstream. Cause lets face it, Apple is kicking @$$ and taking names. But that is just my 2 cents…

What I like

  • Well made hardware
  • Comfortable, light-weight form factor
  • Very sport-/training centric design
  • Polished, integrated fitness ecosystem
  • Smartwatch functionality has been added thru firmware updates
  • Collects huge quantity of data and presents it in a well thought out Polar Flow interface
  • Excellent battery life

What needs to be improved

  • Expensive
  • Can’t stream music
  • Isn’t a true “smartwatch”

Bottom Line

For this review, I wore the Vantage V nonstop for nearly two weeks then on and off when I exercised for approximately a month. I hate to say it but the Polar Vantage V is out of my league…that is the cold hard truth of it. For how I use a fitness smartwatch, this bad-boy is definitely overkill. It has been fun to try out but the realist in me knows I’ll never truly use many of the features of the Vantage or Polar Flow ecosystem. I’m definitely more of an Apple Watch, Samsung, or Wear OS kind of athlete. I like my motivational tunes streaming thru my earbuds and I would trade that over the differential the Vantage V gives you over the more mainstream fitness/smartwatches.

Final thoughts

The Vantage V and the Polar ecosystem that support it are an extremely powerful training tools that really anyone could use to improve their personal best in whatever sport or exercise regime they live in. That said, this flagship fitness and training watch is tailored more for the true athlete wanting to optimize their performance at the very far end of the curve. Though Polar, via firmware updates, has and continues to add smartwatch functionality to both variations of the Vantage. The Vantage V is impressive, with really have zero complaints other than no wireless music capabilities but that is a known quantity going into it.

As I said, I’ll continue to use the Vantage V this summer and will hopefully have a follow on review that discusses its accuracy and niche capabilities this Fall.

Price: $499.95
Where to buy: The Vantage V is available directly from Polar and Amazon
Source: The sample of this product was provided by Polar.

Filed in categories: Reviews

Tagged: ,

Polar Vantage V Pro multisports watch review originally appeared on The Gadgeteer on May 8, 2019 at 11:00 am.

Note: If you are subscribed to this feed through FeedBurner, please switch to our native feed URL http://the-gadgeteer.com/feed/ in order to ensure continuous delivery.
Use Eustachi to equalize the pressure in your ears

NEWS – Have you ever had problems with your ears when there is a change in atmospheric pressure like when you’re flying or scuba diving? This is called ear barotrauma according to Medical News Today. You can use Eustachi to help alleviate this common problem. But before we talk about how Eustachi works, let’s briefly talk about what ear barotrauma is and how most of us normally treat it.

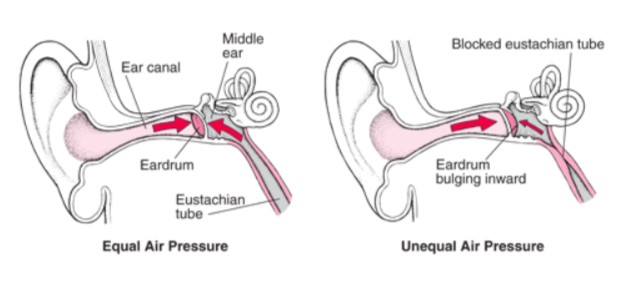
When you look at the above illustration (Merck Manual) of the structure of the ear, you can see that the outer ear (ear canal) is separated from the middle ear (an air-filled cavity) by the eardrum. The eustachian tubes, which are part of the middle ear, connect to “an area behind the nose” and remain closed most of the time (Cedars-Sinai Medical Center). In order to hear normally, the pressure must remain the same on both sides of the eardrum.

However, when there is a change in pressure, the eardrum will bulge outward when the pressure is greater inside the middle ear or it will bulge inward when the pressure is greater in the ear canal (shown above in the drawing on the right, Merck Manual). As you can see, the eustachian tube has remained closed during the pressure change, thus causing the imbalance of pressure and pain in the ear. This is ear barotrauma.

Many of us use techniques like yawning, swallowing or chewing gum to open the eustachian tubes which equalize the pressure in our ears. (See the following fascinating video (Merck Manual) illustrating ear barotrauma and how the eustachian tubes function in equalizing ear pressure.)

However, sometimes the common techniques used to equalize the pressure in your ears just don’t work.

Eustachi might help in these cases. It is a device that gently blows air into your nostrils (one at a time) and while it is doing so, you swallow to open up your eustachian tubes which thereby equalizes the pressure in your ears.

The reviews of this device are mostly positive but there are some that say this device does the same thing as holding your nose and blowing air gently into your nose to equalize the pressure. The Eustachi is also rather expensive. It is available at Target for $59.99.

I suppose that most of us will use the old fashioned (and free) techniques to equalize the pressure in our ears, but if you don’t have a lot of success with those or you have a child that does not know how to perform those techniques, then perhaps this is worth a try.

Filed in categories: News

Tagged:

Use Eustachi to equalize the pressure in your ears originally appeared on The Gadgeteer on April 30, 2019 at 8:00 am.

Note: If you are subscribed to this feed through FeedBurner, please switch to our native feed URL http://the-gadgeteer.com/feed/ in order to ensure continuous delivery.