Pampered Chef Ice Cream Maker review

I scream, you scream, we all scream.  Someone calls the police and the situation becomes awkward.  And one great way to break through that awkwardness is with home made ice cream.  Today we are going to take a look at the Pampered Chef Ice Cream Maker.  How easy is it to use and will it help get you out of a mandatory 24 hour police hold?  Read on to find out…

There are 3 basic kinds of ice cream makers.  The first is the traditional ice/rock salt maker where you line the outside of the ice cream container with a mix of rock salt and ice.  You fill the container with your favorite ice cream recipe, put into the mixer and within hours you have ice cream.  A lot of us grew up with the hand-crank version of this where your parents told you that not only did the ice cream taste better when you cranked it yourself but that your efforts over the next few hours would build character.  When we grew up, we put a motor where the hand crank used to be and put a stop to building character through manual labor.

The second type is the compressor model, where a refrigerant is built into the mixer and all you need to do is put your ice cream mix into the container and press the button.  You no longer need to prep by getting rock salt and ice nor do you need to spend hours on your knees turning a crank and wondering what the big deal about character is.

The latest type of ice cream maker is a compromise between the two.  It is the chilled container ice cream maker, and this is the type Pampered Chef delivers.  You no longer need to get a refrigerant via ice and salt, but rather you use the one you already have – your own freezer.  Place the container in the freezer for some length of time prior to actually making the ice cream, and when it is properly chilled you remove it from the freezer, pour in your ice cream recipe and press the button.

Let’s face an important fact here: making ice cream at home will never be a spontaneous activity.  Assuming for the moment you have all of the necessary ingredients on hand to actually make the ice cream itself, there is always some level of prep involved.  Whether that is cooking the mixture prior to freezing it, chilling the container, lining the maker or any of a host of prep activities, you are pretty much never going to think “I want home made ice cream” and 20 minutes later you are eating it unless you made it yesterday.
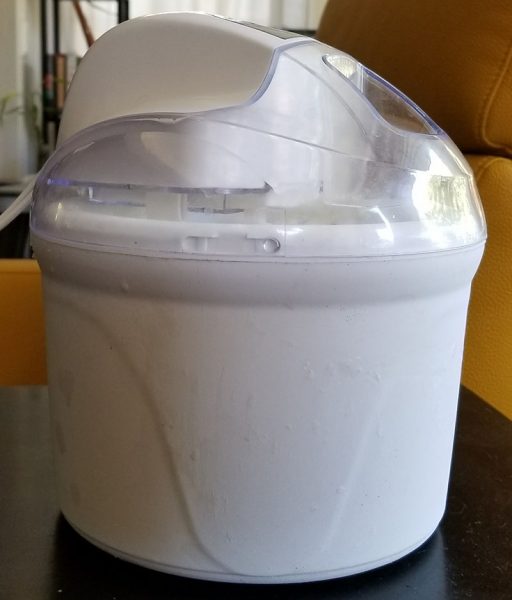
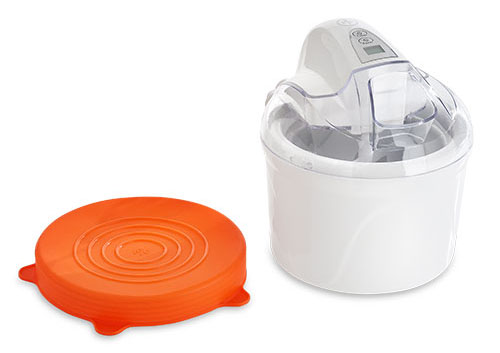
The Pampered Chef Ice Cream maker consists of a freezer container on the bottom and the mixing unit with the paddle as the top of the maker.  The set also comes with an orange silicon topper for the container so you can store the ice cream you make in the freezer container.  The mixing unit simply twists on and off, and the paddle snaps into place or can be removed for cleaning and storage.

So how easy is the Pampered Chef to use?  Well, it is no less easy or more difficult than any other ice cream maker.  Place the freezer container in your freezer 8-12 hours before you want to make ice cream to allow the container to get to the proper temperature.  After that, it is up to you and your ice cream recipe to do the rest.  Once thing to note, though: although the freezer container is very nicely insulated, if you are making ice cream in a warm location – say, a kitchen without air conditioning – then it is going to take longer to get your ice cream to soft-serve consistency.  Much longer.  Like double the time.  Not a fault of the Pampered Chef unit by any means, but more of the hybrid approach.  So be warned, and also don’t make your ice cream in direct sunlight.

Once your mix is in the container, turn on the paddle and wait.  On 3 runs, it took me on average 35 minutes in the mixer to get the right consistency.  The unit runs on its own and when it is done, it stops.  Remove the top, take the paddle off (remembering to lick the paddle AFTER you have removed it from the motor) and place the container in the freezer with the silicone lid on for about 2 hours.  And your ice cream is ready.

That said, there are quirks.  The instructions for the unit tell you to mix your ice cream and then start the paddle.  Pour the ice cream mix into the unit with the paddle moving via that small hole on the top.  As I am not Luke Skywalker and have never hit a womp-rat with my T-16, getting the ice cream mix into the thermal exhaust port proved to be challenging.  The first two batches – cherry (because we have a cherry tree) and coffee (I live in Seattle and it’s the law) – saw a significant portion of my ice cream all over the side and on the counter.  On batch 3 (pineapple-vanilla liqueur custard) I decided to pour directly into the container and then put the top on.  Less mess, more ice cream.  And the world did not explode because I did not follow the instructions.

Another quirk is consistency.  Assuming you have a good ice cream recipe and you follow it, you are never going to get solidly frozen ice cream even after sitting in the freezer overnight.  No matter what I did, I could only get soft-serve consistency.  This isn’t bad by any stretch of the imagination, but something to consider if you want to use the ice cream as the filler for, say, ice cream sandwiches.  Probably not going to turn out well if you do.

When you are done, though, you can enjoy a nice dish of pineapple-vanilla liqueur ice cream.  And there aren’t that many better ways to cap off a hot summer evening.

So, is the Pampered Chef Ice Cream Maker worth your hard-earned money?  If you accept that any kind of home made ice cream requires work and planning, and if the taste of the ice cream you make appeals to you, then the answer is yes.  This is a well-made maker and seems like it could be a part of your kitchen arsenal for years to come.  If on the other hand, you want ice cream now and are willing to trade taste for expediency, then you might want to head to a local ice cream parlor instead.  Me, I land in the middle.  I love having the Pampered Chef for special occasions like an outdoor movie party, but when I need a quick fix I call on my old friends Ben and Jerry.

The sample for this review was provided by Pampered Chef.  For more info visit their site.


Product Information

Price: $80.00
Manufacturer: Pampered Chef
Pros:
  • Easy to use
  • Makes a quart of ice cream
  • Cleans up fast
Cons:
  • Takes longer to freeze ice cream
  • Takes a lot of prep time outside of your recipe to prepare

Filed in categories: Reviews

Tagged: ,

Pampered Chef Ice Cream Maker review originally appeared on The Gadgeteer on July 25, 2017 at 8:00 am.

Note: If you are subscribed to this feed through FeedBurner, please switch to our native feed URL http://the-gadgeteer.com/feed/ in order to ensure continuous delivery.

AICOK Electric Kettle review

An electric kettle is a really useful appliance to have around the kitchen. The AICOK Electric Kettle not only promises some new design & safety features but gives you a set of 6 preset temperatures for more refined control of your hot water for teas and coffees (in addition to a boil). How does it work in practice, and is it worth considering as a replacement for your old electric kettle? Let’s turn up the heat! 

Design and Construction

Out of the box, the AICOK Electric Kettle is a nice looking appliance. It has a brushed metal finish, accented with black in the handle and base. At XX inches tall, it fits nicely under most overhead kitchen cabinets, and the overall streamlined look of the kettle is attractive enough that you won’t mind keeping it on display on your kitchen counter.

The design of the kettle has some nice features for safety and confident handling. The kettle itself is placed on a base to provide power to the heating unit. There’s a wide peg that the kettle slides onto to attach to the base, so it’s easy to place and lift free as needed with 360-degree rotation when in position. Because the power chord is attached to the base, it doesn’t get in the way when serving; you can heat up your water in the kitchen, for example, and take the kettle out to the dining room for your guests. The base is wide and stable, so it will take an accidental hit and not tip over. It’s also got a burly cool-touch handle, which enables safe management of a full pot of boiling water when carrying and dispensing.

Construction overall on the kettle is solid and substantial. It’s built from stainless steel and BPA-free plastics, which are both pluses for safety and durability. The water meter, tucked behind the handle, is wide and easy to read from multiple angles while filling. The lid is solidly constructed, sports extra seals to promote insulation, and unlocks with a spring-activated mechanism by pushing a button. It’s a good build and feels like it will stand up to long-term regular use.

Operation

The water heating options on the AICOK Electric Kettle are where things start to get really interesting. Many teas and coffees require more precise heat control to get the most out of your brew. This kettle has 6 preset temperature options, enabling you to dial in the right temperature for your application. Recommended temperature settings are as follows:

  • 160°F For Delicate Teas
  • 175°F For Green Tea
  • 185°F For White Tea
  • 190°F For Oolong Tea
  • 200°F For French Press Coffee
  • 212°F (boil) For Black Tea Or Instant Cocoa, Oatmeal, Noodles, etc.

Once you fill the kettle to the desired capacity (0.5 liters to 1.7 liters), the kettle will heat to the selected temperature. The warming option keeps the water at that temperature for up to two hours. Should the water level get too low, the unit will automatically shut off to prevent burning. Both of these are great safety and convenience features because you don’t have to babysit the kettle as you go about your business.

The controls on the AICOK Electric Kettle are all found on a small panel on the handle. You have 6 LEDs (one for each temperature setting), and three buttons. After filling the kettle to the desired level and placing it on the base, you press “Start” and use the “Set” button to toggle to the desired temperature setting. Press the “Keep Warm” button to activate this feature, and that button will light up to indicate that it is active. The “Start” and “Keep Warm” button remain lit until the kettle reaches the desired temperature, at which point the “Start” button light shuts off and the “Keep Warm” button begins to blink to let you know that it’s active if it’s been toggled. If you remove/replace the kettle on the base, the unit has a 90-second memory that will activate your last setting.

If you think that this setup sounds a little confusing, you’re right. At first, I kept trying to set temperatures and warming preferences before I hit “Start,” which would yield no result. There’s also no indicator when the water has reached temperature if you’re not using the warm feature; everything just shuts off. I don’t think that either of these are deal breakers that you won’t get used to, but they are little design “gotchas” that could have been thought through better to make the interface completely intuitive. It would also be nice to have some additional piece of feedback to indicate when heating is complete, like an audio tone or a “done” indicator light. This isn’t a big deal if you are in “Keep Warm” mode since the button blinks, but there’s no such indicator if you’re not using that feature.

Pricing and Conclusion

The electric kettle isn’t the most glamorous appliance in your kitchen, but it’s a very useful tool to have around. I think the added utility the AICOK make it even better, essential if you or your guests are tea drinkers (or you brew your own coffee like I do). I have found myself using it more and more, and the combination of fixed temperature controls and extended warming add an unexpected bit of convenience as part of the morning routine. The safety features are great, especially if you have a houseful of kids and/or guests. On top of all of that, it actually looks good if it takes up a permanent position on your countertop. And there’s nothing wrong with that!

The list price for the AICOK is under $50, which seems pretty good based on what I have seen in pricing for electric kettles that start adding additional features like this. It’s only available for purchase through Amazon, and was unavailable when I last checked… but keep an eye out on the product page to see when it will be back in stock!

Source: The sample for this review was provided by AICOK. For more info visit their site and Amazon to order.


Product Information

Price: $50.00
Manufacturer: AICOK
Retailer: Amazon
Pros:
  • Solid build for safe handling
  • 6 temperature presets for teas and coffees
  • Extended warming feature keeps the water at temperature for up to 2 hours
  • BPA-free construction
Cons:
  • Controls could be more intuitive, but are easy to learn

Filed in categories: Reviews

Tagged: , ,

AICOK Electric Kettle review originally appeared on on July 12, 2017 at 6:52 am.

Note: If you are subscribed to this feed through FeedBurner, please switch to our native feed URL http://the-gadgeteer.com/feed/ in order to ensure continuous delivery.

Can this cardboard box grill your next steak?


Have you ever purchased a grill only to use it the one time you had a craving for chargrilled hot dogs and hamburgers? I’ll admit that we did that. We bought a small Webber grill, grilled with it one time and then it sat in the garage for years until we gave it away. Maybe a better alternative would be the disposable CasusGrill.

The CasusGrill is a biodegradable grill that is made of 100% natural components like a cardboard box lined with lava stone, a bamboo rack, and special charcoal briquettes that are also made of bamboo.

This 12.2″ x 9.25″ won’t cook enough food for a huge party, but it is ready to use in about 5 minutes and has a 1-hour cooking time.

After you’re finished grilling your favorite foods, you can chuck the CasusGrill in a bonfire. That means no cleanup!

With a price tag of only $8.00, the CasusGrill biodegradable instant BBQ is the perfect little cooker for the next time you get a craving for charred meats.

Head over to TheFowndry for more info and to pre-order one for your next cookout.

Filed in categories: News

Tagged: ,

Can this cardboard box grill your next steak? originally appeared on on June 20, 2017 at 5:00 pm.

Note: If you are subscribed to this feed through FeedBurner, please switch to our native feed URL http://the-gadgeteer.com/feed/ in order to ensure continuous delivery.

BBQ Dragon Chimney of Insanity charcoal starter review


There’s something magical about charcoal grilling, especially during the long days of summer. You just can’t replicate that taste on a gas grill. Since 2013 BBQ Dragon has been bringing new innovations to the charcoal grilling market, and I have one of their latest gadgets on the back patio for testing. It’s the Chimney of Insanity, a chimney starter that BBQ Dragon claims is the best in the industry.

What’s a chimney starter? And is the Chimney of Insanity the best around? Let’s go make a fire and find out!

Design and Build

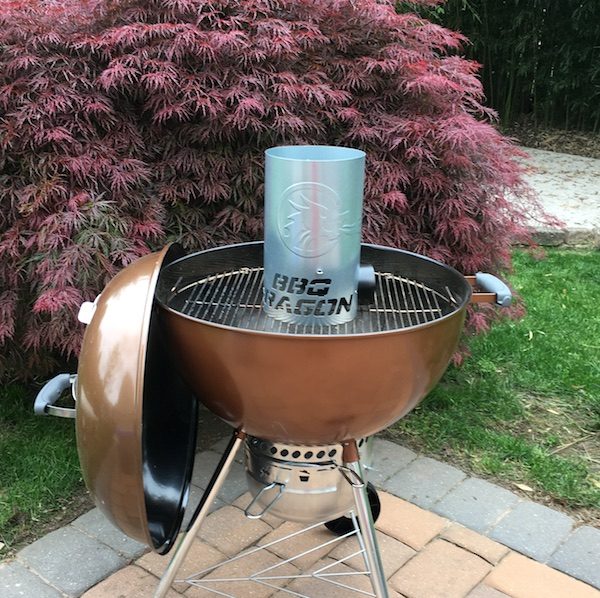
Before we begin, let’s take a moment to recognize how cool this thing looks. That raised dragon logo? The name die-cut out of the base instead of boring vent holes? You know you want it on display at your next cookout. I’d probably manufacture some story about how I won it in a martial arts contest at an ancient dojo, nestled in a hidden mountain valley… but that’s me.

Now let’s get down to business. For those of you who don’t know, modern-day chimney starters have been around since the 1960s. The basic concept is pretty simple: charcoal is suspended on a rack in a metal cylinder with holes cut in the bottom to promote air flow. Ignite your starter material under the charcoal and, as the charcoal starts to burn, and updraft is created that speeds up the process of firing up the whole stack. It’s a tried-and-true design, with variations offered by hundreds of manufacturers.

What makes the Chimney of Insanity unique? Well, they’ve added a 3″ tube, bent at a 90-degree angle, that’s accessible from a side vent on the cylinder. This allows for side-loading your starter material, which is a great safety feature (you don’t have to move a hot chimney to add more starter fuel underneath). That’s not the only benefit, however: if you blow air through that tube, it’s designed to create a vortex in the chimney that will dramatically accelerate the ignition of your coals. BBQ Dragon makes a fan specifically designed to attach to this tube that was not tested here, and videos show the rig lighting a full batch of charcoal in under 10 minutes. Given that a traditional chimney starter usually takes 20-25 minutes to fire up, this is an impressive time saver.

In addition to the innovative tube design, the overall build on the Chimney of Insanity is excellent. Heavy-duty materials are used throughout the construction, with extra rivets added at all the seams to ensure durability. It’s got a burly vinyl handle and heat shield, which allow for confident handling when loaded with rocket-hot coals. After killing several cheap chimney starters, I bought a heavy-duty Weber model that’s lasted several seasons. The Chimney of Insanity’s construction quality is easily on par with the Weber, and I expect that it will last just as long.

Testing the Insanity

I wanted to put the Chimney of Insanity through its paces, so I set up three different performance tests to see how it lives up to its claim.

For the first test, the Chimney of Insanity squared off against my old Weber chimney starter. I measured out two pounds of natural lump charcoal (my preferred heat source) for each chimney. Each chimney also got three sheets of 8-1/2″ by 11″ paper as starter material (rolled up and placed under the starter for the Weber, and inserted in the tube for the Chimney of Insanity). Both chimneys were fully lit and ready for grilling after about 25 minutes. I found the Chimney of Insanity easier to fuel with the side tube (and definitely easier to handle), but not particularly fast under normal circumstances compared to the Weber. 

For the second test, the Chimney of Insanity was loaded to the brim with traditional charcoals. Paper was loaded into the side tube and lit, adding additional paper every few minutes as needed to stoke the burn. Things got off to a slow start, so we added some manpower by blowing into the side tube periodically after about 5 minutes to speed things up. That’s when I started seeing the benefits of the design, with a fully lit chimney ready to go in under 20 minutes. A nice improvement, but my technique was still lacking. 

For the final test, the Chimney of Insanity was loaded with 50 charcoal briquettes and 6 hunks of raw hickory wood (to add flavor}, filling the whole chamber. We also borrowed one of the wife’s old hair dryers to simulate the effects of the BBQ Dragon fan (you know… for science). We started the fire, gave it a couple minutes to settle in, then turned on the hair dryer and aimed it at the tube.

Ladies and Gentlemen, please step back for your own safety. We have liftoff.

After a moment, you could hear a dull roar emanate from the chimney. Within a few minutes, we didn’t just have fire… we had roaring flames belching out of the top of the stack. It was as if Smaug himself woke up and decided to torch those pesky dwarves poking around for his treasure. Just check out the photo below:

Neat, right? It was impressive to behold. I’d say we had the whole chimney lit at about 15 minutes, which is great considering that I had some big ol’ chunks of raw hickory wood stuck in there. Honestly, we had to dial back on the hair dryer action every minute or so to make sure that we didn’t create a catastrophe in the back yard.

We’ve since used the Chimney of Insanity in this manner several times, with similar results. I would imagine that the BBQ Dragon fan, which is specifically designed to fit the vent, would produce more impressive results with a consistent low-velocity airflow. Sadly, I did not get the opportunity to test it here.

I can’t leave the testing portion of the review without a gratuitous food pic. Here was that night’s dinner: chicken thighs, legs & breasts with my homemade barbecue rub and sauce, baby sweet peppers marinated in garlic and olive oil, and sliced potatoes roasted in foil. The hickory wood adds an extra layer of flavor and smoke. Let me know if you want the recipes!

Additional Notes

The Chimney of Insanity is a nice chimney starter, but there are some things to consider if you’re looking to buy. It’s a good size (6″ diameter, 11″ tall), but there are bigger models out there if you need to fire up extra charcoal. The Weber I tested it against is 7″ in diameter and 12″ tall, and left more room when loaded with the same amount of charcoal (see picture above). I measured the Chimney of Insanity’s capacity at about 2 pounds of lump charcoal or 50 standard briquettes. If you are using standard briquettes, I don’t know that you’ll notice a size issue here; if you use wood chunks or natural lump charcoal, however, the extra size is helpful for managing odd-sized fuel. If you have a bigger grill, you might be firing up multiple stacks of charcoal anyway. Mine is a standard Weber kettle 22-1/2″ grill, and I found the Chimney of Insanity’s amount sufficient for most two-zone grilling (filling half of the grill, and leaving the other half for indirect cooking).

You’ll also see some discoloration in the pictures that resulted from firing up the chimney several times. This is something I have seen happen with every chimney starter I have owned, and it’s the result of the high heat you’re playing with. I think it shows that you’re using your toys often and well, but you should be aware that the shiny exterior will show signs of use over time.

Finally, it could be argued that you could get similar results by applying a steady air stream to any stack of charcoal. I’ve done this on camping trips with an air compressor. The BBQ Dragon fan, in fact, was originally sold for this purpose without the Chimney of Insanity (see our review here) . I do like the fact that the side vent give you much more control for a safe burn, however, and consistent results with each grilling session.

Conclusion and Pricing

Bottom line? I believe that the Chimney of Insanity performs well as a replacement for your current chimney starter with a solid build, a great handle, and some nice additional safety with the side-loading tube. The real magic happens when you get airflow going through that side tube. That’s when the beast earns its name, firing up a full stack of charcoal in half the time it would take otherwise.

At about $30, the Chimney of Insanity is just about right in terms of pricing when compared to similar models. You can get a cheap chimney for under $15, but it probably won’t last more than a season or two. The better-built models (like this one) usually range between $25 and $40 and can be expected to last several seasons. With the additional design features adding to the performance, I think the Chimney of Insanity is a good buy for the charcoal griller.

Source: The sample for this review was provided by BBQ Dragon. For more info visit their site or Amazon.


Product Information

Price: $29.95
Manufacturer: BBQ Dragon
Retailer: Amazon
Pros:
  • Solid construction
  • Great handle
  • Innovative design
  • Can light a stack of charcoal in half the time with air flow support
Cons:
  • Works best with a source for air flow (purchased separately)
  • Holds about 2 pounds of charcoal, which may not be enough for larger grills

Filed in categories: Reviews

Tagged: ,

BBQ Dragon Chimney of Insanity charcoal starter review originally appeared on on June 20, 2017 at 7:43 am.

Note: If you are subscribed to this feed through FeedBurner, please switch to our native feed URL http://the-gadgeteer.com/feed/ in order to ensure continuous delivery.

Luke, I am your toaster


We showed you a Star Wars inspired toaster about seven years ago that burned the image of Darth Vader into the piece of toast. Cool yes, but not as cool as this toaster which is actually shaped like Darth Vader’s helmet!

The Darth Vader Toaster from Pangea Brands is a two slice toaster that is an officially licensed Star Wars product.

In addition to looking cool on its own, it makes your toast look cool too by burning the Star War’s logo into it.

The toaster is made of black plastic in the shape of Darth Vader’s iconic helmet and features a removable crumb tray, an adjustable thermostat, and a quick stop button to pop up the toast.

If you like your toast on the dark side (see what I did there?), grab yourself a Darth Vader Toaster for $39.99 from Amazon where they also sell Death Star and Stormtrooper toasters too.

Filed in categories: News

Tagged: , ,

Luke, I am your toaster originally appeared on on June 9, 2017 at 9:03 am.

Note: If you are subscribed to this feed through FeedBurner, please switch to our native feed URL http://the-gadgeteer.com/feed/ in order to ensure continuous delivery.