Julie’s gadget diary – Is this really what the iPhone 8 will look like?

Earlier in the week, Boy Genius Report posted a quick article with a picture/rendering/rumor of the soon to be announced Apple iPhone 8. Click on the BGR link and take a look. I’ll wait… Ok, now look at the image above. The screen shape, bezels, and top screen edge looks very similar, doesn’t it? What is that in the image above? It’s a screen protector. A screen protector for the iPhone 8. Or at least it sure seems like it’s going to be for the iPhone 8 considering the email I received this morning.

It’s not unusual that I receive emails from screen protector makers and companies who make cases for devices that have not been yet officially announced yet, and this morning I received such an email from a person representing Smartificer Techology Limited in Shenzhen China.

As you can see and read from the email, this company is trying to sell this new tempered glass screen protector to me because they think The Gadgeteer sells products. I get emails similar to this one every day from other Chinese companies, but this one caught my eye because I had seen the same style of the screen in the BGR article.

So do you think this is just a scam or the real thing? Unfortunately, we won’t really know for sure until Apple unveils the new iPhone in a couple months. I hope it’s true because I like the look of this device.

Filed in categories: Articles

Tagged:

Julie’s gadget diary – Is this really what the iPhone 8 will look like? originally appeared on on July 7, 2017 at 1:27 pm.

Note: If you are subscribed to this feed through FeedBurner, please switch to our native feed URL http://the-gadgeteer.com/feed/ in order to ensure continuous delivery.

Julie’s gadget diary – I returned the LG G6 and even I’m surprised by the phone I’m using now


Are you confused by the title of this post because you remember that I just purchased an LG G6 a few weeks ago? It’s true, I did buy one and I enjoyed using it… for awhile. Then a few bugs crawled in that annoyed me enough that I decided to return the phone while I was still within my 30-day return window with B&H Photo. The problem is that I had already sold my Nexus 6P. So I didn’t have another phone to use while I figured out what to get next. 

I tried putting my Verizon SIM into my ancient LG G3 and it complained that I had no service. So I tried an even older iPhone 4S and had the same result. I came to find out later that older phones like the LG G3 and iPhone 4S will not work with the newer SIM cards due to not being able to work with 4G LTE.

Not having a working smartphone would normally not have caused me to panic had it been a few weeks prior, but I had also recently disconnected my landline phone at home meaning that without a smartphone, no one could contact me.

First I thought about the higher end Android phones currently on the market that I might want to buy. The main ones I considered were the Samsung Galaxy 8, and the Pixel XL. Since I’m not a fan of the S8’s curved screen, I put an X through that choice. Then I gave some thought to the Pixel XL and although that would be the best choice for an Android fan like myself, I just couldn’t get excited about buying one.

So what did I do? I bought an iPhone 7 Plus and I’m as surprised by that as you probably are considering my last attempt to switch from Android to iOS failed 9 months ago with an iPhone 7. But this time is different for two reasons.

First of all, I don’t have any other Android phones to fall back on right now. So that means that I am forced to give the switch a better effort than I did the last time.

Secondly, I am ready for something different. Even though I always harp on the fact that Apple won’t let you customize your home screens like Android does, and that they lock down certain features like NFC, and their phones don’t have Qi wireless charging, I have to be honest with myself that I’ve been living without Qi charging for the past year with the Nexus 6P and I don’t use NFC at all these days. I do like to customize my home screens by moving around icons and adding widgets, but I rarely pay attention to the widgets I use. So my arguments for not liking iOS limited customization features are weak.

This past Saturday, I walked into my local Verizon store and walked out a few minutes later with a black 128GB iPhone 7 Plus. I’ve been using the phone for 3 days now and I have almost zero buyer’s regret. I say almost zero because the price of the iPhone is stupidly expensive, which makes me feel guilty for buying something so pricey for myself.

After 3 days do I miss Android? So far the only thing I miss is being able to arrange the icons exactly the way I want on the screen with black spaces here and there. But other than that one thing, I’m actually really enjoying the iPhone which surprises the heck out of me.

I’m especially impressed by how well all my other devices like my Kevo lock are working with the iPhone. With Android, it would take minutes to lock or unlock the door using the app on the phone, but with the iPhone, it only takes about 15 seconds. I also noticed that my Flic wireless smart buttons react faster with the iPhone than with my past Android phones.

Am I going to stick with the iPhone this time? It’s still really early in the switch, but so far it’s looking good!

Filed in categories: Articles

Tagged:

Julie’s gadget diary – I returned the LG G6 and even I’m surprised by the phone I’m using now originally appeared on on July 4, 2017 at 5:21 pm.

Note: If you are subscribed to this feed through FeedBurner, please switch to our native feed URL http://the-gadgeteer.com/feed/ in order to ensure continuous delivery.

Wireless Emergency Alerts (WEA) explained: AMBER alerts and what the heck is a Severe Alert vs. an Extreme Alert and how do I turn them off?!?


Here’s the scenario: I’m at home in the middle of the night sleeping, dreaming of eating doughnuts without guilt when suddenly I’m jolted out of my blissful reverie by my phone’s blaring emergency broadcast alert. I fumble around frantically to find my phone to determine the type of impending doom that’s about to befall me and mine only to find that it’s a flash flood warning which is not a threat to me where I live. Uuuugh! Sometimes this happens when I’m in a meeting or in a class or watching a recital and I’ve diligently silenced my phone except for the Wireless Emergency Alerts (WEA) that get through in mortifying fashion. Most of my alerts have been flash flood warnings, so how do I turn those off?

In all seriousness, these alerts were implemented to warn us of highly dangerous situations and I’m thankful that they exist. They save lives. But before I get into how to alter the emergency alert settings I want to explain a little about the alerts.

About Wireless Emergency Alerts (WEA)

Who issues emergency alerts: They are issued by government alerting authorities like the National Weather Service (NWS), Department of Homeland Security, and state and local public safety agencies according to Weather warnings to go!, a publication issued by the National Weather Service (NWS).

How are the alerts sent?: “Federal, state, local and tribal public safety agencies must apply to FEMA to become alert-originating authorities. Once the alert-originators are authorized, FEMA authenticates the sender and the alert. FEMA transmits the WEA to the more than 100 participating wireless providers who may have customers in that designated alerting area. Only those customers in that target area receive the alert.” (from ctia.org – the Cellular Telecommunications Industry Association – an international nonprofit organization that represents all sectors of wireless communications).

They are not text messages: Some of these alerts might look like text messages but they are not and are thus not affected by network congestion that may affect mobile voice or text messaging services. According to ctia.org, the emergency alerts will be no more than 90 characters, contain the type of alert it is and the time, who is affected and what action to take and the agency issuing the alert.

Types of alerts/examples of alerts: There are only three types of alerts that you will receive according to the Federal Communications Commission FCC:

  1. Alerts issued by the President
  2. Alerts involving imminent threats to safety or life
  3. AMBER alerts (named after “9-year-old Amber Hagerman, who was kidnaped while riding her bicycle in Arlington, TX, and then brutally murdered” according to amberalert.gov; also stands for America’s Missing: Broadcasting Emergency Response)

So, in addition to severe weather and AMBER alerts, you may receive evacuation orders, terrorist threat alerts, chemical spill alerts, etc. according to the FCC.

Wireless carrier/device limitations: It is important to know that some phones may not be WEA compatible. If that is the case for you, you may still receive alerts via mobile apps. Also, your wireless carrier must participate in the WEA program for you to receive the alerts; however, more than 100 mobile carriers, including all of the largest carriers, participate in the WEA program according to ctia.org.

Alerts are location dependent: Alerts are issued according to your current location. Thus, if you are traveling, you will receive alerts according to the location you are visiting. In other words, if you are using a cell tower in the alert zone, you will receive that alert according to the FCC. Since the alerts are dependent on the cell tower you are currently using, you and a friend can be in the same location but if you are using different cell towers, you may not receive the same alerts (FCC).

Altering your alert settings

Can the alerts be turned off?: Depending on your wireless carrier and type of phone that you use, you can turn off some of these alerts but you CANNOT block alerts issued by the President. And, since these alerts are so important, they will ignore your Do Not Disturb settings. For my own purposes, I’m focusing on altering the settings of the weather alerts that I receive. Since I spend most of my time at home as a homeschool teacher where flash floods are not a threat, I do not want to receive those unnecessary warnings. So I dug into my phone’s settings to investigate how to turn this alert off.

Location of alert settings on phones: Where in the world are the WEA (or Emergency broadcasts) settings? It’s fairly straightforward to find those settings on an iPhone. They are located in Settings > Notifications > (scroll to the bottom) Government Alerts. Under Government Alerts there are only two settings to turn on or off: AMBER Alerts and Emergency Alerts.

However, if you use an Android phone, it turns out the alert settings could be anywhere (well almost anywhere it seems), depending on the phone (the following list of steps is based on the Android phones I have at home and steps I have googled for some other phones):

  • Android 7: Phone Settings > Sound > Emergency broadcasts
  • Android 5 and 6: Phone Settings > More > Emergency broadcasts
  • Older Android versions: Phone Settings > More > Wireless & Networks > Cell Broadcast settings  (from phonetipz.com)
  • Samsung Galaxy S7: Phone Settings > Privacy and Emergency > Emergency Alerts > More button > Settings (from tomsguide.com)
  • HTC One M9 and LG G6: Emergency Alerts app > Menu icon (vertical ellipsis) > Settings (from tomsguide.com)

You can also alter the alert settings via your messaging app on your Android 7.0 phone:

  • Messenger > Menu icon (vertical ellipsis) > Settings > Advanced > Wireless Alerts > Menu icon (vertical ellipsis) > Settings
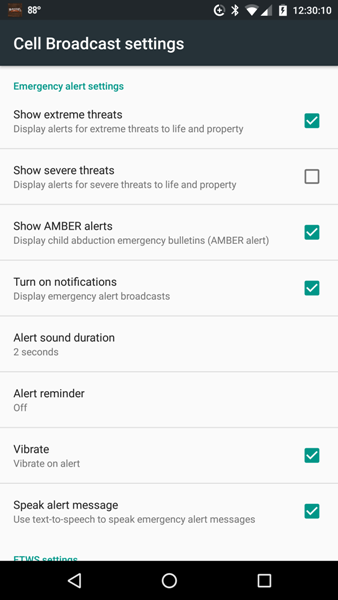
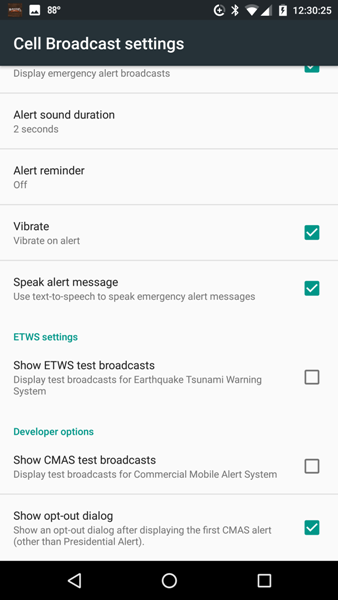
Android emergency alert settings: These are broken down into more detail than iPhone users have access to. The above screenshots show the various alerts and alert settings that you can disable or enable on your Android phone. They are:

  1. Show extreme threats
  2. Show severe threats
  3. Show AMBER alerts

You also have the option to enable the following: display notifications, select the duration of the alert sound, set an alert reminder, vibrate on alert, speak alert messages, display test broadcasts for the Earthquake Tsunami Warning System (ETWS), display test broadcasts for Commercial Mobile Alert System (CMAS – this is an older name for what is now known as Wireless Emergency Alerts), and show an opt-out dialog after displaying the first CMAS alert (other than Presidential Alert).

By default, all of my alerts were enabled. You might be saying to yourself just as I did, “I want to receive tornado alerts but not flash flood alerts. So, is a flash flood a severe threat or an extreme threat? And what exactly is the difference between the two?” *scratching head*
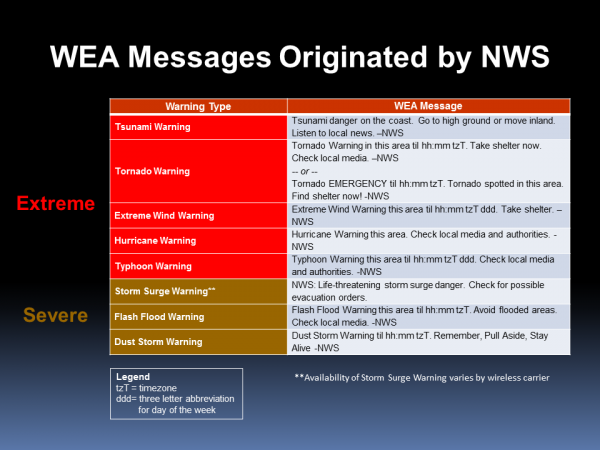
It turns out that severe threats and extreme threats include the following (the table above and the following information come from the NWS):

Severe threats (see the table above for warning details):

  • storm surge warnings
  • flash flood warnings
  • dust storm warnings

Extreme threats (see the table above for warning details):

  • tsunami warnings
  • tornado warnings
  • severe wind warnings
  • hurricane warnings
  • typhoon warnings

Now, knowing the difference between Severe threats and Extreme threats, I unselected the Show severe threats so that I could avoid getting flash flood warnings. So, there you have it. All about Wireless Emergency Alerts. Whew! That was a lot of work just to figure out how to turn off Flash Flood warnings!

Filed in categories: Articles

Tagged:

Wireless Emergency Alerts (WEA) explained: AMBER alerts and what the heck is a Severe Alert vs. an Extreme Alert and how do I turn them off?!? originally appeared on on June 30, 2017 at 8:00 am.

Note: If you are subscribed to this feed through FeedBurner, please switch to our native feed URL http://the-gadgeteer.com/feed/ in order to ensure continuous delivery.

Android 7.0 tips part 2: Open Chrome in two separate windows using split-screen and enable Night Mode


Last month I wrote an article entitled Android 7.0 tips: Notifications and power notification controls which seemed to interest some of you, so this month I thought that I would share some additional Android 7.0 tips. Did you know that you can open two Chrome windows using the split-screen feature? And did you know that Nougat has a hidden Night Mode feature that you can enable without rooting your phone?

Before I detail the steps on how to open two Chrome windows using split-screen, I will cover how to use the split-screen feature with two different apps.

Split-screen for two different apps


First, you will need to open an app that works with the split-screen feature (not all apps do; you will not be able to enter split-screen mode if the app does not work with it). Next, long press on the Recent Apps button which is the square soft key located at the bottom of your phone. After doing so, you will notice that the square soft key becomes two stacked horizontal rectangles and the app will be placed in the upper portion of your phone’s screen. At that time, if you have other apps that are open, you may scroll through the Recent Apps area in the lower part of the screen and tap on the one you want to fill the lower half of your screen. If you do not have any other apps open, you can tap on your phone’s Home button and then select an app to open. If the second app you launch does not work with split-screen, you may have to start over with the split-screen process. You can adjust the size of the two windows by long pressing and dragging up or down on the small dash located within the center of the bar that separates the apps.

If you would like to switch the app in the lower window to another app, use a short single tap on the Recent Apps button then either select another app from the Recent Apps area or tap on the Home button of your phone to open another app. To exit split-screen mode, you’ll need to long press on the Recent Apps button again. That’s it.

Open two Chrome windows using split-screen


To open two Chrome windows in split-screen, you need to open your Chrome app then open two tabs in Chrome that you are interested in as shown in the left screenshot above (the square containing the number 2 located at the top of the Chrome app to the right of the web address indicates the number of tabs you have open). Make sure that the tab that you want to move to the LOWER part of your phone’s screen is the active window (the tab that you are viewing), then long press on the Recent Apps button.


Next, you will need to tap on the vertical ellipsis (or More Options) icon located in the upper-right corner of the Chrome app to access the Chrome app menu as shown in the left screenshot above. Now you’ll need to tap on “Move to other window” after which, the Chrome tab that you are viewing will be moved to the lower part of the split-screen, leaving the other tab to fill the upper part of your phone’s screen. When you want to exit the split-screen mode, you’ll need to long press on the Recent Apps button again.

Enabling Night Mode

The next tip I have for you is enabling Night Mode. Night Mode is a blue-canceling mode for your phone to help reduce interference with your sleep patterns. I learned how to activate this feature thanks to android.gadgethacks.com and found that this feature is somewhat twitchy to use, but it is possible to get it to work.


Even though this feature did not visibly make it to the final version of Android 7.0, the code is apparently still there and can be accessed (without root) by downloading the app called Night Mode Enabler by Mike Evans.

NOTE: Before being able to use the Night Mode Enabler app you must first enable the System UI Tuner. If you haven’t already done this, please visit the Android 7.0 tips: Notifications and power notification controls article that I wrote last month (the steps to enable it are located in the middle of the article). HTC phones users and others that cannot enable AND access the System UI Tuner from your phone’s settings will not be able to enable Night Mode. Remember, all of the System UI Tuner settings are experimental and may not work.

When you open the Night Mode Enabler app, you’ll need to tap on the Enable Night Mode button as shown in the right screenshot above.


Just after tapping on the button, you will be brought to the Night Mode settings located in the System UI Tuner. The Night Mode settings consist of turning the mode on, turning it on automatically, adjusting the tint and adjusting the brightness.

When you fully expand your phone’s Quick Settings (by pulling down on the Notification Shade twice) you will then notice that the Night Mode toggle was added to your list (it was added automatically for me). If it was not, you can tap on the Edit button located in the lower right corner of the Quick Settings area then, from the list of additional toggles, long press on the Night Mode toggle and drag it to your desired location in Quick Settings (you can reorder any of your toggles using this process). If you have trouble adding it, according to android.gadgethacks.com, you can “reset your Quick Settings toggles, then add the Night Mode switch again. To do that, just head to the ‘Edit’ menu in Quick Settings, then tap the three-dot menu button in the top-right corner and choose ‘Reset.’” Now you can manually toggle Night Mode on or off if you wish. When this feature is active, the screen on your phone takes on an orange hue which I could not capture with screenshots.

NOTE: the ONLY way to access and alter these Night Mode settings is by long pressing on the Night Mode toggle in your phone’s Quick Settings or by launching the Night Mode Enabler app – you WILL NOT see it by going into the System UI Tuner settings directly.

It was my experience that leaving the Night Mode settings in their default positions allowed me to manually turn Night Mode on or off from my phone’s Quick Settings. Turning off the Adjust Tint setting seemed to prevent my phone’s screen color from changing, so I left this in the “On” position. I have not tested turning on Night Mode automatically, I’ve only used the manual toggle in Quick Settings. I realize that there are night mode apps available that perform this function well, but this method is free (no ads to deal with) and I do like having a Night Mode toggle available in my phone’s Quick Settings.

I hope you find these features useful and fun to use like I did!

Filed in categories: Articles

Tagged:

Android 7.0 tips part 2: Open Chrome in two separate windows using split-screen and enable Night Mode originally appeared on on June 29, 2017 at 1:12 pm.

Note: If you are subscribed to this feed through FeedBurner, please switch to our native feed URL http://the-gadgeteer.com/feed/ in order to ensure continuous delivery.

24 Hours with Bixby


Unless you have been under a rock, you already know about Samsung’s entry into the Smart Assistant category with the odd name Bixby.  If you have been under a rock, welcome back and we’ll wait while you catch up.

Bixby launched on the new Samsung Galaxy S8 and S8 Plus phones back in April, but it was incomplete.  At launch, it only supported a small set of functions (no voice) that made it look a lot like Google Now.  Months later, Samsung is finally preparing to launch voice capabilities for Bixby.  I have been lucky enough to get early access and as I am not under an NDA, I get to tell you about my experience with Samsung’s Smart Assistant.  Is it a worthy competitor to Siri, Cortana and Google Assistant?  Read on to find out…

Samsung is sending odd messages about how Bixby fits into the Smart Assistant landscape.  They pointedly avoid any sort of comparison to any of the other assistants like the Google Assistant or Siri.  Instead, the messaging is around how personal and local to you Bixby is.  It is an intelligent interface to your device, although from a function perspective it is difficult to see how that interface differs from the competition.

Both the S8 and the Plus come with a dedicated Bixby button on the left side of the phone.  That’s important to know later when I get into how to use Bixby, but for now, it just serves to bolster the message that Bixby is part of the phone’s interface.  Installation was pretty simple – an over the air update delivered the necessary modules, and after a quick restart of my S8 Plus, I was ready to train Bixby.

Yes, train.  While both Cortana and Google Assistant offered to improve voice recognition through training, neither actually required me to read phrases into my device like Samsung did.  And the interface for training was particularly laggy – during the training, the phrase to speak would take a minute or more to appear on the screen.  I was not prevented, however, from pressing the Bixby button nor did anything I say to the phone actually get used UNTIL the phrase appeared on the screen.  Instead, I was greeted with an error message telling me the phrase was not understood – and the error message showed before the phrase to read.

Once trained, Bixby sits (mostly) in the background waiting for you to give him something to do.  Bixby is supposed to respond to a trigger phrase (in this case, “Hi, Bixby”), which implies an always-listening connection on your phone.  I have yet to be able to get Bixby to respond to the trigger phrase except for the first time I say it post-reboot of the phone.  After I have used the trigger phrase, Bixby apparently stops listening until the phone restarts.  This is beta software, I guess, but it seems like a big miss.

The only consistent way I can get Bixby to respond is to press the dedicated button.  A quick press of the button launches Bixby Home, which should remind you of a pastel version of Google Now.  Context cards appear on the screen that tells you about the weather, your calendar, and alarms, some “trending stories” categories that take you to a Google news search and Samsung Themes (in case you obsessively want to change the look of your phone).  There are other links to apps like Samsung Health and reminders, but only if the app lives on your phone and you connected it with Bixby via setup.

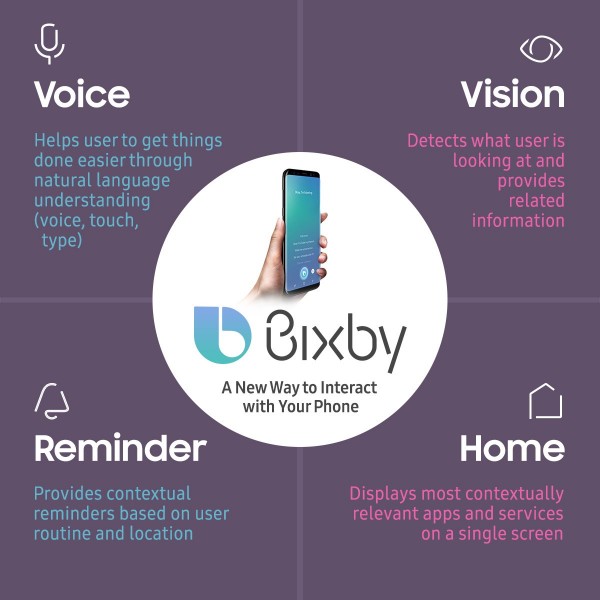
This chart is the optimistic use case for Bixby.  Home is the Google Now-equivalent page.  Vision is connected to the Samsung Camera app and is supposed to allow you to snap a picture of something and get a translation, identification or other data.  So far, I get about 1 hit with data out of every 5 attempts.  Often the data is wrong – I snapped a picture of a “wet floor” sign at my local Starbucks and instead of a translation of “piso mojado” I was shown a Google search for the phrase “slippery when wet” – granted, it is in the same ballpark, but since the Spanish phrase was all that was visible in the picture, it seems like an odd way to answer what should have been a simple translation.

Reminders are just that – location and time aware reminders to do something.  When you are able to get the reminder into Bixby, they work exactly the same as Google’s reminders (and Cortana’s and Siri’s, I would guess).  Getting the reminder in is challenging, though, because…

Voice is the interface portion of Bixby and primarily how you are supposed to interact.  You can tell Bixby to remind you to pick up milk when you get to Metropolitan Market or to remind you to buy tickets for Chris Isaak tomorrow at 9 AM.  You can tell Bixby, but if there is any noise in the room or anything going on with your phone, Bixby will almost always get it wrong.  Asking Bixby to remind me to get milk while walking towards the store netted me a Google search for the etymology of the word “ilk”.  In fact, about half the time I got something entirely different than the reminder I was hoping for.

Pressing and holding the Bixby button allows you to launch a command or set a reminder without the trigger phrase, which is a very good thing since I could never get the trigger to work consistently.  You can use commands like “Open Messages” and the Messages (SMS) app will open.  For apps that have deep-linking (at the moment, only a handful of Samsung apps like Health and Messages), you can add an operation to the command – like “Open Messages and Send a Text to Beth”.  For the apps which Samsung has deep-linking setup, this works quite nicely.  However, Bixby has recognition problems here, too.  I use Pulse for SMS messaging, and if I use the command “Open Pulse” inexplicably Bixby launches Samsung Health – while I get the “pulse” reference, it would appear Bixby has trouble parsing the syntax of commands and just executes whatever it thinks it is near-matched.

Other than reminders and VERY light phone commands, Voice leaves a lot to be desired.  And even those leave something to be desired.

I would love to tell you of a better experience, but it is truly early days for Bixby.  Samsung must have realized that the assistant is something less than half-baked because not long after the beta was launched Samsung announced the general availability would be delayed until there are more resources (read: apps) available.  Probably a good thing, too, because it gives them more time to perfect something the other guys have right already: voice recognition with consistent results.  It was 24 hours of frustrating near misses, reminders to check my alarms (which I routinely dismissed only to have them reappear a couple of hours later), inability to set reminders for the things I needed, and other quirky results that made me think of Apple’s Newton handwriting fiasco many years ago.  If you want a laugh, go look that last one up.

So for now, back to the Google Assistant where I know it will remind me to get milk.

Filed in categories: Articles

Tagged:

24 Hours with Bixby originally appeared on on June 29, 2017 at 7:59 am.

Note: If you are subscribed to this feed through FeedBurner, please switch to our native feed URL http://the-gadgeteer.com/feed/ in order to ensure continuous delivery.