ddpai X2 Pro dual channel dashcam review

Is it wrong every time I receive a new dashcam to review I hope and pray for something crazy/insane to happen in front of me while driving? I firmly believe in the benefits of dashcams and recording the world zipping by while motoring down the road. You never know when something bad is going to happen; when it is your word vs the person who hit you and a picture or in this case video proof could be priceless. For this review I’ll be looking at the X2 Pro, ddpai’s latest and most ambiguous dashcam to date, packed full of high-tech features and is the first duel channel dashcam I have ever tried.

The ddpai X2 Pro features dual cameras/channels enabling one camera facing forward through the front windscreen and one pointed behind. In addition to featuring dual cameras, the X2 Pro is a high resolution, GPS/WiFi enabled, social media capable dashcam. I really like the X2 Pro’s form factor…preferring screen-less dashcams, finding them less distracting or intrusive.

Package Contents:

  • ddpai X2 Pro dashcam
  • xX2 Pro rear dashcam
  • Connection/extension wire for rear dashcam
  • microUSB 12v power cord
  • Remote Snapshot button
  • 32gb microSD card
  • Spare 3M adhesive pads and wire stays
  • Wire shim tool

Specifications:

  • HUAWEI HiSilicon processor; Format H.264 HD video coding
  • OmniVision Image Sensor
  • 6-class glass lens and 1 infrared filter with zero distortion; Front cam – 140°wide angel & F1.8 aperture; Rear cam – 120°wide angel & F2.2 aperture
  • Front cam – 2592×1520P image; Rear cam – 1440×896P image;
  • Digital image stabilization
  • New generation GPS system; High speed positioning
  • 3 axis acceleration sensor
  • High sensitivity microphone; high power loudspeaker (1w)
  • Front cam – 12V@1A~2.1A; Rear cam – 5V@1A~2.1A
  • Built-in super capacitor allows video shooting when electricity is turn off

The top of the X2 Pro dashcam has its mounting hard point which allows for easy installation and removal of the device. The bottom of the X2 has a speaker, microphone, and convenient LED-lit mute button. Even though I installed the X2 Pro in my truck, I find being able to quickly unplug and remove any device a convenient/important security feature so I can lock it in my glovebox vs closing the top of my convertible or if I’m in the wrong part of town.

The front facing camera takes a very respectable 2592 x 1520 resolution for still images and 2560 x 1440 for videos. The front camera has a 6-class glass lens with a 140° wide viewing angle & F1.8 aperture.  The X2 uses an OmniVision Image Sensor that provides “excellent video monitoring performance under low light & WDR”. The front camera is able to be rotated for best line of sight based on the angle of your car’s windshield.

The smaller rear camera’s resolution is 1280 x 720 for both still images and video. Like the front camera, the rear also has a 6-class glass lens but a more narrow 120° wide viewing angle & F2.2 aperture. It can rotate in its mount as well.

The back of the X2 Pro has one microUSB port for power and a port for connecting the rear camera. There is also an indicator LED on the far side. I did find it interesting the camera would not work with my Macgyver’d USB power outlet I mounted behind my rearview mirror or any other microUSB cable I tried. My best guess why neither worked is that the X2 Pro is more power hungry due to the built-in GPS, capacitor, rear camera, etc.

The right side of the dashcam has the microSD card slot. The X2 Pro is compatible with up to 128gb class 10 microSD cards. The left side has a speaker that is loud enough to hear 99% of the time. The X2 Pro has built-in NAND flash memory (D2 Save technology), that acts as a backup should your microSD card fail.

The windshield mount installed as you would expect, quick and easy. ddpai includes an adhesive mount but no suction cup option. There is little to no movement or shaking/vibration in the video when driving on a smooth roadway. Though the X2 Pro has digital image stabilization for bumpy roads.

The rear camera is small and does not interfere with your view. Running the wires to the back of your vehicle may take a bit of trial and error but overall it is a simple enough project depending on the interior of your car. I’m pretty AR and I was relatively pleased with my efforts. Total setup time was less than an hour.

As I mentioned above, the X2 Pro needs the dual USB charger (Front cam 12V@1A / 12V@2.1A; Rear cam5V@1A / 5V@2.1A) ddpai includes in the package. The X2 has IPS (Intelligent Protection System) technology that protects vehicles against extremely low voltage and intense heat by cutting off the power to the dashcam automatically. The X2 Pro has a built-in “super capacitor” that holds a charge and enables it to function in Parking Mode video capture that records even when electricity is turned off.

ddpai also includes a wireless, one-click physical button that when pushed captures a still image and automatically downloads it to your smartphone. It attaches nearly anywhere in your vehicle with a double sided sticky pad. The button is a surprisingly convenient and useful.

The internal GPS acquires the satellites fast enough. It’s not the quickest dashcam in this respect but not the slowest either. The GPS tracks not only location but calculates speed as well. The X2 Pro also has a built-in G-sensor to monitor your acceleration in three-dimensional space and collisions, that will lockdown that video/moment for future review.

Since the X2 Pro does not have a screen, setting up the camera, viewing live video & driving telemetry, watching past recordings, and downloading pictures and video is all done via your smartphone. The X2 Pro is the most complex and capable dashcam I have ever used. It is definitely not a plug & play, beginners dashcam setup by any stretch of the imagination. It’s smartphone control and management app is complicated and does take a bit of time to get used to. It also takes time to understand all the features of the X2 that you can tweak and/or manage via app as well.

The ddpai X2 Pro supports photos, videos, and driving stories sharing via the app linked to multiple social networks (Facebook, Twitter, Instagram, Youtube and etc.).

The I mentioned above, your connection to the X2 Pro is 100% via your smart device. The interface is well designed and thought out. It provides you not only 2k front facing video but a PIP with the rear view/video plus: date, time, speed, temp, power (I believe), G-forces, compass direction, GPS connection, elevation, time and distance traveled. The vertical orientation of the app also adds a map with your location superimposed on it. Though you have to toggle between two screens to get all the telemetry.

It is a shame you do not get all of this data and rear view PIP captured in the video you download from the dashcam. Worse yet, ddpai has not created any desktop software to view all of your driving perimeters holistically from the microSD card.

The X2 Pro records video in H.264 / .mp4 format in 5-minute segments. When the microSD card is full, the dashcam continuously overwrites the oldest video with new. You can tweak the video resolution, various video, and card management settings via the ddpai smartphone app.

Daytime Video:

The 2K video is very clear with more detail than the standard 1080p resolution that a majority of dashcams record at. The 140-degree viewing angle has nearly no fish-eye effect towards the edges. The camera does a great job blocking out glare.

Skipping Video:

Occasionally the video would record with hiccups/skips happening every few seconds for no apparent reason.

In addition to skipping, I did have my fair share of other issues with the X2 Pro as well.

These included:

  • The dashcam occasionally failed to begin recording when I started my vehicle, often never turning on until I unplugged it for a few seconds then reinserting the power plug.
  • When in parking surveillance mode, it occasionally didn’t record or did but in normal time for the whole duration (aka hours). It does have a smart shutdown mode when power is low, but this happened right after driving long distances.
  • Occasionally after sitting in a cool garage all night, it immediately shuts down due to overheating and doesn’t start back up again until I reset the power. Sometimes continuing to shut down over and over again.
  • The rear facing camera does not work every now and then. Turning the X2 Pro on & off occasionally fixes the connections other times not.

I worked with ddpai and some of the issues were fixed with a firmware update. Though I am still working thru many lingering sporadic glitches.

I really wanted to like the ddpai X2 Pro, its screen-less form factor and a long list of high-end features definitely appeal to me. But its poor performance and sporadic reliability are more frustrating than anything…never knowing when it will operate as advertised. Sadly the X2 feels like a beta product still in development. Bottom line — I plan on uninstalling it ASAP and replace it with a more dependable dashcam.

Source:  The sample for this review was provided by ddpai. Please visit their site for more information and Amazon to order.


Product Information

Price: $299.00
Manufacturer: ddpai
Retailer: Amazon
Pros:
  • Great form factor
  • Built-in GPS and G-sensor
  • Front and rear cameras
  • 2k video capture
  • Zero fisheye effect
  • Well designed smartdevice app
  • Social media connectivity
Cons:
  • Sporadic/glitchy performance
  • Poor reliability
  • Fails to turn on after vehicle start
  • Shutdown for no reason

Filed in categories: Reviews

Tagged: ,

ddpai X2 Pro dual channel dashcam review originally appeared on on July 11, 2017 at 9:00 am.

Note: If you are subscribed to this feed through FeedBurner, please switch to our native feed URL http://the-gadgeteer.com/feed/ in order to ensure continuous delivery.

Want to save money on gadgets? Then check out this quick list of Amazon Prime Day tech deals

Today is like Black Friday except that it’s Tuesday and it’s July. But other than that, it’s exactly the same because today is Amazon Prime Day where there are tons of deals and bargains on some of your favorite products. You’ll need to be an Amazon Prime member to take advantage of all the savings, so if you’re not a member yet, head over to Amazon and sign up for a free 30-day trial and then warm up your credit card and browse through this quick list of deals that look worthy to me. Don’t wait too long though because the best deals are selling out fast.

Amazon hardware deals

Echo Dot (2nd Generation) for $34.99 which is a 30% savings and the lowest price it’s ever been. Read our Amazon Echo Dot 2nd Gen review.
Amazon Echo for $89.99 which is a 50% savings and the lowest price it’s ever been.
Kindle Paperwhite E-reader for $89.99 which is a savings of $30.
Fire 7 Tablet for only $29.99.
Element 50-Inch 4K Ultra HD Smart LED TV – Amazon Fire TV Edition for only $549.99.

Keyport key organizer deals

Keyport Pivot Essential Bundle for $33.79.
Keyport Pivot Key Organizer for $17.99. Read my Keyport Pivot review.
Keyport Slide Pro 8+ Bundle for $39.99. This is the original Keyport Slide.
Keyport MOCA Key Tool – 10-in-1 Keychain Multi-Tool for $9.99.

AUKEY

AUKEY Latitude Wireless Earbuds for $19.99.
AUKEY 24W Dual-Port Car Charger for $6.29.
Quick Charge 3.0 AUKEY 6-Port USB Charger for $20.99

Other deals

Mohu Leaf 50 TV Antenna for $59.95.
Mohu Leaf Glide HDTV 65-mile range antenna for $89.99.
iRobot Roomba 652 Robotic Vacuum Cleaner for $249.99 which is a $125 savings.
Ring Video Doorbell Pro for $176.69 which is a $72 savings.
Moto G Plus (5th Generation) for only $179.99 which is a $120 savings.

Filed in categories: News

Tagged:

Want to save money on gadgets? Then check out this quick list of Amazon Prime Day tech deals originally appeared on on July 11, 2017 at 7:41 am.

Note: If you are subscribed to this feed through FeedBurner, please switch to our native feed URL http://the-gadgeteer.com/feed/ in order to ensure continuous delivery.

Porsche brings the power and performance of a sports car to the home theatre with their 911 soundbar

I’ve been fascinated with Porsche’s 911 sports car since I was old enough to even think about driving. I even owned a scale die cast model in midnight black. So when I saw that Porsche had designed a soundbar using parts from a 911 you can bet it peaked my interest.

I never could afford that 911 I dreamed of as a kid and quite frankly even the sound bar is a little too rich for my blood. But, it’s oh so cool! Porsche Design took the original rear silencer and twin exhaust from a 911 GT3 and used them to resonate sound. The rear silencer acts as an onboard subwoofer. The result is a deeper, measurably louder audio experience with a higher maximum volume. Design wise it’s awesome. The look is raw, right down to the visible soldering marks on the rear silencer and the glossy black of the twin exhaust. A real collector’s piece to be sure. 

The 2.1 virtual sound system has a powerful 200-watt output and is loaded with features. A Dolby Digital decoder, DTS TruSurround, Bluetooth 3.0, a LED display and more. As far as connections go, there are 2 digital inputs (coaxial and optical), an analog input and a Subwoofer output in case you want to add your own subwoofer to the mix. The soundbar also comes with a basic remote control.

The Porsche 911 soundbar can be yours all for the low, low price of $3500. After you pick your jaw up off the floor, head over to their website for more info. Vrooom! Vrooom!


Filed in categories: News

Tagged:

Porsche brings the power and performance of a sports car to the home theatre with their 911 soundbar originally appeared on on July 11, 2017 at 7:00 am.

Note: If you are subscribed to this feed through FeedBurner, please switch to our native feed URL http://the-gadgeteer.com/feed/ in order to ensure continuous delivery.
SnapPower SwitchLight review

I love products that are simply designed, simply packaged, and easily installed. Products from SnapPower tick all three of those boxes. Three years ago I reviewed their GuideLights outlet covers plates which I still use today and today I’m going to show you their newer SwitchLight covers.

What is it?

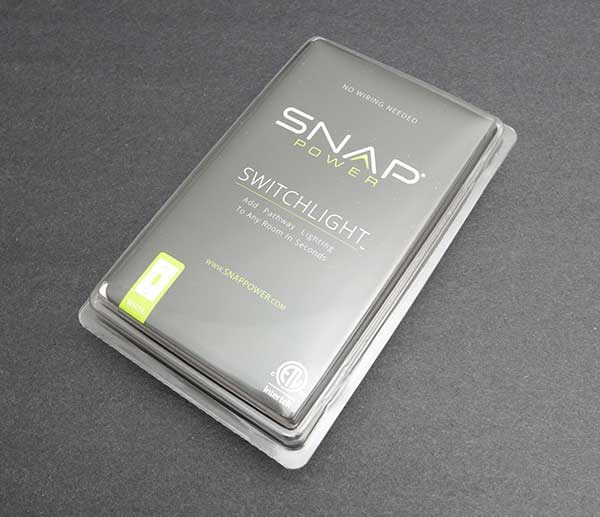
The SnapPower SwitchLight is a cover that turns your ordinary switch light cover into a night light without any special wiring, batteries or a complicated installation.

What’s in the package?

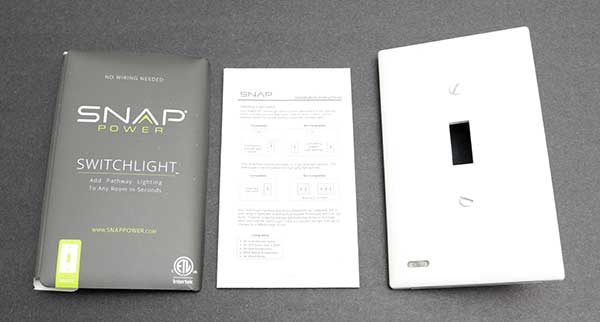
SnapPower SwitchLight
Instructions

Design and features

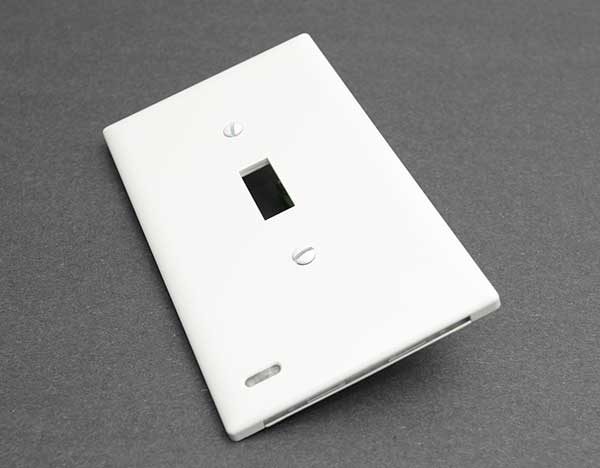
SnapPower SwitchLights are available in two styles that include the Toggle style and a Decor style. They also come in white, light almond, and ivory colors. I was sent a Toggle style in white.

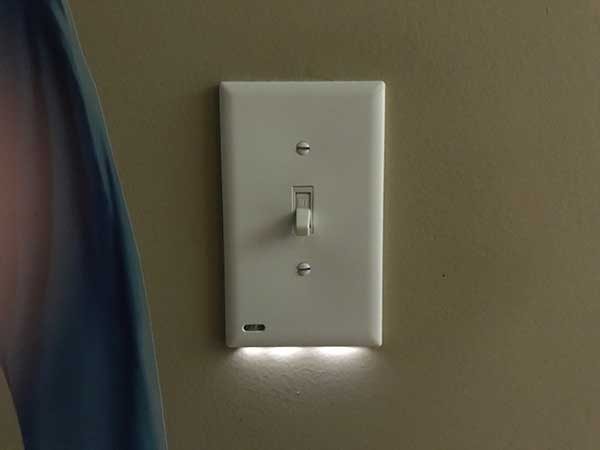
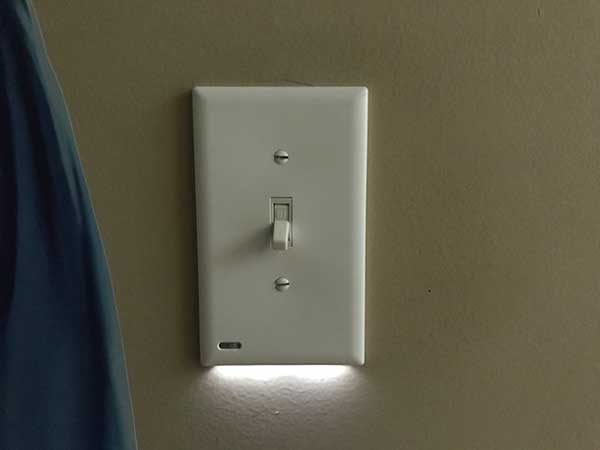
The SwitchLight looks like an ordinary switch light cover until you look closely. Then you’ll notice the small switch / ambient light sensor in the lower left corner and a row of LEDs along the bottom edge of the cover.

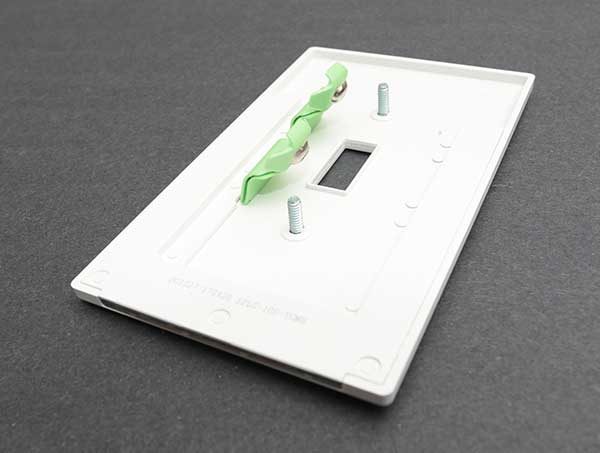
When you flip the SwitchLight over, you’ll see two tabs with electrical contacts on the end. These expertly designed tabs make installation literally a snap.

Installation

Installing the SnapPower SwitchLight will take you less than 5 minutes. All you will need is a light switch in a room that has a light fixture that is controlled by just one switch. You’ll also need a flat head screwdriver, a flashlight, and you’ll need to know where your electrical panel is located.

Step 1. Turn off the power to the light fixture by flipping one of the switches in your breaker box / electrical panel.

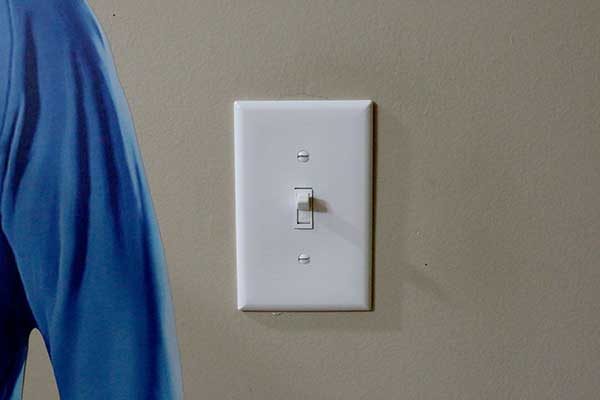
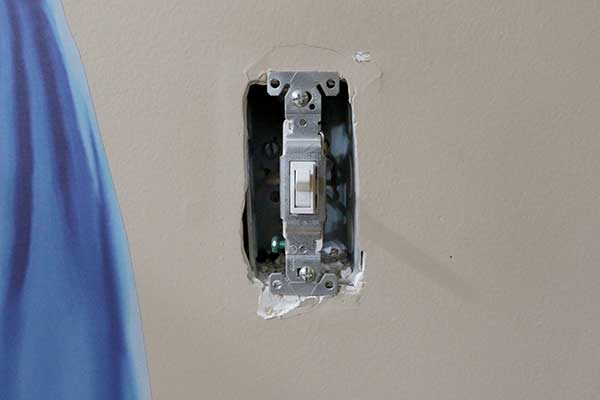
Step 2: remove the existing switch cover.

When I did this, part of the paint and drywall chipped off and I was immediately dreading the annoyed looks that I knew I would be getting from Jeanne as soon as she noticed that I damaged the wall.

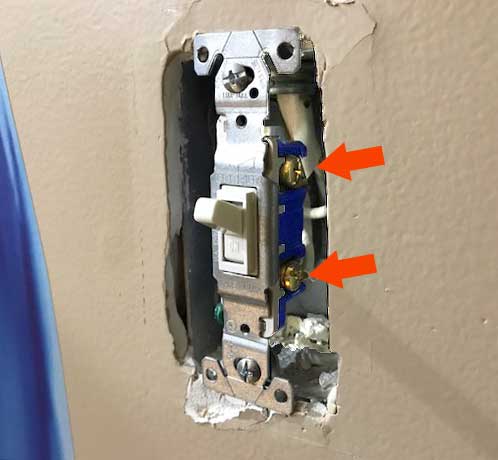
Step 3: Notice the screws on the side of the switch. The tabs on the SwitchLight press against these screws to power the built-in LEDs. Genius right?

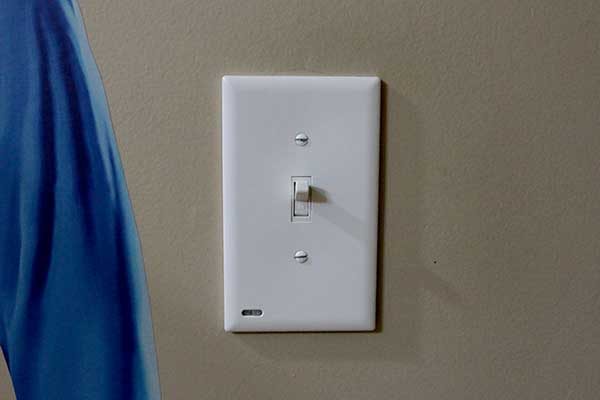
Step 4: Snap the SwitchLight in place.

Step 5: Tighten the screws.

Step 6: Turn the power back on.

That’s it!

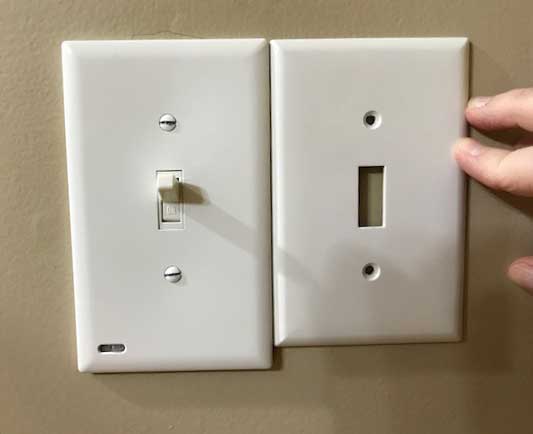
I was overjoyed that the SnapPower SwitchLight plate is slightly longer than the original switch light cover. The extra length hides the chipped paint. Crisis averted!

It’s time to try it out!


Turn off the light and make sure the switch in the lower left corner is set to low or high brightness instead of off. Then as the room gets darker, the LED lights along the bottom edge of the SwitchLight cover will start to glow. The LEDs turn off as the room gets brighter. Simple!

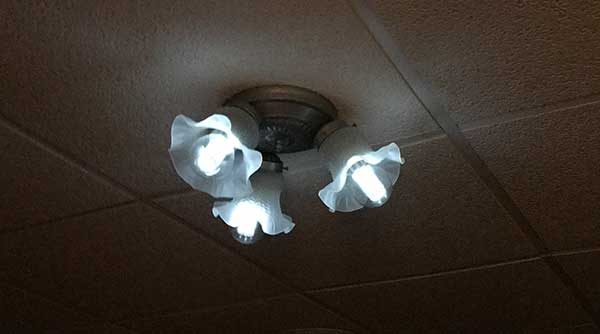
However, I did notice something strange with the SwitchLight cover. If I have the switch set to bright and turn off the overhead light fixture by toggling the switch where the SwitchLight is installed, the LED bulbs in the fixture will still glow dimly. The image above makes the bulbs appear brighter than they are in real life. If I move the switch to the lower brightness setting, this doesn’t happen.

Final thoughts

I think the SnapPower SwitchLight is a great way to add ambient night lights to a room, hallway, etc., without complicated wiring or electrical know-how. Installation is incredibly fast and easy. The LEDs in the SwitchLights should last for 25 years and will only cost about 10 cents a year to power. You can’t beat that!

Source: The sample for this review was provided by SnapPower. Please visit their site for more info and Amazon to order.


Product Information

Price: $17.00
Manufacturer: SnapPower
Retailer: Amazon
Pros:
  • Fast and easy to install
  • Simple "night light" without batteries or wiring
  • 3 light settings
Cons:
  • High setting causes LED bulbs in ceiling fixture to continue glowing (dimly)

Filed in categories: Reviews

Tagged:

SnapPower SwitchLight review originally appeared on on July 10, 2017 at 5:25 pm.

Note: If you are subscribed to this feed through FeedBurner, please switch to our native feed URL http://the-gadgeteer.com/feed/ in order to ensure continuous delivery.
SnapPower SwitchLight review

I love products that are simply designed, simply packaged, and easily installed. Products from SnapPower tick all three of those boxes. Three years ago I reviewed their GuideLights outlet covers plates which I still use today and today I’m going to show you their newer SwitchLight covers.

What is it?

The SnapPower SwitchLight is a cover that turns your ordinary switch light cover into a night light without any special wiring, batteries or a complicated installation.

What’s in the package?

SnapPower SwitchLight
Instructions

Design and features

SnapPower SwitchLights are available in two styles that include the Toggle style and a Decor style. They also come in white, light almond, and ivory colors. I was sent a Toggle style in white.

The SwitchLight looks like an ordinary switch light cover until you look closely. Then you’ll notice the small switch / ambient light sensor in the lower left corner and a row of LEDs along the bottom edge of the cover.

When you flip the SwitchLight over, you’ll see two tabs with electrical contacts on the end. These expertly designed tabs make installation literally a snap.

Installation

Installing the SnapPower SwitchLight will take you less than 5 minutes. All you will need is a light switch in a room that has a light fixture that is controlled by just one switch. You’ll also need a flat head screwdriver, a flashlight, and you’ll need to know where your electrical panel is located.

Step 1. Turn off the power to the light fixture by flipping one of the switches in your breaker box / electrical panel.

Step 2: remove the existing switch cover.

When I did this, part of the paint and drywall chipped off and I was immediately dreading the annoyed looks that I knew I would be getting from Jeanne as soon as she noticed that I damaged the wall.

Step 3: Notice the screws on the side of the switch. The tabs on the SwitchLight press against these screws to power the built-in LEDs. Genius right?

Step 4: Snap the SwitchLight in place.

Step 5: Tighten the screws.

Step 6: Turn the power back on.

That’s it!

I was overjoyed that the SnapPower SwitchLight plate is slightly longer than the original switch light cover. The extra length hides the chipped paint. Crisis averted!

It’s time to try it out!


Turn off the light and make sure the switch in the lower left corner is set to low or high brightness instead of off. Then as the room gets darker, the LED lights along the bottom edge of the SwitchLight cover will start to glow. The LEDs turn off as the room gets brighter. Simple!

However, I did notice something strange with the SwitchLight cover. If I have the switch set to bright and turn off the overhead light fixture by toggling the switch where the SwitchLight is installed, the LED bulbs in the fixture will still glow dimly. The image above makes the bulbs appear brighter than they are in real life. If I move the switch to the lower brightness setting, this doesn’t happen.

Final thoughts

I think the SnapPower SwitchLight is a great way to add ambient night lights to a room, hallway, etc., without complicated wiring or electrical know-how. Installation is incredibly fast and easy. The LEDs in the SwitchLights should last for 25 years and will only cost about 10 cents a year to power. You can’t beat that!

Source: The sample for this review was provided by SnapPower. Please visit their site for more info and Amazon to order.


Product Information

Price: $17.00
Manufacturer: SnapPower
Retailer: Amazon
Pros:
  • Fast and easy to install
  • Simple "night light" without batteries or wiring
  • 3 light settings
Cons:
  • High setting causes LED bulbs in ceiling fixture to continue glowing (dimly)

Filed in categories: Reviews

Tagged:

SnapPower SwitchLight review originally appeared on on July 10, 2017 at 5:25 pm.

Note: If you are subscribed to this feed through FeedBurner, please switch to our native feed URL http://the-gadgeteer.com/feed/ in order to ensure continuous delivery.