Nikko Air Race Vision 220 FPV Pro drone review

The Drone Racing League and Toy State have developed the Nikko Air line of racing drones powered by the same technology used by professional DRL  pilots. The first models to come out of this partnership went on sale in August 2017. I had a chance to review one and experience the fast-paced fun of drone racing. Read on to see what I think!

What Is It?

Drone racing is an extreme sport in which pilots compete head-to-head with small flying drones while wearing first-person-view goggles. Like every type of competition, proficiency only comes with practice. The Nikko Air Race Vision 220 FPV Pro provides everything you need to start racing drones and practice the skills needed by a professional drone pilot. The kit includes real-time video transmission to a full color screen and FPV goggles that provide an immersive flight experience. Just in case, the drone is designed to be resistant to crashes. The controller has progressive flight modes and speed limiters that can be adjusted as skills improve akin to removing training wheels on a bicycle. The controller also has 4 buttons which are configured for one touch stunts. The drone can be connected to a computer to interface the controller to a DRL simulator on Steam or custom configured using BetaFlight.

Hardware Specs

  • 220 mm wheelbase
  • 5.8 GHz analog transmission
  • 4.3″ LCD screen
  • 130 degree wide angle camera with adjustable mount pitch
  • Highly durable composite frame designed to flex, bend and crash
  • 16 pre-programmed stunts
  • Speeds of 25+ miles per hour
  • removable propeller guards
  • View and record stills and video from the drone POV
  • BetaFlight controller tuning
  • Hard case quick swap battery design
  • Interchangeable pinch and thumb stick controls
  • Does not require FAA registration

What’s in the box?

  • Racing drone
  • Controller + 4 AA batteries
  • FPV goggles
  • SD Card
  • Screen Holder
  • Thumb sticks
  • 2 of 7.4 V Rechargeable Li-PO batteries
  • USB charging cable
  • 2 “A” and 2 “B” replacement propellers
  • 4.3” LCD Screen + 4 AA batteries
  • Instruction booklet

Design and Features

One of the stand out features of this kit is how complete it is.

The package contains everything needed to start flying a few minutes after opening the tape on the box.

The package even includes batteries for the screen and the remote controller.

However, it seems that the batteries aren’t quite as fresh as they could be – the life indicator on the video display isn’t quite full even when used for the very first time.

The drone is a 220 mm wheelbase design. A dollar is included in the picture for scale.

its a decent sized unit to learn how to pilot. One thing that is deceptive from the picture above is the type of motor installed on the drone. It looks like they are brushless type motors from a distance. But, upon closer inspection:

They are actually brushed gear motors. The drone still has plenty of pep, but an experienced pilot may complain about the responsiveness and top speed achievable.

The manual states that fully charging the battery will take from 60 to 180 minutes. Furthermore, the batteries may only be charged when installed in the drone. However, the batteries in the box were mostly charged.

Its nice that the battery installation doesn’t require handling connectors. I tied the drone to a stool and ran the throttle close to 90% of capacity with a full battery. The battery lasted for 4:50 before the controller started to vibrate, alerting a low battery. The drone motors stopped 10 seconds later. This probably translates to the rated 6 minute flying time because rarely is the throttle turned up this much.

The controller is more like a game controller than a model aircraft controller, but that makes it easy to hold. I noticed that sometimes my yaw doesn’t center all the way back, but I usually have a finger on throttle anyway.

The buttons for tricks are easily reachable from the controller handles. The controller also has a vibration motor in it. It will vibrate when various settings and modes are made and will also vibrate to alert you that the drone battery is weak.

The controller has three built in modes: The Nikko mode has auto banking, the auto mode has auto leveling, and the pro mode has full acrobatic ability. The Nikko mode switches the yaw to the right stick and the roll to the left. The auto and pro modes have the same controller layout, with the throttle and yaw on the left and the pitch and roll on the right. It seems confusing that beginner lessons would be done in one mode and later lessons would be in another. Imagine, after driving for 6 months, that you learn the left pedal is really for breaking and the right is the accelerator.  The controller also has two speed limiting settings: 1 is 50% max, 2 is 75% max and 3 permits 100% maximum speed.

Usually the first thing that is required when using a drone is trimming out the drift. The Race Vision is no exception, but the controller for this unit doesn’t have the usual trim wheels. Instead the pitch and roll stick is pushed in the direction opposite the drift. This is simple in theory but lacks the ability to specify the amount of trim applied. It may take a few repetitions to get it just right. Once it is trimmed out though the drone has a good ability to hover in one spot.

 A pilot that can comfortably control the drone in P mode has the ability to adjust the responsiveness of the pitch, roll, and yaw by changing the PID tuning parameters in BetaFlight. Because the flight controller is BetaFlight compatible the flying experience can be tailored to personal preferences. Programming the drone is achieved by connecting it to a computer via a USB cable and then using the BetaFlight software in Chrome to adjust the settings.

There are 16 stunts available by pressing bumper buttons in combination with the right stick. See the excerpt from the instruction manual below. The P mode has no auto-leveling so these stunts are possible by just using the sticks, but are also accessible by using the buttons.

Rarely does the topic of learning to fly drones or drone stunts not include some discussion of crashes. The frame of the Race Vision drone is very robust and can take a beating. The nylon frame is designed to flex and adsorb the energy of a crash and ensures a damping of the impact. The propeller protectors limit damage to the propellers and other property during an impact and are removable for more advanced pilots.

The Race Vision 220 FPV comes with a 4.3″ LCD video screen. It is powered by 4 AA (included) batteries. The screen receives an analog 5.8Ghz signal which has the advantage of much less latency and greater range than WI-FI signal. The screen also has the capability of recording the incoming video. A 4GB Class 4 SD card is included with the set for this purpose.  The recorded video is in .AVI format and has the following characteristics:

Bit rate : 6,711 kb/s
Width : 720 pixels
Height : 240 pixels
Frame rate : 60.000 FPS

The screen is also capable of recording still pictures with a resolution of 720 x 240 pixels.

The screen is designed to either be mounted on top of the controller or at the end of a head-mounted display.

The image in the head mount display appears as a 48″ diagonal image at 3 feet distance. The image is neither stereoscopic nor convincingly immersive; the real benefit of the head-mounted design is that it allows training from a drone POV and completely isolated from observing the flight 3rd person.

There are 3 basic ways to fly the drone: out in the open individually, out in the open with friends, or with the simulator. Using the drone individually is the most obvious scenario. I found that the range for the FPV was somewhat limited compared to other more professional units, but beat out what is typically provided by WI-FI drones. The video starts to cut out about 50 yards and when using the drone in a line-of-sight scenario. However, becasue the transmission is a linear 5.8 GHz signal (5732, 5769, 5806, or 5843 MHz) the FPV may be used with many other FPV goggles that support these frequencies. Also, the 130 degree FOV paired with the 240 TVL resolution made for difficult viewing at times.

One good thing about the camera on the drone is that it is also designed with growth in mind – the camera angle can be increased as the pitch is increased with faster flying speeds.

Each frequency has a different tail light LED color: green, cyan, blue, and violet. Unfortunately, the blue and cyan LEDs are virtually indistinguishable.

Using the drone with the simulator allows new pilots to learn how to fly a racing drone. The simulator allows pilots to practice the controls and perfect the basics before taking flight in real life. On the computer pilots can master skills, race against friends, and compete in actual DRL courses. The  DRL simulator runs on the Steam game platform, which means it is cross-platform.

After installing Steam and the DRL simulator, the drone is USB connected to the computer and the controller can interact with the game just like it is being used in real life.

The image below is a screenshot from one of the training sessions

In the field I had a ball playing with this. I also crashed it a bunch of times too. The frame and propellers withstood all of my hard landings. The video I recorded has the quality of a bad VCR but looked better as I was filming.

Positives

  • True novice to expert flexibility
  • Complete kit includes everything (even batteries and an SD card!)
  • BetaFlight compatible
  • Simulator learning
  • Durable design

Negatives

  • Limited FPV range
  • Limited controller range
  • Marginal recorded video quality

Final thoughts

Having a drone controller and FPV goggles all in one package is nice. Its also great that the drone is designed for the novice through the enthusiast. I think the greatest benefit to this is the simulator. This is the perfect collection of merchandise and the right price point to get someone who is curious about drone racing into the sport.  If you are looking for a system for a pilot that has intermediate experience, there are some comparably priced units on Amazon that don’t have simulator capability and may not have channel specific LEDs but have brushless motors, carbon fiber construction, 15 minute flight time, and HD video.

Price:  $169.99
Where to buy: Target
Source: The sample of this product was provided by Nikko Air.

The O.G. and O.M.G. bags – for when you need an everything EDC bag

Some days you can carry light, and other days you need everything plus the kitchen sink.  For days when you need everything, the O.G. and O.M.G. bags from Lo & Sons can carry your heavy loads and still look stylish.  The dome-shaped bags can serve as a travel bag, a commuter bag, or a trip-to-the-gym-after-work bag.  The bags have a zippered exterior pocket to organize wallets, phones, pens, and similar items.  There’s a zippered pocket on the bottom to hold a pair of shoes, and the big center pocket can hold up to a 13″ laptop, plus tablets, books, sunglasses, and clothes.

The bag is easy to carry on your shoulder with the attached straps or crossbody with the clip-on long strap.  A large strap across the back of the bag slides down over the handle of your rolling bag for hands-free carrying.  The bags have a nylon exterior with leather trim and a premium poly jacquard fabric interior.  The O.G. bag is 15″ tall x 17″ wide; the O.M.G. bag is 13.5″ tall x 16″ wide.  Both bags are available now in a variety of colors for 30% off the normal price, with the O.G. for $206.50 and the O.M.G. for $192.50 at Lo & Sons.

and in the morning… we’re making WAFFLES!

Make Monday mornings magnificent with Dash’s new mini waffle maker! This hot new appliance produces perfect little 4 inch waffles in seconds; an exact single serving size. It’s got a non-stick surface and it’s also cute and compact, so it won’t take up much room in your kitchen.

Don’t worry about overcooking your waffle due to life’s unpredictable distractions. Dash’s mini waffle maker displays an indicator light when your waffle is ready to be taken out, decorated in toppings and soon devoured. Even if you fail to notice the luminescence right away, this gadget turns itself off when your waver is prepared to perfection.

A recipe book and access to Dash’s growing database of recipes is included. Apple pie waffles, churro waffles, and peanut butter french toast waffles are a must try! Save money on buying toaster waffles by cooking up a mass amount of these mini waffles at once and then storing them in the freezer for another miserable morning.

Dash‘s new mini waffle maker will be the trendiest new addition to your turquoise kitchen. Other colors available when ordering through Amazon are pink, white, black, silver, and red. The Dash mini waffle maker is being offered as an add-on item for only $9.99 and being sold inclusively for $14.99 through Amazon Prime. Don’t miss out on this opportunity to make your mornings sweeter.

ChordBuddy Guitar Learning System is training wheels for your guitar

The ChordBuddy Guitar Learning System is designed to help you learn to make chords as you learn to play guitar.  The ChordBuddy attaches to the neck of electric or acoustic guitars and guides you through learning basic chord fingering positions.  It works in the key of G and makes the G, C, D, and Em chords.  The included instruction book, songbook, DVD, and two-month lesson plan guides you until you learn to make the chords on your own and you’re ready to remove the “training wheels”.  The ChordBuddy Guitar Learning System is $59.99 at Sharper Image.

Healbe GoBe 2 Smart Life Band fitness tracker review

Did you start the new year off with a resolution to exercise more and improve your fitness level? If you answered yes, how are you measuring your progress towards your goals? If you have been shopping for a wearable fitness tracker but don’t know which one to choose from the crowded market of trackers, you’ll be thrilled to find out that I’m going to make your choice even harder by telling you about the Healbe GoBe 2 Smart Life Band fitness tracker.

What is it?

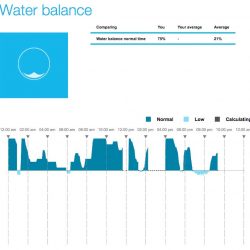
The Healbe GoBe 2 is a fitness tracker that measures all the normal things that most fitness trackers measure, like your steps, sleep, and even your heart rate. But the GoBe 2 goes quite a bit further by also tracking calorie intake, calories burned, energy balance, hydration levels, and emotional state.
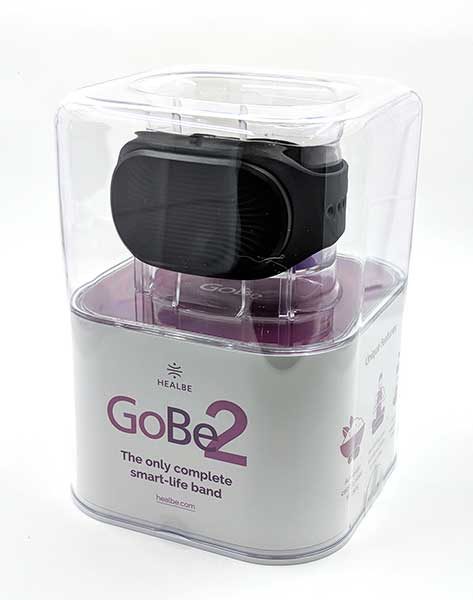
What’s in the box?

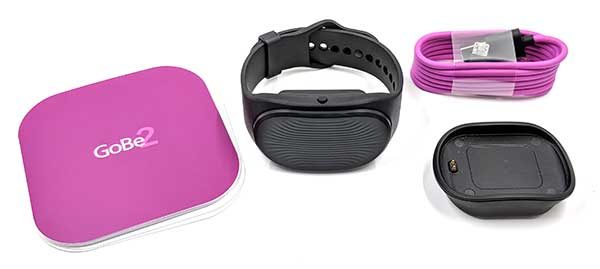
  • Healbe GoBe 2 fitness band
  • Charging dock
  • Charging cable
  • Instructions

Design and features

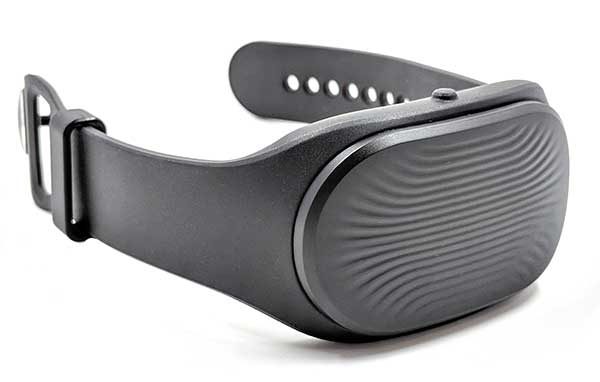
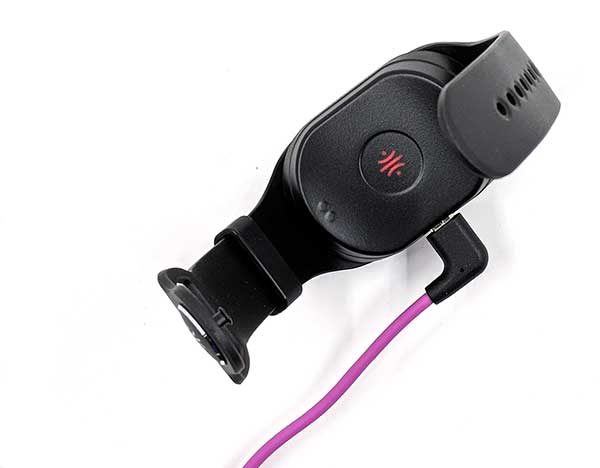
The GoBe 2 is a made of black plastic with a flexible and adjustable wristband. The top of the GoBe is actually a display. I’ll show you more about that in a bit.

The wristband can be replaced and various color straps are available for purchase from the Healbe website.

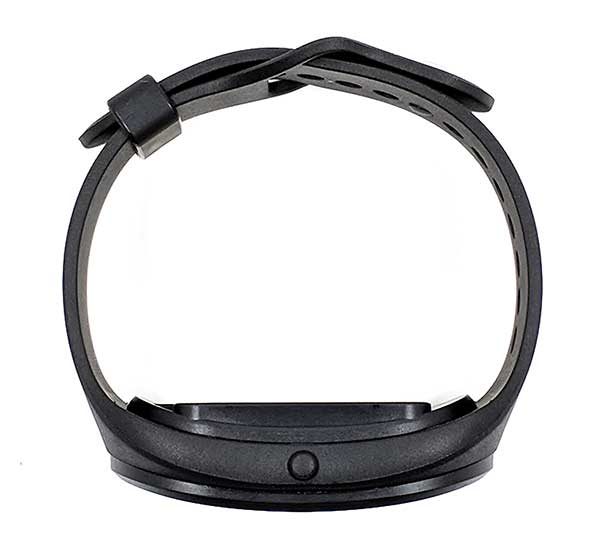
There’s only one button on the GoBe, which toggles power to the tracker and shows the time and other status indicators when pressed multiple times.

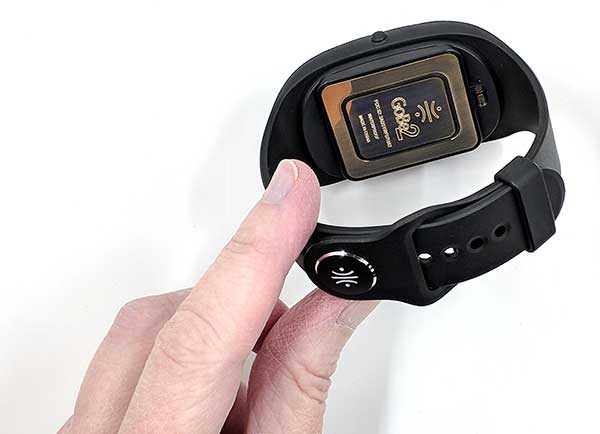
A large gold sensor is built into the underside of the tracker. This sensor is designed to make contact with the top of your wrist so that it can measure your calorie intake, stress levels, hydration levels, and heart rate.

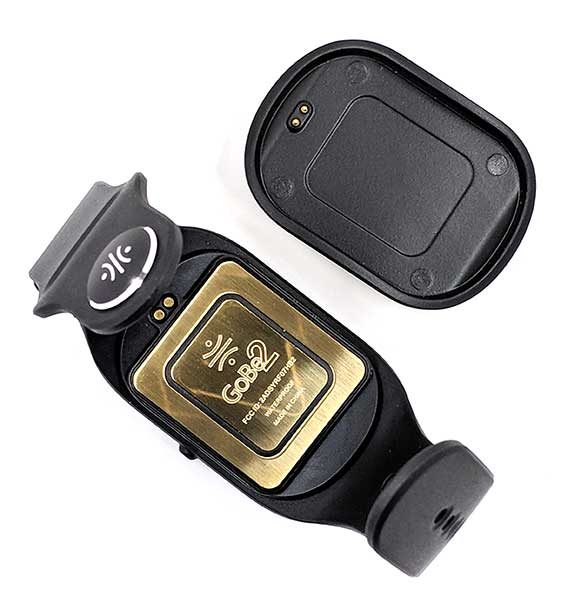
There are also two small electrical contacts on the underside of the tracker that connects to the charging dock to charge the tracker.

The included dock snaps to the bottom of the GoBe 2 fitness tracker by magnets. The included micro USB cable plugs into the dock and the other end can plug into a free USB port on your computer or into a USB adapter (not included) to charge the tracker.

You’ll become very familiar with the charging dock because you’ll be charging the Healbe GoBe 2 every day. You might be able to squeeze two days of use out of the GoBe if you turn it off while you’re sleeping, but then you’ll be losing sleep tracking data. They recommend that you charge the GoBe each day when you’re sitting at your desk or showering.

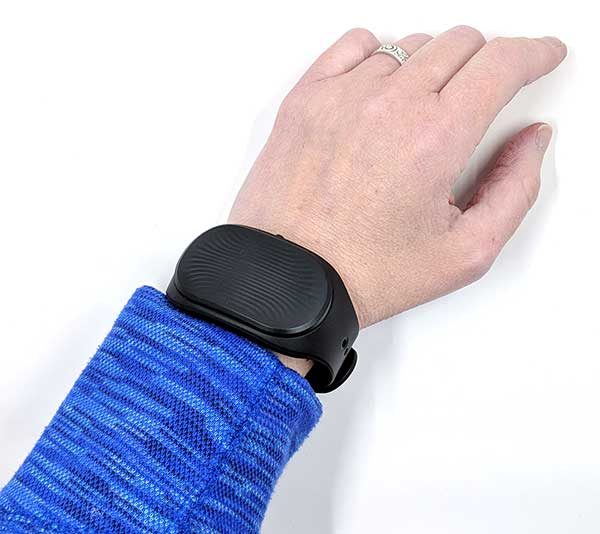
Compared to other fitness trackers on the market, I found the Healbe GoBe 2 to be huge. Here it is on my wrist. For reference, I’m 5’6″ and 129lbs. The GoBe looked and felt like I was wearing some sort of house arrest monitor.

Remember, I mentioned above that the gold plate on the bottom of the tracker has to make full contact with the skin on your wrist? Well, that means that you have to keep the strap snug. If the tracker isn’t making full contact, it will vibrate and show NO CONTACT on the display to let you know that you need to tighten the strap. I found the GoBe to be uncomfortable to wear all day and it even irritated my skin slightly.

For the most part, you won’t look at the tracker while you’re wearing it although you can press the button on the side to show the time which lights up in a bright blue old school dot matrix style display. Tip: Don’t check the time in the middle of the night when you’re half awake because it will blind you.

Subsequent presses of the button on the GoBe will cycle through readings for battery status, heart rate, steps, hydration level, and more. It’s easier to consult the Healbe app when you want to check the fitness data.

Healbe app

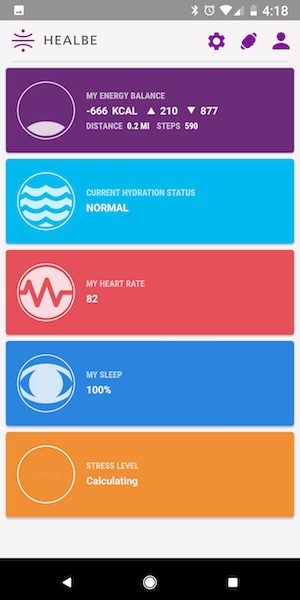
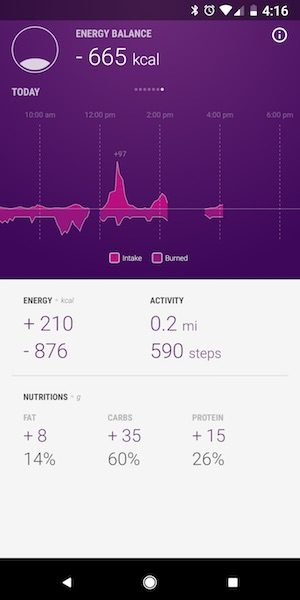
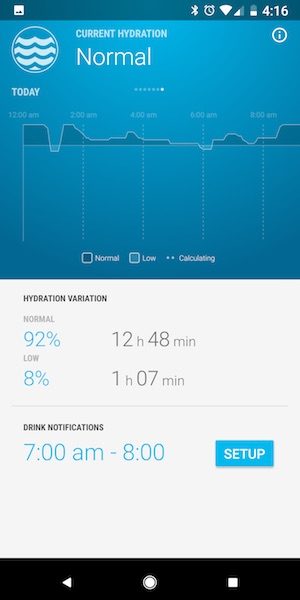
The Healbe mobile app has an easy to use interface that has a dashboard that displays calorie info, hydration info, heart rate, sleep data, and stress info.

I was really interested in the calorie and hydration features of this fitness tracker. If you’ve ever used apps that count your calories vs. presumed calorie burn, you will probably agree that they are tedious and a pain to use. The allure of not having to manually enter food and exercise sounded great to me.

First of all, how does this wearable fitness tracker even measure calorie intake and burn rate?

When you eat, food travels to your stomach to be broken down and digested.
10-15 minutes after you eat, your body starts converting the carbohydrates in your food into glucose. This process continues for up to 4-6 hours, depending on what you eat and your body’s unique physiology.
As glucose concentrations rise, your cells absorb glucose and release water. Fat and protein in your food influences the rate of glucose absorption—leading to different shapes and durations of the “glucose curve,” which GoBe measures.
GoBe uses an impedance sensor to measure the fluid moving in and out of your cells—continuously, around the clock.
Healbe FLOW™ Technology uses an advanced algorithm to analyze impedance readings and calculate calorie intake based on your glucose curves, giving you a complete picture of your calorie and nutritional intake over time.


If you expect the GoBe 2 to accurately show you exactly how many calories you consumed and the exact number of calories you burned, or how much water you drink on a given day, you’ll be disappointed.

The app will show you percentages of fat, carbs, and protein consumed, and will also show if you had a calorie surplus or calorie deficit for the day. This can be useful if your goal is to lose weight. However, the readings change throughout the day, so you won’t be able to check the app 5 minutes after you swallowed the last bite of your cheeseburger and see that you just consumed 500 calories. It can take between 5 minutes and 6 hours for the calories to be tracked.

The app shows spikes after a meal or after you’ve drunk something, but it also shows changes when you’ve not eaten anything at all and doesn’t show exact calorie amounts.

I also found it odd that the app would show that my hydration was low in the middle of the night, but then show that it got better before I took even one sip of water the next day.

So while the calorie tracking feature is interesting and I’m excited about the possibilities going forward, I wasn’t wowed.


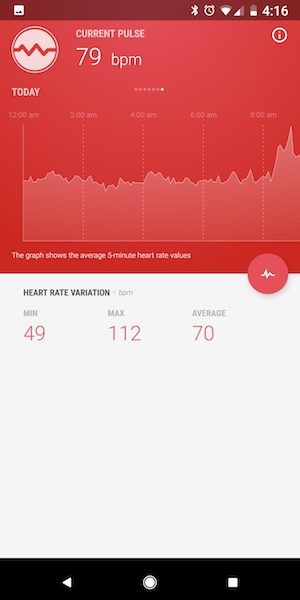
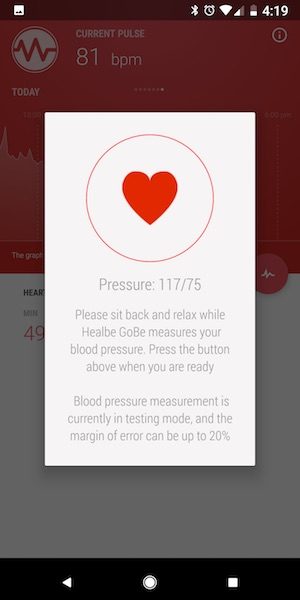
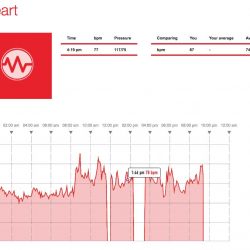
I did like the GoBe’s heart rate tracking feature and experimental blood pressure reading feature.


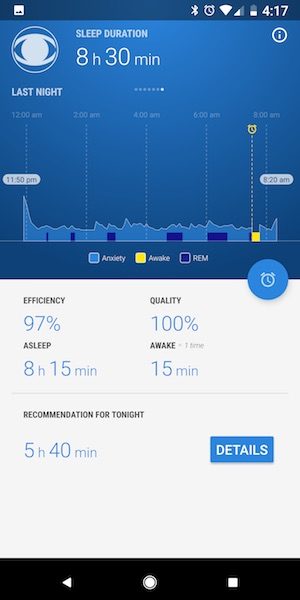
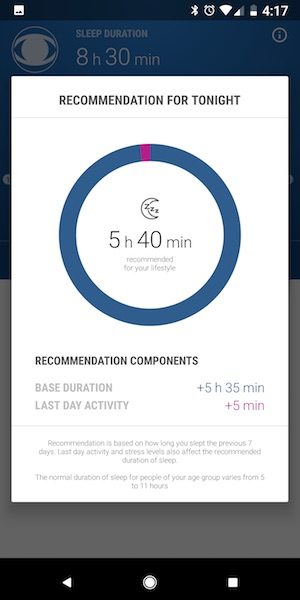
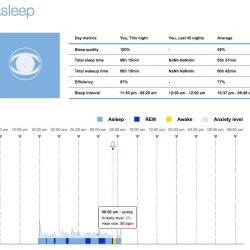
The sleep tracking feature was only mildly interesting. The sleep tracking reports in the mobile app don’t let you see details like the amount of time you were in REM sleep versions light sleep or the exact times you were in each level of sleep.


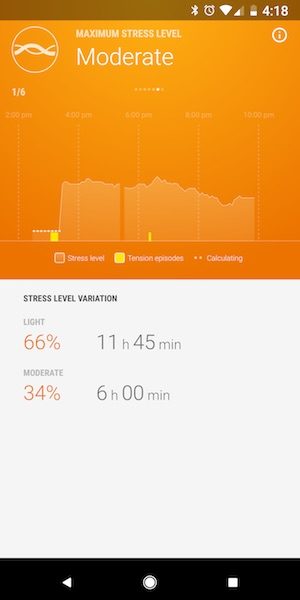
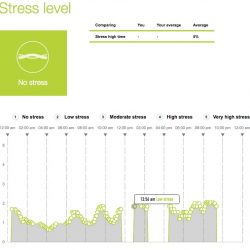
The Healbe GoBe 2 can even track your emotion/stress levels. I was skeptical about this feature but changed my mind when the tracker vibrated to tell me that I was having a tension episode right as I was getting ready to record my voice for a video that I was working on.

Healbe web app

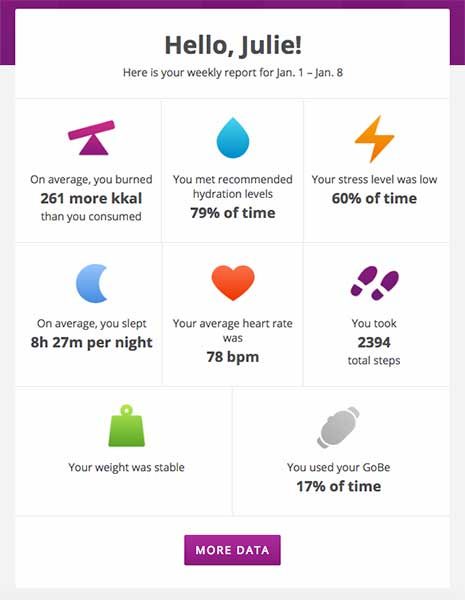
If you prefer viewing your fitness data or a larger screen, there’s a Healbe web app that you can sign into. You’ll be reminded of this each week when you receive an email from Healbe with a weekly report. Clicking the More Data button will prompt you to login to their web app.


The web app is excruciatingly slow, but it does allow a deeper dive into the data where you can see timestamps for calorie, heart rate, stress levels, sleep data, etc.

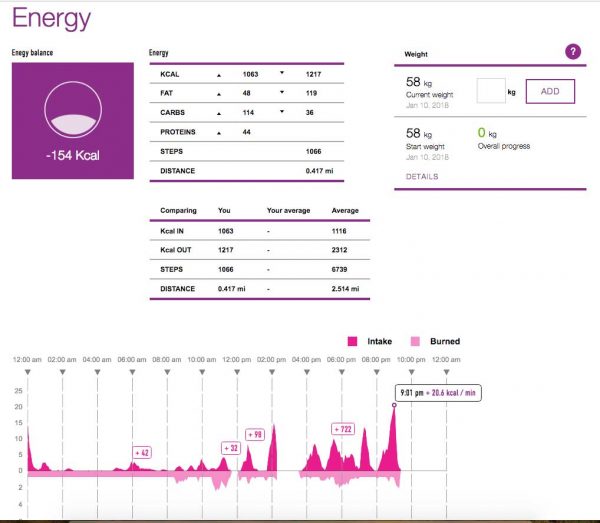
As I mentioned earlier, I’m not convinced that the GoBe 2 reports calorie intake or calorie burn accurately. I wore the GoBe 2 for a full day (minus a short time where I had to charge it which you will see above) and the web app reported that I only had 1063 calories that day. I know that number is significantly lower than it should be because we had a big bowl of oatmeal with walnuts and berries for breakfast, a whole turkey sandwich with chips for lunch, a couple of pieces of chocolate after lunch, soup and crackers for dinner, and a piece of homemade banana bread with chocolate chips later after dinner.

What I like

  • Calorie intake and calorie burn features show promise
  • Hydration level features
  • Continuous heart rate measurement
  • Can export data to Google Fit

What needs to be improved

  • Price is high
  • Short battery life
  • Bulky and not comfortable to wear
  • Calorie intake number doesn’t seem accurate
  • Web app is painfully slow

Final thoughts

Although I found the GoBe 2 to be bulky and uncomfortable to wear, I’m hoping that these calorie tracking features continue to evolve. Being able to see accurate trends that show how the fuel (food) I put in compares with the fuel I burn can be a powerful tool for staying healthy and at an optimal weight. As it stands, I can’t quite give my full recommendation for the Healbe GoBe 2 based on my own experience. But I will definitely keep an eye on future versions of this product.

Price: $199.00
Where to buy: Amazon
Source: The sample for this review was provided by Healbe.

If you buy something with the links on our pages, The Gadgeteer may earn an affiliate commission.