Life without Windows, transitioning to iOS only

So, it finally happened. It’s not like I didn’t want to transition, but am I ready. What happened you may ask? My Windows computer crashed after a long hard fought life. To be honest, I was expecting it to happen, the signs were there, really. I woke up every day to a warning message saying my system was destined for imminent disk failure, I was just hoping that I would have a little more time. As a result, I’ve had to push forward with my plans to transition to an all iOS setup.

I have been prepping myself for this transition ever since I purchased my first iPad, but iOS and the iPads themselves just could not handle all that I wanted to do on them. You may ask yourself what has changed besides my loss of a Windows computer.  Two things mainly.

First the hardware, Apple has released the iPad Pro (I have the 10.5-inch second-generation version). Having a device that can handle the workload of a laptop or desktop system is important. I will admit that my iPad can never fully replace the functionality of a desktop or laptop, but it should be close enough to allow me to function without one.

The second reason is the operating system – iOS 11. Apple has continually improved the iOS software to the point that I feel that I can live without a desktop or laptop.

I am not kidding myself, I know this transition will not be without its trials and tribulations, just trying to figure how to set up my desk to best utilize my new set up is a challenge. Before, when I would work at my desk I would basically have two screens. I had an HP Elite L2201x monitor that was hooked to my Windows machine, a keyboard, and mouse. I also had my iPad, my Apple Magic Keyboard and my iPhone with its Qi charging stand. As far as accessories I have BYBLIGHT and my iClever multi-port USB charger. I did most of my writing on my iPad and used my desktop for reference. I have been a two monitor user for many years now and don’t think I could function well without that kind of setup.

My first inclination was to try to replicate a setup similar to my old one using my iPad Pro and my iPhone 6. I have the Apple Lightning Digital AV Adapter and figured I could use that to run my iPad or iPhone into my HP monitor. In theory, I could do this by buying an adapter that would allow me to run my HDMI cable into the monitors DP (Display Port) port. In reality, this was a no go. My thinking was to use my iPhone similar to my desktop, basically for reference and minor research. Mind you I could go out and buy a bunch of peripherals to make things work, but to be honest I may be a little on the cheap side so I would like to try to use what I have on hand.

I had to move to plan B. This plan consists of me using my original iPad 2 and my iPad Pro. The good thing about this solution is that I have my iPad 2 and it works. The bad thing with the iPad 2 is that it is obsolete and is no longer supported. For now, this will work as I really only use the iPad 2 to browse the internet and to look up reference info while I write. Some alternatives that may exist that I am not ready to explore yet are a newer iPad, a Monitor that accepts HDMI input, or a different tablet device I may have access to. For now, I am not prepared to try any of these alternative solutions, so plan B it is.

Plan C, yes I know I said it would have to wait, but while writing this article I had the good fortune to be the recipient of a 2016 iPad. To be honest, I was happy to receive it, my old iPad 2 was a dog, it would work but it was slow. So, now that my base setup was determined and setup it is time to try to function in this matter.

Switching to this new methodology means I will have to look at software and accessories that will help my set up feel more like a real work environment. The first item that I think I will need is a second Bluetooth keyboard. My main keyboard for my iPad has been my Apple Magic Keyboard, and while I love it, it is pricey and to be honest, lacks a little pizazz. I think I found what I was looking for in an Arteck HB030B keyboard (more on this at a later date) the keyboard is backlit rechargeable and priced at $19.99 from Amazon (it has a high user rating). The next item I decided I need is something for power management. I settled on the iClever multi-port USB charger that I had reviewed in the past. The iClever has 6 USB ports, more than enough to charge my iPads and the accessories I use. As far as other accessories, I will be using a BYBLIGHT as my lighting source (it has various brightness and temperature levels), A Cooler Master stand for my iPad (my iPad lives on my desk), The Apple Smart Cover on my iPad Pro (I carry this one around with me), a set of Supertooth Disco Twin Bluetooth speakers (for true stereo sound), and a Thecus NAS server for backup and storage. I have reviewed most of these items and they are linked if you are interested in reading about them.

Software for this transition may be a different animal for me. For the basics, I am happy to use the Apple suite of products (Number, Pages, and Keynote), but for other things such as video and photo editing, I am still looking for the one. For photo editing, I am using a program called Filterstorm Neue. Knowing that we are trying to standardize some things here at The Gadgeteer I am not sure this program will meet my needs (it may also be a little too sophisticated for my rudimentary skill level). The program lets me crop, resize and touch up photos but I am not sure I am getting full use out of it so I am always open to suggestions. Other useful software apps I have so far, are Grammarly, Google Chrome, and Dropbox.

So, what’s my bottom line here? Seeing as I am just getting started on this journey I cannot say for sure. I do not see myself going back to a desktop or laptop so I am basically in the “damn the torpedos full speed ahead mode”. I do like my setup and I seem to be functioning well with it so we shall see. I am always looking for suggestions and feedback so if you have any drop me a note in the comments section.

Foldscope is a real microscope that’s made of paper

One year for Christmas, I received a Tasco microscope set. I loved that thing. It came in a wooden box that had tweezers, eye droppers, glass slides, etc. I would spend hours “playing with that microscope to explore strange new worlds that were too tiny to see with my own eyes. One bad thing about a traditional microscope like the one I had as a child, is that they are too bulky and awkward to take along to other locations to explore different miniature worlds. The Foldscope is a microscope that has been designed to be as portable as it is affordable.

The Foldscope microscope was invented by two Standford University PhD students and is made of a heavy duty water-proof paper and comes in a small metal box with tools for collecting samples, processing samples, preparing slides and collecting data. You can use the Foldscope by itself, or you can use it with a smartphone’s camera using the included universal phone lens mount. The microscope itself has to be assembled and features a 140x, 2um resolution lens.

You can buy your own Foldscope for $39.99. Find out more at foldscope.com and Amazon.

This portable Bluetooth speaker looks like a flaming torch

If you got some of the SIXDEFLY LED bulbs that simulate a gaslight flame, you’ll need to pair them with this portable speaker that looks like a flaming torch.  The base has 96 LEDs that flicker with a yellow light to simulate a flame to add a romantic touch to any outdoor gathering.  The 5W speaker with “excellent stereo sound and powerful bass” connects to any Bluetooth-compatible audio source.

Specifications for the Lightclub Portable Outdoor LED Flame Light speaker:

  • Bluetooth Version: 4.2
  • Frequency Response: 100Hz-20KHz
  • Waterproof Level: IP65
  • SNR: 75dB
  • Distortion Rate: 10%
  • Horn Parameters: 52mm, 4.5W
  • Impedance: 4
  • Bluetooth Range: 10m/33ft
  • Interface: 1 x Micro USB Part, 1 x Tripod Slot
  • Battery: Built-in 7.4V 2000mAh Li-ion Battery (Included)
  • Power Supply: 5V/1A
  • Output Power: 5W
  • Charge Time: Approx. 2 Hours
  • Music Playing: Approx. 6 Hours
  • Torch Lamp Working Time: 12 Hours
  • Standby Time: Approx. 24 Hours
  • Size:  7.36″ x 4.61″ x 4.72″

The Lightclub Portable Outdoor LED Flame Light speaker is available for $33.63 from Amazon.

Winegard Elite 7550 Long Range Outdoor HDTV Antenna review

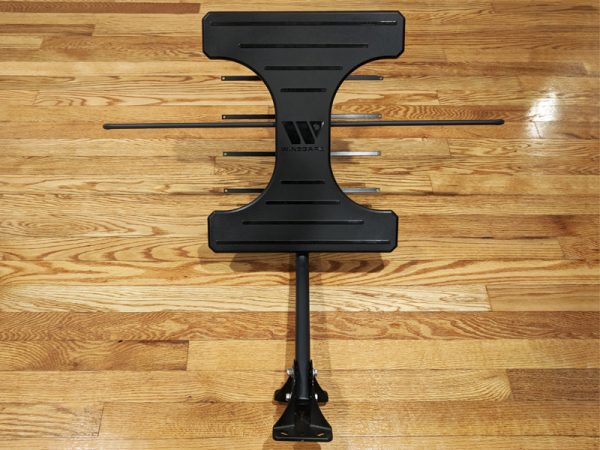
The Winegard Elite 7550 is a very powerful HDTV antenna that is able to pull in high-definition television signals from as far away as 70 miles. Reasonably priced at $149.99, it works exceptionally well despite a somewhat fragile build and a plastic roof mount that you’ll want to swap out for something a lot sturdier.

What is it?

The Winegard Elite 7550 is a USB-powered, long-range, outdoor HDTV television antenna. These antennas are popular with cord-cutters because they allow you to access high definition over-the-air programming for free without the hassle and cost of dealing with a cable or satellite company.
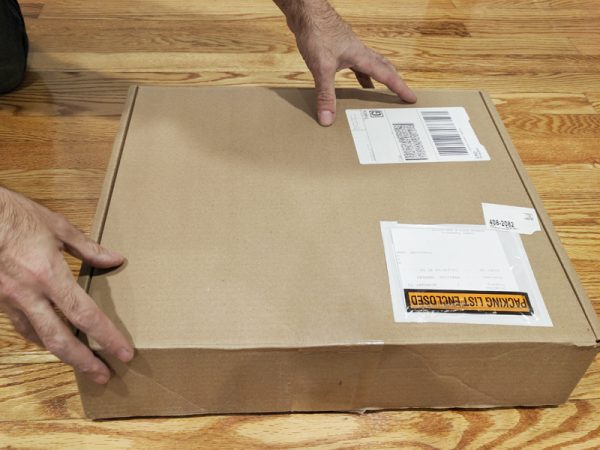
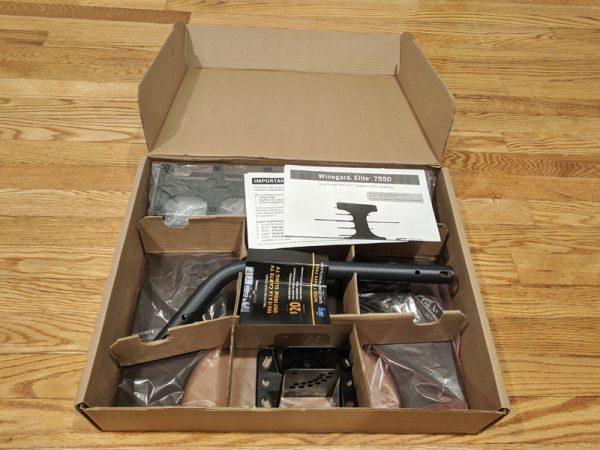
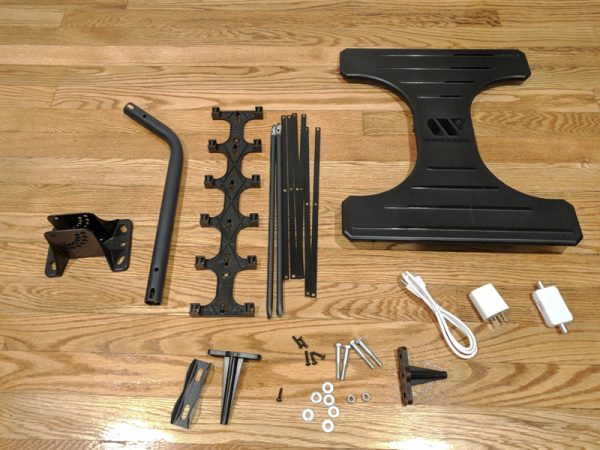
What’s in the box?

  • The Winegard Elite 7550 Antenna with embedded ultra low noise amplifier
  • Inline 5V Power inverter with LED power indicator
  • 3′ USB power cable with 110V adapter
  • Mounting supplies (pipe, foot, and hardware)
  • Instruction manual

Hardware specs

  • 70+ Mile Range with “Clear Circuit Technology”
  • Optimized for Dual-Band VHF/UHF Reception
  • Dimensions: 30″ x 17.5″ x 5″
  • Weight: 1 lb
  • Directional
  • Embedded ultra low noise (1db) digital amplifier
  • LTE Filter

Setup

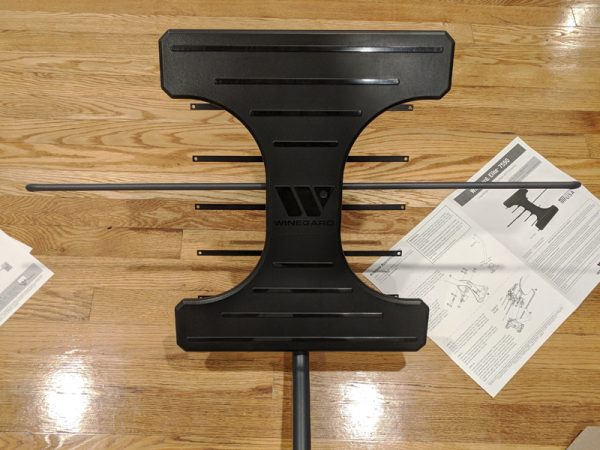
It’s easy to get overwhelmed when first beginning to assemble the Elite 7550. There’s no shortage of little screws, fasteners and delicate metal and plastic beams. Fortunately, after a quick perusal of the instruction manual, things will quickly make more sense.

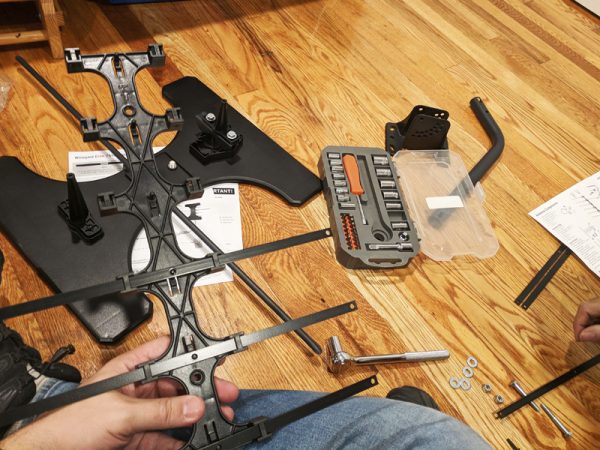
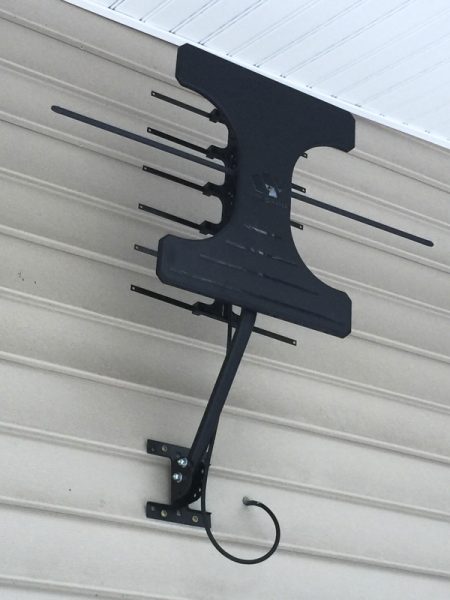
Each beam and fin has a home on the Elite 7550, but you have to take great care not to over-tighten any of the screws or snap a beam when bending and inserting them into position.

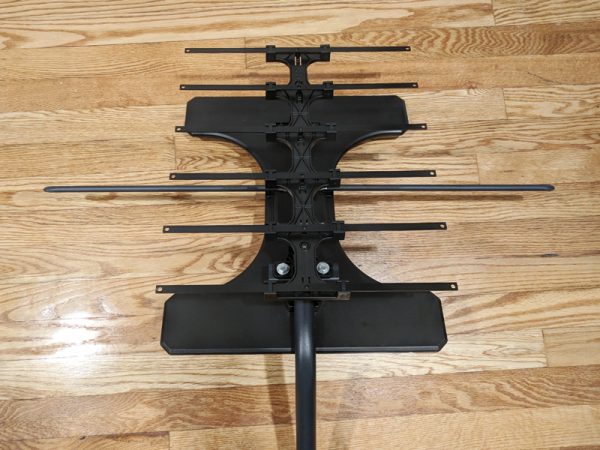
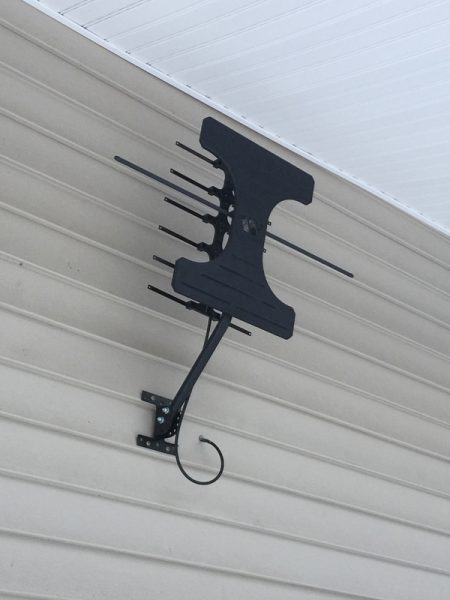
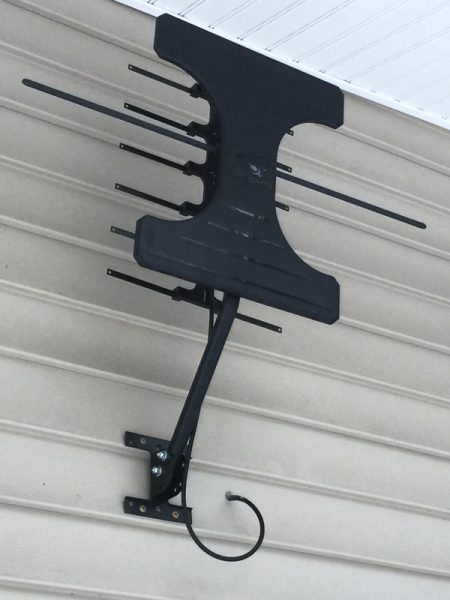
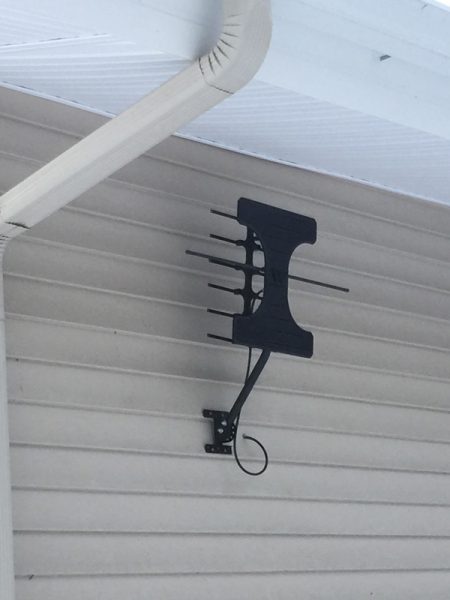
Once assembled, the Elite 7550 is pretty impressive looking, in a futuristic sci-fi kind of way.

Design and features

The secret behind the power of the Winegard Elite 7550 is its embedded low-noise preamp and LTE filter. These two unique features help to filter out a lot of existing signal noise and boost weaker signals that might otherwise get lost.

As a perfect example to the power of the Elite 7550, after assembling the antenna we set it up next to the TV on a shelf in the back room of a house surrounded by woods in Westchester County, New York. Against all odds, the antenna STILL pulled in about 18 channels after we ran the Channel Search function on our test TV.

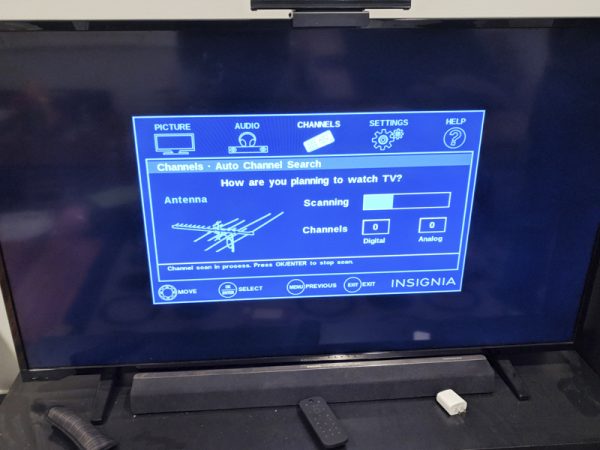
Every television and set-top box has a different way to search for HD channels, but they’re all pretty similar. Connect the antenna to your TV or box, find the “Auto Channel Search” or similar function, and sit back and let the process run.

With the great success the Elite 7550 had inside, we couldn’t wait to see how it did once mounted properly outside. The first step to that process was to visit the antenna selector at the Winegard website.

After inputting your address or zip code, the Winegard site will bring up a handy map showing you signal strengths, available channels, and the location of the nearest broadcast towers. The site will also show which Winegard antenna would work best for your location.

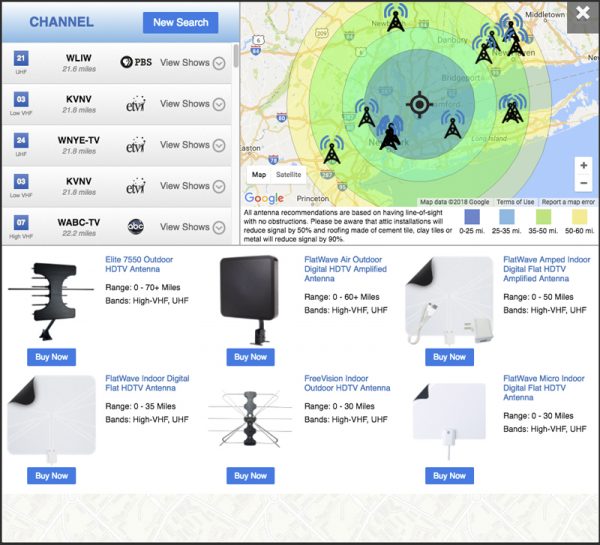
Once you’ve determined the direction of the nearest broadcast tower, make sure you align your antenna to face that direction BEFORE you mount it and start drilling holes through your house.

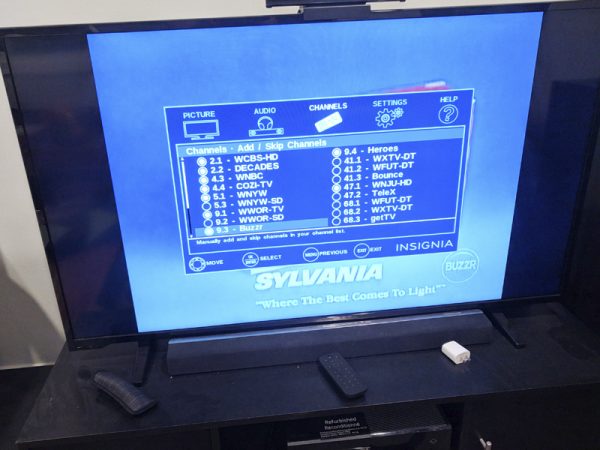
The outdoor mounting and directional adjustment allowed us to bring in even more channels than we had hoped for, over 50 in total.

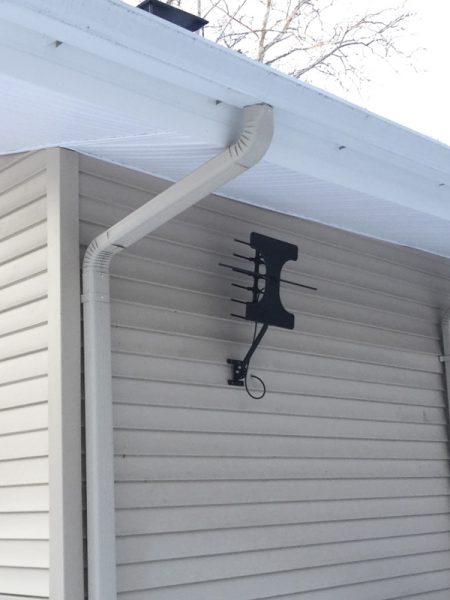
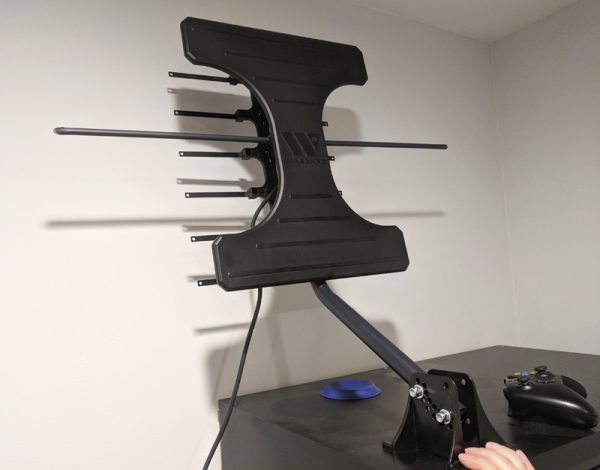
We opted to mount the Elite 7550 on the side of the house instead of the roof, partially to protect it a bit from heavy winds and weather, but also because we were fearful of climbing up on the roof and potentially falling off.

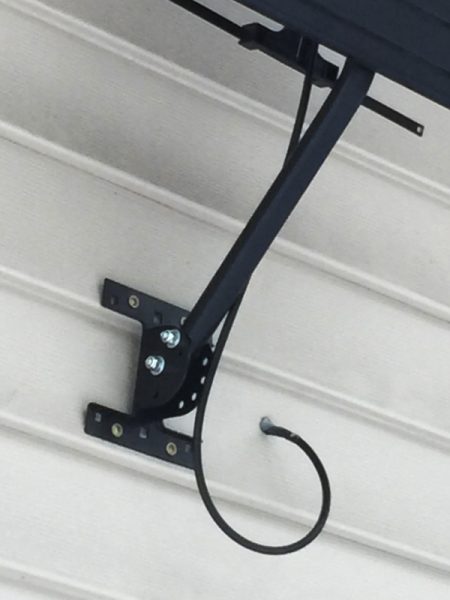
As I mentioned previously, the supplied mounting bracket felt pretty flimsy and we were afraid that it wouldn’t hold up to the weight and mounting pressure, so we replaced it with an Ailuki J-Pole Antenna Mount we found on Amazon.com. We also hired a professional to drill through the house and run the coaxial cable into the living room right behind the main television.

Now that the Elite 7550 is mounted and working, every once in awhile we’ll run the Auto Channel Search again and discover that more channels have become available. The Winegard Elite 7550 has definitely made cutting the cord that much easier for us.

What I like

  • Relatively easy set-up
  • Very powerful
  • A number of mounting options

What needs to be improved

  • Care must be taken during assembly because of fragile elements
  • Plastic roof mount not adequate for permanent mounting
  • No coaxial cable included

Final thoughts

The Winegard Elite 7550 Long Range Outdoor HDTV Antenna is a great product. Once you do a little online research for signal towers and directional information this powerful antenna will pull in more free high-definition television channels than anyone would ever care to watch, even in some areas with tough terrain. The build quality is a little lacking for the price and some supplied coaxial cable would’ve been nice as well, but overall for $149.99 it’s a decent purchase.

Price: $149.99
Where to buy: Amazon
Source: The sample of this product was provided by Winegard.